Having Adobe Acrobat and cannot find how to create a stamp in Adobe Acrobat? I also ever had the same issue. It is not an easy task to create a custom and dynamic stamp with Adobe per your requirements. If you already bought Adobe Acrobat, you can follow the below guide to learn how to do it. But when you still do not buy Adobe Acrobat, you can choose a better alternative - UPDF. It is much easier and cheaper to create a stamp with UPDF. Click the below button to create a stamp now.
Windows • macOS • iOS • Android 100% secure
How to Create a Custom Stamp in Adobe? (2 Methods)
Adobe Acrobat has a feature to create a custom stamp. However, it only supports uploading an image which means that you have to create the custom stamp in image format with another tool, then, upload it to your Adobe Acrobat. If you are not in a rush, you can also use its shapes and add text features to create the stamp in Adobe manually. I will show you how to use these two methods to create the stamps you need.
Way 1. Create a Custom Stamp in Adobe With Creating Stamp
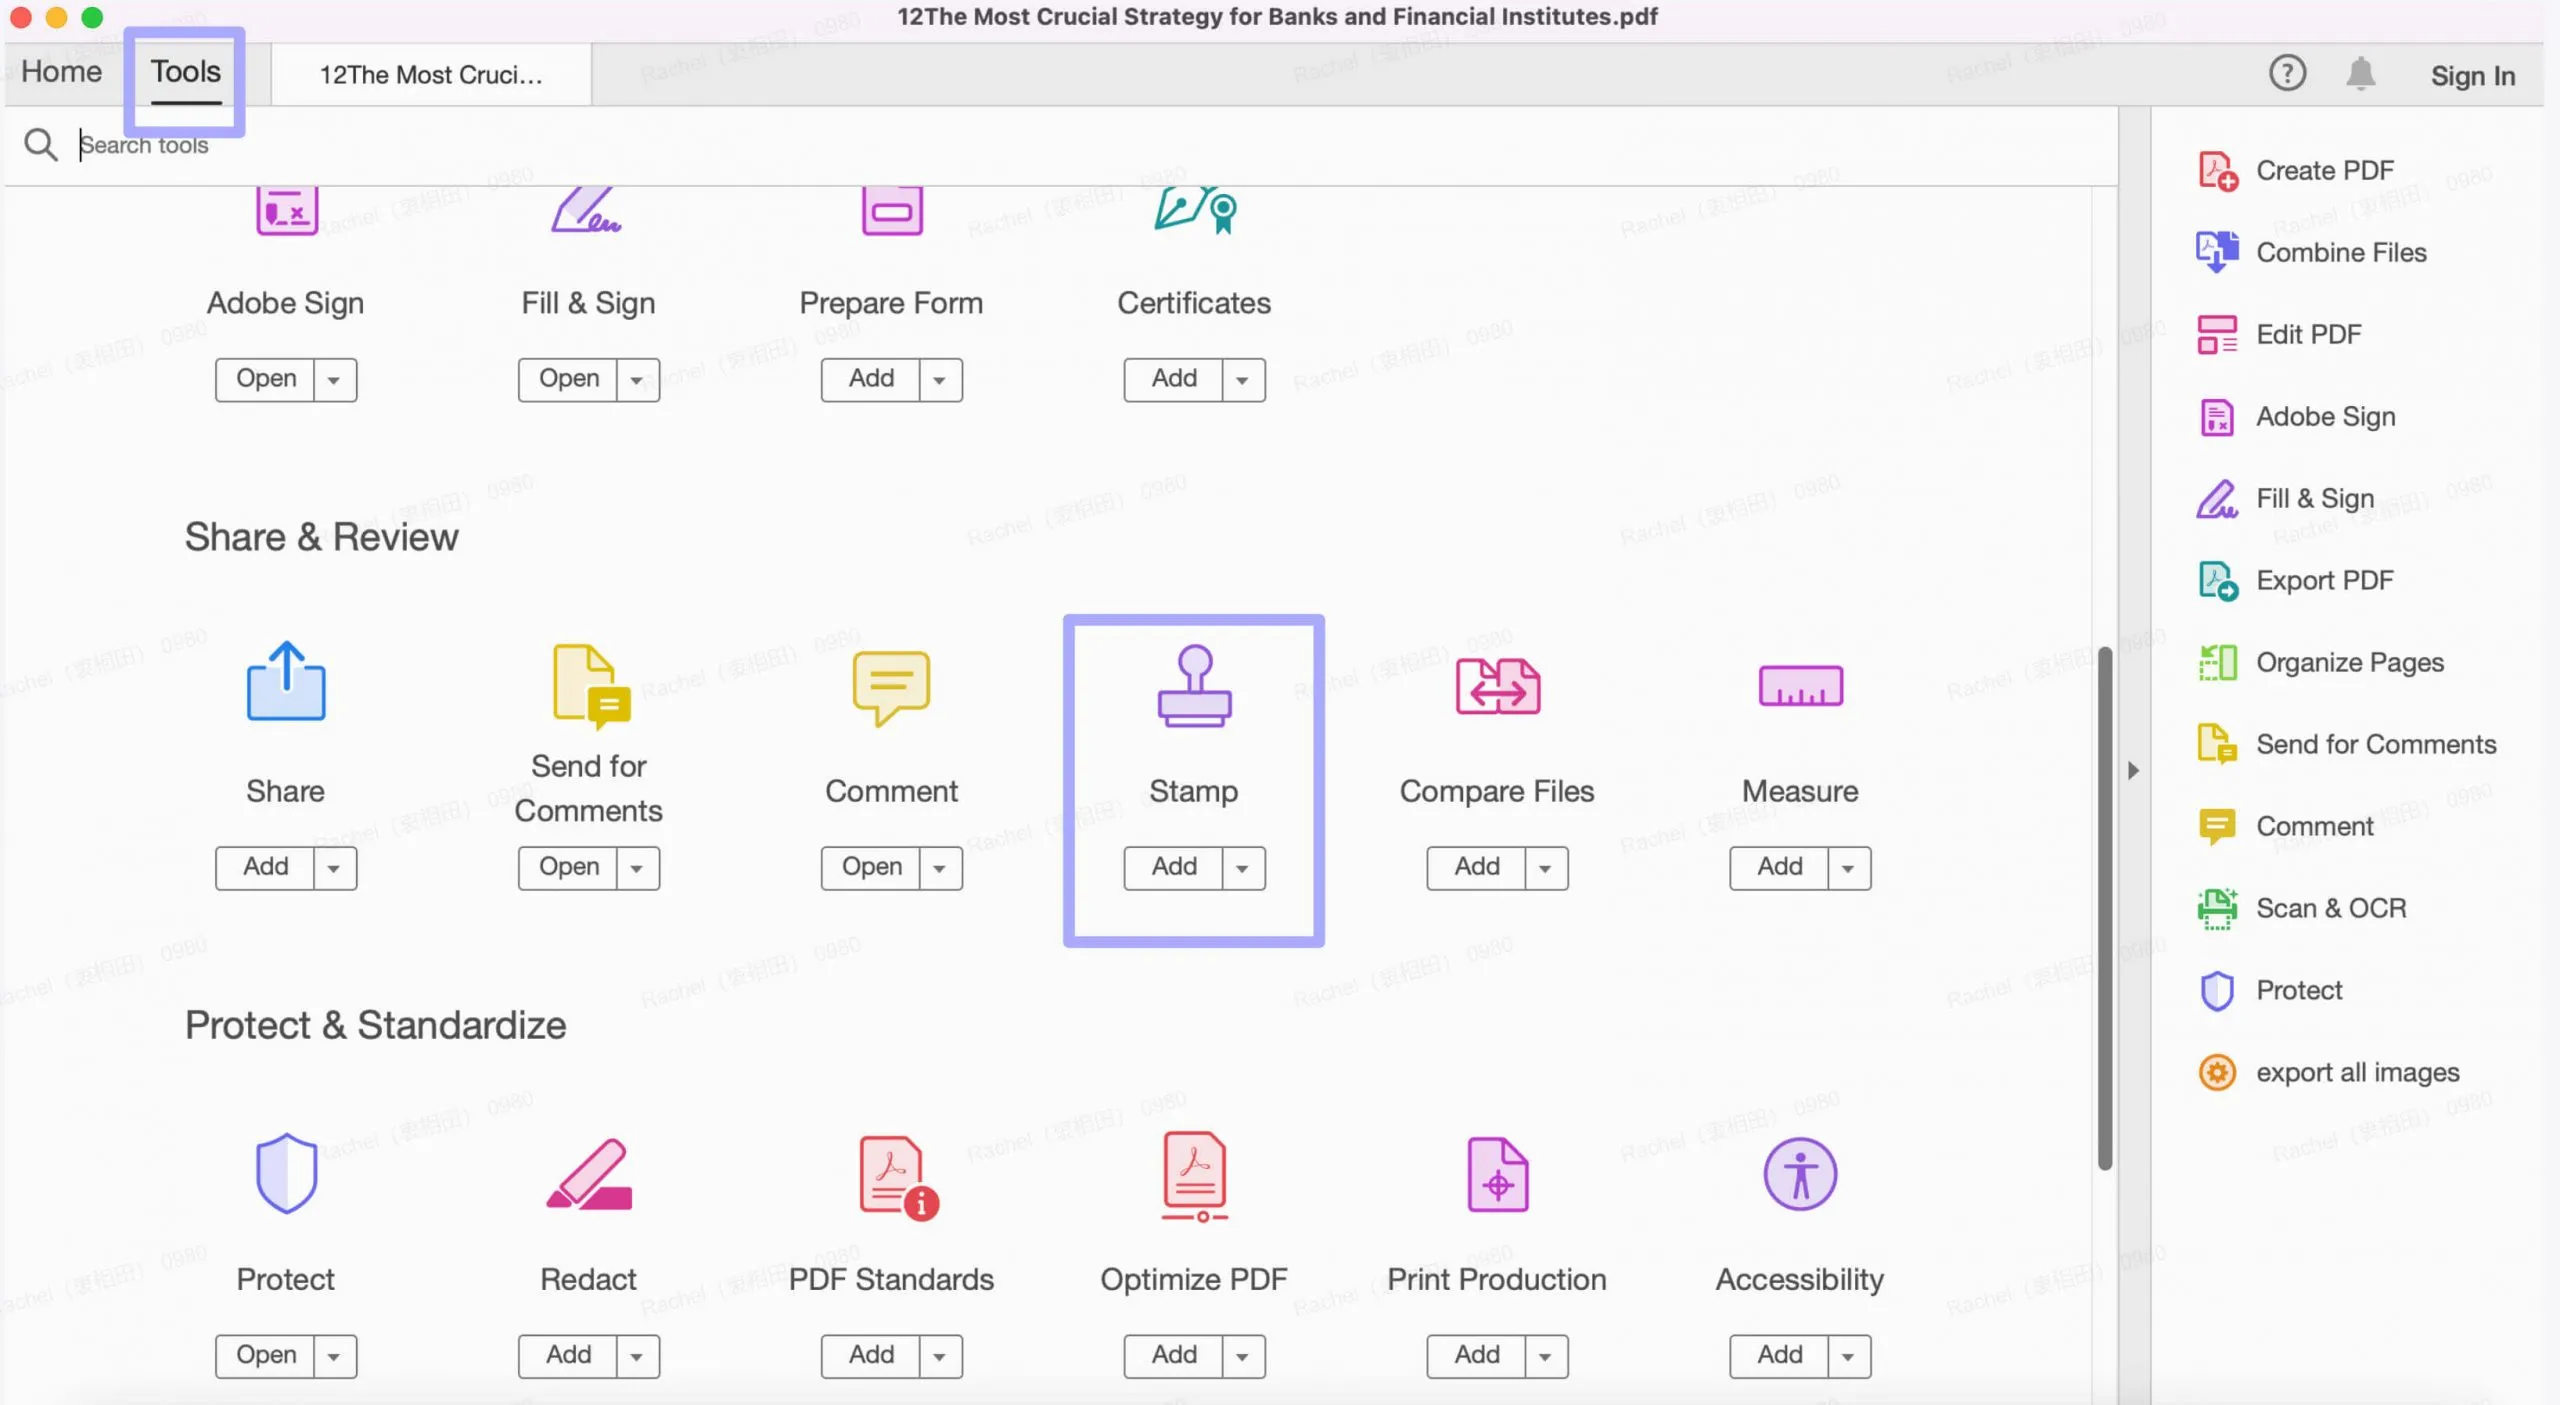
Step 1. Open PDF with Adobe Acrobat. Click on the "Tools" on the top menu. Scroll down to find the "Stamps" in the "Share&Review" part.
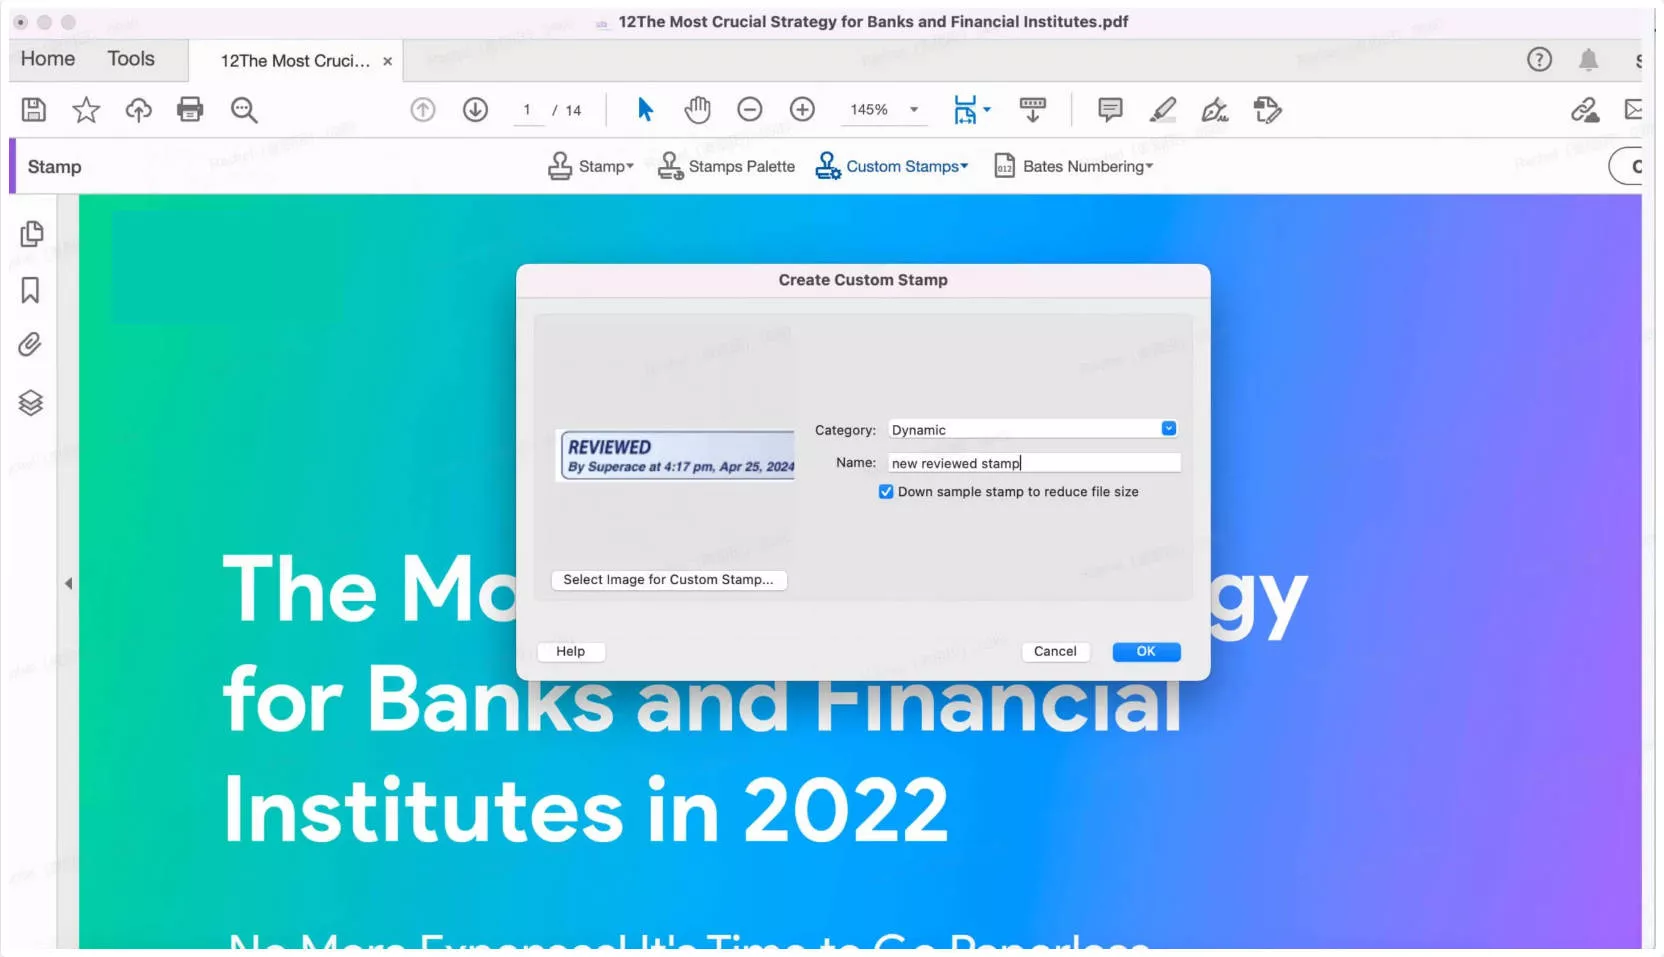
Step 2. Click on the "Custom Stamps" > "Create" > "Browse" to select the image stamp you created with other tools like Photoshop. Click on the "OK" icon, select "Dynamic" in the Category, and name the custom stamp. Then, hit on the "OK" icon the save.
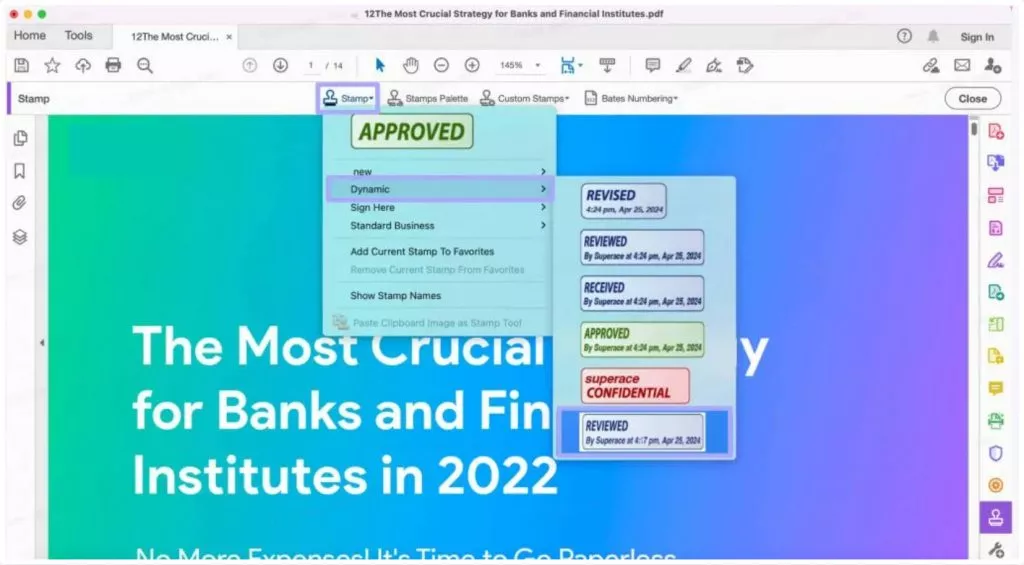
Step 3. To use it, you can click on the "Stamp" > "Dynamic" and choose the custom stamp and click to use it on the PDF page. You can adjust its place and position.
Way 2. Create a Custom Stamp in Adobe by Adding Shapes and Text
If you do not have a tool to create image stamp on your computer, you can also use Adobe Acrobat's shapes and text features to create custom stamp in Adobe manually.
Step 1. Click on the "Comments" in the "Tools" part. Click on the "Rectangle" in the Shape list.

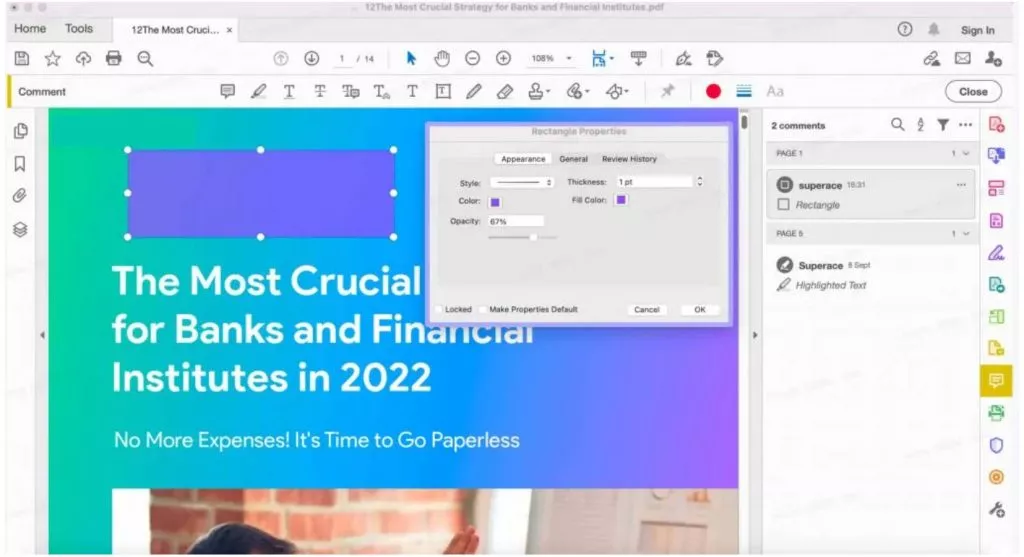
Step 2. Right click on the "Rectangle", click on the "Properties", select the border style, thickness, color and fill color you need. Click on the "OK" to save the settings.
Step 3. Click on the "T" and click outside of the rectangle to add the content. You can change its text style, size and color. Then, move it over the rectangle. If you need to add the date, you can repeat the same steps. Now, everything is OK. You can save your PDF.

How to Create a Custom Dynamic Stamp in Adobe
To create a custom dynamic stamp using Adobe Acrobat, use the following steps;
Step 1: Open Adobe Acrobat on your computer. This feature may not be available on the free online version of Acrobat. So, you may need to purchase and install Adobe Acrobat on your computer.
Step 2: In Acrobat, click on "Tools" and select "Stamp".
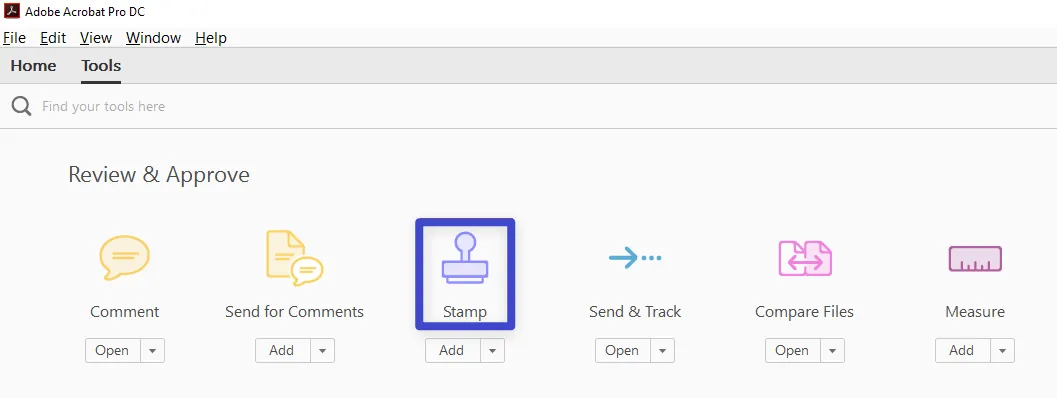
Step 3: The Stamp Window will open. Here, click on "Custom Stamps" and choose "Create."
Step 4: Now click on "Browse" to choose a stamp image from the file types that you will see in the "Open" dialog box. Click "OK" when you've made your selection and the file you have selected will be converted to PDF.
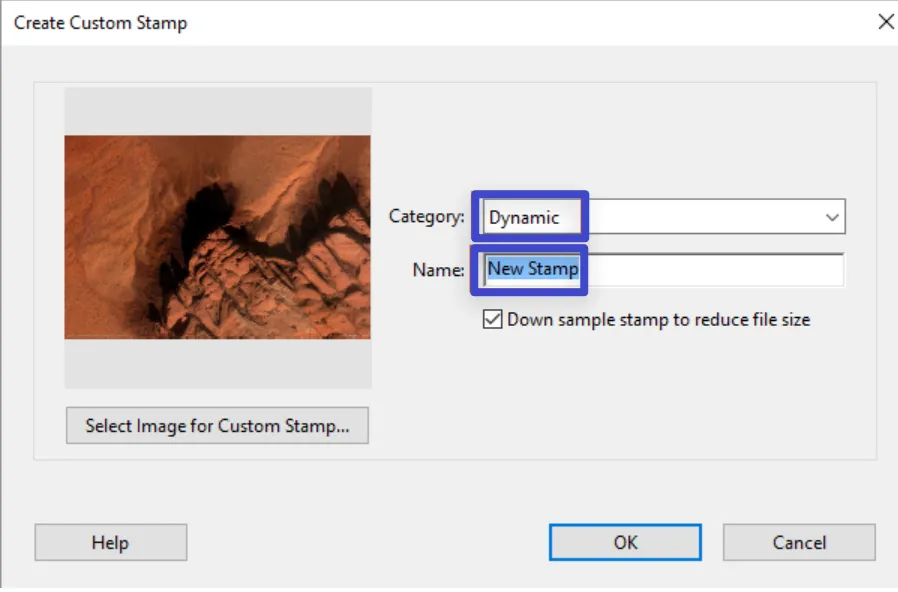
Step 5: This will take you to the "Create Custom Stamp" window. Here, choose "Dynamic" in the category, name the stamp, and click "OK."
Step 6: Now find the newly created stamp on your computer and open it. The file will be located in the following paths:
- PC: C:\Users\[user name]\AppData\Roaming\Adobe\Acrobat\DC\Stamps
- Mac OS: /Users/[user name]/Library/Application Support/Adobe/Acrobat/DC/Stamps
Step 7: Now go to "Tools" and click "Prepare Form." Ensure that the stamp you have just created is selected and then click "Start."
Step 8: Click on "Add a Text Field" and then name and place the field where you would like the date to appear.

Step 9: Double-click on the text field and choose "All Properties."
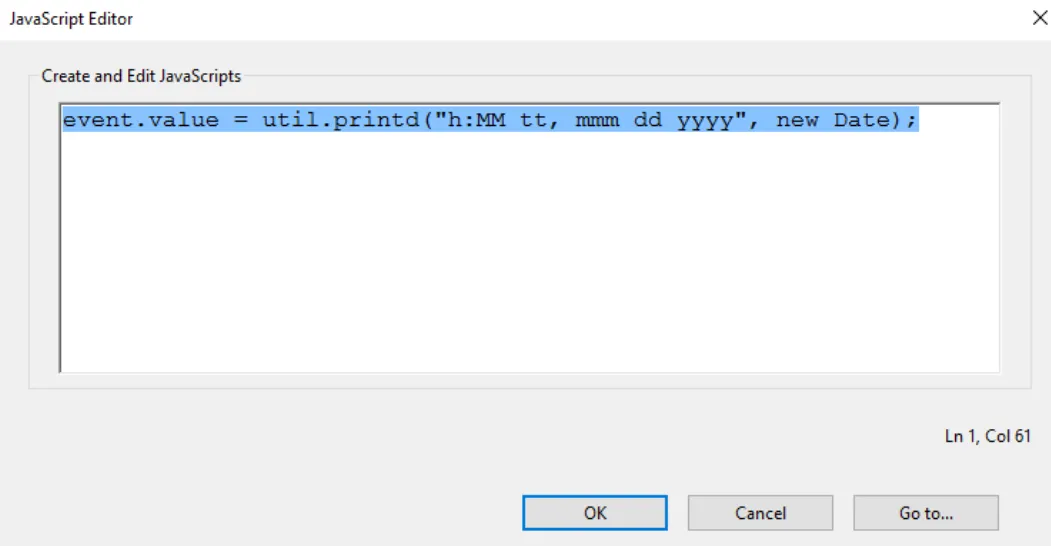
Step 10: Click on the "Calculate" tab and choose the "Custom Calculation Script." Click "Edit" to open the JavaScript Editor window.
Step 11: Type in the code below in the JavaScript Editor and click "OK."
event.value = util.printd ("h:MM tt, mm dd, yyyy" , new Date);
Step 12: Now close both the "Text Field Properties" dialog and the "Prepare Form" mode and save the file. You might want to rename the stamp so it is easier to find later.
Now your Dynamic Stamp will be ready to use on any computer, just copy the file to transfer it whenever you need to add it to your document.
Bonus Tip
Windows • macOS • iOS • Android 100% secure
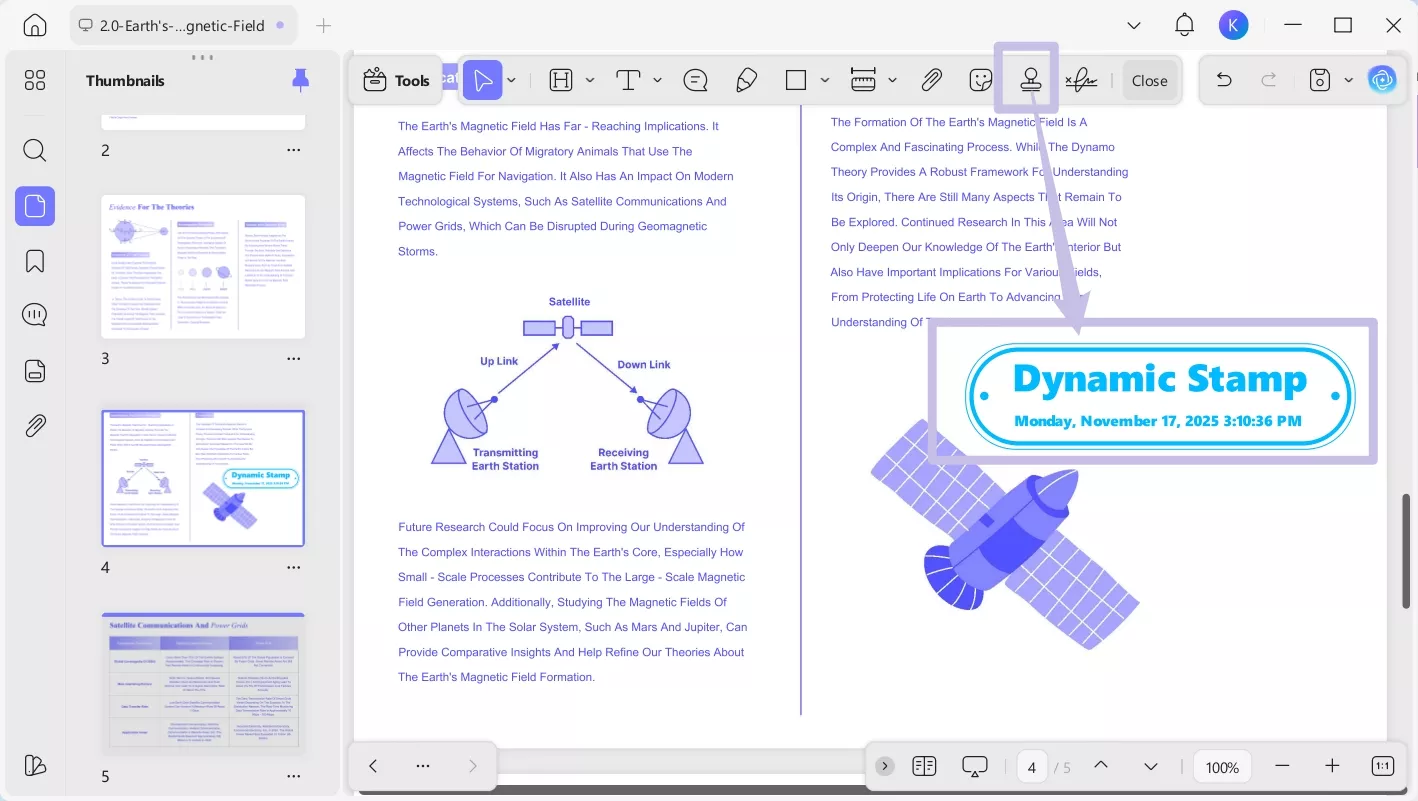
Disadvantages of Using Adobe to Create a Stamp
A Dynamic Stamp like the one you can create using the steps above can be very useful in numerous ways, especially since it can validate the date and time that the stamp was added to any PDF. But Adobe doesn't make it very easy to create a PDF stamp.
In our tests, we found that there are several disadvantages you will have to contend with when attempting to create a stamp in Adobe Acrobat. They include the following;
- The process to create the stamp is complicated and it is very easy for something to go wrong in the implementation. We had to try more than once to get the date and time right and you may find that you will as well, thereby wasting valuable time.
- This feature is not available on the free version of Adobe Acrobat. To create a Dynamic Stamp, you have to purchase the full version of Acrobat which can be quite expensive.
- We also found that Acrobat can be slow to load large PDF files which was certainly a problem for us when we tried to add the stamp in numerous locations on the document.
How to Create a Custom Stamp with the Best Acrobat Alternative
So, does this mean that you can't create a custom stamp for your PDF without Adobe Acrobat? No. Acrobat may be the most publicized tool to create, edit, and manage PDF documents, but it is not the only solution. It isn't even the best one out there by far.
There is another PDF solution that can allow you to create a custom stamp for your documents at a fraction of the cost and in just a few simple steps. This tool is known as UPDF and its creators had simplicity and ease of use in mind when they designed it, as it proved to be the easiest way to create and add custom stamps to PDF documents.
The following step-by-step guide shows you just how easy it is to create a custom stamp using UPDF;
Step 1: Download and install UPDF on your computer by clicking the below button. The program has a free trial version that you can have a try.
Windows • macOS • iOS • Android 100% secure
Step 2: Open it and click "Open File" to import the PDF file. This is the file to which you will add the stamp.

Step 3: Click on the "Comment" button in "Tools" from the toolbar on the left. This should open all the annotation tools that are available to you, including the stamps.
Step 4: Now simply click on the "Stamp" icon at the top. Click on the "Custom" tab and select "Create."
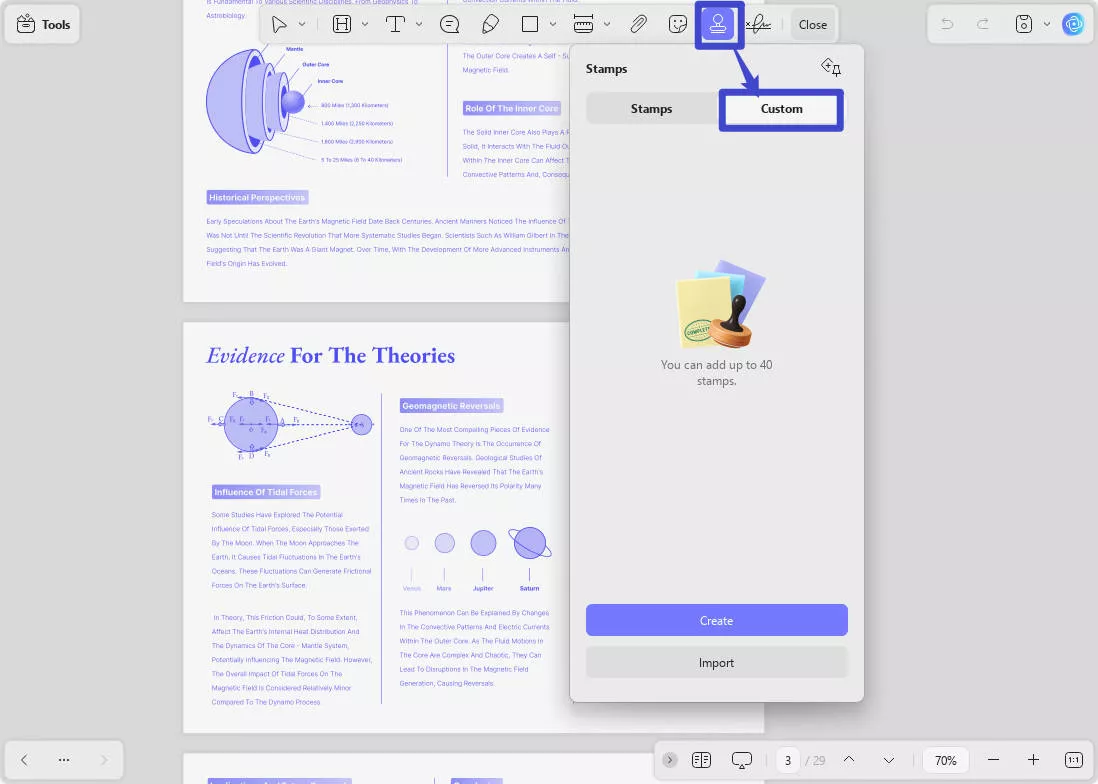
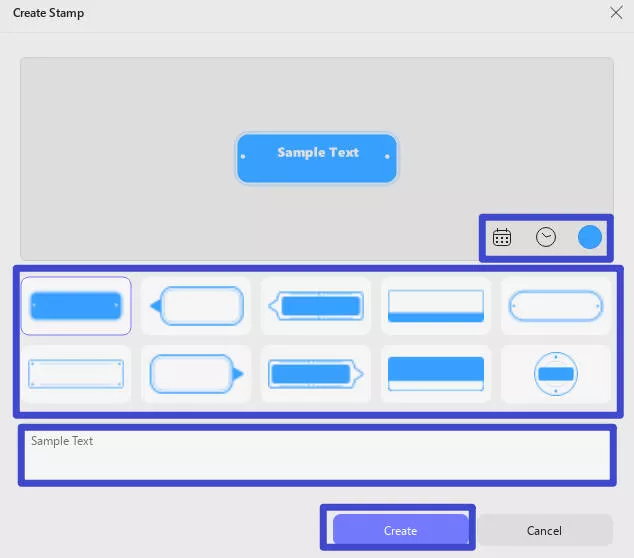
Step 5: This will open the "Create Stamp" dialog where you can start to design the stamp you want.
Step 6: Start by choosing a template from the options below the preview box. Click on the "Sample Text" section to add the text you want to appear on the stamp.
Step 7: Click on the "Calendar" icon at the top to choose a date to add to the stamp and the "Time" icon next to it to add a custom time.
Step 8: Finally click on the "Color" icon to choose a custom color for your stamp. Then simply click "Create" and click on any section of the document to add the custom stamp.
Bonus Tip:
Conclusion
Now, you know how to create a stamp in Adobe Acrobat. But while you can create a customizable version of stamp in Adobe Acrobat, the process is lengthy and complicated.
Using UPDF to create an easily customizable stamp that you can then add to your PDF is the best option when you don't want to spend too much time on the task. Unlike Acrobat, UPDF significantly simplifies the process, making it easy for you to annotate the PDF in numerous ways. Try it now!
Windows • macOS • iOS • Android 100% secure
 UPDF
UPDF
 UPDF for Windows
 UPDF for Mac
 UPDF for iPhone/iPad
 UPDF for Android
 UPDF AI Online
 UPDF Sign
 Edit PDF
 Annotate PDF
 Create PDF
 PDF Form
 Edit links
 Convert PDF
 OCR
OCR PDF to Word
 PDF to Image
 PDF to Excel
 Organize PDF
 Merge PDF
 Split PDF
 Crop PDF
 Rotate PDF
 Protect PDF
 Sign PDF
 Redact PDF
 Sanitize PDF
 Remove Security
 Read PDF
 UPDF Cloud
 Compress PDF
 Print PDF
 Batch Process
 About UPDF AI
 UPDF AI Solutions
 AI User Guide
 FAQ about UPDF AI
 Summarize PDF
 Translate PDF
 Chat with PDF
 Chat with AI
 Chat with image
 PDF to Mind Map
 Explain PDF
 Scholar Research
 Paper Search
 AI Proofreader
 AI Writer
 AI Homework Helper
 AI Quiz Generator
 AI Math Solver
 PDF to Word
 PDF to Excel
 PDF to PowerPoint
 User Guide
 UPDF Tricks
 FAQs
FAQs UPDF Reviews
 Download Center
 Blog
Blog Newsroom
 Tech Spec
 Updates
 UPDF vs. Adobe Acrobat
 UPDF vs. Foxit
 UPDF vs. PDF Expert



 Enid Brown
 Delia Meyer
 Enrica Taylor
 Enola Miller
 Enya Moore