 UPDF
UPDF
 UPDF for Windows
 UPDF for Mac
 UPDF for iPhone/iPad
 UPDF for Android
 Nomostar
 UPDF AI Online
 UPDF Sign
 IvyCraft
 Edit PDF
 Annotate PDF
 Create PDF
 PDF Form
 Edit links
 Convert PDF
 OCR
OCR PDF to Word
 PDF to Image
 PDF to Excel
 Organize PDF
 Merge PDF
 Split PDF
 Crop PDF
 Rotate PDF
 Protect PDF
 Sign PDF
 Redact PDF
 Sanitize PDF
 Remove Security
 Read PDF
 UPDF Cloud
 Compress PDF
 Print PDF
 Batch Process
 About UPDF AI
 UPDF AI Solutions
 AI User Guide
 FAQ about UPDF AI
 Summarize PDF
 Translate PDF
 Chat with PDF
 Chat with AI
 Chat with image
 PDF to Mind Map
 Explain PDF
 PDF AI Tools
 Image AI Tools
 AI Chat Tools
 AI Writing Tools
 AI Study Tools
 AI Working Tools
 Other AI Tools
 AI Bookmark Generation
 AI Bookmark Summary
 AI Watermark Generation
 AI Background Generation
 AI Sticker Generation
 AI Stamp Generation
 AI Editing Suite
 UPDF Copilot
 AI Page Management
 AI Semantic Search
 PDF to Word
 PDF to Excel
 PDF to PowerPoint
 Enterprise Solution
 Enterprise Sign
 Enterprise AI
 Enterprise Plan
 Enterprise User Guide
 Enterprise Webinar
 IT
IT Education
 Construction
 Financial Service
 Healthcare
 Insurance
 Legal
Legal Manufacturing
 Government
 Researchers & PhDs
 Solopreneurs & Freelancers
 Lawyers & Legal Professionals
 Real Estate Agents & Brokers
 Education Solution
 Customer Stories
 User Guide
 UPDF Tricks
 FAQs
FAQs UPDF Reviews
 Download Center
 Blog
Blog Newsroom
 Tech Spec
 Updates
 UPDF vs. Adobe Acrobat
 UPDF vs. Foxit
 UPDF vs. PDF Expert

Microsoft Word does provide useful tools for replacing sensitive text, removing comments and revisions, inspecting hidden information, and—within some Microsoft 365 enterprise environments—detecting sensitive content. However, these capabilities are not the same as a dedicated permanent-redaction workflow.
If you need to share a final document containing legally, financially, medically, or otherwise sensitive information, the safer workflow is generally to remove the information in Word, inspect the document, convert it to PDF, and apply permanent redaction with a dedicated PDF tool.
This guide explains how each approach works, where Word falls short, and when tools such as UPDF or Adobe Acrobat Pro make more sense.
Windows • macOS • iOS • Android 100% secure
Can You Permanently Redact a Word Document?
Microsoft Word does not provide the same dedicated permanent-redaction workflow as a professional PDF redaction tool.
However, Word can handle several related tasks:
- Replace sensitive text
- Remove comments
- Remove tracked revisions and other review information
- Remove document properties and personal information
- Find hidden text
- Inspect headers, footers, and watermarks
- Detect certain sensitive information in supported Microsoft 365 environments
Word's Document Inspector is specifically designed to find and remove hidden data and personal information before you share a document.
Microsoft 365 can also use sensitivity labels and sensitive-information detection in supported enterprise environments. Microsoft notes that sensitive content can be identified in Word and, in supported configurations, instances of detected sensitive content can be reviewed and removed.
But none of this means that putting a black rectangle over a paragraph is equivalent to permanent redaction.
For a final document that must safely disclose only selected information, a dedicated redaction workflow is more appropriate.
How to Redact in Word in 4 Methods
There are several approaches, and they are suitable for different situations.
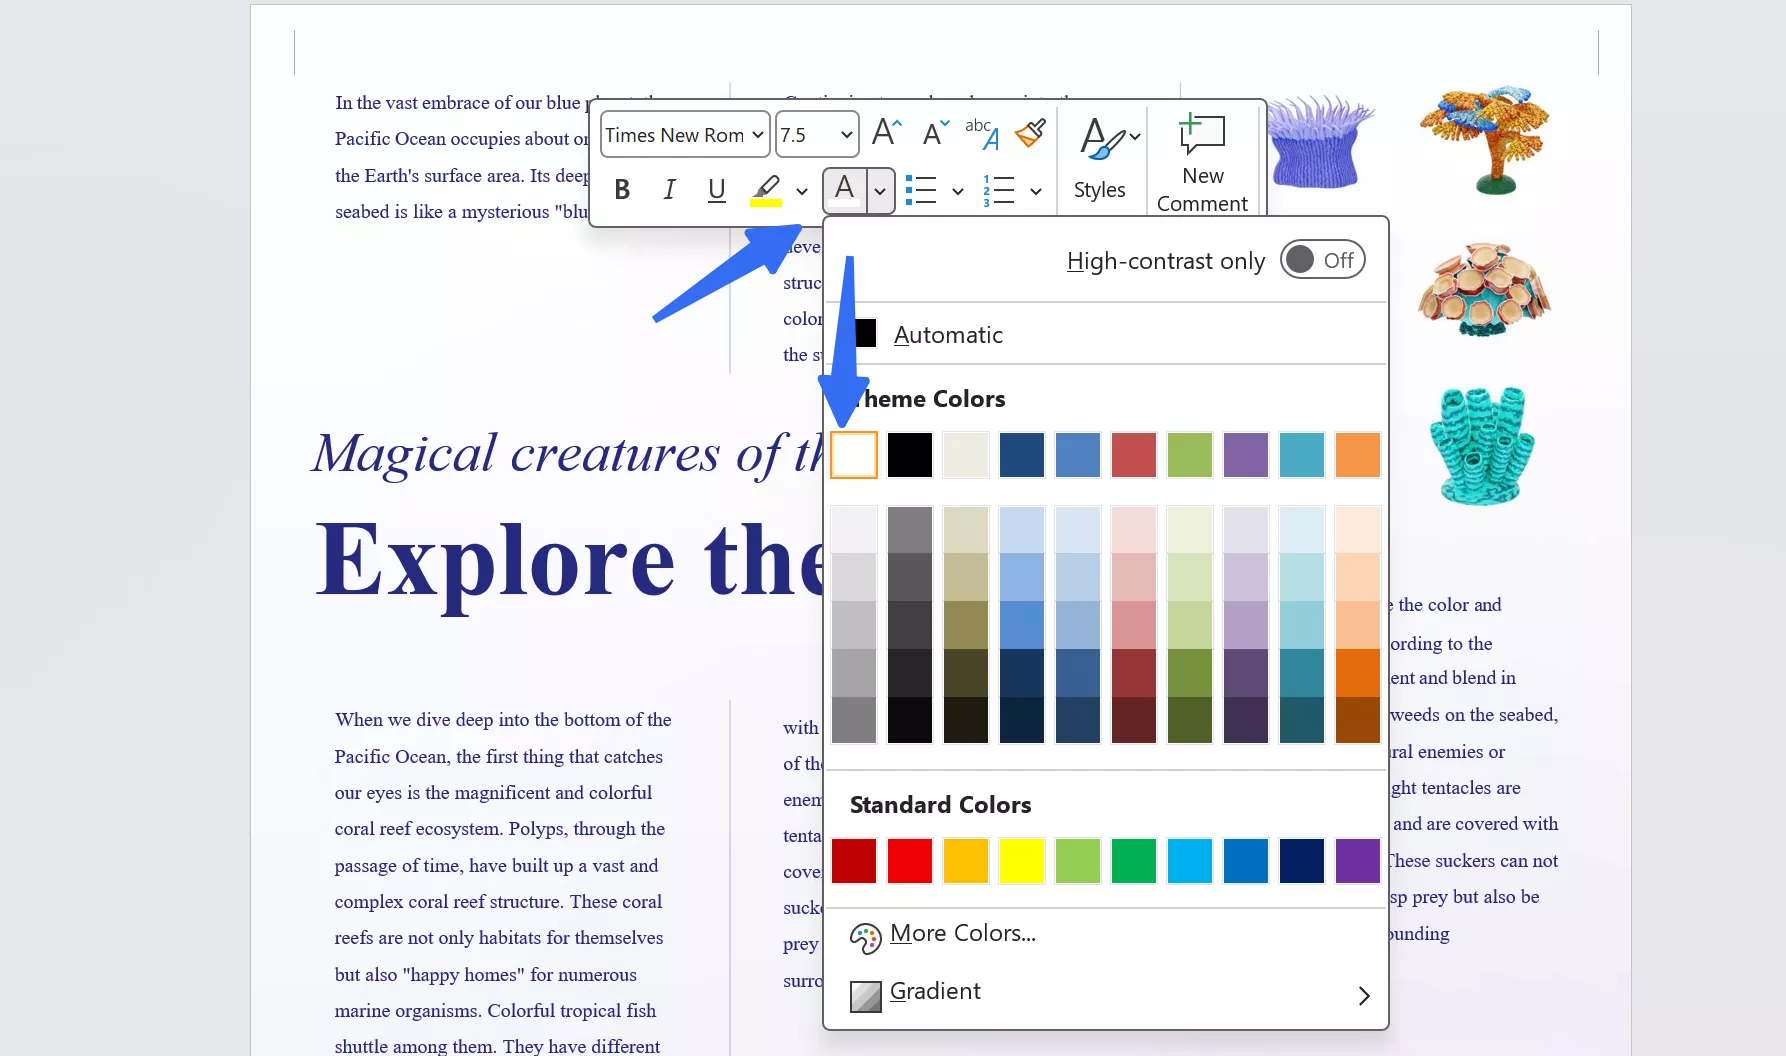
Method 1: Hide Text with Font Color or Shading
You can make sensitive text visually disappear by changing its formatting.
For example, you could:
- Select the sensitive text.
- Change the font color to match the page background.
- Apply shading if necessary.
- Review the document to make sure the information is no longer visible.
Another approach is to place a black shape over the text.
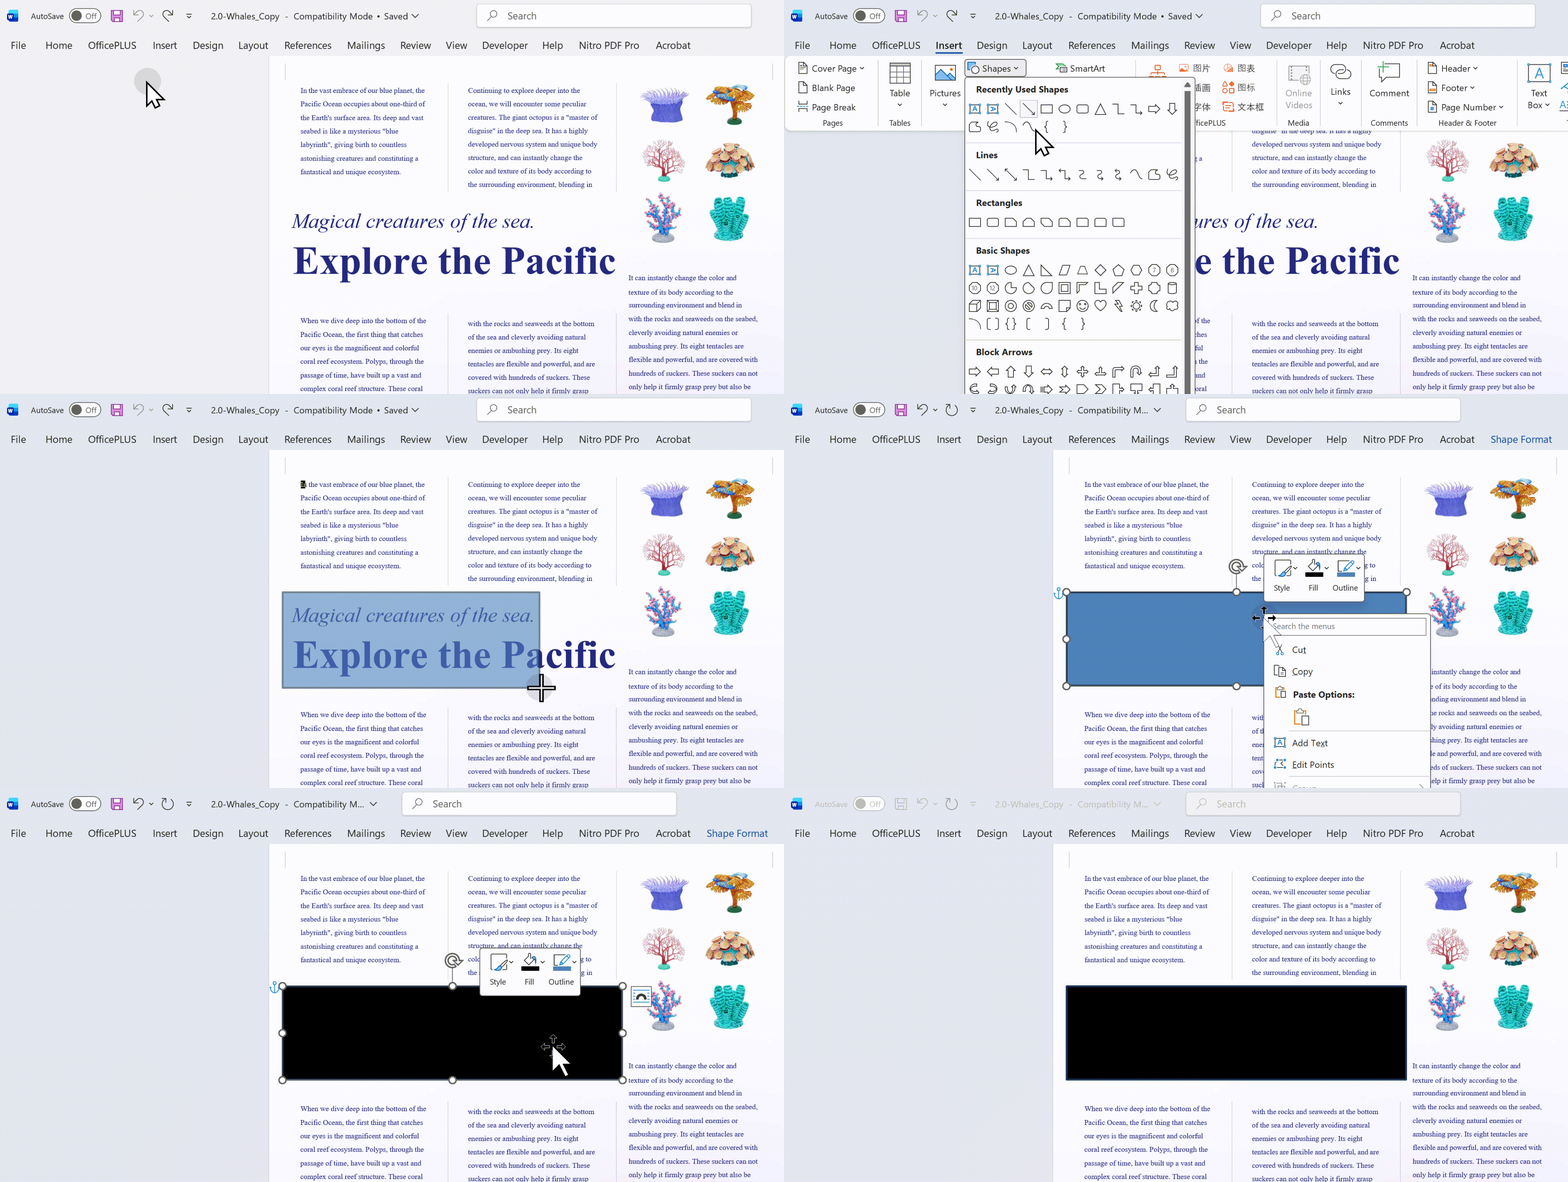
Is this a secure way to redact Word documents?
No. Not for sensitive information.
This is visual concealment, not permanent redaction.
The original text can remain in the document structure. Depending on how the document is handled, someone may be able to:
- Select the text
- Copy and paste it
- Change the font color
- Remove the shading
- Move or delete the covering shape
- Edit the document
- Open the file in another application
Therefore, this method should only be used when you need temporary visual concealment.
Do not use this method for:
- Social Security numbers
- Bank account information
- Credit card information
- Medical records
- Legal documents
- Confidential contracts
- Employee records
- Personally identifiable information
If the recipient must not be able to recover the original content, use a real redaction workflow instead.
Method 2: Replace Sensitive Text with "[REDACTED]"
For many Word documents, replacing sensitive information is a better approach than simply hiding it.
For example:
Before
Client: John Smith
Phone: 555-123-4567
Email: [email protected]
After
Client: [REDACTED]
Phone: [REDACTED]
Email: [REDACTED]
How to replace text in Word
- Open the Word document.
- Press Ctrl + H on Windows or use Find and Replace.
- Enter the sensitive text in the Find what field.
- Enter
[REDACTED]in Replace with. - Select Replace All if appropriate.
- Search the document again to verify that no intended instances remain.
This is particularly useful when the same information appears many times.
For example, if a document contains a client's name 50 times, manually covering every occurrence is inefficient and increases the risk of missing one.
When is this method appropriate?
It works well for:
- Names
- Phone numbers
- Email addresses
- Account numbers
- Client IDs
- Internal project names
- Repeated phrases
However, replacing visible text does not automatically remove every other trace of information from the document.
A Word file may also contain:
- Comments
- Tracked changes
- Document properties
- Hidden text
- Headers and footers
- Watermarks
- Custom XML
- Other hidden information
That is why you should inspect the document before sharing it.
Method 3: Use Word's Document Inspector
If privacy is your concern, Document Inspector is one of the most important Word features to include in your workflow.
Microsoft provides Document Inspector specifically to find and remove hidden data and personal information from documents before sharing.
How to use Document Inspector
First, save a copy of your original document.
Then:
- Open the copy.
- Select File.
- Select Info.
- Select Check for Issues.
- Select Inspect Document.
- Choose the types of information you want to inspect.
- Select Inspect.
- Review the results.
- Select Remove All for the categories you want to remove.
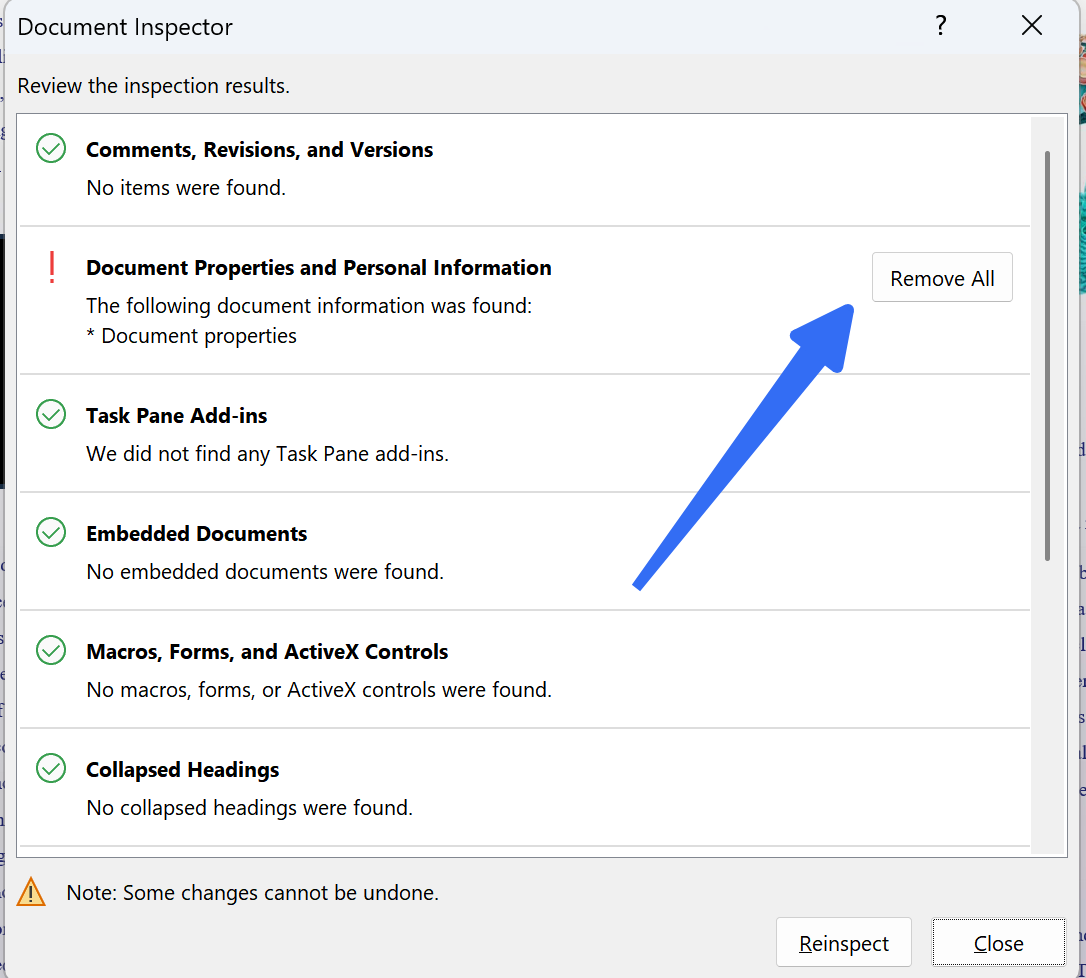
Microsoft recommends working on a copy because some information removed by Document Inspector cannot necessarily be restored.
What can Word's Document Inspector find?
Depending on the document and Word version, it can inspect information such as:
- Comments
- Revisions
- Versions
- Annotations
- Document properties
- Personal information
- Headers
- Footers
- Watermarks
- Hidden text
- Document server properties
- Custom XML data
Important limitation
Document Inspector is not a replacement for visible-text redaction.
It is designed to remove hidden information and personal/document metadata.
If a paragraph containing a Social Security number is still visibly present, running Document Inspector does not magically redact that paragraph.
You still need to remove or replace the sensitive content itself.
Method 4: Use Microsoft 365 Sensitive-Information Features
If your organization uses Microsoft 365 with the appropriate enterprise configuration, you may have another option.
Microsoft 365 can detect certain types of sensitive information in Word, including categories such as credit card numbers and other sensitive information, when the relevant features and policies are configured.
Microsoft also supports sensitivity labels that can classify files and, depending on organizational configuration, apply protection such as encryption, headers, footers, or watermarks.
When this makes sense
This approach is particularly useful for organizations that already use:
- Microsoft 365
- Microsoft Purview
- Sensitivity labels
- Information protection policies
- Enterprise compliance workflows
However, these features are not simply a standard redaction button available to every Word user.
Microsoft states that sensitivity labels require an eligible Microsoft 365 subscription and, in relevant scenarios, administrator configuration.
There is also an important limitation: Microsoft notes that removing sensitive content in Word does not remove the term from tracked changes or other versions of the document.
That is another reason to inspect the final document rather than assuming that one automated feature has removed every copy.
As discussed in the previous section, several ways and methods exist to redact text in Word documents. The choice is whether to add text boxes or shapes to hide the desired text or choose one of the following methods. Both of these methods are the best ways to black out text in Word.
What's the Difference between Word Redaction and PDF Redaction?
Once a Word document is ready for external distribution, the workflow often changes.
Word is excellent for creating and editing the source document.
PDF is often more appropriate for creating a controlled final version for distribution.
A dedicated PDF redaction tool can permanently remove selected content from that final version.
The distinction is important because redaction is not simply another formatting operation.
| Requirement | Word | UPDF | Adobe Acrobat Pro |
|---|---|---|---|
| Edit Word content | Excellent | Requires PDF workflow | Requires PDF workflow |
| Replace sensitive text | Yes | Yes | Yes |
| Hide text | Yes | Yes | Yes |
| Dedicated redaction workflow | No | Yes | Yes |
| Search & Redact | Find & Replace | Yes | Yes |
| Redact images/areas | Not the core workflow | Yes | Yes |
| Redact entire pages | No | Yes | Yes |
| Sanitize hidden PDF information | No | Yes | Yes |
| Document Inspector | Yes | No | No |
| Microsoft sensitivity ecosystem | Yes | No | No |
| Best for | Word authoring | PDF editing + redaction | Advanced PDF workflows |
Opt for Adobe Acrobat Pro when you require permanent PDF redaction, search‑and‑redact for sensitive data, sanitization of hidden PDF content, advanced PDF security workflows, and access to a mature enterprise PDF ecosystem. Check to learn how to redact in Adobe.
Choose UPDF for permanent PDF redaction tasks, including redacting text or images, searching for recurring information, redacting full pages, sanitizing output files, and performing further PDF editing and management afterwards.
Anyone can use this user-friendly tool to redact private data in their documents. Users can simply select any text or area in the PDF file to redact essential data with the help of this tool. Download this amazing tool to try.
Windows • macOS • iOS • Android 100% secure
Additionally, they can use the "Search & Redact" feature to redact all the same text or a whole page in the document. Using this feature, users can redact certain words from everywhere in the file without needing to scroll through the whole document.
Moreover, you can also adjust the redaction properties to personalize the redaction process. Users also have the option to access the "Overlay Text" feature to insert new content on top of the redacted text.
Steps to Redact in PDF Document
Now that you have learned about all the features of this PDF redactor tool, it is time to learn how to redact a Word document. Let's analyze this step-by-step guide to redact text in PDF files via UPDF:
Step 1: Enter the Redaction Mode
After downloading UPDF on your device, you have to open the PDF containing sensitive information. (The great news is that the creation feature also allows you to drag a Word document directly into UPDF's interface, which helps you convert the Word document to PDF easily.) Proceed to click the "Redact" icon on the left toolbar to access the redaction tool.
Windows • macOS • iOS • Android 100% secure
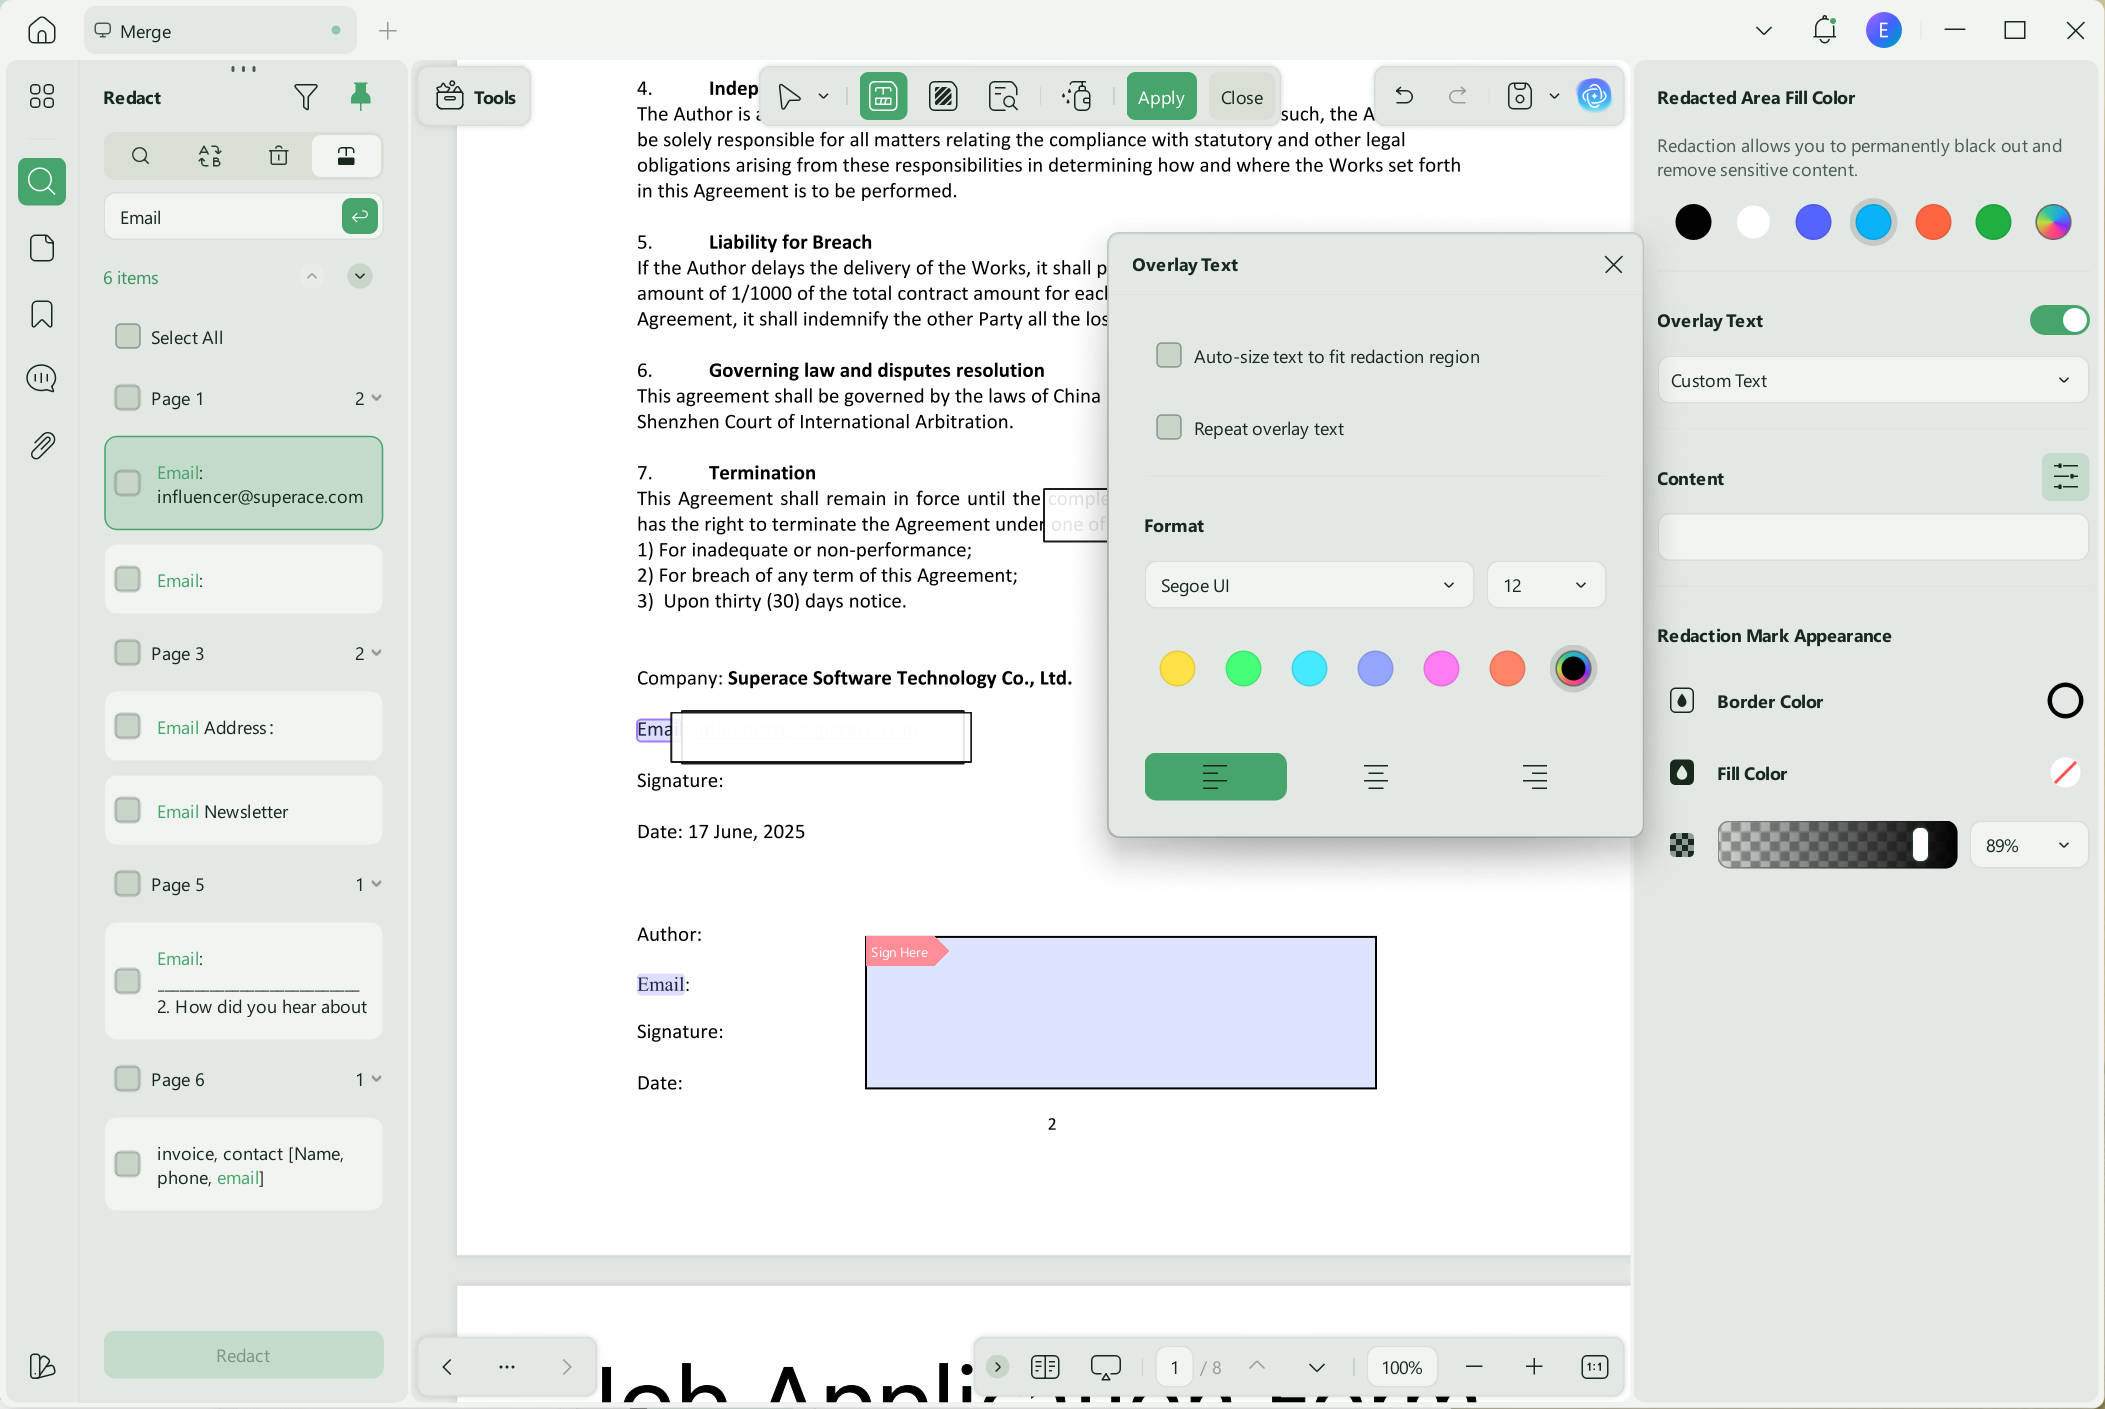
Step 2: Select the Text You Want to Redact
Once you have accessed the redaction mode, To redact the text in the PDF file, you need to select the content you want to redact and it will apply the redaction. You also have the option to adjust redact properties by clicking the "Properties" button on the top toolbar. In these settings, you can choose a color for the fill and border to hide the sensitive content completely.
Afterward, select the text you want to redact and press the "Apply" button on the toolbar below the selected content.
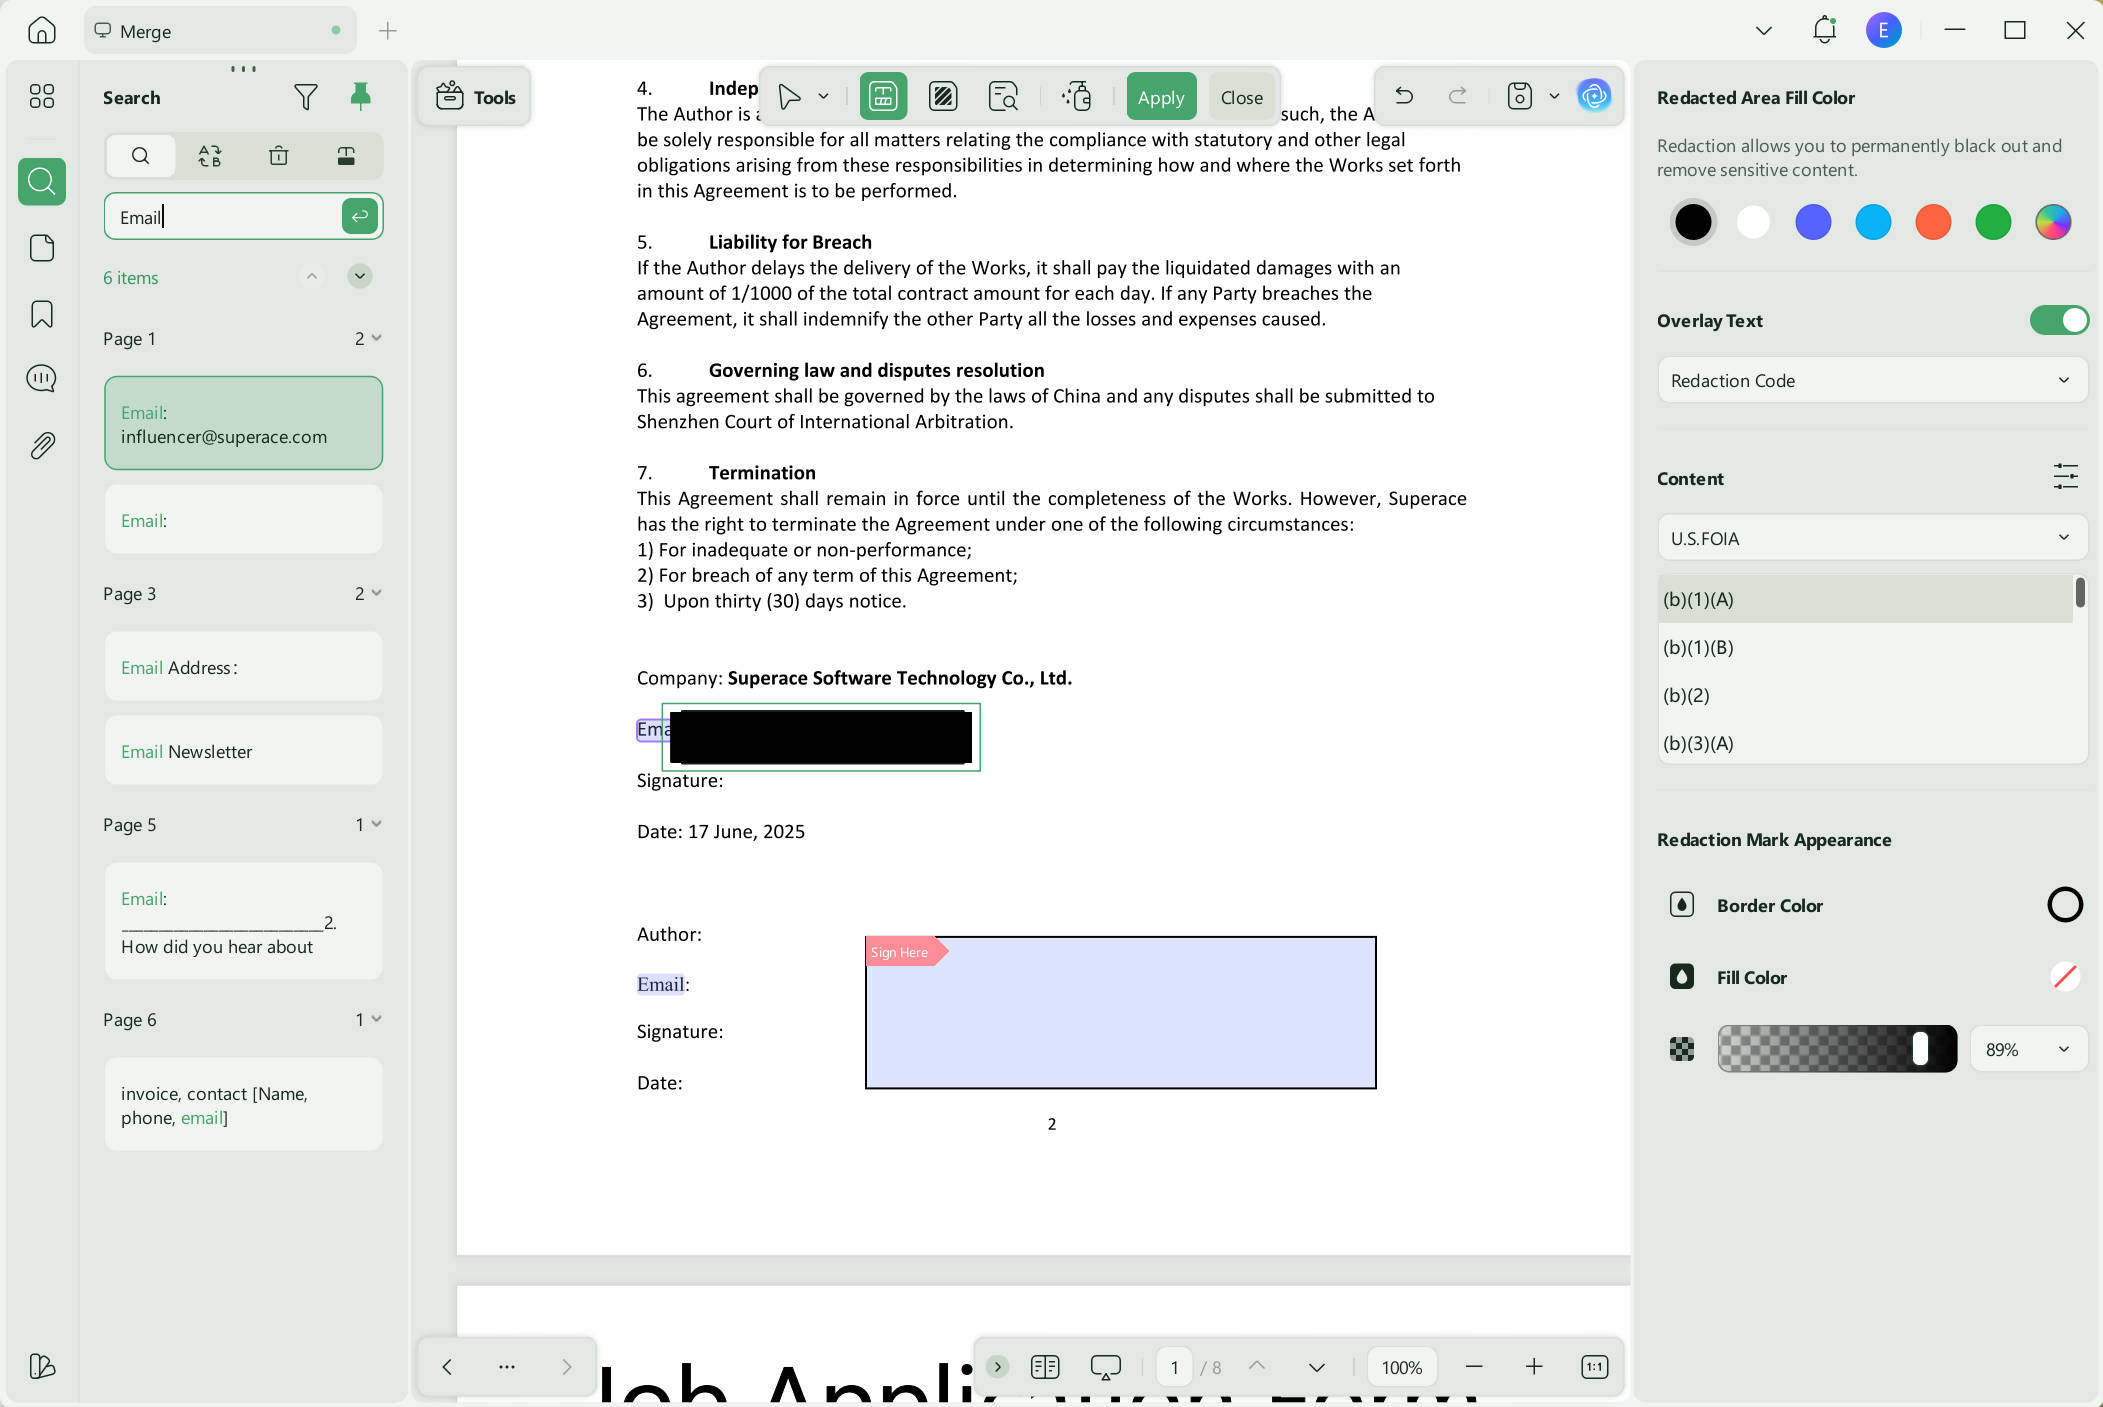
Step 3: Utilize Search and Redact Feature to Redact Specific Words (Optional)
Now, if you have to redact any specific word from the whole document, hit the "Search & Redact" button to perform this operation. Then, proceed to write the word or phrase you want to hide everywhere in the PDF, and you will see a list containing all lines with this particular phrase. Check the pages or all the results. Finally, click the "Redact" button to hide the text in the PDF document.
Redacting in a PDF document is safer than redacting in a Word document. UPDF is always the best choice for you to black out sensitive information in PDF. Why not upgrade it now and enjoy the exclusive offer?
Why Do You Need to Redact a Word File?
As discussed throughout the article, you have to redact a Word file to remove confidential information from a document before it is shared with others. Other use cases of this function are explained below for proper understanding of the readers:
1. Protecting Privacy
You have to redact Word documents to keep personal data safe. This includes social security numbers, addresses, phone numbers, or medical records. It's really important to do this, especially when sharing legal, medical, or HR documents.
2. Legal Compliance
Some documents may contain information that must be kept confidential by law, like legal cases or government records. Redacting your Word files ensures compliance with privacy regulations when sharing these files. Moreover, you can also avoid legal consequences by doing so.
3. Safe Data Sharing
When sharing Word documents, you may need to reveal certain sections while concealing private information. This is particularly crucial in professional or legal settings. Redaction is a valuable tool for safeguarding sensitive data in such cases.
4. Hide Mistakes and Errors
You may find many mistakes and incorrect information in your documents. Redaction is one way to fix these mistakes by hiding or removing them from your resources. This helps you verify that the document only contains correct and necessary details, avoiding all confusion or problems.
Common Questions About Redacting in Word
Is blacking out text in Word secure?
Not necessarily. If you simply change the text color, add shading, or place a shape over the text, the underlying information may remain in the document.
For sensitive information, use actual content removal and a dedicated redaction workflow when appropriate.
Can someone uncover blacked-out text in Word?
Potentially, yes, depending on how the blacking-out was performed. If the original text remains underneath a formatting change or covering object, it may be recoverable.
That is why visual concealment should not be treated as secure redaction.
How do I permanently remove sensitive information from a Word document?
For a low-complexity document, replace the sensitive information in Word, review revisions and comments, and run Document Inspector. If the final document must be distributed with sensitive content permanently removed, convert the cleaned document to PDF and use a dedicated PDF redaction tool.
Does Word remove metadata?
Word's Document Inspector can find and remove certain hidden data and personal information, including document properties and other categories of hidden content. Microsoft recommends inspecting a copy because some removed information may not be recoverable.
How do I redact multiple words in Word?
If you simply need to replace repeated terms, use Find and Replace. If you need permanent redaction in a final PDF, use a Search & Redact feature in a dedicated PDF tool.
Should I convert Word to PDF before redacting?
For a final document that needs permanent redaction, converting the finalized Word document to PDF can provide a better workflow because dedicated PDF applications can permanently redact text and graphics.
However, clean the Word document first. Conversion does not automatically remove comments, revisions, or every type of hidden information.
Is redaction the same as sanitization?
No. Redaction removes selected visible sensitive content. Sanitization addresses hidden information such as metadata and embedded content. Both may be necessary for sensitive documents.
Conclusion
Hiding text is not the same as redacting text. If you only need to temporarily conceal information while editing a document, Word formatting may be sufficient.
When the information must truly be removed before external distribution, move to a dedicated PDF redaction workflow with UPDF. How to protect PDF with true redaction is necessary. Download today to try it now!
Windows • macOS • iOS • Android 100% secure





 Enid Brown

 Engelbert White