 UPDF for Windows
 UPDF for Mac
 UPDF for iPhone/iPad
 UPDF for Android
 UPDF AI Online
 UPDF Sign
 Edit PDF
 Annotate PDF
 Create PDF
 PDF Form
 Edit links
 Convert PDF
 OCR
OCR PDF to Word
 PDF to Image
 PDF to Excel
 Organize PDF
 Merge PDF
 Split PDF
 Crop PDF
 Rotate PDF
 Protect PDF
 Sign PDF
 Redact PDF
 Sanitize PDF
 Remove Security
 Read PDF
 UPDF Cloud
 Compress PDF
 Print PDF
 Batch Process
 About UPDF AI
 UPDF AI Solutions
 AI User Guide
 FAQ about UPDF AI
 Summarize PDF
 Translate PDF
 Chat with PDF
 Chat with AI
 Chat with image
 PDF to Mind Map
 Explain PDF
 PDF AI Tools
 Image AI Tools
 AI Chat Tools
 AI Writing Tools
 AI Study Tools
 AI Working Tools
 Other AI Tools
 AI Bookmark Generation
 AI Bookmark Summary
 AI Watermark Generation
 AI Background Generation
 AI Sticker Generation
 AI Stamp Generation
 AI Editing Suite
 UPDF Copilot
 AI Page Management
 AI Semantic Search
 PDF to Word
 PDF to Excel
 PDF to PowerPoint
 User Guide
 UPDF Tricks
 FAQs
FAQs UPDF Reviews
 Download Center
 Blog
Blog Newsroom
 Tech Spec
 Updates
 UPDF vs. Adobe Acrobat
 UPDF vs. Foxit
 UPDF vs. PDF Expert
Screenshots are an important part of our digital lives. They are the perfect way to capture and share important information from professional chats, emails, and online posts. Converting these snaps into PDFs can further facilitate their secure sharing across all platforms.
But if you don't know how to convert a screenshot to PDF on Mac, we are here to help! This article will provide a full guide on how to turn your snaps into PDFs using an AI-powered tool, UPDF! With UPDF, you can convert your screenshots into PDF in four easy ways.
You can drag and drop, import files, batch convert, and even take screenshots directly with this advanced tool. Plus, UPDF offers a full suite of features to streamline your PDF workflows. So, why not give it a try? Click the below button to download it now and supercharge your PDF management with productive solutions right on your desktop!
You can learn more about UPDF's advanced capabilities by watching the short video below!
Windows • macOS • iOS • Android 100% secure
Now, let's start with the full guide on how to turn a screenshot into a PDF!
Part 1. How to Convert Screenshot to PDF on Mac by Dragging and Dropping
UPDF offers a productive way to create a PDF from screenshots with a quick drag-and-drop method. It is especially useful if you already have several screenshots saved on your Mac. You can select all of the snaps and drag-drop them to UPDF at once.
And if you're wondering how to make multiple screenshots into one PDF on Mac, UPDF can help you out! It gives you the power to combine multiple screenshots into one comprehensive document. Or, you can choose to convert your images into separate PDF files.
First, download and install UPDF on your Mac. Then use the instructions below to convert your screenshots to PDF.
Step 1
Launch UPDF on your Mac. Then, access the folder where you have your screenshots saved. Double-click and drag the cursor over the screenshots to select all of them.
Step 2
Drag the selected images to UPDF's interface and drop them. UPDF will prompt you to combine all the images into one PDF file.
Step 3
All of your screenshots will now open in UPDF either as a single PDF file (if you chose to combine them) or in individual tabs (if you selected No).
Step 4
Now, click on "Organize Pages" from the left panel and drag and drop the screenshots to achieve your desired sequence.
Step 5
Go to the narrow next to save and choose "Save As" to store your screenshots as PDF on your Mac.

That's all! Now you know how to change a screenshot to a PDF on Mac. UPDF makes the process effortless. Now, let's move on to our next method to convert your screenshots to PDF.
Part 2. How to Convert Screenshot to PDF on Mac by Creating PDF from File?
Apart from drag and drop, UPDF lets you create PDFs by importing screenshots from your device. This can be accomplished with its Create PDF from File feature. This method facilitates selecting a large number of screenshots and opening them in UPDF all at once. You can also choose to convert all of your snapshots into single or multiple PDF files.
Now, let's find out how to turn a screenshot into a PDF on Mac with this method.
Step 1
First, download and install UPDF and launch it on your device. Then, click "File" from the top right corner and select "Create."
Step 2
Choose "PDF from File" from all the available options to create a new PDF.
Step 3
Select your desired screenshots from the new window and click "Open" to import them to UPDF.
Step 4
Now, edit your screenshots if needed by clicking on the "Edit PDF" option. You can add new text, images, or links. Once done with your changes, click on " Save As" to store your PDF on your device.

Now, you're all done converting your screenshots to PDF! With UPDF's versatile file conversion features, the possibilities are endless. Now, let's explore another powerful solution to convert your screenshots with UPDF!
Part 3. How to Save Screenshots as a PDF on Mac by Creating a PDF from Selection Capture?
Imagine you're reading through a PDF file. It can be an academic document, research paper, project report, or an ebook of your choice. Suddenly, you come across important information that you wish to preserve for later use.
That's where UPDF comes in, allowing you to capture key information instantly with its selection capture feature! It lets you capture a part of your document directly while it's opened in UPDF. You can also minimize UPDF to capture content from other programs.
This can be done easily. First, click the below button to download UPDF on your device. Then, use the steps below to learn how to save a screenshot as a PDF on the Mac with this method.
Windows • macOS • iOS • Android 100% secure
Step 1
Open UPDF on your device and click on "Open File" to upload your desired document to UPDF.
Step 2
Once your document is opened, click on "File" from the top menu and choose "Create." Select "PDF from Selection Capture" from the available options. You can also choose to create PDF from Window or Screen Capture.
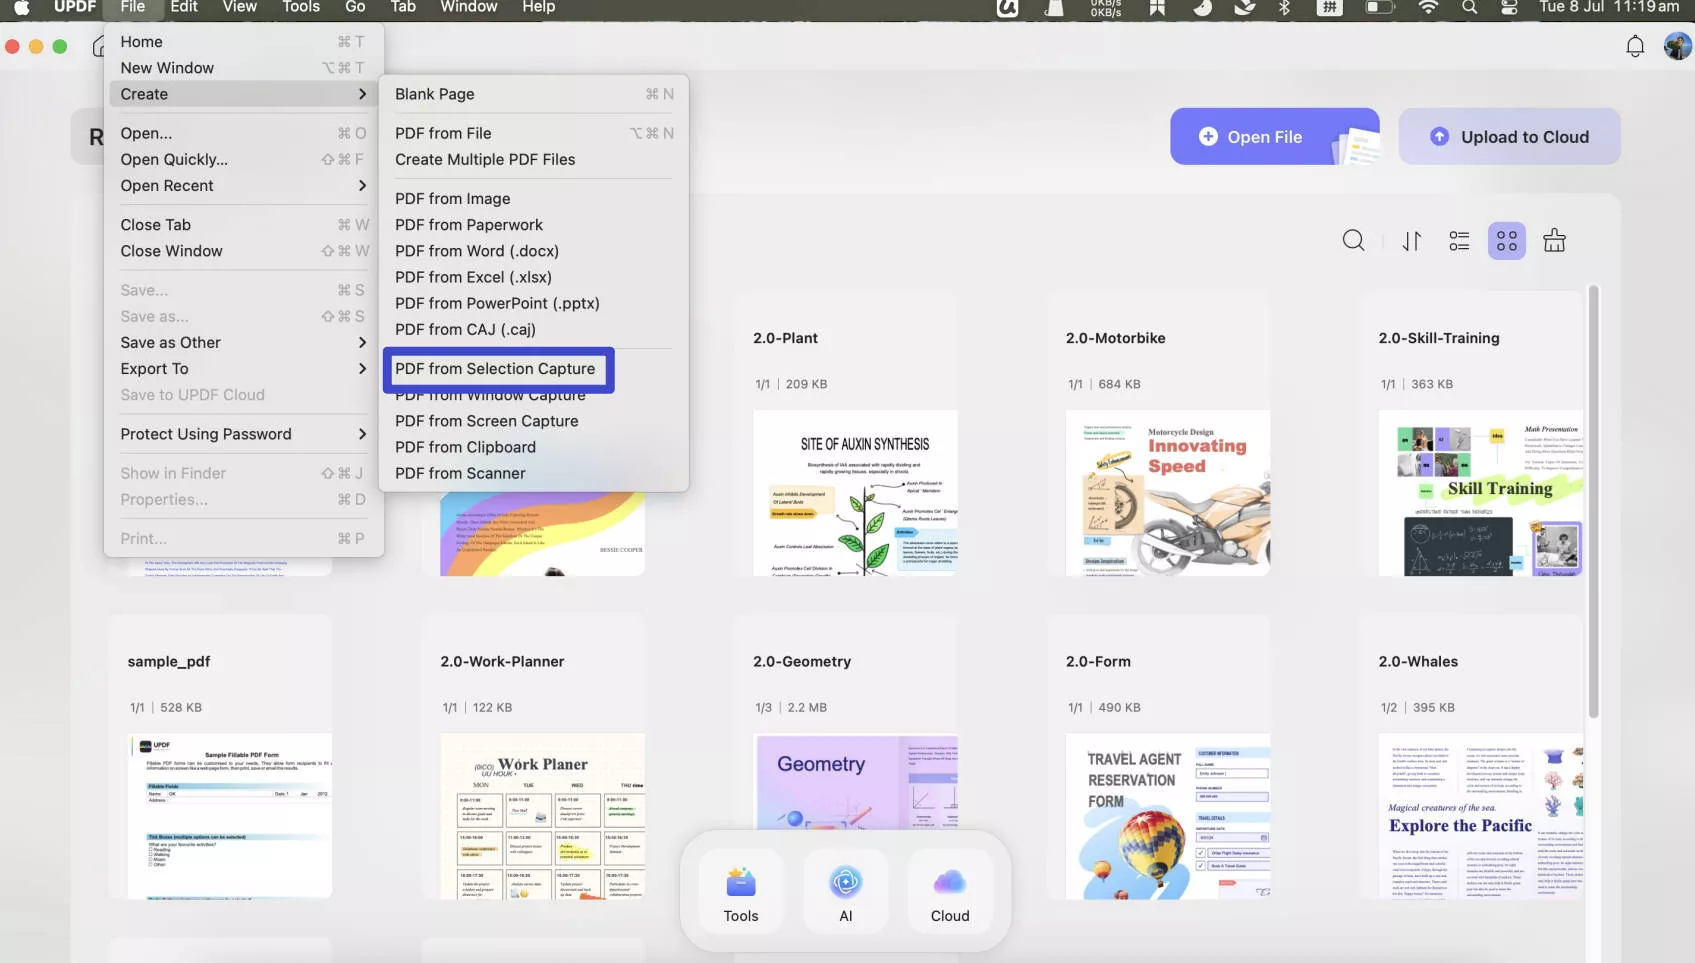
Step 3
Click and drag the cursor over the part of the document you want to capture. Once you release the cursor, the selection will open up in a new tab automatically.
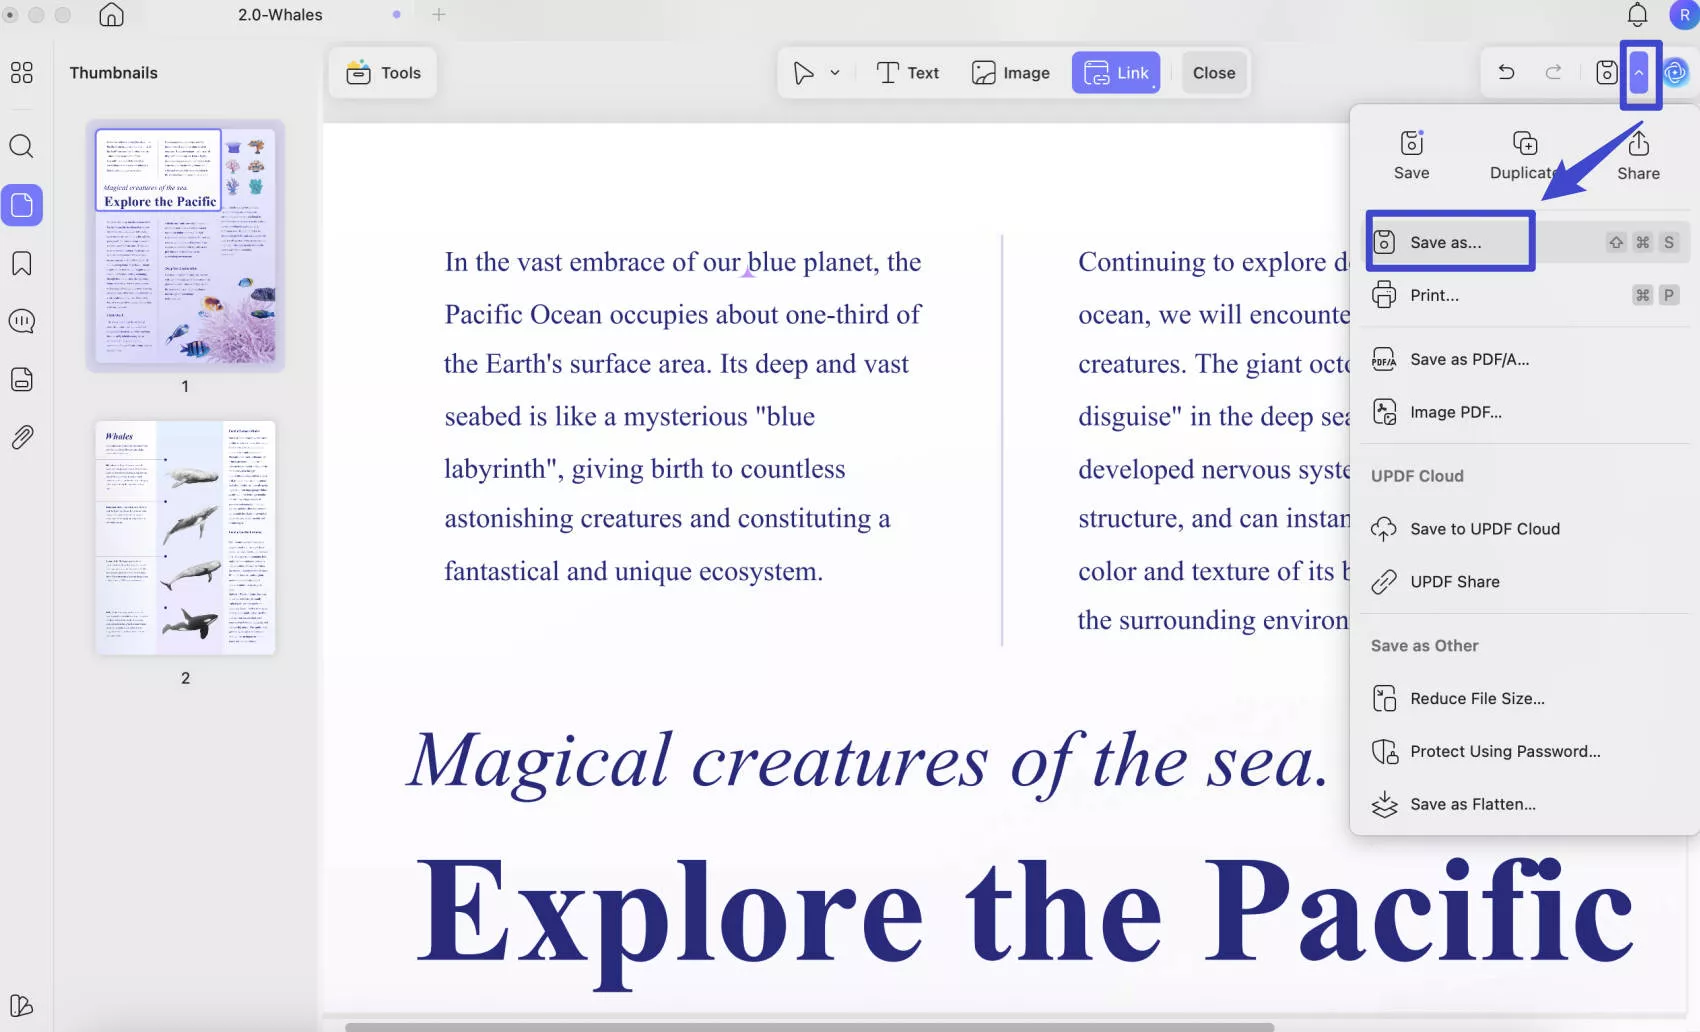
Step 4
Go to the new tab with your captured screenshot. Click on narrow next to save and choose "Save As" to store your captured screenshot as PDF on your Mac.
That was easy, right? UPDF makes handling your documents a seamless experience. No more following technical steps or switching platforms to take screenshots before converting them to PDF. UPDF provides a one-stop solution for all of your PDF handling needs.
Now, let's move forward to the next method. It lets you convert a large number of screenshots and even an entire folder of them to PDF in seconds!
Part 4. How to Convert Screenshot to PDF on Mac Using Batch Combine
If you're looking for a quick way to convert a large number of screenshots into one PDF, UPDF can help you out! It offers a handy batch combine feature to quickly create a PDF from screenshots on Mac.
It allows you to create one PDF file from several screenshots or an entire folder of them within seconds! You can use this method to add other file types such as Word, Excel, or PPT along with your screenshots. You can even drag and drop your files instead of importing them from your device.
If you still do not have UPDF on your Mac, you can click the below button to download it. Then, follow the steps below to quickly turn your snaps into PDF.
Windows • macOS • iOS • Android 100% secure
Step 1
Launch UPDF on your device and click on the "Tools" option near the top right of your screen.
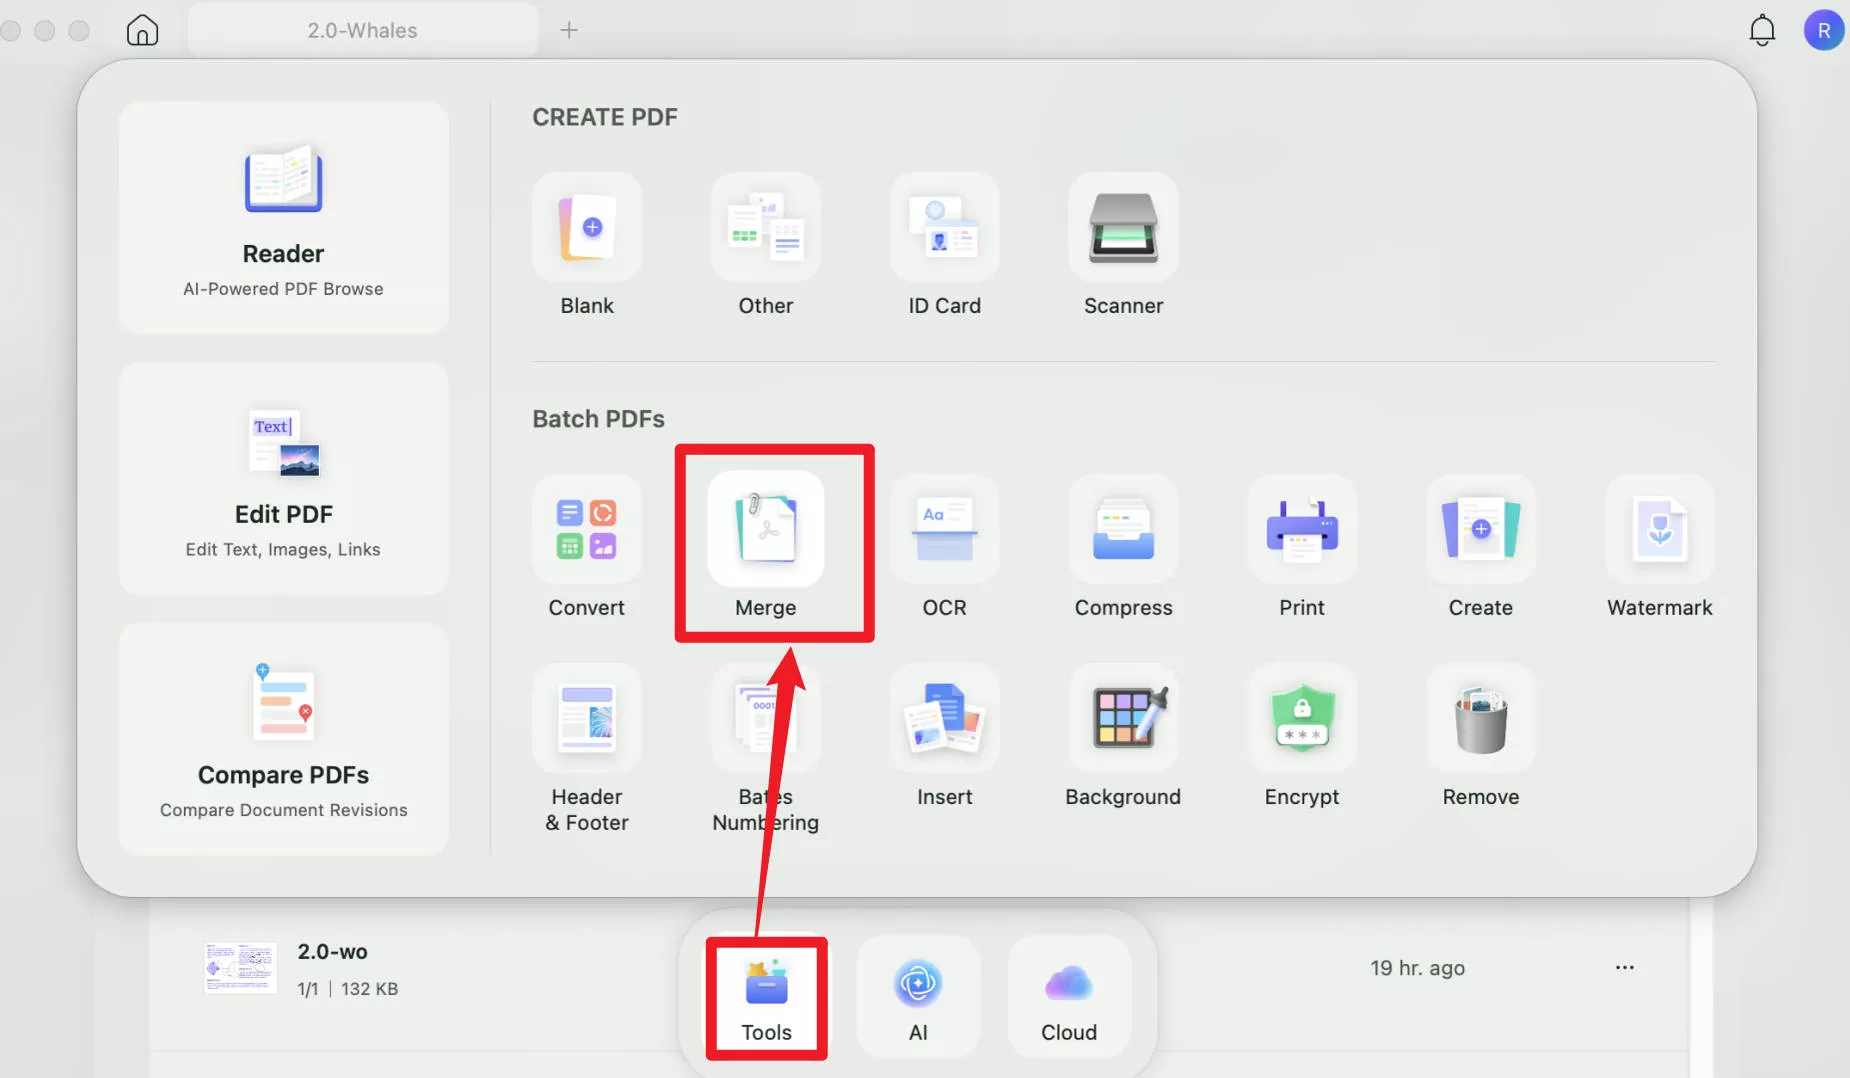
Step 2
Select the "Merge" option in the new window, showing all of UPDF's batch processing features.
Step 3
Click on the "Add Files" button to import your screenshots to UPDF. Or, click on the drop-down arrow next to the Add Files button and choose "Add Folders." This will import an entire folder of screenshots. Otherwise, you can also drag and drop your desired files to UPDF.
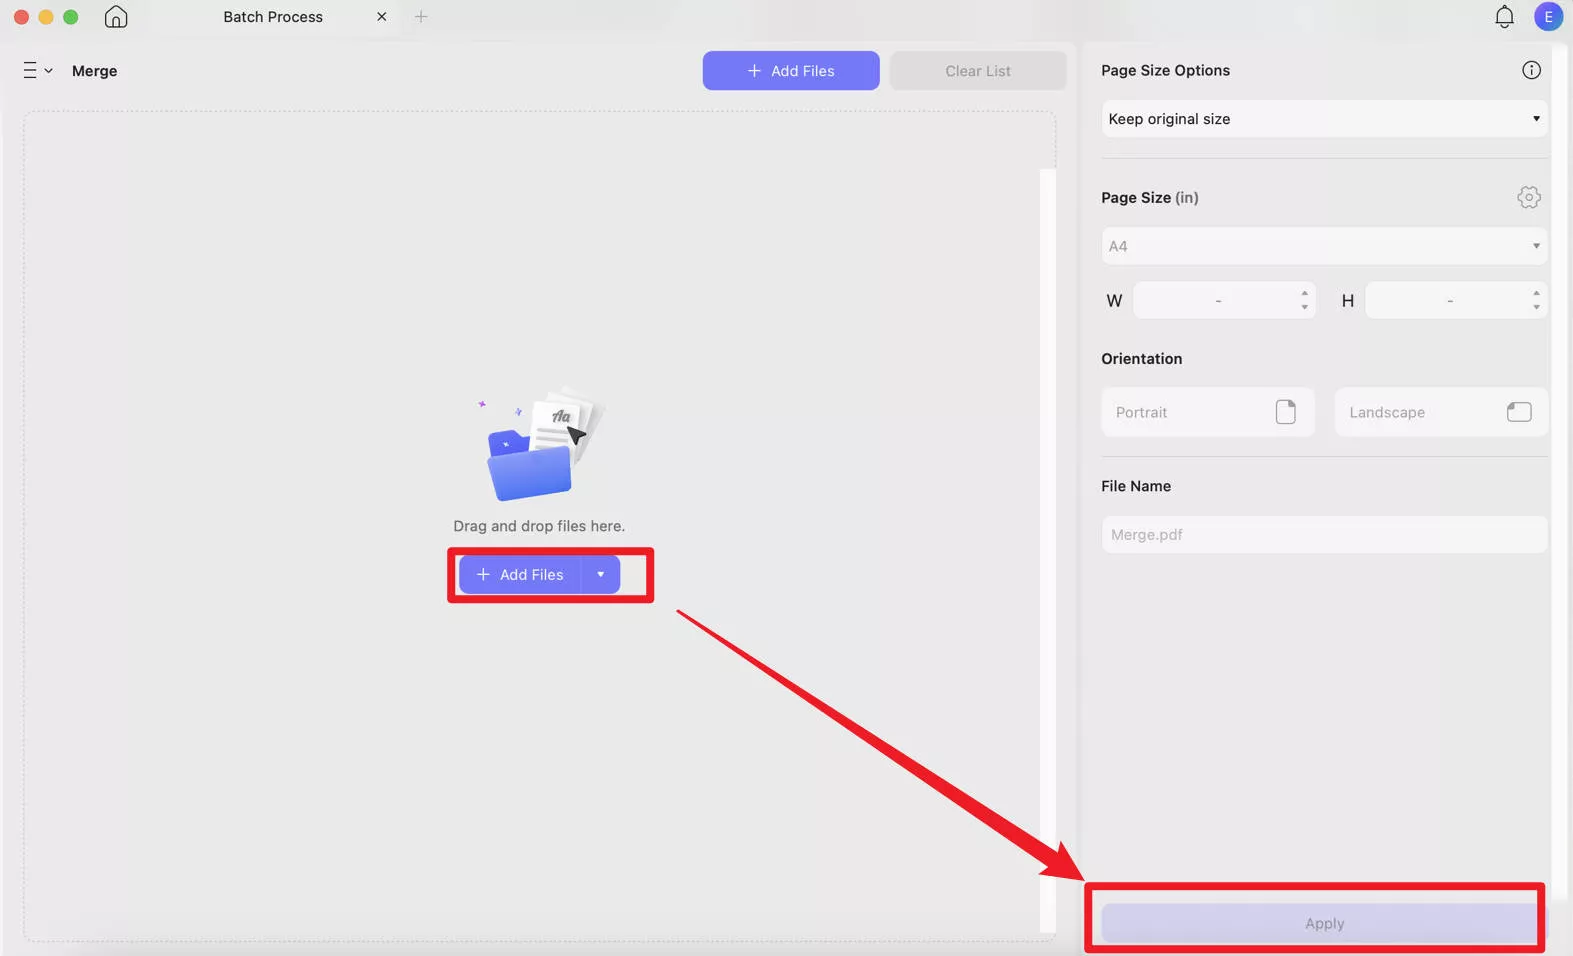
Step 4
Once your screenshots are imported, adjust their order by dragging and dropping them in your preferred sequence. Click on "Apply" once you are done!
Now, simply select a folder to save your new PDF file and you're all done! UPDF makes handling a large number of files easy with its powerful batch-processing capabilities. Apart from converting screenshots to PDF, it offers a treasure trove of AI-driven solutions to manage your documents more efficiently.
And the best part is, you can get UPDF at a massive discount right now! Now is your golden chance to avail the full features of this powerful PDF manager at an unbeatable price. Wait no more. Buy UPDF now and unlock a world of possibilities in productive PDF management!
Part 5. FAQs About Screenshot to PDF on Mac
Q1. How to Make Multiple Screenshots into One PDF on Mac?
You can easily make a PDF from multiple screenshots on Mac using UPDF. Here is how it's done:
- Open UPDF and click "Tools > Merge".
- Click "Add Files" to import your screenshots.
- Lastly, click on the "Apply" button to save the screenshots as one PDF on your Mac.
Q2. How to Convert Screenshot to PDF Free?
UPDF is the ultimate solution to convert your screenshots to PDF for free. You can do it easily with the steps below:
- Open UPDF then drag and drop your screenshot to its interface.
- Once your screenshot is opened, click "The narrow next to save > Save As."
- Rename your screenshot and click "Save" to convert it to PDF for free.
Final Thoughts
Converting screenshots to a PDF on Mac offers a reliable way to preserve and share important information with others. PDFs are not only widely compatible but also ensure secure file sharing across all platforms.
When choosing the best PDF tool to convert screenshots to PDF on Mac, you cannot look past UPDF. It offers versatile solutions to turn your snaps into PDFs. You can drag and drop, import files, batch combine and even directly capture your screen with this powerful tool!
No technical steps are involved. Working with UPDF is fast and easy. With its advanced AI-powered PDF tools, it is the ultimate solution to ace your PDF tasks in seconds. So why settle for less? Click the below button to download UPDF and experience the most powerful solutions to manage your documents productively!
Windows • macOS • iOS • Android 100% secure


 Enrica Taylor
 Enid Brown


 Enola Davis