UPDF for Windows
 UPDF for Mac
 UPDF for iPhone/iPad
 UPDF for Android
 UPDF AI Online
 UPDF Sign
 Edit PDF
 Annotate PDF
 Create PDF
 PDF Form
 Edit links
 Convert PDF
 OCR
OCR PDF to Word
 PDF to Image
 PDF to Excel
 Organize PDF
 Merge PDF
 Split PDF
 Crop PDF
 Rotate PDF
 Protect PDF
 Sign PDF
 Redact PDF
 Sanitize PDF
 Remove Security
 Read PDF
 UPDF Cloud
 Compress PDF
 Print PDF
 Batch Process
 About UPDF AI
 UPDF AI Solutions
 AI User Guide
 FAQ about UPDF AI
 Summarize PDF
 Translate PDF
 Chat with PDF
 Chat with AI
 Chat with image
 PDF to Mind Map
 Explain PDF
 PDF AI Tools
 Image AI Tools
 AI Chat Tools
 AI Writing Tools
 AI Study Tools
 AI Working Tools
 Other AI Tools
 AI Bookmark Generation
 AI Bookmark Summary
 AI Watermark Generation
 AI Background Generation
 AI Sticker Generation
 AI Stamp Generation
 AI Editing Suite
 UPDF Copilot
 AI Page Management
 AI Semantic Search
 PDF to Word
 PDF to Excel
 PDF to PowerPoint
 User Guide
 UPDF Tricks
 FAQs
FAQs UPDF Reviews
 Download Center
 Blog
Blog Newsroom
 Tech Spec
 Updates
 UPDF vs. Adobe Acrobat
 UPDF vs. Foxit
 UPDF vs. PDF Expert
We all know that PDF is a universal file format for sharing data. That said, most people find the need to create PDFs either from scratch or from images. This helps in the convenient sharing of data across different platforms. Whether you are a student wanting to share assignments with friends or a teacher or an administration department worker with the file to share with every office member, you should prefer converting your images into PDF.
In this guide, we will explain how to convert image to PDF on Mac, what tools you can use for the purpose, and more. Let's dive in to explore!
How to Create a PDF from Multiple Images on Mac
UPDF for Mac can serve as your ideal companion for the entire process of converting images to PDF on Mac. It guarantees conversion with utmost precision, maintaining the quality of data and visuals to the highest standards possible. Notably, if the images contain text, UPDF can render the text within images editable. Furthermore, it offers batch conversion functionality, allowing users to convert multiple images into PDFs simultaneously.
Meaning with UPDF by your side, you can effortlessly create PDF from multiple images on Mac. Here is how you can do so:
Step 1: Download and install UPDF from the official website. Launch the software once you are done with the installation.
Windows • macOS • iOS • Android 100% secure
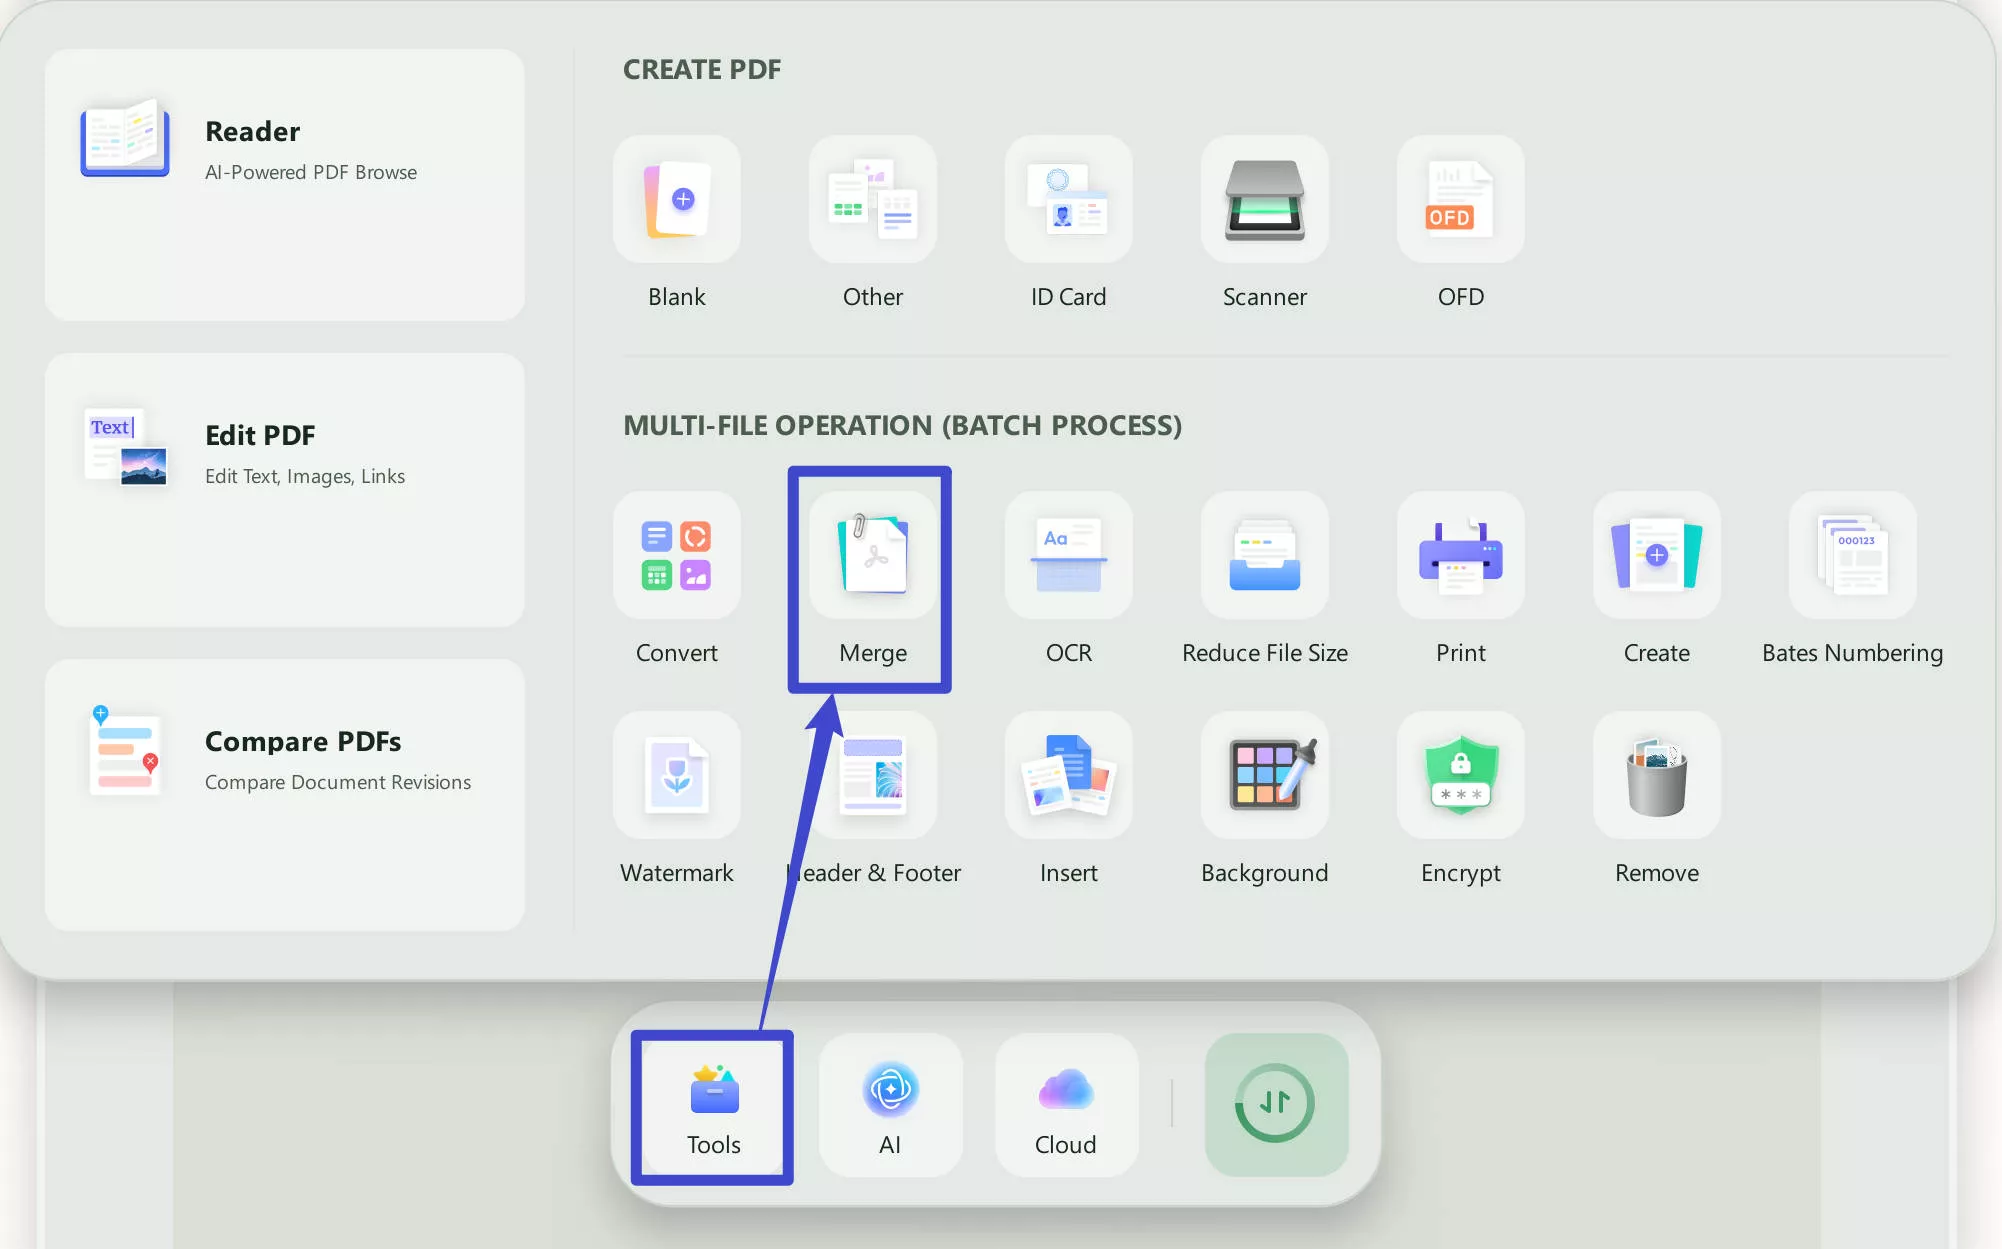
Step 2: On the main interface, select "Tools" on the top right of the screen.
Step 3: In the following window, select "Merge", as we need to create a PDF from multiple images.
Step 4: Drag and drop the images you want to create PDF from or click the "Add Files" option to select files from your device.
Tip: You can also upload folders by clicking the drop-down arrow beside the Add Files option and selecting Add Folders. Moreover, to add multiple files at once, press the Cmd key when selecting files and hit Enter when done.
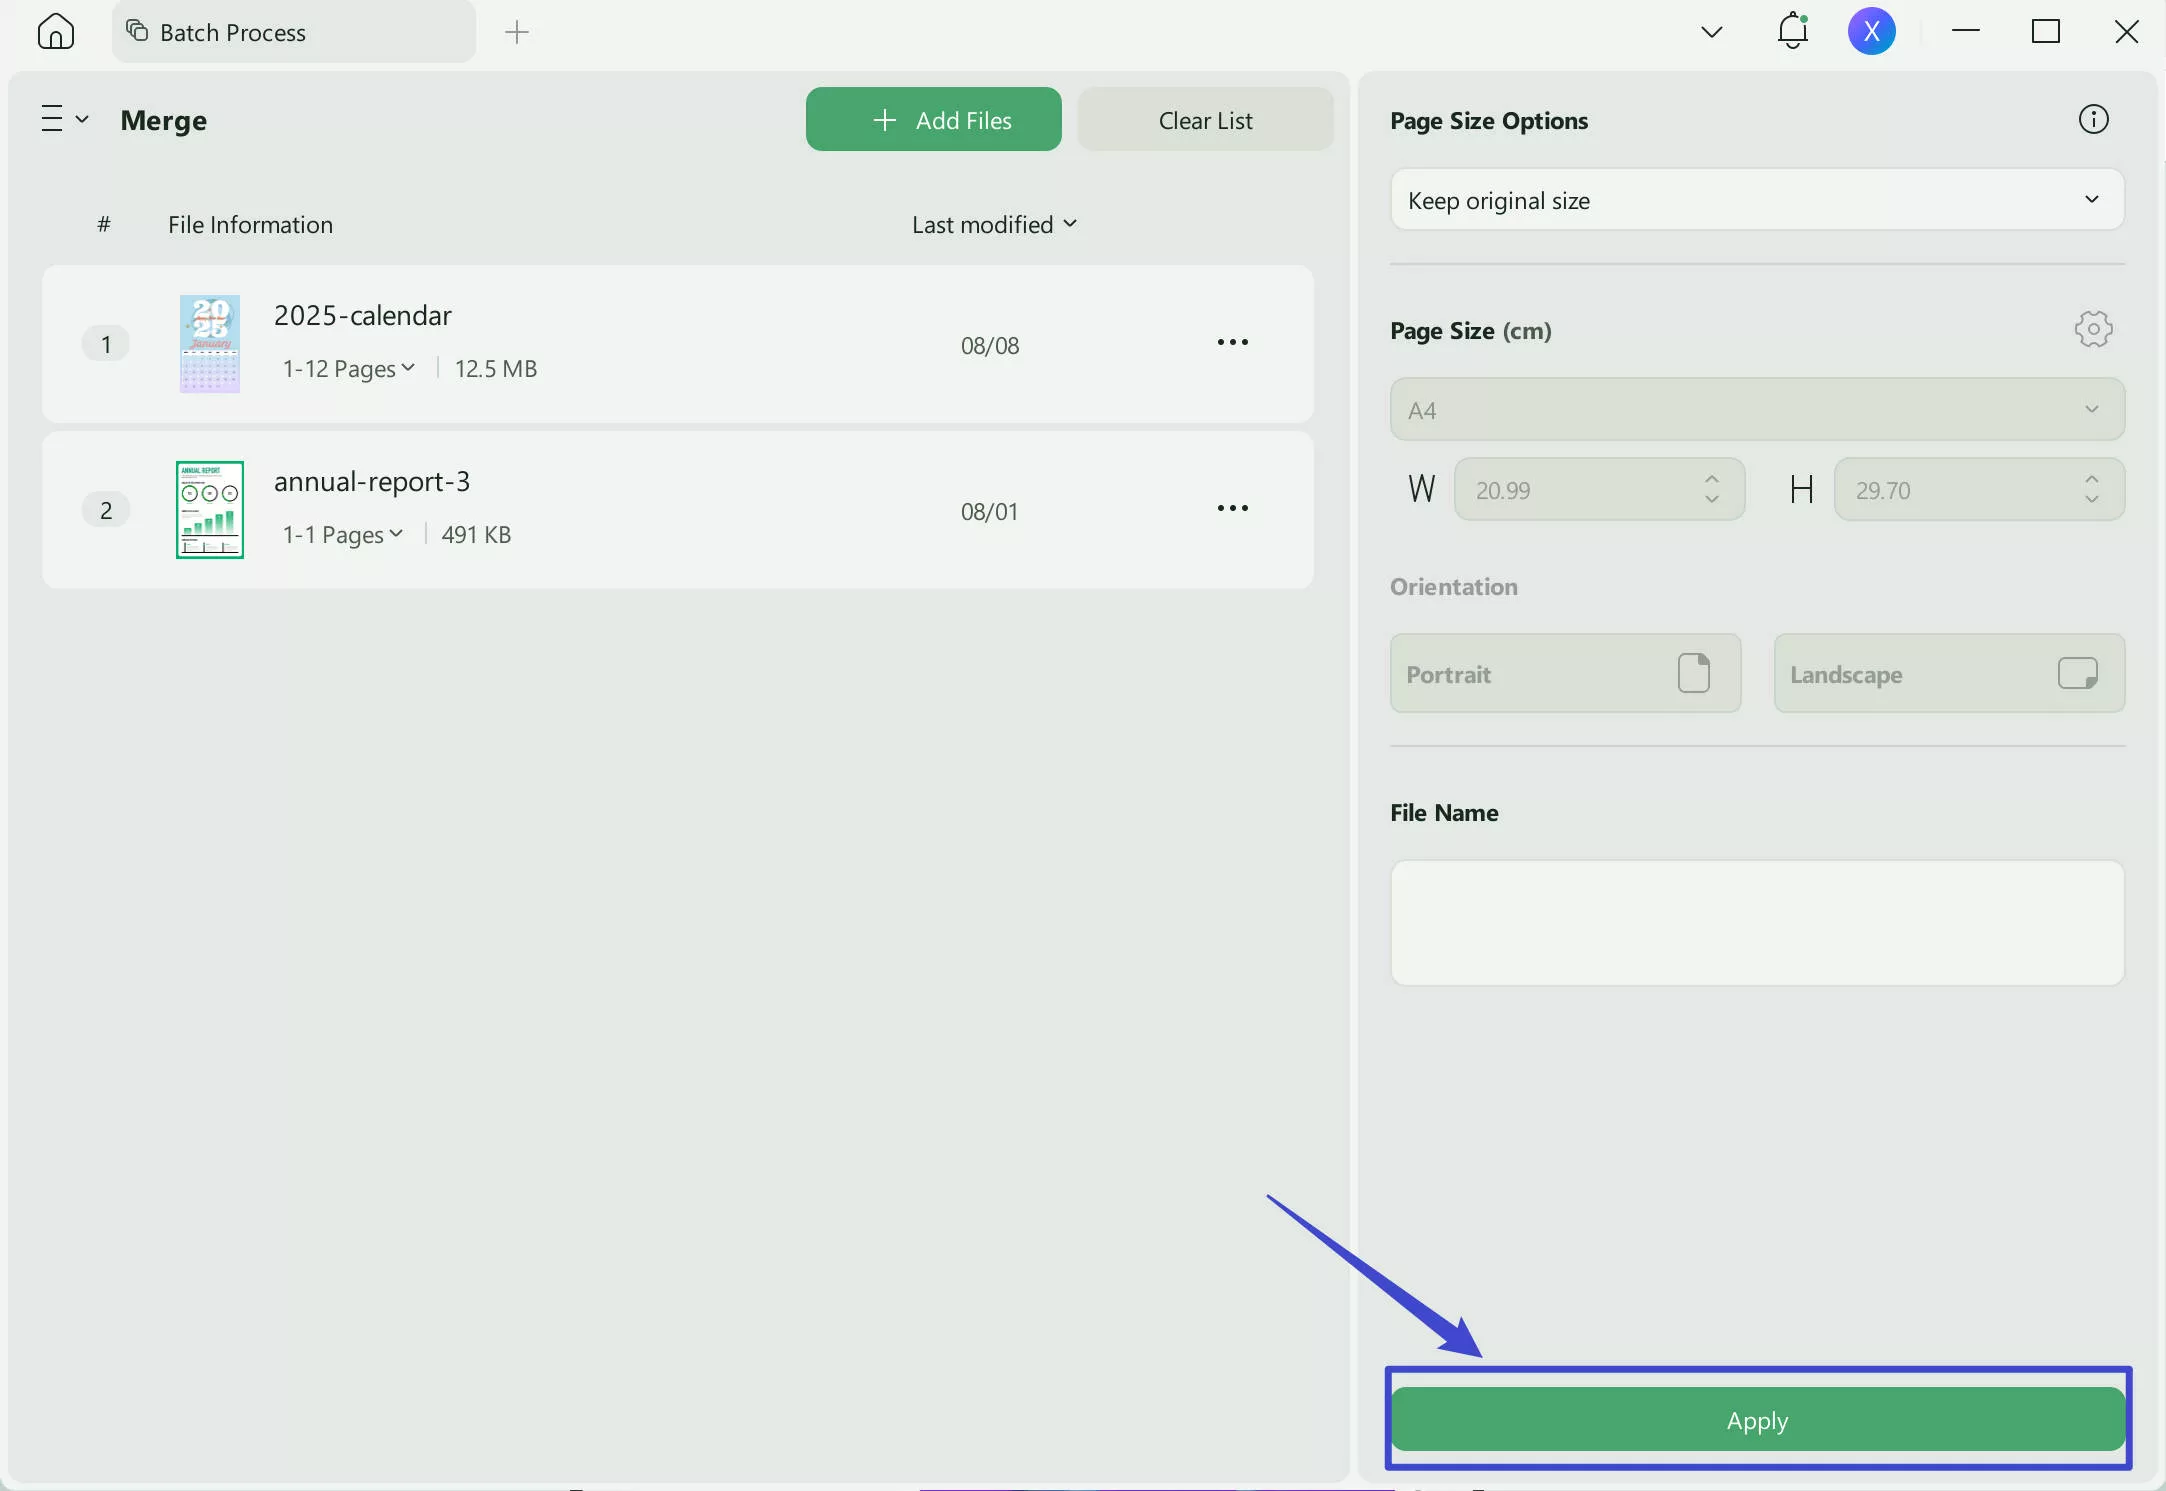
Step 5: Once you have uploaded all the files, drag and drop them to reorder them if needed.
Step 6: Hit "Apply" and enter the destination and file names for the created PDF. Click Save to complete the process!
If you wish to edit the text within the PDF you've generated, you can utilize UPDF's OCR feature to make it editable, as we'll delve into in Part 3.
By this last step, you have learned how to convert photos to PDF on Mac with UPDF! That's how simple UPDF makes the process with its impressive features.
Tip
How to Convert a Captured Image to a PDF on a Mac?
Want to convert a captured image to a PDF on Mac? Follow the steps mentioned below:
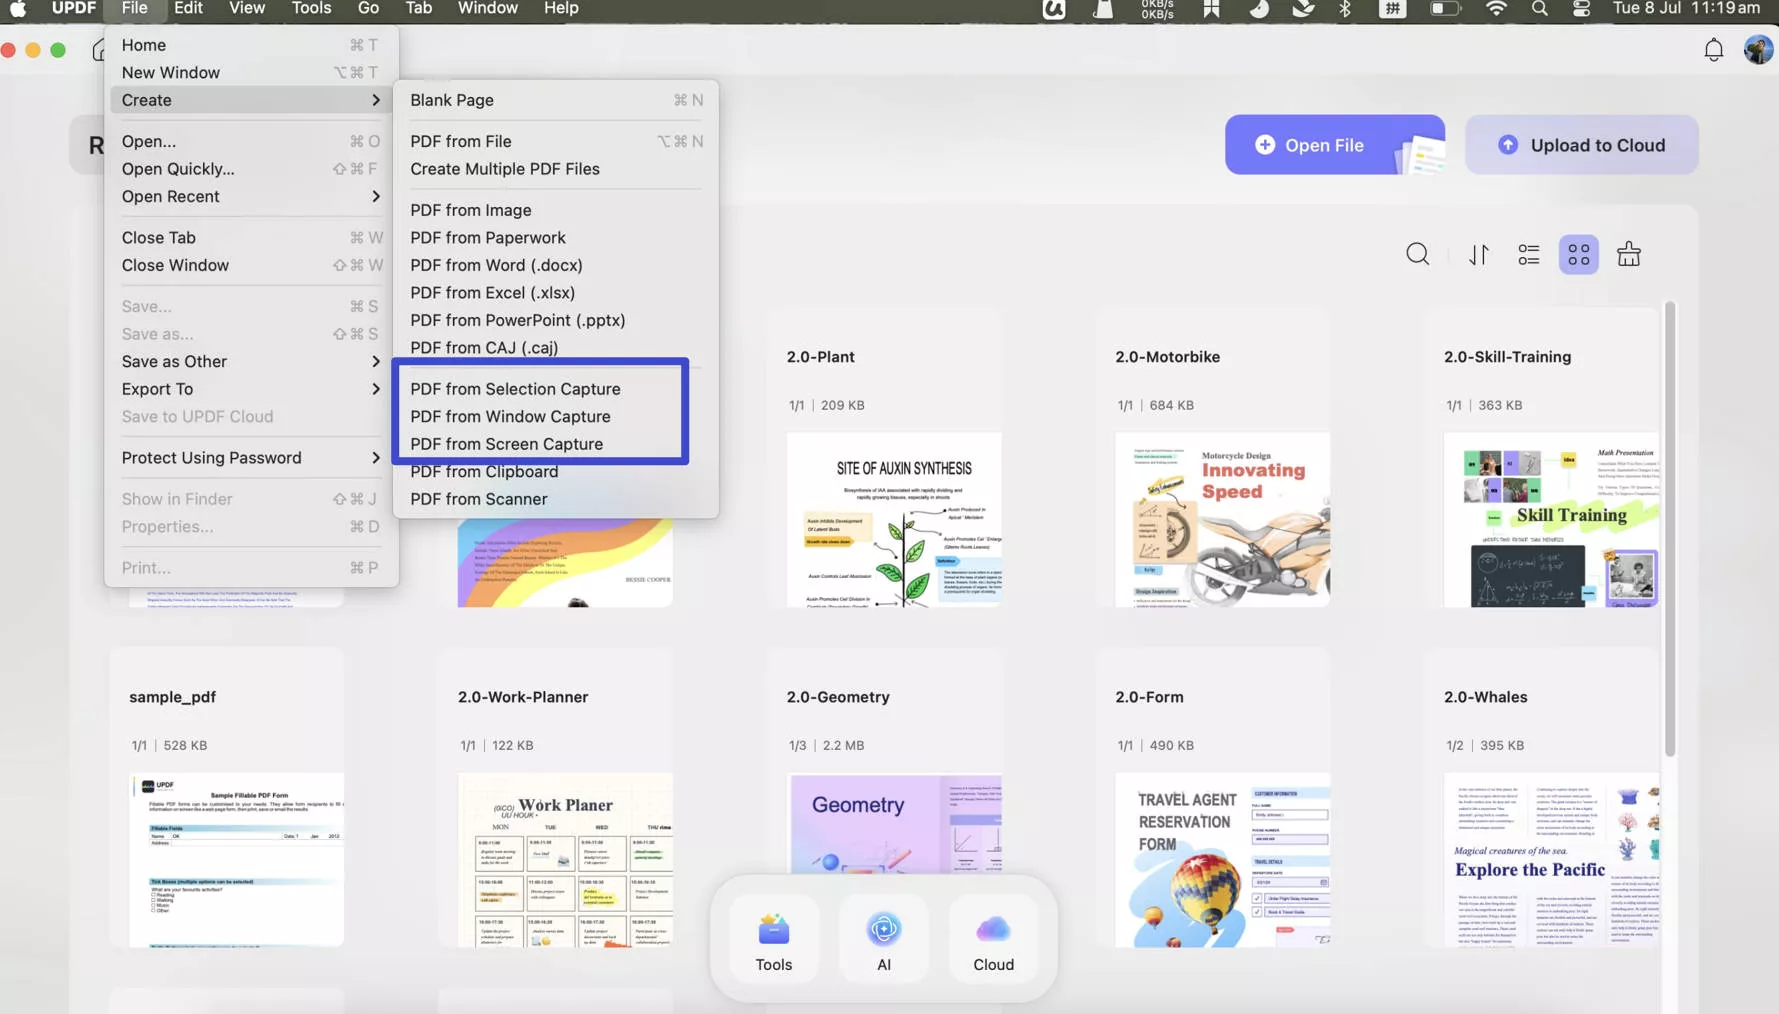
Step 1: Launch UPDF, go to the "File" Tab, and click "Create".
Step 2: A menu with the following options will pop up:
- PDF from Selection Capture: With this option, you can capture a portion of your screen and convert it to PDF. For this purpose, drag the cropping tool to your desired screen area and release your mouse hold, creating a PDF from the resulting screenshot.
- PDF from Window Capture: This option captures a screenshot of the entire window and converts it into PDF. You will only need to select the window to convert to PDF.
- PDF from Screen Capture: This option allows the software to take a screenshot of your entire screen, converting it to PDF.
Step 3: Choose your desired option and save the PDF afterward.
How to Turn a Photo into an Editable PDF on Mac?
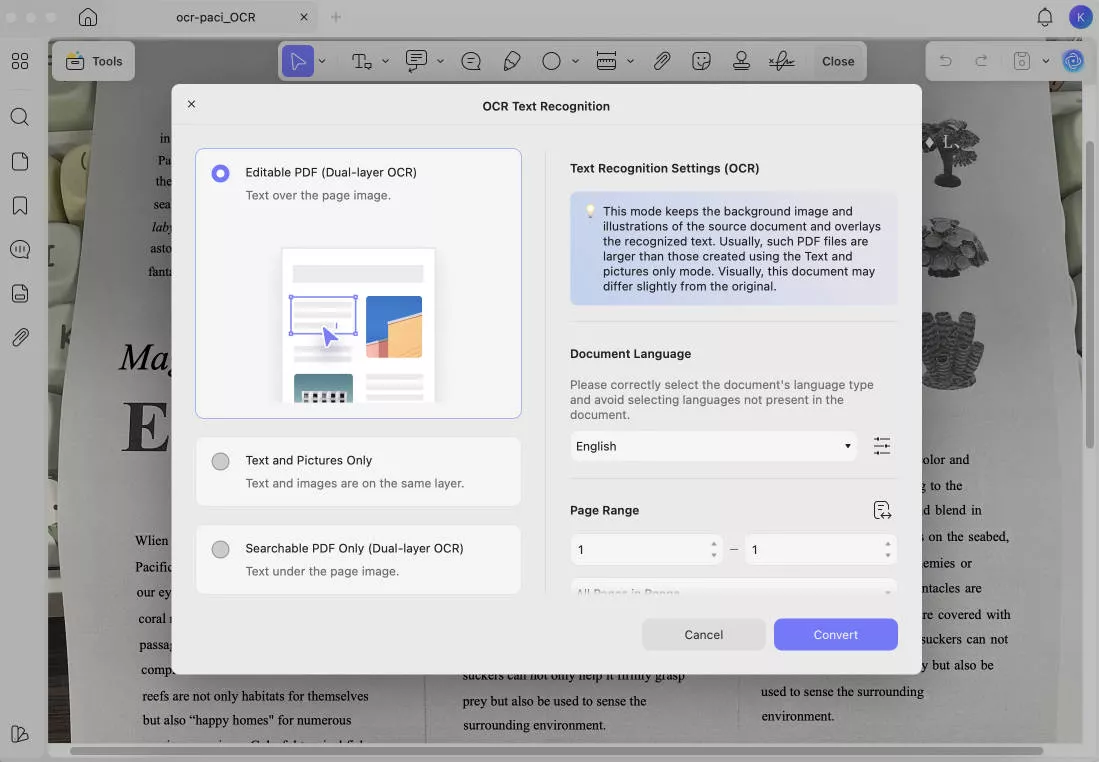
No doubt, you can create a PDF from images on Mac using the above-mentioned guide. But the resulting PDF files aren't editable. If you want to edit the PDF further after making it from an image, you will have to rely on UPDF's OCR conversion. Owing to it, UPDF reads images and scanned PDFs with authenticity. The technology supports 38 languages for accurate identifications of each and every word on an image.
Here is how you can use UPDF to learn how to convert pictures to editable PDFs on Mac with OCR:
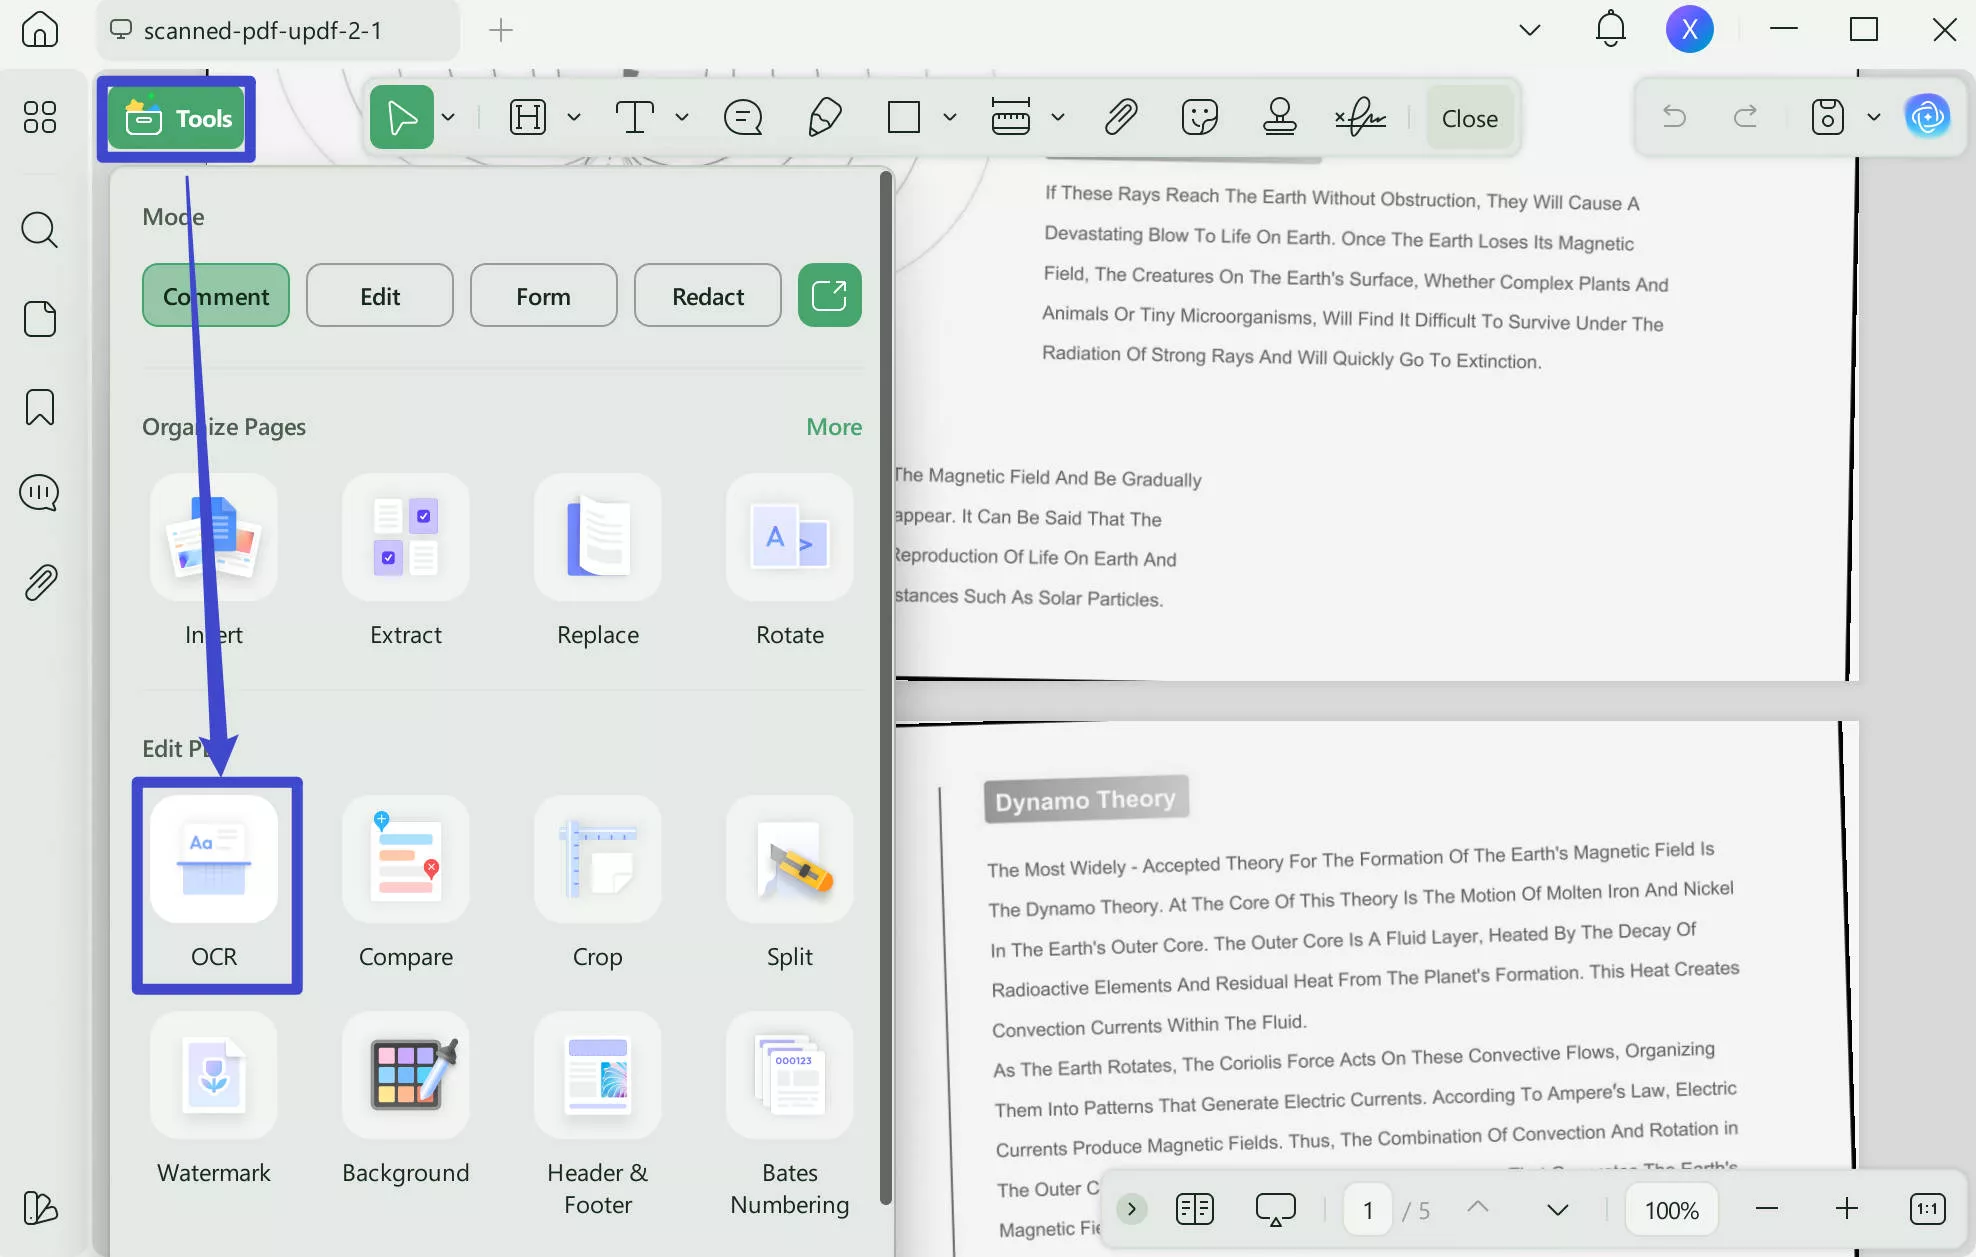
- Open the image-based PDF in UPDF, click on the Tools and choose "OCR" option.
- A menu will pop up; go to the Editable PDF section.
- Now, tweak the settings per your choice, selecting Layout, Document Language, Page Range, and more.
- Once done, hit "Convert".
- A window asking to enter the recently created PDF's name and destination will pop up. Enter it and hit "Save".
- The conversion process will begin after you hit the key. Wait for a while until the process completes, and that's it!
Voila! You have learned how to make a photo a PDF on Mac and turn it editable. Also, UPDF also offers a free trial for this software, letting the users explore its features in-depth before upgrading. Get the free trial from the button below now.
Windows • macOS • iOS • Android 100% secure
How to Create a New PDF with Images on Mac?
Wait, what? Do you want to create a PDF with images? Fret not, as UPDF has got you covered in this aspect too! Follow the steps below to figure out how Mac creates PDFs from images using a blank page!
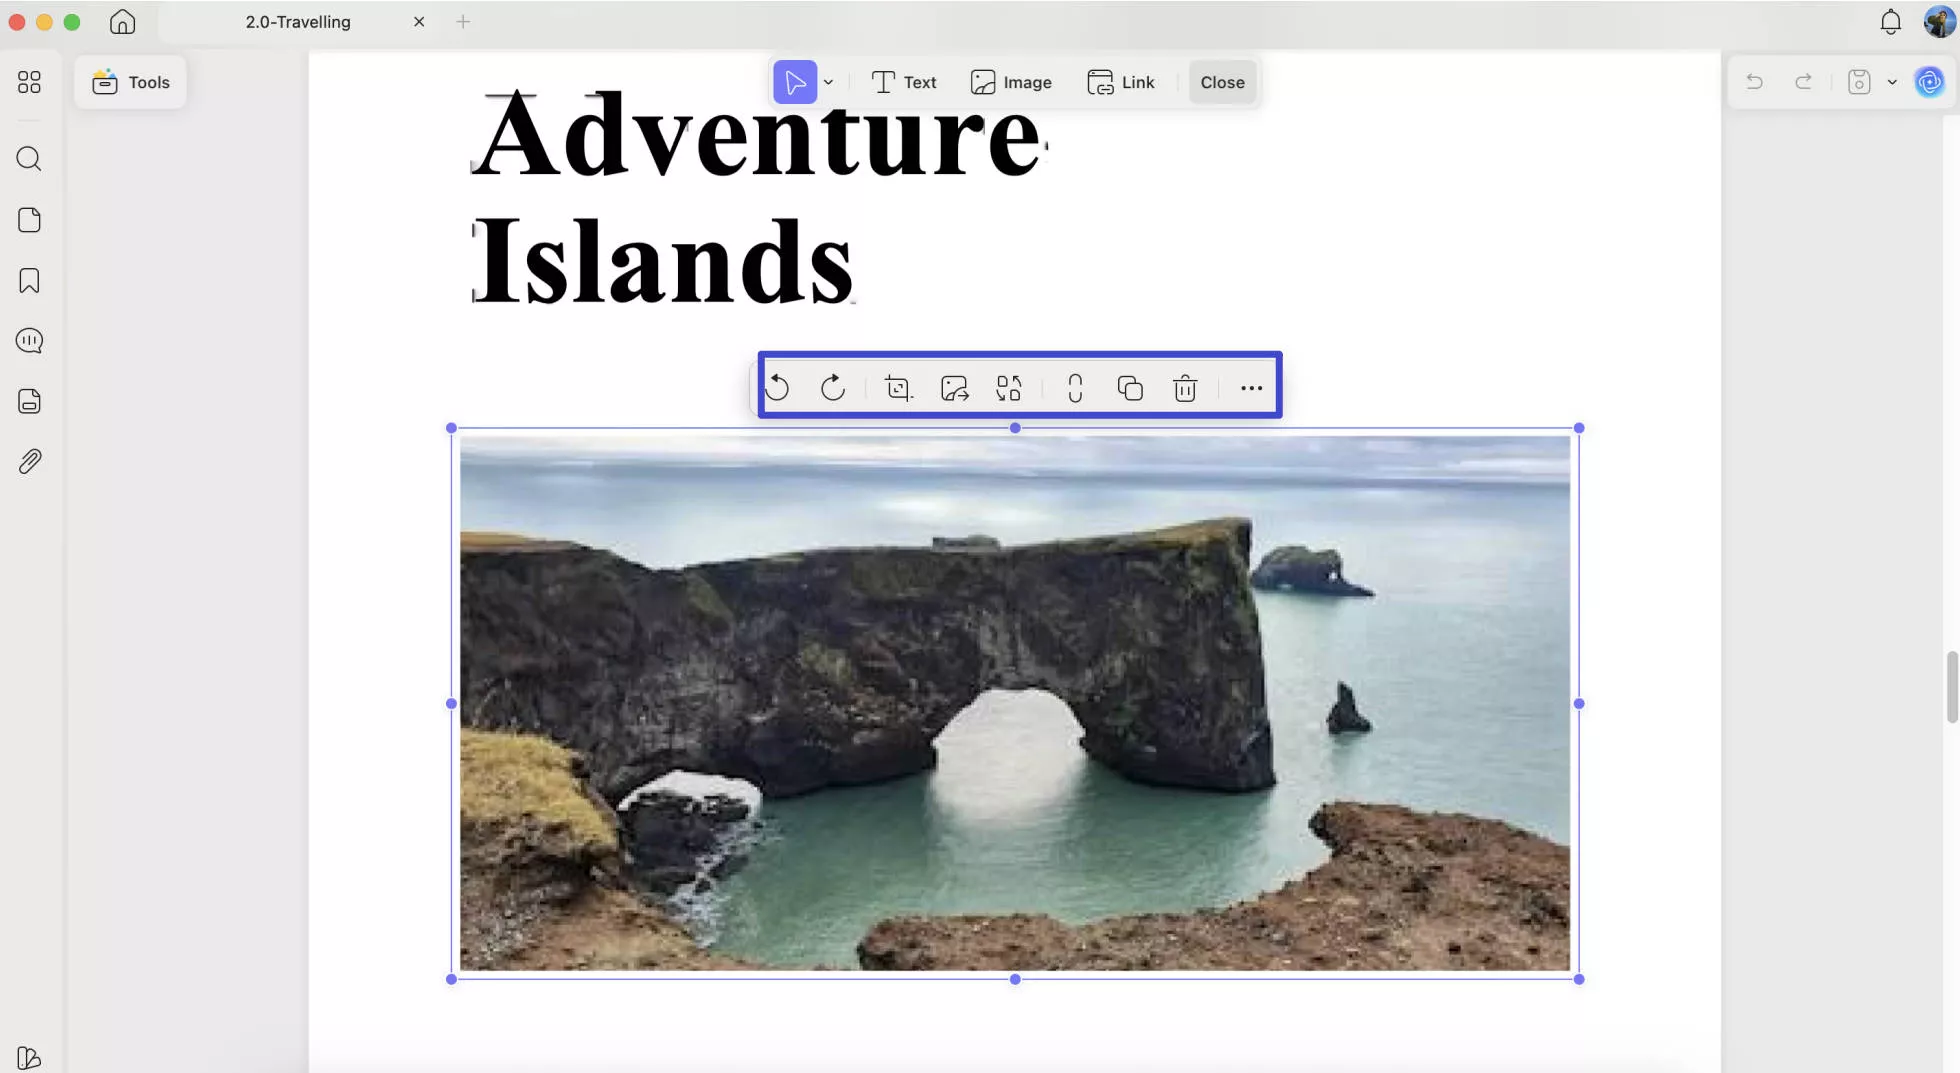
- Launch UPDF and go to the "Tools" tab.
- Create to reveal the menu and hit "Blank", making a PDF containing a blank page.
- Enter editing mode by clicking the "Edit" icon in Tools on the left menu bar.
- Now, go to the top toolbar and select "Image".
- Click anywhere on the PDF page where you want to add the image file.
- Choose your image file from the device and hit "Enter" to add it to the PDF.
- You can click on the image anytime to edit, rotate, crop, and resize it.
- Once done with editing, save the PDF using shortcuts, Cmd + S, entering the PDF file name, selecting the saving destination, and hitting "Save".
For a more detailed guide, watch the video below.
Why is UPDF the Best Tool to Make a Photo a PDF on Mac?
If you are curious why we call UPDF the best PDF tool for making a photo from PDF on Mac, we have covered you in this section. This quick-responsive platform can be easy to use for beginners or those who aren't tech-savvy. Here are a few more reasons proving our stance:
- UPDF enables quick conversion without compromising an inch on data quality. You won't see any changes in quality before and after the conversion.
- It allows users to skip converting single images manually; you can save loads of time by converting multiple images in a batch.
- Its intuitive interface is user-friendly. The clear-cut and straightaway options make it much easier to swiftly convert images to PDF on Mac.
- Besides this, UPDF boasts editing, annotating, form-filing, signing, and other features that make it an all-in-one solution for PDF-related concerns.
Why Should You Convert Pictures to PDFs on Mac?
Here are a few possible reasons one might end up browsing for how to turn a photo into a PDF on Mac:
- Sharing Data without Affecting Quality: This conversion can prove helpful for designers who want to share their design ideas with clients without quality loss. By converting to PDF, they can best preserve the visuals.
- Combine Relevant Info in One Place: Image to PDF on Mac enables gathering all the relevant images in one place for convenient viewing and sharing. This can be helpful for photographers wishing to send their high-quality images boasting portfolios to potential clients.
- Benefitting from PDF Customization: Moreover, art collectors can create a themed digital version of their collection by converting images to PDF and editing later.
- Accessing Annotating Features: This can also be done via the innovative UPDF annotation tools on Mac. This can be useful for construction project managers, as they can better express their thoughts and suggest changes, adding text as a comment or using stickers, etc.
- Ensuring Data Privacy: Image-to-PDF conversions can also prove amazing for securing privacy if you want to share experimental info or any private legal document. After performing the conversion, you can lock the PDF using an Open or Protected Password.
FAQs on Converting PNG to PDF on Mac
How Do I Turn Multiple Images into a PDF on Mac?
You can turn multiple images into a PDF using the batch combine feature. To convert using UPDF, you just need to launch the software and select Tools > Merge > Add Files > Apply > Save.
How do I Save an Image as a PDF in Preview Mac?
Here is how to convert a photo to PDF on Mac Preview:
Step 1: Choose the images you want to convert to PDF in Finder.
Step 2: Once selected, right-click on any selected photos and click "Open With", followed by "Preview".
Step 3: After the image is open. Go to "File" and choose the "Export as PDF" option.
Step 4: Enter the name of your PDF file, select saving destination, and click "Save" to save it.
Why Can't I Turn PNG to PDF on Mac?
This can occur due to several reasons. It might be because Preview in your macOS version doesn't support this conversion. After all, the previous Mac version had limited features. Secondly, your PNG file might have restricted permission, preventing the software from converting it. Thirdly, the PNG file you are trying to convert to PDF is too large to be uploaded to the software.
It exceeds the software uploaded document size. Other reasons include the corrupted PDF editor, insufficient system resources, etc. The issue won't happen if you switch to use UPDF to do it and you can rely on this software.
Conclusion
This article has summarized multiple guides on how to create a PDF from a single image or multiple images on Mac. You can rely on UPDF for this conversion, and you won't have to compromise on visual quality, and the conversion is accurate. Also, UPDF for Mac can create editable PDFs from images, as it has built-in OCR features. Download and try UPDF now. Its ultra compatibility, affordability, versatility, and user-friendliness will surely leave you impressed.
Windows • macOS • iOS • Android 100% secure


 Enrica Taylor
  Lizzy Lozano
 Enola Davis