Exporting text messages/iMessages into a PDF is a great option to save important information. Surely you can use other ways like starring important messages or taking screenshots. But eventually, it becomes cluttered and hard to find the info you want. This is why we are going to learn some really effective solutions to export text messages from iPhone 17 to PDF in the following guide. So, stick till the end to know it all!
Way 1. Convert Text Messages to PDF on iPhone Via Screenshots and UPDF
One of the easiest ways to export your messages into a PDF is through UPDF. It's a free and quick PDF reader with a plethora of features to convert pictures into PDF format on your iPhone 17.
Once the PDF file is made, you can further edit it, like adding text or images to the file. You can also annotate your PDFs and upload them to UPDF Cloud to access your files on multiple devices.
So, how to convert text messages to PDF on iPhone 17 via screenshots and UPDF? Let's dive into the step-by-step guide to do that:
First, make sure of the following:
- Take screenshots of your important messages and keep them in your iPhone's gallery.
- Visit UPDF for iOS and download the UPDF app in your iPhone 17. Or download directly via the below link
Windows • macOS • iOS • Android 100% secure
Done? Now you can follow these steps to export your text messages from screenshots to PDF using UPDF:
1.Open the UPDF app. Choose the "Tools" section.
2.Click the "Image to PDF" button.
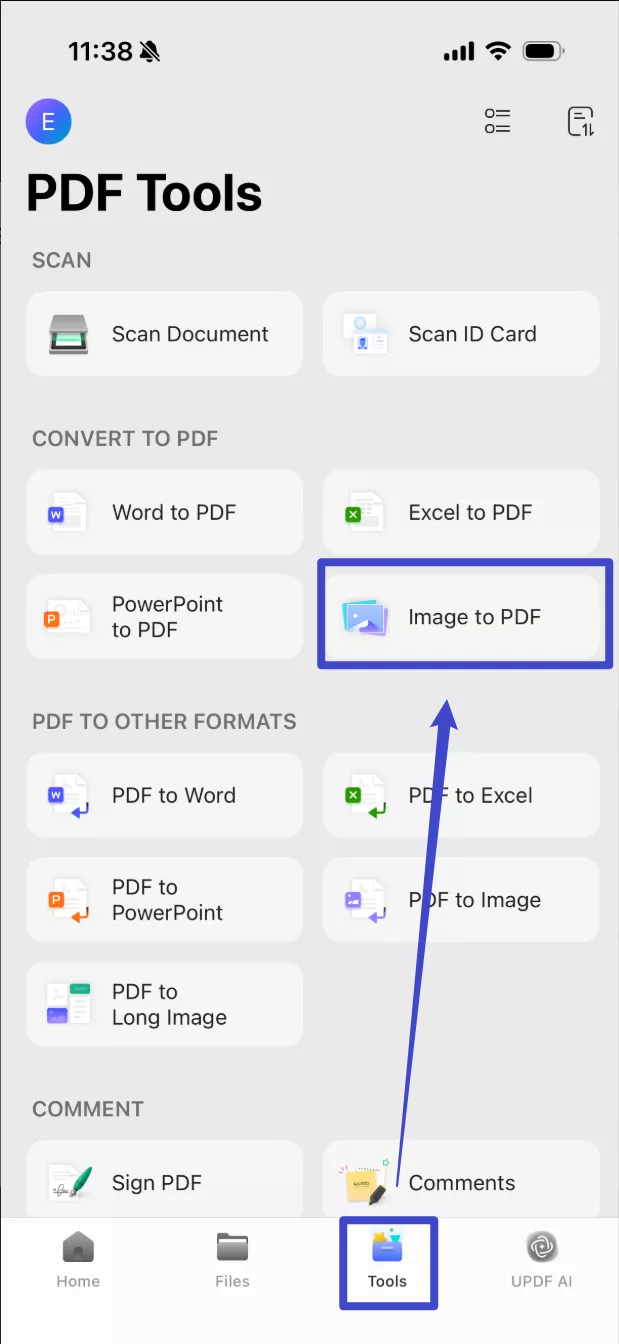
That's it, your PDF copy is generated. You can find the PDF file available in the same document name as the image/screenshot name.
The above method was to export your messages to pdf for only one image. It's an easy method, but can be frustrating too if there are multiple images that you want to convert to PDF.
So, instead of exporting each image individually, you can save your time and energy with the multiple-selection feature available on UPDF.
Now download UPDF to give it a try!
Windows • macOS • iOS • Android 100% secure
Way 2. Export Text Messages from iPhone to PDF Free With Mac
If you are an iPhone 17 user, you must be familiar with iMessages. It's a messaging service designed by Apple and works just like a texting app. But, the best thing about iMessages is that you can send and receive texts and media between multiple Apple devices.
Hence, you can use this to your advantage as the Messages app on your Mac has a free feature to convert your texts into PDF. You don't even need to do the hassle of taking screenshots or downloading third-party apps on your iPhone or Mac. In fact, all you need to make sure is:
- Your Mac is logged in with the same Apple ID as your iPhone 17. If not, go to "System Preferences" > "Apple ID" and log in with your Apple ID.
- Your Mac has access to your messages on iMessages. If not, open the "Messages" app on your Mac > navigate to "Messages" > "Preferences" > "Accounts" > make sure your Apple ID is listed and selected.
Once you are done with these two requirements, your messages should sync both on your iPhone 17 and Mac using the same Apple ID.
Now, let's see how you can save iMessages to pdf using Mac in the following step-by-step guide:
- Open the Messages app on your Mac.
- Select the conversation you want to convert to PDF from the list.
- In the top menu bar, click "File."
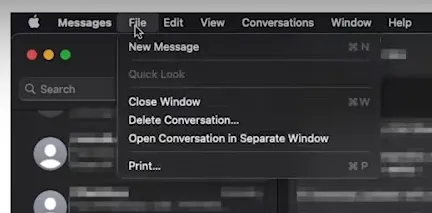
- From the dropdown menu, select "Print."
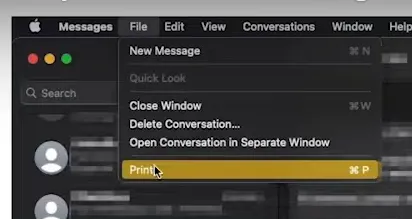
- At the bottom center of the print dialog, find the dropdown menu and choose "Save as PDF."
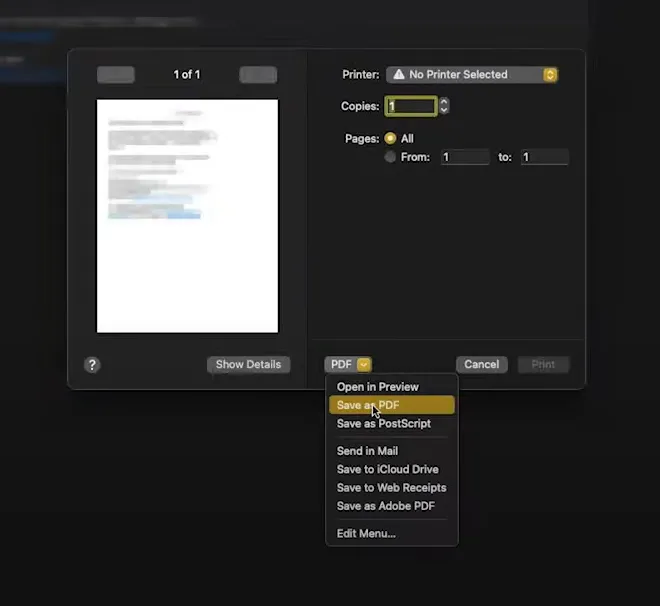
- In the new pop-up window, select the destination where you want to save the PDF file and give it a name.
- Click "Save" to save the conversation as a PDF on your Mac.
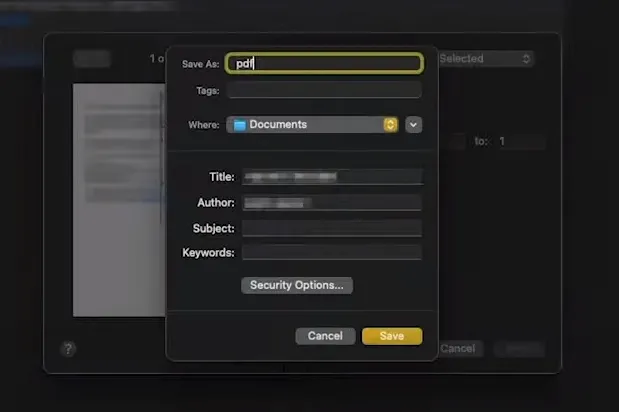
That's it. Now you have a PDF file with the selected conversation from the Messages app on your Mac.
Way 3. Export iMessages to PDF With TouchCopy
TouchCopy is an app to help you transfer your files from your iPhone, iPod, or iPad to your Mac. You can transfer a wide range of files, including music, messages, photos, and other media.
When you are using TouchCopy to export iphone messages to pdf, you can choose from a variety of options. This includes SMS, MMS, iMessage, WhatsApp, and even LINE conversations that you can export. TouchCopy comes with features to save your texts in HTML, PDF or Plain Text. So, let's dive into how you can export iMessages to PDF using TouchCopy.
First, make sure to download TouchCopy on your Mac. Once you are done with the installation process, you can follow these steps to set up TouchCopy and export your iMessages to PDF.
- Open TouchCopy on your Mac.
- Connect your iPhone 17 to the computer using a USB cable.
- Once TouchCopy recognizes your iPhone 17, you'll see the main interface. Look for the "Messages" tab on the left-hand side of the TouchCopy window and click it.
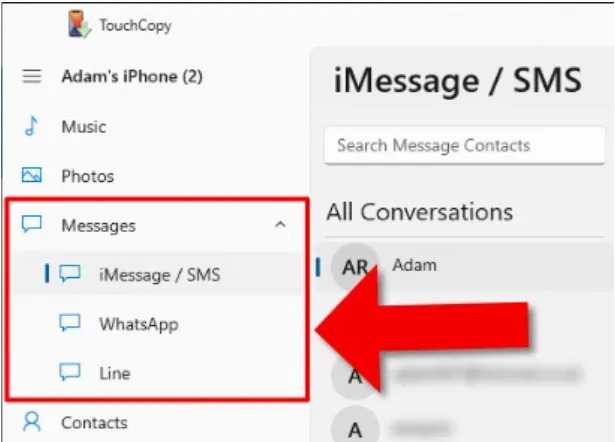
- The "Messages" tab organizes all your conversations by type. This can include SMS, MMS, iMessage, WhatsApp, and LINE. You need to browse through the conversations to find the particular message you want to copy or print.
- Click on the name of the contact (with whom the conversation took place) to select it. If you want to select multiple contacts, hold down the Command key and click the names of all the desired contacts.
- Once you have selected the contact(s) and message(s), find the "Save as PDF" button at the top of the window and click it.
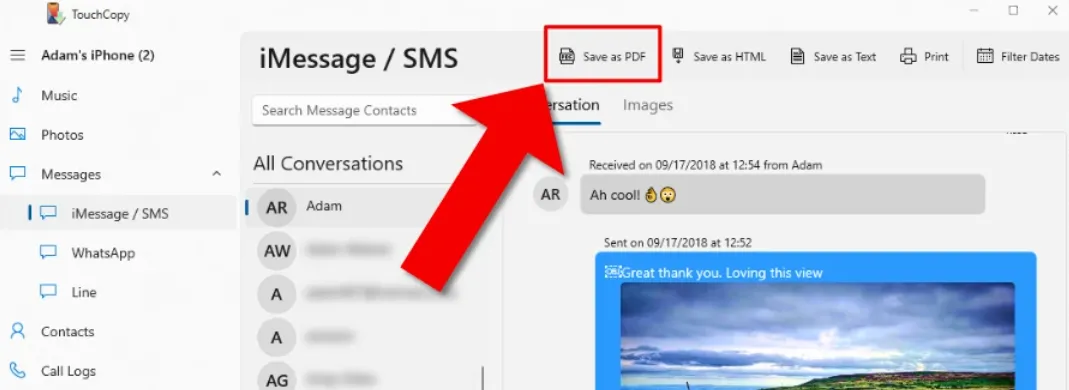
- A new window will appear asking where to save the PDF file on your Mac. Navigate to the folder where you want to save the PDF file and click "OK."
That's it. TouchCopy will then convert the selected text messages to a PDF file and save it in the specified location on your computer.
Bonus Tip: How to Edit PDF After Saving Text Messages to PDF on iPhone?
As mentioned earlier, UPDF comes with many features to edit your PDF. After saving your messages into a PDF file, you can do a lot, like adding and editing text. The following is a step-by-step guide on how you can add and edit text on the PDF file using UPDF.
The first thing is to download the UPDF app on your iPhone 17 and on your computer. If you do not have the app, you can download it from the below link. Once the app is set up, follow these steps to add and edit text on the PDF file:
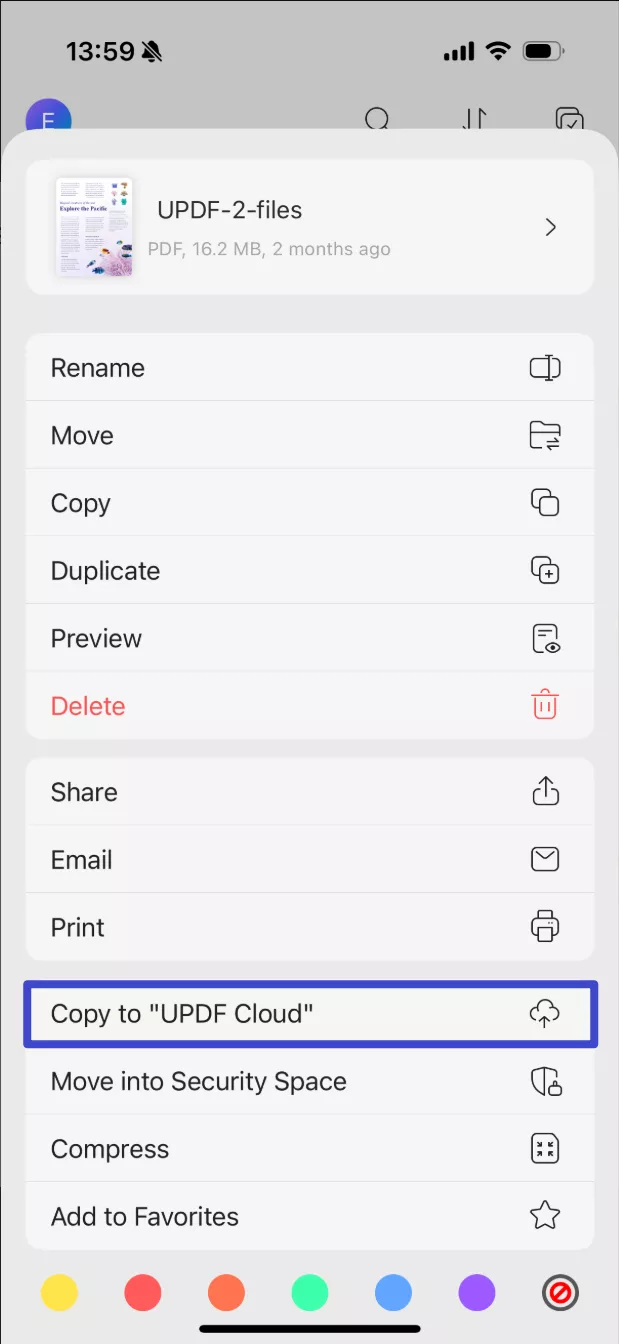
- Find the PDF file you created in UPDF on your iPhone 17. Then, click the "Three Dots" to select "Copy to UPDF Cloud", then, your PDF file is uploaded to UPDF Cloud and you can access it on any device.
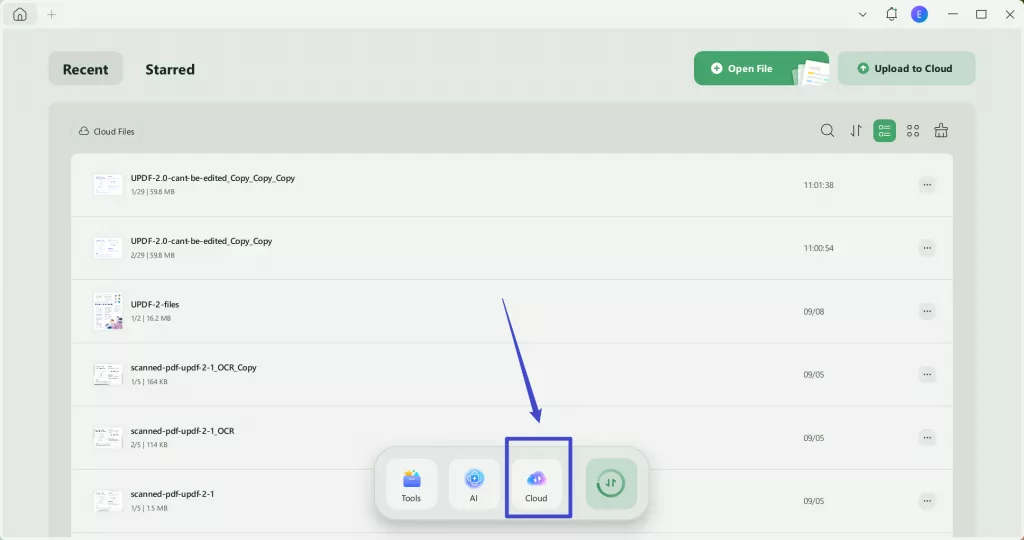
2. Open UPDF on your computer. Then, log in with the same account. Click on "Cloud", then, you can Open or Download it directly on UPDF.
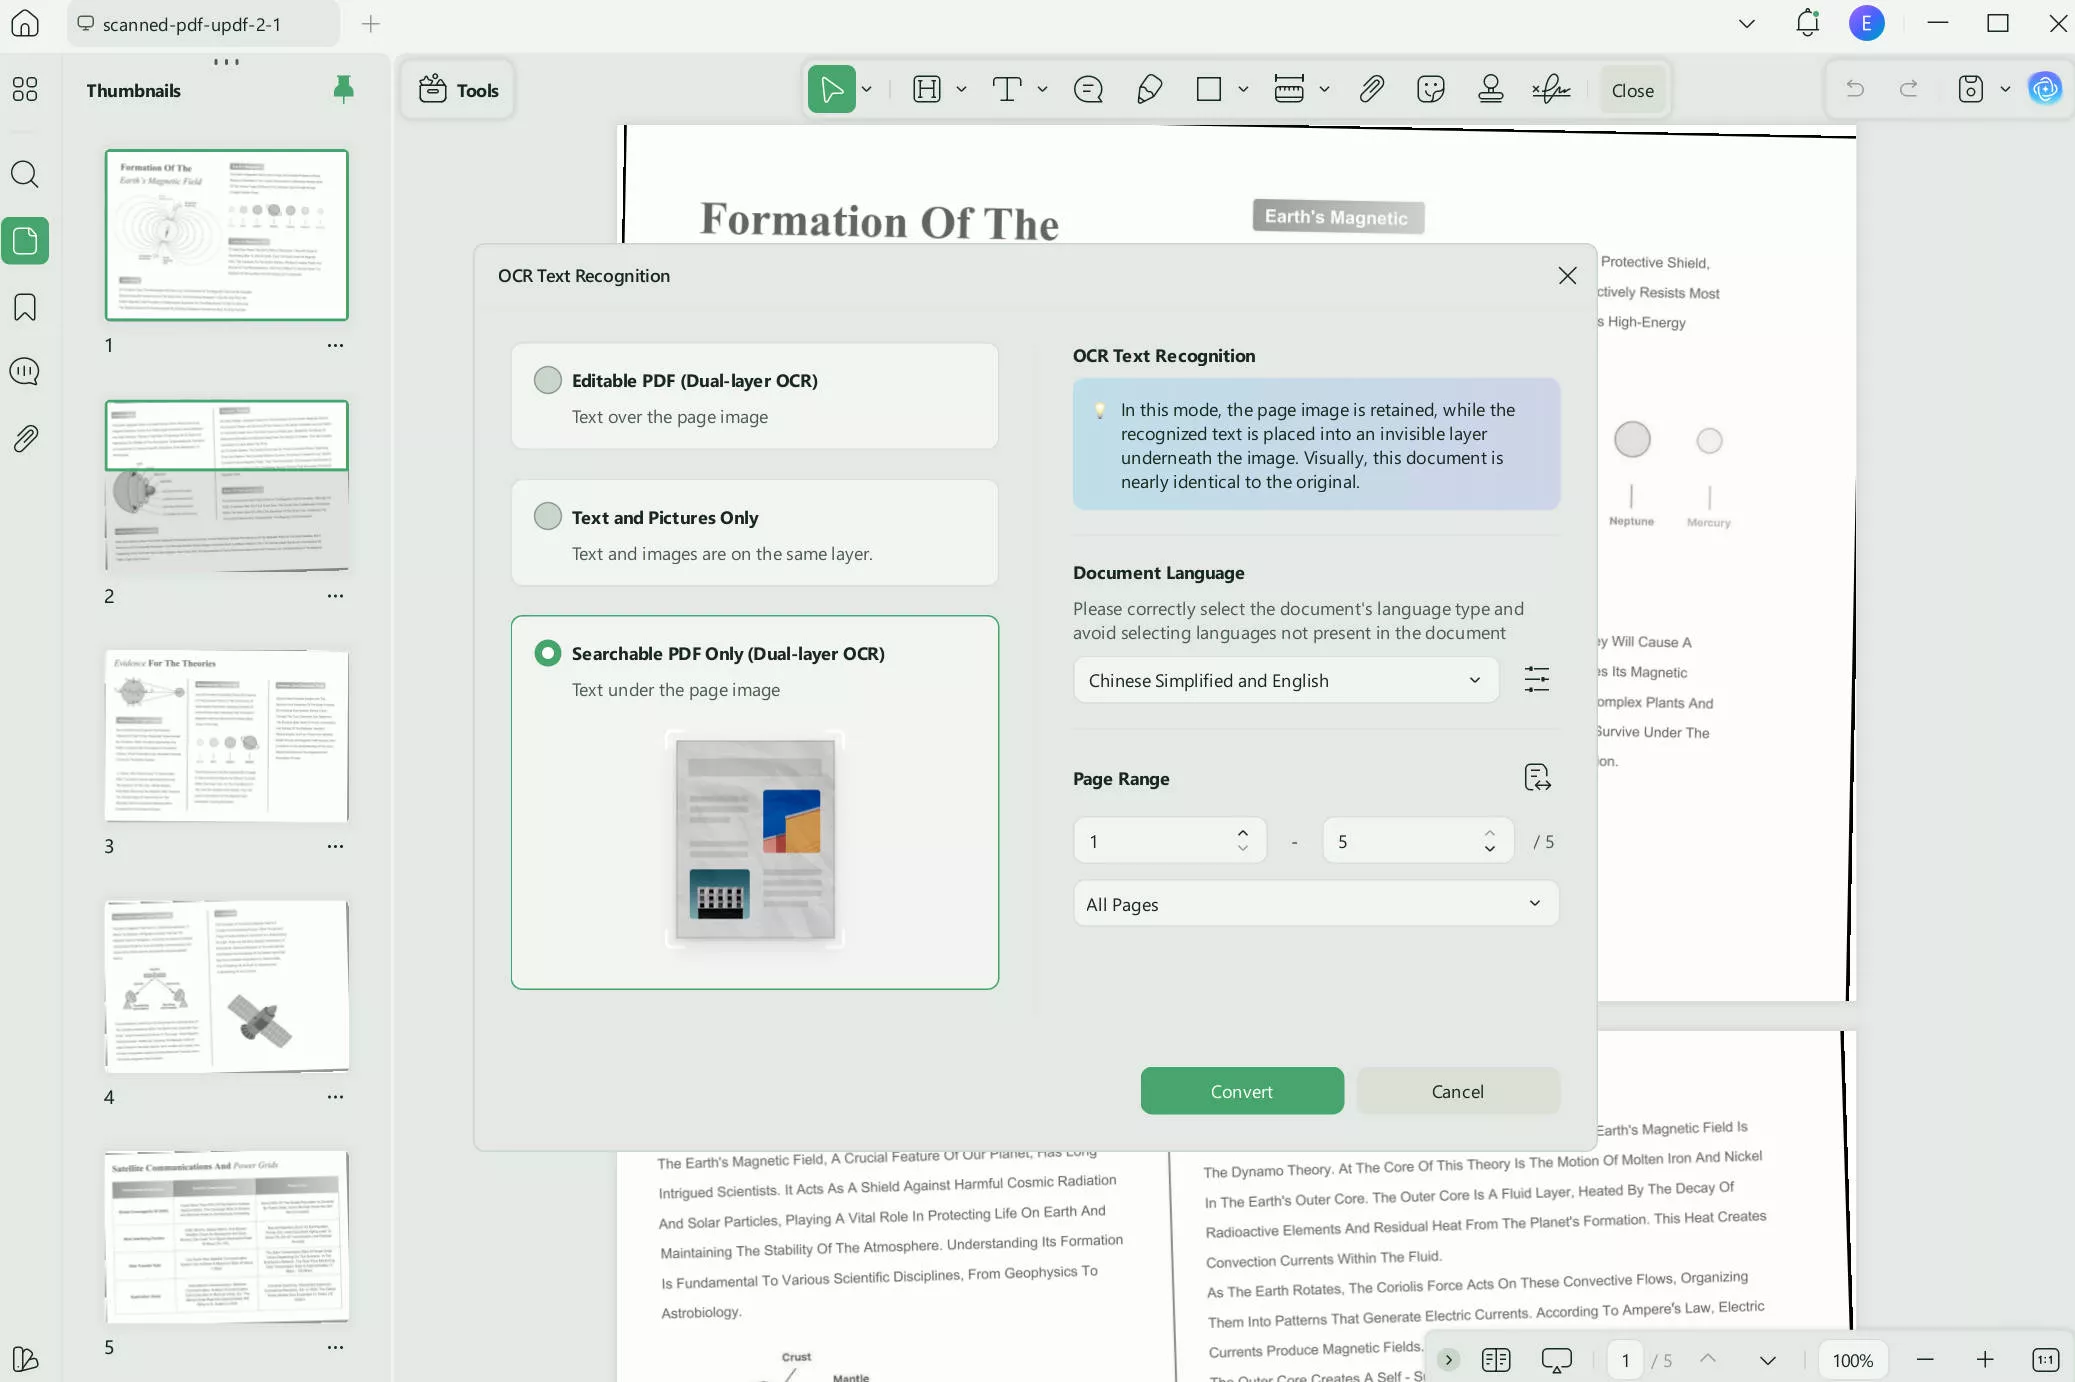
3. Click on the "OCR" icon from "Tools", then, select "Seachable PDF", choose the correct language and do other settings. Then, click on "Convert" to make it editable.
4. Once the process is finished, you can click "Edit PDF" to edit it texts, images, and links.
Windows • macOS • iOS • Android 100% secure
Final Words
Hopefully, now you know how to export text messages from iPhone 17 to pdf quickly. You can use third-party apps like TouchCopy to convert texts into PDF files. Or, you can export your iMessages in PDF directly from your Mac. Alternatively, the UPDF app is also amazing for exporting texts into PDF files. Not just that, it is a great tool with plenty of features to add, remove, or edit your text. You can download the UPDF app on your iPhone 17 for free from the below button. It’s super-easy to set up and use and saves your time with multiple image selection!
Windows • macOS • iOS • Android 100% secure
 UPDF
UPDF
 UPDF for Windows
 UPDF for Mac
 UPDF for iPhone/iPad
 UPDF for Android
 UPDF AI Online
 UPDF Sign
 Edit PDF
 Annotate PDF
 Create PDF
 PDF Form
 Edit links
 Convert PDF
 OCR
OCR PDF to Word
 PDF to Image
 PDF to Excel
 Organize PDF
 Merge PDF
 Split PDF
 Crop PDF
 Rotate PDF
 Protect PDF
 Sign PDF
 Redact PDF
 Sanitize PDF
 Remove Security
 Read PDF
 UPDF Cloud
 Compress PDF
 Print PDF
 Batch Process
 About UPDF AI
 UPDF AI Solutions
 AI User Guide
 FAQ about UPDF AI
 Summarize PDF
 Translate PDF
 Chat with PDF
 Chat with AI
 Chat with image
 PDF to Mind Map
 Explain PDF
 Scholar Research
 Paper Search
 AI Proofreader
 AI Writer
 AI Homework Helper
 AI Quiz Generator
 AI Math Solver
 PDF to Word
 PDF to Excel
 PDF to PowerPoint
 User Guide
 UPDF Tricks
 FAQs
FAQs UPDF Reviews
 Download Center
 Blog
Blog Newsroom
 Tech Spec
 Updates
 UPDF vs. Adobe Acrobat
 UPDF vs. Foxit
 UPDF vs. PDF Expert




 Enya Moore


 Enola Miller