UPDF for Windows
 UPDF for Mac
 UPDF for iPhone/iPad
 UPDF for Android
 UPDF AI Online
 UPDF Sign
 Edit PDF
 Annotate PDF
 Create PDF
 PDF Form
 Edit links
 Convert PDF
 OCR
OCR PDF to Word
 PDF to Image
 PDF to Excel
 Organize PDF
 Merge PDF
 Split PDF
 Crop PDF
 Rotate PDF
 Protect PDF
 Sign PDF
 Redact PDF
 Sanitize PDF
 Remove Security
 Read PDF
 UPDF Cloud
 Compress PDF
 Print PDF
 Batch Process
 About UPDF AI
 UPDF AI Solutions
 AI User Guide
 FAQ about UPDF AI
 Summarize PDF
 Translate PDF
 Chat with PDF
 Chat with AI
 Chat with image
 PDF to Mind Map
 Explain PDF
 PDF AI Tools
 Image AI Tools
 AI Chat Tools
 AI Writing Tools
 AI Study Tools
 AI Working Tools
 Other AI Tools
 PDF to Word
 PDF to Excel
 PDF to PowerPoint
 User Guide
 UPDF Tricks
 FAQs
FAQs UPDF Reviews
 Download Center
 Blog
Blog Newsroom
 Tech Spec
 Updates
 UPDF vs. Adobe Acrobat
 UPDF vs. Foxit
 UPDF vs. PDF Expert
Excel sheets are meant to organize data, but they sometimes contain cluttered data strings. I often have to split names, addresses, and codes into separate columns to make the information easier to analyze and work with. Therefore, I have today decided to share these tips with you and present the five proven methods for how to separate text in Excel. Stick around until the end, where I will also show you how UPDF can make working with PDF-to-Excel tasks much smoother.
Windows • macOS • iOS • Android 100% secure
Part 1. Why Split Text in Excel?
There are many situations that urge the need to split text in Excel. The common ones include:
- Want to separate full names into the first name and last name.
- Break down complete addresses into street, city, state, and ZIP code.
- Extract product codes or SKUs into distinct parts.
- Split dates or timestamps into day, month, and year.
- Separate text from numbers in a cell.
- Separate product categories from item descriptions.
No matter what reason has caused you to look for how to divide text in Excel, head to the next part to learn the best methods with detailed steps you need to follow.
Part 2. How to Separate Text in Excel?
When I was looking for Excel how to split text in a cell, I was amazed to find multiple ways to get the job done. So, I have decided to share them all with you so that you can pick the one that best suits your requirements.
Here are the step-by-step instructions on how to separate text in Excel using five methods:
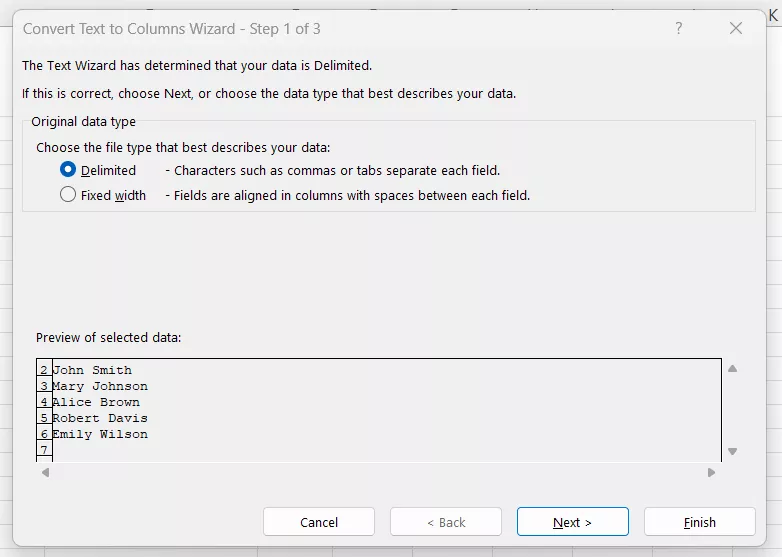
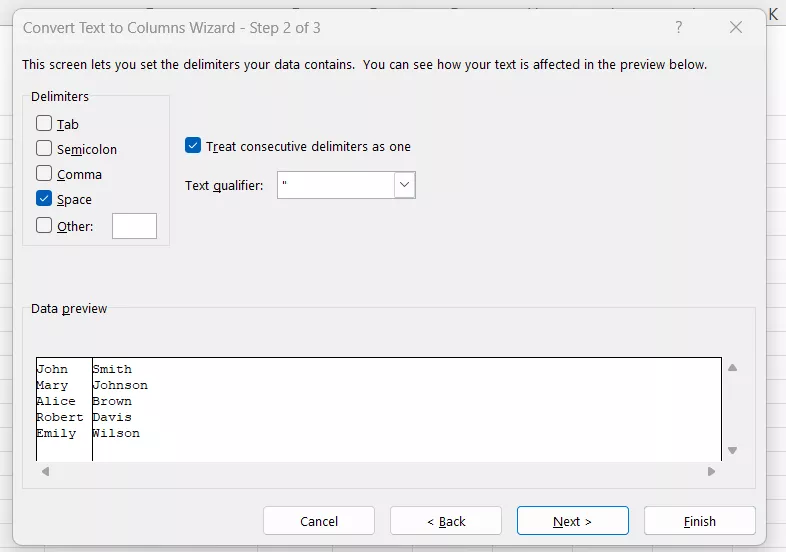
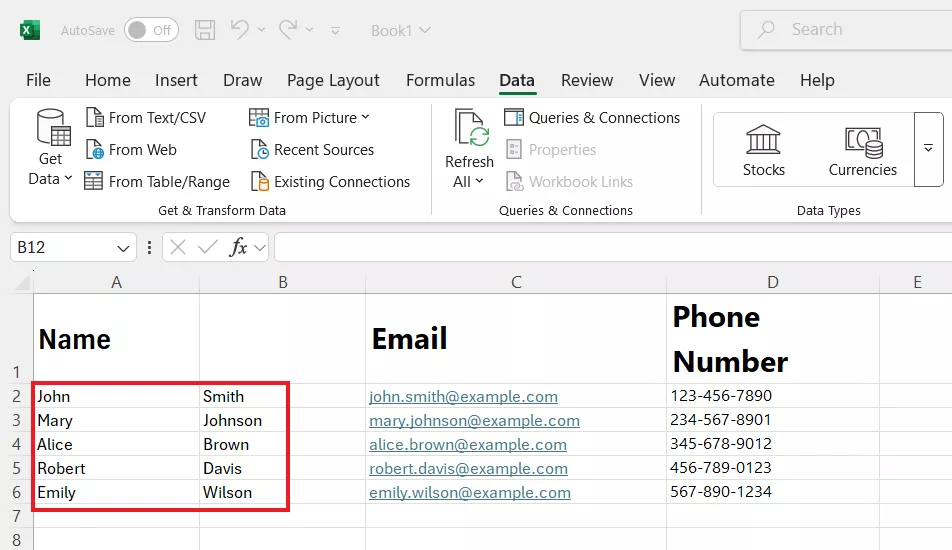
Method 1: Use "Text to Columns" in Excel
When your data is separated by spaces/commas or other delimiters, the Text to Columns tool is a handy way to split text. This method quickly divides long strings into multiple columns with simple clicks. Follow the steps below to learn how to divide text in Excel using this method:
Step 1. Select the column that contains the text you want to split.
Step 2. Go to the Data tab and choose Text to Columns.
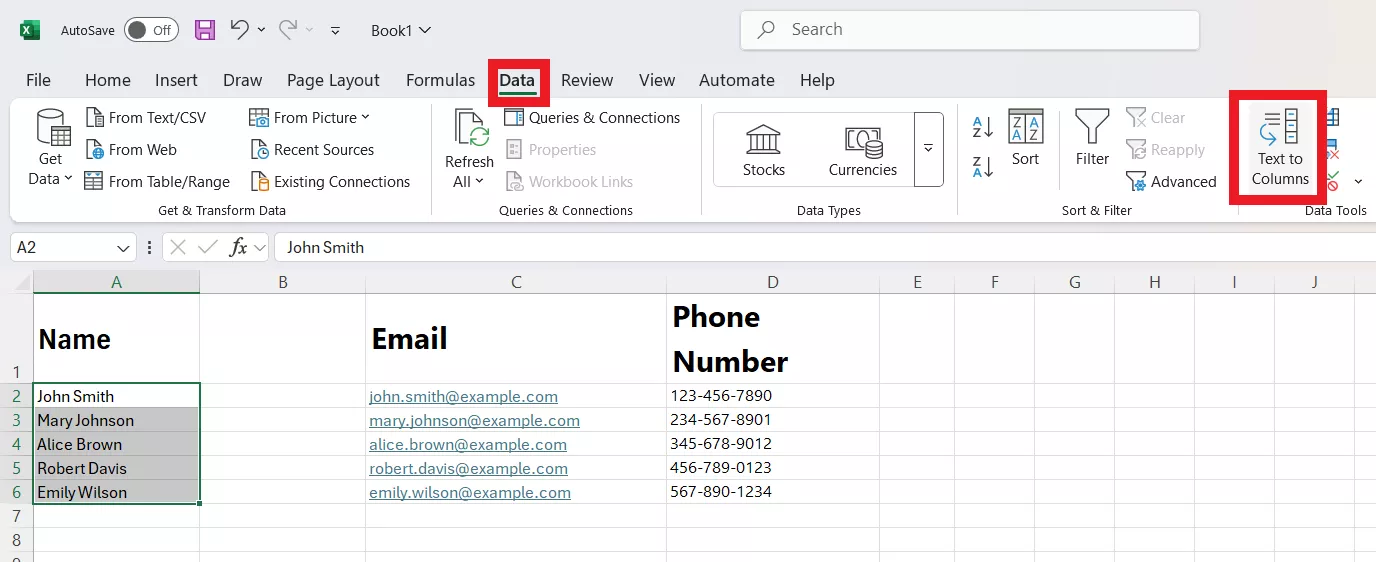
Step 3. Pick Delimited if commas, spaces, or tabs separate the text. Otherwise, select Fixed width.
Step 4. Click Next and choose your delimiter, such as a space or comma. Afterward, again click Next.
Step 5. Select the column data format and click Finish to split your text into separate cells.

Now you have successfully split your text into separate cells.
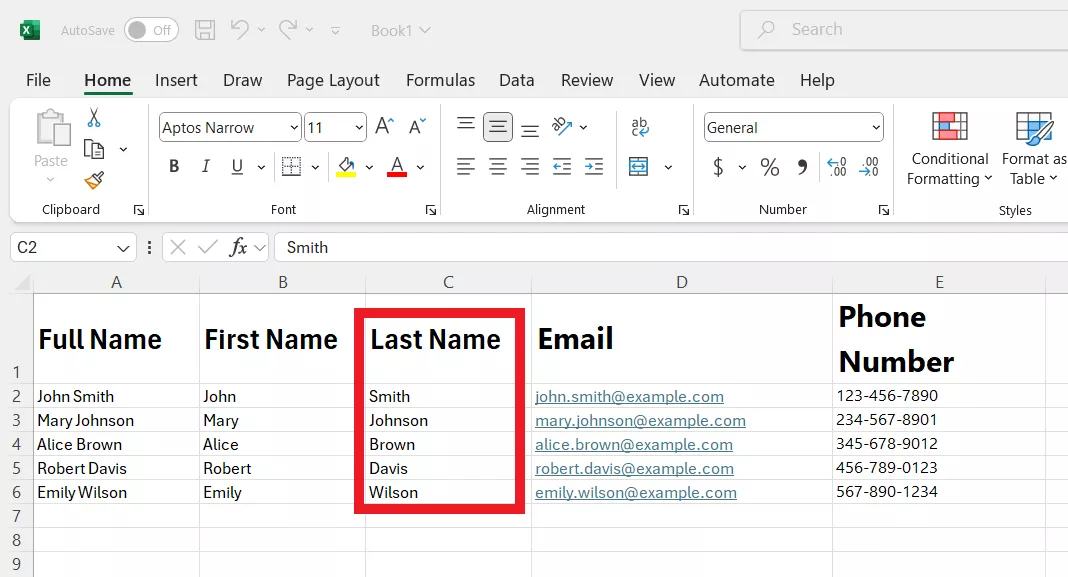
Method 2: Use "Ctrl + E" in Excel
If you are working with consistent text patterns, such as separating the first and last name from full names, you can use the "Ctrl + E" shortcut. This will automatically recognize the pattern based on your first entry and fill the remaining cells. Here's how to separate text in Excel using the Ctrl + E shortcut:
Step 1. Input the first item in the first row that needs to be split. For example, suppose column A has full names. In the first row of column B, type only the first name from the first cell.

Step 2. Press Ctrl + E. Excel automatically detects the pattern and fills the rest.
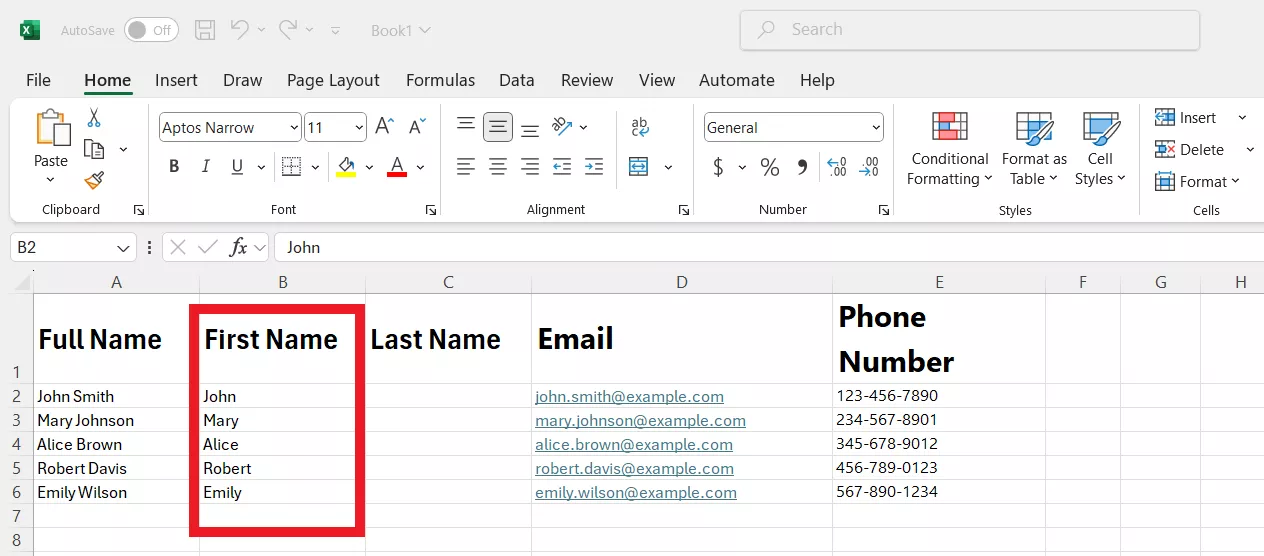
Step 3. Now, enter the second item of the first row that you want to extract. For example, you can input the last name in the first row of column C and then tap Ctrl + E.
Method 3: Use "TEXTSPLIT" Formula in Excel
You must be surprised to find that there is a built-in formula in Excel (TEXTSPLIT) that allows you to split text directly within a cell using a specific delimiter. For example, if you type "=TEXTSPLIT(A2, ",")", it will split the contents of cell A2 wherever a comma appears.
This formula only works for Excel 365 subscribers. The syntax of this formula is:
=TEXTSPLIT(text, col_delimiter, [row_delimiter], [ignore_empty], [match_mode], [pad_with])
- text → The cell or text string you want to split.
- col_delimiter → Character(s) used to separate text into columns (comma, space).
- row_delimiter → Character(s) used to separate text into rows (optional).
- ignore_empty → TRUE/FALSE option to skip empty results caused by extra delimiters.
- match_mode → Defines case sensitivity (0 = case-sensitive, 1 = case-insensitive).
- pad_with → Value used to fill in blank cells when rows/columns don't align evenly.
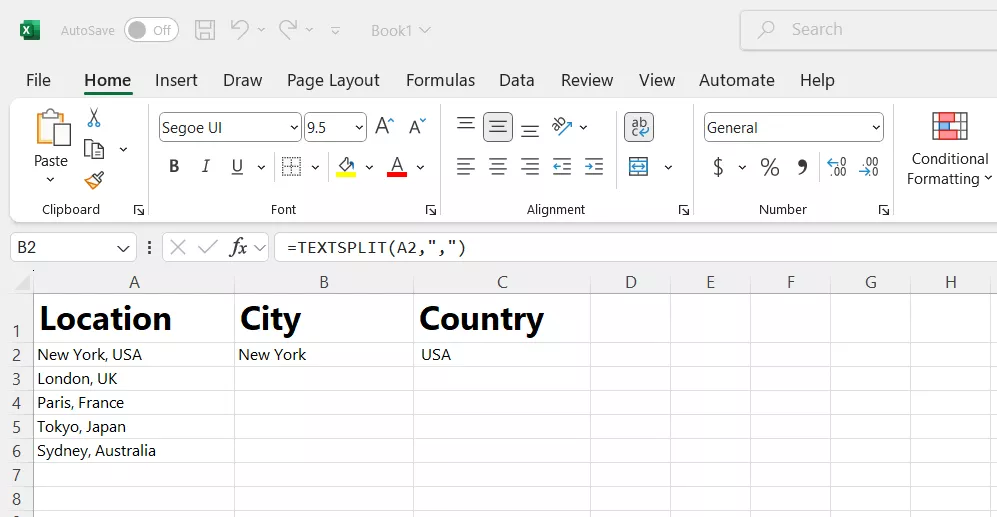
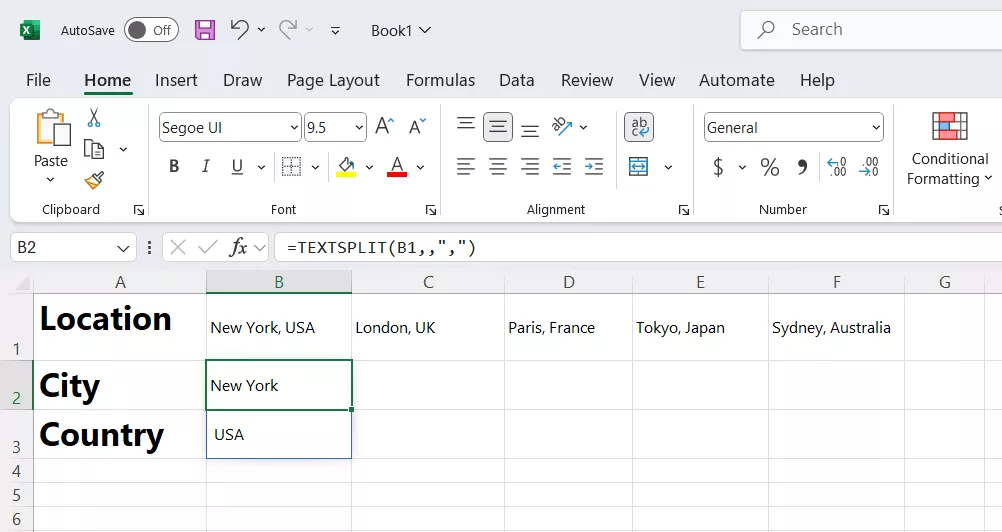
Let's now look at how to divide text in Excel using the TEXTSPLIT formula. For that, I am considering an Excel sheet that contains a list of locations in one column, such as New York, USA. I will show you how to separate the city and country into different columns or rows:
Step 1. Enter the formula "=TEXTSPLIT".

Step 2. Enter the cell from where you want to look into the text: "=TEXTSPLIT(A2,".
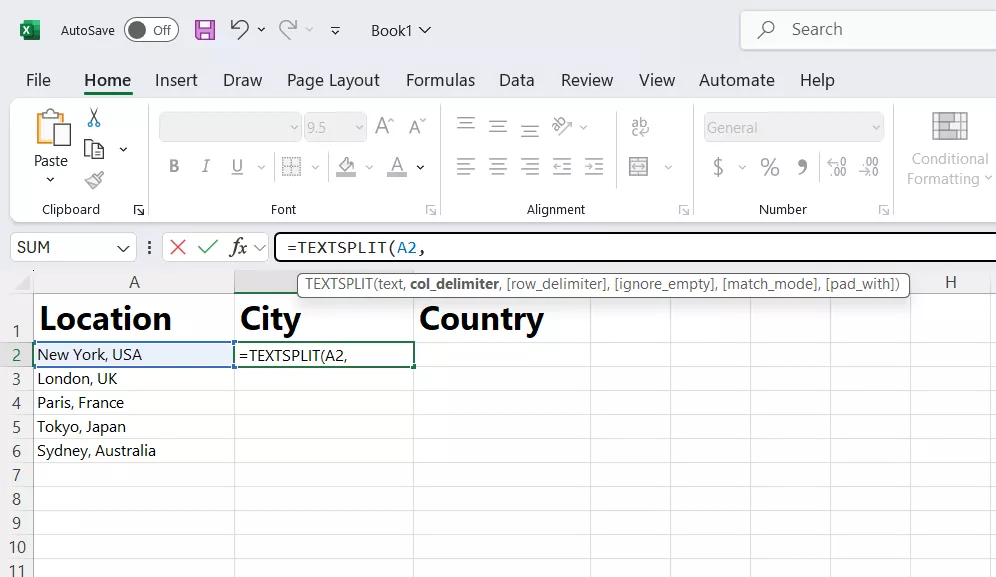
Step 3a. To split the text into columns, enter this: "=TEXTSPLIT(A2,",")". You will notice that the formula will look for the comma delimiter in the text and separate the content into adjacent columns wherever a comma appears.
Step 3b. To split the text into rows, there should be two commas. Enter this: "=TEXTSPLIT(B1,,",")".
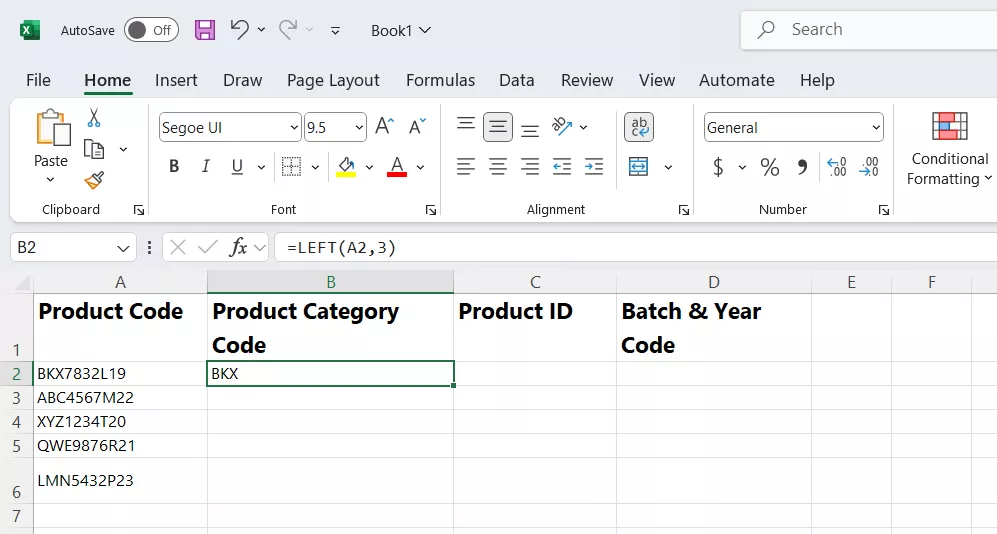
Method 4: Use LEFT, MID, and RIGHT formulas
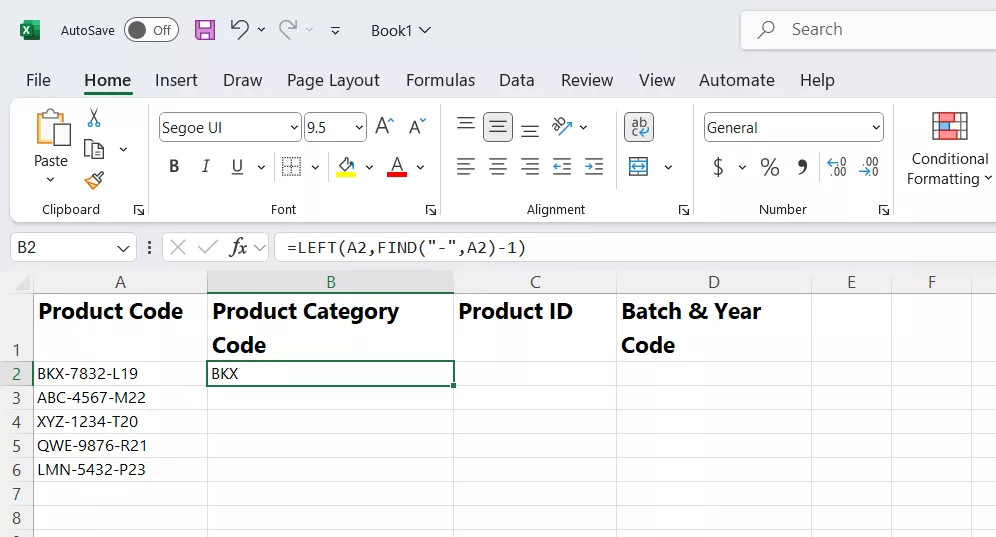
Sometimes, we have to extract different parts of text from a long word. For example, you may have product information in the following format – BKX7832L19. Here:
- BKX – Product category code
- 7832 – Unique product ID
- L19 – Manufacturing batch and year code
We can use the LEFT, MID, and RIGHT formulas to extract specific text from a single word. Check out the intuitive steps below on how to separate text in Excel using this formula:
Step 1. Use the LEFT formula to extract the product category code. Specify the cell from where to extract the code and the number of characters to pull. In our case, the formula is:
=LEFT(A2,3)
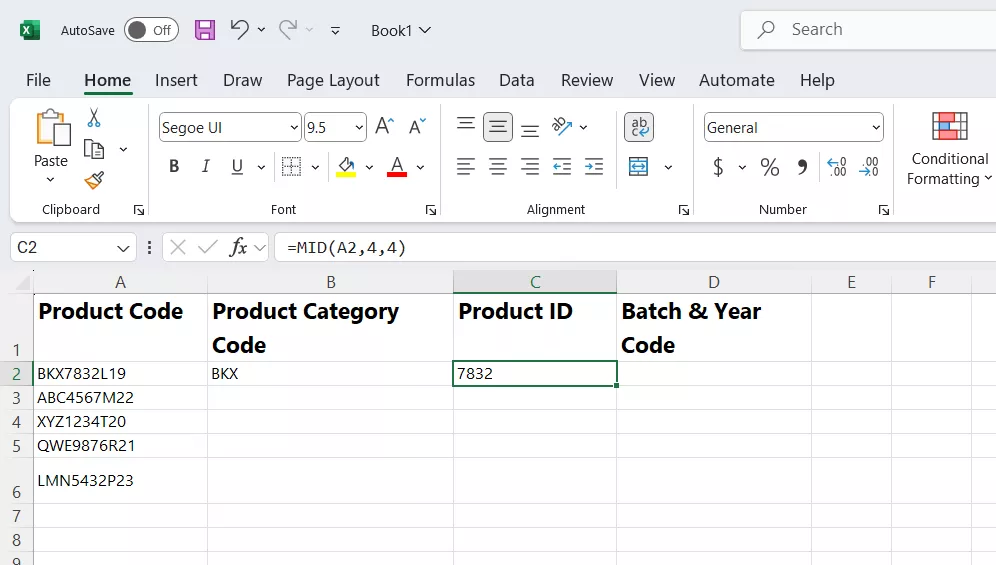
Step 2. Now, extract the product ID using MID. The MID formula requires you to specify the cell and the start and end points to pull characters. In our case, the formula is:
=MID(A2,4,4)
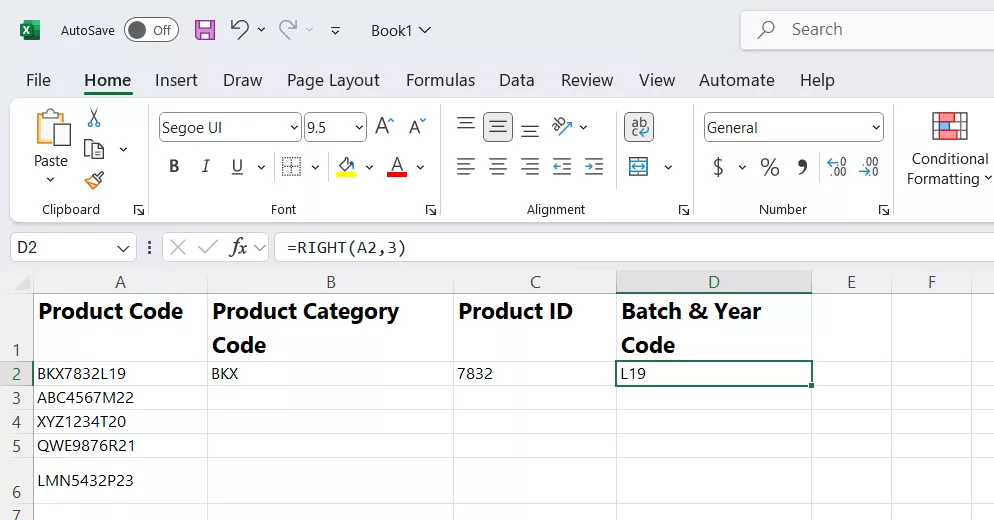
Step 3. Next, we can extract Manufacturing Batch and Year using the RIGHT formula. Its syntax is similar to the LEFT function. In our case, the formula is:
=RIGHT(A2,3)
Method 5: Use FIND and SEARCH Formula
If the text isn't in a consistent format or fixed length, Excel lets us use the FIND or SEARCH formulas to locate specific characters or delimiters before extracting text with LEFT, MID, or RIGHT.
The difference between the FIND and SEARCH formulas is case-sensitivity. The former is case-sensitive, while the latter is case-insensitive.
Let's now look at how to use FIND and SEARCH formulas to extract specific text from Excel. We will slightly modify our above text figure to include delimiters so we can demonstrate how these formulas work, "BKX-7832-L19".
Step 1. Use the formula below to find the position of the first hyphen (-) and extract the first part:
=LEFT(A2,FIND("-",A2)-1)
Step 2. Next, we have to use four FIND formulas along with the MID function to extract the middle part:
=MID(A2,FIND("-",A2)+1,FIND("-",A2,FIND("-",A2)+1)-FIND("-",A2)-1)

Step 3. Lastly, we can pull the last digits using two FIND formulas and the RIGHT function.
=RIGHT(A2,LEN(A2)-FIND("-",A2,FIND("-",A2)+1))
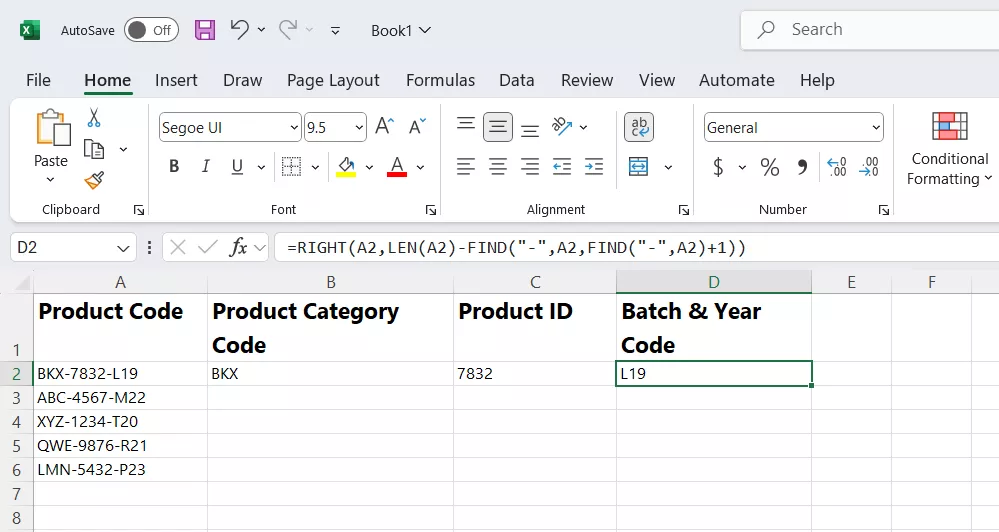
Here, LEN is used to calculate the total number of characters in the text string.
Part 3. Bonus Tip: Convert PDF to Excel with UPDF
Many times, our PDFs contain tables or unstructured text that we want to reorganize or analyze in Excel. Instead of following a manual copy-paste approach, we can now convert PDF to Excel with simple clicks using UPDF.
UPDF is a powerful PDF converter and editor that can turn your PDFs into editable Excel spreadsheets for easy analysis and further manipulation.
Windows • macOS • iOS • Android 100% secure

The key features include:
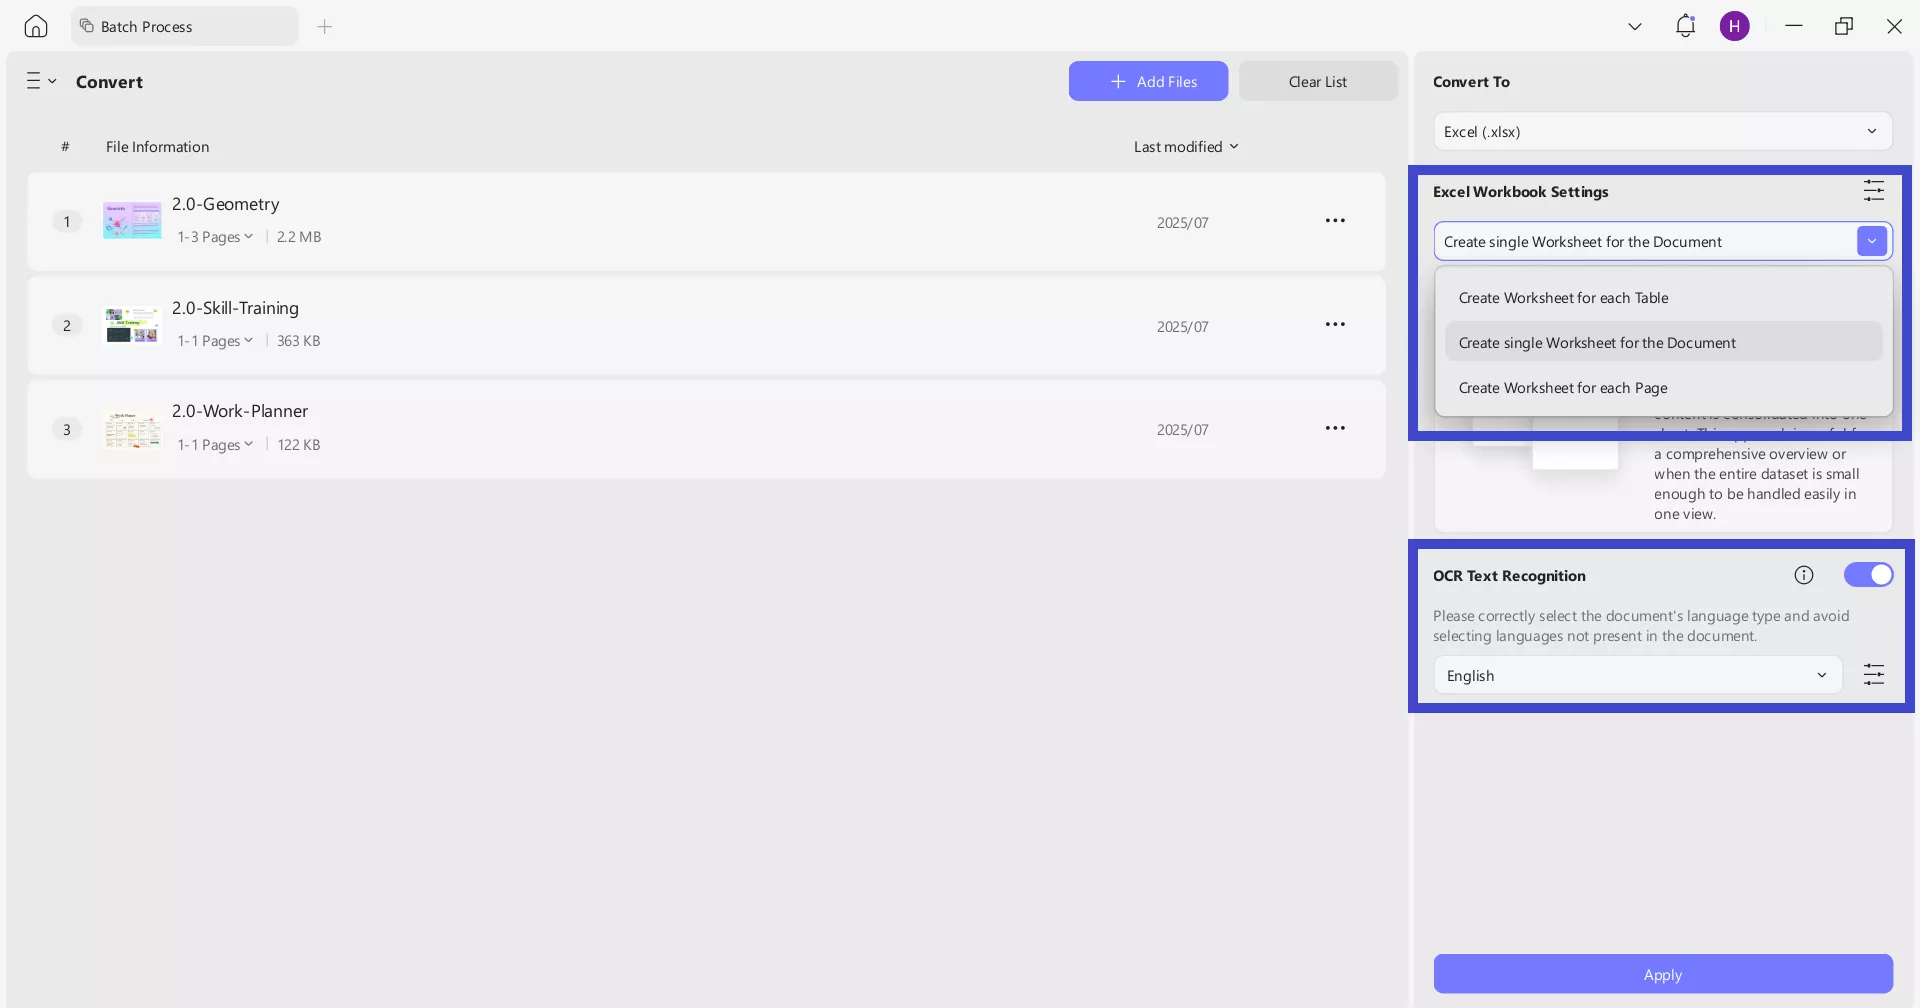
Batch Convert PDFs to Excel
UPDF can batch convert PDFs to Excel spreadsheets in one go. This expedites the process of splitting and analyzing data from numerous documents. The best thing is that users get three settings to choose from:
- Create worksheet for each table
- Create single worksheet for the document
- Create worksheet for each page
UPDF also includes the option to perform OCR text recognition. This means that even if PDFs are scanned or image-based, the OCR scan will make sure the converted Excel file contains editable and searchable text.
AI-Powered Data Analysis
UPDF AI enables users to analyze data directly within their PDFs. The "Chat with PDF" and "Chat with Image" features allow users to take screenshots of reports and ask the AI questions about the data. In addition, the UPDF AI chat function now supports displaying LaTeX formulas for precise mathematical and scientific discussions.
Windows • macOS • iOS • Android 100% secure

Extract Specific Text or Tables from PDFs
Instead of converting the entire PDF to Excel, UPDF allows for extracting specific text or tables from PDFs. This helps in focused data handling, analysis, and reporting.
Organize and Annotate Reports Before Exporting Data
UPDF lets users organize their PDFs by rearranging, splitting, replacing, adding, or removing pages. In addition, its powerful PDF annotate feature lets users add annotations, such as highlights, underlines, drawings, and comments. These features enhance clarity and communication when reviewing reports.

Overall, UPDF is your go-to companion to convert PDF to useful Excel spreadsheets and also extract/organize/analyze data with other built-in advanced features. Download UPDF now and experience its PDF conversion features yourself.
Windows • macOS • iOS • Android 100% secure
Conclusion
There isn't a rocket-science on how to separate text in Excel. All it requires is using one of the official Excel formulas mentioned above to transform cluttered text into usable information. In addition, using UPDF for PDF-to-Excel conversion makes it easy to handle data stored in PDFs without struggling with manual copy-paste practices. Now it's time for action. Use built-in Excel formulas to separate text and download UPDF for turning PDF data into useful insights.
Windows • macOS • iOS • Android 100% secure


 Enid Brown
 Enola Miller