Everyone is aware of Microsoft Excel these days, a spreadsheet program used by professionals worldwide to collect and analyze data. Dates are critical to any data analysis because we need to gauge data trends properly. However, there's a problem here: capturing dates in Excel in the wrong format results in it being treated as text by the program.
As a result, you can no longer use it in further calculations. The good news is that we can convert that text to date in Excel with the proper techniques, and that's what this write-up is all about. So, if you have been wondering how to change text to date in Excel, the answer lies below.
Part 1. What Are the Differences Between Regular Date and Text Date?
Microsoft Excel has two date formats: regular date and text date. Excel recognizes the regular date and lets you perform different calculations and date-related functions on it. On the other hand, text date is a format that Excel recognizes as a text string instead of a date and doesn't allow you to perform calculations or edits.
So, Excel behaves differently towards these two formats in the following ways:
1. Sorting
Excel sorts regular dates chronologically while text dates alphabetically. For example, regular dates will be sorted as follows:
01/01/2023
02/01/2023
03/01/2023
On the other hand, text dates are sorted as follows:
01/01/2023
01/02/2023
01/03/2023
Unless you Excel convert text to date dd/mm/yyyy, you'll keep facing these issues.
2. Calculations
Excel allows you to add/subtract the number of days between two days, making calculations easy. On the other hand, the text date format doesn't let you do such calculations.
3. Date Functions
Regular date formats work perfectly with different date functions, such as TODAY(), MONTH(), and YEAR(), for performing calculations. On the other hand, text-based dates cannot work with these functions.
Let's now discuss how to convert text to date in Excel efficiently.
Part 2. Convert Text to Date in Excel Via Paste Special?
Paste Special is a technique to convert text to date in Excel by adding a zero to it. Doing it forces Excel to convert the text into an Excel value without changing it because you're just adding a zero.
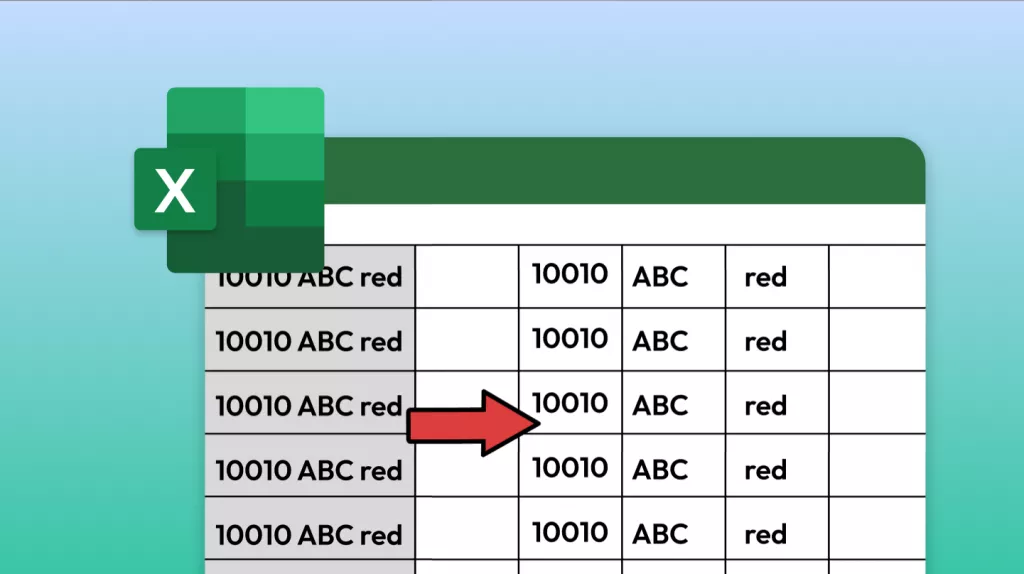
For instance, we have the following dataset from which we want to convert text to date in Excel.
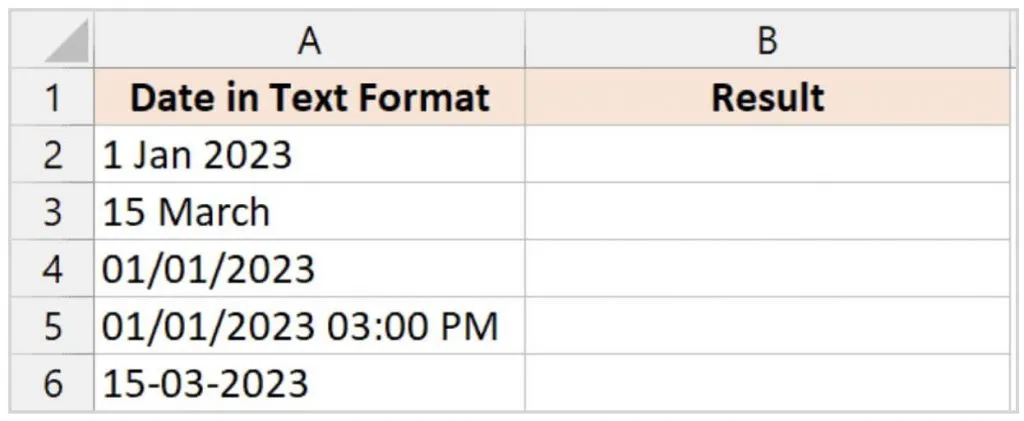
You need to follow these steps to convert text to date in Excel:
Step 1: You have a worksheet opened in front of you; all you need to do is to copy any blank cell.
Step 2: Copy the text dates on the left side to convert them to regular dates.
Step 3: Once you have selected the left section, right-click and click the Paste Special option on the list, which will open a Paste Special dialog box.
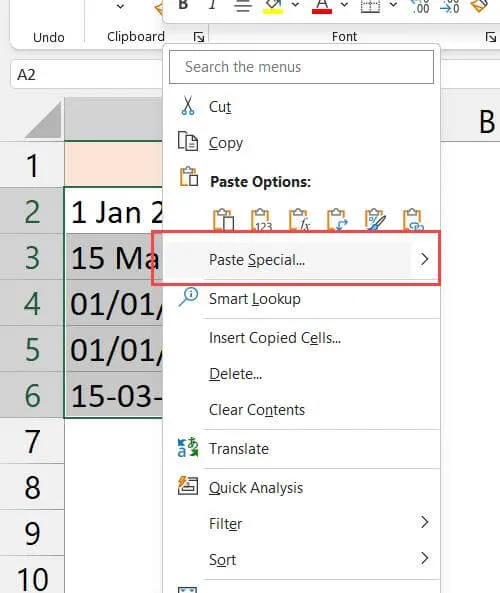
Step 4: Select the Values option in the 'Paste' category.
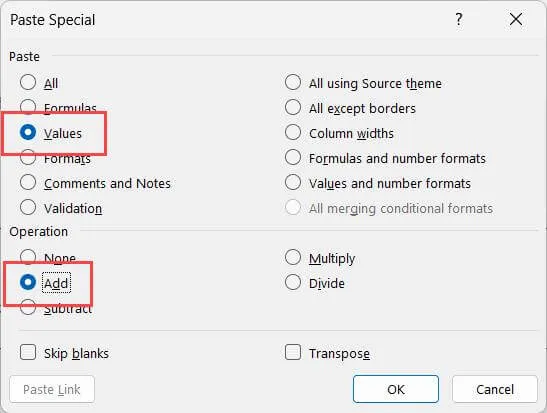
Step 5: Select 'Add' in the 'Operations' category.
Step 6: In the final step, click 'Ok,' all your text dates will be converted into numeric values.
Step 7: Once you have completed the above process, changing the format and showing these numbers as dates is easy via choosing short Data or Long Date
Part 3. Change Text to Date in Excel Via DATEVALUE?
Copying your data from a database or the web converts regular dates to text dates. But don't worry; you can change the text to date in Excel using the DATEVALUE function. It converts the text data into a numerical value which you can easily format as a date.
Let's work with the following dataset in which Column A changes text to date format in Excel.
Step 1: You need to use the formula =DATEVALUE(A2) and copy it to all the cells in Column B.
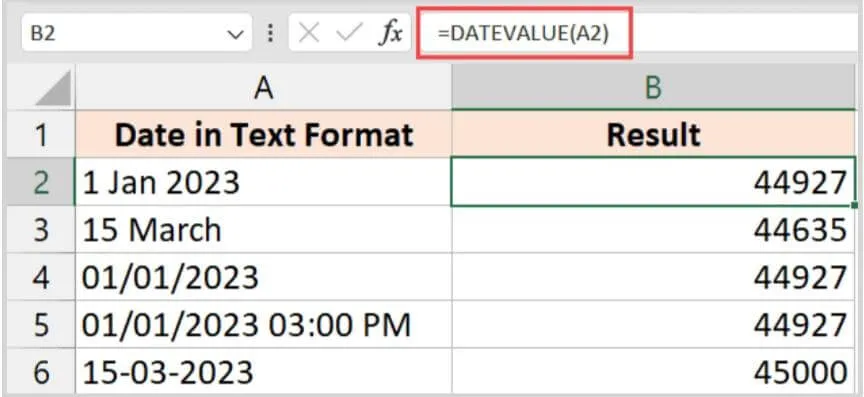
As you can see, using the formula gives you a numeric in front of each text date.
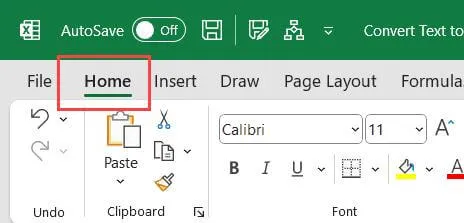
Step 2: To convert the numeric values into dates, select the cells that contain date value results and click the Home tab.
Step 3: Click the formatting drop-down and select Short or Long Date format.
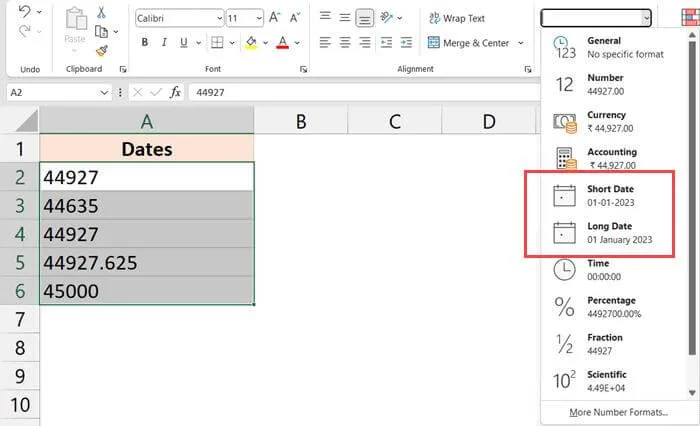
Step 4: Once you have completed the 3rd step, you will see the text dates formatted to regular dates.
Part 4. Converting Text to Date in Excel Via VALUE
Like other methods discussed above, using the VALUE functions also helps you convert text to date in Excel. What sets it apart from the DATEVALUE function is that it works with dates and non-dates.
Let's take the dataset we have used in the other examples and see how we can convert it to dates using the VALUE function.
The formula we use here is =VALUE(A2).
Follow these steps to convert text to date in Excel:
Step 1: Copy the formula above to all the cells in Column B, giving you numerical values. You can convert these numbers to dates in the later steps.
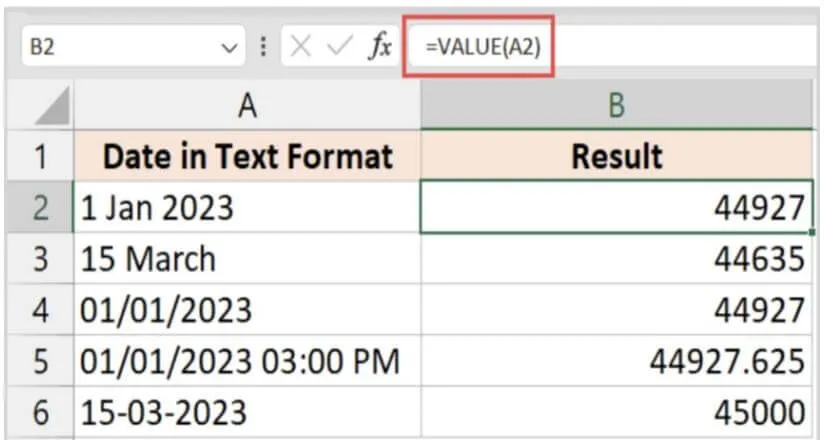
Step 2: Now select the numerical values and click the Home tab.
Step 3: On the right side, click the formatting drop-down menu and select either Short or Long Date format.
Part 5. Change Text to Date Format in Excel Via Text to Columns
Converting text to date in Excel is also possible via text to columns with any separator to the Date format. Here's the dataset that we need to convert to regular dates.
Follow these steps to convert text to date in Excel:
Step 1:Click the Data tab on the top of the screen. Then hit Data Tools Group. Finally, select Text to Column options.
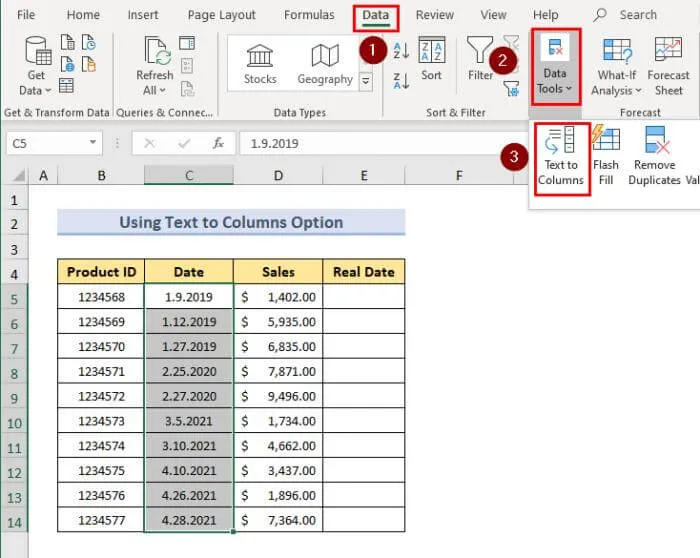
Step 2: A Convert Text to Columns Wizard will appear where you have to go through 3 stages. Click on Delimited and follow it up by clicking Next.
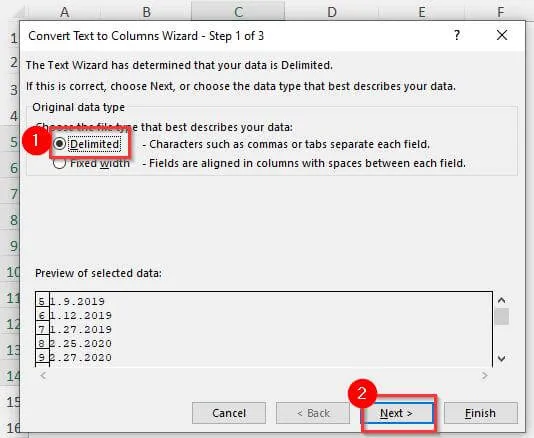
Step 3: Don't select any delimiter and press Next.
Step 4: Select any Date format you like. Then type the cell name you want as the Destination Box. Finally hit Finish.
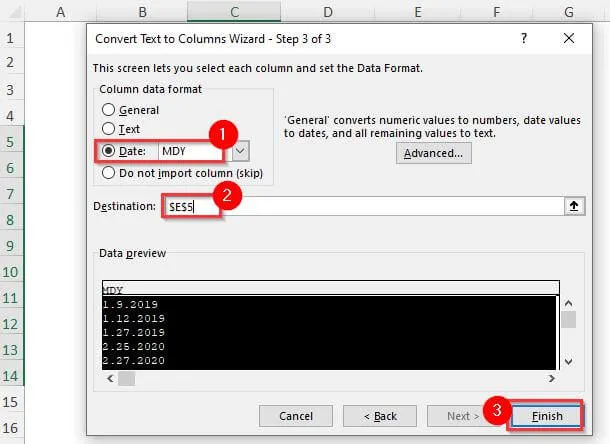
Result: You'll see all the converted dates in the Real Dates column.
Part 6. Bonus Tip: The Best PDF to Excel Converter
Sometimes you encounter PDF files with many tables you'd like to edit. Therefore, you must convert them to an Excel format to add or remove tables, apply different formulas, etc. However, you need a specialized program or app, and UPDF is among the best.
It is a simple tool that can help you convert your PDF files into Excel files or other formats to edit them easily. Although it has powerful and handy features, the interface is simple and can be operated by anyone.
Windows • macOS • iOS • Android 100% secure
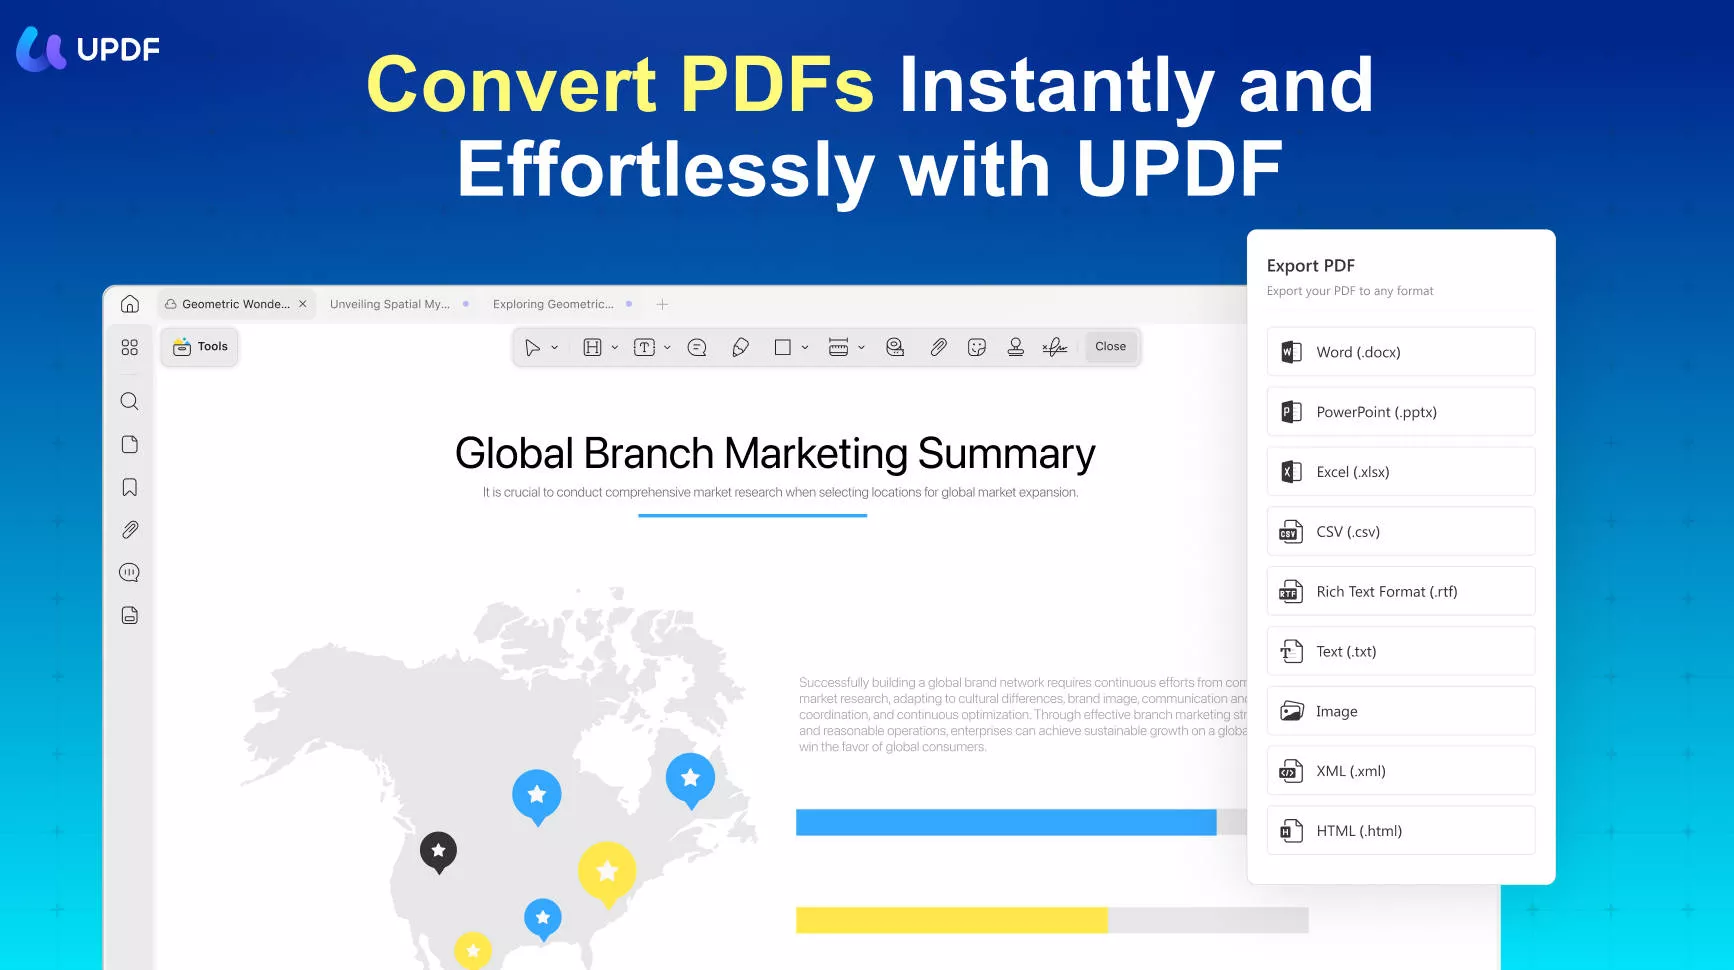
Here are some of the best features offered by UPDF:
- Available on Windows, MacOS, iOS, and Android.
- PDF conversion to 14 formats, including MS Office, Text, CSV, HTML, etc.
- OCR and other advanced options for detecting texts in image-based PDF files.
- Minimal user input is required thanks to a simple interface.
- Handles large PDFs easily and doesn't compromise content quality or integrity after conversion.
- Allows you to view, annotate, edit, or share a PDF file easily.
PDF to Excel Conversion Using UPDF
Follow these steps to convert PDF to Excel using UPDF:
Step 1: The first step is downloading and launching the UPDF app on your devices. Once you have launched it, drag and drop your PDF file into the interface or click the "Open File" button.
Windows • macOS • iOS • Android 100% secure
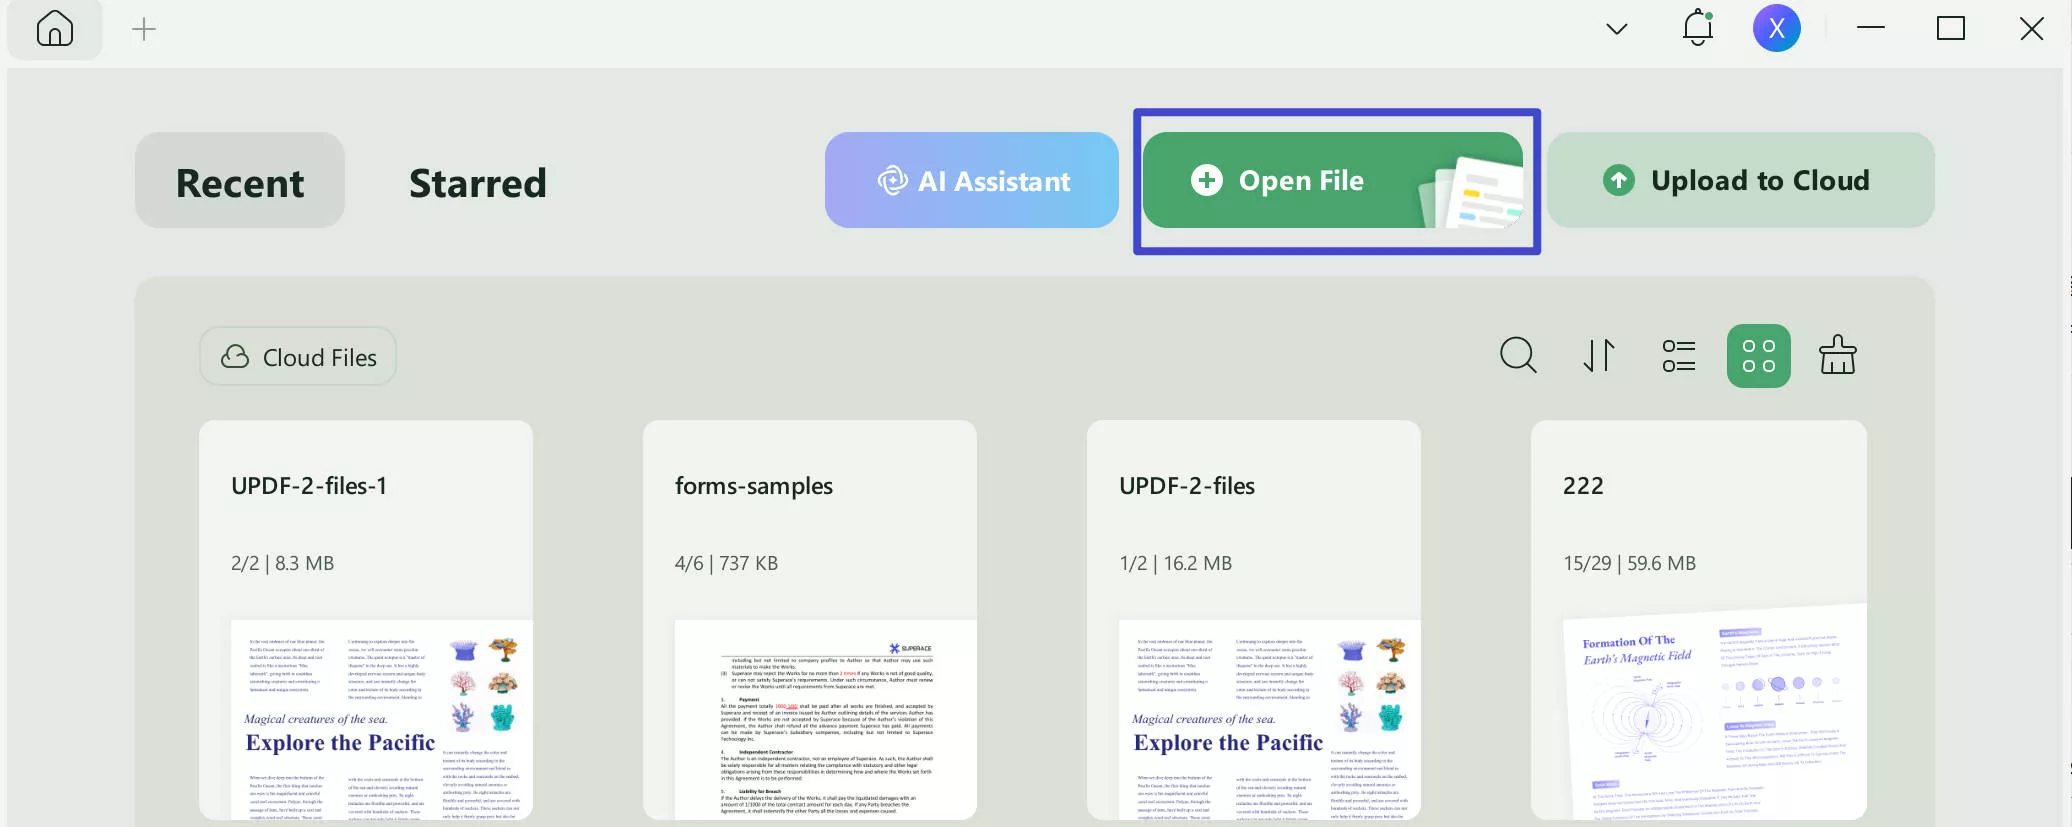
Step 2: After importing your PDF file into UPDF, it's time to select the output format, which is Excel in this case. Click the "Tools" tab and select the "Excel (.xlsx)" option.
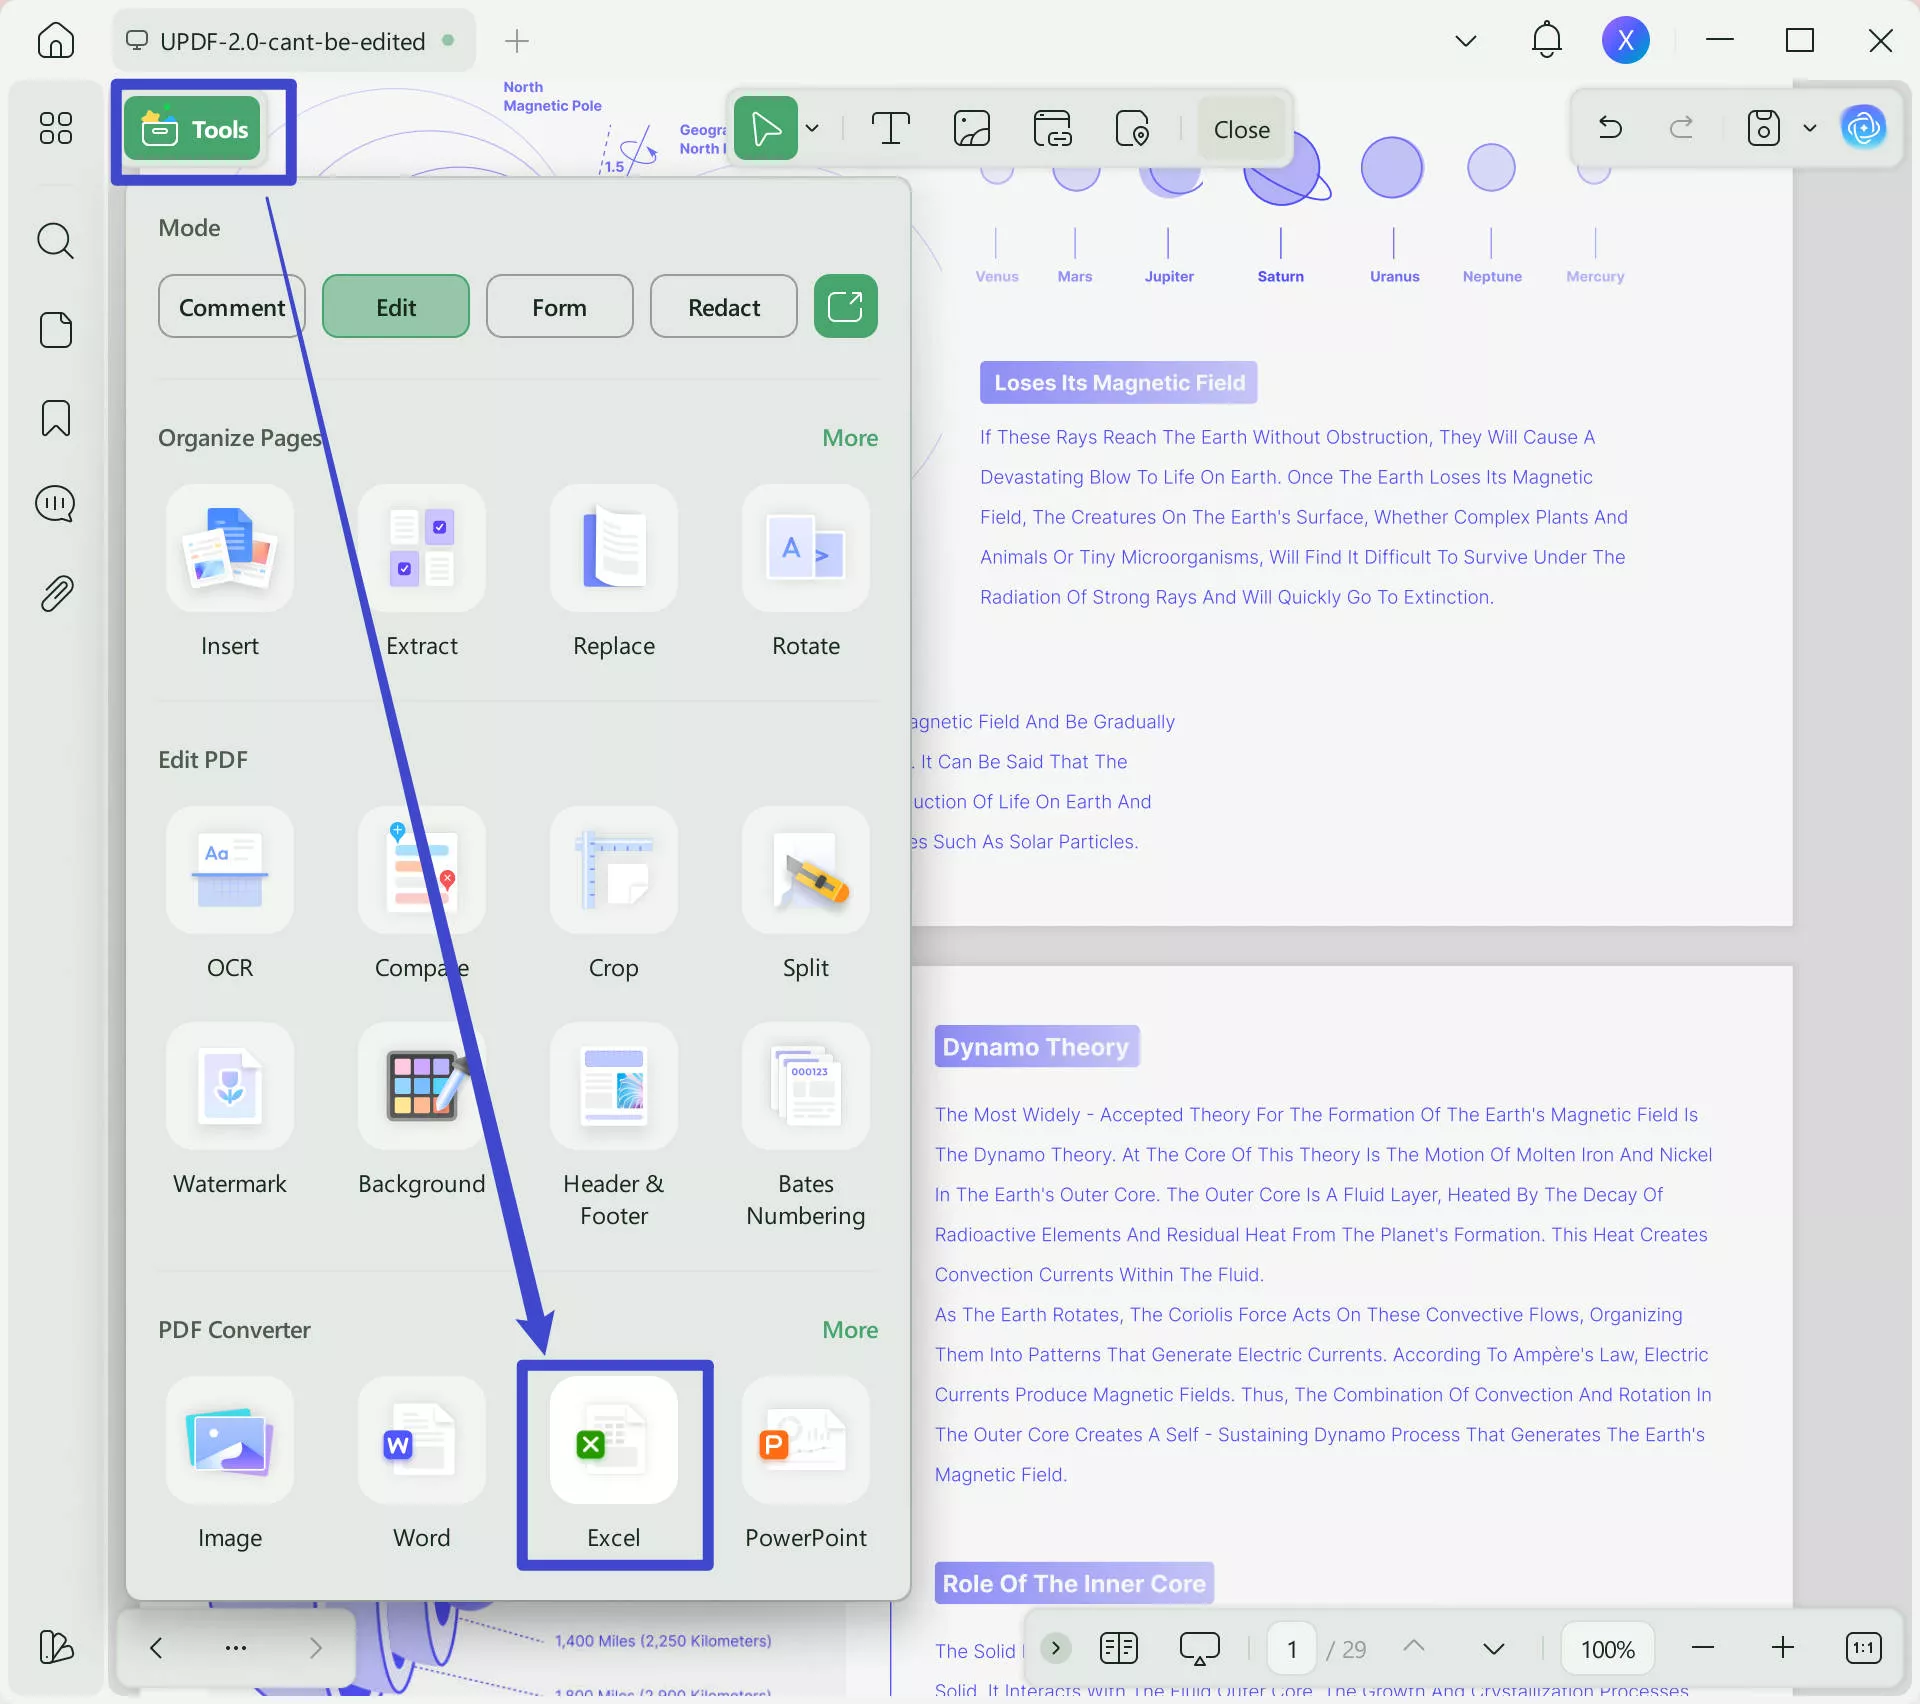
Step 3: Now, it's time to export your PDF file in an Excel format. You'll see a popup window after completing step 2, with an "Export" button at the bottom. Click on it, and the program will ask you to select a destination folder.
Additional Tips
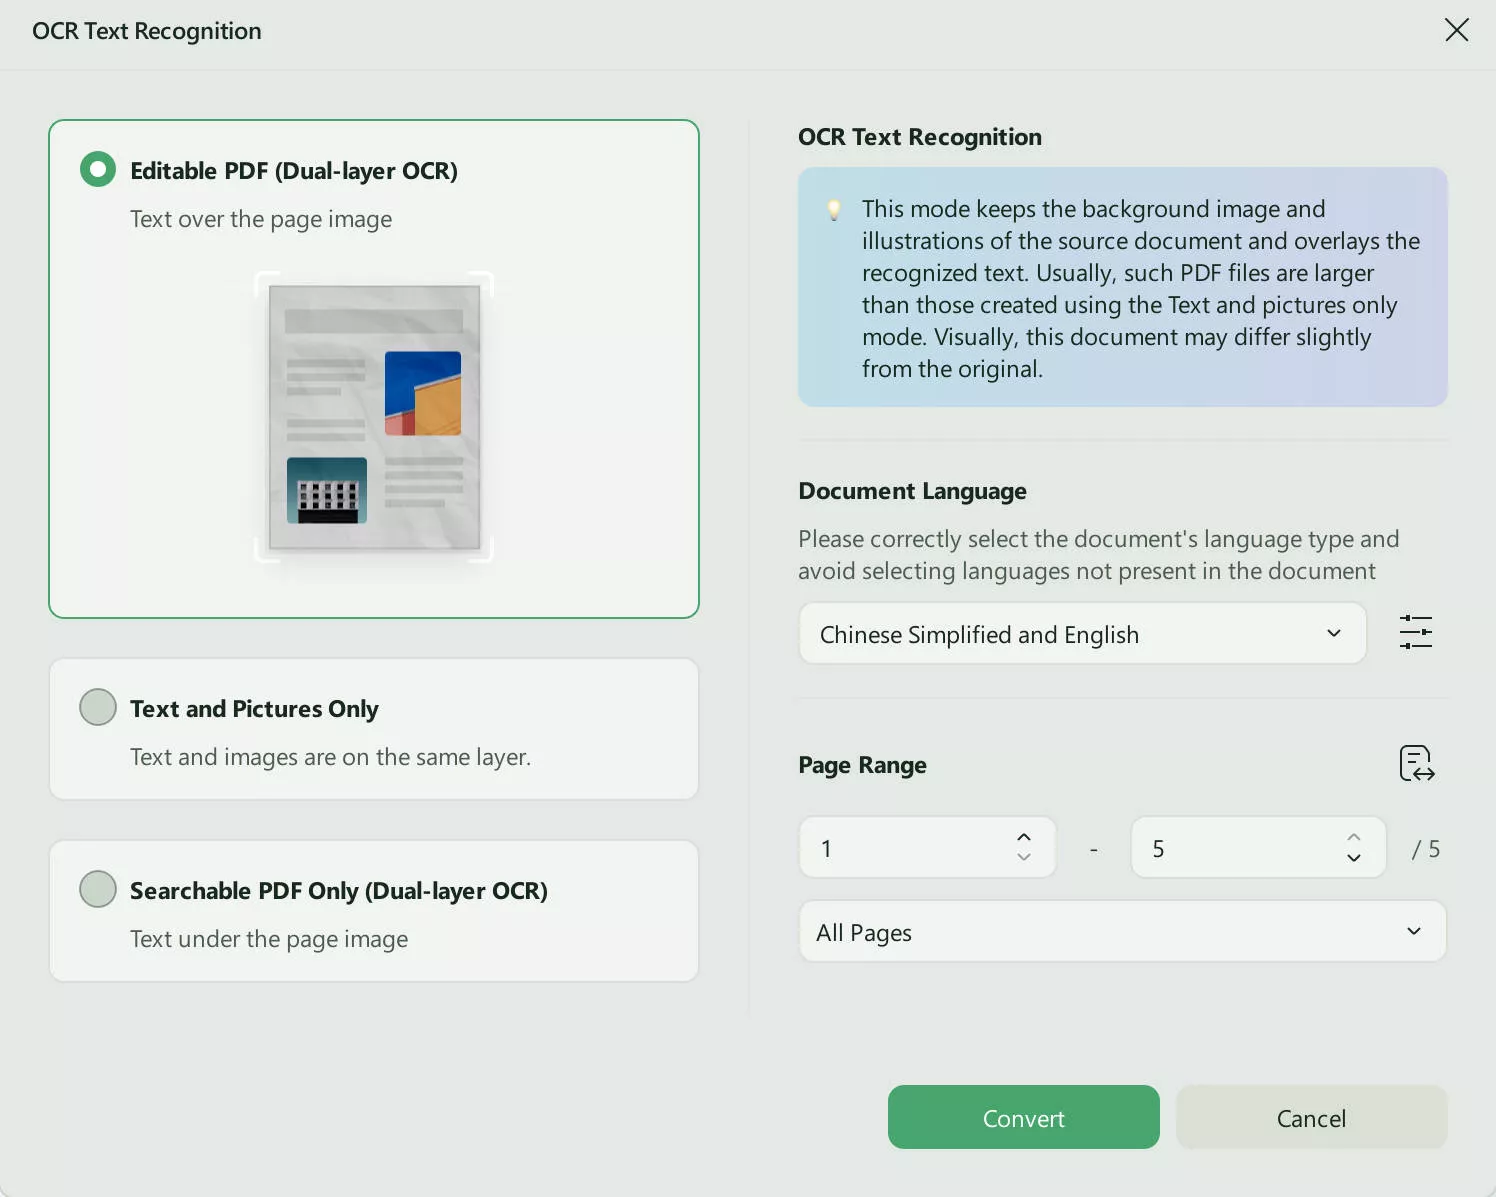
Most of the time, people use scanned PDFs that are hard to detect and convert. However, UPDF has an OCR feature, activated by clicking "OCR" in Tools. It can accurately detect the text on your scanned PDF files and convert them to editable ones.
You only need to select "Editable PDF" to calibrate the layout, language, and image resolution. Tap "Convert," and your PDF file becomes searchable. Now you can convert it to Excel easily using the steps described above.
Final Words
People dealing with MS Excel often ask: How do I convert text to date in Excel without losing formatting?
Converting text to date in Excel can be tricky for many people. However, with this guide, you can pull it off quickly. Just make sure you pay attention and follow the steps correctly, as described above.
Some people also have difficulty converting their PDF files to editable Excel format because they differ entirely. Although many tools exist to do this conversion, UPDF's powerful features and simple interface make it stand out from its competitors.
You only need to follow a few simple steps and click on a few options to convert your PDF files and edit them the way you want. So, download the program on your devices today and convert your pdf files into Excel seamlessly.
Windows • macOS • iOS • Android 100% secure
 UPDF
UPDF
 UPDF for Windows
 UPDF for Mac
 UPDF for iPhone/iPad
 UPDF for Android
 UPDF AI Online
 UPDF Sign
 Edit PDF
 Annotate PDF
 Create PDF
 PDF Form
 Edit links
 Convert PDF
 OCR
OCR PDF to Word
 PDF to Image
 PDF to Excel
 Organize PDF
 Merge PDF
 Split PDF
 Crop PDF
 Rotate PDF
 Protect PDF
 Sign PDF
 Redact PDF
 Sanitize PDF
 Remove Security
 Read PDF
 UPDF Cloud
 Compress PDF
 Print PDF
 Batch Process
 About UPDF AI
 UPDF AI Solutions
 AI User Guide
 FAQ about UPDF AI
 Summarize PDF
 Translate PDF
 Chat with PDF
 Chat with AI
 Chat with image
 PDF to Mind Map
 Explain PDF
 Scholar Research
 Paper Search
 AI Proofreader
 AI Writer
 AI Homework Helper
 AI Quiz Generator
 AI Math Solver
 PDF to Word
 PDF to Excel
 PDF to PowerPoint
 User Guide
 UPDF Tricks
 FAQs
FAQs UPDF Reviews
 Download Center
 Blog
Blog Newsroom
 Tech Spec
 Updates
 UPDF vs. Adobe Acrobat
 UPDF vs. Foxit
 UPDF vs. PDF Expert








 Enola Davis