 UPDF for Windows
 UPDF for Mac
 UPDF for iPhone/iPad
 UPDF for Android
 Nomostar
 UPDF AI Online
 UPDF Sign
 IvyCraft
 Edit PDF
 Annotate PDF
 Create PDF
 PDF Form
 Edit links
 Convert PDF
 OCR
OCR PDF to Word
 PDF to Image
 PDF to Excel
 Organize PDF
 Merge PDF
 Split PDF
 Crop PDF
 Rotate PDF
 Protect PDF
 Sign PDF
 Redact PDF
 Sanitize PDF
 Remove Security
 Read PDF
 UPDF Cloud
 Compress PDF
 Print PDF
 Batch Process
 About UPDF AI
 UPDF AI Solutions
 AI User Guide
 FAQ about UPDF AI
 Summarize PDF
 Translate PDF
 Chat with PDF
 Chat with AI
 Chat with image
 PDF to Mind Map
 Explain PDF
 PDF AI Tools
 Image AI Tools
 AI Chat Tools
 AI Writing Tools
 AI Study Tools
 AI Working Tools
 Other AI Tools
 AI Bookmark Generation
 AI Bookmark Summary
 AI Watermark Generation
 AI Background Generation
 AI Sticker Generation
 AI Stamp Generation
 AI Editing Suite
 UPDF Copilot
 AI Page Management
 AI Semantic Search
 PDF to Word
 PDF to Excel
 PDF to PowerPoint
 User Guide
 UPDF Tricks
 FAQs
FAQs UPDF Reviews
 Download Center
 Blog
Blog Newsroom
 Tech Spec
 Updates
 UPDF vs. Adobe Acrobat
 UPDF vs. Foxit
 UPDF vs. PDF Expert
Taking snapshots in PDF is helpful in extracting information from digital documents. Moreover, they address essential challenges related to teamwork, version control, and sharing data. Snapshotting PDFs offers a way to keep specific versions of a document to ensure critical information is preserved during crucial moments.
Furthermore, this method not only improves the clarity and reliability of collaborative work but also makes it easier to track changes over time. As we dive deep into the importance of PDF snapshotting, it becomes essential to explore the best PDF snapshotting tool for a smooth workflow. Additionally, we'll explore the detailed instructions on how to take a screenshot of a PDF for maintaining document accuracy.
Part 1. How to Snapshot on PDF with UPDF?
UPDF is a top-notch PDF snapshot tool to simplify document management with versatility and outstanding performance. It provides a variety of inclusive options to meet different user requirements. Additionally, users can focus on specific parts of a PDF for a customized snapshot with the "PDF from the Selection Capture" feature. In addition, the PDF from Window captures the entire window for a complete view of the content.
Moreover, you can streamline the snapshotting process with copied content on the clipboard. Its diverse options establish it as an essential tool to give users the flexibility and precision to take a snapshot of PDF.
Simplified Step-by-Step Guide to Take a Snapshot with UPDF
After knowing the diverse capabilities of UPDF for snapshotting PDFs, let's discuss the instructions on how to take a picture from a PDF using UPDF. This versatile and user-friendly tool ensures accuracy and adaptability in taking pictures from documents.
Step 1. Download UPDF and Open the PDF to Take a Screenshot
To initiate the process, download the software on your devices by hitting the "Free Download" button below. Then, proceed further by completing the installation instructions and opening the tool on your systems. From the tool's homepage, select the "Open File" button at the top middle of the screen to import the PDF from your device.
Windows • macOS • iOS • Android 100% secure
Step 2. Access the File Tab to Create a PDF from Selection Capture
Once the file is imported into the tool, you will be directed to a new window. Within this screen, head to the top left and press the "File" tab to get different options for document management. Hover over the "Create" option among the various features to access an extended menu. Here, you can tap on "PDF from Selection Capture" to create a PDF.
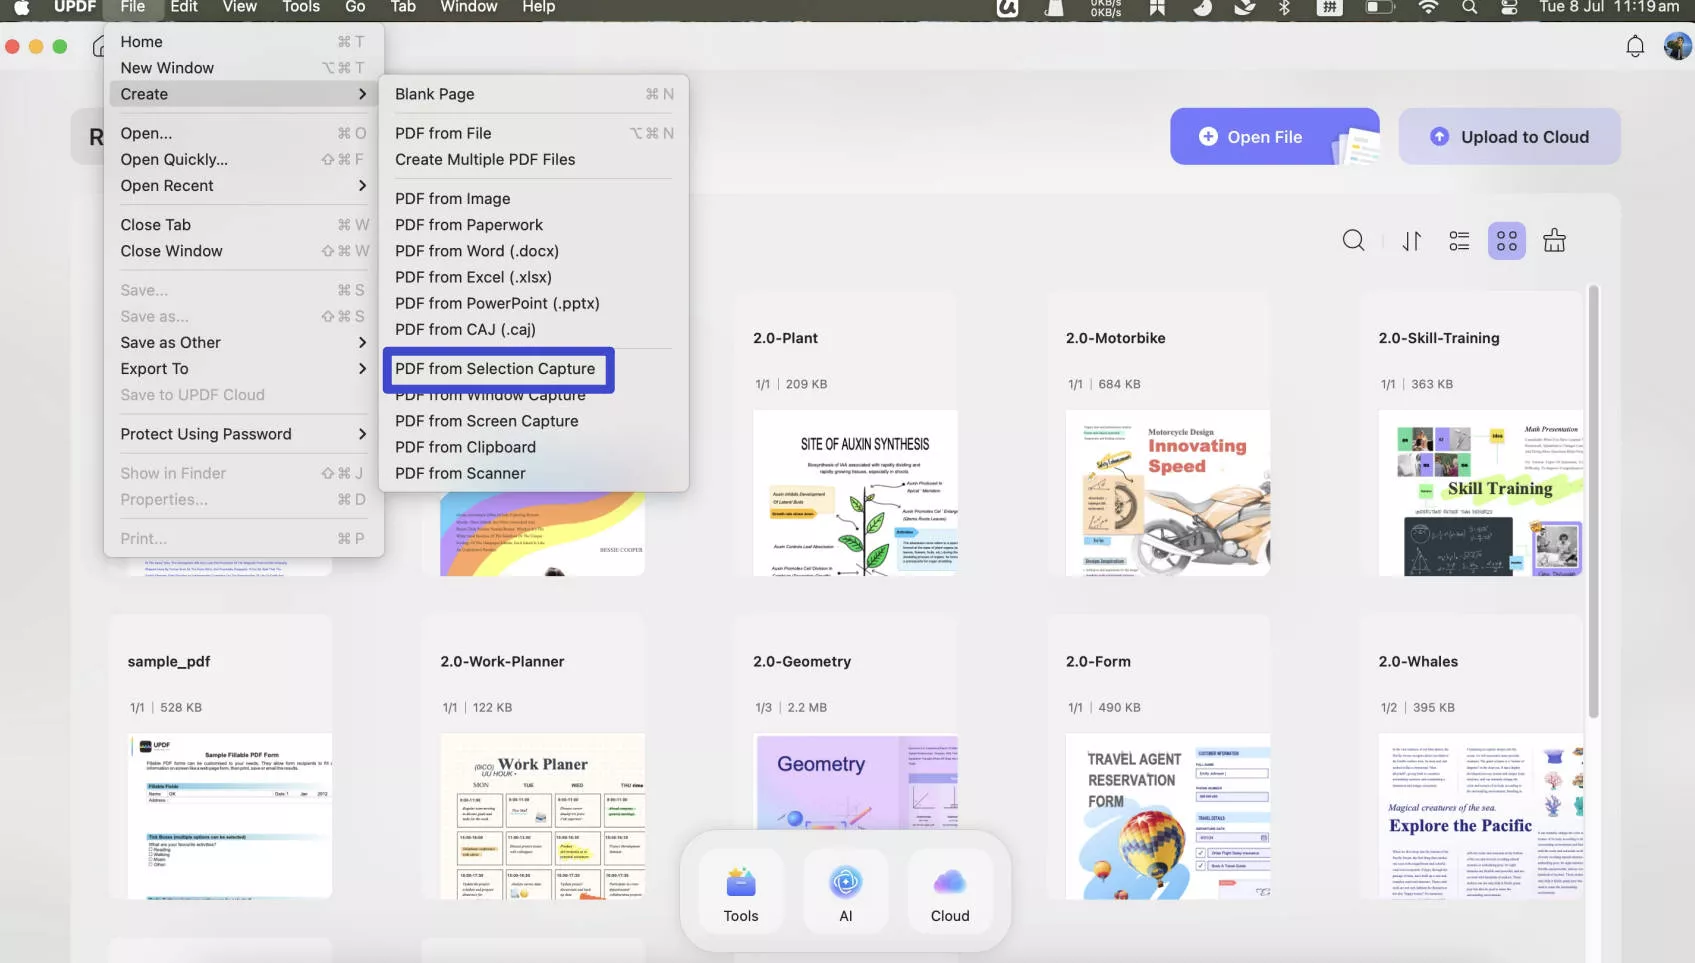
After this, you can use your mouse to capture specific content from the screen by dragging it over the desired area in the document.
Step 3. Export the Screenshot in Image Format
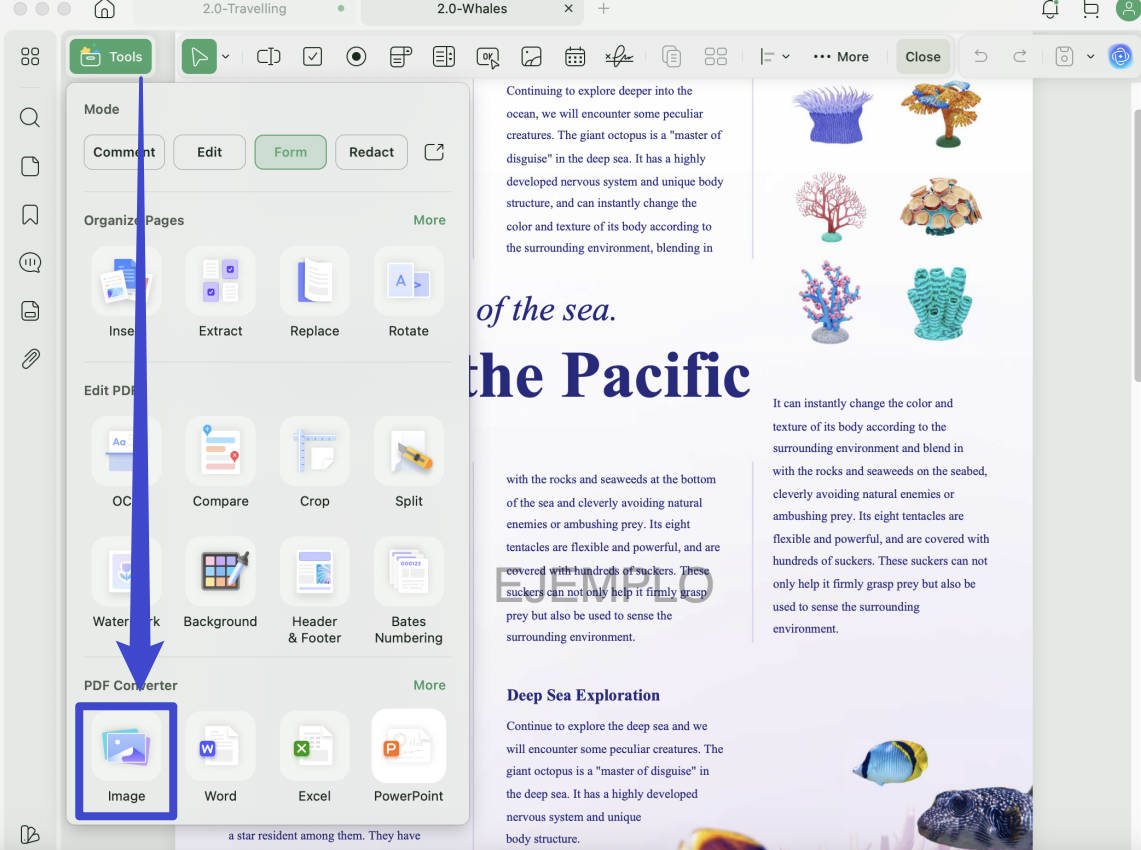
The captured snapshot will automatically be converted into a PDF and opened in a new tab for your convenience. To save it in an image format, navigate toward the right sidebar and opt for the "Tools" icon. A menu will pop up with different output formats from which press the "Image" option. Now, a mini window will appear in the middle of the screen, requiring your desired changes in image type and page ranges. Once done, select the "Apply" button to save this screenshot on your device.
Part 2. How to Take a Screenshot of a PDF with Shortcut Keys?
Shortcut keys provide a fast and smooth way to capture and save specific moments in your documents on different operating systems. UPDF supports Windows, Mac, iOS, and Android to cater to every sort of requirement for users with different preferences. By opening the document on UPDF, users can utilize shortcut keys to reduce repetitive mouse movements and clicks.
Additionally, this approach improves accuracy when capturing specific parts of a document for a more focused and precise snapshot. Now, let's explore the steps to take a snapshot in PDF on different operating systems with UPDF.
1. Screenshot PDF on Windows
Step 1. Launch UPDF on Windows and Open the File
First, download UPDF on your Windows and launch UPDF on it. From the main interface of the tool, choose the "Open File" button located at the top. This action will allow you to import the file from which you want to take a snapshot on the tool.
Step 2. Press the Specific Short Keys for Windows
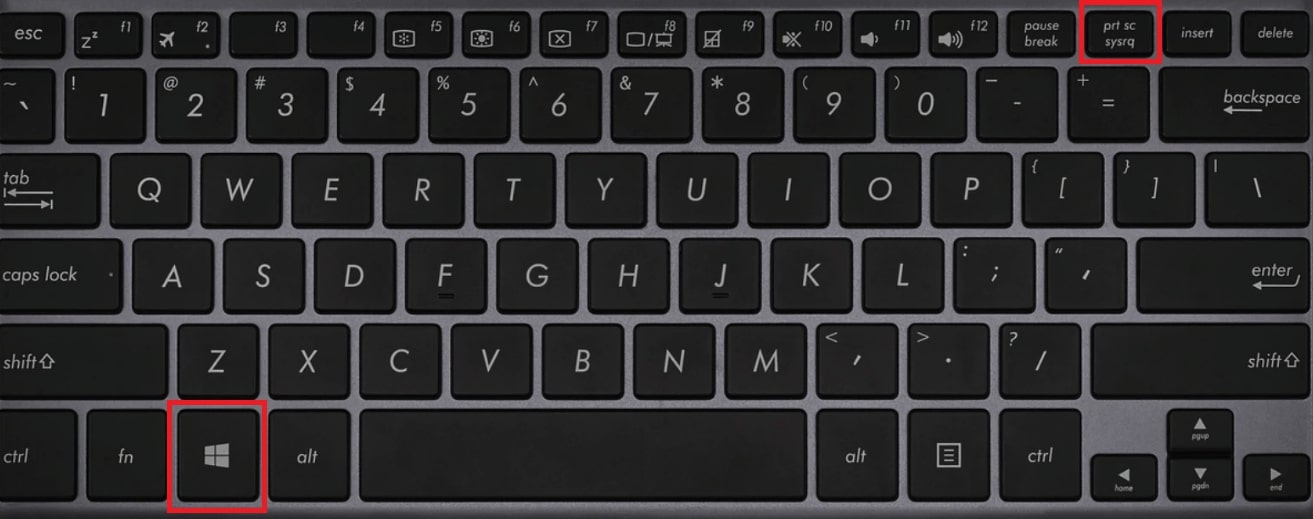
After successfully importing the file, the tool will open it in an editing window. Press the "Windows + Print Screen" keys to capture the full-screen view. Furthermore, to get the snipping tool for selection capture, tap the "Windows + Shift + S" keys for precise results.
2. Screenshot PDF on Mac
Step 1. Open UPDF on Mac and Hit the Upload File Button
Launch UPDF on your Mac and navigate to the main interface of the tool. Now, hit the "Open File" button to initiate the file selection process. Next, a file dialogue box will appear, allowing you to select and import the PDF file you want to work with.
Step 2. Capture the Full Screen or Partial Screen Using Short Keys
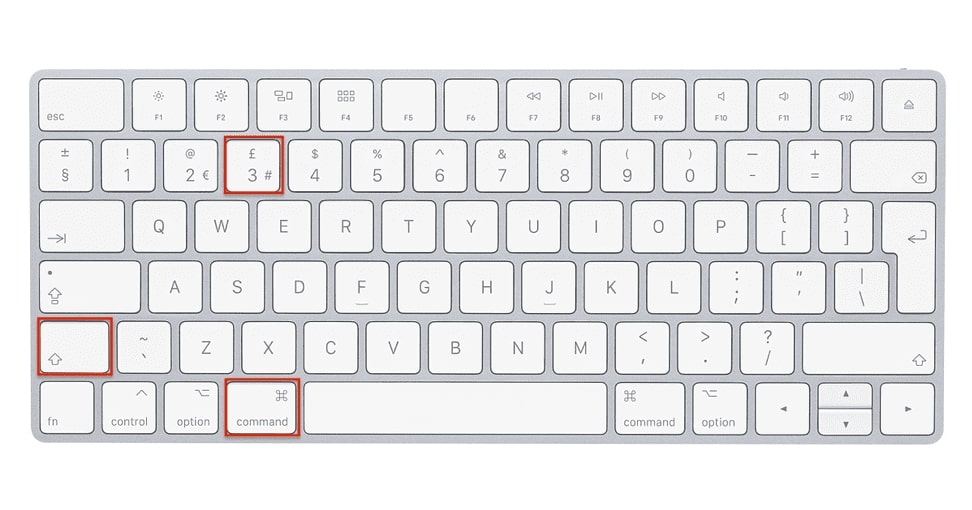
With a file opened on UPDF, press "Shift + Command + 3" altogether to capture the entire screen. Plus, you can take a partial screenshot by pressing the "Shift + Command + 4" keys together. Now, move the crosshair pointer to where you want to start the screenshot from PDF and drag over the area you want to capture.
3. Screenshot PDF on iOS
Step 1. Access the UPDF App for iOS and Choose the File to Import
Begin by downloading the UPDF's supported version for iOS. Open the app on your iOS devices and access its homepage for users. Here, press the "+" icon at the right bottom that opens a bottom-up menu. From the available options, tap "Files" and choose the required PDF file.
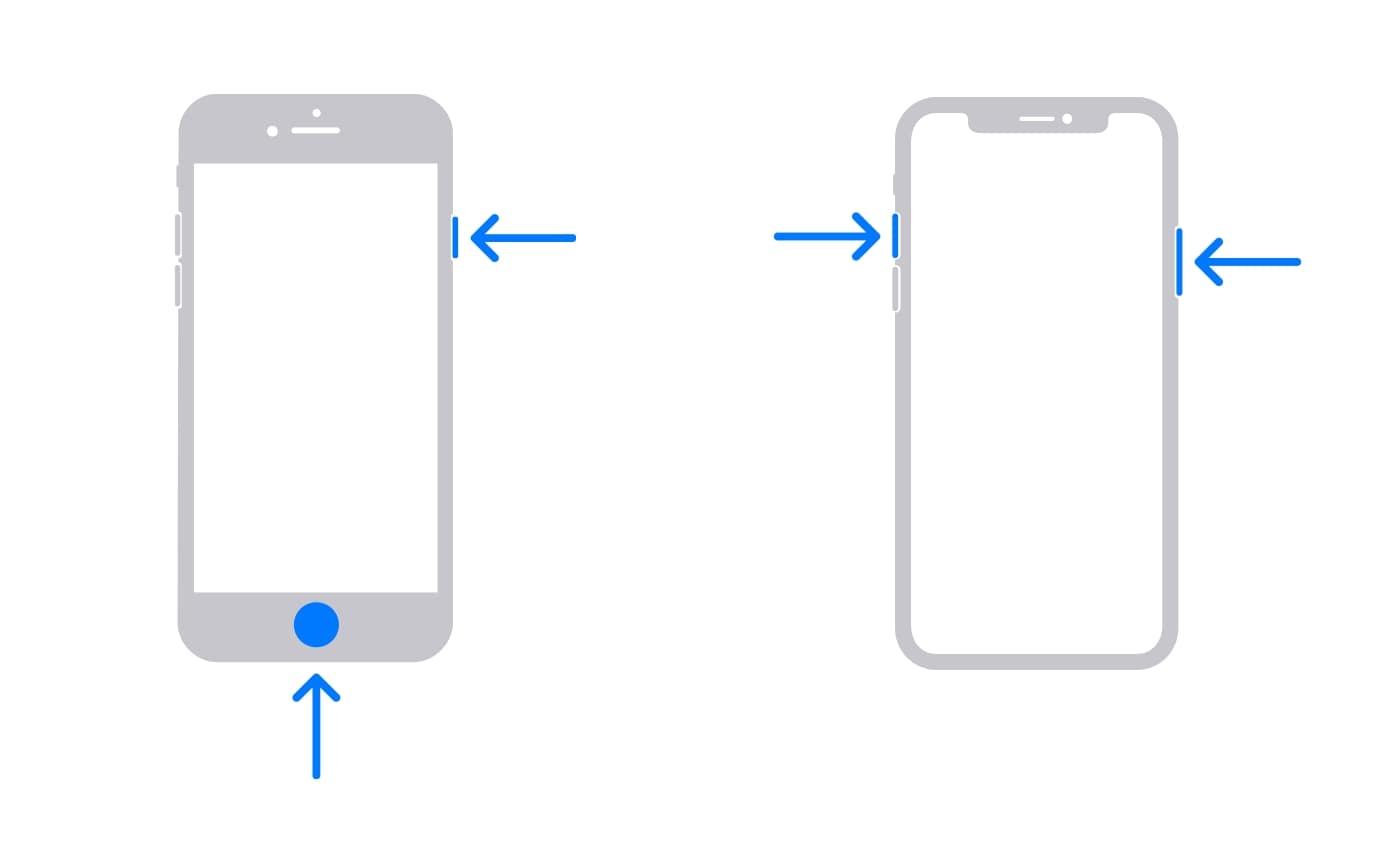
Step 2. Press Short Keys for Touch ID and Face ID iPhones
With an iPhone having a touch ID, quickly press the "Side + Home" buttons simultaneously on your iOS device. A brief preview of the screenshot will momentarily appear in the lower-left corner of your screen. For iPhones with Face ID, you can press the "Side" button and "Volume Up" button together to take a snapshot on PDF.
4. Screenshot PDF on Android
Step 1. Download the UPDF Application for Android and Import the File
First, download the UPDF app from the Google Play Store and complete the on-screen instructions. Once it is installed, open the app on your Android and access its dashboard. Within this screen, choose the "All PDFs" option that lets you browse your files after authorization. Now, pick the file you want to take a snapshot of in PDF, and it will be imported into the application.
Step 2. Hold the Short Keys According to Your Model
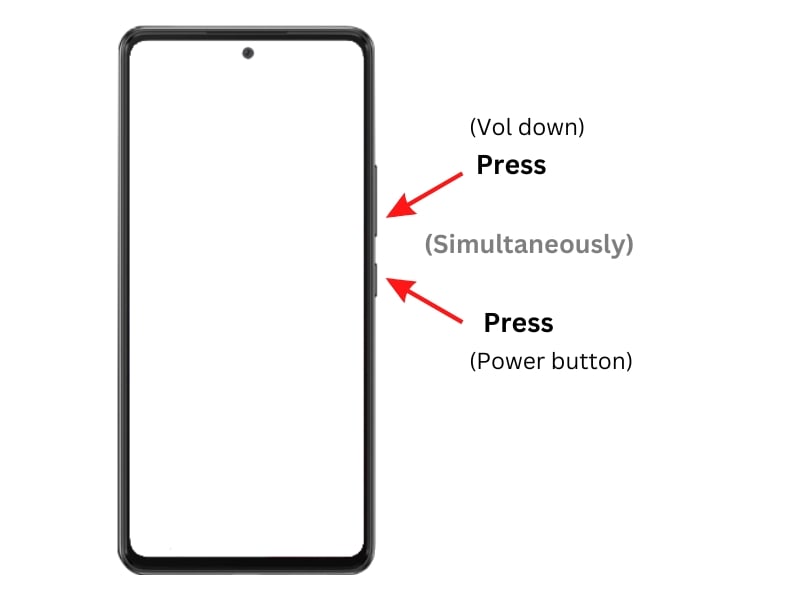
After opening the file on the app, you can now take screenshots using short keys. The majority of Android devices support the capture of screenshots by pressing the "Power + Volume Down" buttons.
Alternatively, if your device includes a physical home button, holding down the "Power + Home" buttons serves this purpose. Additionally, some Android devices feature a dedicated screenshot button accessible in the "Pull-Down Notification" shade.
After acknowledging the strong compatibility with different operating systems, we suggest downloading it now to explore its full potential. Moreover, if you upgrade to UPDF Pro now, you can get an exclusive discount for a limited time. Don't miss this opportunity to transform your document workflow.
Windows • macOS • iOS • Android 100% secure
Part 3. How to Take a Scrolling Screenshot of a PDF?
GoFullPage is an impressive Chrome plugin designed to enhance your experience in capturing screenshots, especially when dealing with long or multiple-page PDFs. This extension can quickly become part of your Chrome browser and allows you to take extensive scrolling screenshots effortlessly. Let's explore the detailed steps of taking screenshots while opening a PDF in Chrome with the GoFullPage extension.
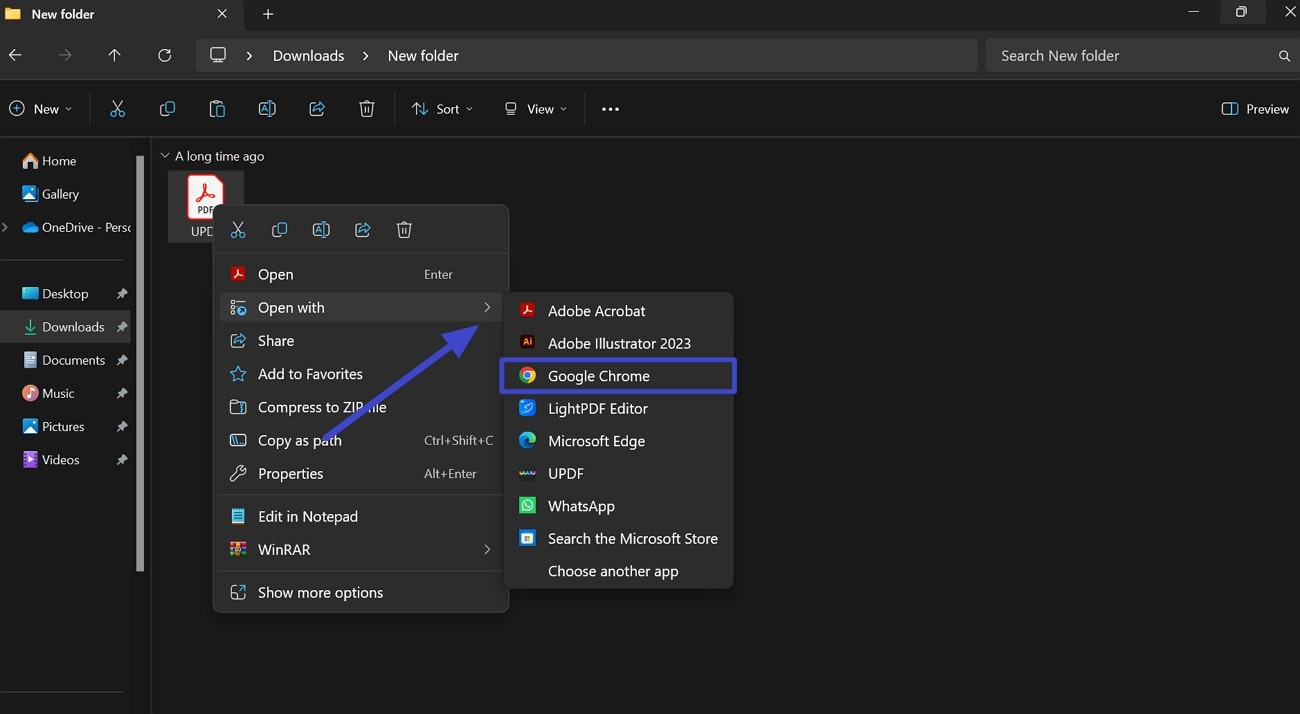
Step 1. First, locate the desired PDF file on your system and right-click on it. A drop-down menu will appear, and you will have to hover over the "Open With" option. From the various opening options, tap on "Google Chrome."
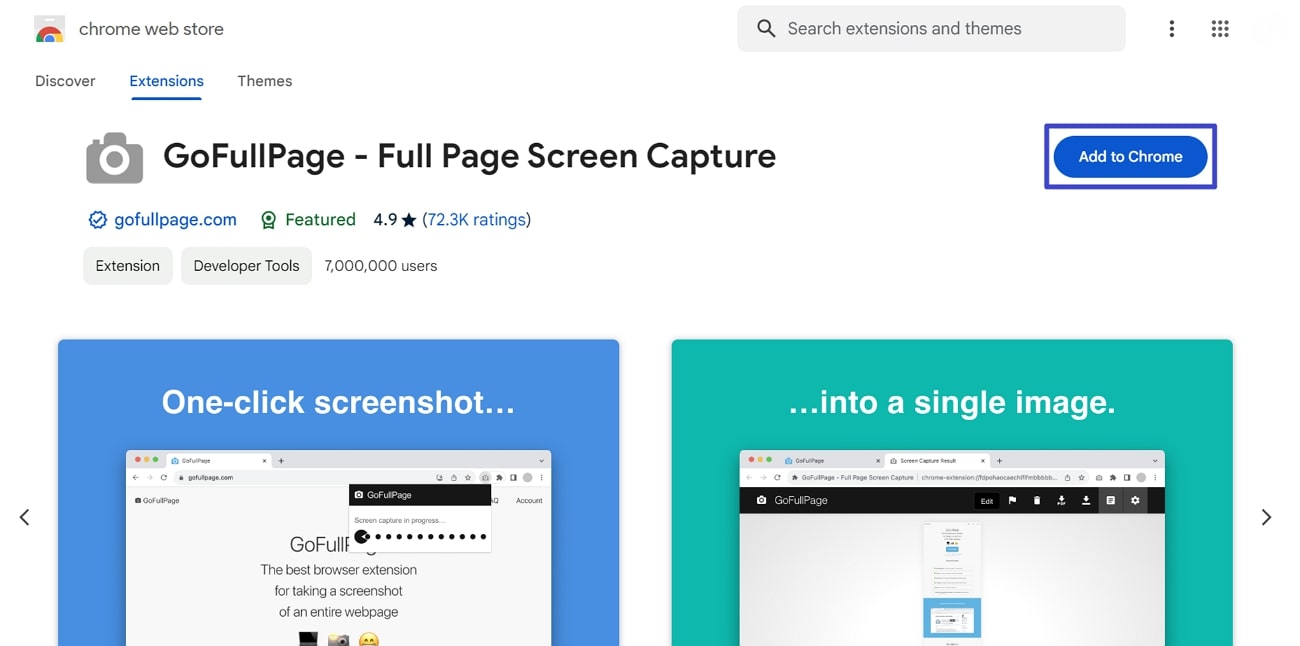
Step 2. Next, from the Chrome Web Store, access the GoFullPage extension. Integrate this extension into your browser by pressing the "Add to Chrome" button. After successful processing, you can see this extension in the top right toolbar of your browser.
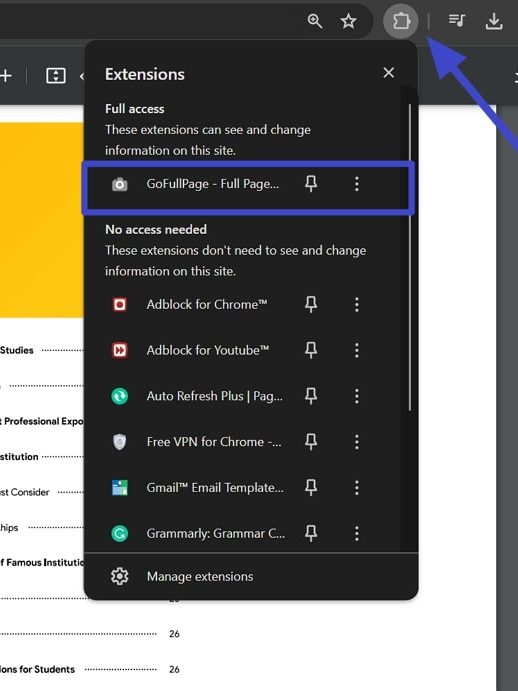
Step 3. Now, switch the tab to the one where your PDF is opened and press the "Extensions" icon. From the drop-down menu, click "GoFullPage-Full Page Screen Capture" to let it take a picture of a PDF.
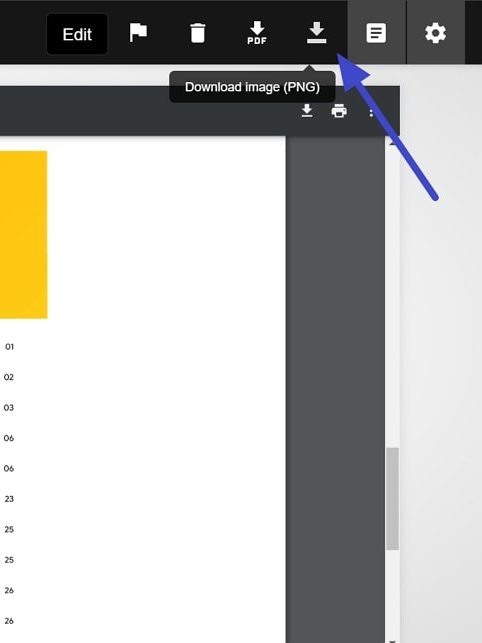
Step 4. GoFullPage will automatically take a scrolling screenshot and open it on a new tab. Within this window, you can save it in either image format or as a PDF by selecting the download icon, appearing at the top right.
Part 4. Can I Take a Snapshot From a Secured PDF?
The ability to capture a snapshot from a secured PDF depends on the type of password protection. Basically, there are two main kinds of passwords for PDFs: Permission Password and Open Password.
1. Permissions Passwords
When a PDF has only a permissions password, it limits actions like copying, editing, or printing, but it doesn't stop you from opening the file. In this case, you can easily capture a snapshot of the content using various tools or built-in functions without facing any issues. It mainly controls what actions users can do with the document but doesn't prevent them from accessing it.
2. Open Passwords
Alternatively, if the PDF is secured with an open password, you can't open the file without entering the correct password. A user password restricts access to the document itself. Here, you need to provide the password to open the PDF, and only then can you take a snapshot of the PDF's content. Additionally, it is a more robust security measure as it blocks unauthorized access to the document entirely.
Part 5. Why Do You Need to Snapshot a PDF?
Snapshots provide a simple way for users to capture, share, and add notes to specific parts of a document. They improve how we work together and communicate and make our digital document tasks more efficient. Moreover, users can get a more visual and focused approach to handling specific content. Let's check out how practical and versatile this feature is for managing documents:
- Sharing Information: Snapping a picture in PDFs provides an easy way to share specific details without sending the whole document. This is super helpful when you want to point out or talk about a particular part of a document. Instead of sending the entire big file that might have things not needed, you can grab just the vital part using snapshots.
- Annotations and Comments: When you need to add extra notes or comments to a part of a PDF, using snapshots becomes a great way. By taking a picture of the content and adding notes or comments right on the image, you can share your thoughts, explanations, or instructions related to that part.
- Reference and Documentation: Snapshots are like a handy tool for saving information for later. If there's a part of a document that you know you'll need in the future, you can take a snapshot to save just that part. It becomes helpful in making archives and creating reference materials.
- Visual Comparison: In situations of comparing things visually, like different versions of a document or seeing changes over time, snapshots are pretty useful. By taking pictures at different times, you can compare them visually, spot changes, and see how the document has changed.
Part 6. FAQs about PDF Snapshot
Q1. Can I take a screenshot of a PDF?
Yes, you can take a screenshot of a PDF by using different snipping tools. Among the available choices, UPDF is your go-to solution. Launch the tool and import the file you want to take a screenshot from a PDF and access the "Create" feature from the "File" tab. Choose "PDF from Selection Capture" and proceed with using the mouse to capture the specific content.
Q2. Where can I find my snapshots?
Snapshots on Windows, taken with the Snipping Tool or Print Screen, are usually saved in the "Pictures" folder. For macOS, both "Command + Shift + 4" captures and "Command + Shift + 3" full-screen captures get saved to the desktop. Additionally, default settings can be changed, and third-party applications may have their save locations.
Q3. Can I snapshot PDF in Adobe Acrobat?
Yes, you can take snapshots of PDFs using Adobe Acrobat. For this, open the tool, import the PDF, and navigate to the "Edit" tab. Select "Take a Snapshot" from the "More" option and either click on a page for a full-page snapshot or draw a box for a specific area. Afterward, "Right-click" on the selected region to copy, share, or print the snapshot.
Conclusion
We conclude that it is helpful to take a snapshot of PDF to handle documents easily. This approach also introduces new ways to work collaboratively and communicate effectively. In this exploration, we discovered the best snipping tool, UPDF. It offers various options, like capturing specific parts, the whole window, or even the entire screen.
Furthermore, this friendly and versatile tool gives you the accuracy and flexibility to capture and share PDF content without hassle. We strongly recommend you download it today to explore its seamless and powerful features for PDF snap shooting. Also, you can improve your effectiveness with this reliable choice for precise and convenient PDF management. You can also learn more about UPDF by reading the review on 9to5mac.
Windows • macOS • iOS • Android 100% secure


 Lizzy Lozano
 Engelbert White
 Enya Moore
 Enid Brown