Microsoft Excel and Word are two world's most widely used software applications for data management and document creation. While Excel is the ideal tool for creating spreadsheets and extracting insights from data, Word is the ideal tool for creating top-notch documents. However, sometimes specific needs urge to use the Excel spreadsheet in Word document. Unfortunately, converting data from Excel to Word can be challenging for many, especially when dealing with large data. So, if you are also struggling with this issue, then this guide is for you. Here we will discuss in detail the 5 best ways to convert Excel to Word. So, let's get started!
Part 1. When to Convert Excel to Word?
There are plenty of scenarios that can require you to convert Excel to Word. Some of the common scenarios are as follows:
- You want to create reports or documents, including tables, charts, or other data visualizations made in Excel.
- You want to present the data analysis or findings in a clear, easy-to-understand format to the stakeholders.
- You want to combine multiple spreadsheets or data sources in one document.
- You want to create a business document, such as proposals and invoices, that requires both text and numeric data.
- You want to share data with other teammates who don't have access to Excel.
Other than the above scenarios, there can be other reasons that require you to convert XLS to Word. So, let's now shift our focus to how to convert Excel data to Word.
Part 2. 5 Ways to Convert Excel to Word
There are multiple ways you can use to convert Excel to Word. Below we present the five best ways, which vary in functionality and complexity. You can choose the one that best fits your needs:
Method 1. Convert Excel to Word via Copy/Paste
The simplest way to move Excel data to Word is using the copy/paste method. You can copy the data from Excel and paste it into Word. Follow the below steps to convert Excel to Word via copy/paste method:
- Open the Excel spreadsheet that contains the data you want to transfer.
- Select the cells by dragging the mouse. Alternatively, you can press "Ctrl + A" to select all the cells.
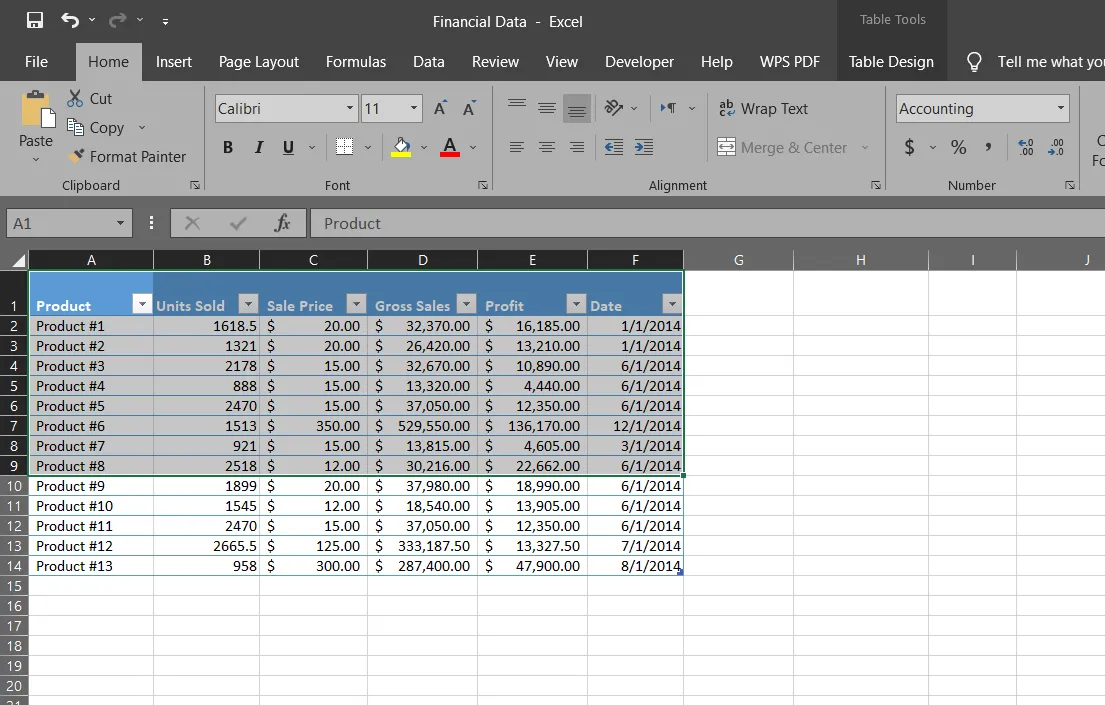
- Click "Ctrl + C" to copy the selected cells.
- Open the Word document where you want to paste the data.
- Click "Ctrl + V" to paste the data.
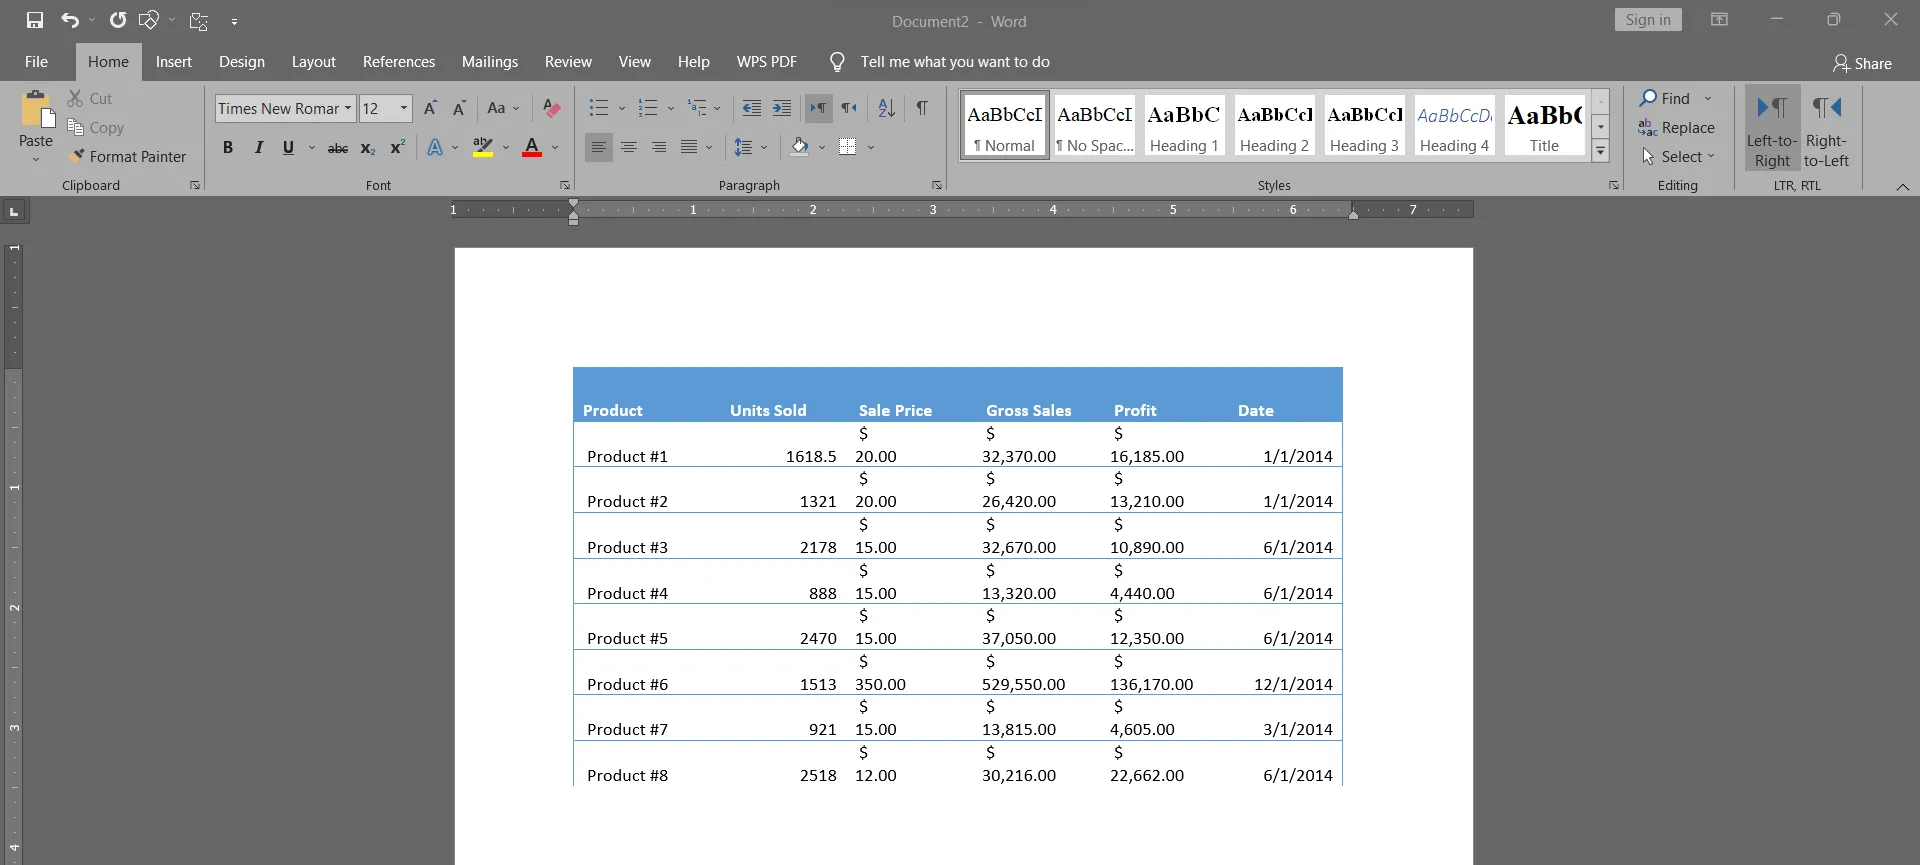
This way, you can easily convert Excel data to Word.
Method 2. Convert Excel to Word via Insert Object
The above copy/paste method converts the Excel data into a Word document by changing it into a Word table or text. However, if you want to embed Excel data in its original format and also want to access a few Excel features in Word, then insert it as an "Object". Follow the below steps to convert XLS to Word via the insert object feature:
- Open the Word document. From the "Insert" tab, click "Object".

- Select the "Create from File" tab and click "Browse".
- Locate the Excel file you want to convert to Word and click "Open".
- Click "OK" to complete the selection.
- The Excel file will load into your Word document. You can drag and drop its edges to adjust its fix according to your document dimensions.
- To edit the Excel data, double-click it and make changes.
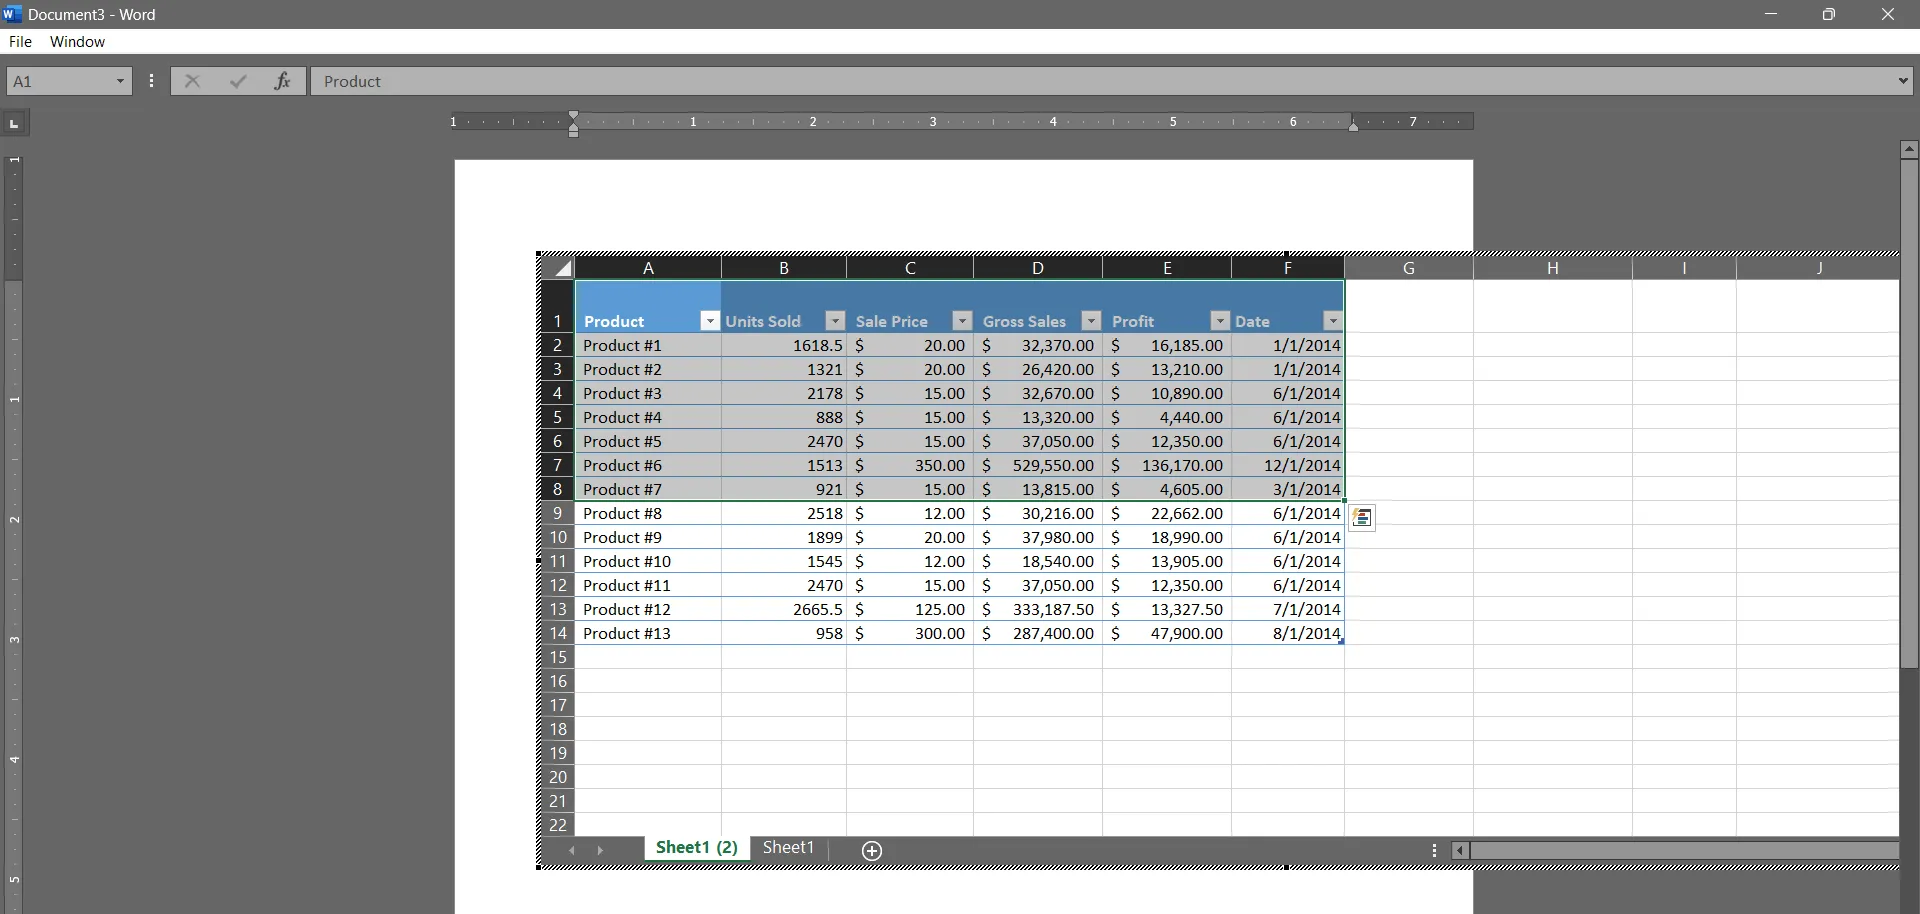
This way, you can insert a complete Excel spreadsheet without opening Excel and access a mini-version of Excel in Word.
Method 3. Convert Excel to Word via Blank Spreadsheet
If you want to access all the main Excel functionalities in Word, such as adding new data, inserting filters, adding formulas, and similar others, then you can do it by inserting a blank spreadsheet in Word. Follow the below steps to convert Excel to Word via the black spreadsheet approach:
- Open the Word document. From the "Insert" tab, click "Table" and select "Excel spreadsheet".
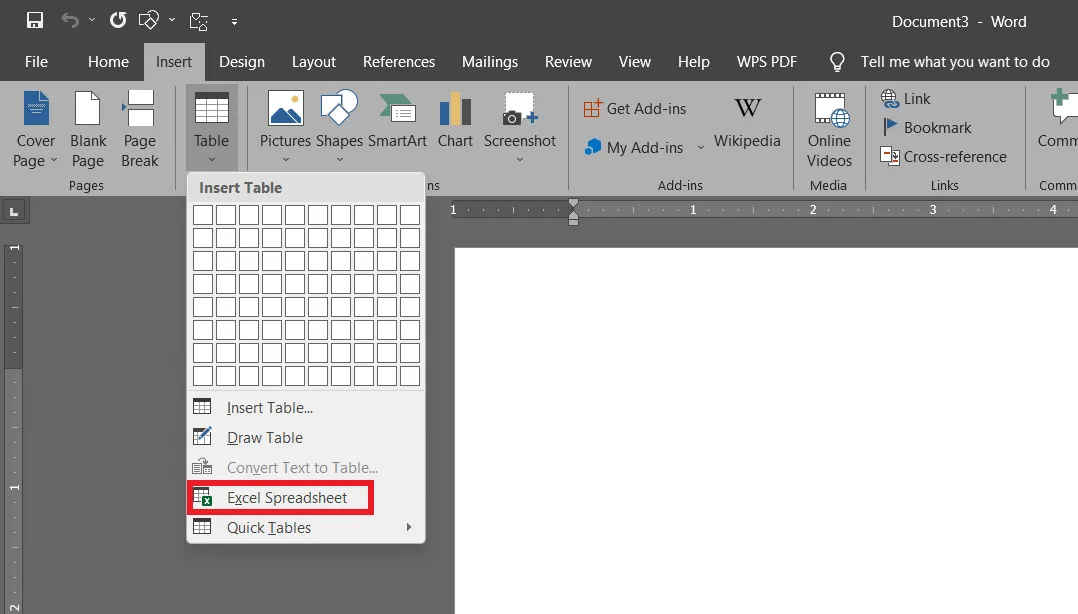
- You will see a blank Excel spreadsheet in your Word document. Now either you can add data from scratch or copy/paste data from your old Excel file.
This way, you can have full Excel capabilities within your Word document.
Method 4. Convert Excel to Word using VBA
Another effective way to convert Excel to Word is by using VBA macros. VBA macros in Excel let you use the Visual Basic Application to create specific functions to automate manual tasks.
So, you can also use a VBA macro to automate importing data from Excel to Word. Follow the below steps to transfer/import data from Excel to Word using VBA:
- Make sure you have already created a Word file where you want to import Excel data. For example, we have created an "Excel-Word" file and placed it in the "ImportExcelWord" folder in the C drive.
- Open the Excel file from where you want to import data.
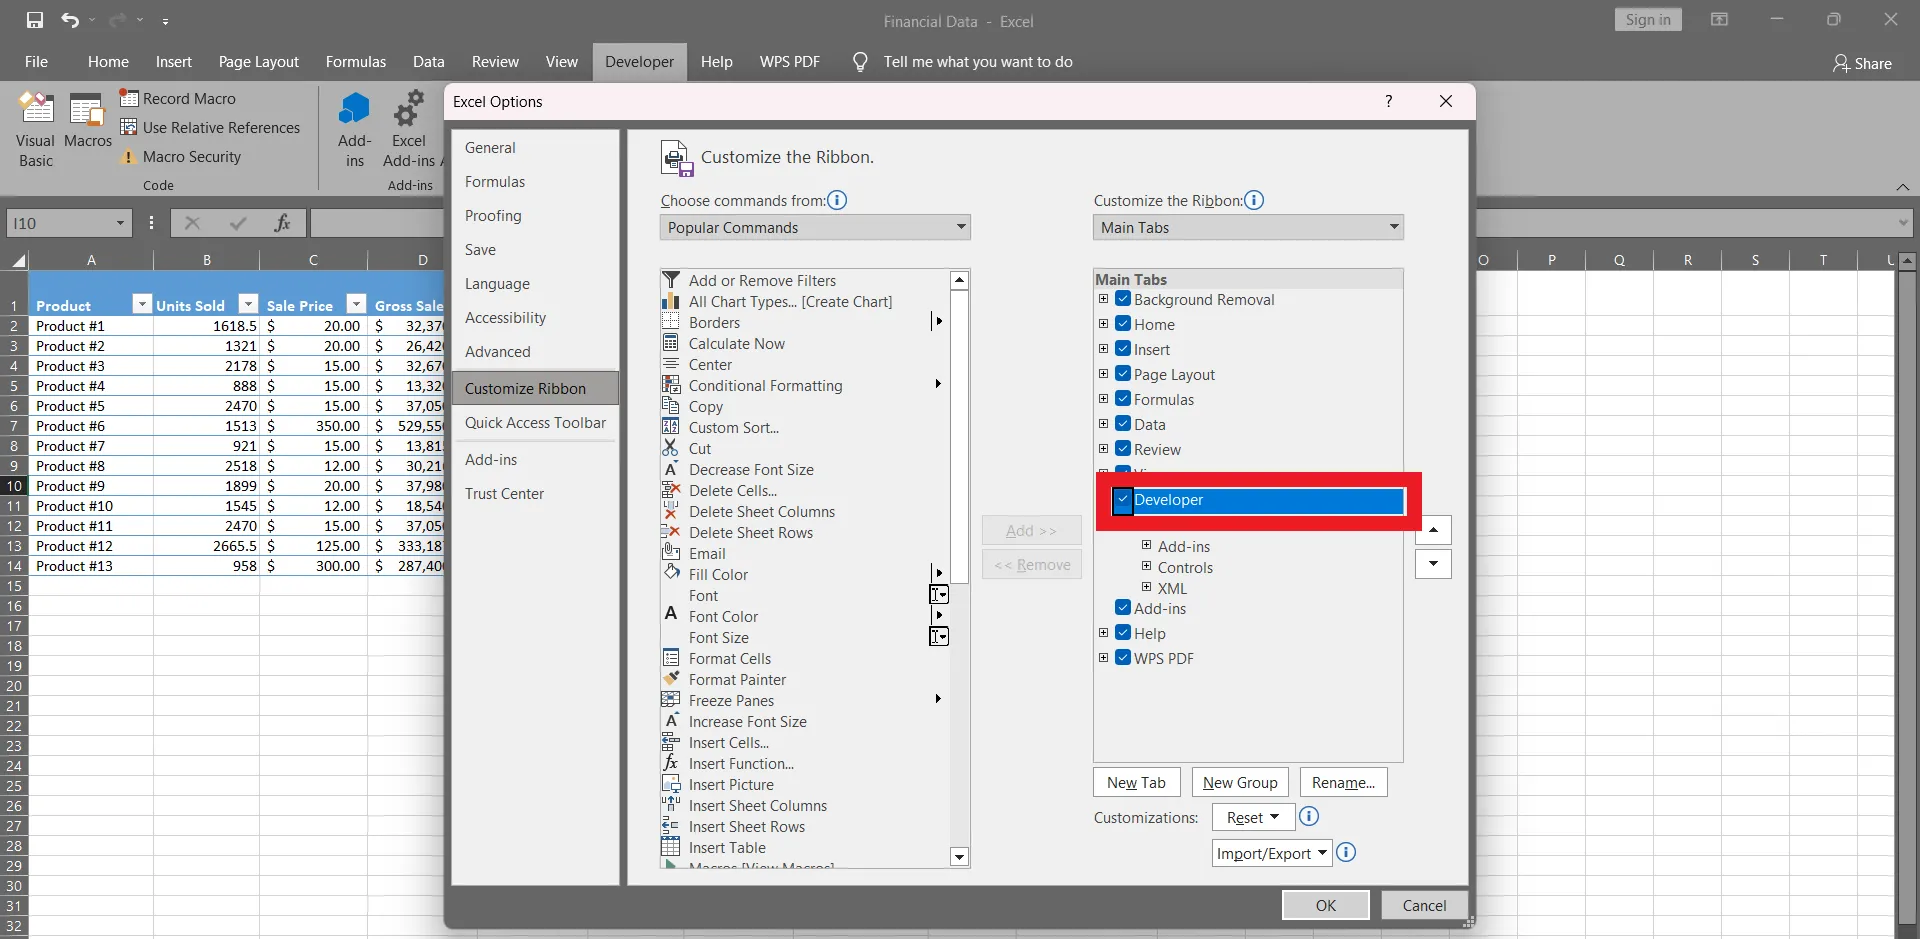
- Click the "Developer" tab from the top and click "Visual Basic". If you don't see the "Developer" tab currently, you can enable this option by clicking File > Options > Customized Ribbon > Main Tabs > Tick the "Developer" checkbox.
- In the pop-up window, click the "Insert" tab and then click "Module".
- Copy and paste the code:
- Sub ActivateWordTransferData()
- Worksheets("Sheet1").Range("A1:F14").Copy
- Dim DocApp As Object
- Dim DocApp As Object
- Dim DocName As String
- On Error Resume Next
- Set DocApp = GetObject(, "Word.Application")
- If Err.Number = 429 Then
- Err.Clear
- Set DocApp = CreateObject("Word.Application")
- End If
- DocApp.Visible = True
- DocName = "C:\ ImportExcelWord\Excel-Word.docx"
- If Dir(DocName) = "" Then
- MsgBox "File " & DocName & vbCrLf & "not found " & vbCrLf & "C:\
- ImportExcelWord\.", vbExclamation, "Document doesn't exist."
- Exit Sub
- End If
- DocApp.Activate
- Set DocFile = DocApp.Documents(DocName)
- If DocFile Is Nothing Then Set DocFile = DocApp.Documents.Open(DocName)
- DocFile.Activate
- DocFile.Range.Paste
- DocFile.Save
- DocApp.Quit
- Set DocFile = Nothing
- Set DocApp = Nothing
- Application.CutCopyMode = False
- End Sub
Note: In the above code, change "Range("A1:F14")" according to the number of rows and columns you want to import from XSL to Word. Similarly, change "C:\ ImportExcelWord\Excel-Word.docx" with the folder location and file name where you have saved the Word file. Also, change & "C:\ ImportExcelWord\." with your Word file folder location.
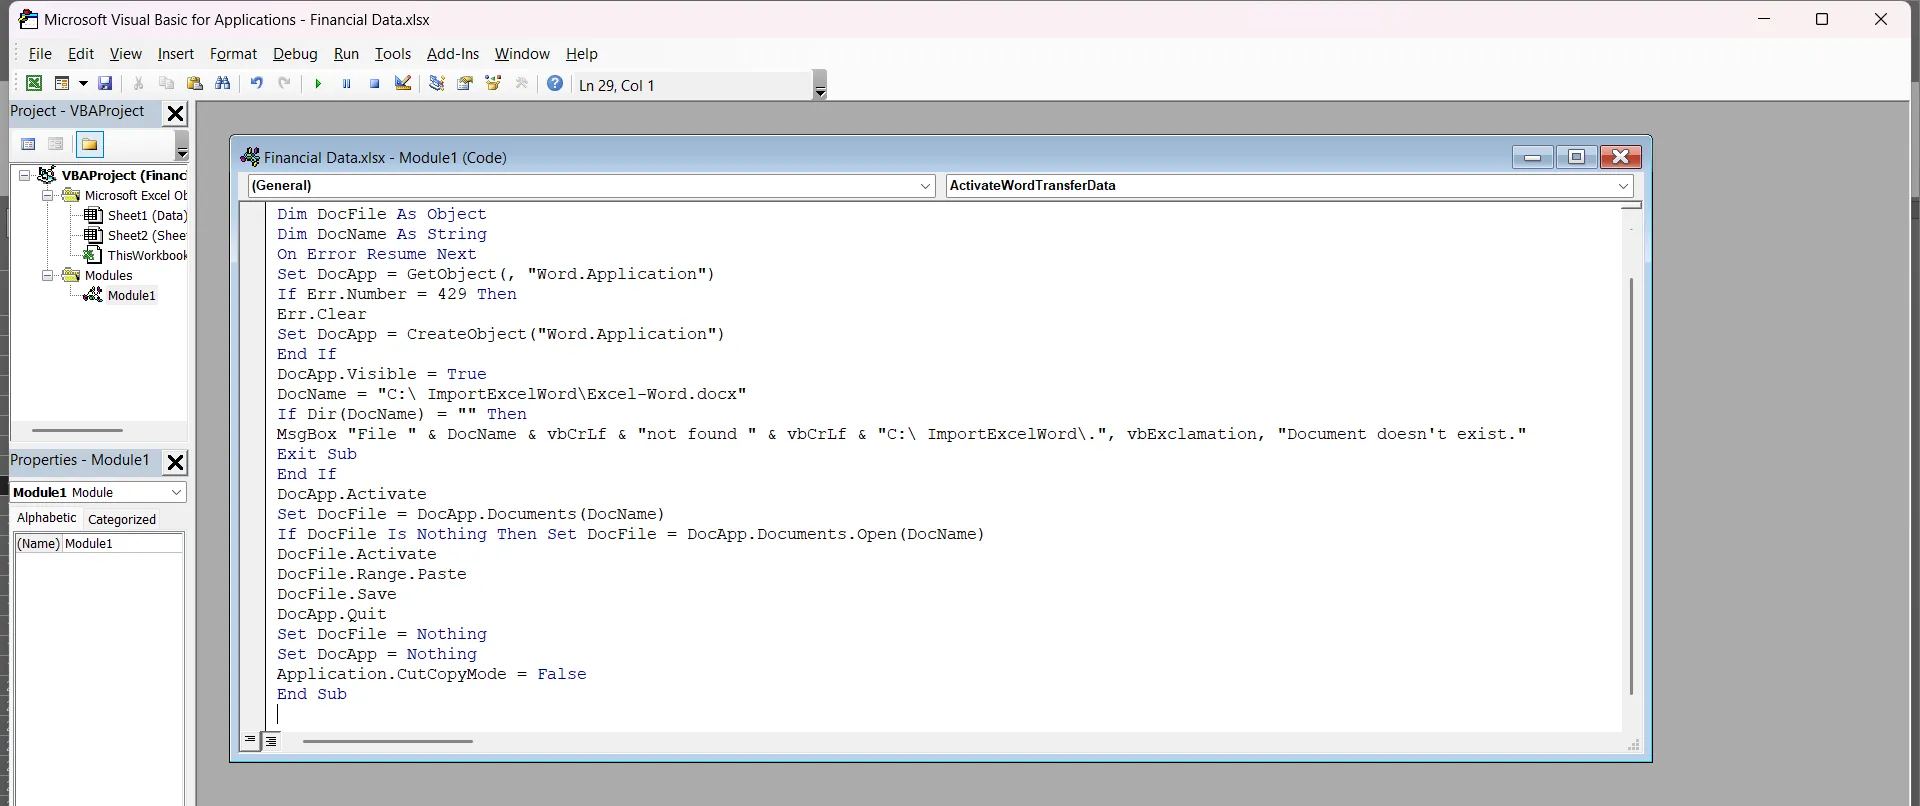
Once you have added the code, press "F5" or click Run > Run Sub/UserForm. The code should execute successfully.
And then, open the Word file and see the Excel data imported successfully there.
This way, you can automate the process of converting/importing Excel data to Word using VBA macros.
Method 5. Convert Excel to Word Online
Other than the above desktop conversion methods, you can also convert Excel to Word using online conversion tools. There are many online tools that can help you convert Excel spreadsheets to Word, and most of them are free to use. So, follow the below steps to convert Excel to Word online:
- Go to any Excel to Word online converter of your choice, such as Convertio, Smallpdf, etc.
- Upload or drag and drop the Excel file you want to convert.
- Select the output format as Word or DOC.
- Click the "Convert" button.
- After conversion, download the converted Word file.
This way, you can instantly convert Excel to Word online. However, online conversion tools also raise privacy concerns. So, choosing a reputed online Excel to Word tool is recommended to protect your files from online theft.
Also Read: How to Convert WPS to Word
Bonus Tip: Convert PDF to Popular Office File Formats Without Losing Quality & Formatting
If you have a PDF file and you want to convert it into popular Office file formats, such as DOC, XSL, PPT, and similar others, without compromising the quality, then you should have UPDF as a permanently installed tool on your PC.
UPDF is an all-in-one, powerful toolkit that lets you view, annotate, edit, convert, organize, and do a lot more to your PDFs. Talking specifically about its convert PDFs feature, its intelligent functionality lets you convert PDFs into editable Word, Excel, PPT, and other popular formats with retained formatting. This way, you can instantly convert PDFs into popular Office file formats and customize them further without any hassle.
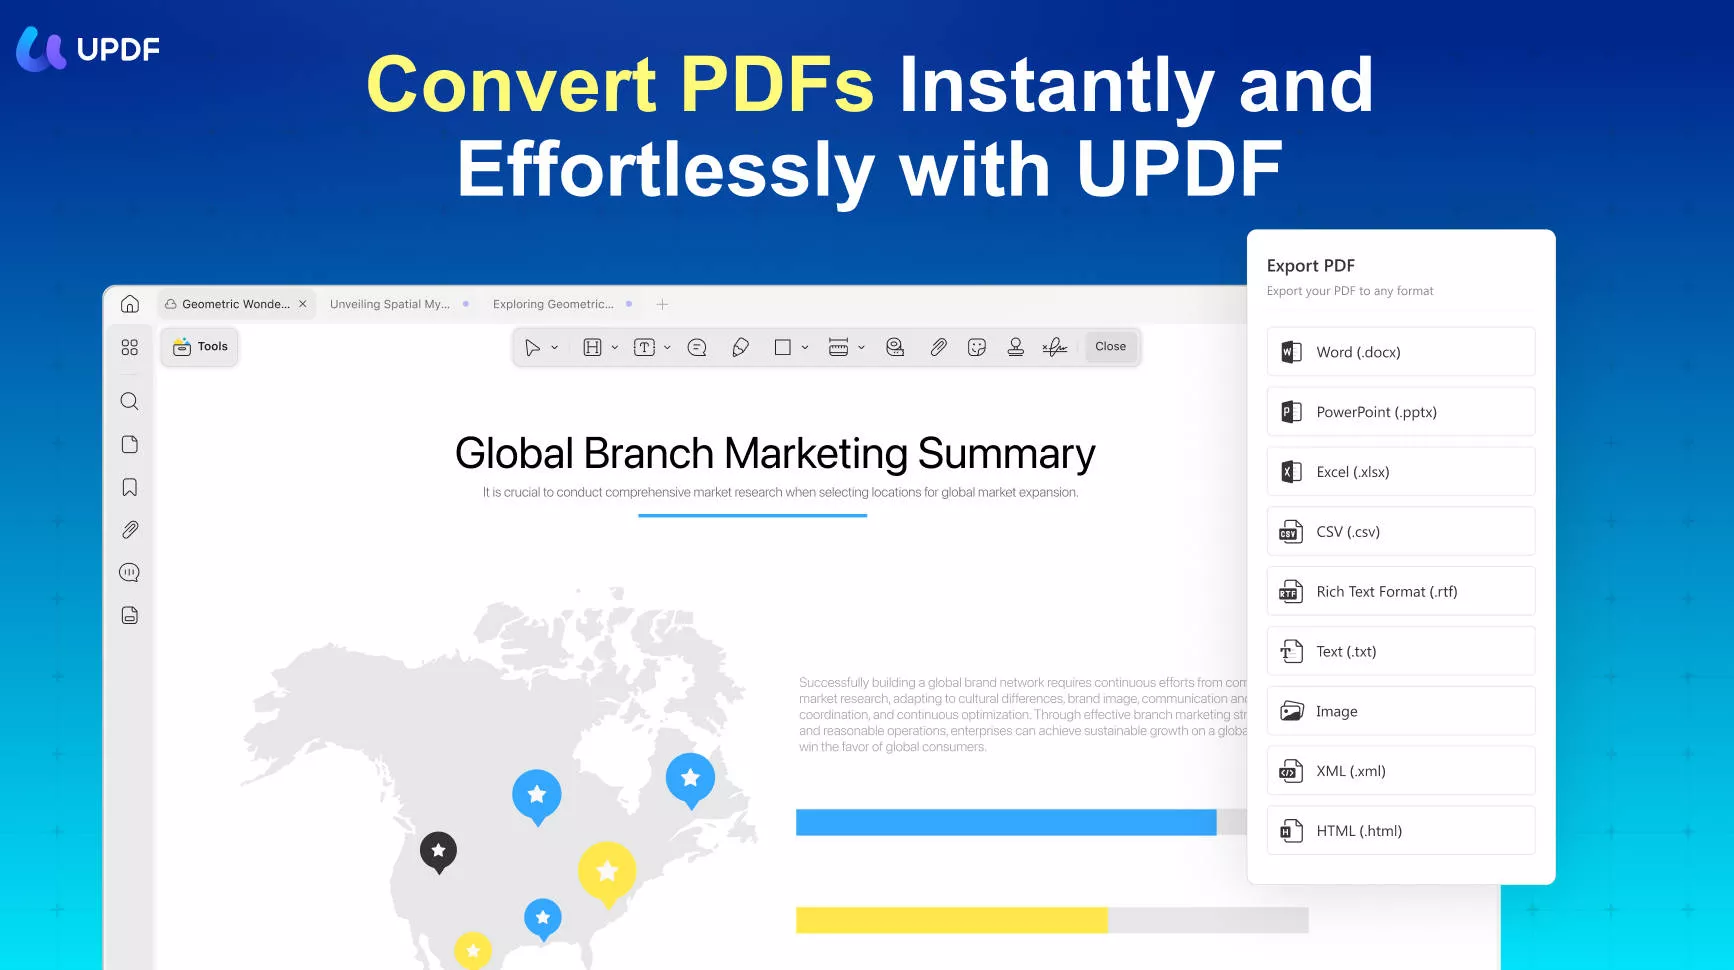
Below are the quick three steps you have to follow to convert PDF to any Office file format with UPDF:
Step 1. Install and launch UPDF on your PC. Drag and drop the PDF you want to convert.
Windows • macOS • iOS • Android 100% secure
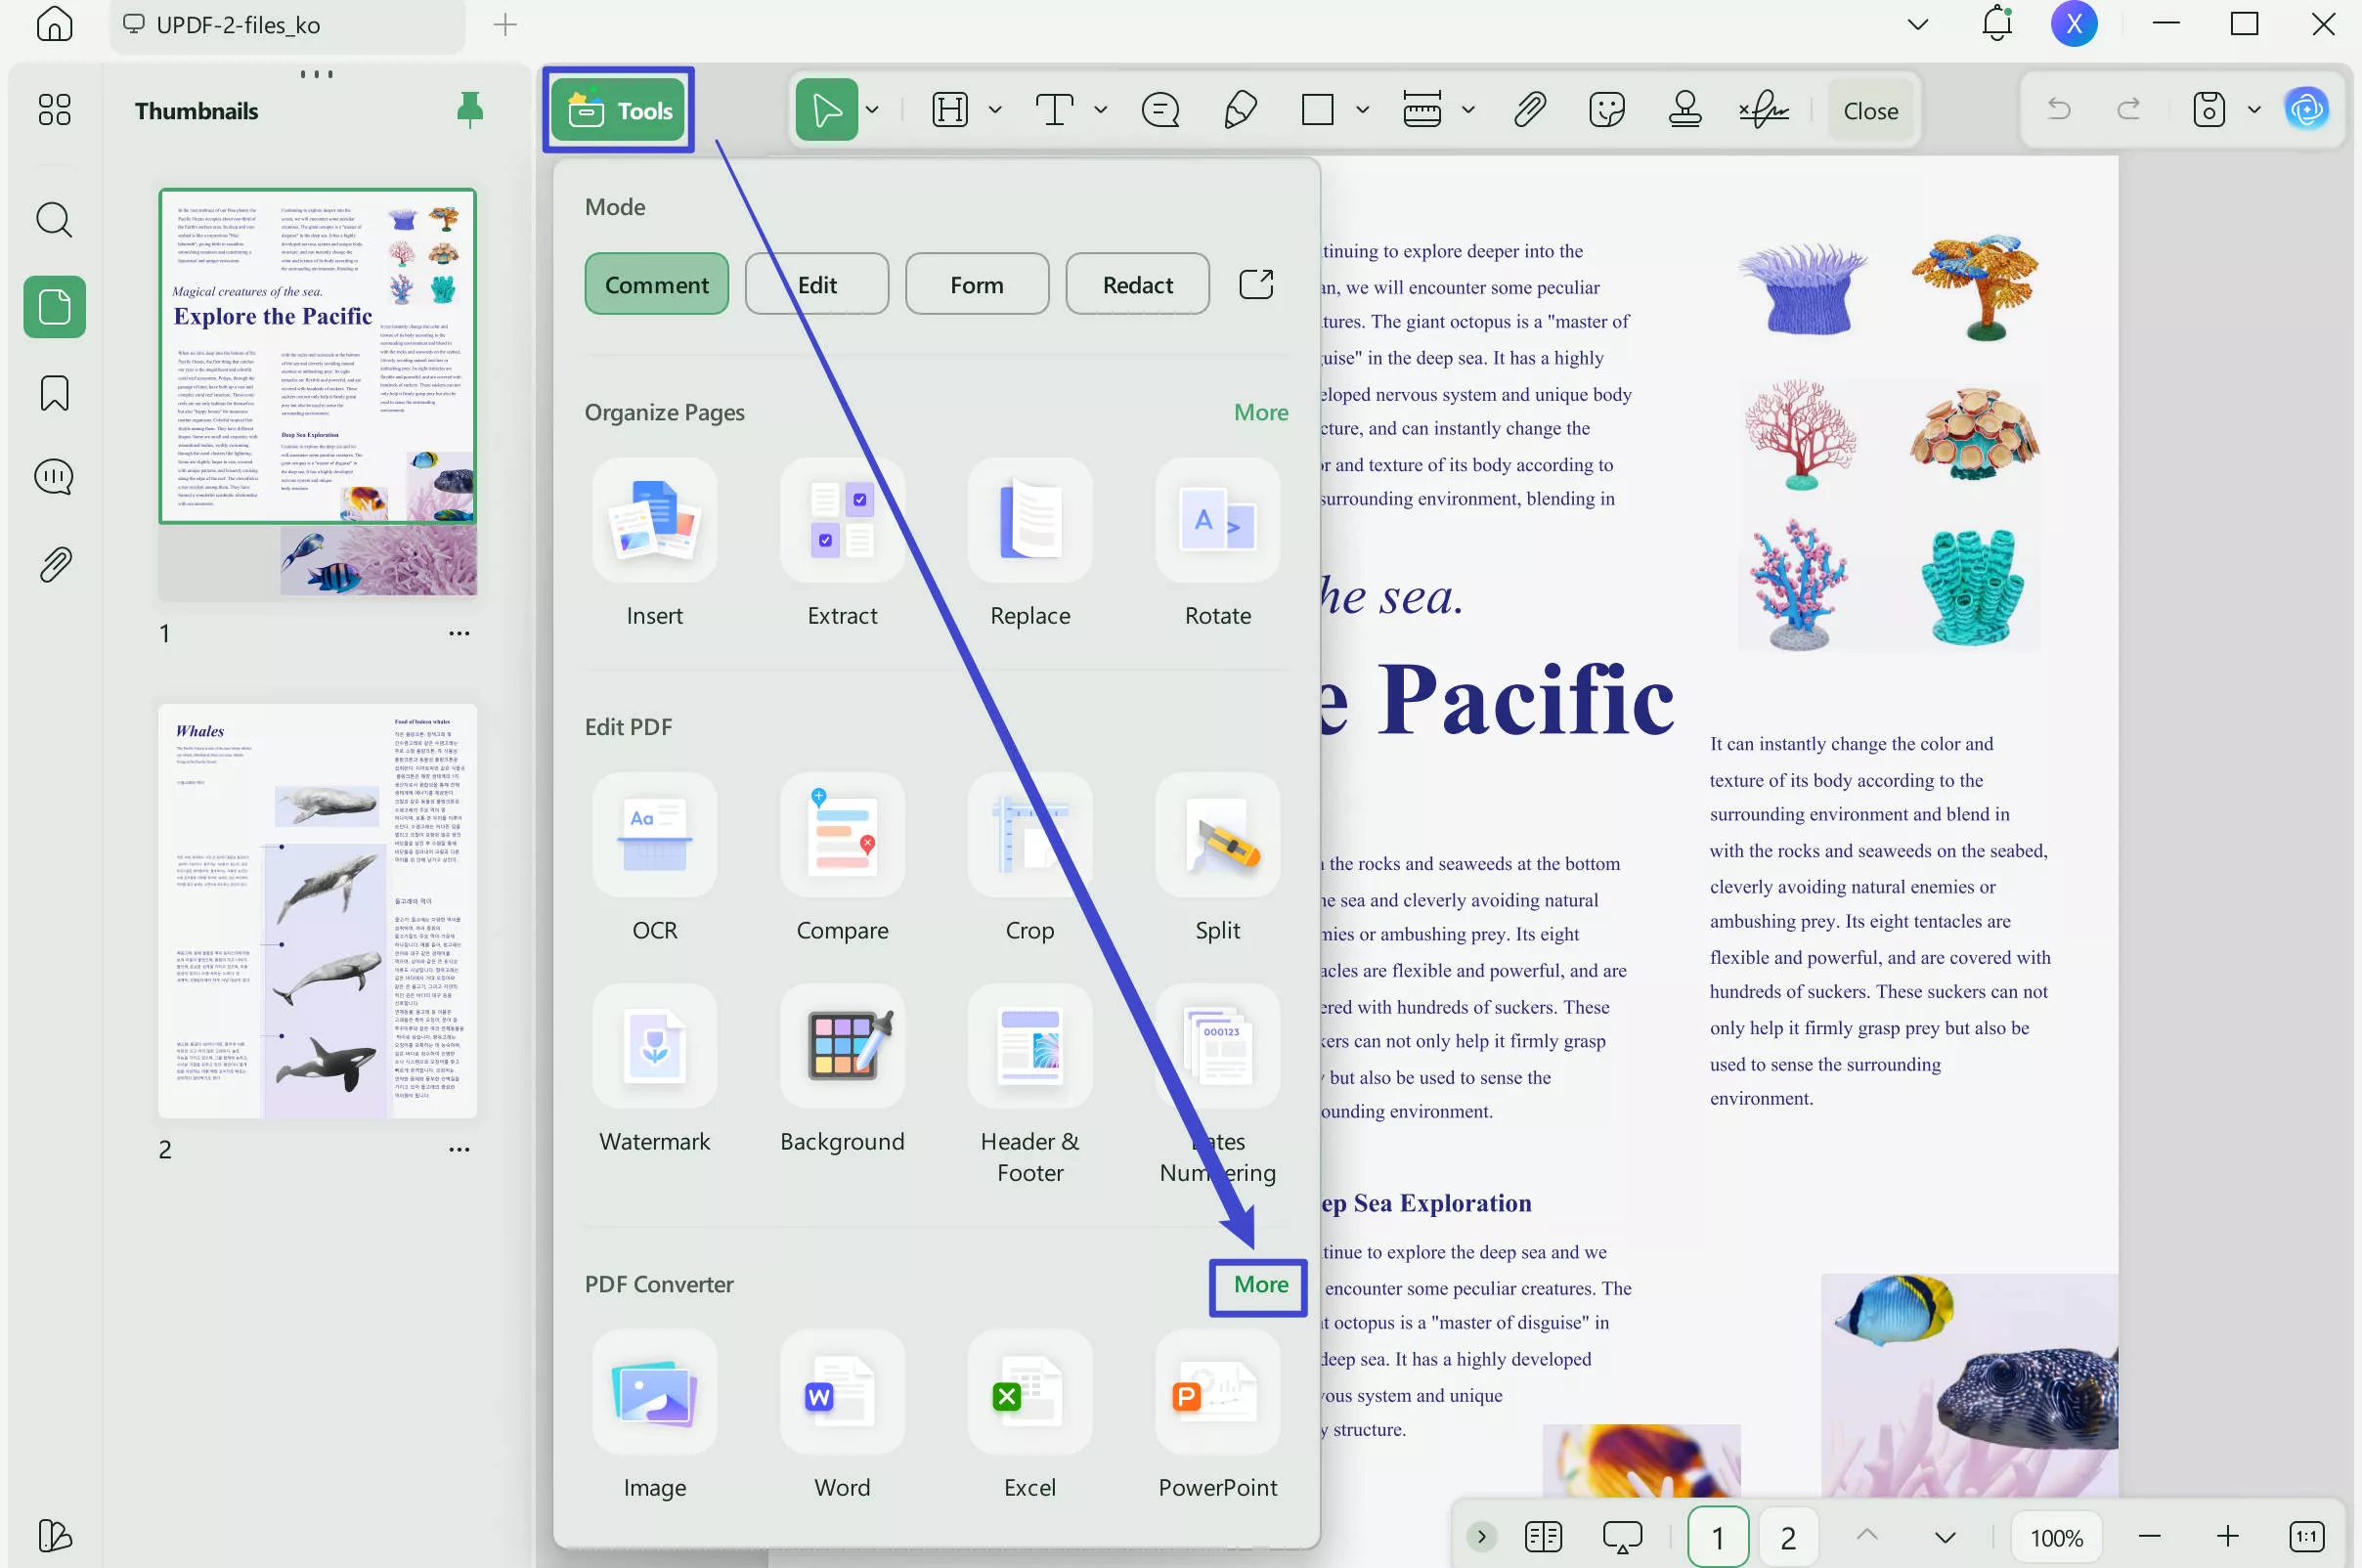
Step 2. Click the "Tools" icon from the toolbar on the left side and select the "More" to find the format of your choice.
Step 3. Click the "Apply" button to convert the PDF to the targeted format.
That's it! This way, you can instantly convert a PDF into an Office file format.
Conclusion
Considering the use cases of Excel and Word, it is not uncommon to see users looking for how to convert Excel to Word. Therefore, we have discussed the best ways to access Excel data or spreadsheets directly into your Word document. So, test out the above methods and pick the one that best fits your needs. Besides that, we also recommend installing UPDF on your computer so that you can quickly convert PDF to any Office file format anytime you want.
Windows • macOS • iOS • Android 100% secure
 UPDF
UPDF
 UPDF for Windows
 UPDF for Mac
 UPDF for iPhone/iPad
 UPDF for Android
 UPDF AI Online
 UPDF Sign
 Edit PDF
 Annotate PDF
 Create PDF
 PDF Form
 Edit links
 Convert PDF
 OCR
OCR PDF to Word
 PDF to Image
 PDF to Excel
 Organize PDF
 Merge PDF
 Split PDF
 Crop PDF
 Rotate PDF
 Protect PDF
 Sign PDF
 Redact PDF
 Sanitize PDF
 Remove Security
 Read PDF
 UPDF Cloud
 Compress PDF
 Print PDF
 Batch Process
 About UPDF AI
 UPDF AI Solutions
 AI User Guide
 FAQ about UPDF AI
 Summarize PDF
 Translate PDF
 Chat with PDF
 Chat with AI
 Chat with image
 PDF to Mind Map
 Explain PDF
 Scholar Research
 Paper Search
 AI Proofreader
 AI Writer
 AI Homework Helper
 AI Quiz Generator
 AI Math Solver
 PDF to Word
 PDF to Excel
 PDF to PowerPoint
 User Guide
 UPDF Tricks
 FAQs
FAQs UPDF Reviews
 Download Center
 Blog
Blog Newsroom
 Tech Spec
 Updates
 UPDF vs. Adobe Acrobat
 UPDF vs. Foxit
 UPDF vs. PDF Expert








 Delia Meyer

 Enola Davis


