Nowadays, authorizing documents is necessary to ensure legality, whether it's a contract, agreement, or other form. Fortunately, various tools allow you to edit and sign the PDFs via multiple methods, including draw and upload. However, users seek a versatile and accessible one that offers them intuitive features to make file authorization seamless.
To offer assurance in such scenarios, we introduced two foremost tools, Sejda Sign PDF and UPDF, which is the most convenient digital and electronic signature facilitator. From features to detailed steps of signing the PDFs, every aspect is discussed comprehensively in this guide for your aid. So, review the article and, at the end, determine which tool suits you best.
Part 1. Sejda Sign PDF: How to Use It
Sejda Sign is a straightforward tool that supports an intuitive interface to make PDF signing easier for all types of users. For authorization, users can insert multiple signatures in the forms, after which they can change the colors for distinctions. In addition, one can choose from multiple signature styles to ensure a personalized and professional finish. Regarding singing, you can either upload, draw, or type the signer's name to legalize the PDF.
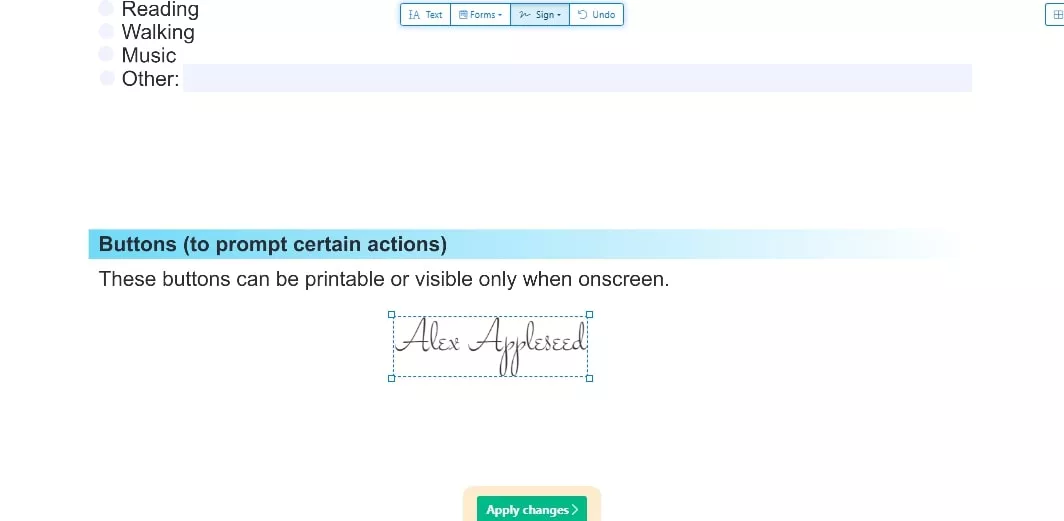
However, a fascinating aspect is that users can capture the signature using its camera tool. After signing, you can save the signature and insert it in PDFs by accessing its sign tool, saving you time and effort. Plus, to sign PDFs online, Sejda offers the facility to duplicate the signatures on multiple pages to ensure consistency. Not just that, you can also rotate it to align perfectly with the PDF layout.
Limitations of Opting For Sejda PDF:
- With Sejda, users cannot digitally sign PDF files, which poses a threat to legally binding document.
- If you want to change the thickness of the signature, unfortunately, this tool lacks this facility.
- Using this tool, you can't highlight the fillable fields while filling the form, which is inconvenient.
- It does not support using the formulars to help automate calculations.
From these limitations, it is clear that Sejda Sign PDF isn't a versatile tool that offers a wide range of signing features. Therefore, we recommend using UPDF, which is a more comprehensive solution and let you change the sign layout to enhance the appeal.
Windows • macOS • iOS • Android 100% secure
For now, navigate to the following guide and understand how Sejda signs a PDF and what better functions one can achieve after switching.
Detailed Guide To Sign PDFs with Sejda
Regardless of its limited singing features, here is how you can sign PDF files with this basic PDF editing tool:
Step 1. Start by accessing the tool on your device and tap the "Upload File" button to import the form you seek to sign.
Step 2. Once displayed on the screen, pick the "Sign" tool from the top toolbar and press the "New Signature" button to start the authorization process.
Step 3. This will fetch a pop-up menu, where you have to pick the signing option from the "Create Signature" section. After you opt for the preferred signing method, sign the PDF and hit the "Save" option to place the sign box in the form.
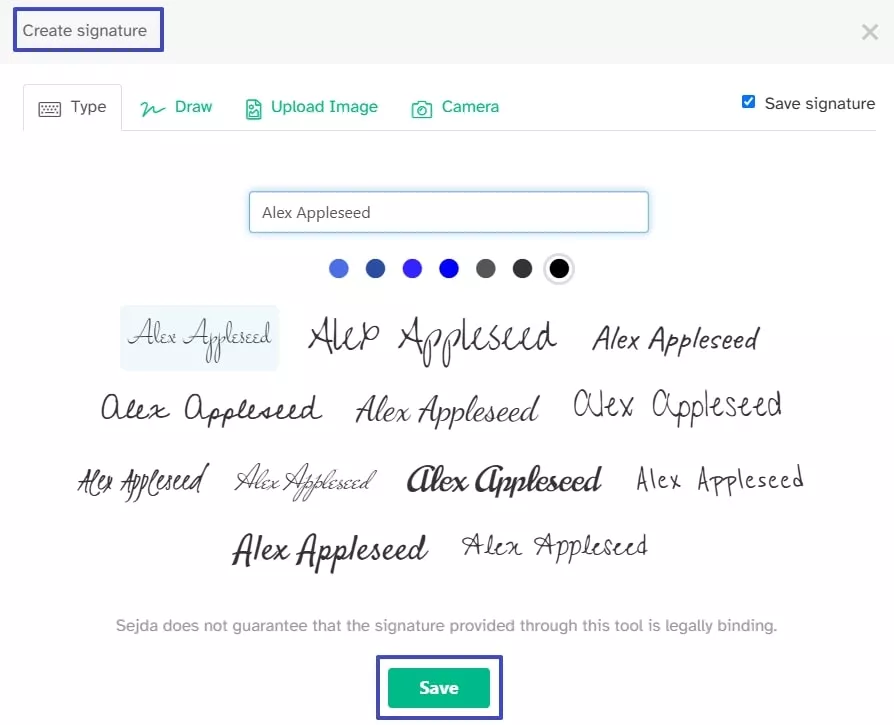
Step 4. Now that you have added the signature on the form, you can either duplicate it by pressing the "Duplicate" icon or rotate it to match the form's layout. Then, choose the "Apply Changes" button from the bottom and implement the signs.
Step 5. Wait till the tool completes the process, and as it's done, press the "Download" button to save the signed form to the device.
Part 2. A Better PDF Signing Platform Than Sejda Sign PDF
To sign PDFs, Sejda offers basic features, whereas UPDF stands out as a superior alternative with a wide range of advanced signing capabilities. As a comprehensive PDF editor, UPDF allows you to create, fill out, and sign PDF forms all in one platform. It supports adding both electronic signatures (by drawing, typing, or inserting signature images) and digital signatures to your PDF forms. Plus, it includes a formula feature to automate calculations, making it especially useful for billing forms. In addition, users can password-protect PDF documents to prevent unauthorized access. Best of all, UPDF offers a free trial—click the button below to give it a try!
Windows • macOS • iOS • Android 100% secure
Bonus
Procedural Guide to Use UPDF for Signing Forms Digitally
Besides using Sejda Sign PDF, here is how to use UPDF to digitally sign and legally bind the PDFs.
Step 1. Open the Tool and Import PDF Form
Launch the tool on your device and tap the "Open File" option to access the form.
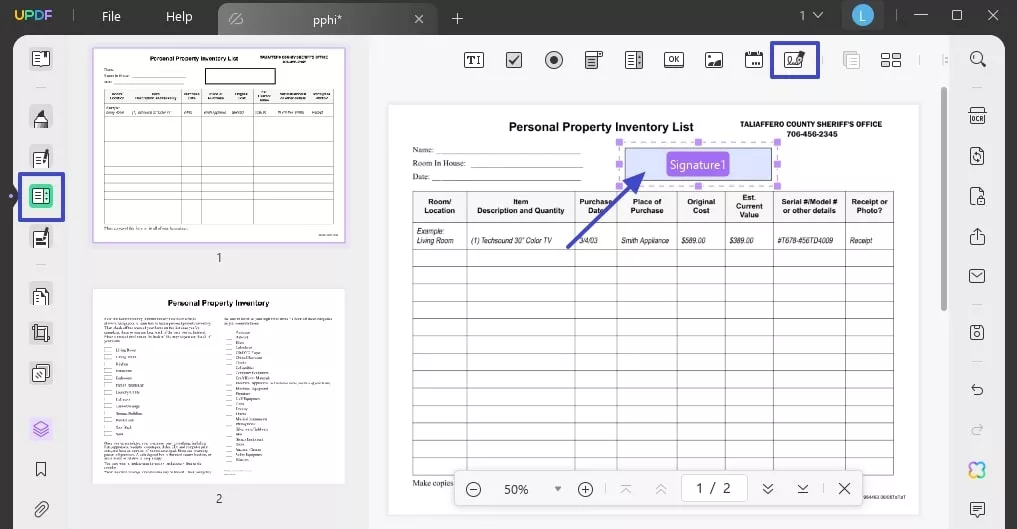
Step 2. Insert the Digital Signature Field
As the PDF form imports and opens, press the "Prepare Form" tool from the left side and pick the "Digital Signature" tool from the top toolbar. After that, place the signature field at the desired location and proceed.
Step 3. Sign the Form By Accessing Reader Tool
To sign it, select the "Reader" tool from the left side and tap the signature field to fetch a popup window. There, press the "Create" icon beside the sign with a digital ID option.
Step 5. Add the Signee Details on the Popup Window
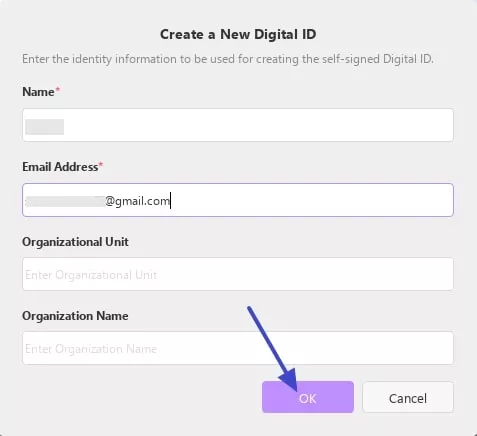
Moving on, insert the signee details into the new pop-up menu and tap the "OK" button. After that, you have to add the file password to secure it.
Step 6. Complete the Signing Procedure
Now that you have authorized the PDF, choose the "Sign" button to apply the changes on the form.
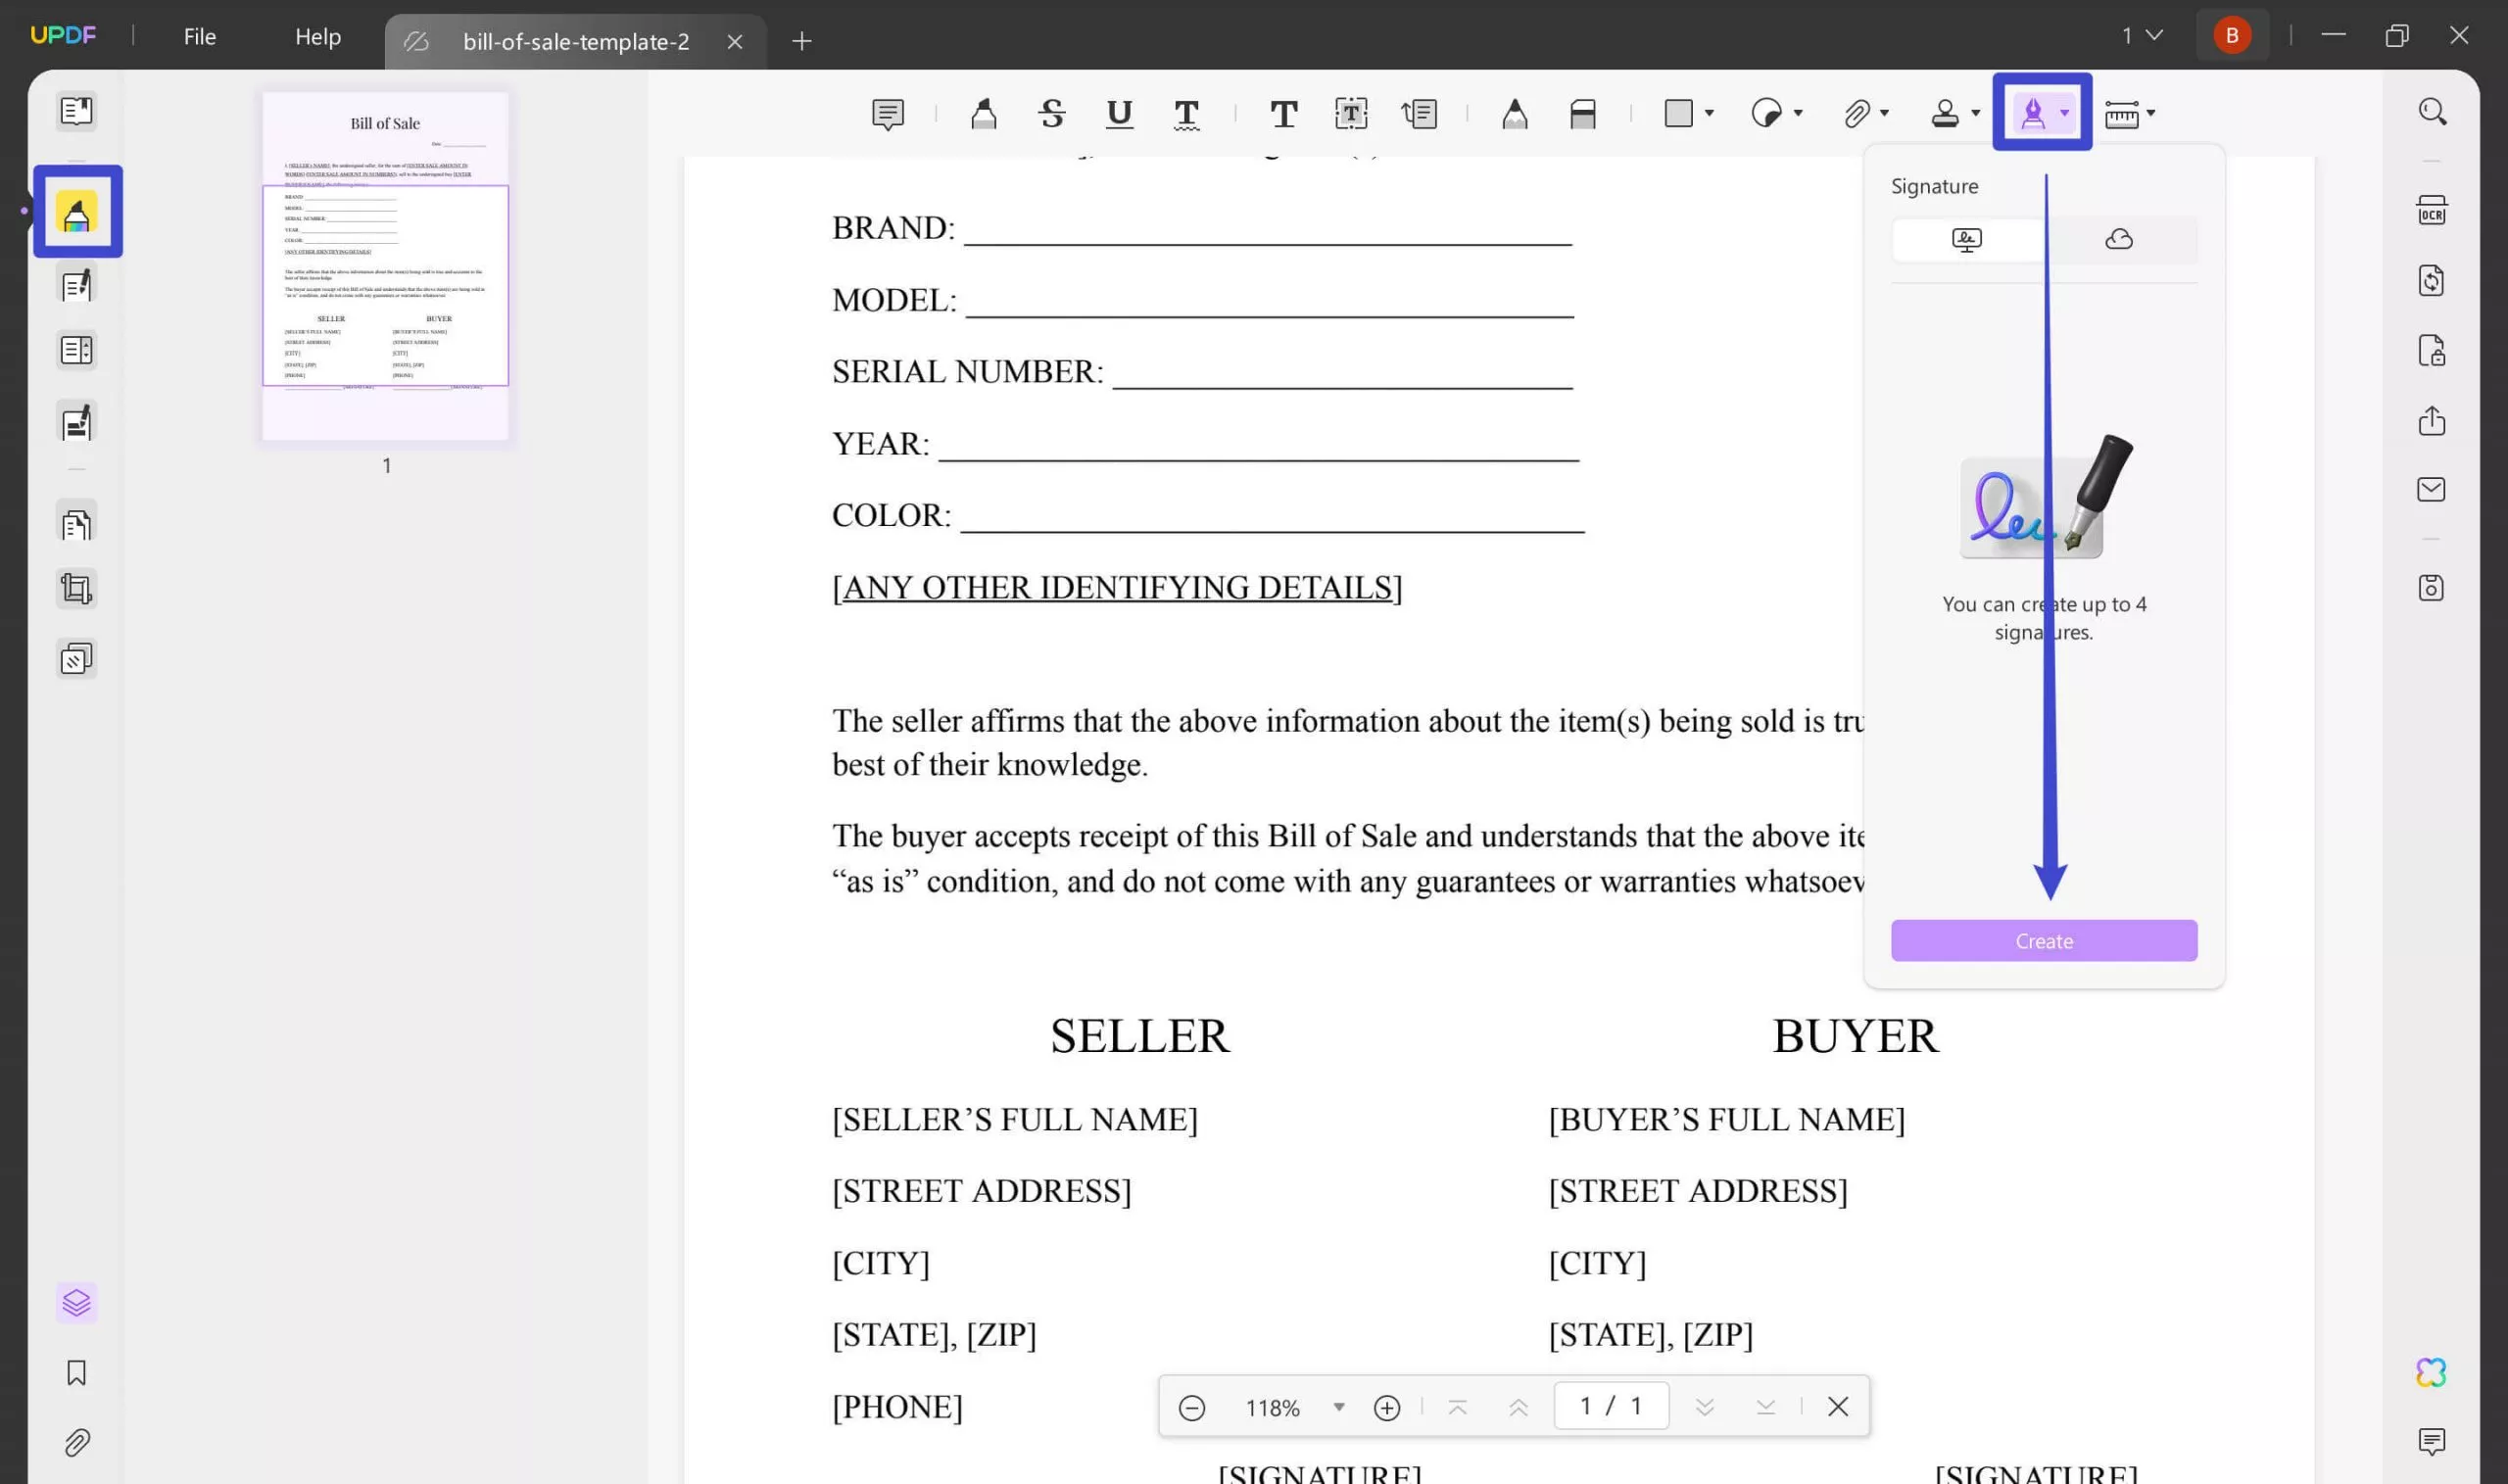
As we have mentioned earlier, UPDF also supports adding an electronic signature to PDF, users can switch to the Comment mode and draw, type, or insert an image as the signature. Moreover, after creating a signature, they can save it for future use. As UPDF is compatible with Windows, Mac, iOS, and Android, they can re-use the saved signature on all these four platforms. For detailed steps, read this guide.
How to Use UPDF Sign to Send and Sign the PDF - Simplified Steps
Other than UPDF, adhere to the given guide and learn to send and sign the file with UPDF Sign:
Step 1. Launch the Tool and Initiate the Process
Open the UPDF Sign and tap the "Initiate Signatures" option to initiate the process of sending forms.
Step 2. Import the File to Add Signature Field
Press the "Upload Document" icon on the new screen to fetch the form you want to insert the signature field and send for authorization.
Step 3. Enter the Signee Details and Choose Signature Settings
Now that the form is there, head to the "Add Recipients" section and enter the signee details. Within the section, unfold the "Need to Sign" option to pick the preferred options. After adding the details, hit the "Continue" button to save the settings.
Step 4. Insert the Signature Field on Desired Location
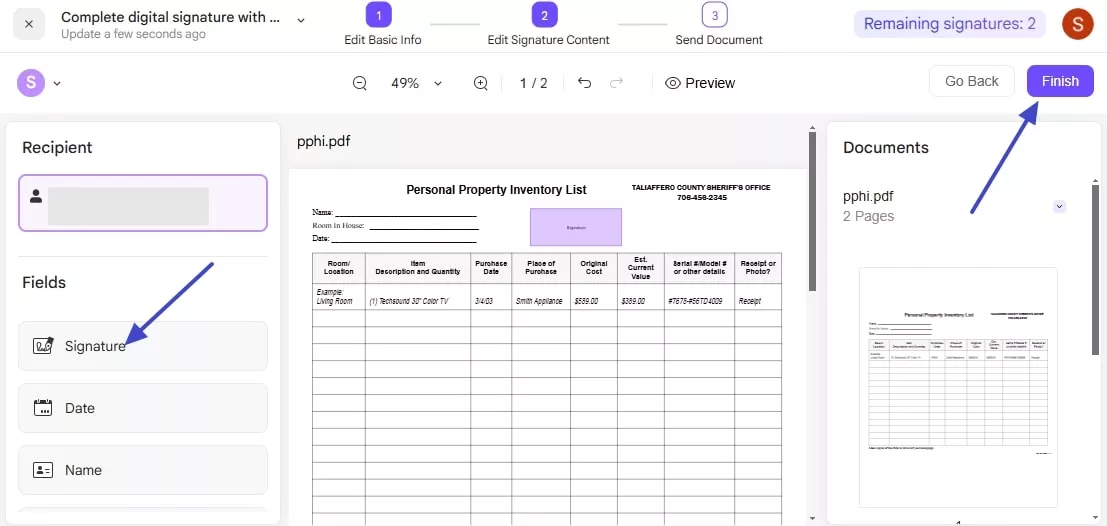
Add the signature field on the new screen by picking the "Signature" option from the fields section. Place the signature box on the desired location and select the "Finish" option to send the form.
Step 5. Preview and Send the Form to Sign
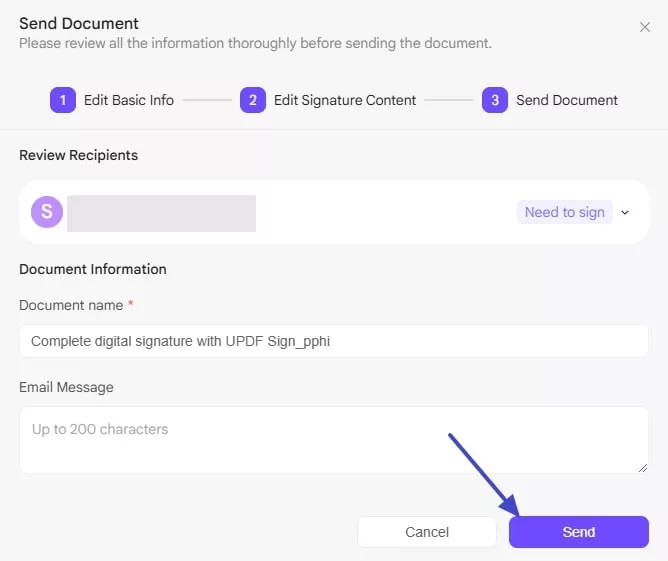
Before you send mail, preview the signee details from a pop-up menu and tap the "Send" button.
Step 6. Access the Form on Receiver's End
Open the mail on the Receiver's end and tick the "Click Here to Indicate that You Agree to the User Agreement" option. Then, select the "Sign" button to access the form for authorization.
Step 7. Pick the +Add Option to Sign
Once it is there, click the form and pick the "+Add" option from the popup menu.
Step 8. Choose the Specific Authorization Method
There, choose the authorization type, upload, type, or draw the sign, and select the "Confirm" button.
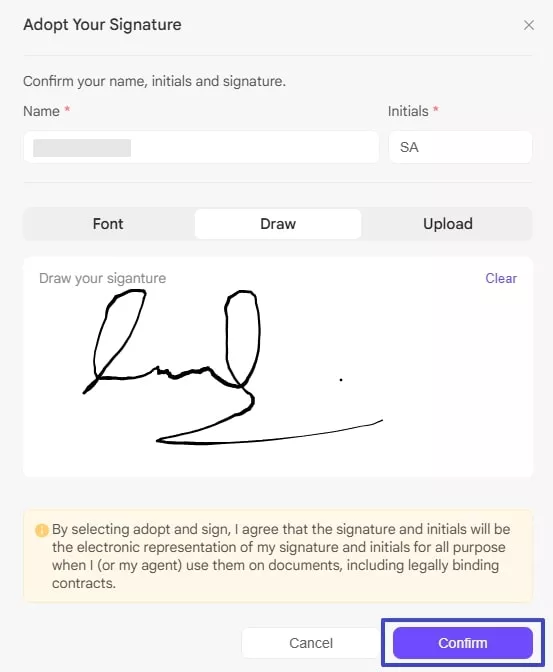
Step 9. Review the Sign and Complete the Process
Preview the signed field and press the "Finish" button to complete the PDF signing procedure.
Conclusion
In a nutshell, to sign PDFs online, Sejda is an ideal tool for beginners that offers a basic singing facility. However, UPDF and UPDF Sign are the foremost options for those looking for an all-in-one solution. UPDF Sign allows you to send multiple files for authorization while inserting more than one recipient. Moreover, unlike Sejda, you can change the signature formatting to enhance its appeal.
 UPDF
UPDF
 UPDF for Windows
 UPDF for Mac
 UPDF for iPhone/iPad
 UPDF for Android
 UPDF AI Online
 UPDF Sign
 Edit PDF
 Annotate PDF
 Create PDF
 PDF Form
 Edit links
 Convert PDF
 OCR
OCR PDF to Word
 PDF to Image
 PDF to Excel
 Organize PDF
 Merge PDF
 Split PDF
 Crop PDF
 Rotate PDF
 Protect PDF
 Sign PDF
 Redact PDF
 Sanitize PDF
 Remove Security
 Read PDF
 UPDF Cloud
 Compress PDF
 Print PDF
 Batch Process
 About UPDF AI
 UPDF AI Solutions
 AI User Guide
 FAQ about UPDF AI
 Summarize PDF
 Translate PDF
 Chat with PDF
 Chat with AI
 Chat with image
 PDF to Mind Map
 Explain PDF
 Scholar Research
 Paper Search
 AI Proofreader
 AI Writer
 AI Homework Helper
 AI Quiz Generator
 AI Math Solver
 PDF to Word
 PDF to Excel
 PDF to PowerPoint
 User Guide
 UPDF Tricks
 FAQs
FAQs UPDF Reviews
 Download Center
 Blog
Blog Newsroom
 Tech Spec
 Updates
 UPDF vs. Adobe Acrobat
 UPDF vs. Foxit
 UPDF vs. PDF Expert




 Enola Davis

 Lizzy Lozano
 Enya Moore
 Enola Miller