When you are working on images and want to save or organize some of them differently, PDF format will be a great choice since it makes sharing over all platforms very easy. This article covers 2 proven ways to convert an Image to PDF Windows.
Part 1. Convert Image to PDF on Windows 10/11 Via UPDF
Converting your images to PDF documents can't get better than this. UPDF offers the best functionality for this conversion thanks to its powerful backend. It is not just an image-to-PDF conversion tool; it packs much more power than that. It comes as a PDF organizer and viewer, giving you a complete experience. You can try it via the below download button.
Windows • macOS • iOS • Android 100% secure
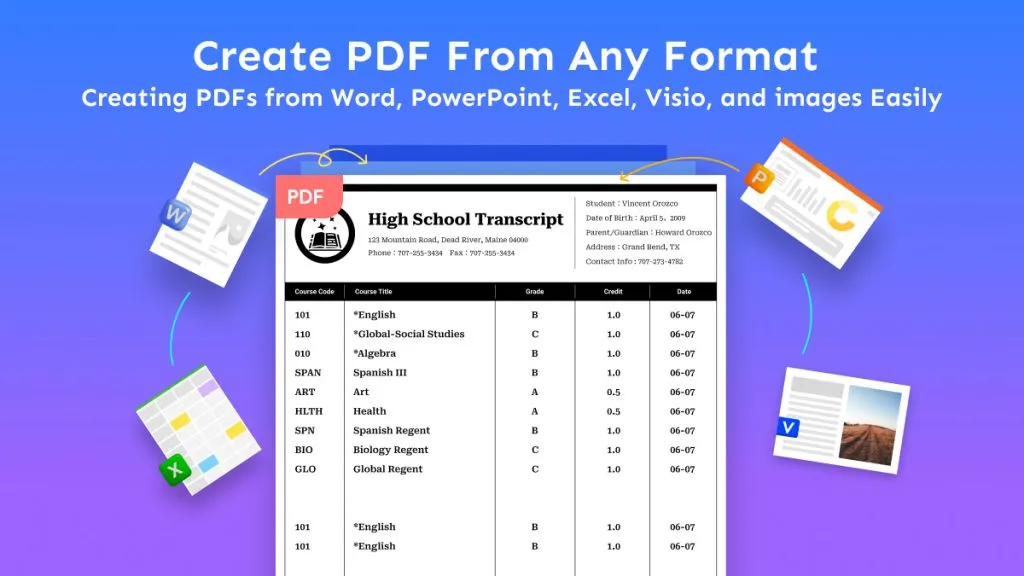
Since there are no built-in tools with a complete PDF working experience in the Windows OS, UPDF takes care of that and offers you an amazing experience all in one place. Speaking of its technical benefits, it brings Cloud and AI capabilities. Moreover, collaboration through sharing and annotation is made very easy. UPDF ensures that all documents across different devices are synced in real-time.
UPDF not only allows you to convert singular images to PDF, but it brings more value by allowing you to combine multiple images into one PDF document. Along with such a feature-rich experience, using UPDF for converting images to PDF is also very simple. Below are the details of both conversion methods you can try with UPDF.
1. Convert One Image to a PDF on Windows 11/10
Here are the steps you will be following on UPDF for the conversion:
1. Create PDF from Image
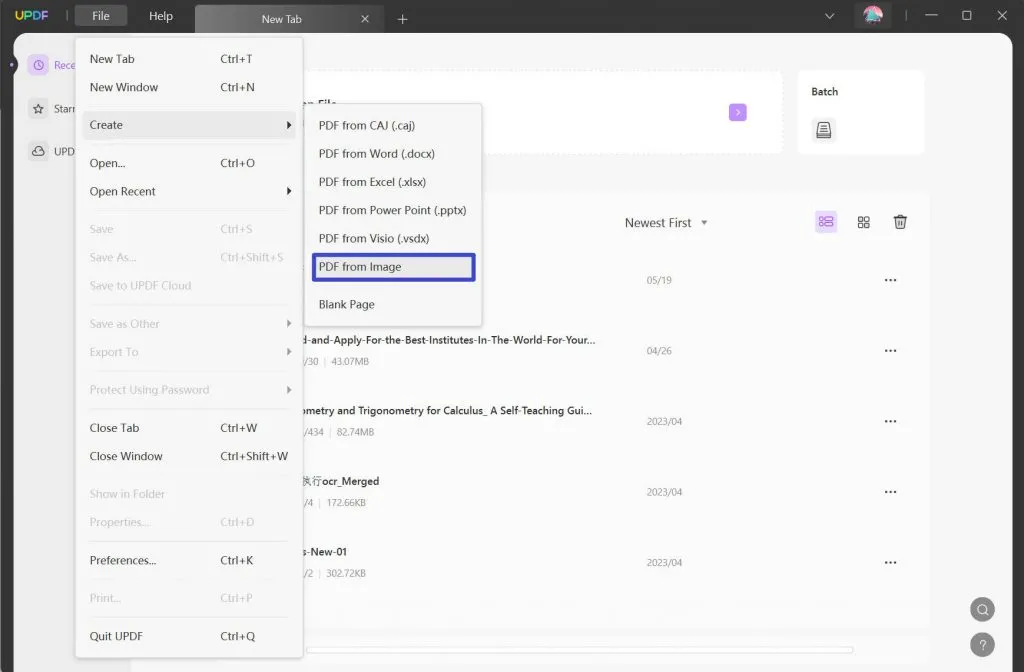
This method starts using the "create PDF from image" functionality at UPDF. To use this functionality, you first need to open UPDF. Double-click the desktop icon, and it will open. Then click "File" from the top and navigate the cursor to "Create" It will show a list of options from where you will select "PDF from Image" It is the built-in feature of UPDF that allows you to instantly convert images of multiple formats into PDF documents. Select any image using the browse function and click “open."
2. Save as Other
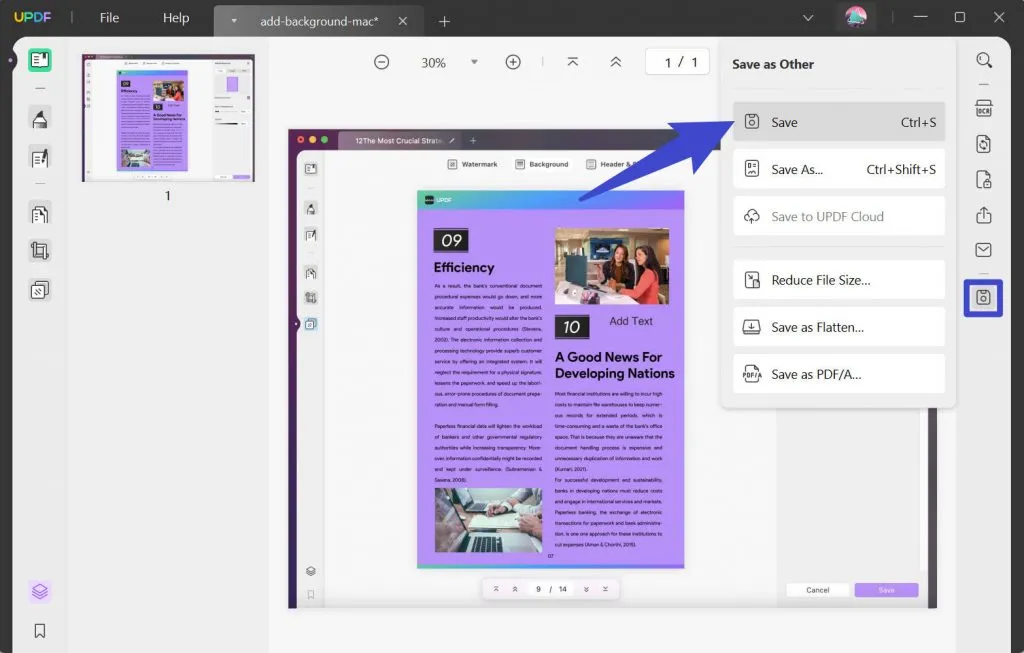
As you open the image, it will be converted to PDF automatically, and UPDF will take you to the "Reader" mode. Here you will have a vertical menu on the right side. From that menu, click "Save as Other”. Now you will have multiple saving options in front of you. The simplest one to pick here is “Save." For better efficiency, you can simultaneously press the "Ctrl + S" buttons on your keyboard.
3. Save PDF Copy
Now you will see a browse screen that allows you to select the saving destination for the PDF. You can rename the PDF document before you click "Save," and the PDF copy of your image gets saved on the PC's offline storage.
2. Convert Multiple Images to One PDF on a PC
What sets UPDF apart from other PDF image conversion tools and methods is that you can use multiple images and collectively convert them into one PDF document. This function at UPDF does not come with any difference in the performance or user experience, making it extremely beneficial for creating big PDF files with multiple images.
Once you select all the images and start the conversion, it does not make you wait, and the file is instantly available to be saved on your PC. Here are the steps you can follow on UPDF for converting multiple images into a singular PDF document:
1. Open UPDF, Select Combine in Batch
You can open UPDF using a similar way of double-clicking its desktop icon as in the previous method. However, there is another way of opening it when you don’t have a desktop icon. You must search the Windows Search option with "UPDF" and hit enter.
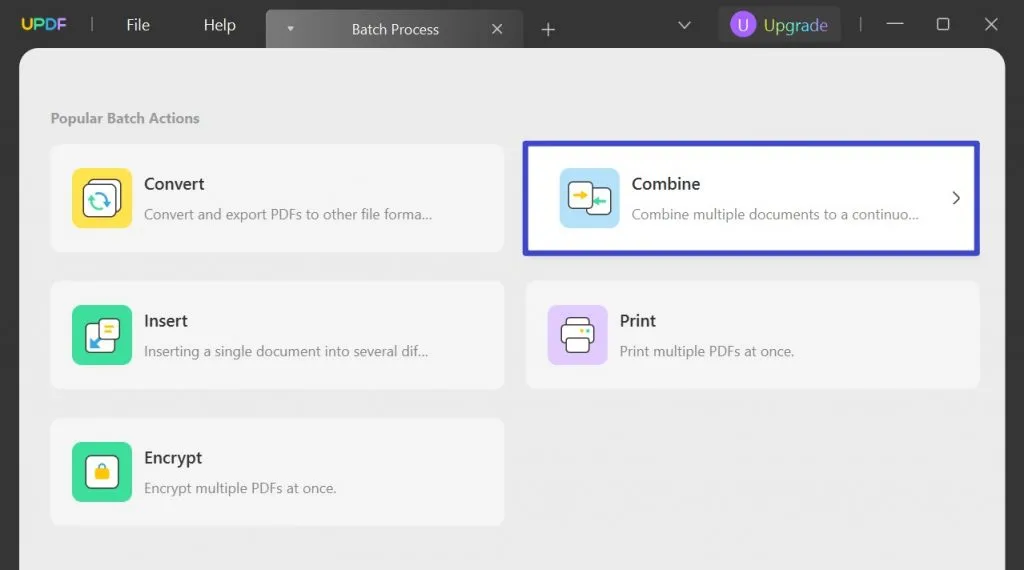
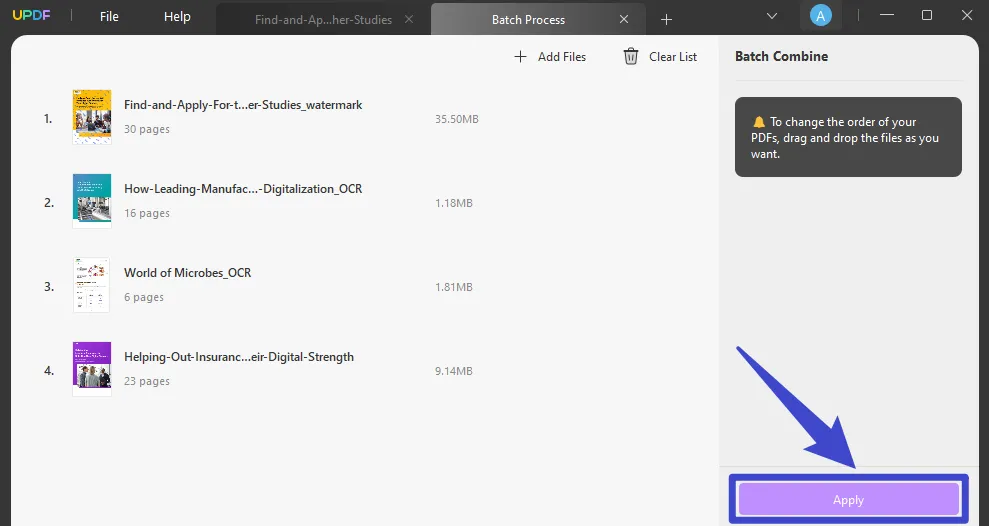
Now you will have UPDF running on your PC. Instead of using the File option, you will click "Batch," from the 5 options available in the Batch feature, select "Combine. You will now move to a new screen that asks you to add files.
2. Add Files to Batch Combine
Click the "Add Files" button on the UPDF screen to open the browse window for selecting files. Now you can select multiple images by clicking them, and they can be of different image formats. As you select an image, click "Open," and it will load in UPDF.
Click the "Add Files" button from the top right to add more images. After you are done adding images, you can also set their order by holding, dragging, and releasing an image to move it up or down.
3. Apply and select a destination folder.
After you have added all images and set their order, you can click "Apply" at the bottom right of the screen. UPDF will now prompt you to select a folder on your PC where this file will be saved. So, you can select a folder and click "Save." Now UPDF will save the PDF file created with those multiple images in that destination inside a folder named "UPDF-Merge." You may look for this folder, and you will find our files in it.
Part 2. Convert Image to PDF in Windows 10/11 Via Printing
Sometimes you don’t want to use any third-party application with your pictures. Although Windows OS does not come with in-depth PDF editing capabilities, there are methods that you can use to get the job done. The printing method is one of those methods. It helps you convert your images to PDF documents with ease. The best part about it is that the process is completely free.
Moreover, it works offline, and since it comes with a built-in feature, you don’t need to download or install anything on your PC. Although you must know some printing technicalities to use this process, it is still easy for everyone. Here are all the steps to follow for converting an image to PDF via printing method:
1. Open the image and print
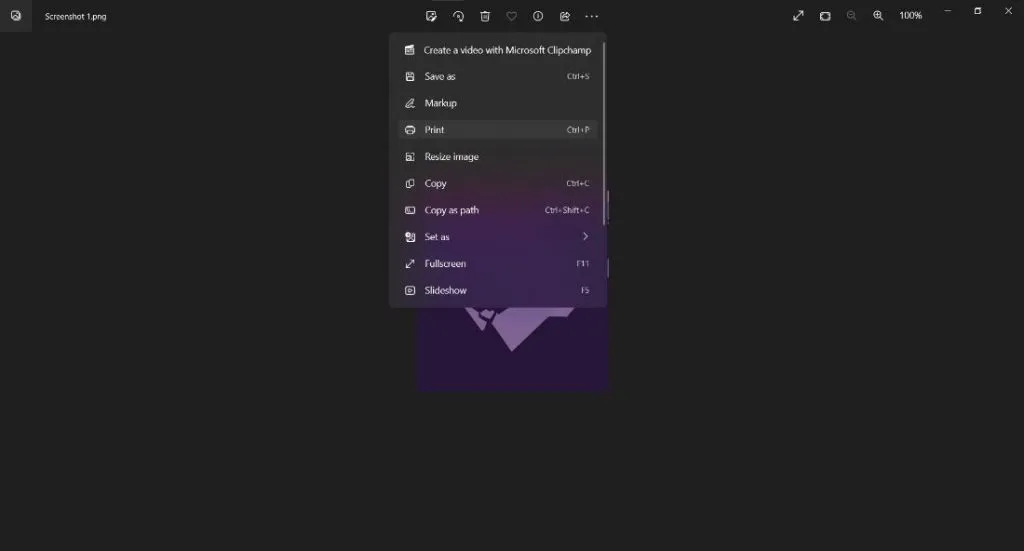
Find the image that you want to convert into a PDF document and double-click it. If it opens with the "Photos" app, you can proceed. Otherwise, right-click, select "Open With," and select “Photos." Once the image opens in the Photos app, click the 3-dots button on top and select "Print." An easy way to print is by pressing the "Ctrl + P" buttons together.
2. Set printing preferences
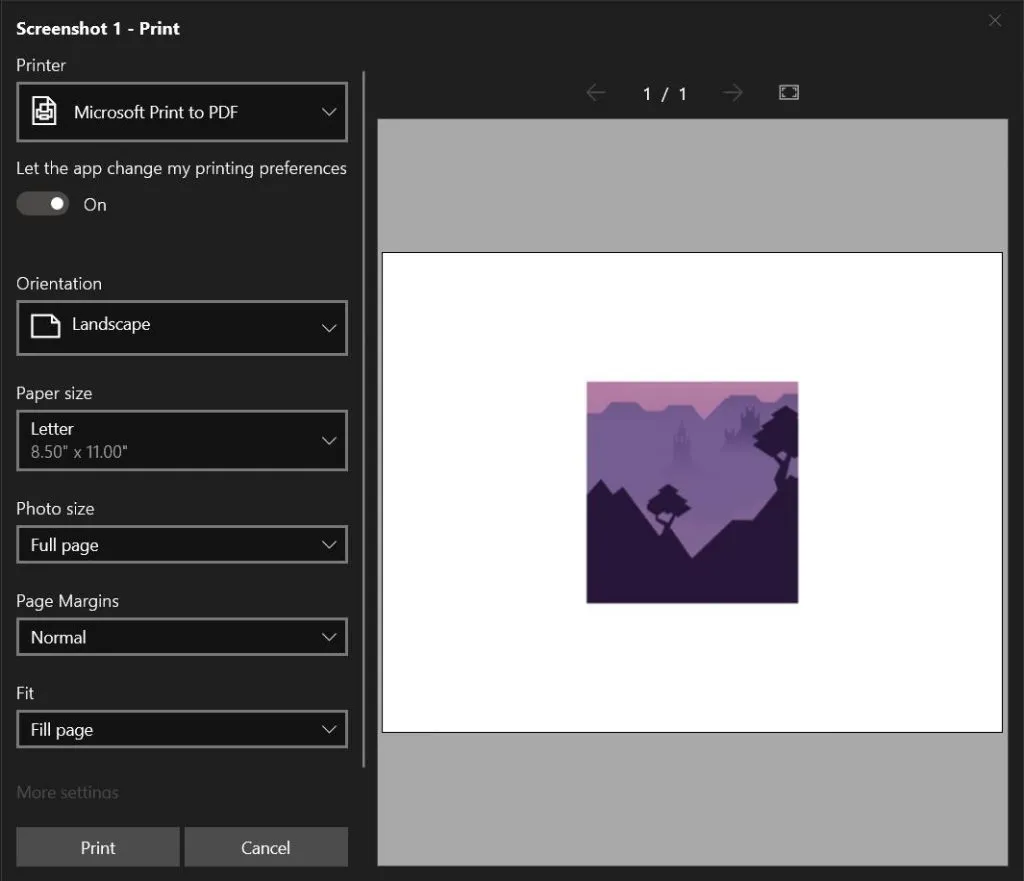
Now you will see a new window in front of you that contains all the printing settings. The first change you must make here is setting the printer to "Microsoft Print to PDF." You also have multiple other options, including orientation, fit, page size, etc. If required, you may set any of these or leave them in default settings.
3. Save to offline storage.
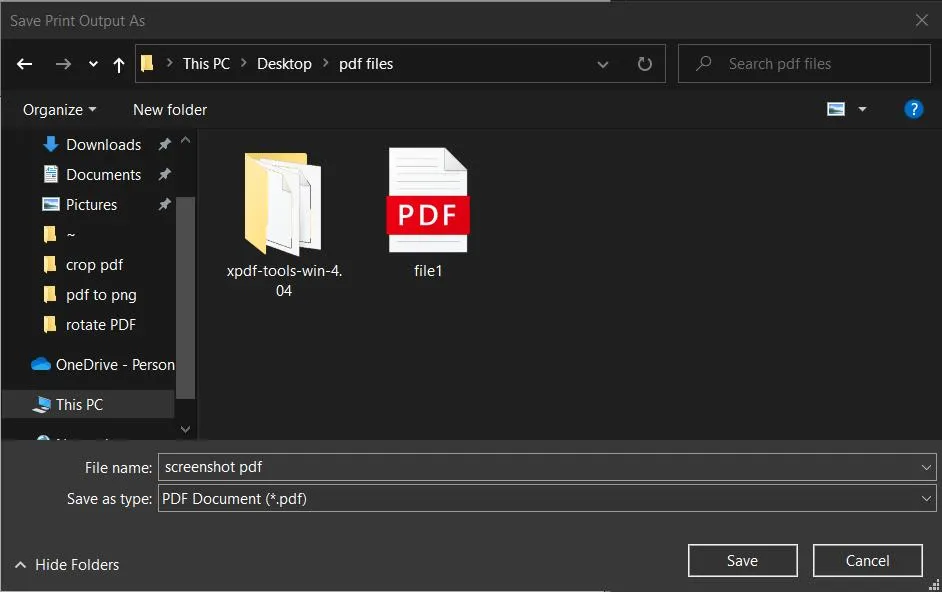
Now click "Print," and a browse window will appear. Select the destination folder for saving that newly created PDF file. If needed, you may also rename the file. Click "Save," and the image converted into a PDF document will now be saved to your offline storage in PDF format.
Final Words
You will encounter multiple online and offline tools whenever you want to convert an image to PDF Windows. However, it is important to understand that not all offer the same functionality, experience, and reliability. When working with images, you must care for your privacy and security, and that's where UPDF and Printing options make the best choice.
UPDF is a better option considering you can convert one image to PDF or multiple to one PDF document. The best part about it is its complete PDF editing package. Whether you need to do a PDF document, UPDF will be your tool of choice.
If you only want to convert an image to PDF once, then you may opt for the printing method. However, if you must work with PDF documents frequently, UPDF will be your best viewer, organizer, and editor software. Download it now to have a try.
Windows • macOS • iOS • Android 100% secure
 UPDF
UPDF
 UPDF for Windows
 UPDF for Mac
 UPDF for iPhone/iPad
 UPDF for Android
 UPDF AI Online
 UPDF Sign
 Edit PDF
 Annotate PDF
 Create PDF
 PDF Form
 Edit links
 Convert PDF
 OCR
OCR PDF to Word
 PDF to Image
 PDF to Excel
 Organize PDF
 Merge PDF
 Split PDF
 Crop PDF
 Rotate PDF
 Protect PDF
 Sign PDF
 Redact PDF
 Sanitize PDF
 Remove Security
 Read PDF
 UPDF Cloud
 Compress PDF
 Print PDF
 Batch Process
 About UPDF AI
 UPDF AI Solutions
 AI User Guide
 FAQ about UPDF AI
 Summarize PDF
 Translate PDF
 Chat with PDF
 Chat with AI
 Chat with image
 PDF to Mind Map
 Explain PDF
 Scholar Research
 Paper Search
 AI Proofreader
 AI Writer
 AI Homework Helper
 AI Quiz Generator
 AI Math Solver
 PDF to Word
 PDF to Excel
 PDF to PowerPoint
 User Guide
 UPDF Tricks
 FAQs
FAQs UPDF Reviews
 Download Center
 Blog
Blog Newsroom
 Tech Spec
 Updates
 UPDF vs. Adobe Acrobat
 UPDF vs. Foxit
 UPDF vs. PDF Expert






 Engelbert White
 Enola Davis
 Delia Meyer