 UPDF
UPDF
 UPDF for Windows
 UPDF for Mac
 UPDF for iPhone/iPad
 UPDF for Android
 Nomostar
 UPDF AI Online
 UPDF Sign
 IvyCraft
 Edit PDF
 Annotate PDF
 Create PDF
 PDF Form
 Edit links
 Convert PDF
 OCR
OCR PDF to Word
 PDF to Image
 PDF to Excel
 Organize PDF
 Merge PDF
 Split PDF
 Crop PDF
 Rotate PDF
 Protect PDF
 Sign PDF
 Redact PDF
 Sanitize PDF
 Remove Security
 Read PDF
 UPDF Cloud
 Compress PDF
 Print PDF
 Batch Process
 About UPDF AI
 UPDF AI Solutions
 AI User Guide
 FAQ about UPDF AI
 Summarize PDF
 Translate PDF
 Chat with PDF
 Chat with AI
 Chat with image
 PDF to Mind Map
 Explain PDF
 PDF AI Tools
 Image AI Tools
 AI Chat Tools
 AI Writing Tools
 AI Study Tools
 AI Working Tools
 Other AI Tools
 AI Bookmark Generation
 AI Bookmark Summary
 AI Watermark Generation
 AI Background Generation
 AI Sticker Generation
 AI Stamp Generation
 AI Editing Suite
 UPDF Copilot
 AI Page Management
 AI Semantic Search
 PDF to Word
 PDF to Excel
 PDF to PowerPoint
 Enterprise Solution
 Enterprise Sign
 Enterprise AI
 Enterprise Plan
 Enterprise User Guide
 Enterprise Webinar
 IT
IT Education
 Construction
 Financial Service
 Healthcare
 Insurance
 Legal
Legal Manufacturing
 Government
 Researchers & PhDs
 Solopreneurs & Freelancers
 Lawyers & Legal Professionals
 Real Estate Agents & Brokers
 Education Solution
 Customer Stories
 User Guide
 UPDF Tricks
 FAQs
FAQs UPDF Reviews
 Download Center
 Blog
Blog Newsroom
 Tech Spec
 Updates
 UPDF vs. Adobe Acrobat
 UPDF vs. Foxit
 UPDF vs. PDF Expert

Quick answer
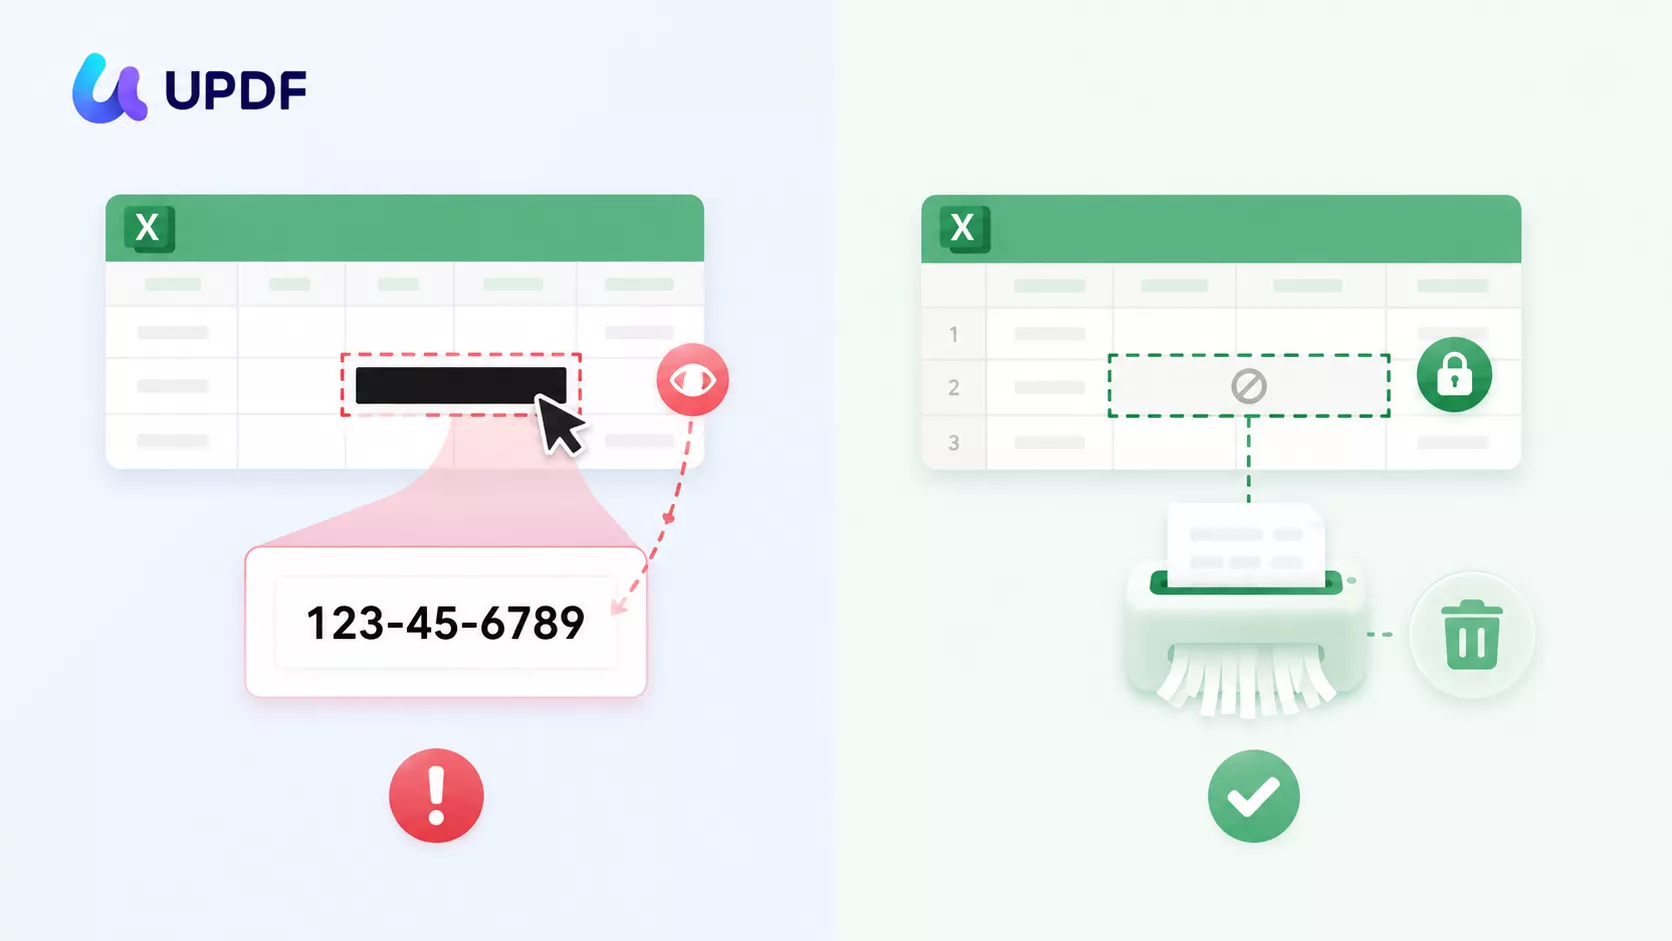
The most common Excel "redaction" — filling a cell with black — leaves the original value sitting in the file. Anyone who clicks the cell, changes the fill color, or copies it into another sheet sees the data again. This is not a rare edge case: in 2023 the Police Service of Northern Ireland published a spreadsheet whose hidden worksheet exposed the surnames, ranks, and locations of all 9,483 serving officers — a breach the ICO fined £750,000.
This guide shows the three built-in Excel methods, where each one fails, and the more reliable route for sensitive files: redacting in PDF.
Part 1. True Redaction vs. Masking: What's the Difference?
These two get confused constantly, and the confusion is what causes data leaks.
- Masking — covering data with a black fill, white font, or a hidden row. The value still lives in the cell; the cover is one click away from being removed.
- True redaction — permanently destroying the underlying data so nothing remains in the file, then stripping the metadata that records it elsewhere.
Think of black fill as a sticky note over a word on glass: peel it off and the word is still there. True redaction erases the word itself. Security guidance like NIST SP 800-88 draws the same line between clearing (hiding) and purging (removing), and improper redaction of personal data can be a reportable breach under GDPR Article 17 and HIPAA. For anything you're legally obligated to protect — SSNs, salaries, patient data — masking is not enough.
Part 2. Why Excel Redaction Is Harder Than It Looks
An .xlsx file stores data in layers, not as flat text. Beneath the visible cells sit formulas, cell comments, hidden rows and columns, hidden worksheets, pivot caches that copy the source data, and document metadata with author and edit history. Redacting only what you can see leaves all of that behind — a file that looks redacted and isn't. That's the root cause behind almost every spreadsheet breach on record.
Microsoft itself warns that hidden rows, columns, and worksheets can be unhidden by anyone the file is shared with, and that Document Inspector only helps find and remove some hidden data — it isn't a guarantee. The three built-in methods below each do part of the job; none is a complete redaction on its own.
Part 3. Method 1: Black Out Cells (and Why It's Not Enough)
This is the fastest visual redaction — and the least secure, so treat it as a first step, not the finish.
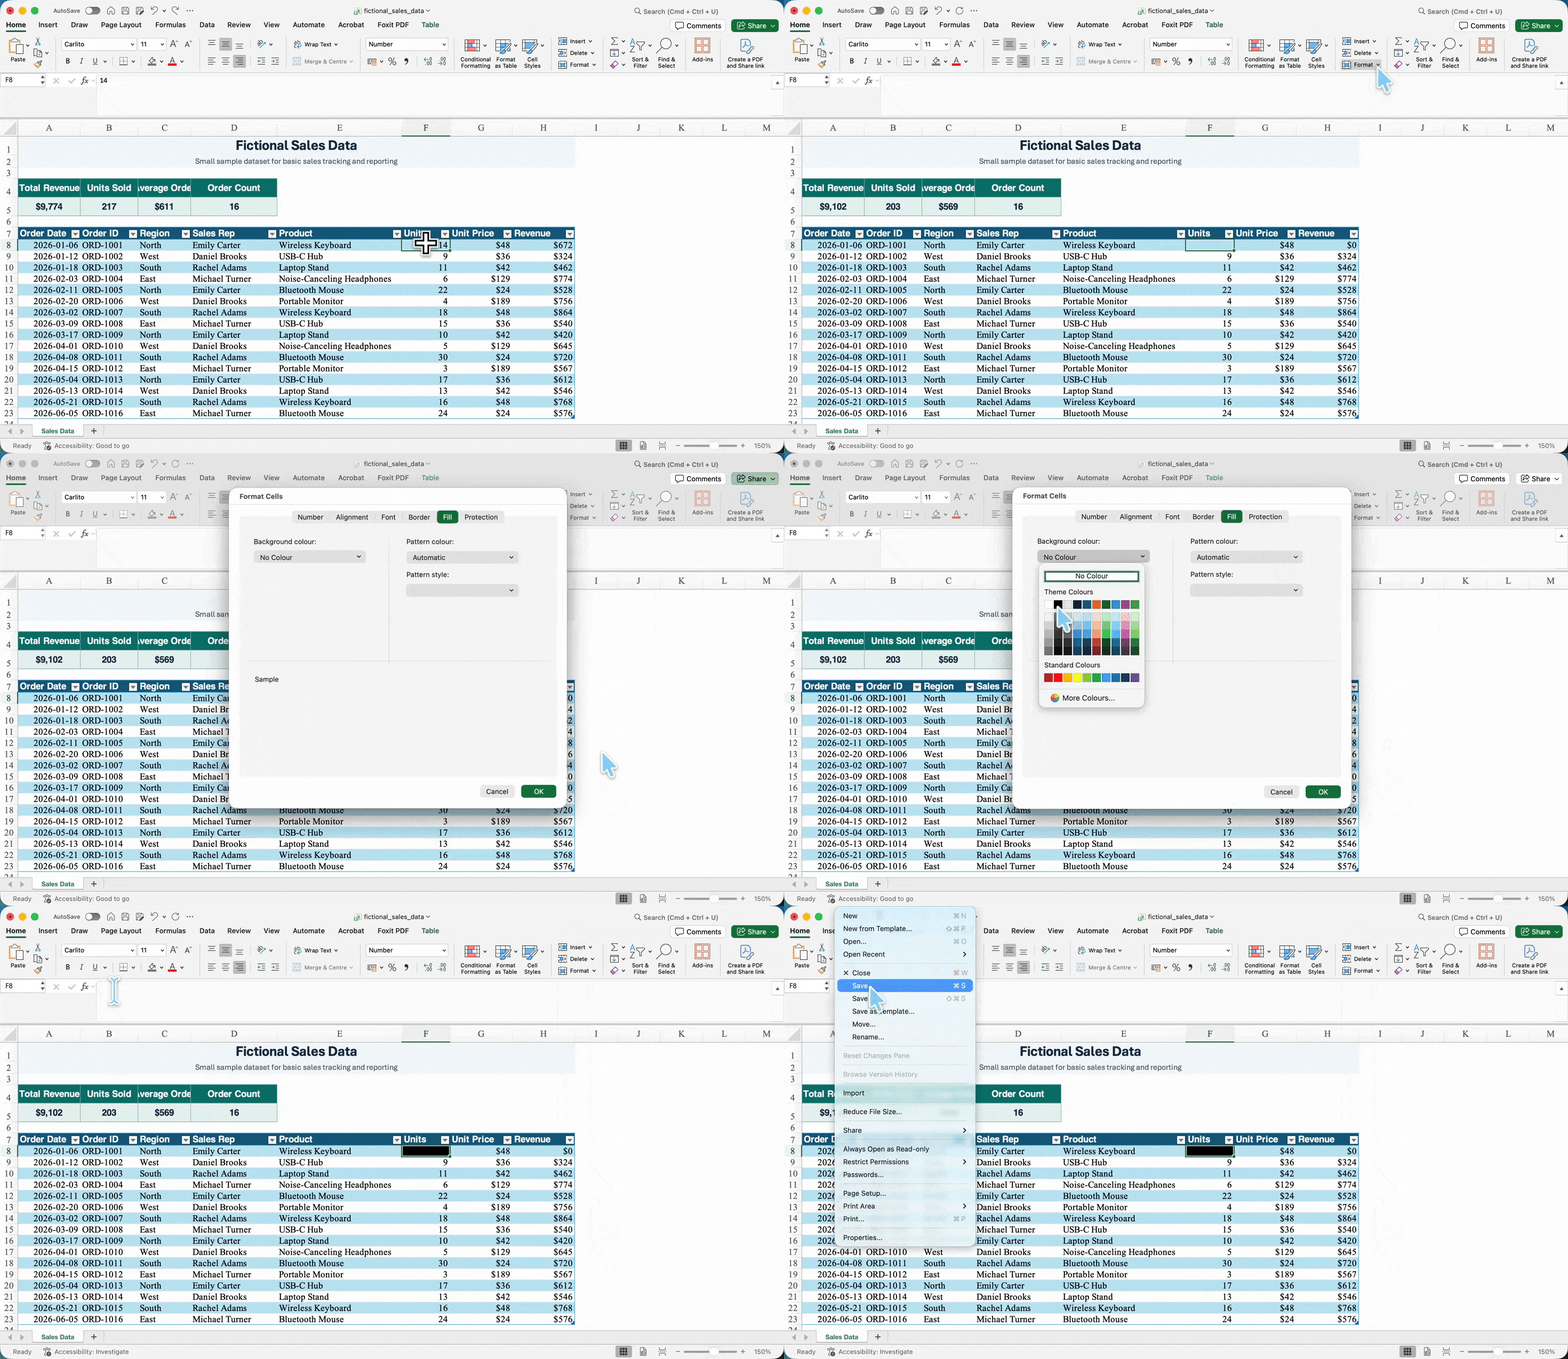
Step 1. Select the cell(s) you want to redact. Press Delete first to actually clear the contents — without this, the next steps only hide live data.
Step 2. Go to Home → Format → Format Cells.
Step 3. Open the Fill tab and choose black for the background, then click OK.
Step 4. Save the file. To share, use File → Save As and choose PDF so the fill can't simply be removed.
Best for:
- a quick visual cover before exporting to PDF
Not for:
- sharing as a live .xlsx — if you skip the Delete in Step 1, the value stays under the fill and reappears the moment someone changes the color.
Part 4. Method 2: Hide Data with the Filter Tool
Filtering hides rows you don't want shown, then you export the filtered view.
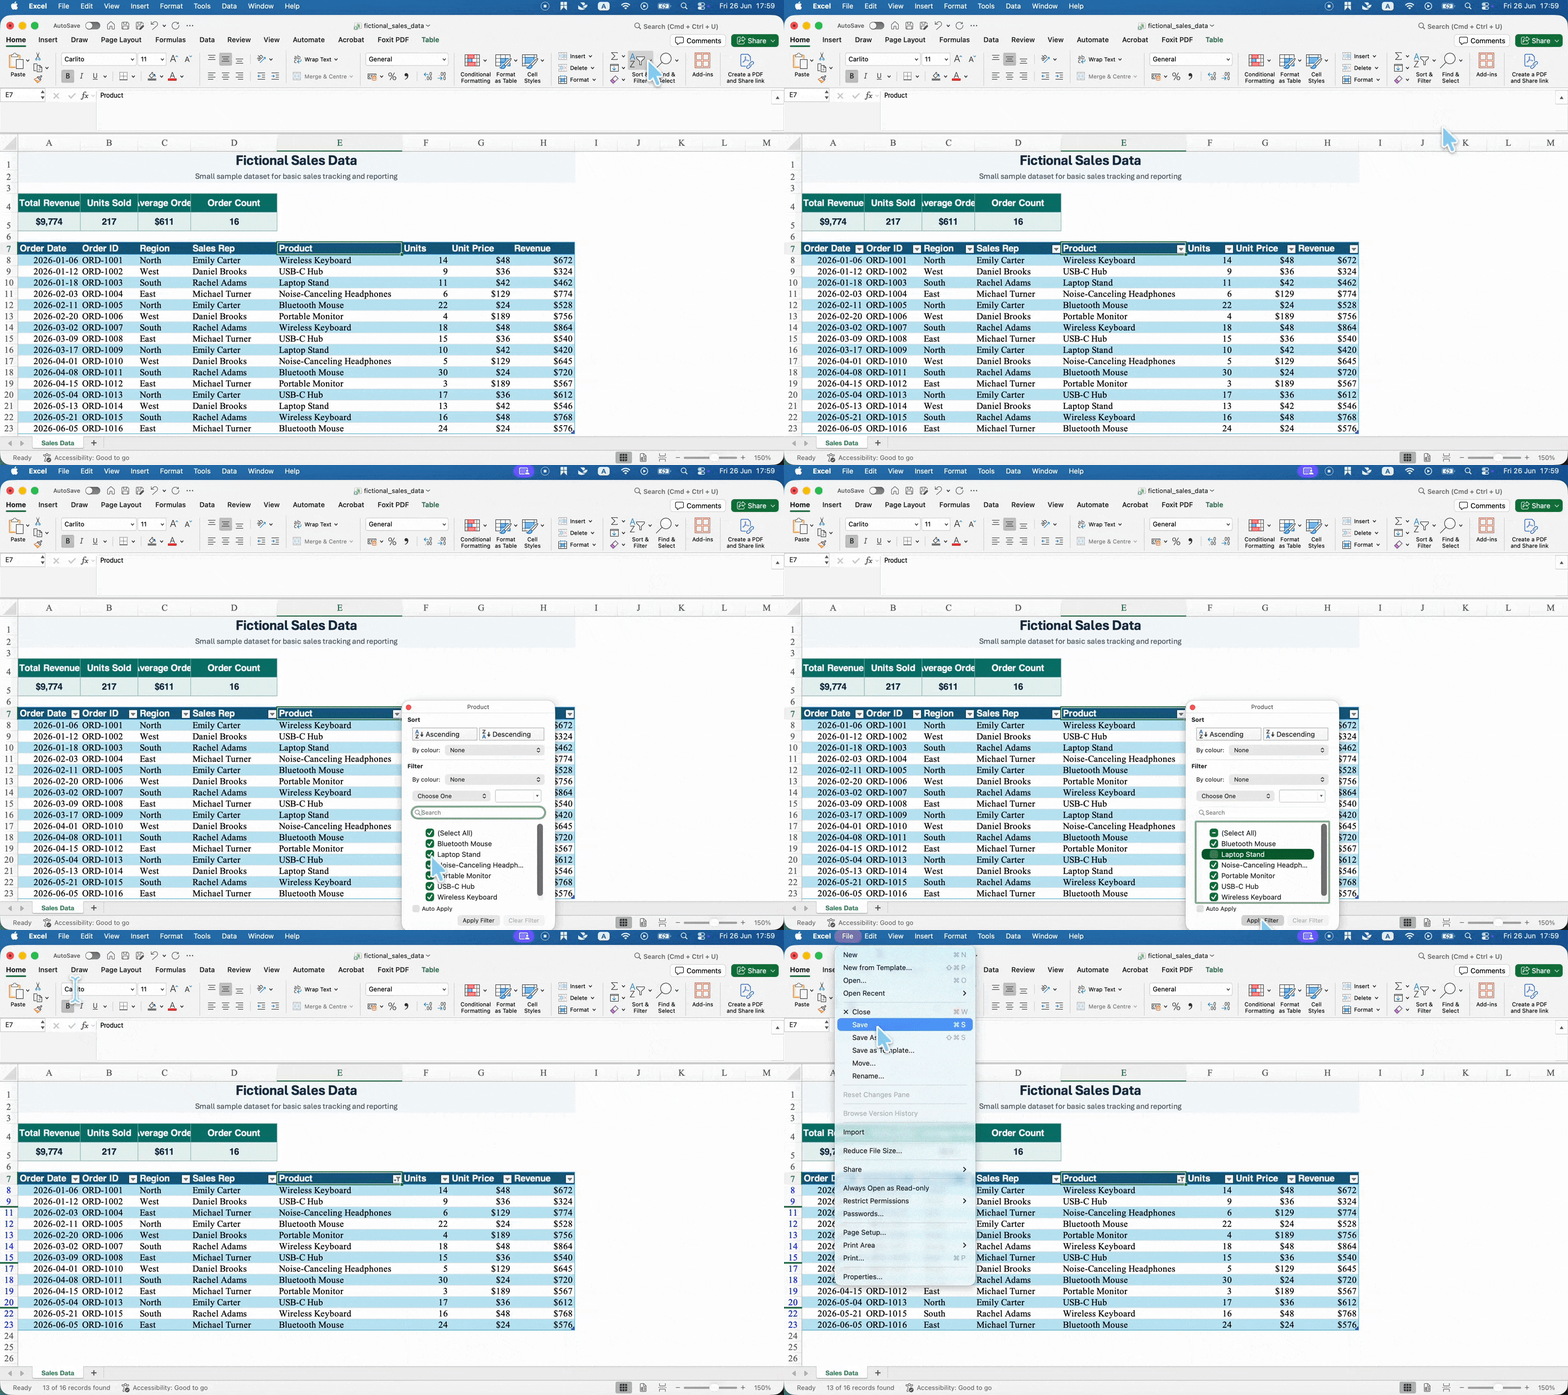
Step 1. On the Home tab, click Sort & Filter → Filter.
Step 2. Click a dropdown arrow (▼) in the header row and uncheck the values you want hidden, then click OK.
Step 3. Export the filtered view: Save As PDF, or Print to PDF.
Best for:
- producing a PDF that shows only certain rows.
Not for:
- sharing the Excel file itself — the hidden rows are one click of "Clear Filter" away from reappearing, so always export to PDF, never send the workbook.
Part 5. Method 3: Strip Hidden Data (Windows Document Inspector / Mac Preferences)
Even after you clear cells, the workbook keeps hidden data and metadata. How you remove it differs sharply between Windows and Mac — and this is where Mac users get stuck, because Excel for Mac has no Document Inspector at all.
On Windows — Document Inspector:
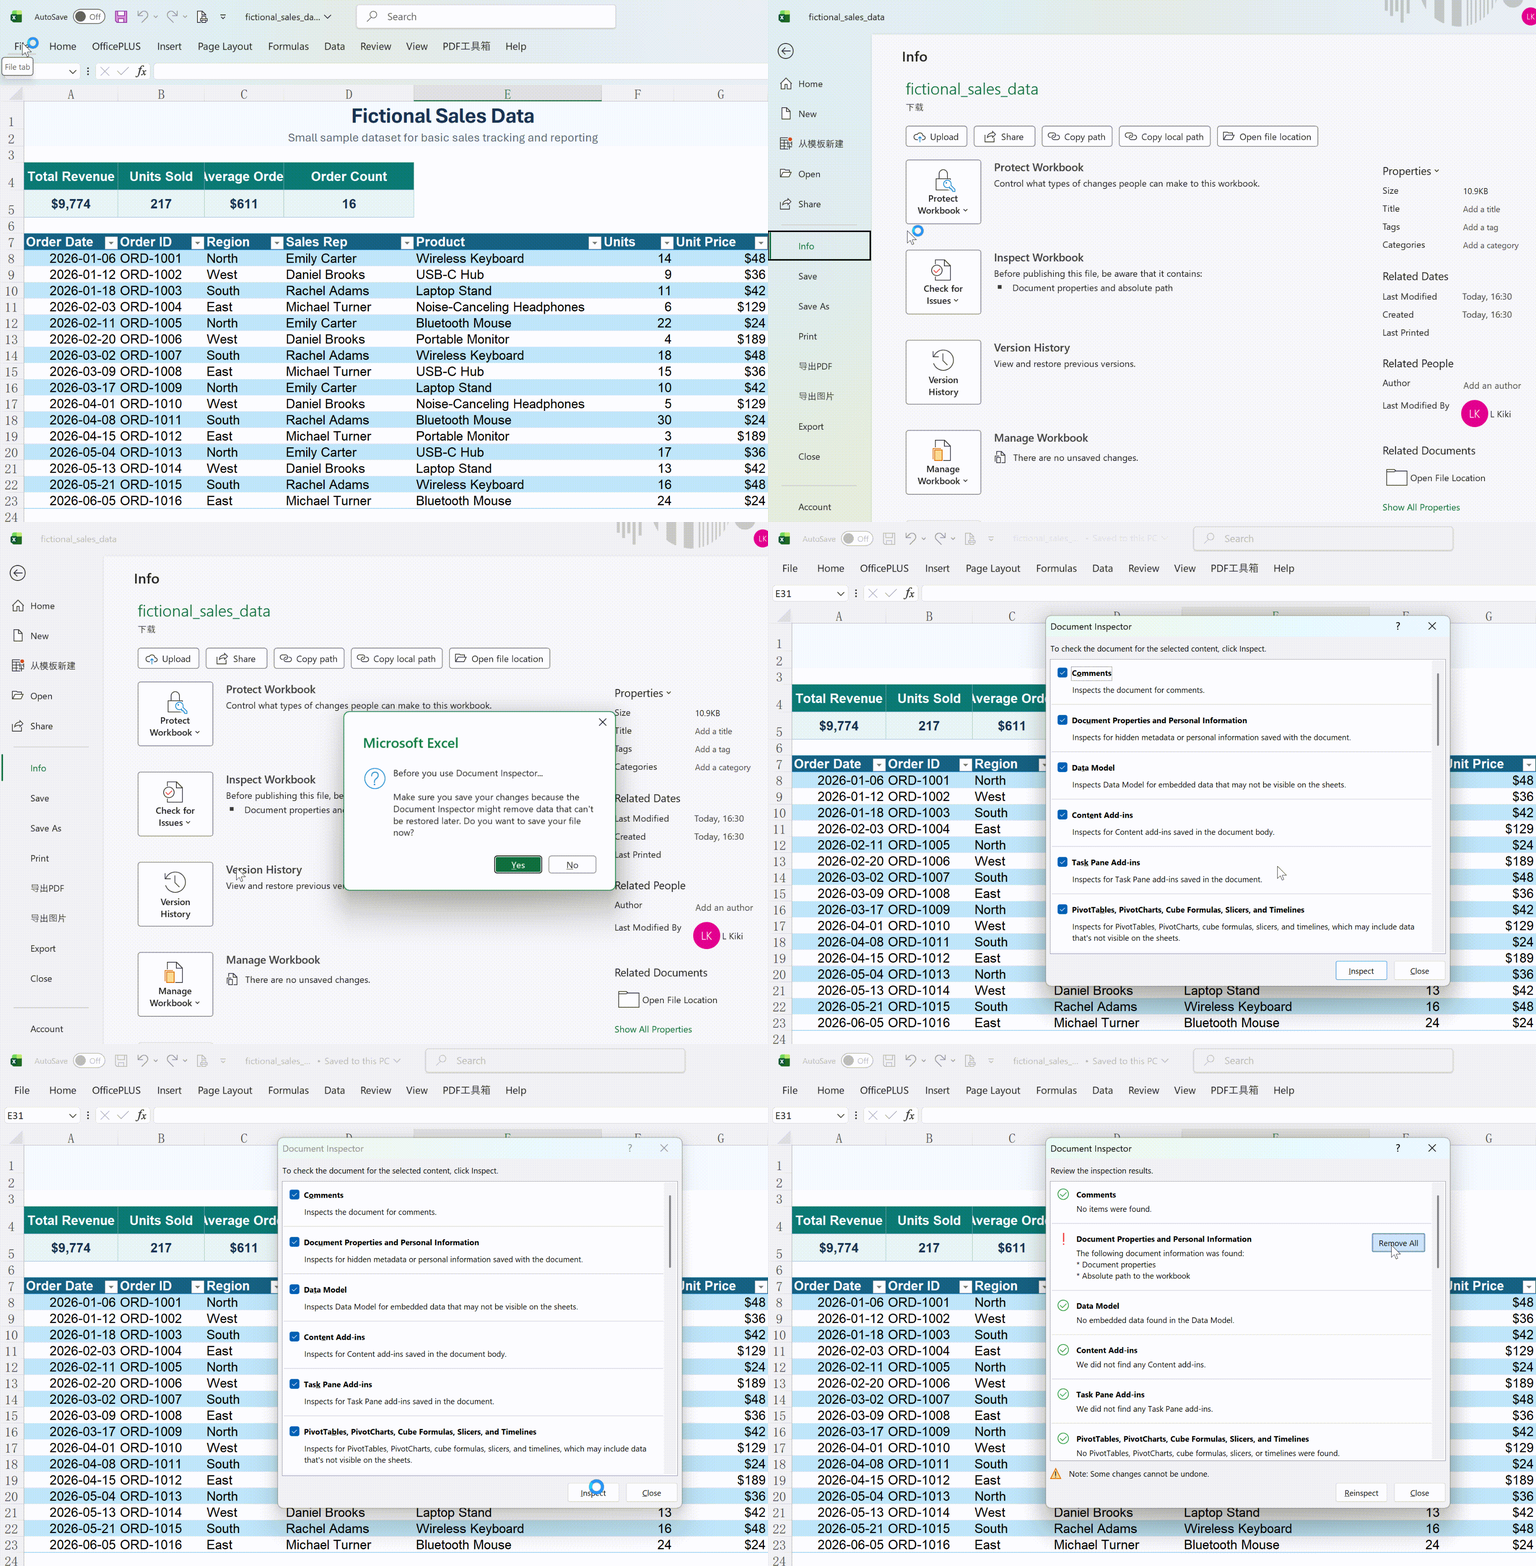
Step 1. Go to File → Info → Check for Issues → Inspect Document.
Step 2. Tick the categories to scan (comments, document properties and personal information, hidden rows/columns, hidden worksheets, invisible content), then click Inspect.
Step 3. Click Remove All next to each category you want cleared.
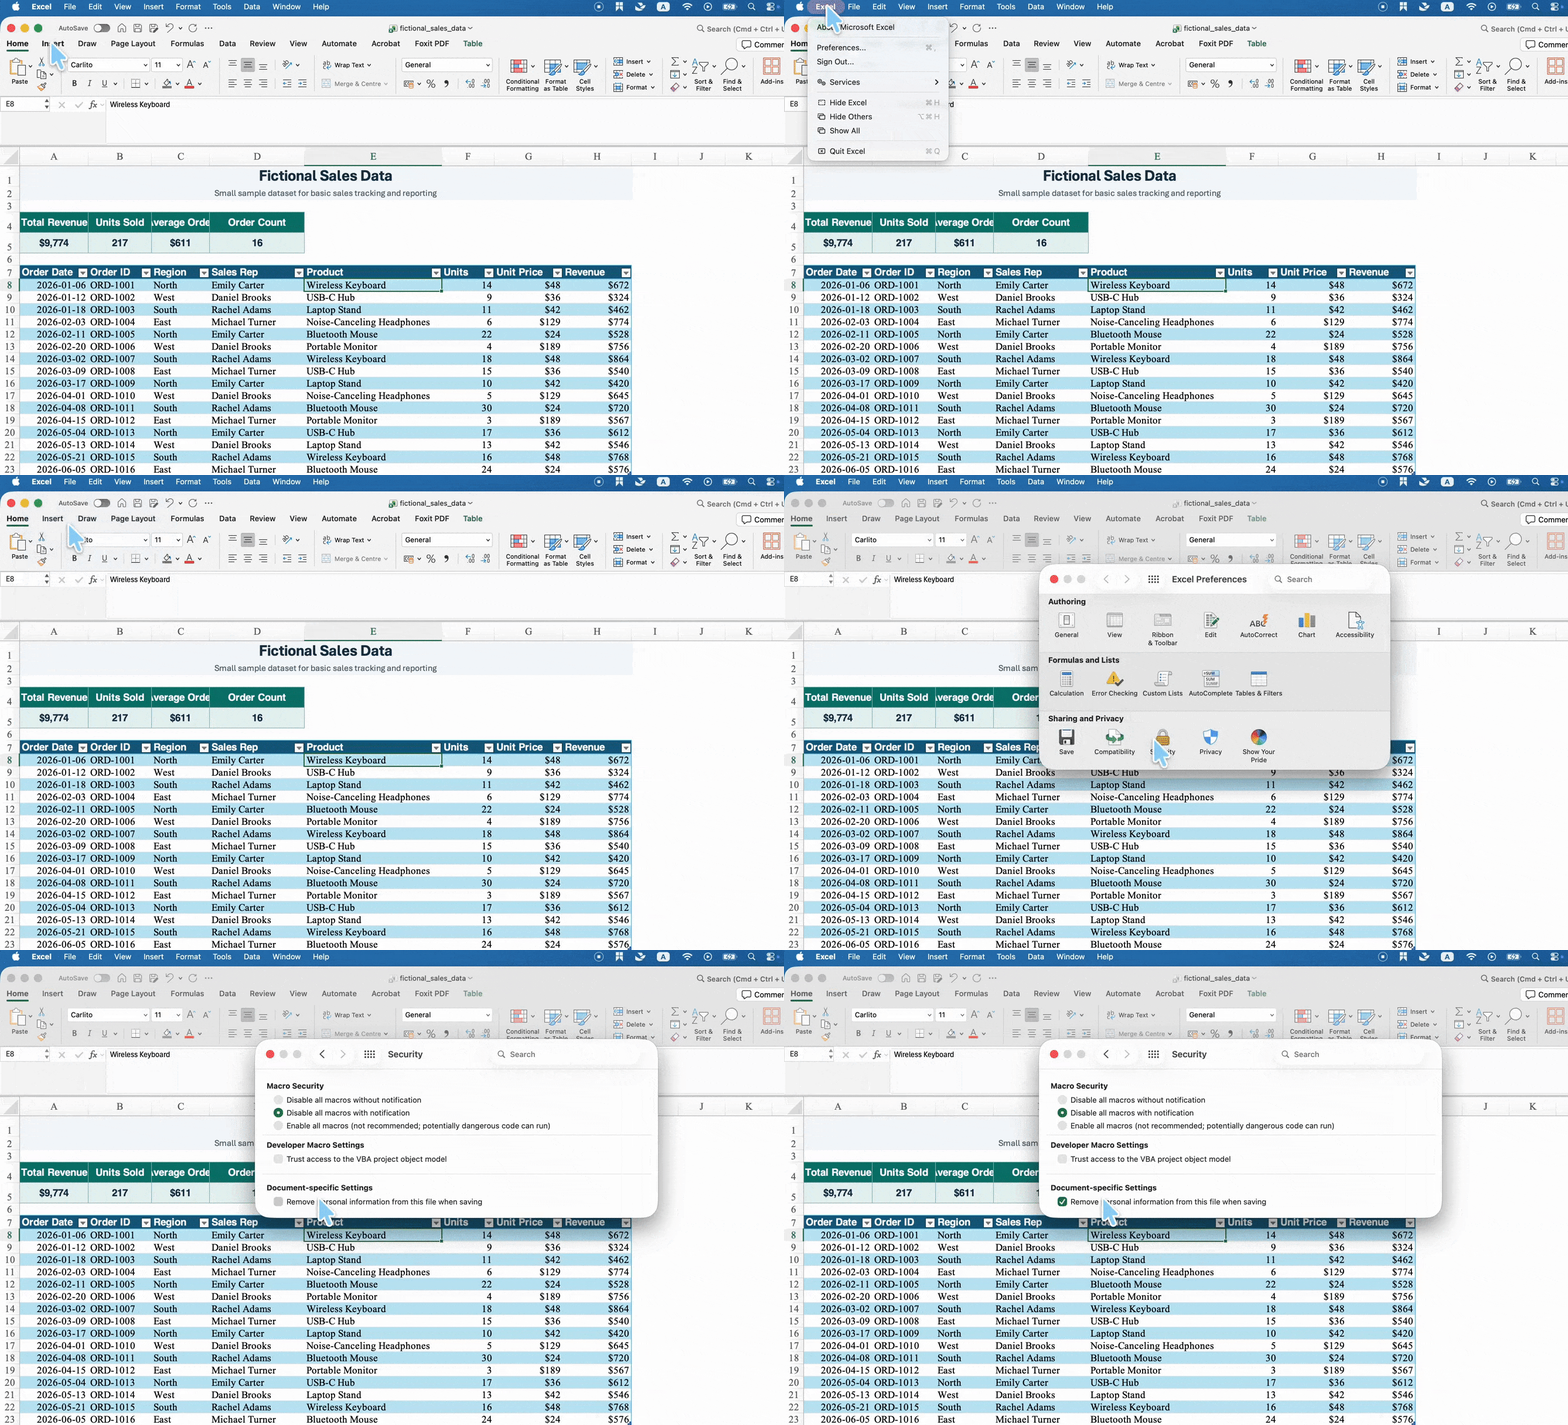
On Mac
There's no equivalent. The closest option is Excel menu → Preferences → Security → tick "Remove personal information from this file on save." But this only strips the author name and some personal info on save — it does not remove hidden worksheets, hidden rows/columns, or pivot caches. On Mac you have to unhide and delete those layers manually, or skip the cleanup entirely and redact in PDF, where hidden Excel layers don't exist.
Best for:
- removing author info, edit history, hidden sheets, and comments before distribution — on Windows.
Not for:
- Mac users needing full hidden-data removal, or anyone treating it as a complete guarantee — Inspector cleans metadata and hidden layers but doesn't apply a visible redaction mark, and you still need to have cleared the actual cell values first.
Part 6. How to Permanently Redact an Excel File by Converting to PDF
Excel can clear cell contents, but it has no one-click redaction flow, and manually sanitizing a workbook is easy to get wrong. For anything you're sending outside your organization, the more reliable route is to export to PDF and apply true redaction there: a redaction software removes the underlying text on Apply, rather than drawing a black box over it.
Dedicated PDF tools that do this include Adobe Acrobat Pro, Foxit, and UPDF; the steps below use UPDF on Windows and Mac. Whichever you use, the rule is the same — the data must be gone in the exported PDF, which happens in one of two ways: either you fully cleared it in Excel first (so nothing sensitive reaches the PDF), or you redact it in the PDF with a tool that destroys content on Apply. A drawn annotation or highlight is not redaction.
Step 1. Convert the Excel file to PDF
Drag and drop your .xlsx straight into the UPDF desktop window — it converts to PDF automatically. If you don't have UPDF yet, download UPDF for free and install it in under a minute, then drop the file in.
Windows • macOS • iOS • Android 100% secure
Step 2. Open Redact mode
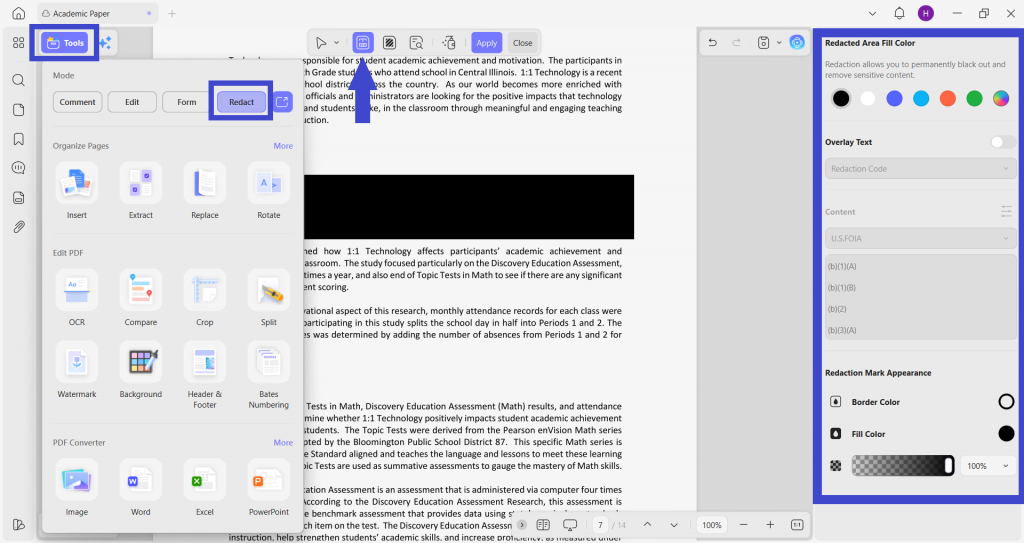
Go to the leftside Tools → Redact. A prompt appears explaining that redaction permanently removes the content — click OK to begin. The redaction toolbar opens at the top.
Step 3. Choose how to redact
- Redact Text — drag the cursor over any value, cell, table, or image to mark it.
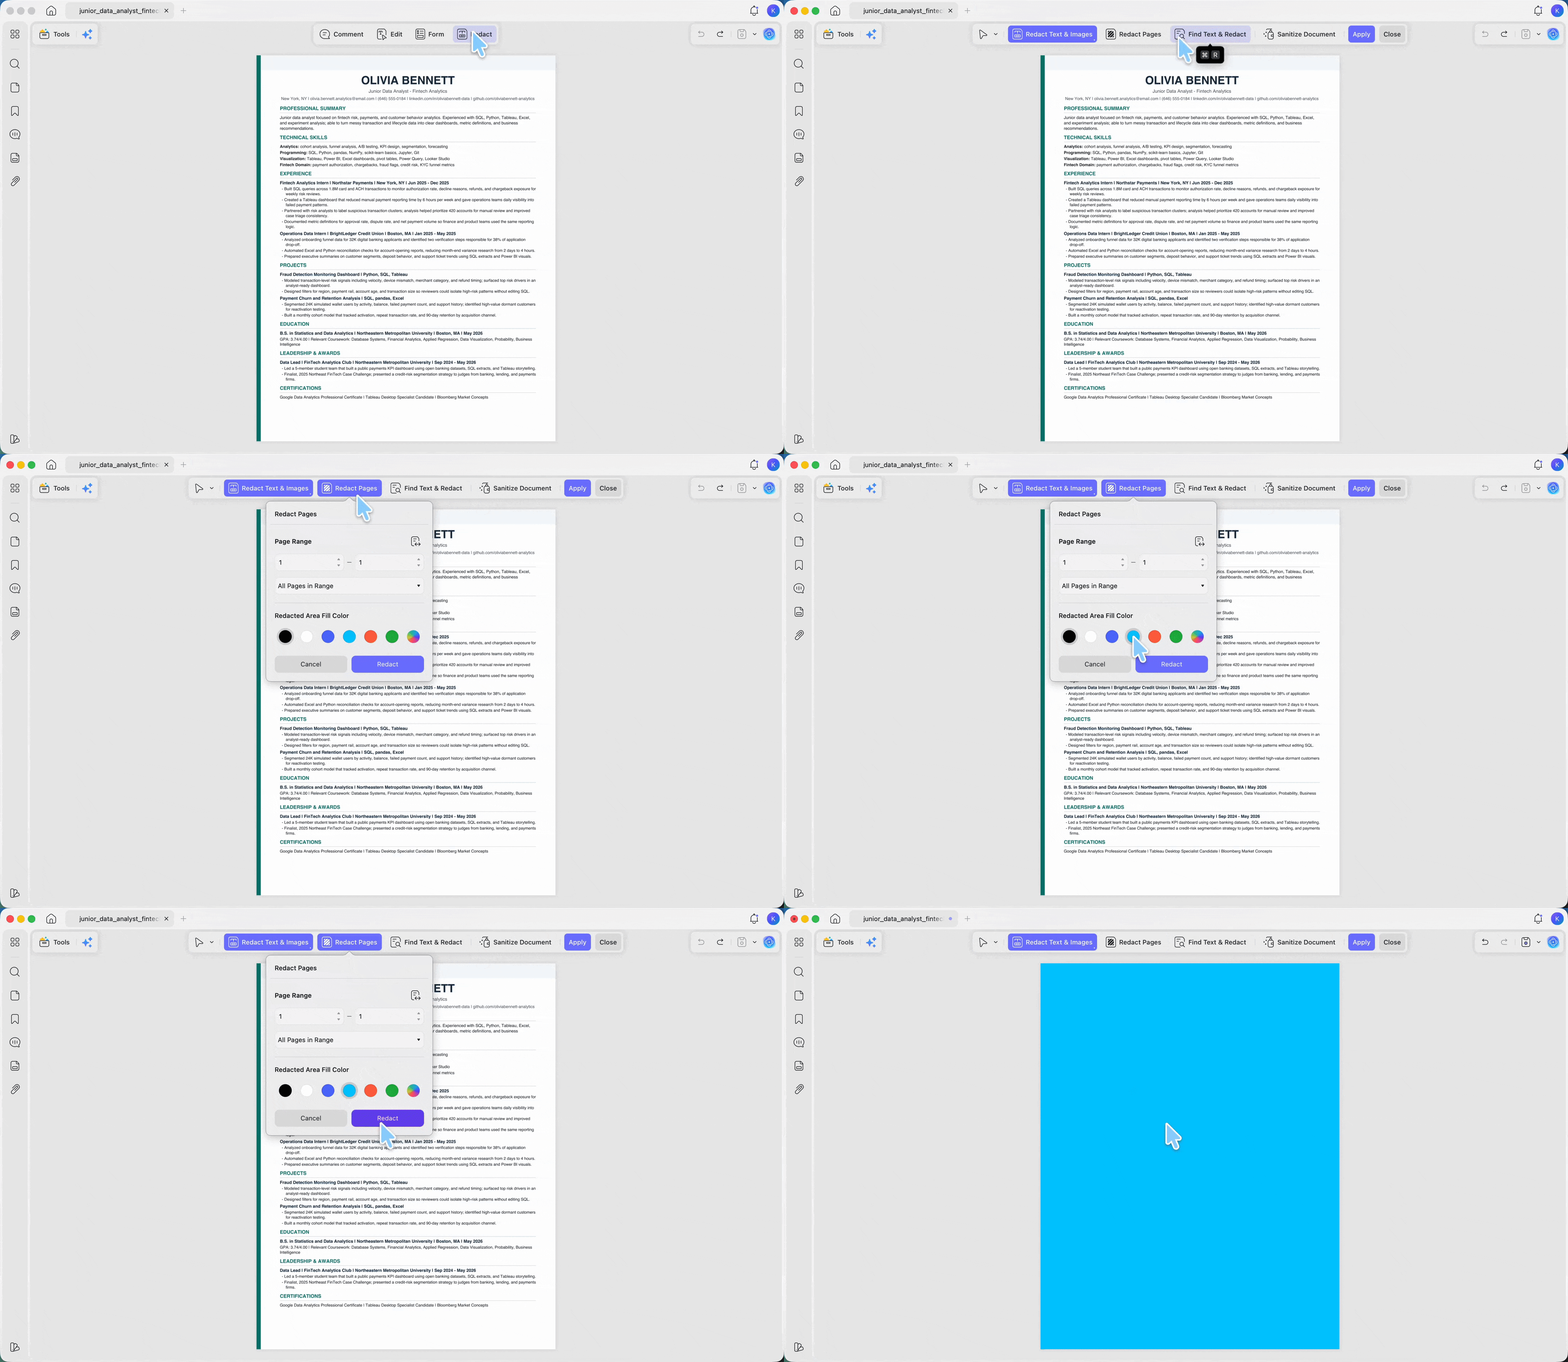
- Redact Pages — redact entire pages at once, with a page-range option.
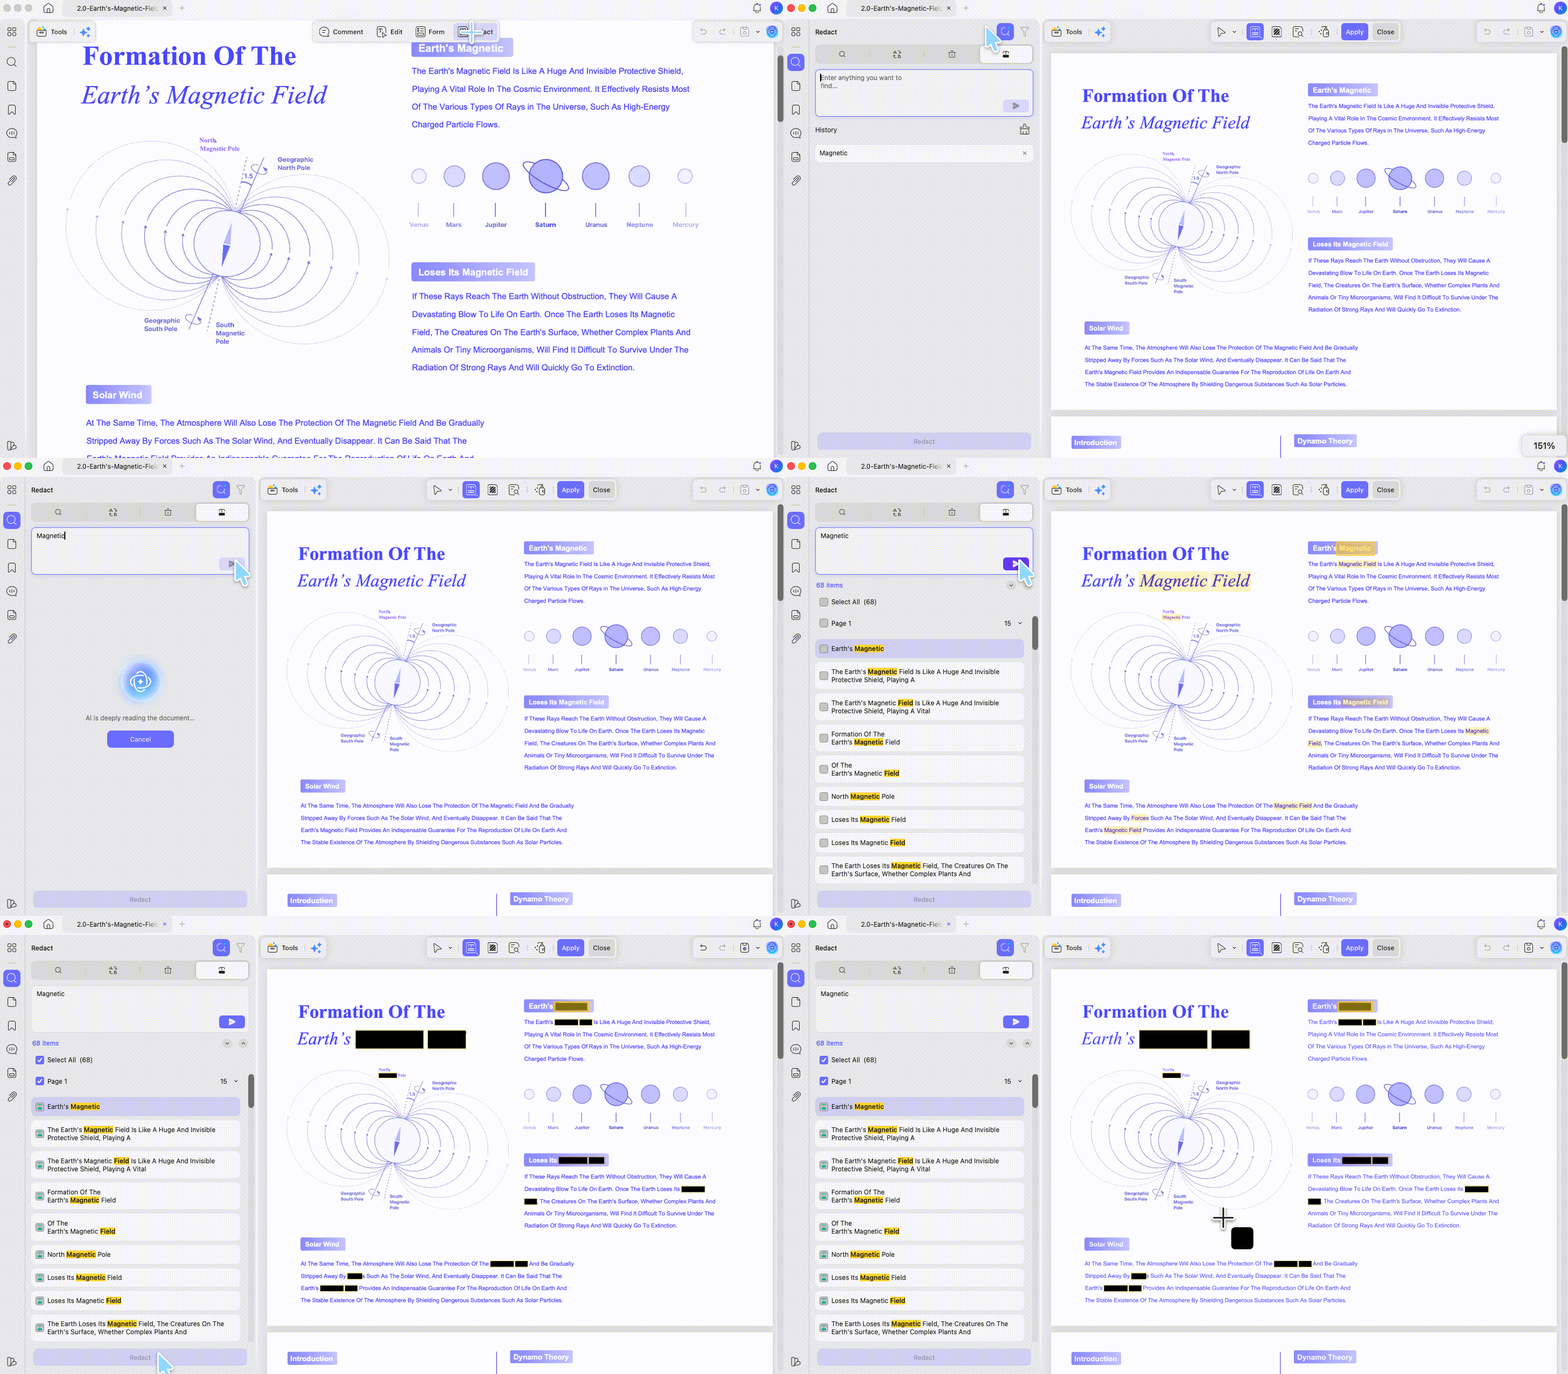
- Search and Redact — type a value (an account number, a name) and mark every instance across the document — the fastest option for a spreadsheet with repeated IDs.
Step 4. Apply to destroy the data
Mark everything you need, then click Apply. UPDF permanently removes the marked content from the file — not a black box laid on top — and you save the redacted copy. Work on a copy and keep the original, since this can't be undone.
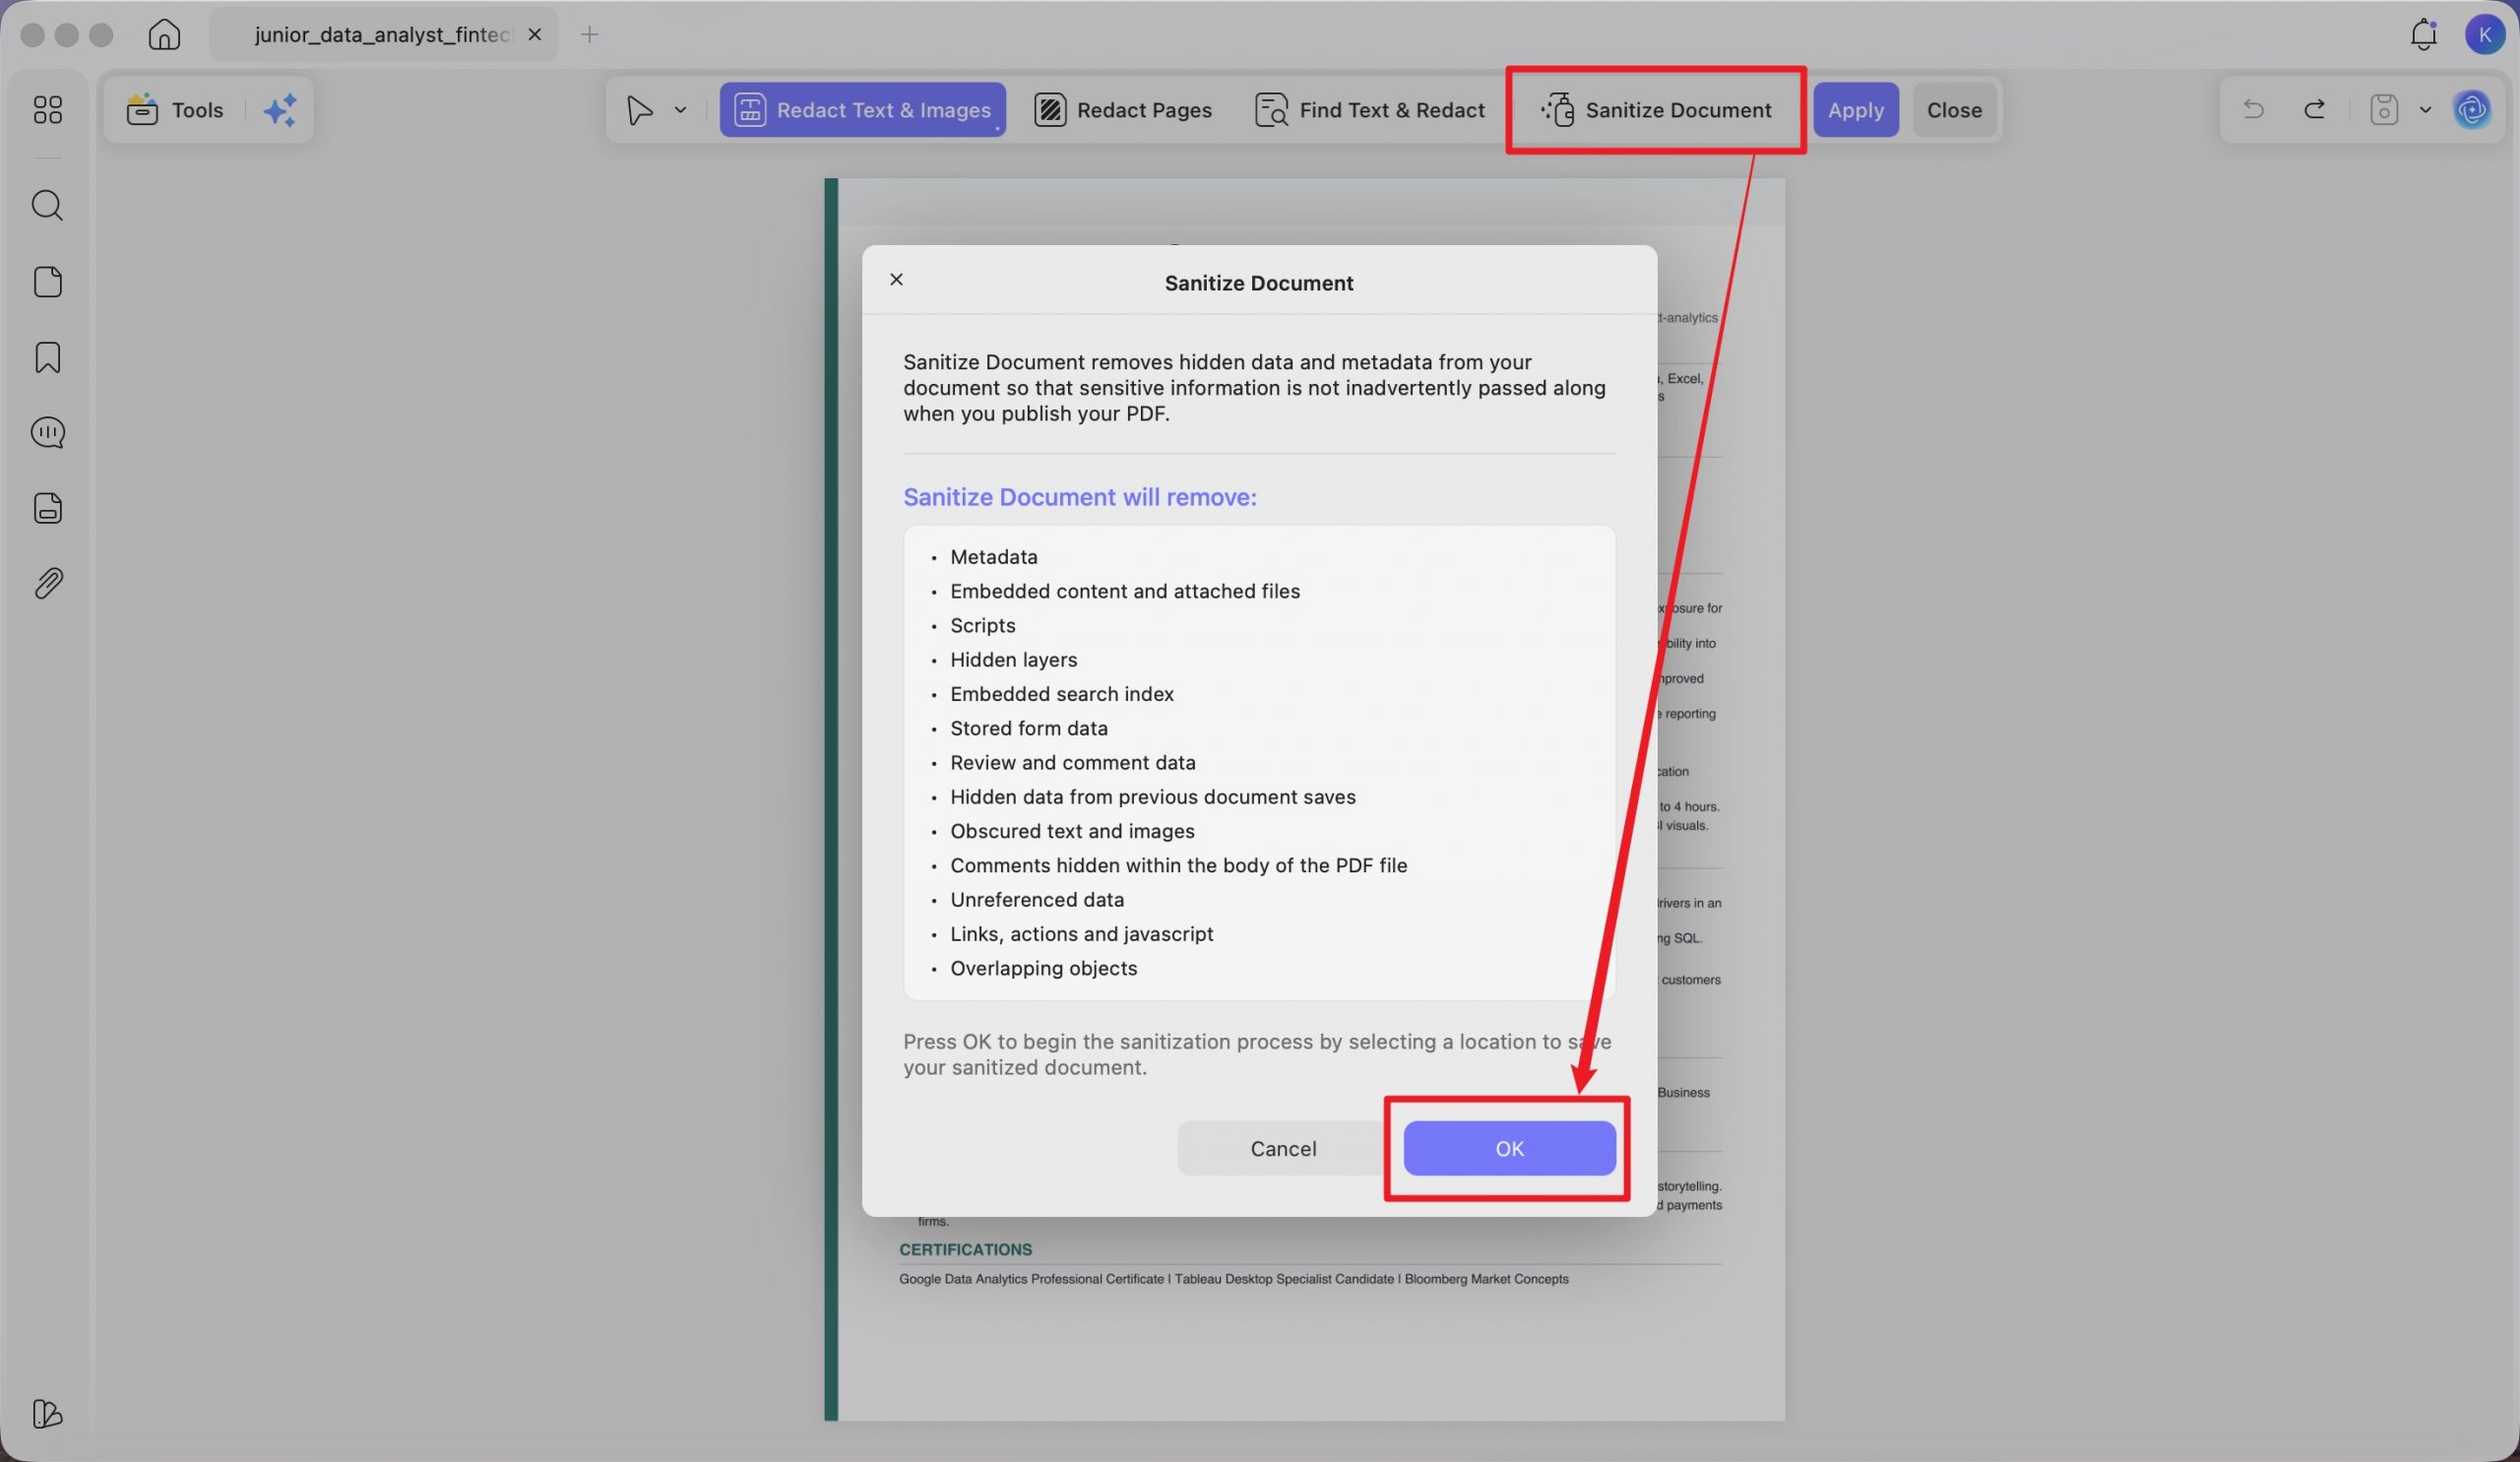
Step 5. Sanitize to clear hidden data
Before sharing, click the Sanitize Document icon in the redaction toolbar to strip hidden data and metadata — the PDF equivalent of Excel's Document Inspector, in the same place you redacted. Read the list of what will be removed and click OK, then save.
Free vs. Pro:
Excel Methods vs. PDF Redaction
| Method | Removes the data? | Cleans metadata? | Best use |
|---|---|---|---|
| Black fill (Method 1) | ✗ — recoverable | ✗ | Quick visual cover before PDF export |
| Filter (Method 2) | ✗ — rows return | ✗ | Showing only selected rows in a PDF |
| Document Inspector (Method 3) | Partially (metadata + hidden layers) | ✓ | Cleaning hidden data before sharing |
| PDF redaction + sanitize | ✓ — permanently | ✓ | A shareable file you must not leak |
The honest takeaway: use Method 3 to clean an Excel file you'll keep internal, but for anything leaving your organization, redact in PDF — with UPDF, Acrobat Pro, Foxit, or another tool that destroys content on Apply — so the data is actually gone.
Edge Cases: When Excel Redaction Goes Wrong
- "I blacked out the cell but the value still shows when I click it." You skipped the Delete step — the fill only covers live data. Clear the contents first, then fill.
- "My recipient unhid a worksheet and saw everything." Hidden ≠ redacted. Run Document Inspector to remove hidden sheets, or redact in PDF where hidden layers don't exist.
- "A formula still references the data I deleted." Deleting a cell can leave Name Manager entries, external links, or pivot caches pointing at the original values. Convert to PDF and redact, which flattens those references away.
- "I need to keep the spreadsheet usable, not send a PDF." You can keep a usable sanitized workbook — just not one that still relies on the original sensitive detail. Replace sensitive cells with summary or static values, delete the source columns/rows, clear formula references and hidden sheets, then run Document Inspector. Anything that depended on the raw data won't survive, and a recolored or hidden cell won't hold up as redaction.
- "The redacted PDF still shows text when I copy-paste." That means a mask was drawn, not a true redaction applied. In UPDF, use Redact Text and click Apply → Continue so the content is removed, then test by trying to select the area.
FAQs
1. Does Excel have a built-in redaction tool?
No one-click one. Excel can clear cells and strip some hidden data via Document Inspector, so you can build a sanitized copy by hand, but it's easy to miss a layer. For a reliable result on sensitive files, export to PDF and apply true redaction there.
2. Is blacking out a cell secure?
No. The value stays in the cell under the fill and returns if someone changes the color, copies the cell, or opens the file's XML. Always clear contents and redact in PDF for sensitive data.
3. Can hidden rows or sheets leak data?
Yes — hidden is not removed. Unhiding is one right-click away, and hidden worksheets have caused major breaches. Use Document Inspector or redact in PDF.
4. Will redaction break my formulas?
Redacting in Excel can leave broken references behind. Converting to PDF first flattens formulas to values, so the redacted output carries no hidden formula links.
Conclusion
Excel's black fill, filters, and Document Inspector help you tidy a spreadsheet, but only Document Inspector actually removes hidden data — and a hand-sanitized workbook is easy to leave a layer in. For anything you can't afford to leak, don't send the .xlsx: export to PDF and apply true redaction, then sanitize the hidden layers. UPDF does this with Redact Text, Search and Redact, and Sanitize PDF. Redaction is a sensitive, privacy-related task — only redact files you own or are authorized to edit, and verify the result before sharing.
Download UPDF for free to try redacting an exported copy of your spreadsheet — installation is free, and Pro features are available when you need a watermark-free export.
Windows • macOS • iOS • Android 100% secure





 Enid Brown
 Enola Miller