UPDF for Windows
 UPDF for Mac
 UPDF for iPhone/iPad
 UPDF for Android
 Nomostar
 UPDF AI Online
 UPDF Sign
 IvyCraft
 Edit PDF
 Annotate PDF
 Create PDF
 PDF Form
 Edit links
 Convert PDF
 OCR
OCR PDF to Word
 PDF to Image
 PDF to Excel
 Organize PDF
 Merge PDF
 Split PDF
 Crop PDF
 Rotate PDF
 Protect PDF
 Sign PDF
 Redact PDF
 Sanitize PDF
 Remove Security
 Read PDF
 UPDF Cloud
 Compress PDF
 Print PDF
 Batch Process
 About UPDF AI
 UPDF AI Solutions
 AI User Guide
 FAQ about UPDF AI
 Summarize PDF
 Translate PDF
 Chat with PDF
 Chat with AI
 Chat with image
 PDF to Mind Map
 Explain PDF
 PDF AI Tools
 Image AI Tools
 AI Chat Tools
 AI Writing Tools
 AI Study Tools
 AI Working Tools
 Other AI Tools
 AI Bookmark Generation
 AI Bookmark Summary
 AI Watermark Generation
 AI Background Generation
 AI Sticker Generation
 AI Stamp Generation
 AI Editing Suite
 UPDF Copilot
 AI Page Management
 AI Semantic Search
 PDF to Word
 PDF to Excel
 PDF to PowerPoint
 User Guide
 UPDF Tricks
 FAQs
FAQs UPDF Reviews
 Download Center
 Blog
Blog Newsroom
 Tech Spec
 Updates
 UPDF vs. Adobe Acrobat
 UPDF vs. Foxit
 UPDF vs. PDF Expert
For as long as I've used Excel, I've encountered the frustrating moment when data seems to disappear, and I realize later that rows have been hidden away. Whether I got a complex spreadsheet from someone or accidentally hid rows myself, I know how confusing it can be to find missing information.
Therefore, I'll share step-by-step instructions on how to unhide all rows in Excel to make sure nothing important stays out of sight. As a bonus, I'll also share how UPDF made it easier for me to convert my PDFs to Excel with preserved format on any device.
Windows • macOS • iOS • Android 100% secure
Part 1. Common Reasons For Hiding Rows, Columns, Or Cells In Excel
Before I share how to unhide all columns in Excel, including rows and cells, it’s important to understand the reasons behind hiding these data areas.

- Keep the Sheet Clean: When my spreadsheet gets too busy, I simply hide unnecessary rows or columns to focus on the data that matters for my current work.
- Compare Specific Data: If I want to compare two data sets that are not next to each other, I hide the rows to view the relevant values side by side without distraction.
- Sensitive Information Protection: There are cases where I need to keep confidential formulas hidden, so I hide those cells to keep secret sensitive information and get it when necessary.
- Ready to Print: Before I print, I conceal the confidential information that I do not require in the report. It assists me in making neat printouts that reflect the key areas of my analysis.
- Make Editing Simple for Others: When I prepare sheets to be used by other people, I hide unused space, such as blank rows or columns. So, they don’t accidentally change something that is not in the working area.
Why I Need to Unhide Rows, Columns, Or Cells?
If I’ve hidden any information to protect sensitive details, I make sure to unhide everything before finalizing my work. Unhiding cells gives me full access to my data, helps me catch errors, and ensures my analysis is transparent and complete.
Part 2. How to Unhide All Rows in Excel?
Now that you know why rows get hidden, let me share some methods on how to unhide all rows in Excel to make all information visible:
Method 1
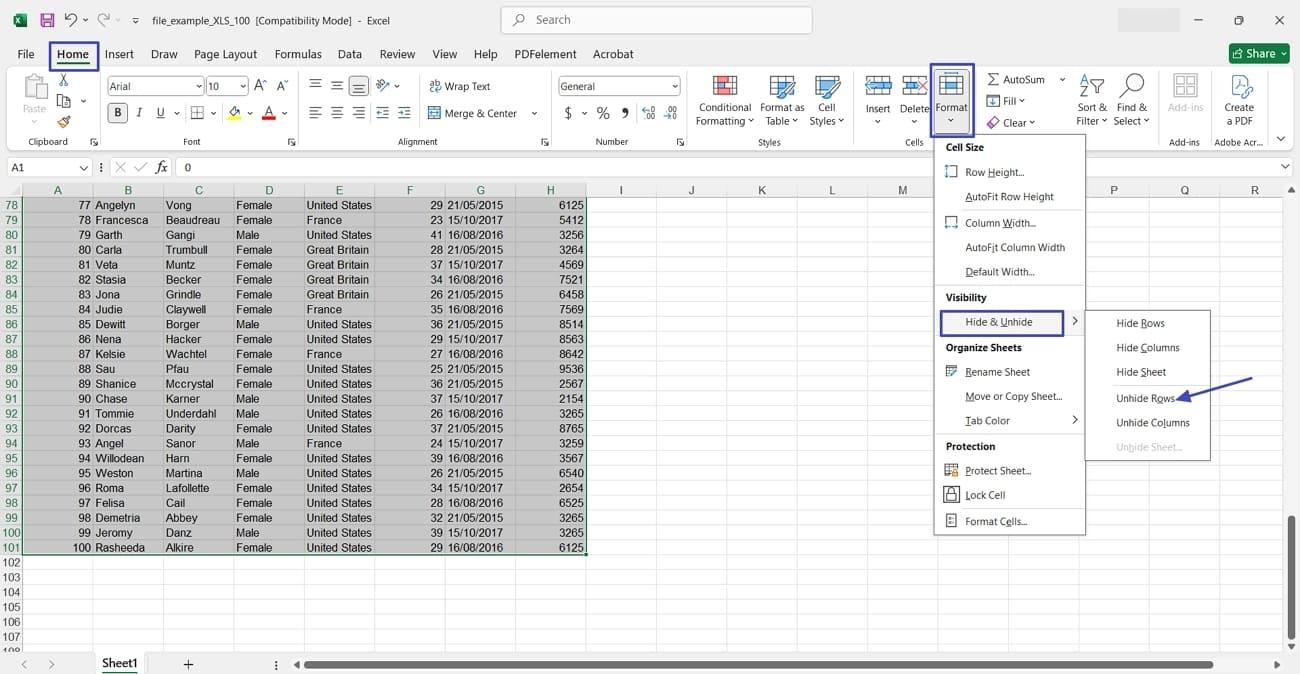
The easiest method to unhide rows is through Excel’s Home menu, follow the instructions below to make them visible again.
Instructions. First off, select all rows and press the “Home” tab on Excel’s main interface, then click the “Format” option to drop down the menu. Next, move the cursor over the “Hide & Unhide” option and click on the “Unhide Rows” to unhide all rows.
Method 2
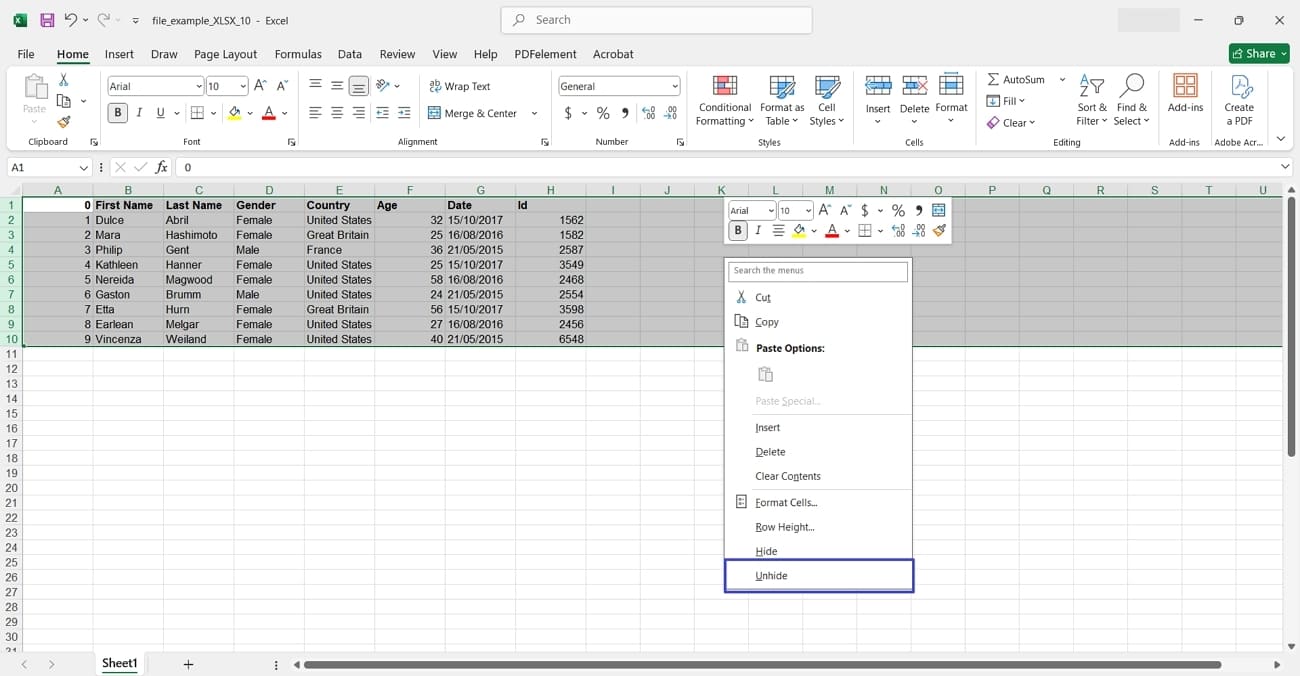
If you prefer a quick approach to unhide all rows, adhere to the instructions below to bring back all rows at once:
Instructions. Select all rows in the Excel sheet and “Right-click” on any row. Then, the context menu will appear and press the “Unhide” button from the menu to unhide all rows.
Method 3
For keyboard users, Excel offers a simple key combination to instantly unhide rows. Follow these instructions below to reveal all hidden rows via keyboard:
Instructions. First, select all rows with the “Ctrl+A” keys on Windows or the “Command+A” buttons on Mac. Next, press the “Ctrl + Shift + 9” on Windows or “Command + Shift + 9” on Mac to unhide all rows using the keyboard.
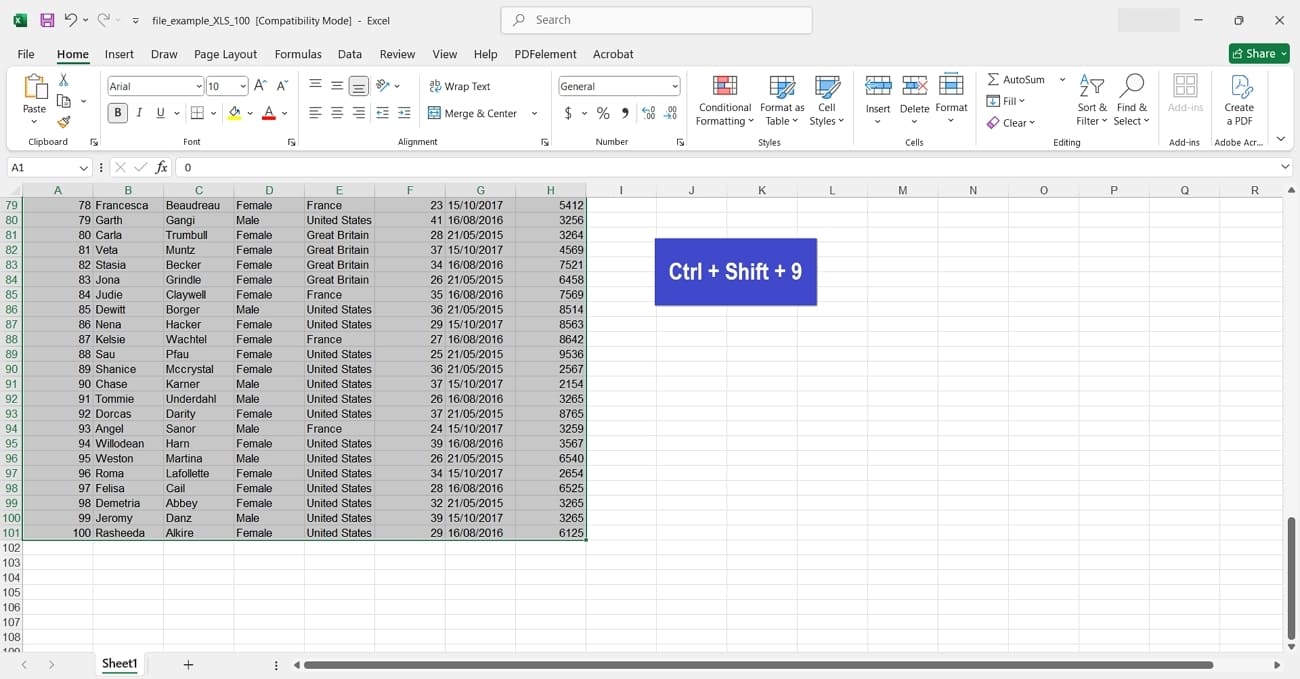
To hide all rows, use the “Ctrl+9” keys on Windows and “Command+9” keys on Mac.
Part 3. How to Unhide All Columns in Excel?
Just like rows, columns can also be hidden accidentally or for better data organization. So, I’ll share some methods on how to unhide all columns in Excel.
Method 1
I can easily bring back the hidden columns using the options available in Excel’s Home tab, so follow these instructions below to unhide columns:
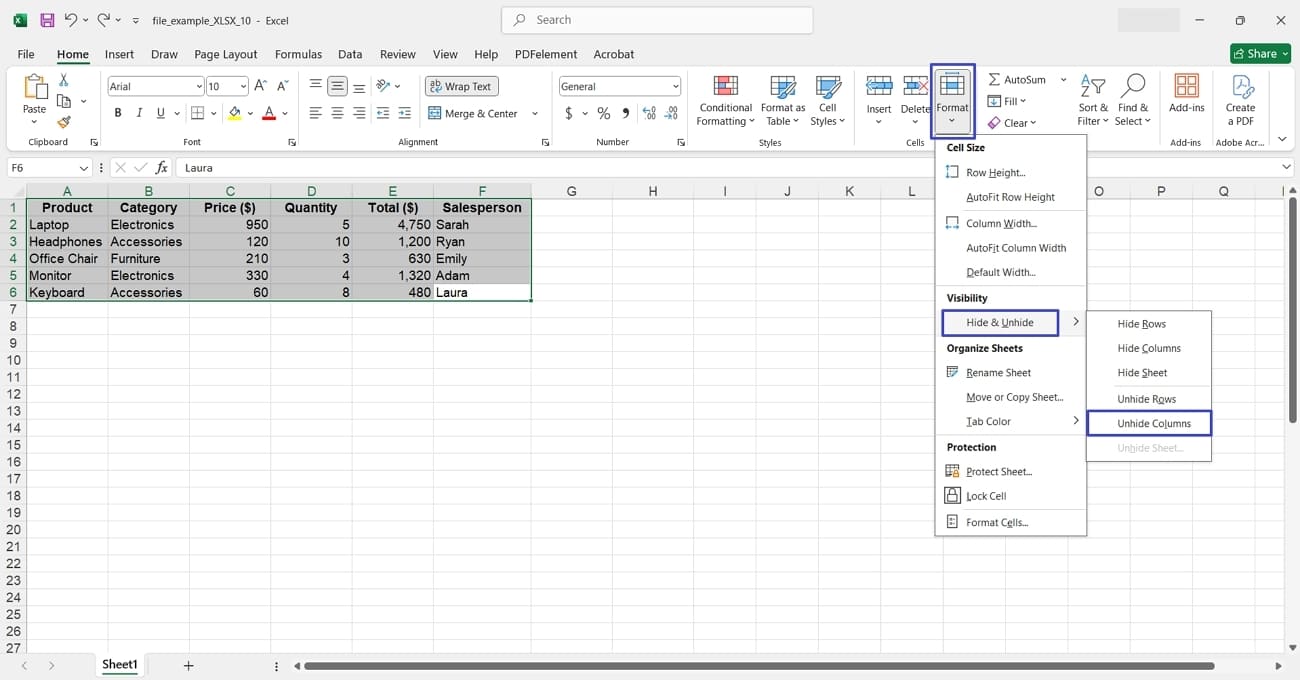
Instructions. Start by selecting all columns and clicking the “Format” tab. Next, hover the cursor over the “Hide & Unhide” option and click the “Unhide Columns” to reveal all hidden columns.
Method 2
In this method, I’ll show how a simple right-click can make all hidden columns visible again.
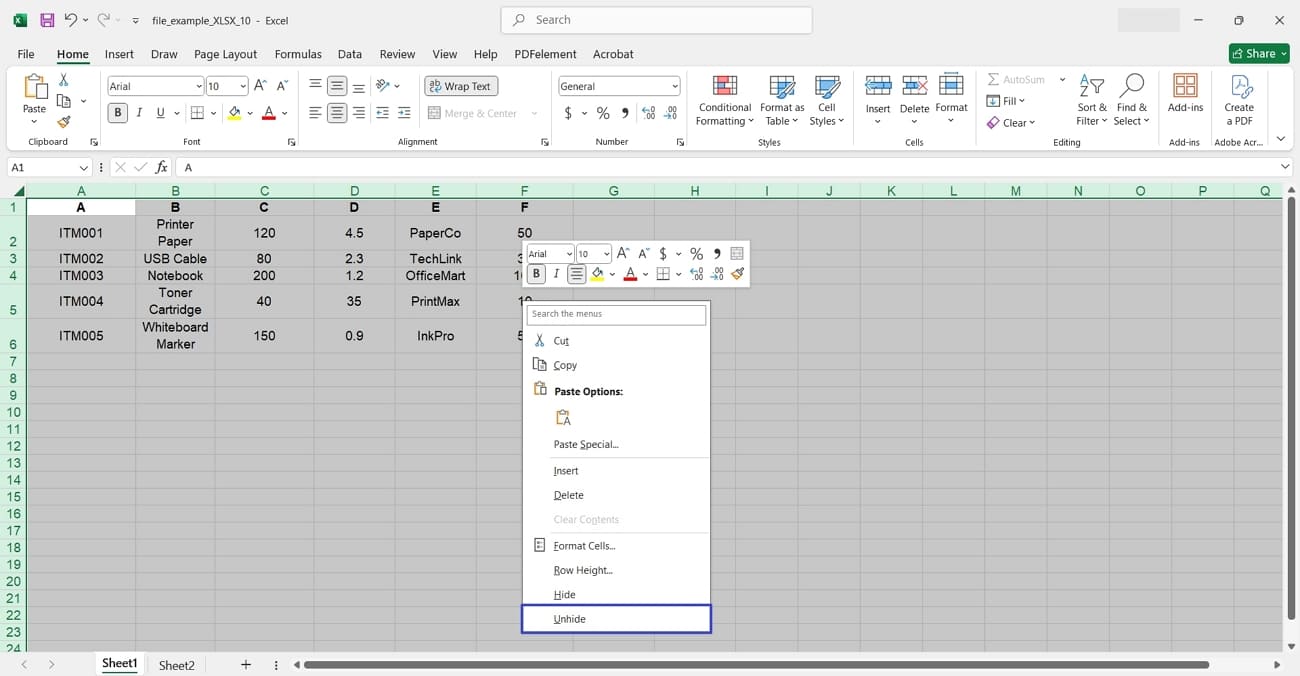
Instructions. Once you select all columns, “Right-click” the columns and hit the “Unhide” button to bring all non-visible columns back.

Method 3
If you prefer using shortcuts to perform quick tasks, adhere to these instructions to reveal all columns in Excel using the keyboard.
Instructions. After selecting all columns, hold the “Ctrl+Shift+0” on Windows and “Command+Shift+0” on Mac to unhide all columns in Excel.
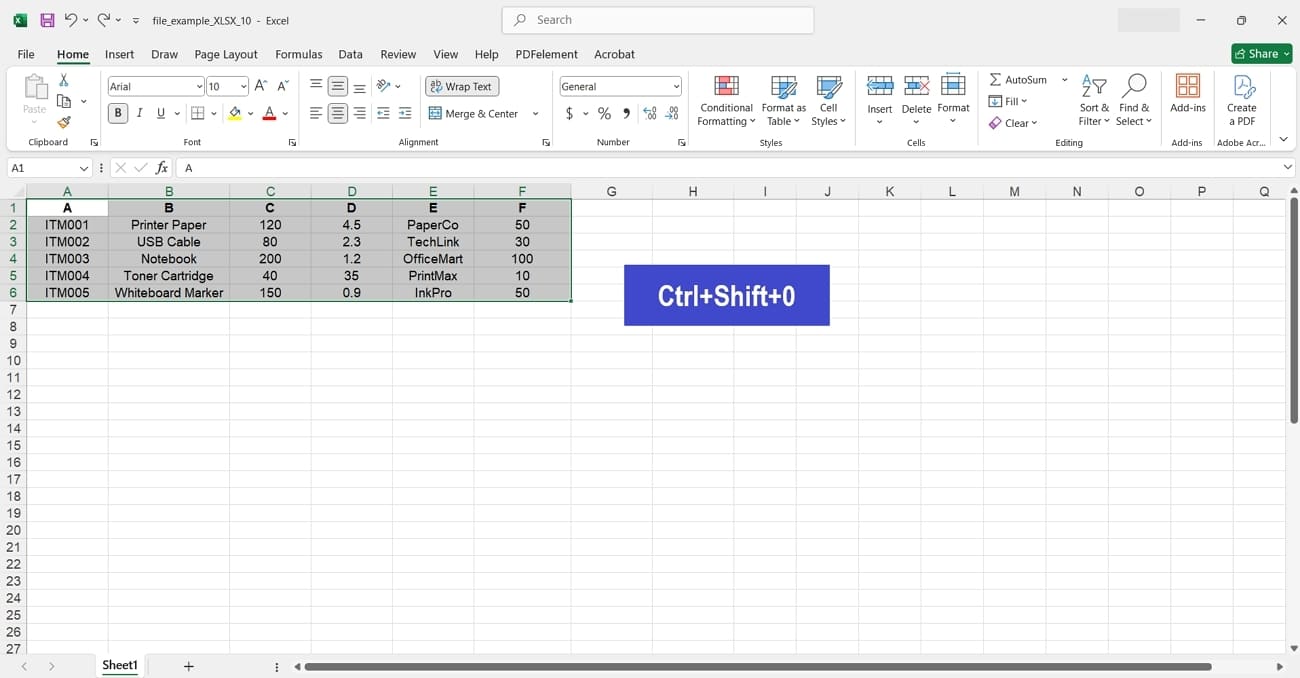
Just like unhide, press “Ctrl+0” on Windows and “Command+0” on Mac to hide the columns through keyboard.
Part 4. How to Unhide All Cells?
Even after unhiding rows and columns, I’ve found that sometimes the whole sheet stays hidden. So, I’ll share some methods on how to unhide all cells in Excel to reveal all cells.
Method 1
When my entire sheet looks blank, I simply unhide the whole sheet and make all cells visible again. Here’s how I do that:
Instructions. First, select the whole sheet and press the “Unhide” button to make hidden cells visible again.
Method 2
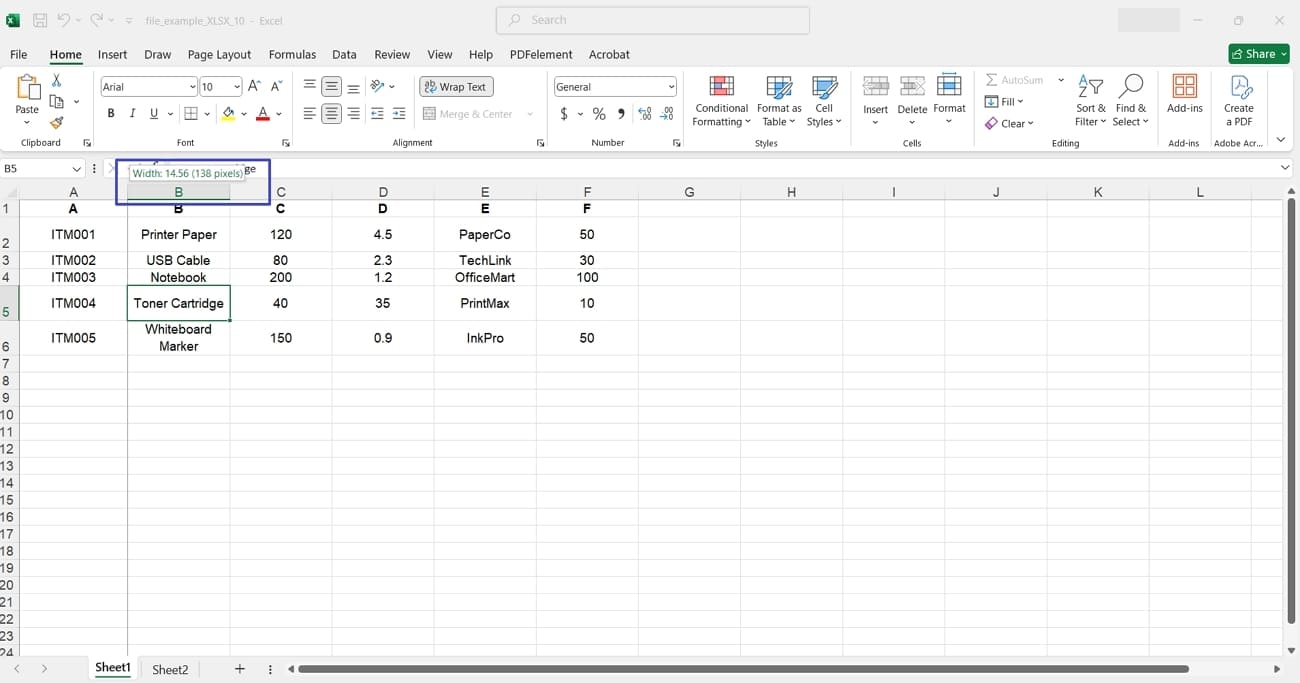
If cells still don’t appear, I check their height and width settings and adjust them to standard values. Follow these instructions to make cells visible.
Instructions. Move the cursor between row or column headers until the double arrow appears, then double-click or drag to resize and reveal any hidden cell data.
Method 3
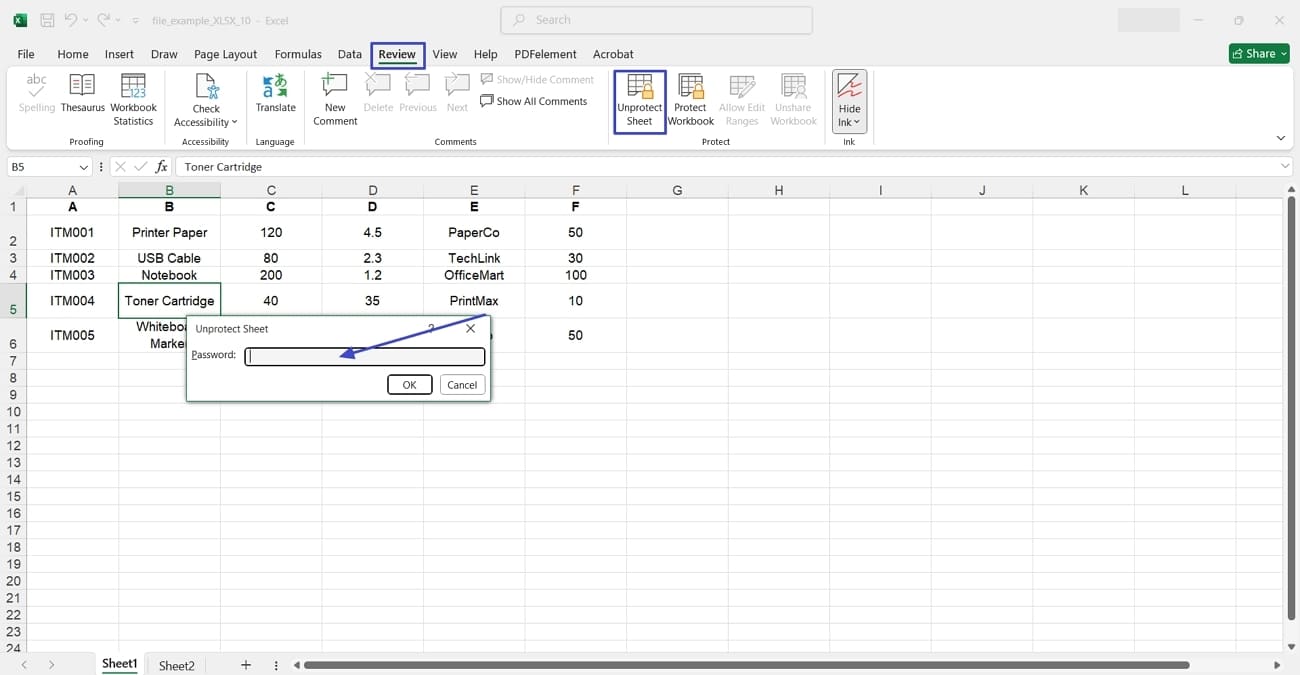
When nothing else works, I make sure the sheet isn’t protected, since that can hide or lock cell data. Adhere to the instructions below to check the sheet protection.
Instructions. Go to the “Review” tab, select “Unprotect Sheet”, enter the password if asked, and recheck the cells once the sheet is unlocked.
Part 5. Bonus Tip: Convert your PDF to Excel with UPDF
Once I understand how to unhide all rows in Excel, I often need to convert my PDFs into Excel sheets to organize and edit data easily. For that purpose, I used UPDF, an all-in-one PDF editor and converter. I simply converted my PDF files into 14 supported formats and vice versa through the UPDF file converter feature.
UPDF is also available for Android and iOS users to work on PDFs directly without needing a dedicated PC.
Windows • macOS • iOS • Android 100% secure
Key Features That Makes UPDF Special
- Fast and Ad-Free Experience: UPDF offers a fast and advertisement-free solution that helps me convert my files without any distractions.
- Batch Files Convert: Converts multiple files using the batch conversion feature, which saves time when handling large amount of data.
- Easy-to-Use: Provides a user-friendly interface that makes it a top choice for professionals and beginners as well.
- Private & Secure: My files stay protected during conversion, with no data uploaded online.
- No Internet Needed: It converts my PDFs to Excel anytime, even without an internet connection.
How to Convert PDF to Excel (PC & Mobile)
UPDF’s PDF conversion features allow me to convert my PDF into any format, so I can edit my sheets easily. Let me share some methods I used to convert my PDF into Excel in simple steps.
For PC
When working on my PC, I easily convert my PDF file through UPDF, so go through this guide to know how I do that:
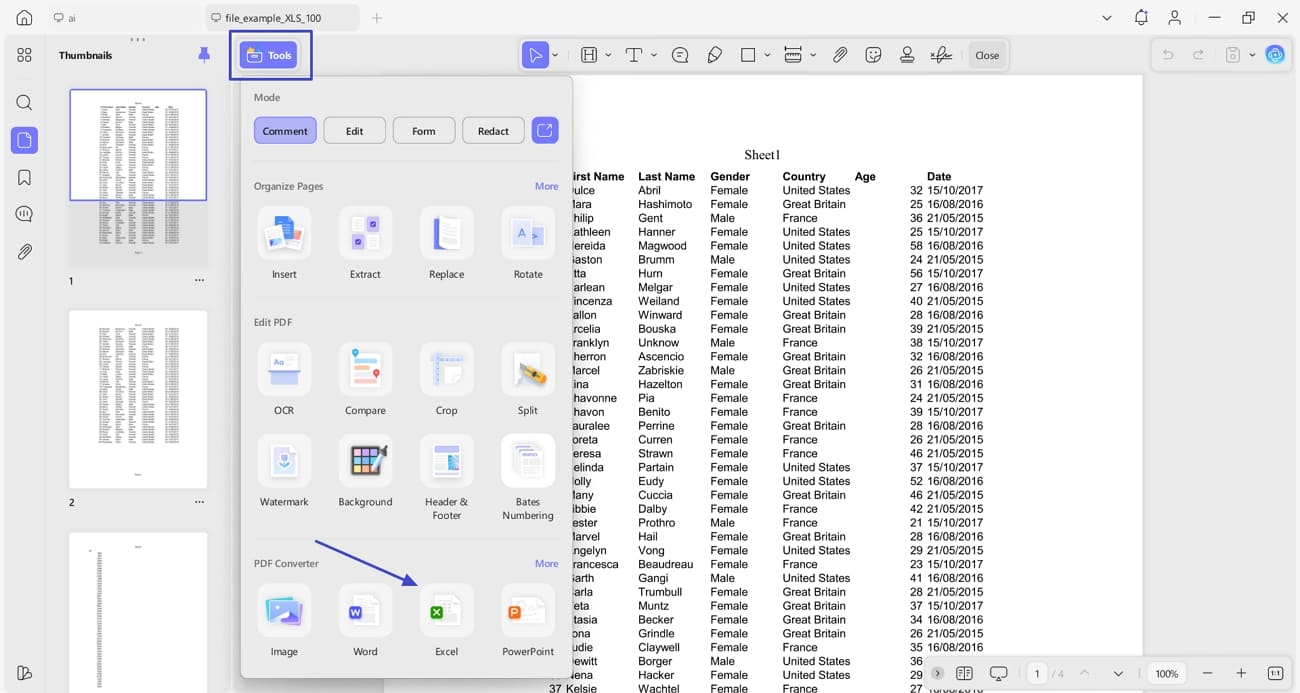
Step 1. Import PDF and Access Tools
Once you open the PDF file on UPDF, press the “Tools” button and hit the “Excel” options under the PDF Convert section.
Windows • macOS • iOS • Android 100% secure
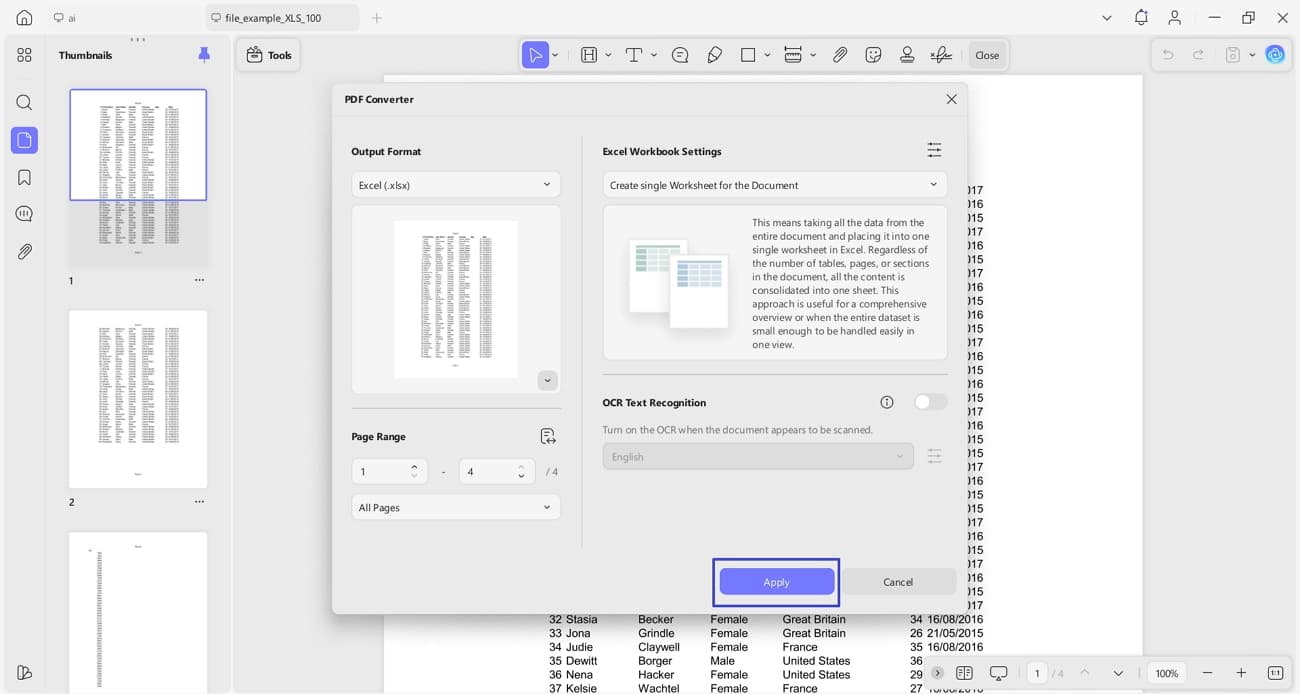
Step 2. Start The Conversion Process
Now, press the “Apply” button to begin the conversion process.
For Mobile
On my phone, I use UPDF to turn PDFs into Excel files within seconds, and the process is surprisingly simple. Follow these steps to do it on mobile:
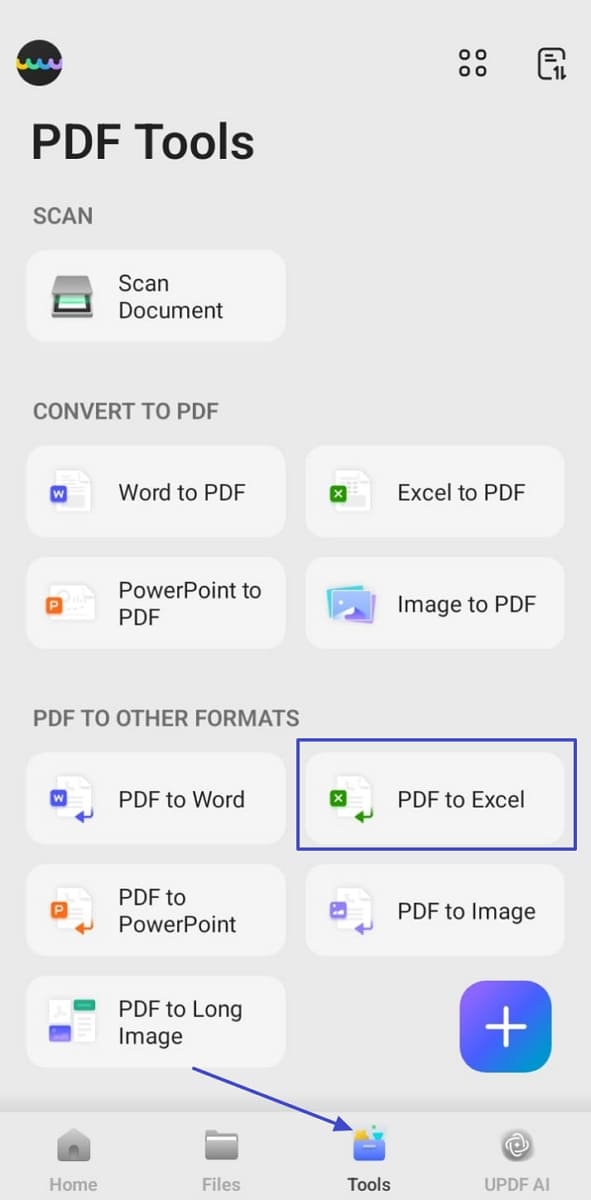
Step 1. Access The PDF to Excel Tool on UPDF
Once you enter UPDF mobile, tap the “Tool” option and hit the “PDF to Excel” tool to proceed further.
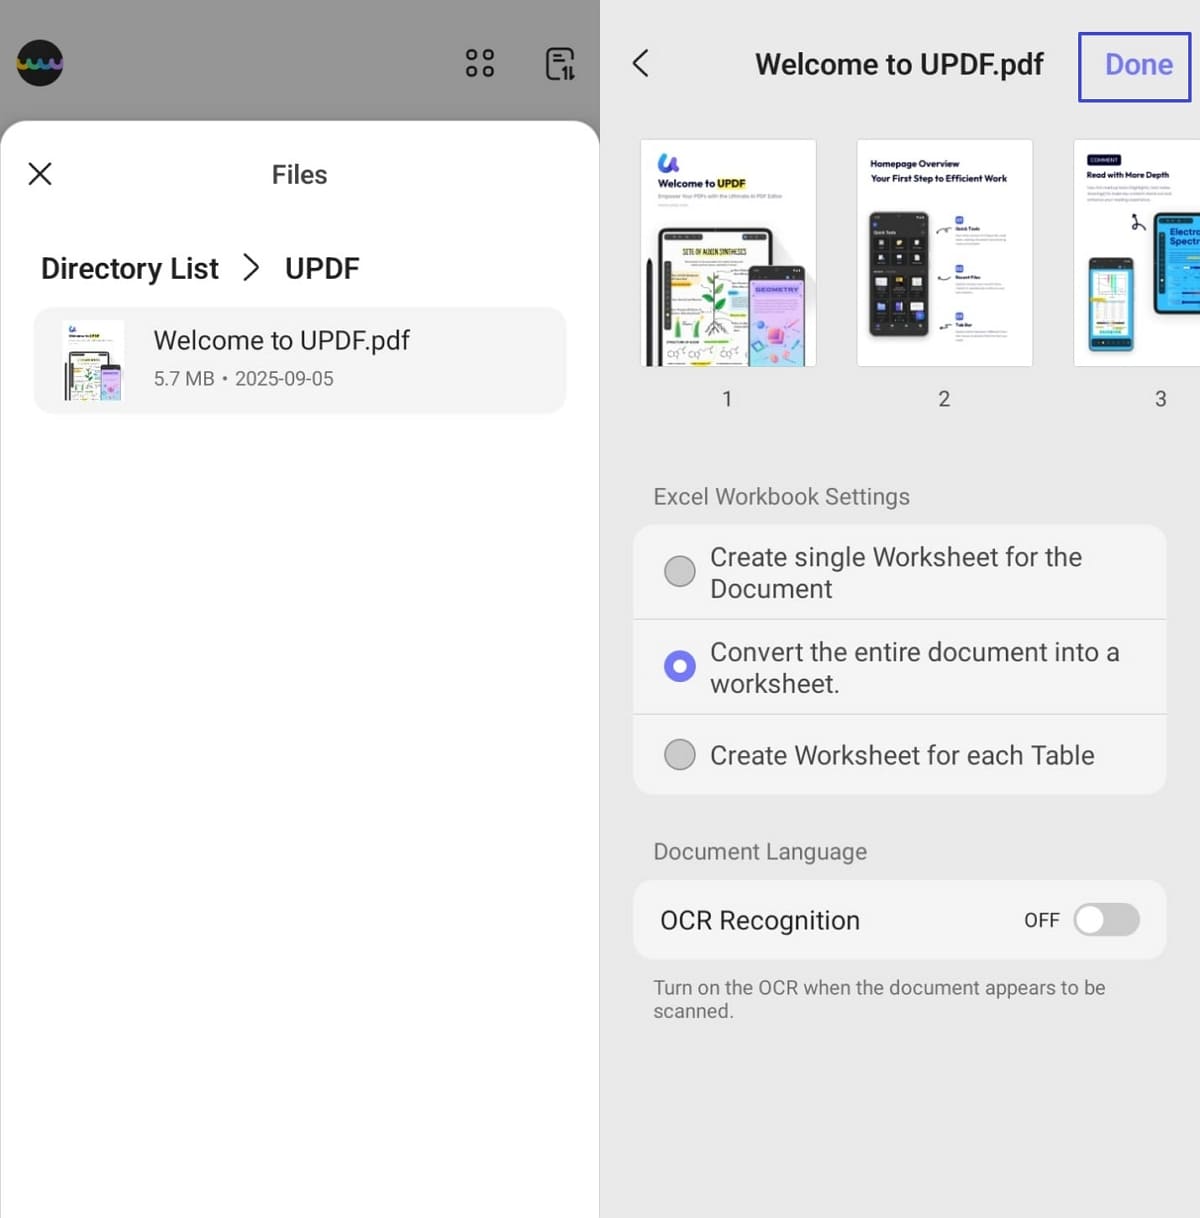
Step 2. Import PDF File and Convert
On the next screen, import your PDF file to UPDF and tap “Done” to begin the conversion.
How to Batch-Convert PDF to Excel (PC & iOS)
After learning how to unhide all cells in Excel, I also discovered that UPDF lets me batch-convert multiple PDF files to Excel on both PC and iOS in just a few clicks. Let’s explore how it works on PC and iOS.
Windows • macOS • iOS • Android 100% secure
For PC
With UPDF, I used the batch conversion feature to convert PDFs to Excel on PC; go through this guide to see how I do it.
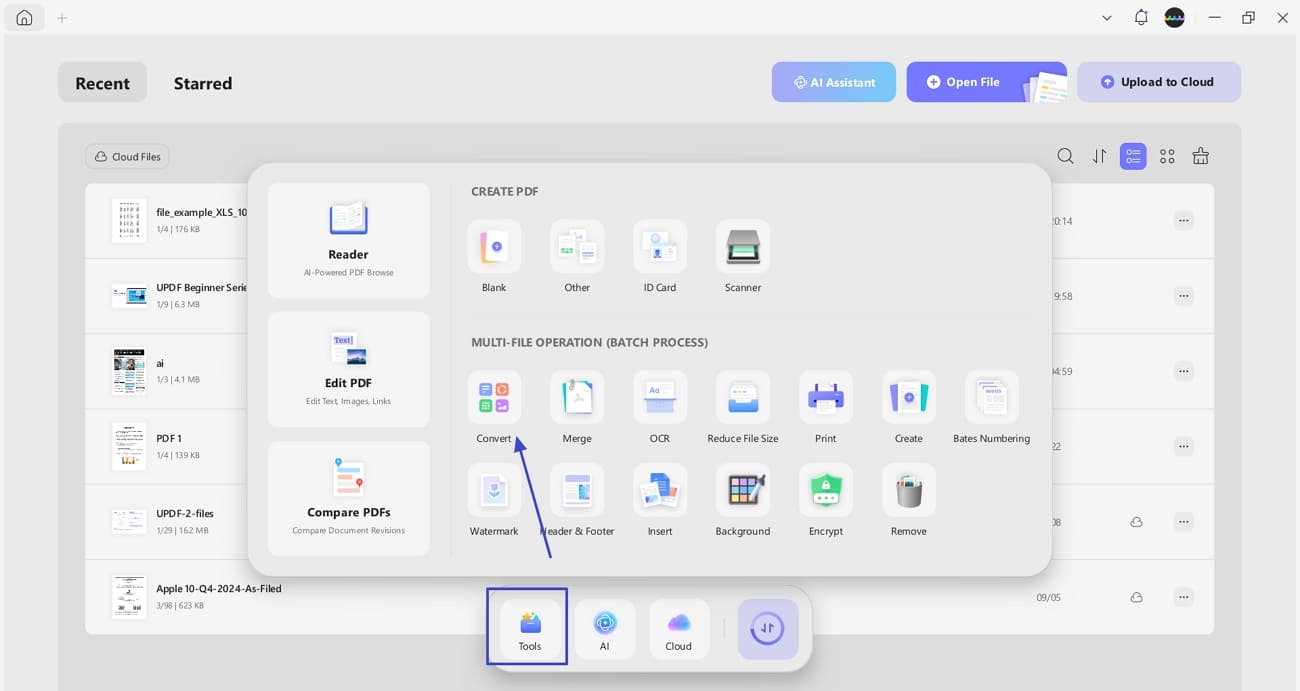
Step 1. Access The Batch Convert Tool in UPDF
First off, press the “Tool” option and click the “Convert” button to proceed further.
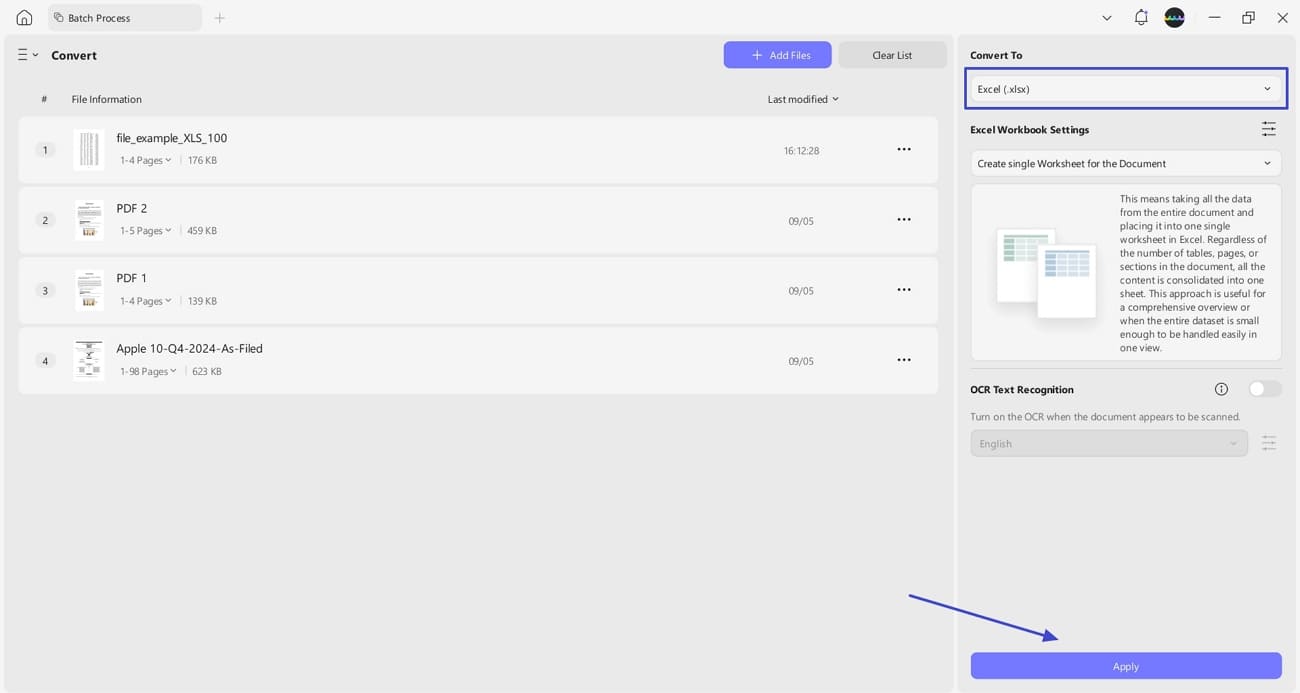
Step 2. Import PDF files and Select Excel Format
Next, import your PDFs and select the “Excel (.xlsx) format from the drop-down menu, then press the “Apply” option to batch convert PDFs.
For iOS
UPDF lets me handle multiple PDFs at once and convert them into Excel-supported format across iOS devices, which is explained as follows:
Step 1. Add Files and Multi-Select Them For Conversion
After you import your files, choose the “Multi-select” button on the top-right and make your selections. Continue to tap the “More” icon on the bottom toolbar and proceed to select the “Convert to PDF” option.

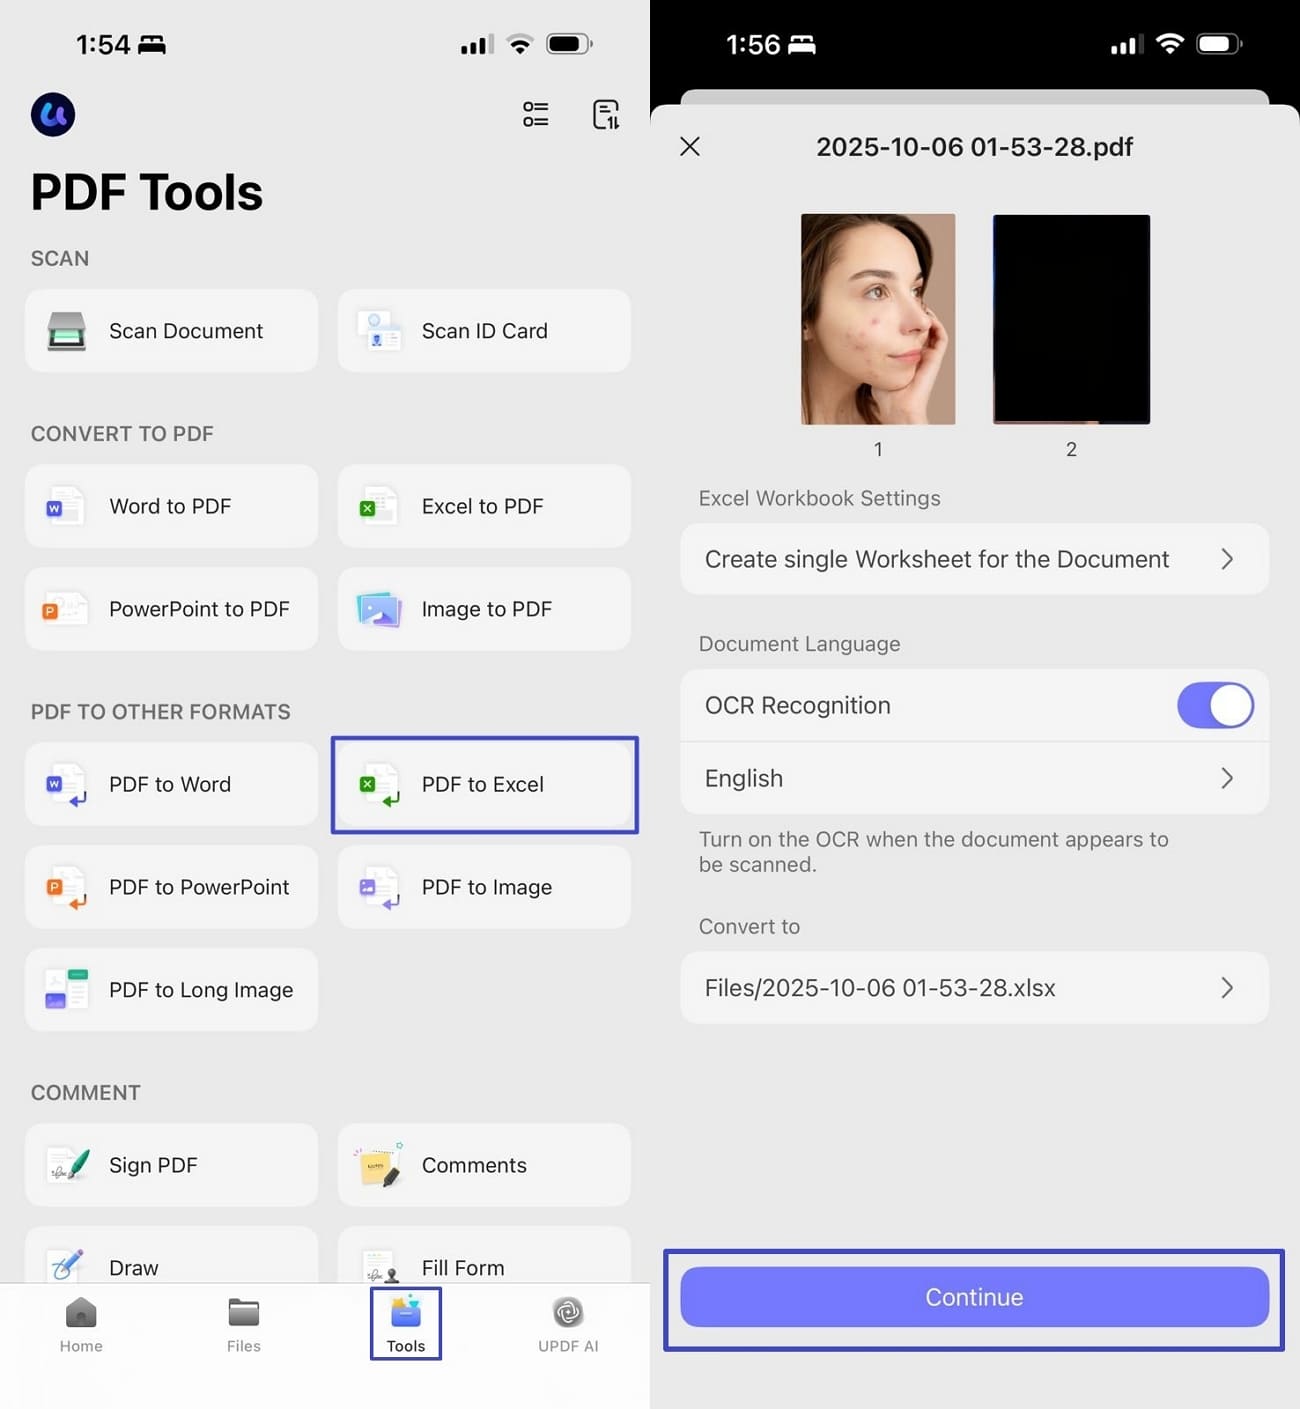
Step 2. Select Excel Format and Start Conversion
While this successfully creates combined PDF, continue into the “Tools” section and select the “PDF to Excel” option. Select your converted PDF, define all appropriate options and tap “Continue” to successfully execute the process.
Conclusion
In conclusion, I’ve shared methods on how to unhide all rows in Excel, including columns and cells. This strategy helped me organize and edit my sheet without wasting time. If you work simultaneously with PDFs and Excel sheets like I do, I prefer using UPDF to convert single and batch PDFs into Excel and vice versa. It also helps me edit and annotate PDF pages directly through one platform.
Windows • macOS • iOS • Android 100% secure


 Engelbert White