Have you ever found yourself struggling to format or read a lengthy Word document? The solution to this problem is simple; learn how to separate pages in Word, and by splitting your document into sections or different files, you can easily format each section without affecting the rest of the document and find the part you need easily.
In this article, we'll guide you through the steps to separate pages in Word, including creating section breaks or dividing them into different files. So, without any further delay, let's get started!
Part 1: 7 Different Methods to Separate or Split Pages in Word
Here, we will discuss different yet easy methods to separate pages in Word. These methods can be useful when splitting a document into multiple files or sections. Let's begin with our step-by-step guide and tell you the first method to split pages in Word!
1. Separate/Split Pages in Word Easily with 1 Click (Into Different Files)
If you’re looking for an easy and hassle-free way to separate pages in Word into different files with one click, then this method will be the best for you.
UPDF is a page separator that allows you to split pages in Word/PDF easily with one click. Except for the page splitting feature, UPDF also serves as a comprehensive tool to edit and read PDF documents. You can also merge multiple Word documents with UPDF since it provides the simplest solution. So, to split pages in Word using UPDF, follow the steps below:
- Download the UPDF by clicking the download button below and installing UPDF.
Windows • macOS • iOS • Android 100% secure
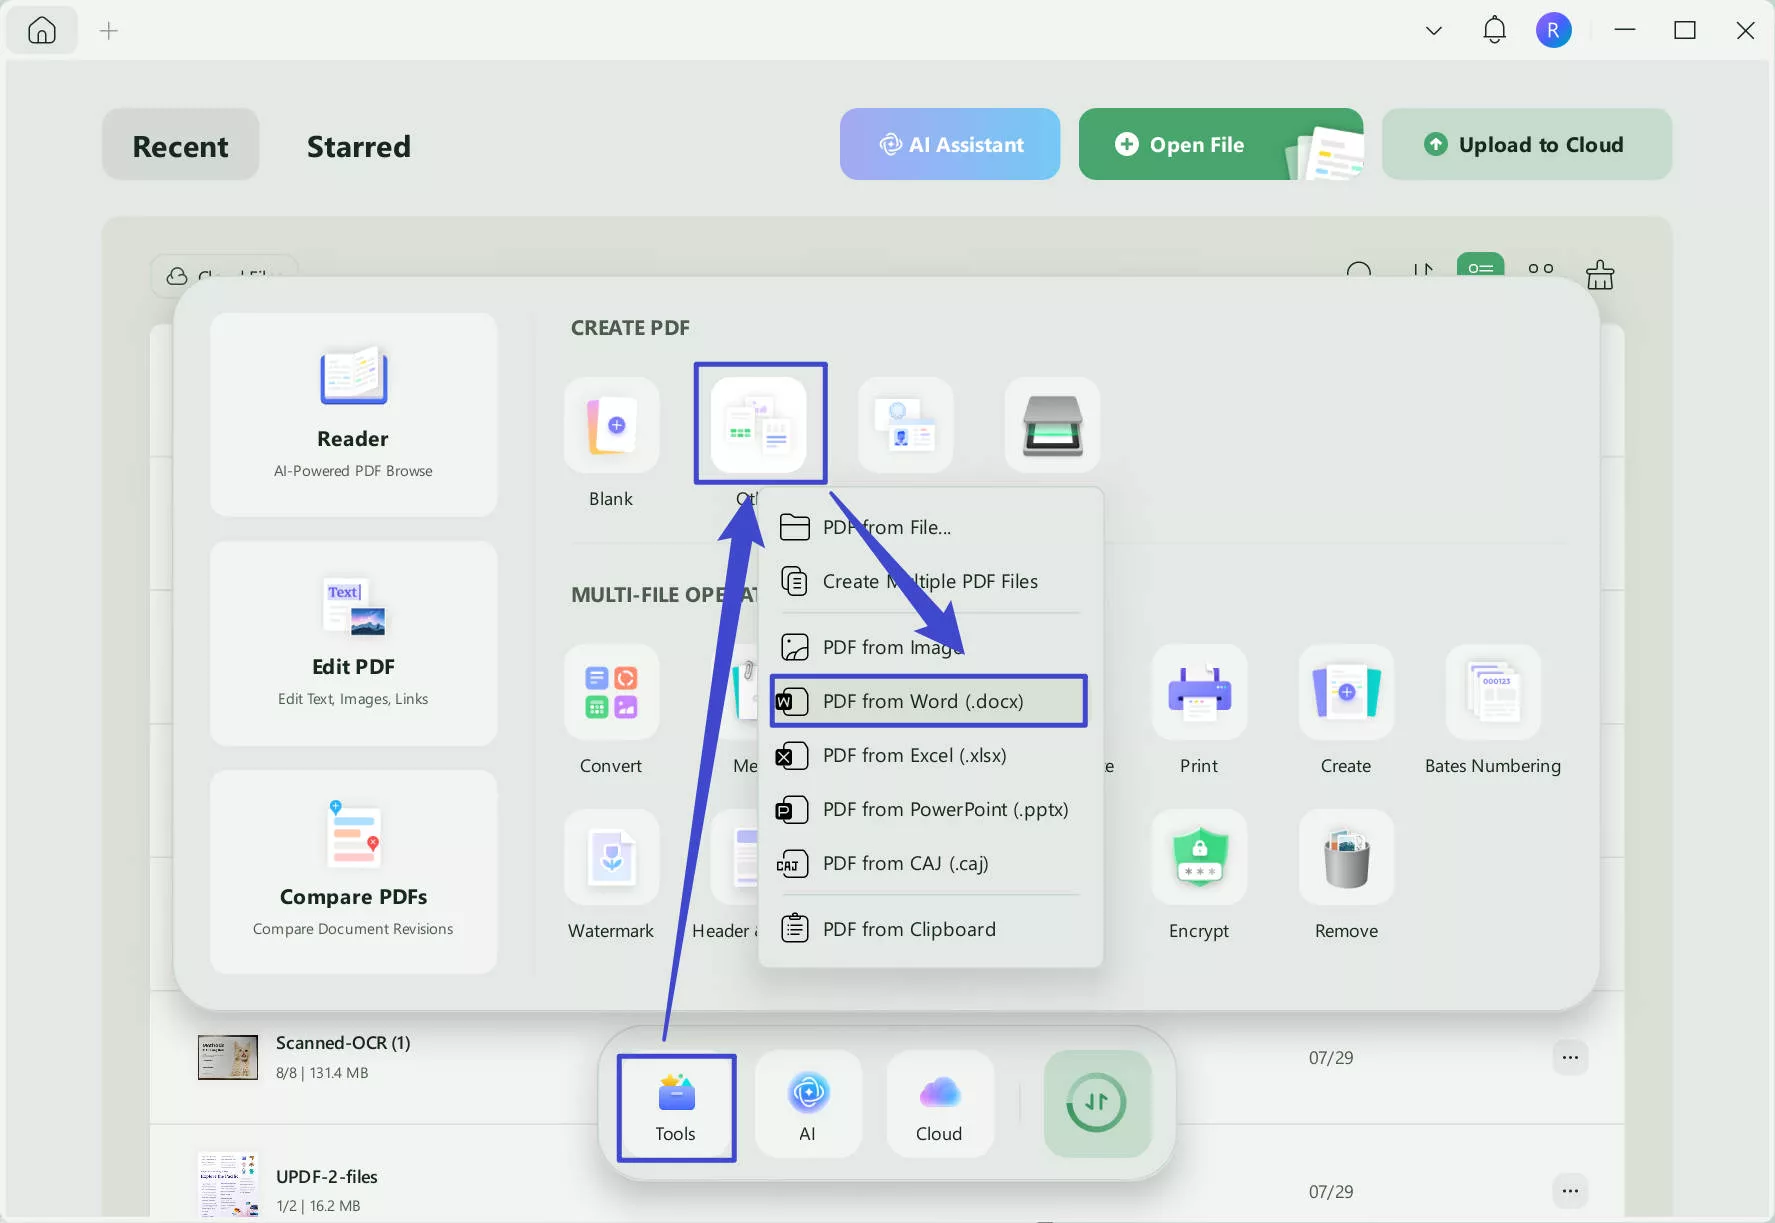
- Click "Tools" > "Other" > "PDF from Word" and select the file from your computer to open the Word file in UPDF.
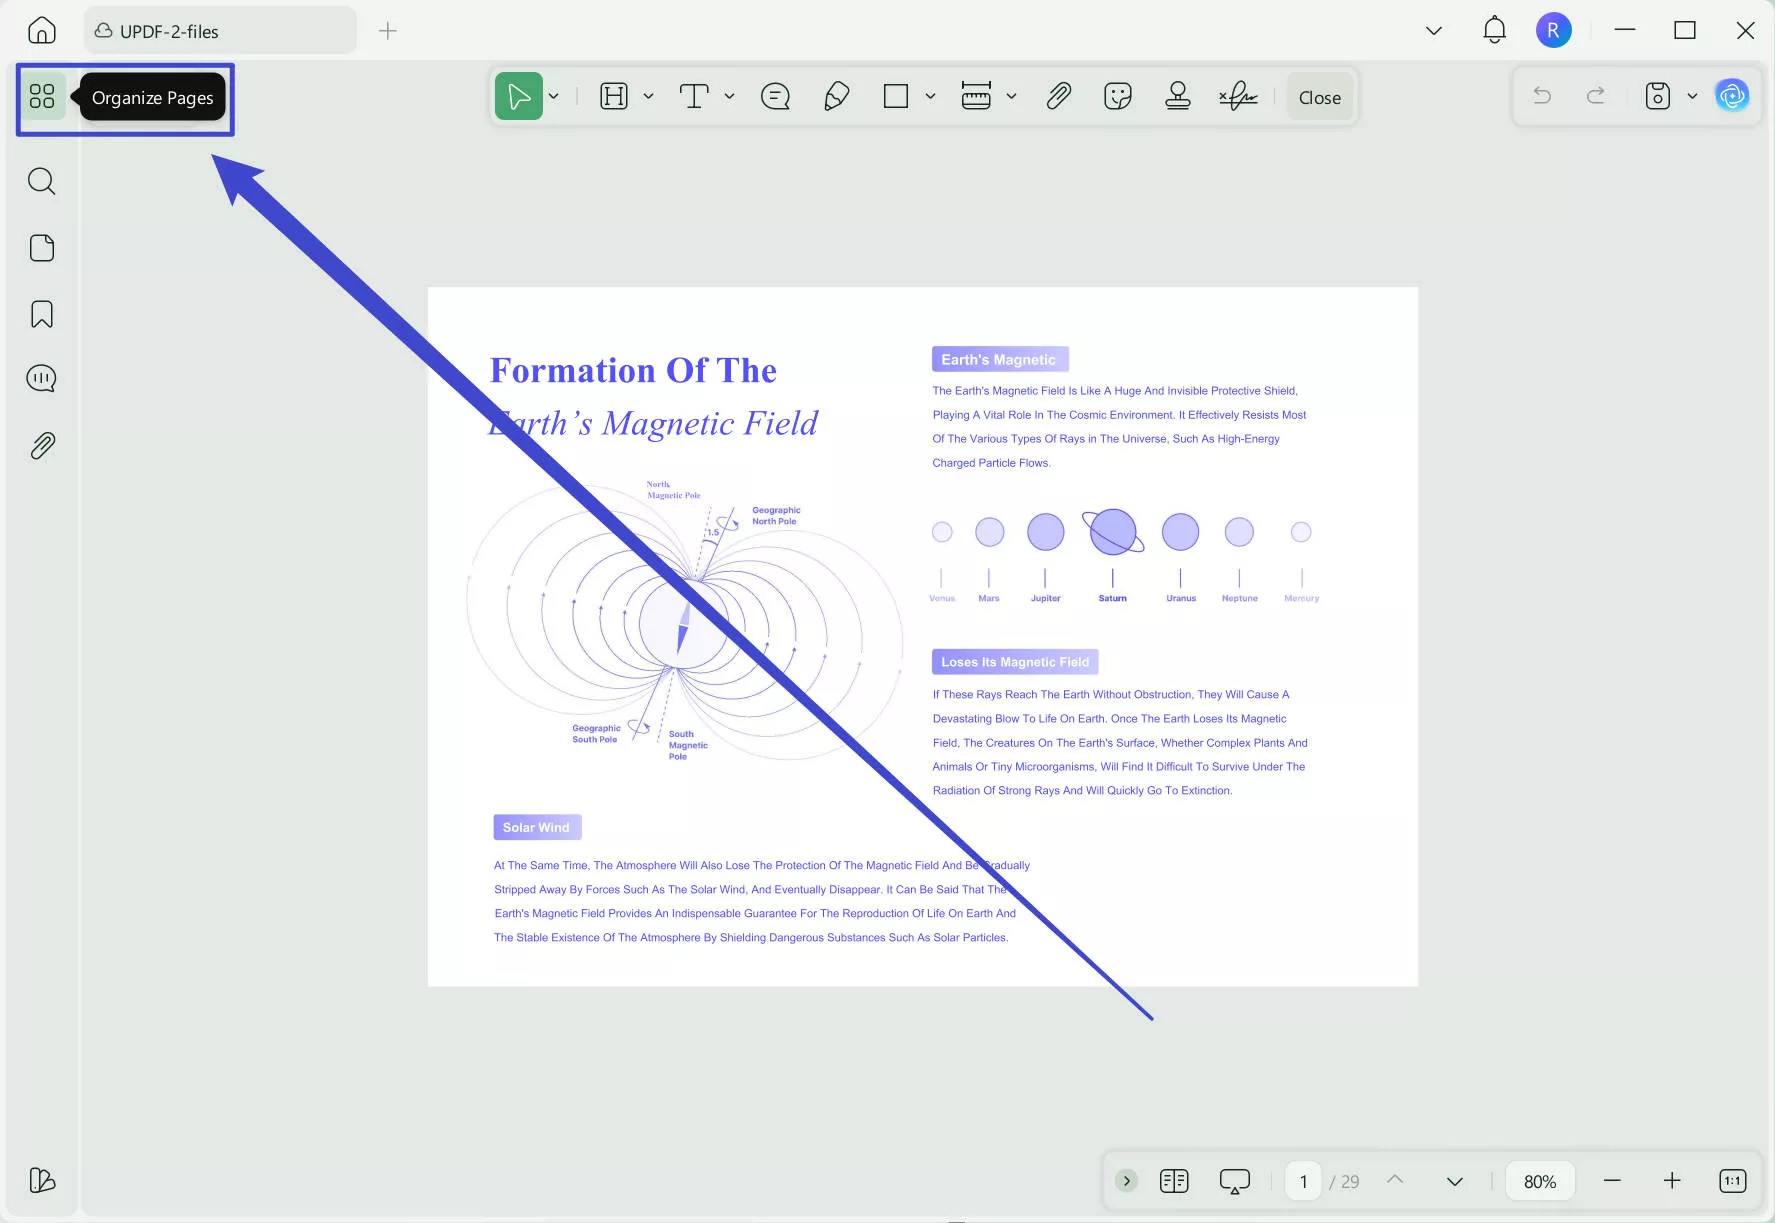
- Click on the 'Organize Pages' option on the left side menu.
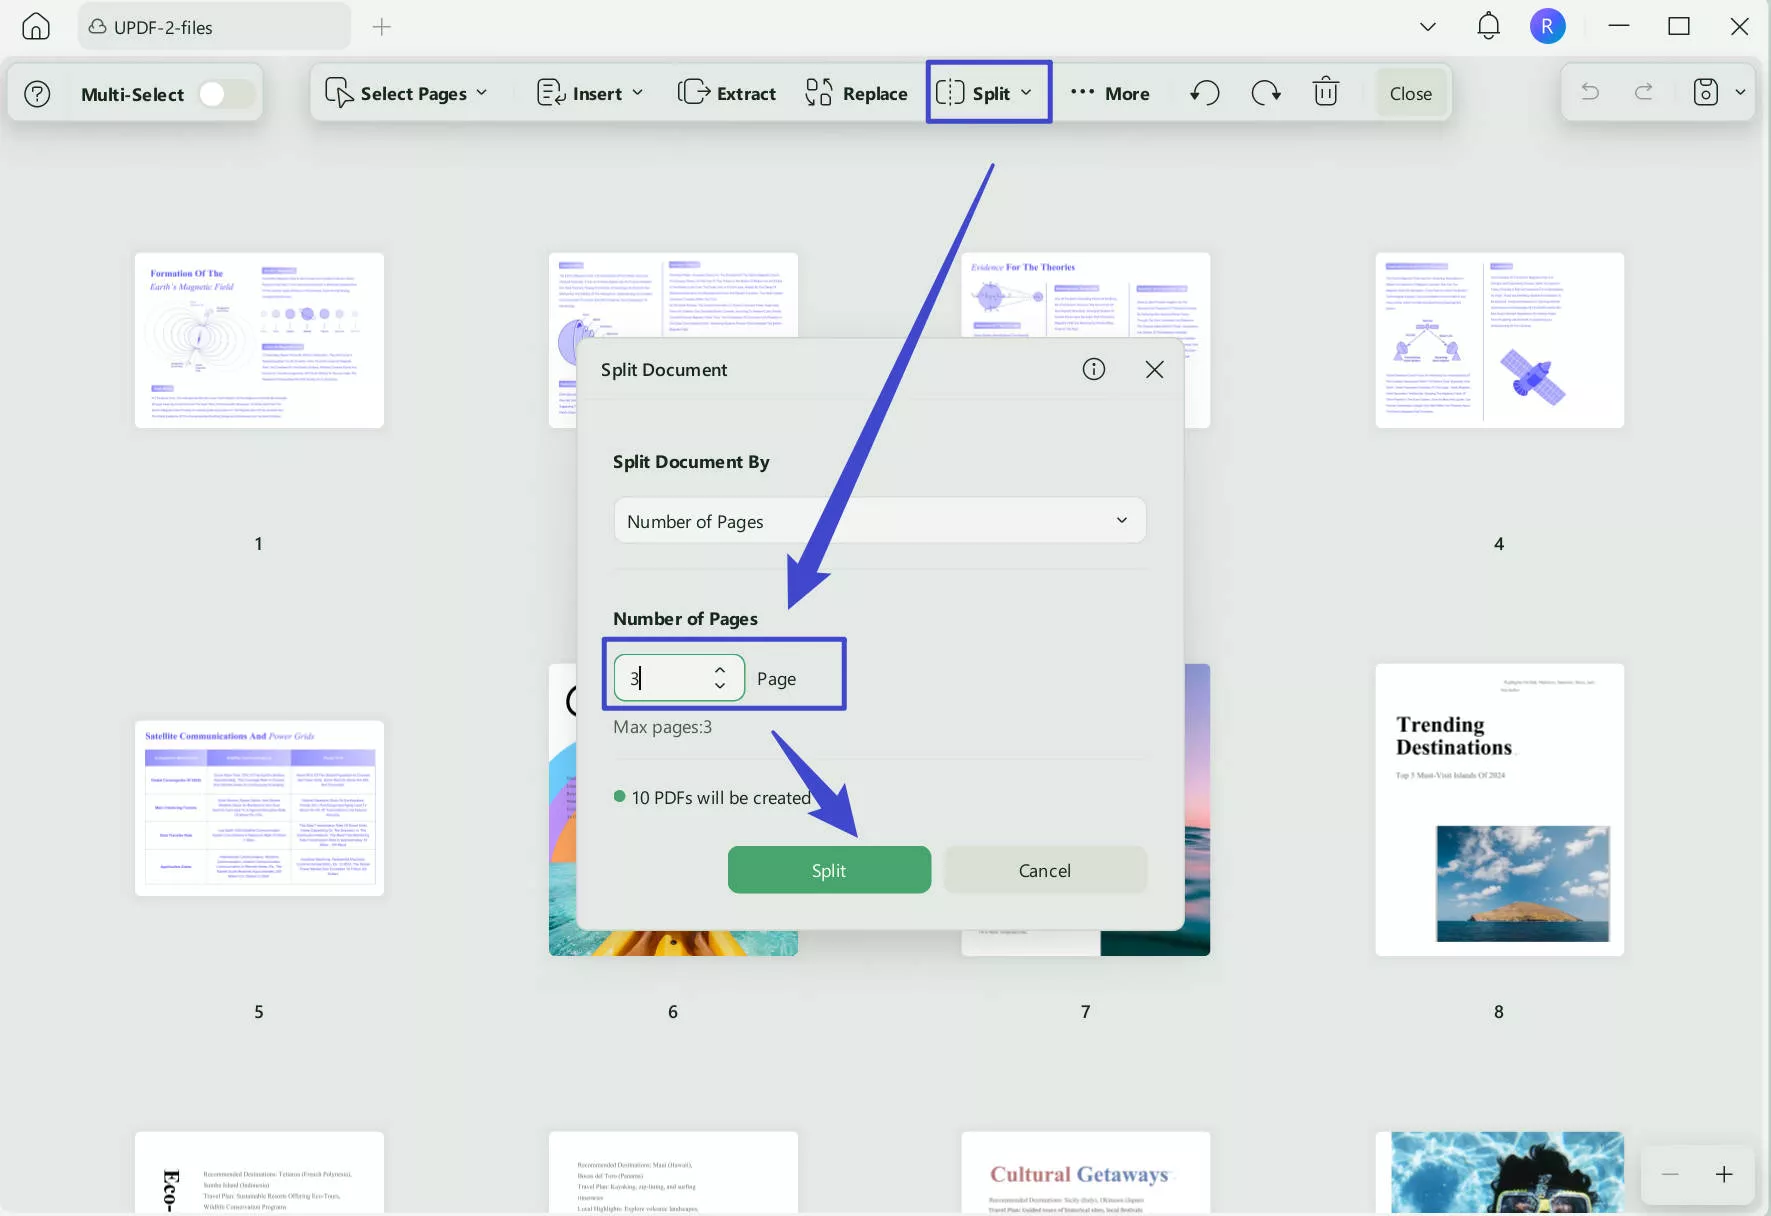
- Now, click the 'Split' feature. Choose Split by Number of Pages. Enter the number of pages you want to split.
- Click the 'Split' button and save the separated files on your computer.
- Now, these files are in PDF format. You can go to home interface of UPDF. Click on the "Tools" > "Convert" > "Add Files" > "Word" in Output Format > "Apply" to convert all split page files into Word format.
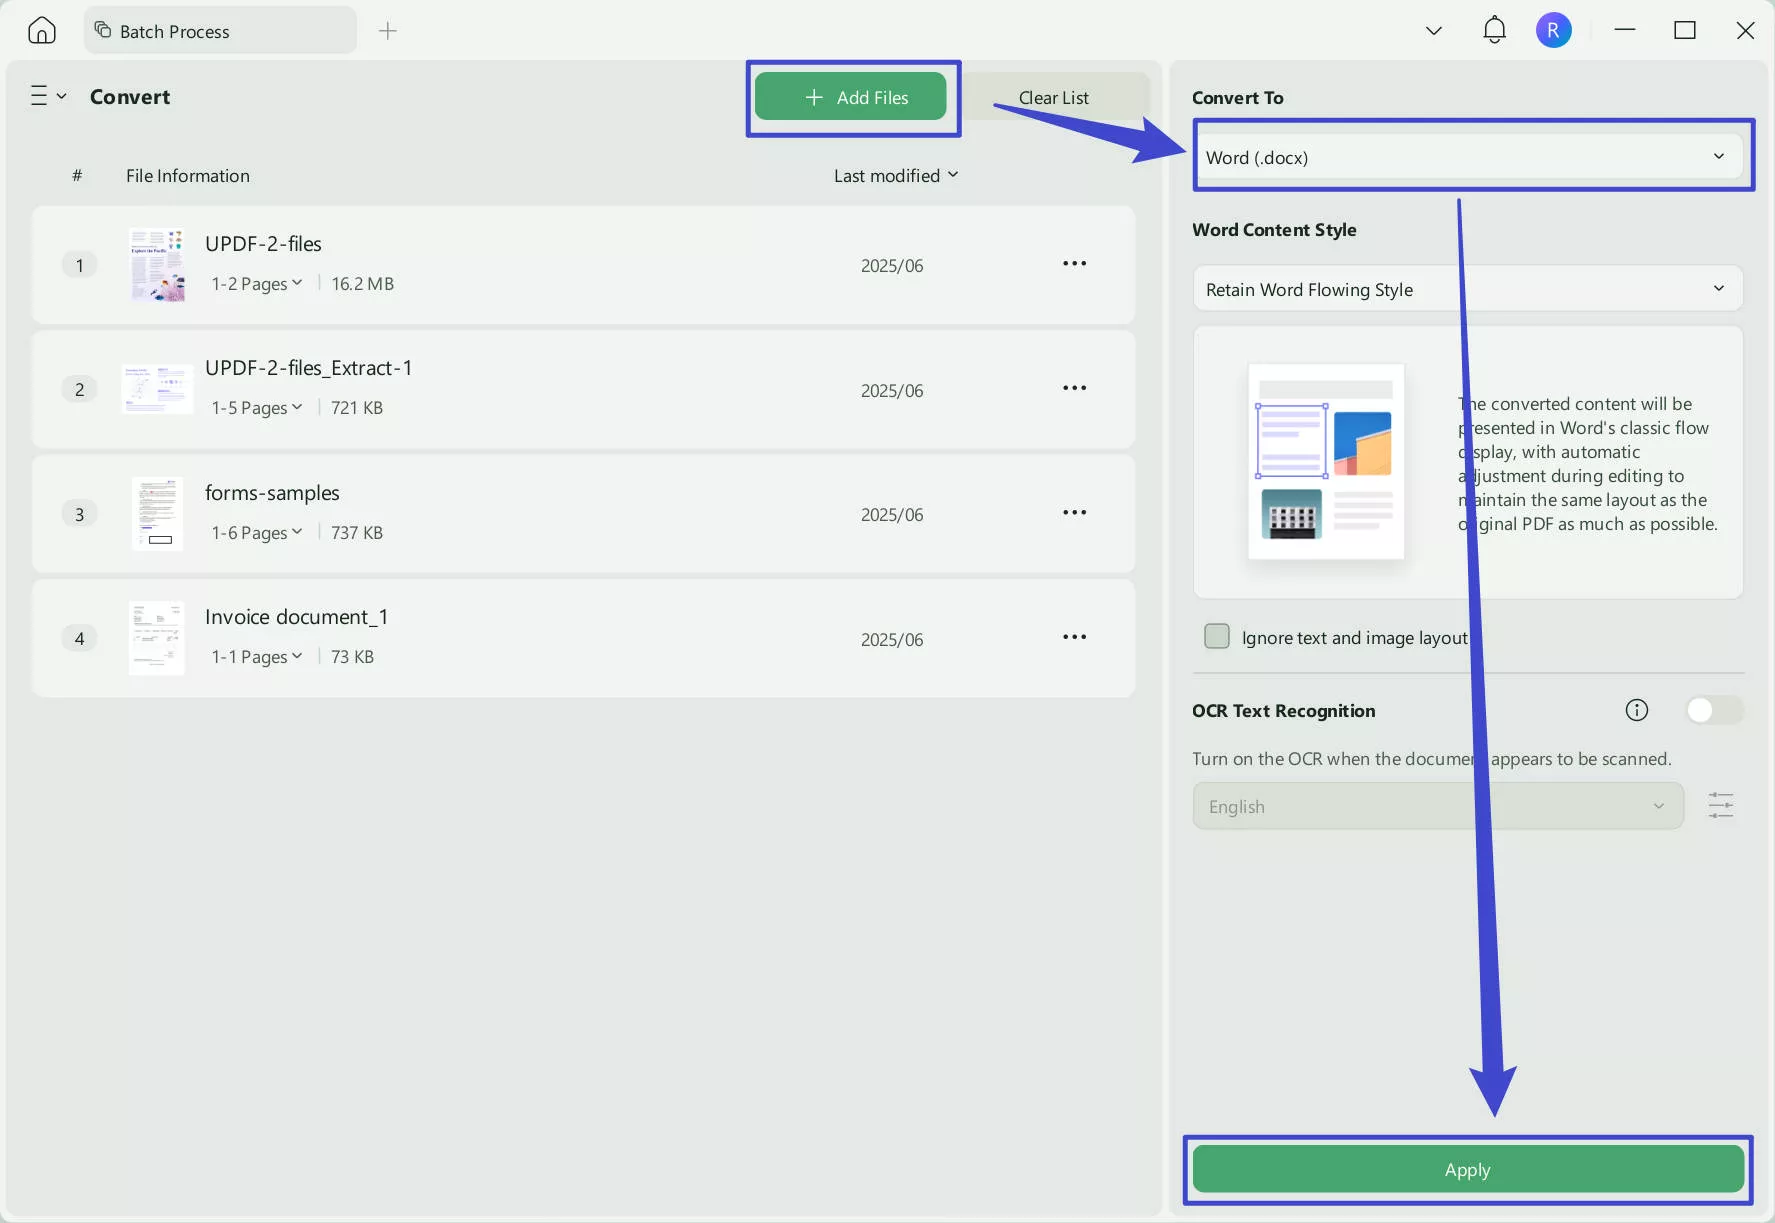
And this is how, by using UPDF, you can make the process of splitting Word documents easier than ever!
Windows • macOS • iOS • Android 100% secure
And UPDF has many other features; you can watch the video below or read this review article to learn more.
2. Separate A Multi-page Word Document into Several Ones with the Outline Feature
If you do not want to use UPDF and do not care for the complicated guide, you can follow the guide below to separate the Multi-page Word.
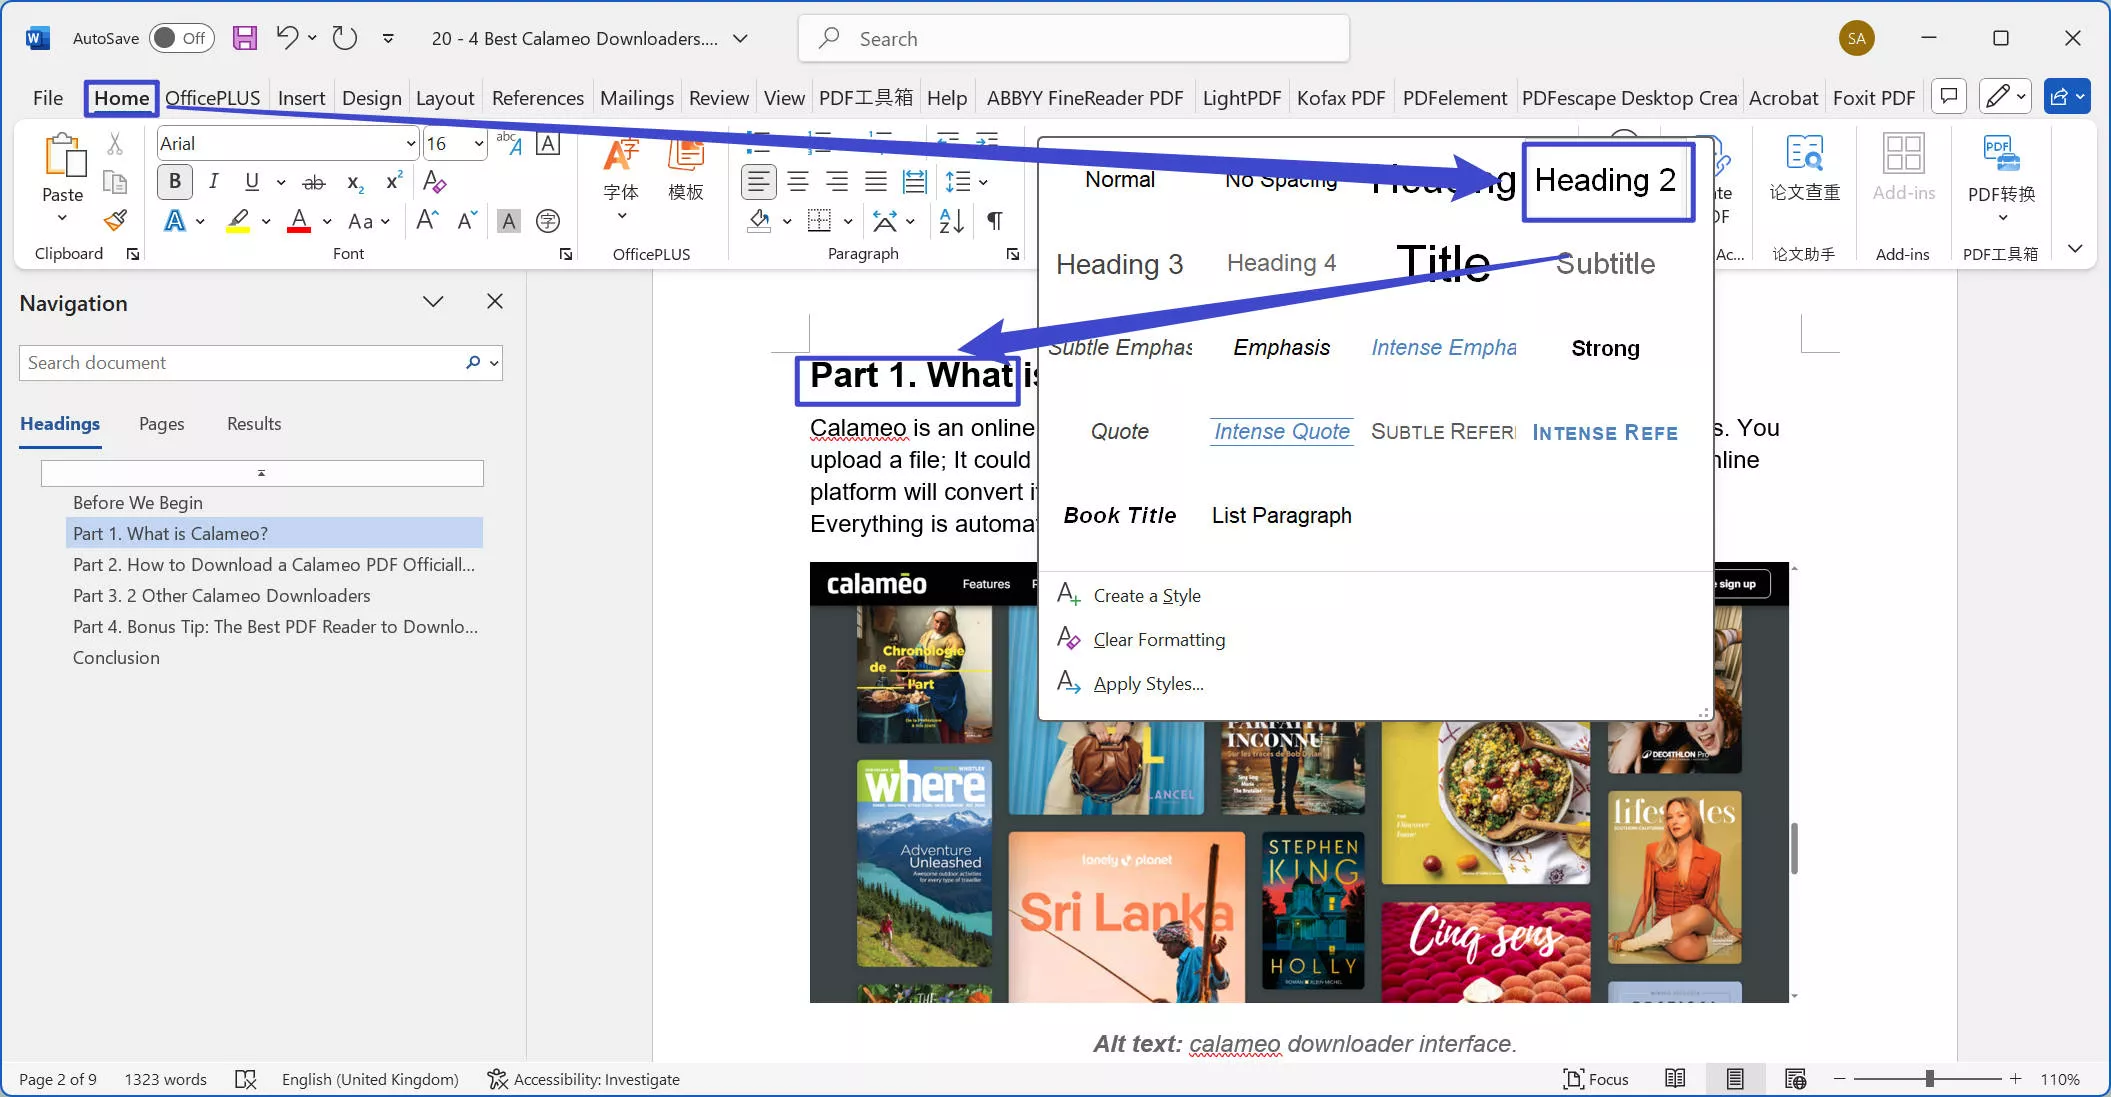
Step 1. Open the Word document you want to split. Identify the beginning of each section you want to separate and apply the same heading style to each one. In this example, I set the start of each section to “Heading 2”.
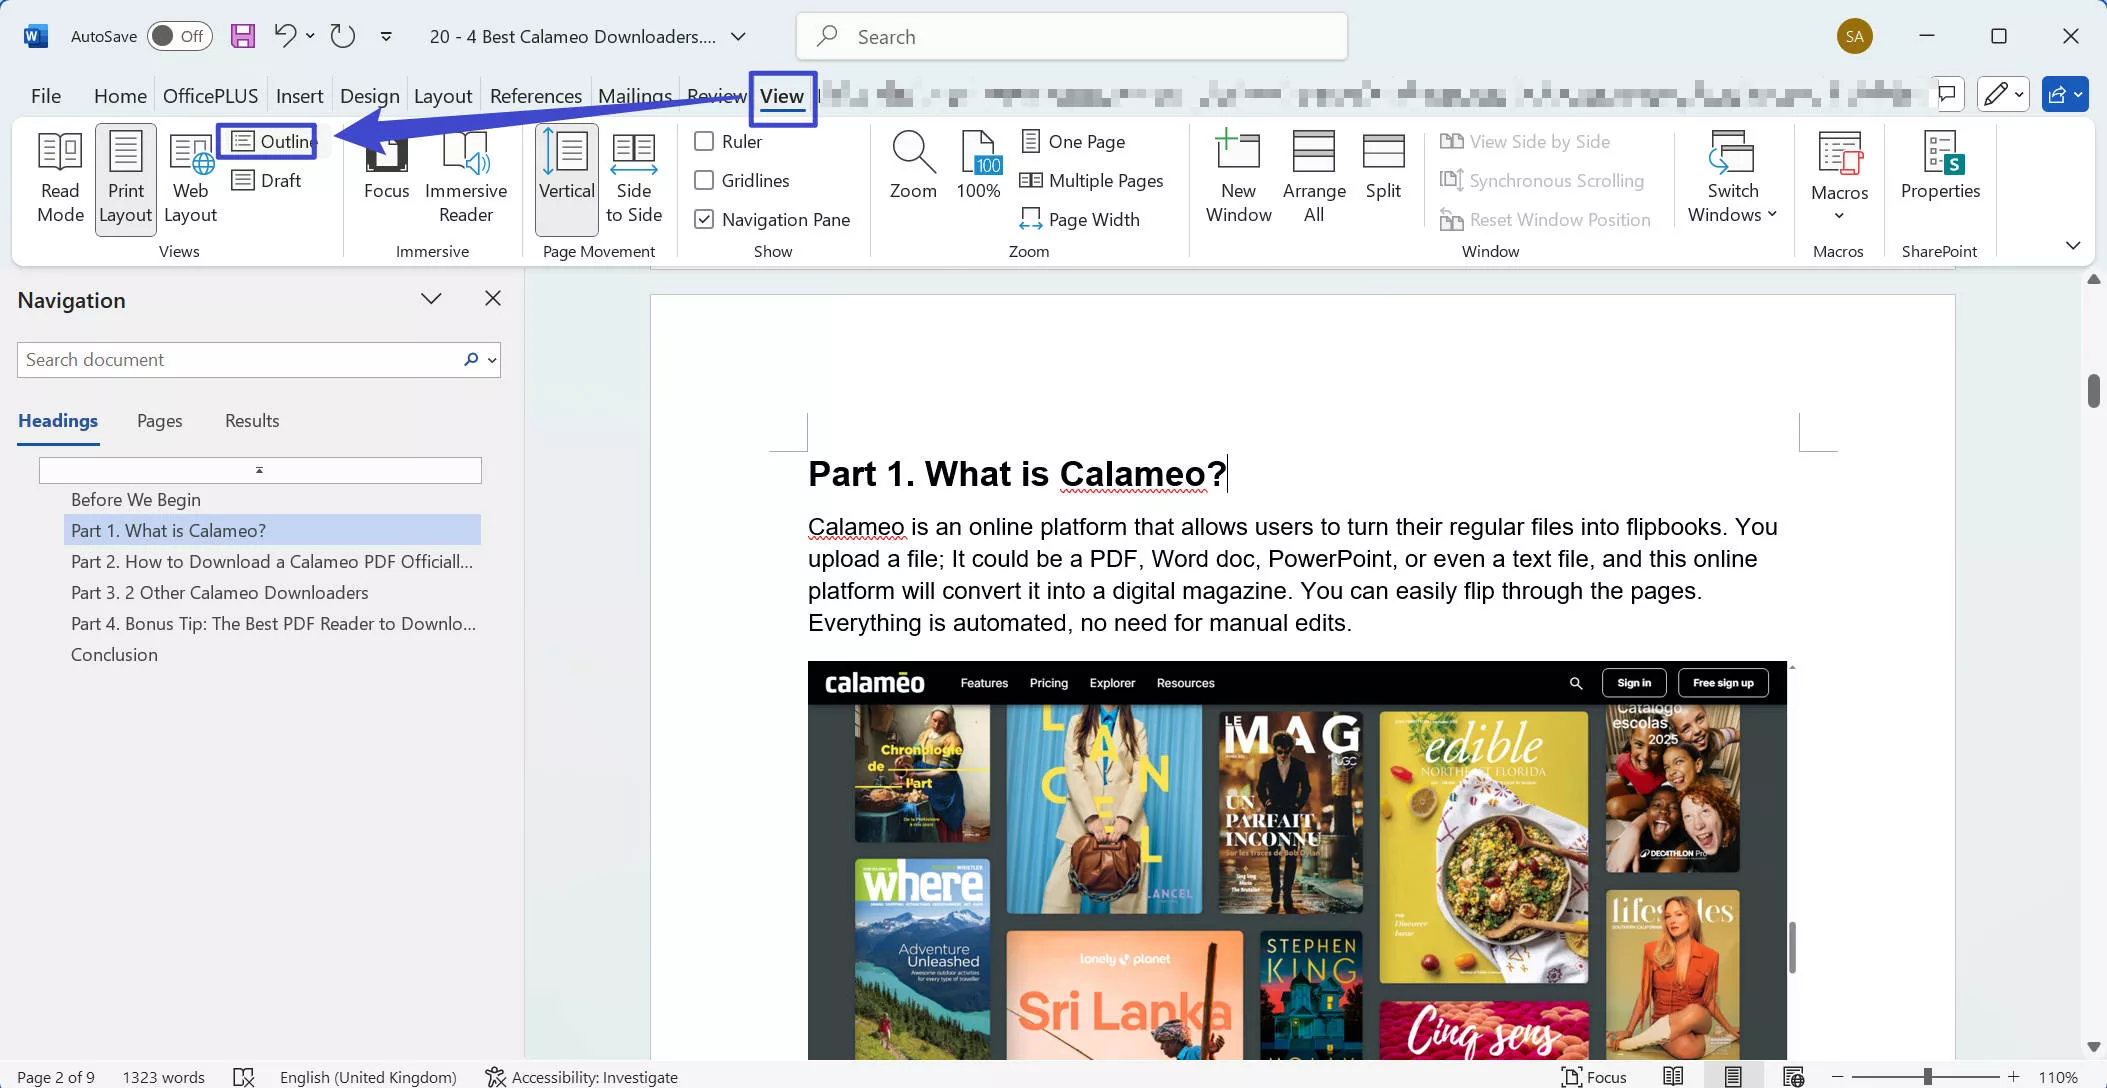
Step 2. Click on the "View" > "Outline".
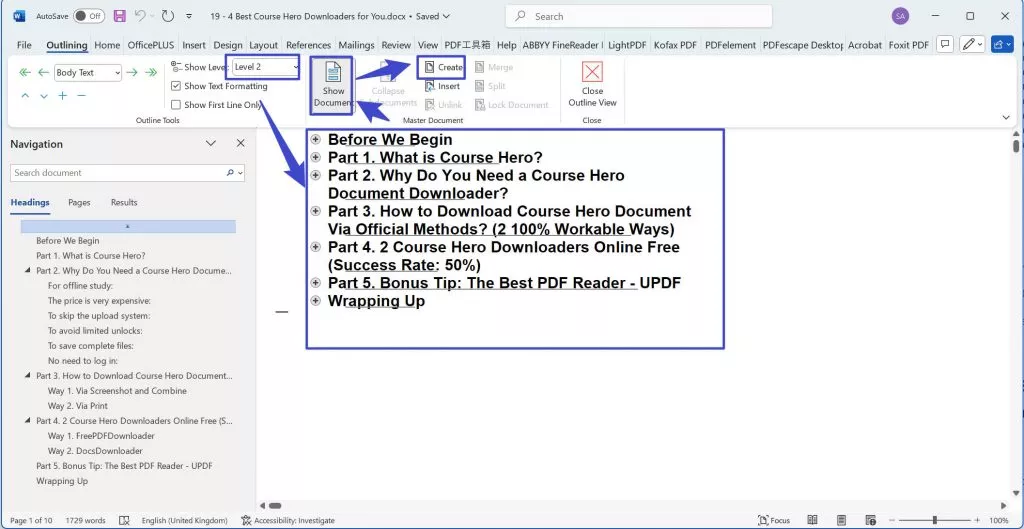
Step 3. Go to the "Show Level" section. As I set all the beginnings of each section as heading 2. I select "Level 2" here. Then, click on the "Show Document". "Control" or "Command" + "A" to select all the content in this page. Then, click on the "Create".
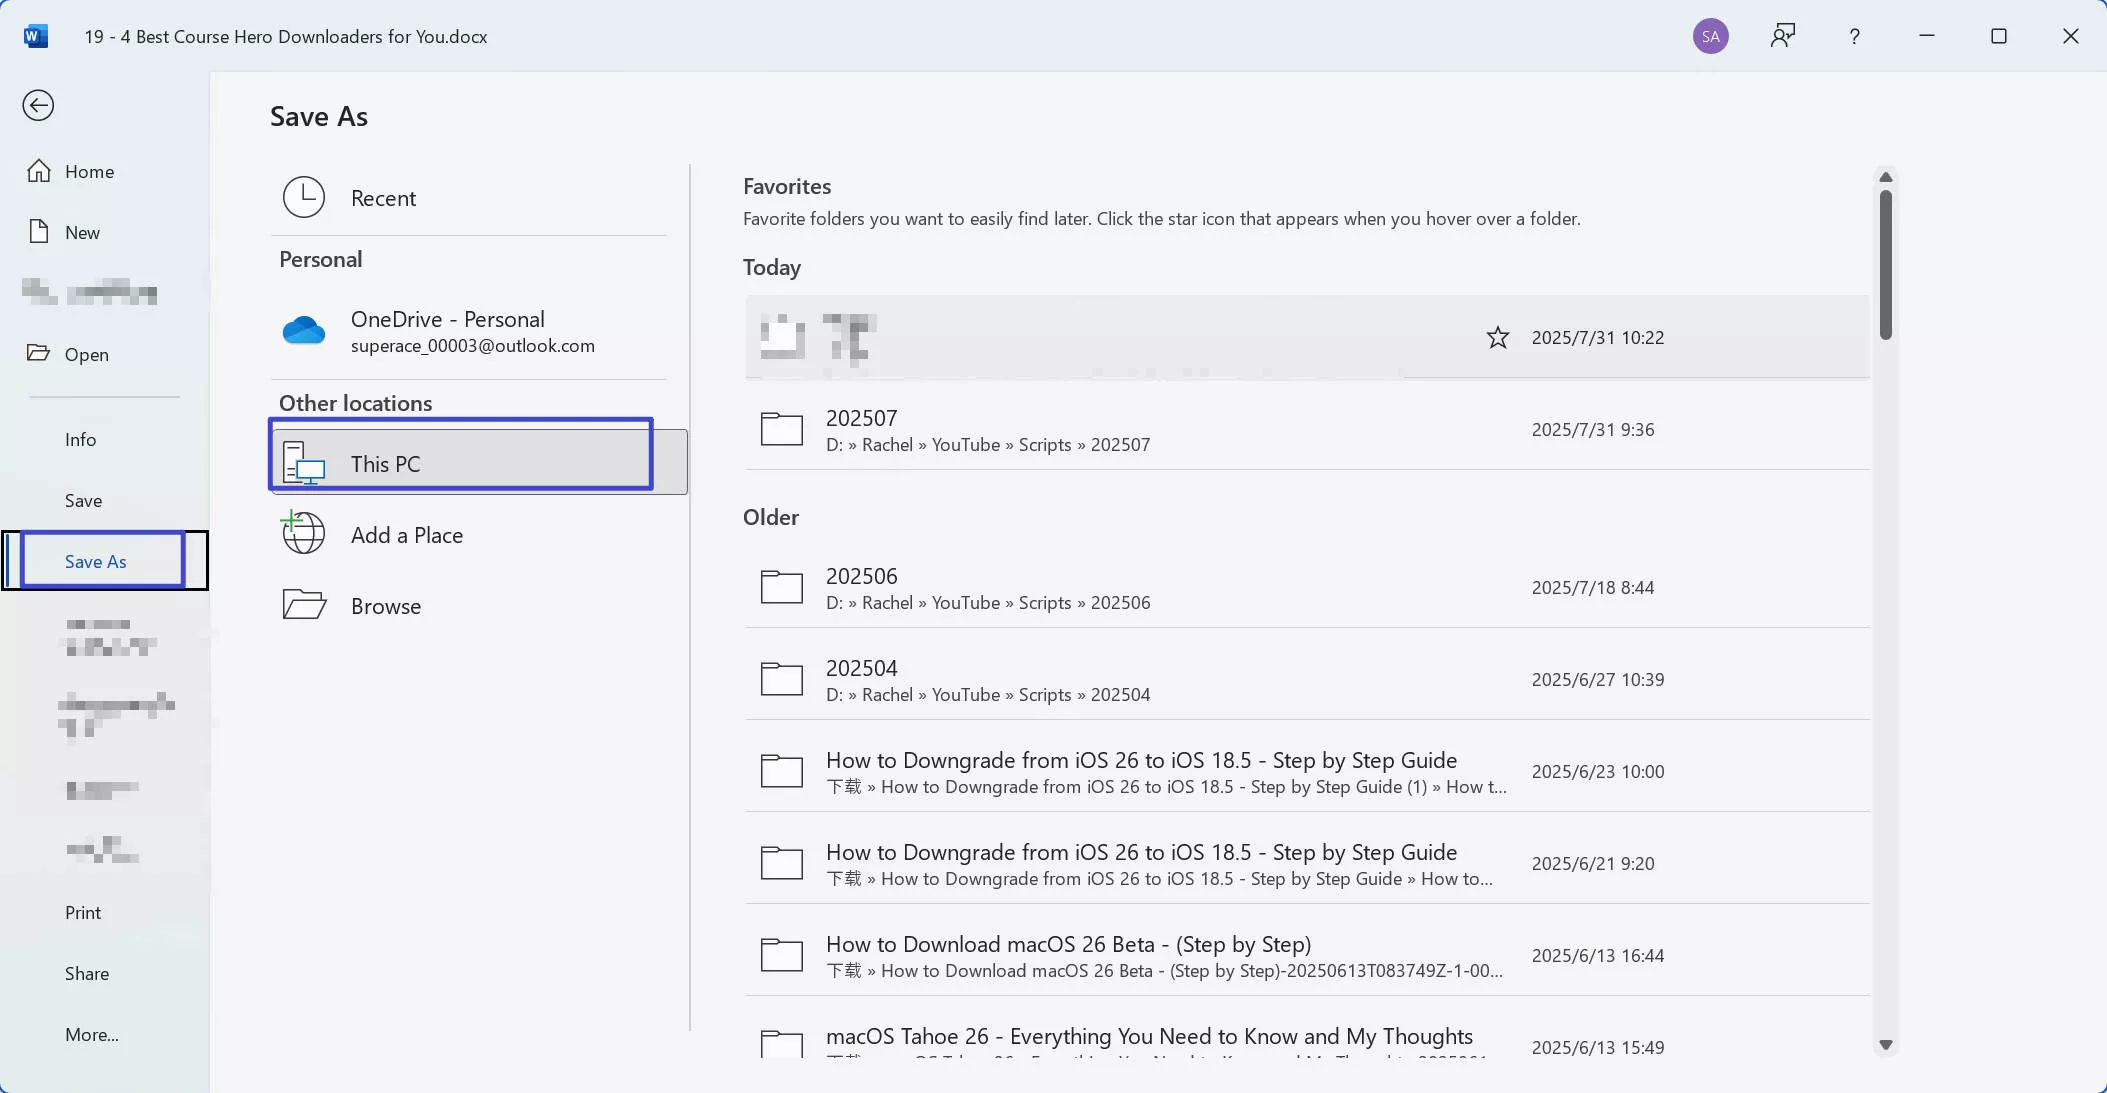
Step 4. Now, go to "File" > "Save As". Select one place where you want to save the separated files. Click on the "Save" to separate all the files successfully.
3. Using Online Tools to Separate Pages in Word
Several online tools allow you to split a Word document into multiple files. Here, we will choose "Aspose" to help you separate pages in Word into several files. Here are some steps you can follow:
- Visit Aspose Free Word Document Splitter, and click on the "upload" button to import the file to this tool.
- Select the option to split the document into separate pages or specific page ranges.
- Choose the format in which you want the split files to be saved. Some online tools allow you to save the split files as Word documents or PDFs.
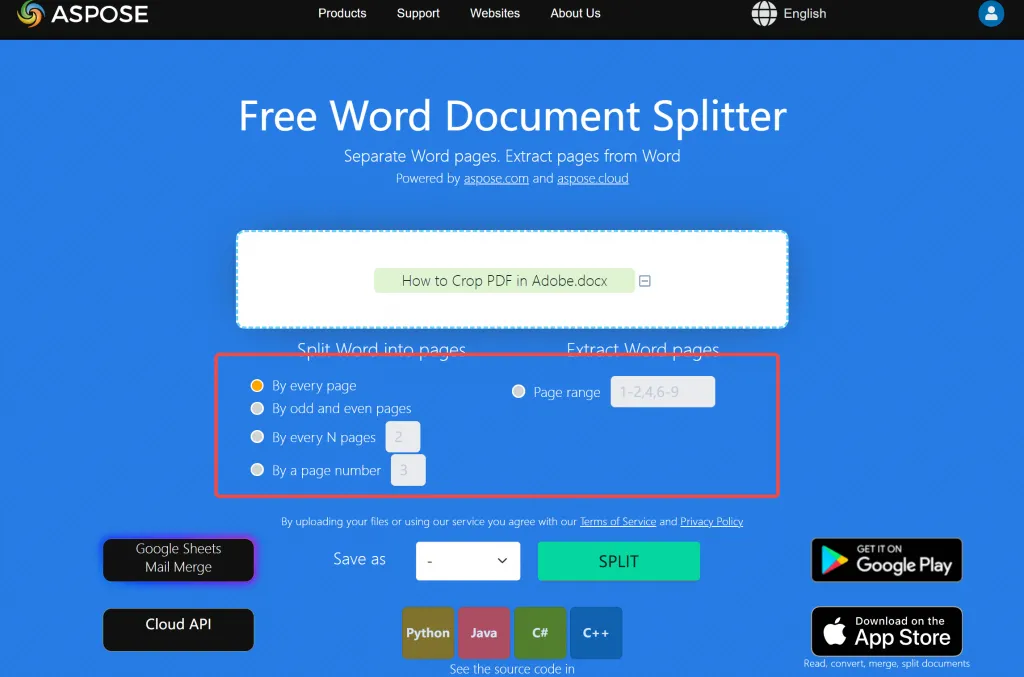
- Start the splitting process and wait for the tool to finish processing your document.
- Download the split files to your computer or cloud storage.
The way is simple. However, it is important to note that some of these tools may not be safe or trustworthy, and it is always recommended to use UPDF to ensure the security and integrity of your document.
4. Split A Multi-page Word Doc into Several Files and Auto Rename Them
Splitting documents in Word and then renaming can also be a simple copy-paste process, and by enabling a simple setting, you can let Word name or rename the separated files for yourself. Here is how to do it:
- Open the Word document that you want to split.
- Go to the "View" tab and click "Navigation Pane" to open the pane on the left side of the document.
- You will see a list of headings in the Navigation Pane in your document.
- Click on the first heading that you want to split into a separate file.
- Select all the content below that heading until the next heading or the end of the document.
- Use the keyboard shortcut Ctrl + C to copy this content.
- Paste the content using the keyboard shortcut Ctrl + V by opening a new document.
- Save this document with a suitable name for that section.
To create several files for the document, keep repeating the process.
To auto-rename the files:
- Click the "File" tab and choose "Options" at the bottom of the menu.
- In the "Word Options," click the "Advanced" tab.
- Go to the "General" settings and check the box next to "Update automatic links at open".
- Click "OK".
The methods described above enable you to separate pages in Word into individual files. However, if you only want to insert a separator line or marker within the Word document, please refer to the instructions below.
5. Separate Pages in Word by Inserting a Page Break
Besides the above-mentioned tool, another simple method is to insert a page break. A page break command tells Word to start a new page. Here's how you can do it:
- Go to the section where you want to split.
- Click on the "Insert" tab.
- Click on "Page Break".
- A new page will be inserted at the cursor's position.

And this is how easy it is to separate a multi-page Word document using the Page Break option.
6. Use Section Breaks to Split Pages in Word
Section breaks divide a document into sections with different formatting or page numbering. Here's how you can use section breaks to separate pages:
- Go to the content section that you want to split in Word.
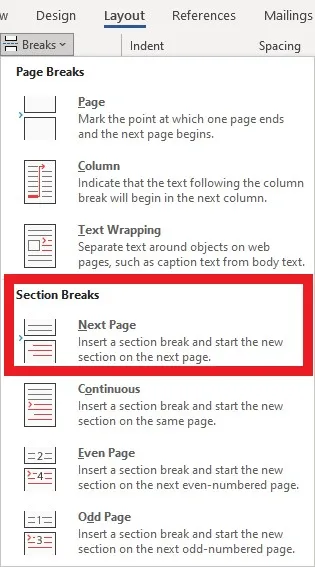
- Click the "Page Layout" tab.
- Click the "Breaks" option.
- Choose the section break type (e.g., "Next Page").
- A new section will be inserted at the cursor's position.
We hope this method of splitting pages in Word was as easy as the previous one. We still have another method up our sleeves, so let's reveal it.
7. Using Tables to Separate Pages in Word
Another method to separate pages in Word is to use tables. Here's how you can do it:
- Insert a table with one row and two columns.
- Drag the table to the bottom of the page you want to separate.
- Resize the table to fill the width of the page.
- Place your cursor inside the table and press "Enter".
- A new page will be inserted.
Part 2: FAQs About Separating Pages in Word
1. Why is Word not separating pages?
Microsoft Word may not separate pages for various reasons, such as incorrect page breaks, hidden formatting, or a corrupted document. Checking for these issues and adjusting the settings can help resolve the problem.
2. How to set page view to see separate pages?
To set the page view to see separate pages in Microsoft Word, you can follow the steps below:
1. Click the View tab.
2. Now, the 'Page Layout' button in the 'Views' group.
3. Click the 'Multiple Pages' option in the 'Zoom' group.
You can now see multiple document pages on your screen at once. Use the scroll bar or your keyboard's arrow keys to navigate between pages.
Conclusion
Knowing how to separate pages in Word can be a valuable skill for anyone who works with documents regularly. Whether you need to split up a long document into more manageable chunks or create a separate section for an appendix or bibliography, there are various methods, as we showed in this article. Among these methods we talked about, UPDF is the easiest way to separate pages in Word, download and try it out today!
Windows • macOS • iOS • Android 100% secure
By mastering these methods, you can improve your productivity and efficiency when working with documents in Word. We hope this article served its purpose and helped you efficiently achieve your page-splitting goals in Word.
 UPDF
UPDF
 UPDF for Windows
 UPDF for Mac
 UPDF for iPhone/iPad
 UPDF for Android
 UPDF AI Online
 UPDF Sign
 Edit PDF
 Annotate PDF
 Create PDF
 PDF Form
 Edit links
 Convert PDF
 OCR
OCR PDF to Word
 PDF to Image
 PDF to Excel
 Organize PDF
 Merge PDF
 Split PDF
 Crop PDF
 Rotate PDF
 Protect PDF
 Sign PDF
 Redact PDF
 Sanitize PDF
 Remove Security
 Read PDF
 UPDF Cloud
 Compress PDF
 Print PDF
 Batch Process
 About UPDF AI
 UPDF AI Solutions
 AI User Guide
 FAQ about UPDF AI
 Summarize PDF
 Translate PDF
 Chat with PDF
 Chat with AI
 Chat with image
 PDF to Mind Map
 Explain PDF
 Scholar Research
 Paper Search
 AI Proofreader
 AI Writer
 AI Homework Helper
 AI Quiz Generator
 AI Math Solver
 PDF to Word
 PDF to Excel
 PDF to PowerPoint
 User Guide
 UPDF Tricks
 FAQs
FAQs UPDF Reviews
 Download Center
 Blog
Blog Newsroom
 Tech Spec
 Updates
 UPDF vs. Adobe Acrobat
 UPDF vs. Foxit
 UPDF vs. PDF Expert






 Enola Davis
