UPDF for Windows
 UPDF for Mac
 UPDF for iPhone/iPad
 UPDF for Android
 UPDF AI Online
 UPDF Sign
 Edit PDF
 Annotate PDF
 Create PDF
 PDF Form
 Edit links
 Convert PDF
 OCR
OCR PDF to Word
 PDF to Image
 PDF to Excel
 Organize PDF
 Merge PDF
 Split PDF
 Crop PDF
 Rotate PDF
 Protect PDF
 Sign PDF
 Redact PDF
 Sanitize PDF
 Remove Security
 Read PDF
 UPDF Cloud
 Compress PDF
 Print PDF
 Batch Process
 About UPDF AI
 UPDF AI Solutions
 AI User Guide
 FAQ about UPDF AI
 Summarize PDF
 Translate PDF
 Chat with PDF
 Chat with AI
 Chat with image
 PDF to Mind Map
 Explain PDF
 PDF AI Tools
 Image AI Tools
 AI Chat Tools
 AI Writing Tools
 AI Study Tools
 AI Working Tools
 Other AI Tools
 AI Bookmark Generation
 AI Bookmark Summary
 AI Watermark Generation
 AI Background Generation
 AI Sticker Generation
 AI Stamp Generation
 AI Editing Suite
 UPDF Copilot
 AI Page Management
 AI Semantic Search
 PDF to Word
 PDF to Excel
 PDF to PowerPoint
 User Guide
 UPDF Tricks
 FAQs
FAQs UPDF Reviews
 Download Center
 Blog
Blog Newsroom
 Tech Spec
 Updates
 UPDF vs. Adobe Acrobat
 UPDF vs. Foxit
 UPDF vs. PDF Expert
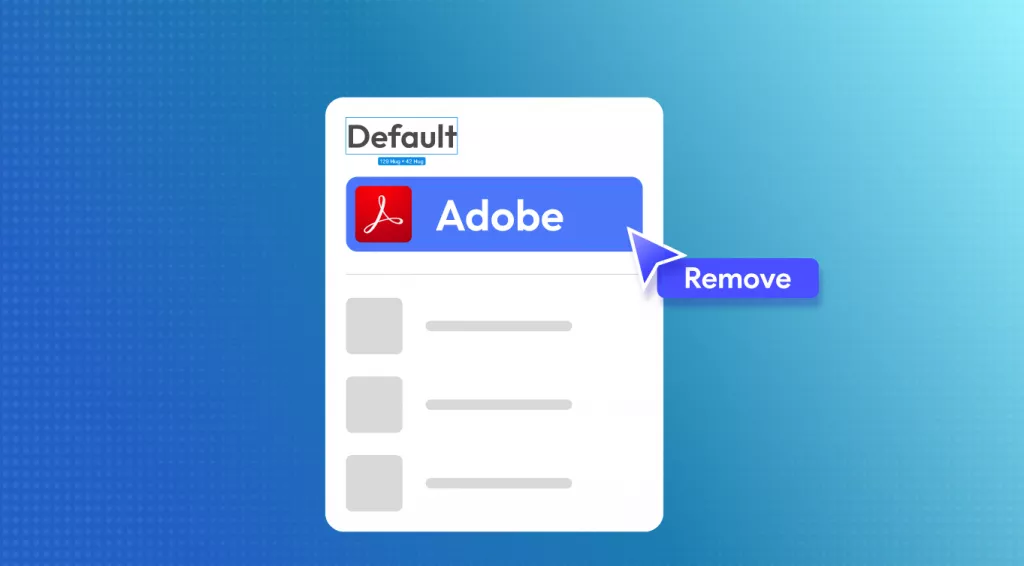
A breaking point arrived when I saw every PDF open in Adobe Acrobat and ignore my chosen settings. I thought something was wrong with my computer, but the real problem was software settings forcing Adobe to stay as the default viewer. After digging through system menus, I finally figured out how to remove Adobe as default and switch to an affordable tool.
Since I prefer using UPDF for everyday PDF tasks, I also learned how to set it as my default viewer. In this guide, I’ll walk you through everything in simple steps to make PDF management easier.
Windows • macOS • iOS • Android 100% secure
Part 1. How To Remove Adobe As Default?
Disabling Adobe as the default PDF viewer can save time and allow one to work with PDFs more easily. Let's walk through the easiest methods to remove Adobe as the default.
Way 1. Change Default PDF Viewer via “Open With”
First, let’s start with the most convenient method of removing Adobe as the default via Open With on Windows and Mac.
Changing Default PDF Viewer on Windows
Follow the steps below to learn how to remove Adobe Acrobat as default on Windows with this method:
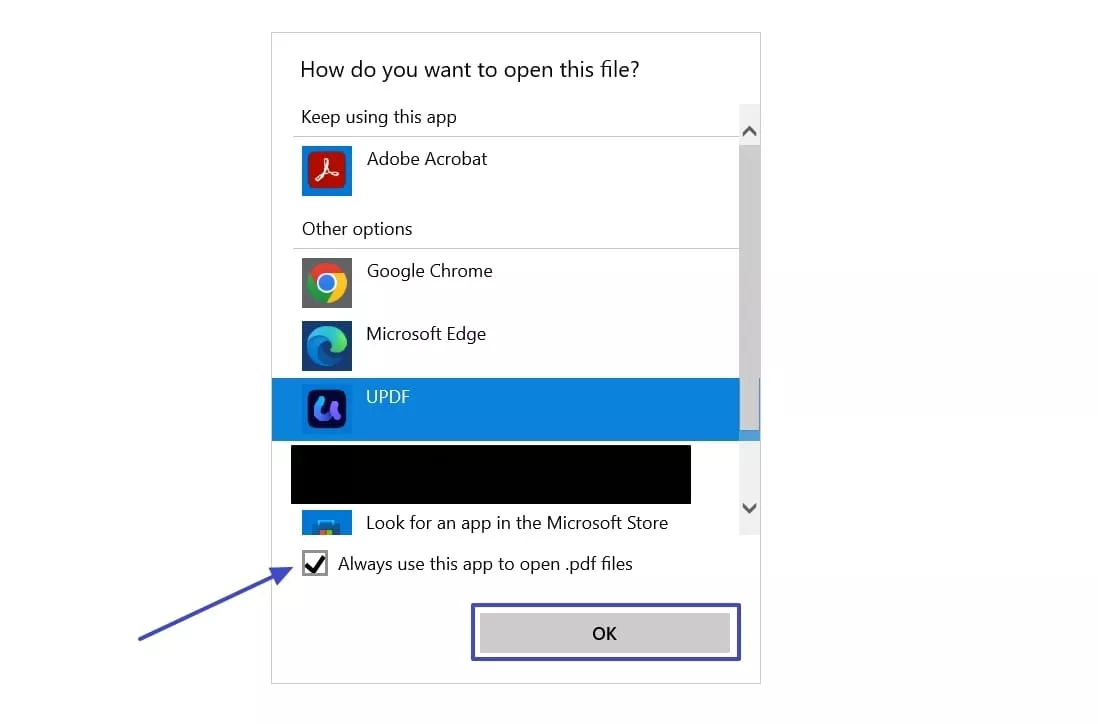
Step 1. First, right-click any PDF file, hover your mouse pointer over the “Open With” option, and hit the “Choose Another App” option.
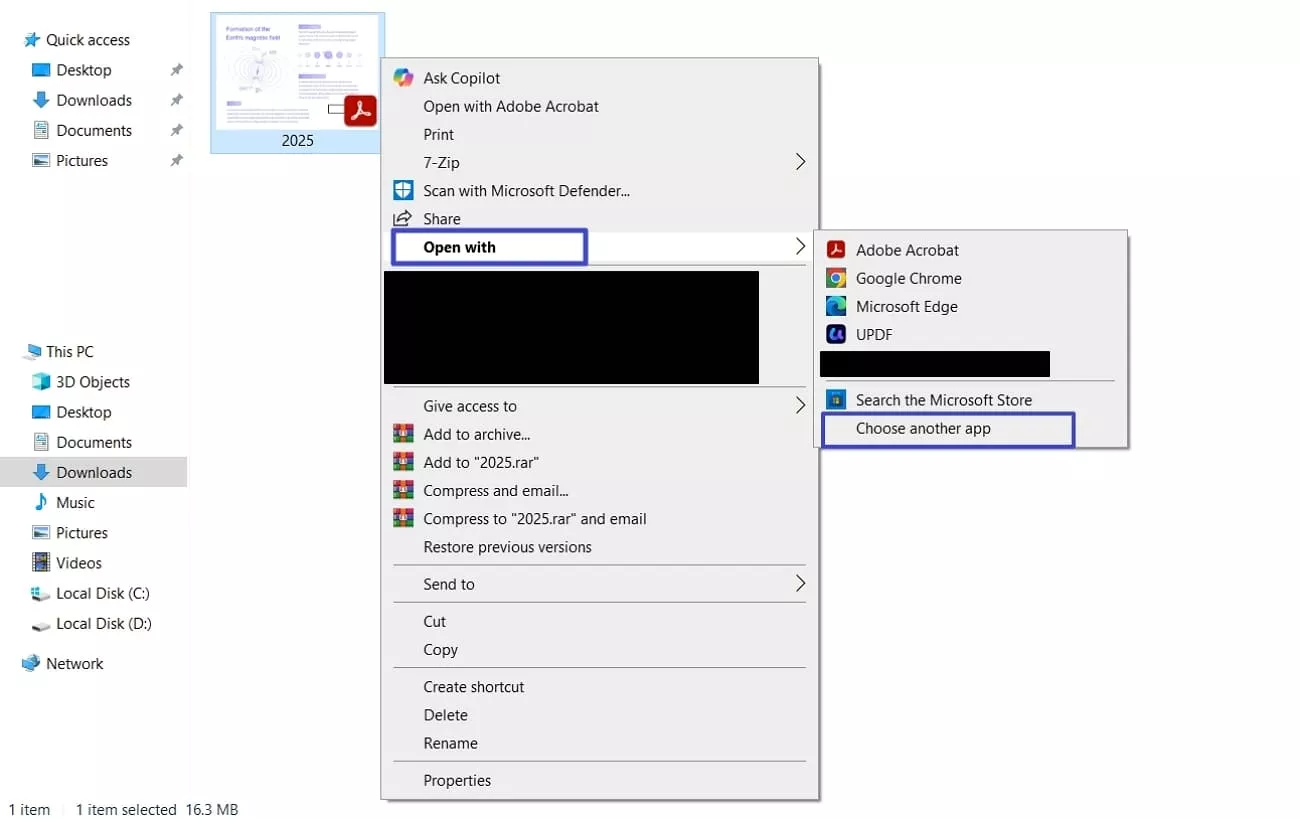
Step 2. Next, in the pop-up window, choose another tool and tick the “Always Use This App” option. Lastly, press the “OK” button to apply this setting.
Changing Default PDF Viewer on Mac
Next, go through the steps below to change the default PDF viewer on Mac via this method:
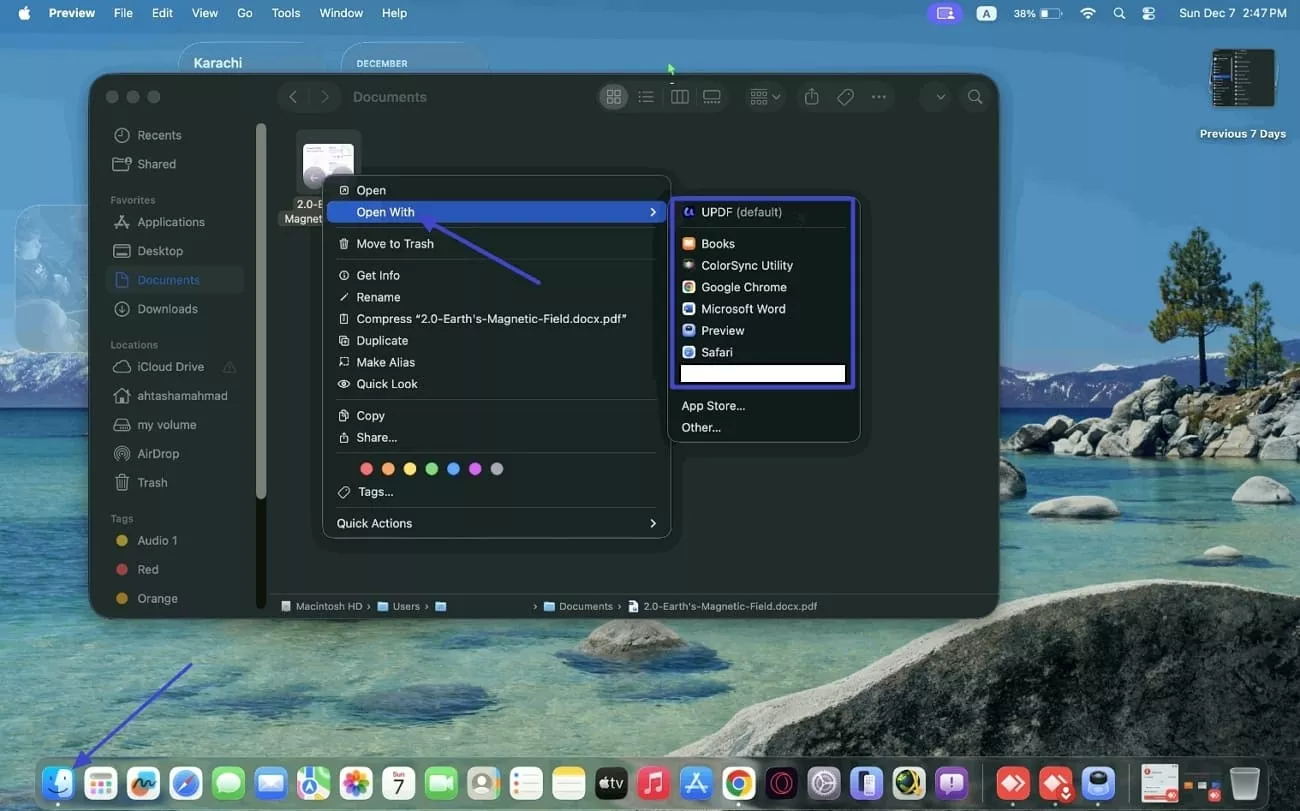
Instructions. First, hit the “Finder” and access a PDF file. Next, right-click the PDF and hover your mouse pointer over the “Open With” option. Afterwards, choose another tool to change the default PDF viewer.
Way 2: Update Default App
After changing the “Open With” preferences, another way is to update your system settings to set a permanent default PDF viewer.
How to Update Default App on Windows
Adhere to the steps below to see how to remove Adobe as default permanently on Windows OS:
Step 1. First, enter the Windows Settings and open the “Apps” section. Next, hit the “Default Apps” section and press the “Choose Default Apps by File type” option.
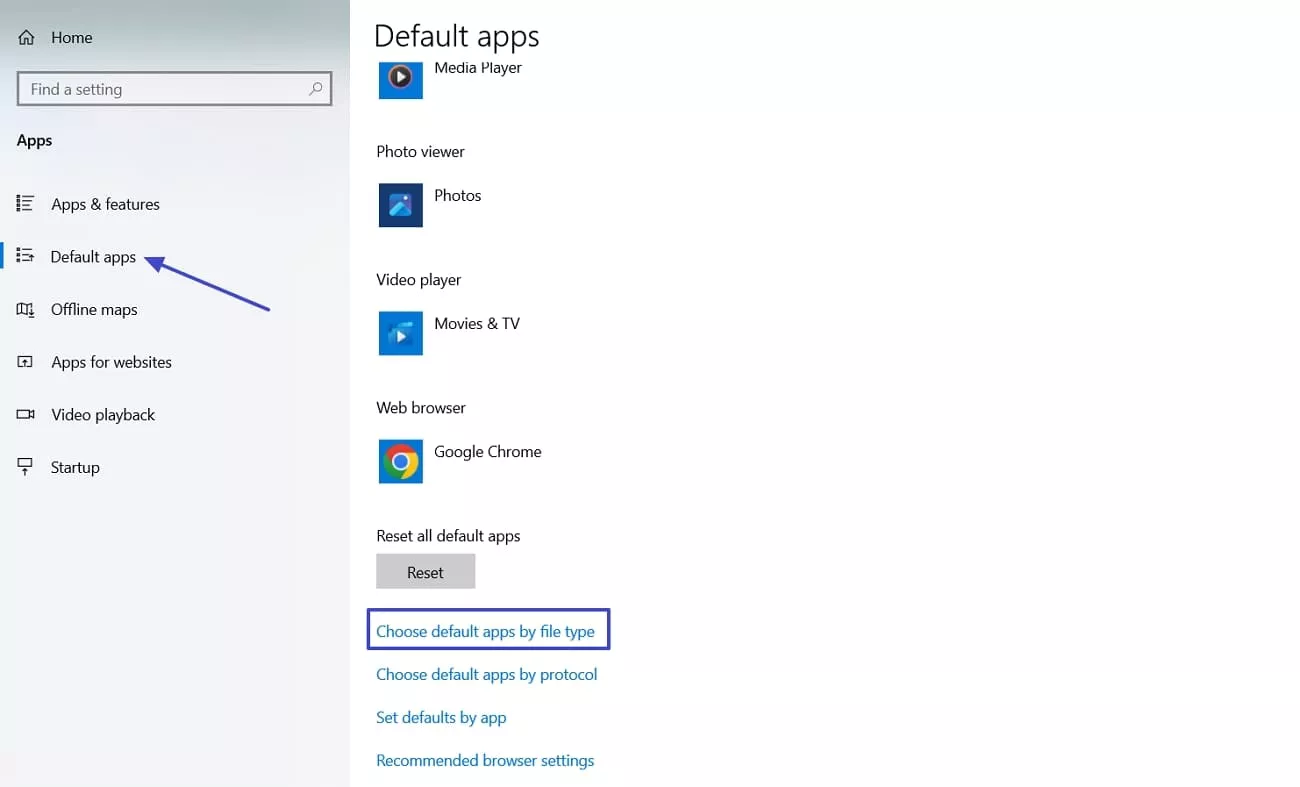
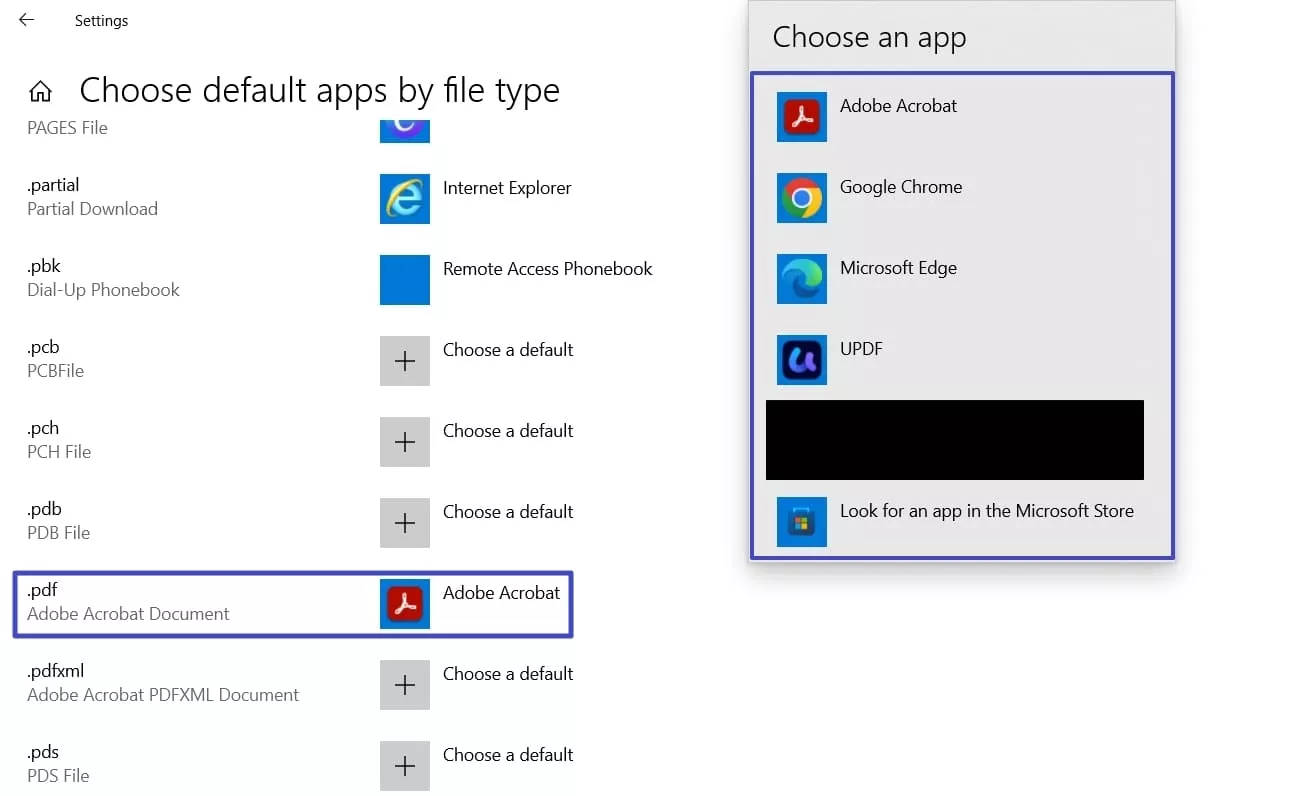
Step 2. Scroll down to locate the “.pdf” format and hit the tool to choose another tool as the default permanently.
How to Update Default App on Mac
Once you know about the Windows method, go through the steps below to update default app permanently on Mac:
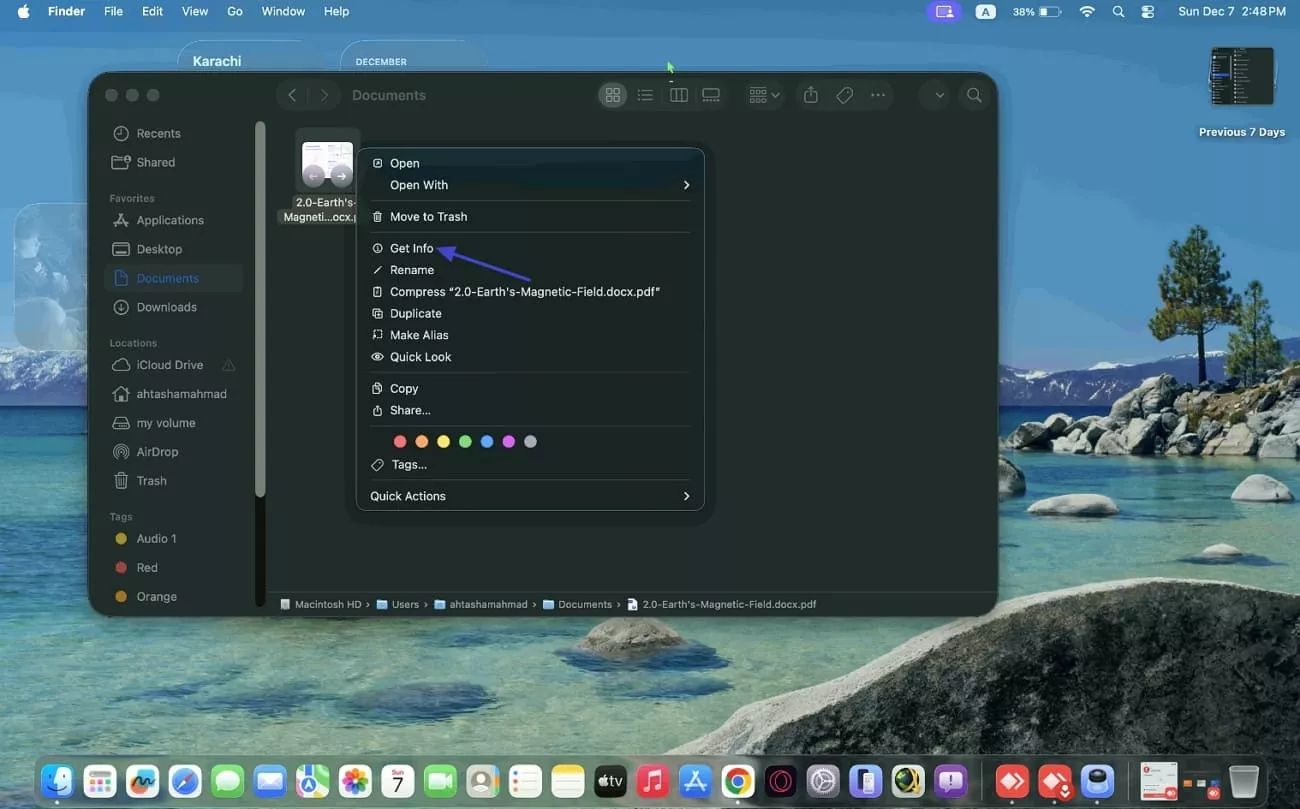
Step 1. Once you access a PDF, right-click the PDF and hit the “Get Info” option in the context menu.
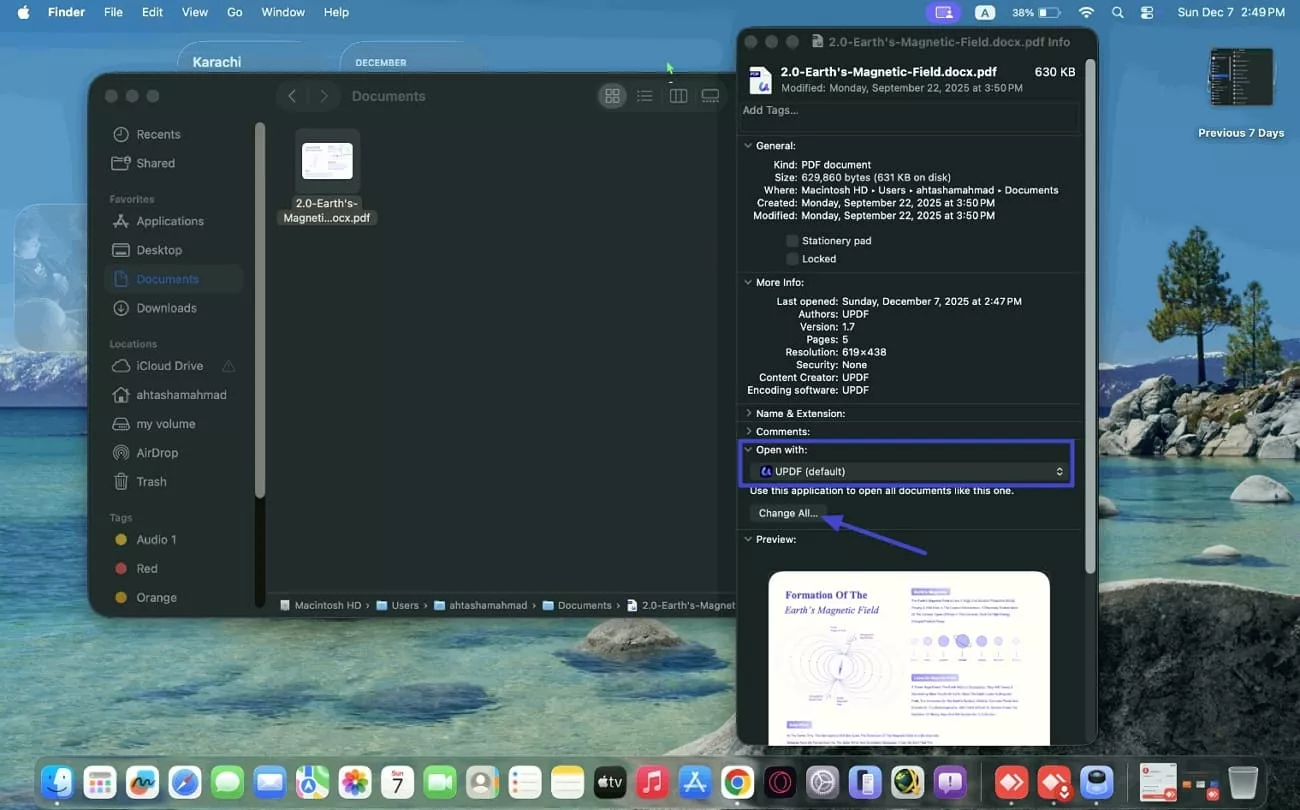
Step 2. In the “Info” window, choose another PDF viewer under the “Open With” section and hit the “Change All” button to update the default app permanently.
Way 3. Adjust The Adobe PDF Settings
Sometimes, Adobe Acrobat keeps taking control of PDF files, which can interrupt workflow unexpectedly. Thus, to know how to remove Adobe Acrobat as default, use the following steps:
Step 1. After you access the “Preferences” window of Adobe Acrobat, choose the “Internet” category and hit the “Internet Settings” option.
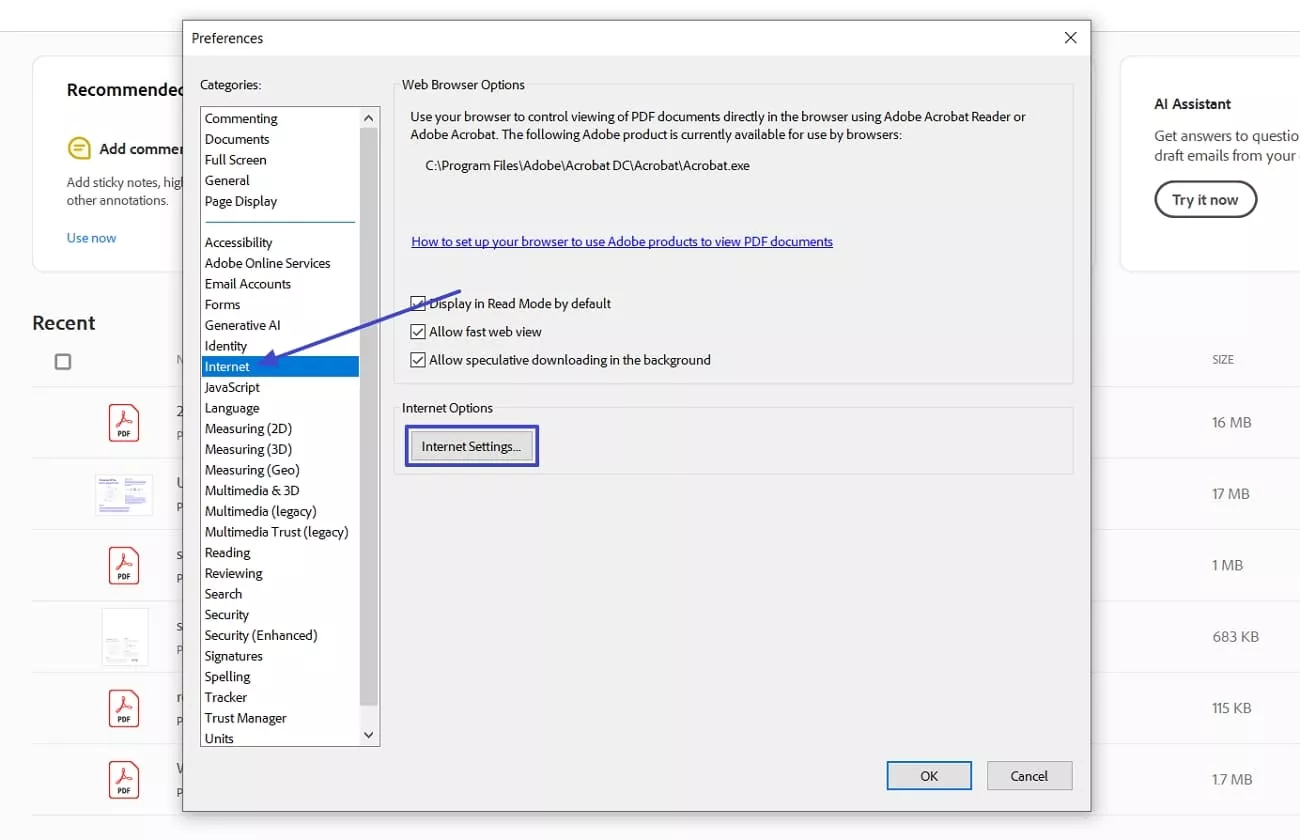
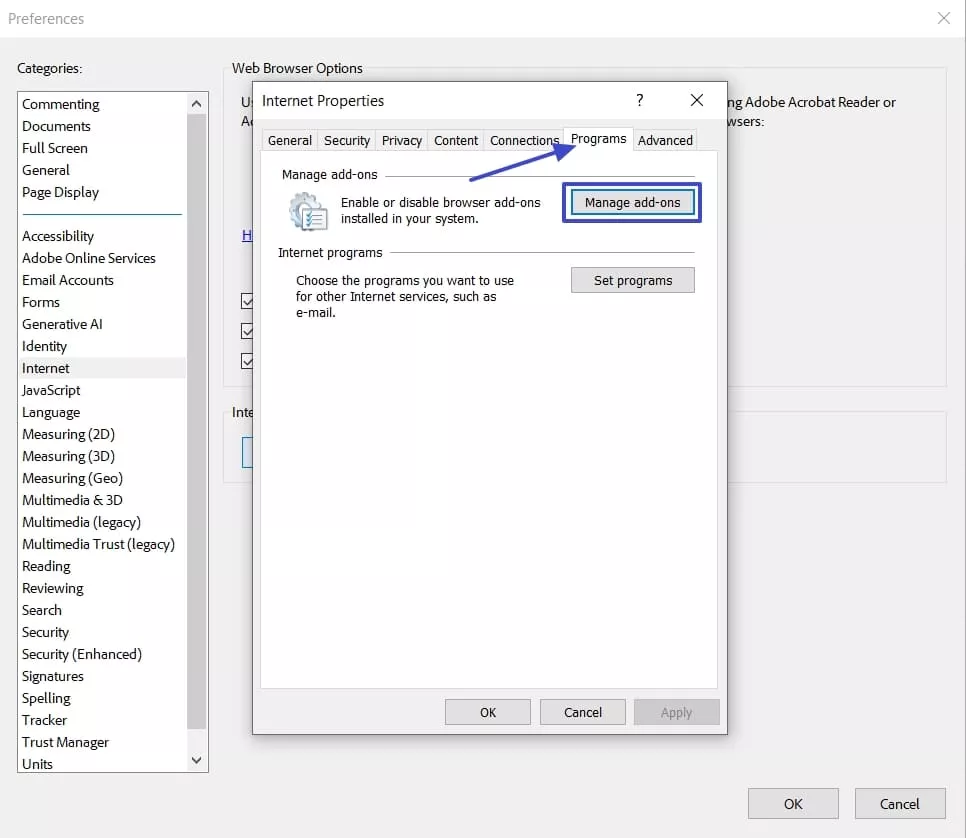
Step 2. Afterwards, hit the “Programs” tab and click the “Manage Add-Ons” button.
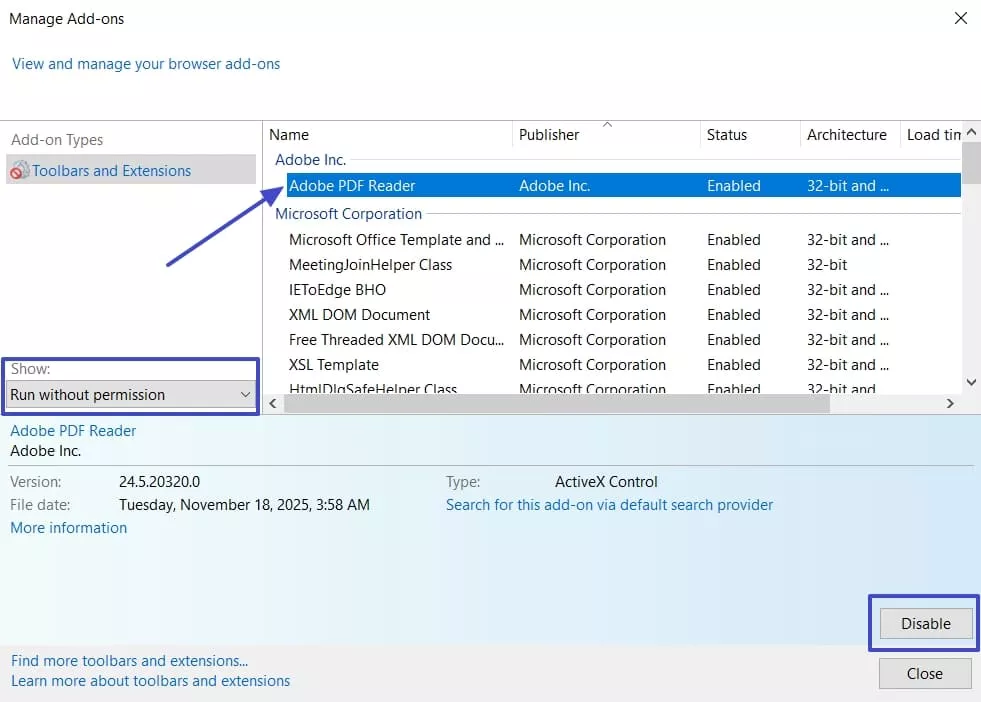
Step 3. Choose the “Run Without Permission” option under the “Show” section and select the “Adobe PDF Reader” tool. Lastly, hit the “Disable” option below to stop Adobe Acrobat from opening PDFs automatically.
Part 2. How to Adjust the Default in UPDF Settings for Windows?
After I learned how to remove Adobe as default, I switched to UPDF for a smoother workflow. Setting UPDF as my default PDF viewer made opening and managing files much faster and easier. Follow the steps below to set it up on your system.
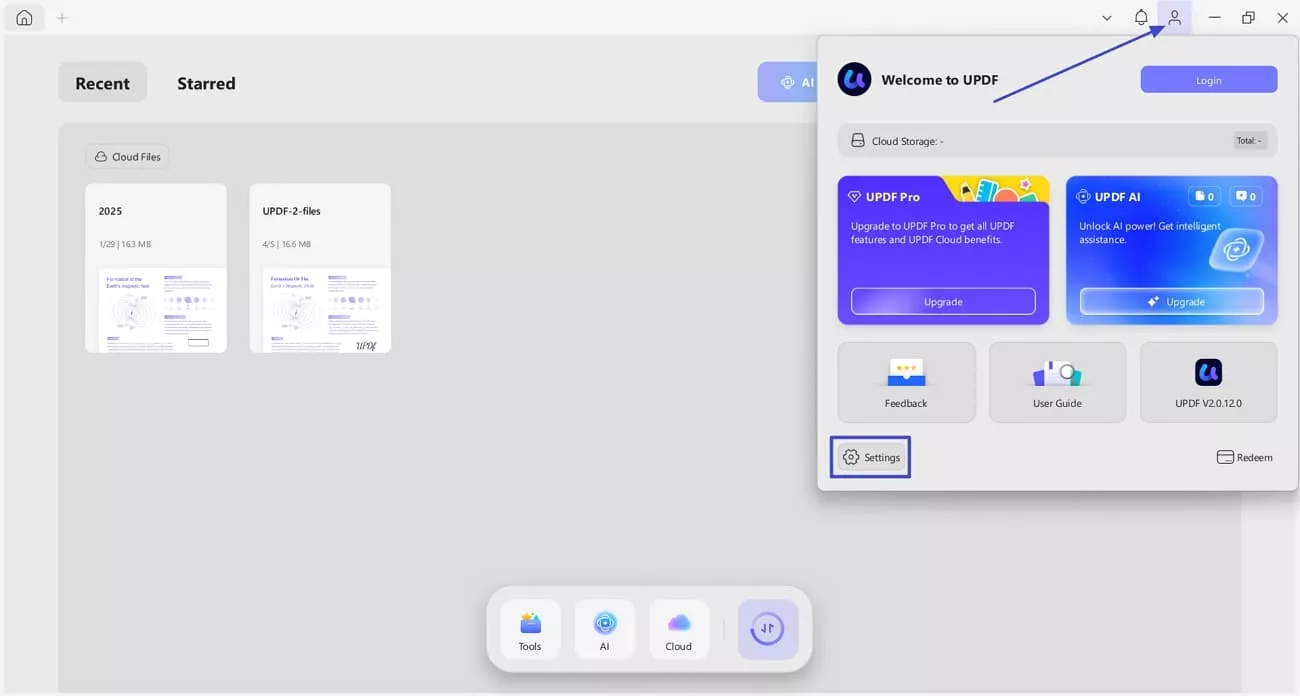
Step 1. Access UPDF Settings
Once you enter the main interface, hit the “Login” option in the top right corner and press the “Settings” button.
Windows • macOS • iOS • Android 100% secure
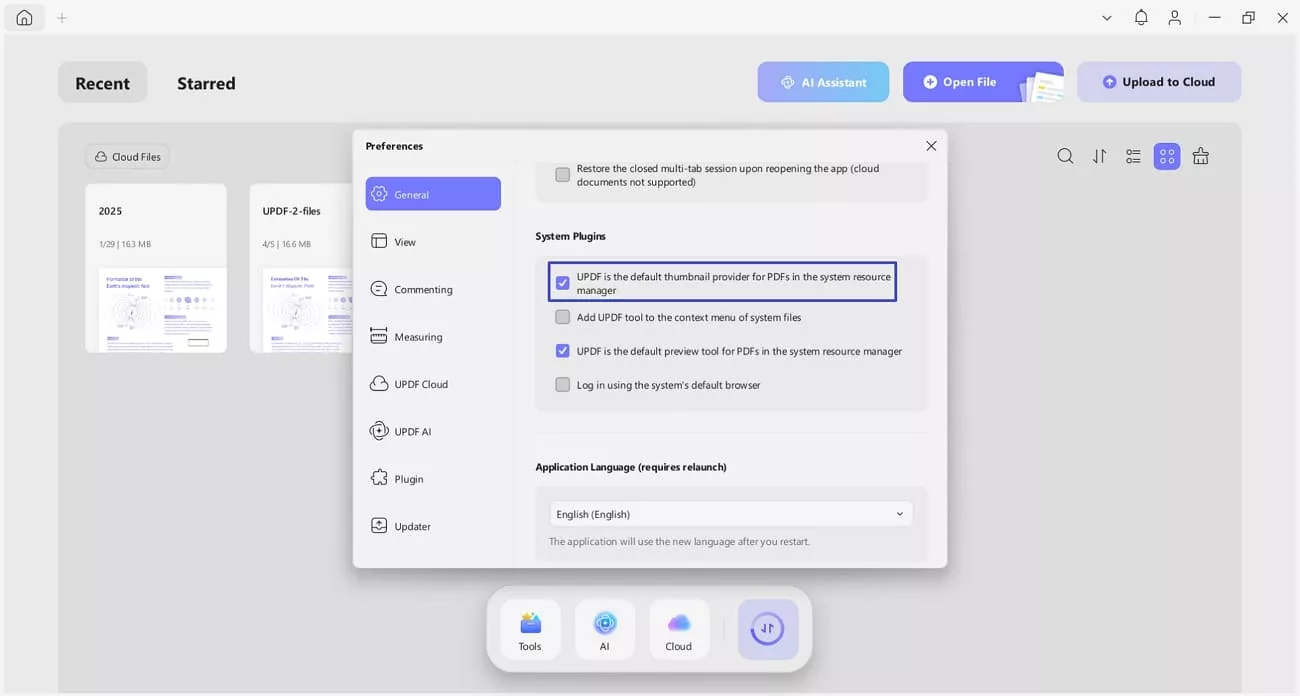
Step 2. Set UPDF as Default PDF Tool
Next, scroll down to locate the “System Plugin” section and select the “UPDF is The Default Preview Tool” option.
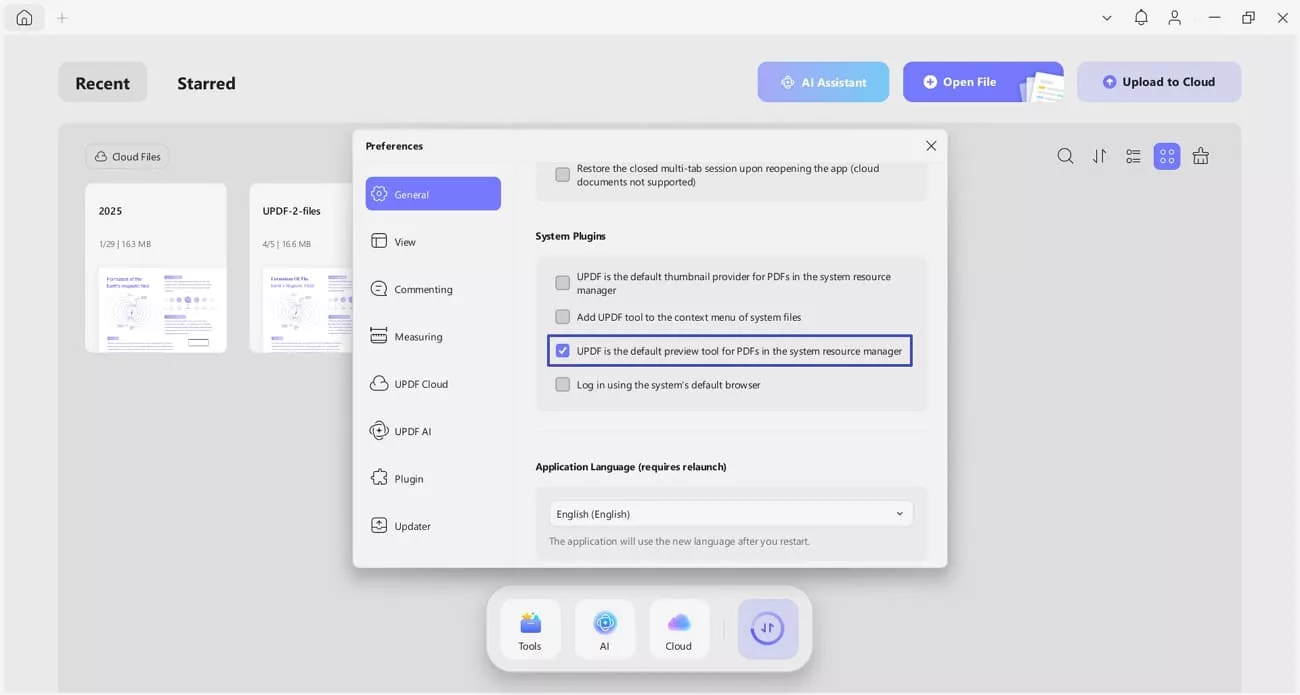
Step 3. Tip: Set UPDF as File Thumbnail Provider
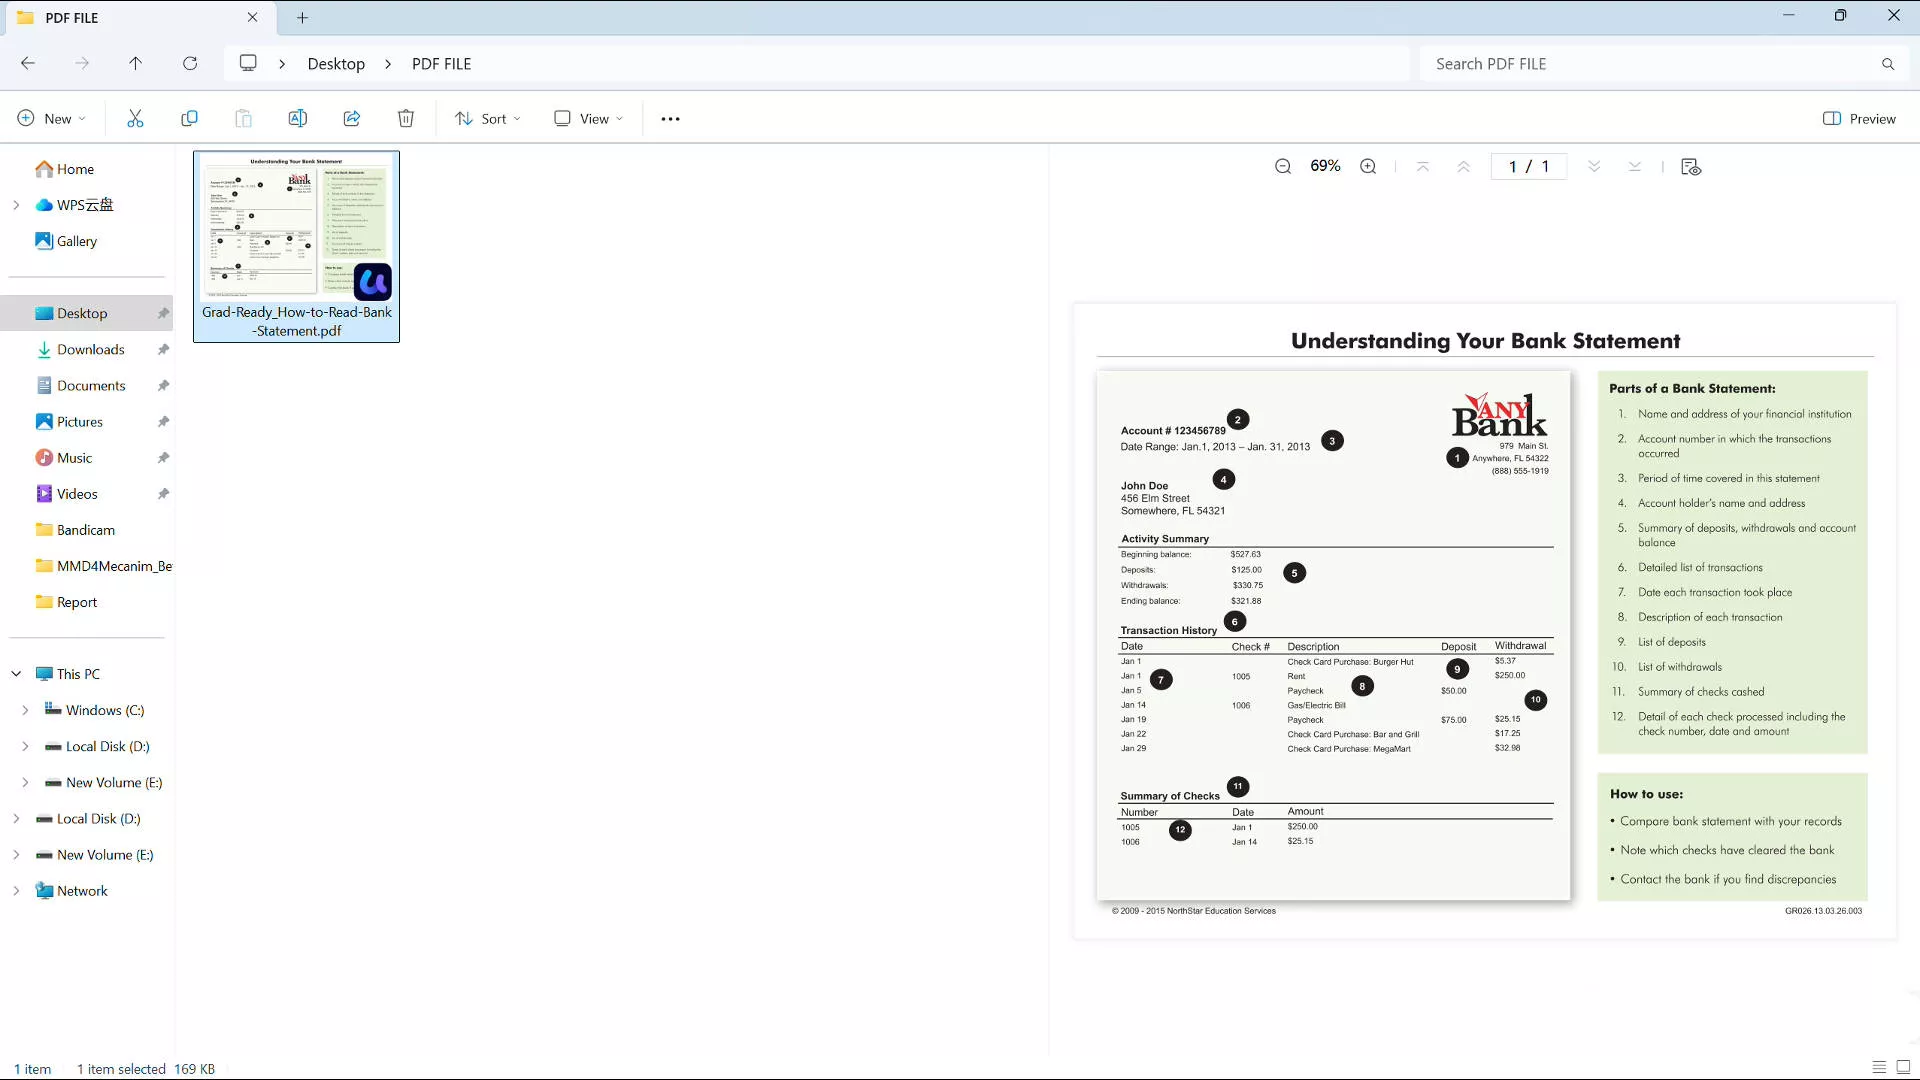
Last, enable the “UPDF is The Default Thumbnail Provider” option to display PDF previews in Explorer.
Now you can preview your PDF instantly—no need to open it. UPDF provides zoom-in and zoom-out buttons in the sidebar, allowing you to adjust to a suitable scale for more convenient previewing of any details in the PDF.
Why UPDF Ranks Above Adobe Acrobat
After learning how to remove Adobe Acrobat as default, I realized Adobe was slow, expensive, and not suitable for my workflow. Then I tried UPDF and realized both tools work well, but UPDF is simpler to manage. I could batch import multiple files at once, which improved how I handled PDF documents. UPDF costs about 1/6 of Adobe’s price and provides comparable full functionality for all PDF tasks.
Moreover, one UPDF license works across all devices, providing seamless access on my computer, tablet, and mobile phone. Since switching, I rely on UPDF regularly to manage PDFs more conveniently without the limitations I faced.
Windows • macOS • iOS • Android 100% secure
Key Features
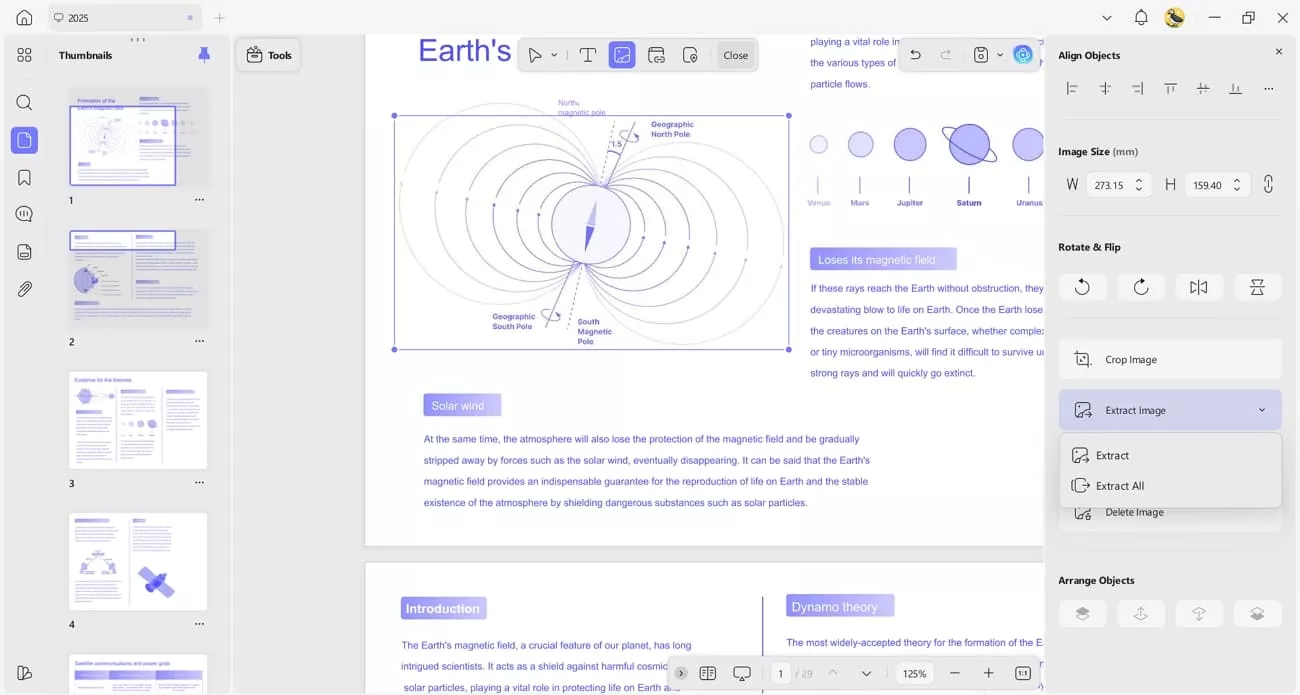
- PDF Editing: With UPDF, I can easily edit the text in my PDF with adjustments in color, size, and alignment.
It also allows me to change or extract the image and adjust the sizing and alignment of the pictures in PDF. Also, you can extract all images in your PDF with the “Extract All” button.
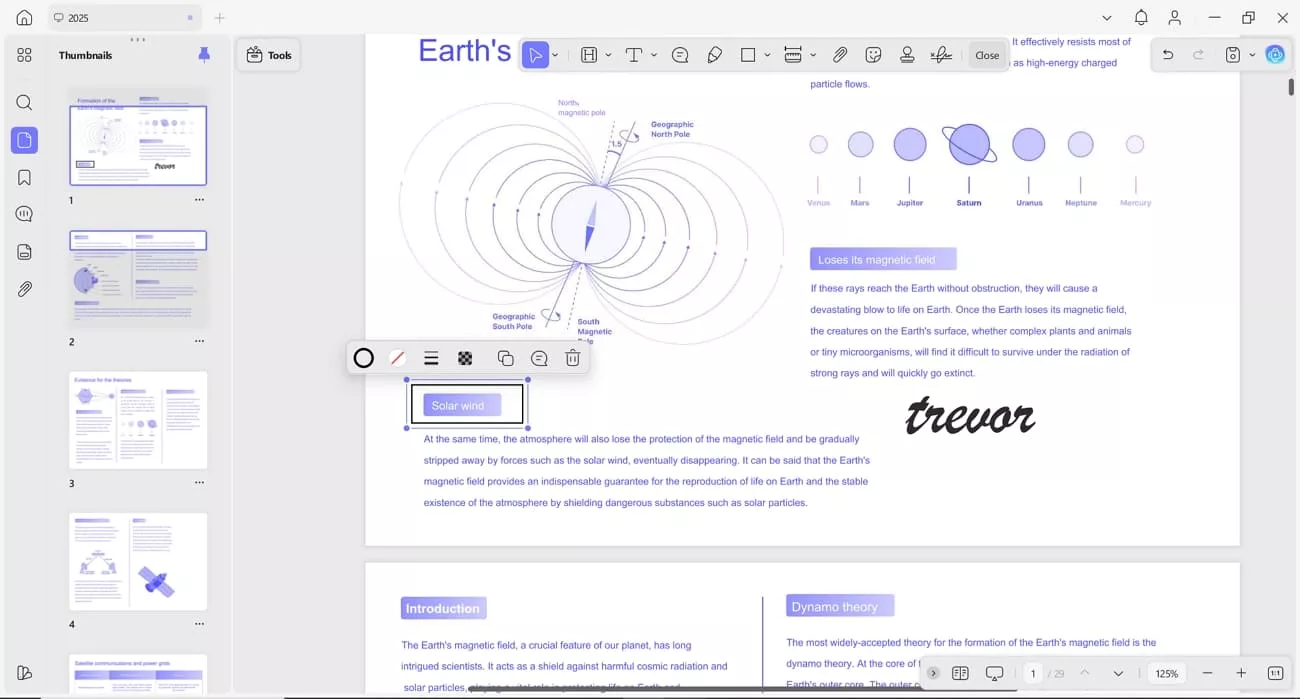
- Annotating PDFs: UPDF allows me to annotate PDF documents by highlighting the text and adding comments or sticky notes for instructions.
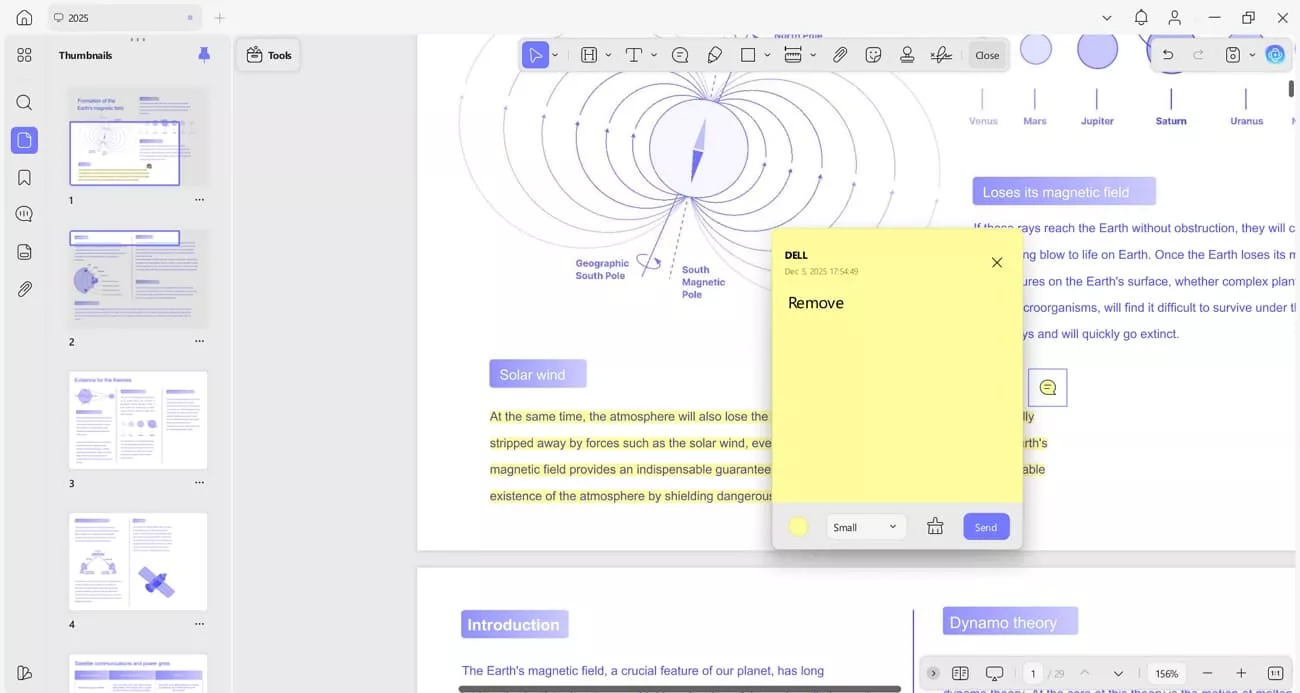
Furthermore, it allows me to add markups in shape form and insert signatures to give a personalized touch to my PDFs.
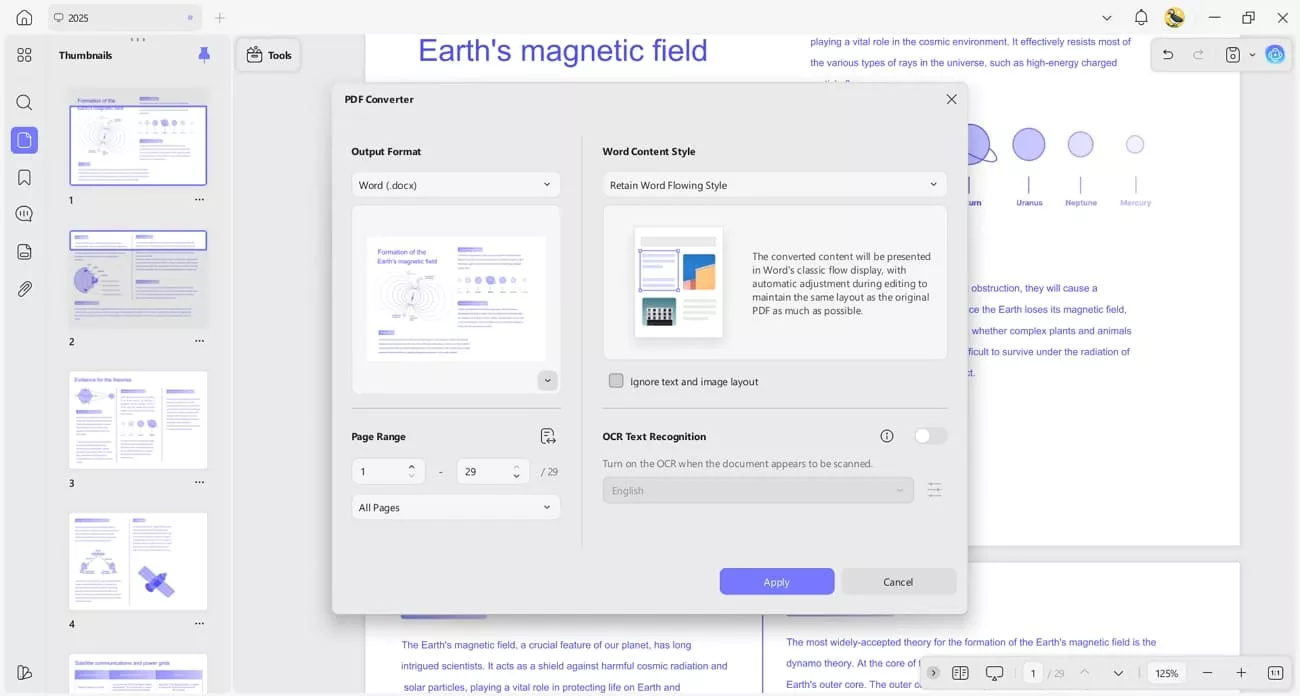
- Convert PDF: This feature allows you to transform PDF files into editable formats for easier use. When I need to convert PDF to Word, the “Word Content Style” options help preserve the original layout and formatting for a polished result.
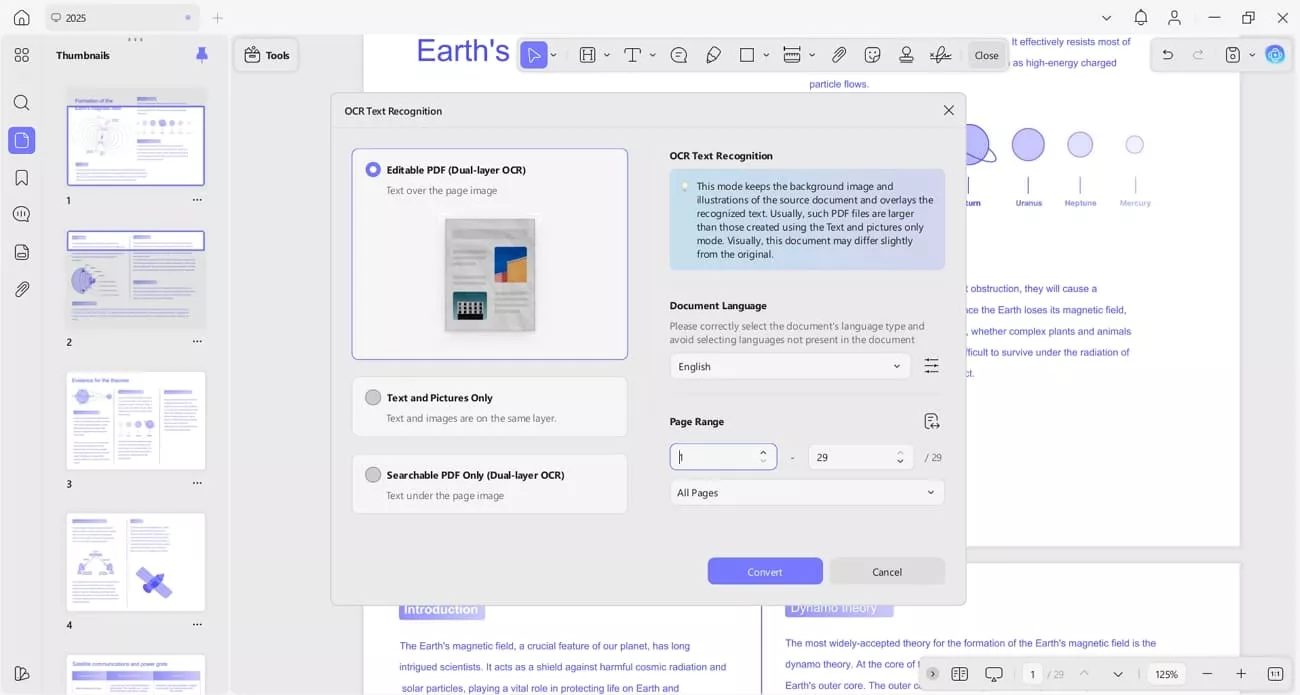
- OCR PDF: I use UPDF to extract text from scanned or image-based PDFs quickly and accurately. UPDF offers 3 OCR modes, and if a document contains multiple languages, it allows selection of all relevant languages for accurate recognition.
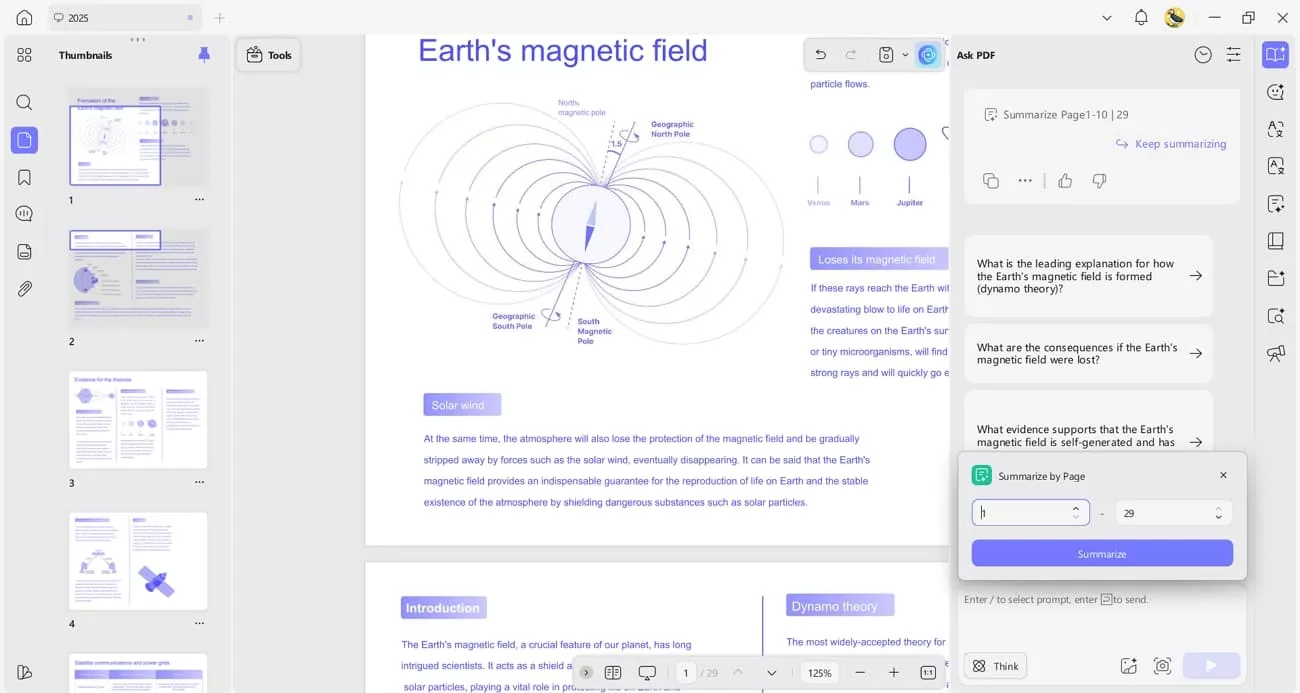
- AI Tools: With AI tools, I can summarize, translate, and generate mind maps of my PDF files. The “Translate by Page” option helps when working with a specific number of pages for easy work management.
If you’re planning to switch to an advanced PDF management tool, check out their pricing page to buy the UPDF Premium license. With all features unlocked, handling, editing, and organizing PDFs becomes faster and much more convenient.
Windows • macOS • iOS • Android 100% secure
Conclusion
In this article, I explained how to remove Adobe Acrobat as default and switch to a flexible PDF viewer. UPDF fills the gaps I experienced with Adobe by offering easy batch imports, multi-device support, and cost-effective functionality. If you want a reliable PDF tool that simplifies your workflow, I highly recommend trying UPDF on all your devices.
Windows • macOS • iOS • Android 100% secure


 Enid Brown

 Enrica Taylor