 UPDF
UPDF
 UPDF for Windows
 UPDF for Mac
 UPDF for iPhone/iPad
 UPDF for Android
 Nomostar
 UPDF AI Online
 UPDF Sign
 IvyCraft
 Edit PDF
 Annotate PDF
 Create PDF
 PDF Form
 Edit links
 Convert PDF
 OCR
OCR PDF to Word
 PDF to Image
 PDF to Excel
 Organize PDF
 Merge PDF
 Split PDF
 Crop PDF
 Rotate PDF
 Protect PDF
 Sign PDF
 Redact PDF
 Sanitize PDF
 Remove Security
 Read PDF
 UPDF Cloud
 Compress PDF
 Print PDF
 Batch Process
 About UPDF AI
 UPDF AI Solutions
 AI User Guide
 FAQ about UPDF AI
 Summarize PDF
 Translate PDF
 Chat with PDF
 Chat with AI
 Chat with image
 PDF to Mind Map
 Explain PDF
 PDF AI Tools
 Image AI Tools
 AI Chat Tools
 AI Writing Tools
 AI Study Tools
 AI Working Tools
 Other AI Tools
 AI Bookmark Generation
 AI Bookmark Summary
 AI Watermark Generation
 AI Background Generation
 AI Sticker Generation
 AI Stamp Generation
 AI Editing Suite
 UPDF Copilot
 AI Page Management
 AI Semantic Search
 PDF to Word
 PDF to Excel
 PDF to PowerPoint
 Enterprise Solution
 Enterprise Sign
 Enterprise AI
 Enterprise Plan
 Enterprise User Guide
 Enterprise Webinar
 IT
IT Education
 Construction
 Financial Service
 Healthcare
 Insurance
 Legal
Legal Manufacturing
 Government
 Researchers & PhDs
 Solopreneurs & Freelancers
 Lawyers & Legal Professionals
 Real Estate Agents & Brokers
 Education Solution
 Customer Stories
 User Guide
 UPDF Tricks
 FAQs
FAQs UPDF Reviews
 Download Center
 Blog
Blog Newsroom
 Tech Spec
 Updates
 UPDF vs. Adobe Acrobat
 UPDF vs. Foxit
 UPDF vs. PDF Expert

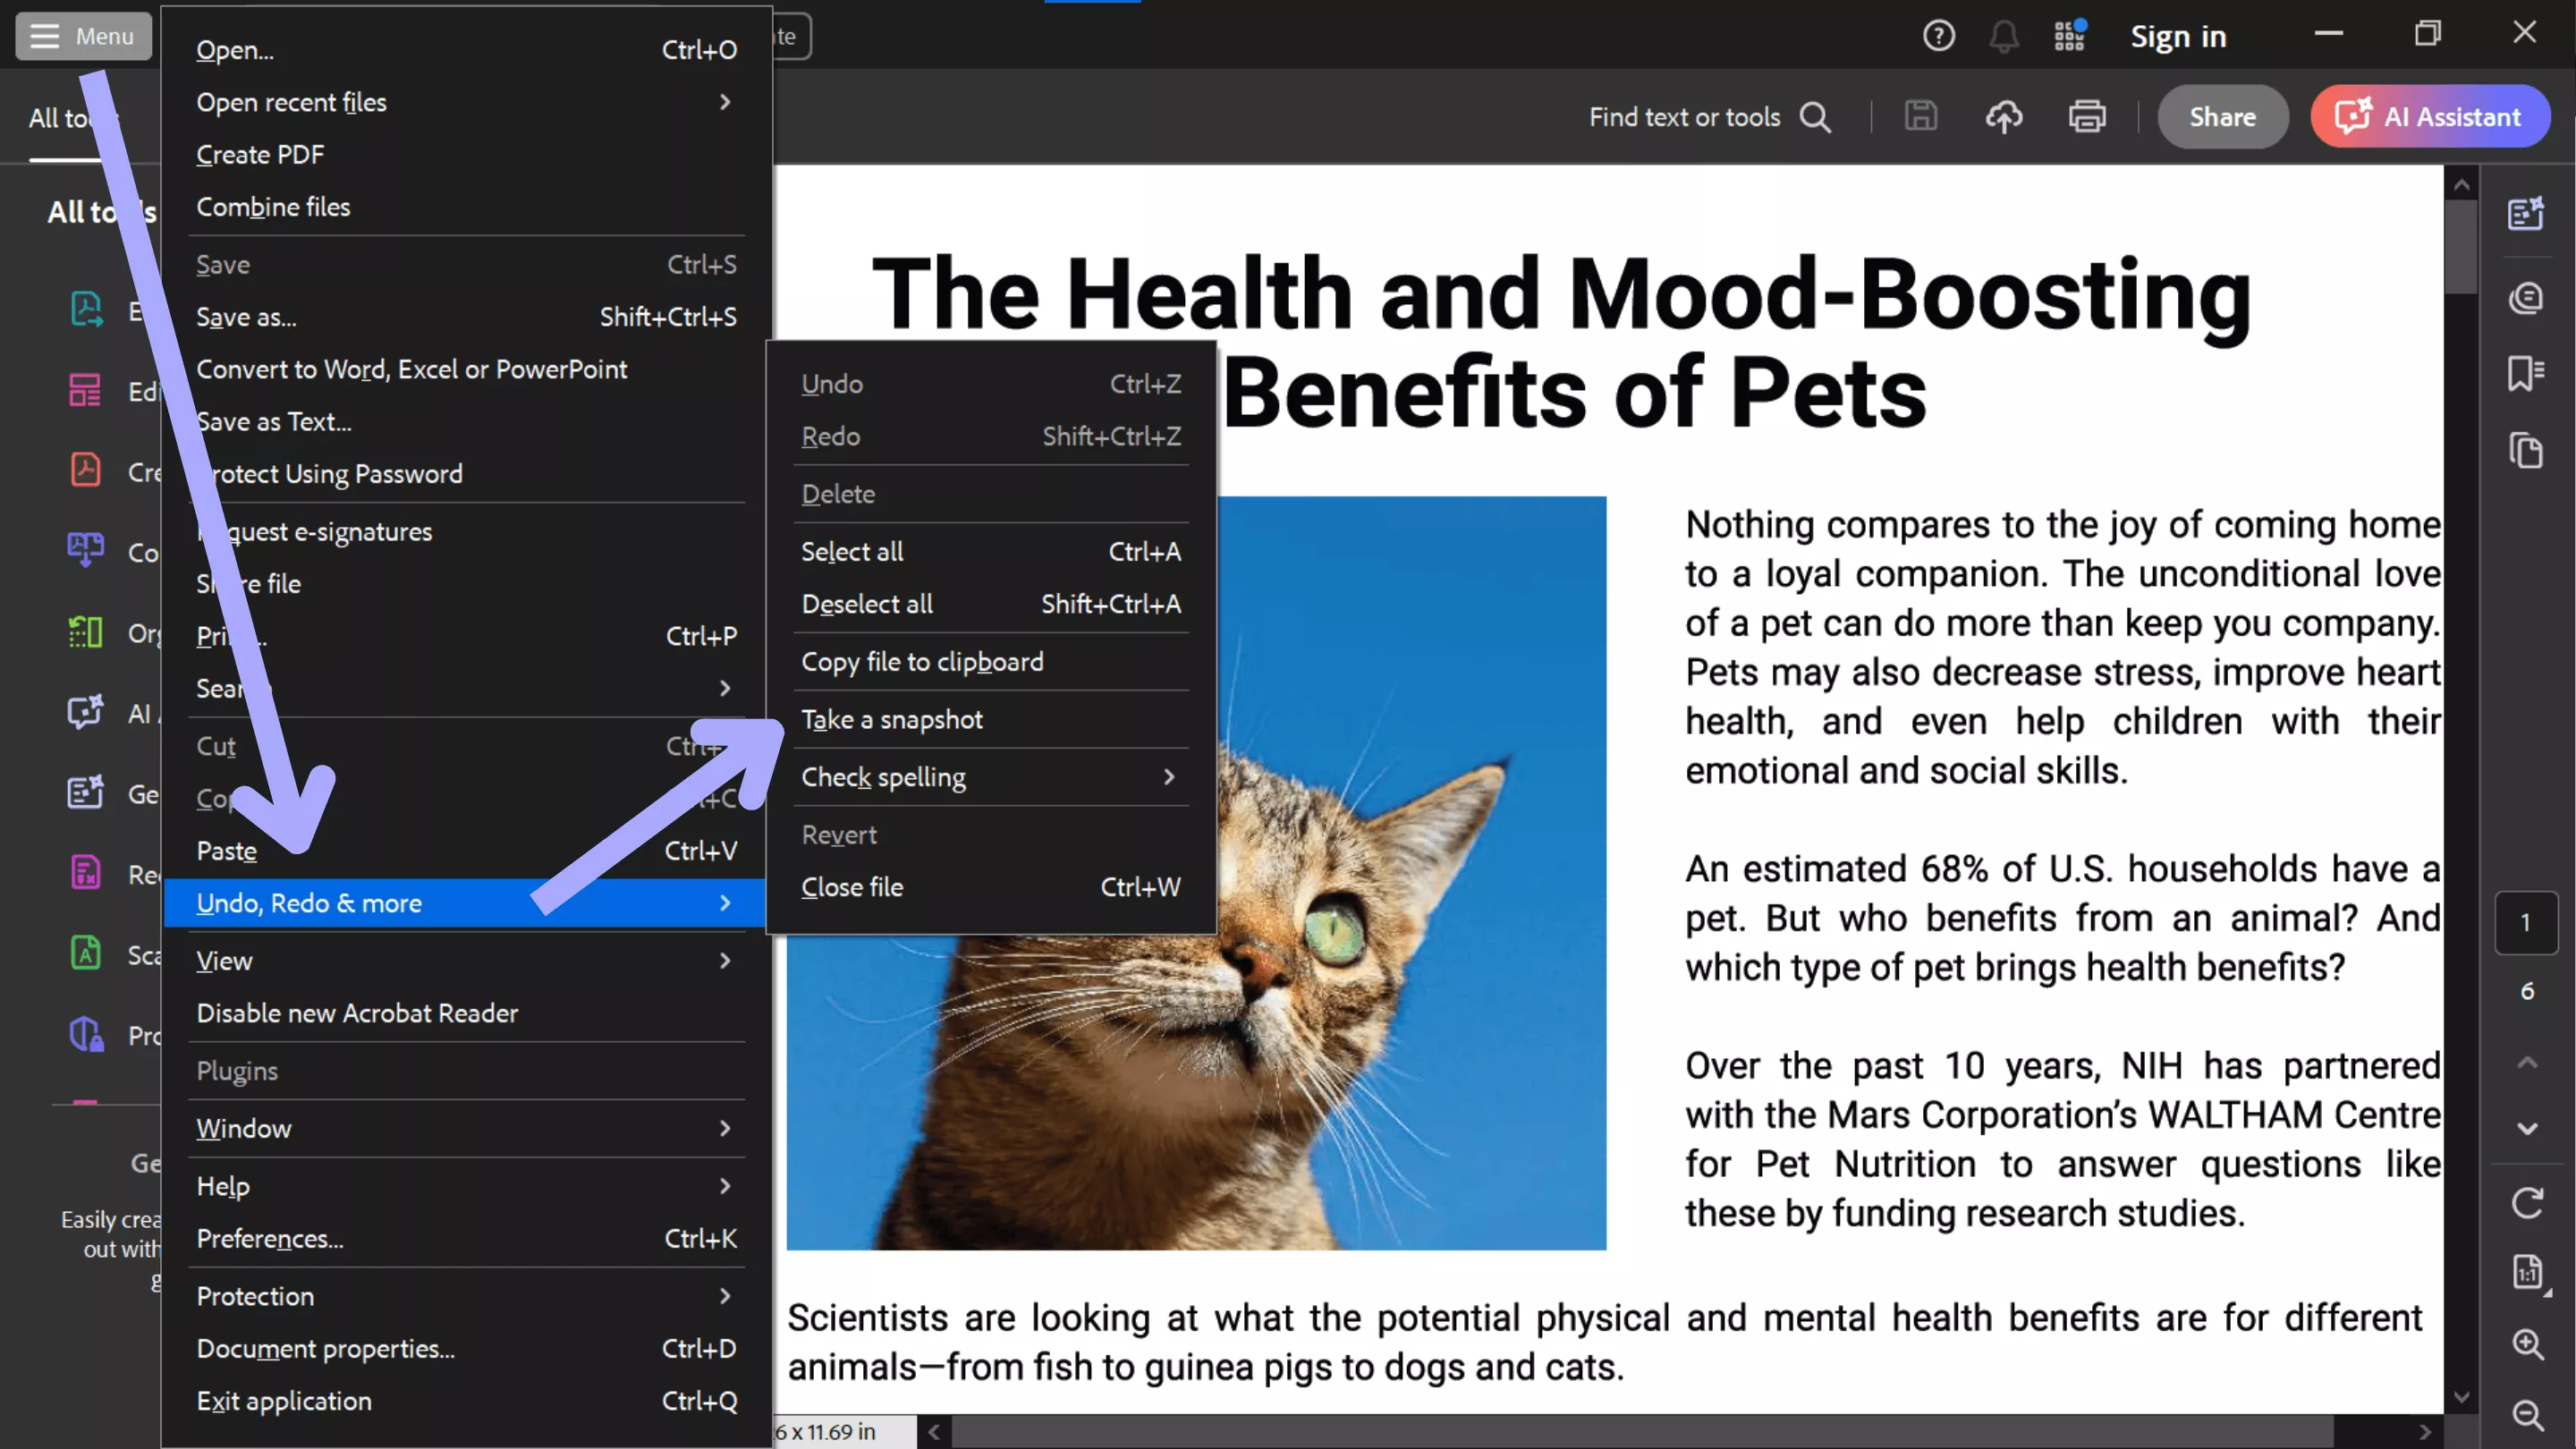
Quick answer: In the current Adobe Acrobat desktop app on Windows, open your PDF and choose Menu > Undo, Redo & more > Take a snapshot. On macOS, choose Edit > Undo, Redo and More > Take a Snapshot. Drag over the area you need, and Acrobat automatically copies it to your clipboard. You can then paste it into Paint, Preview, Word, or another app. The Snapshot tool is available in the desktop application, not Acrobat's browser-based PDF viewer.
If you need more control over the result, UPDF lets you select an area of a PDF and copy it as an image or editable text. It can also create a new PDF from a screen, window, selection, or clipboard. Download UPDF below to try these options while following this guide.
Windows • macOS • iOS • Android 100% secure
Part 1. How to Use the Adobe Snapshot Tool in the New Acrobat
The Snapshot tool still exists in the current Acrobat interface, but its location differs between Windows and macOS. Use the steps for your device below.
Step 1: Find the Snapshot Tool
On Windows: Open the PDF in the Acrobat desktop app. Select Menu > Undo, Redo & more > Take a snapshot.
On macOS: Open the PDF and select Edit > Undo, Redo and More > Take a Snapshot. Depending on your Acrobat version and interface, you may also be able to right-click the PDF page and select Take a Snapshot.
Step 2: Select and Copy an Area
Drag a rectangle around the part of the PDF you want to capture. Acrobat automatically copies the selected area to the clipboard. Open your destination app and paste the image with Ctrl + V on Windows or Command + V on Mac. Press Esc when you want to exit Snapshot mode.
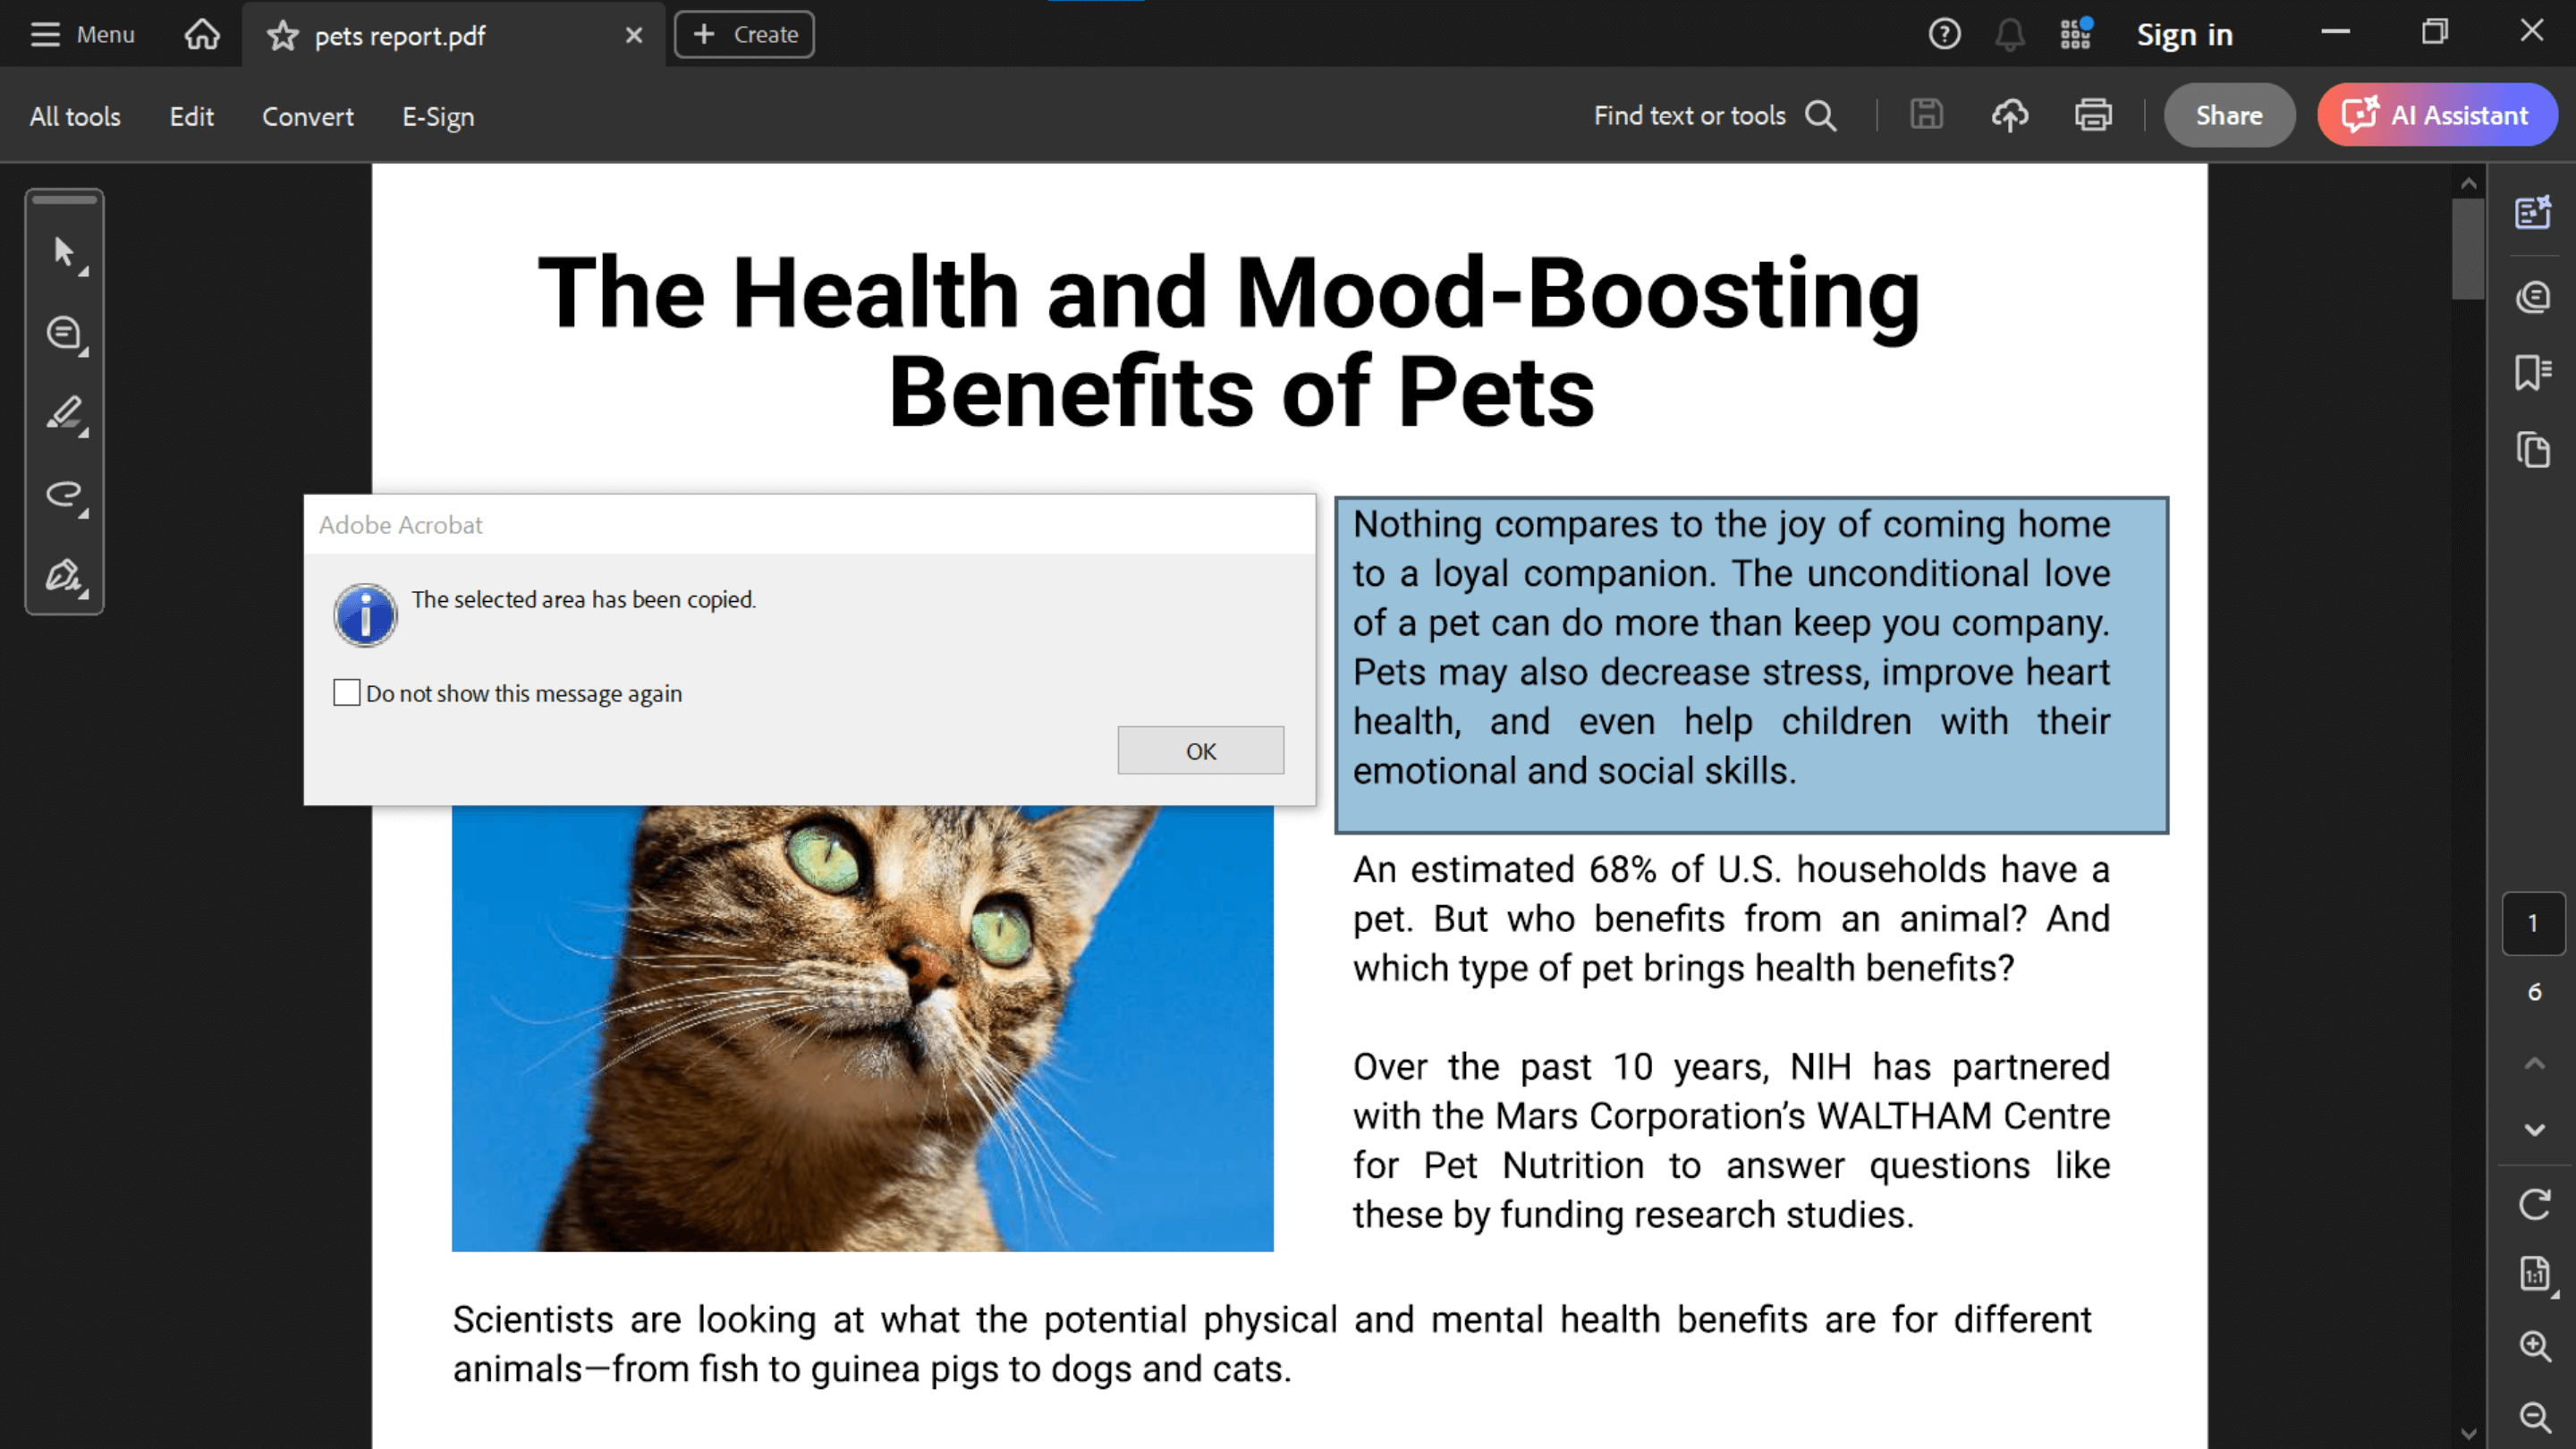
Note: If your PDF is open in Chrome, Edge, or Acrobat's browser experience, open or download it in the Acrobat desktop app first. The desktop Snapshot tool does not appear in the browser viewer.
Part 2. How to Take a Snapshot in the Classic Acrobat Interface
If you use an older or classic Acrobat interface, the Snapshot tool is in a different menu, although the capture process remains the same.
Step 1: Open Take a Snapshot
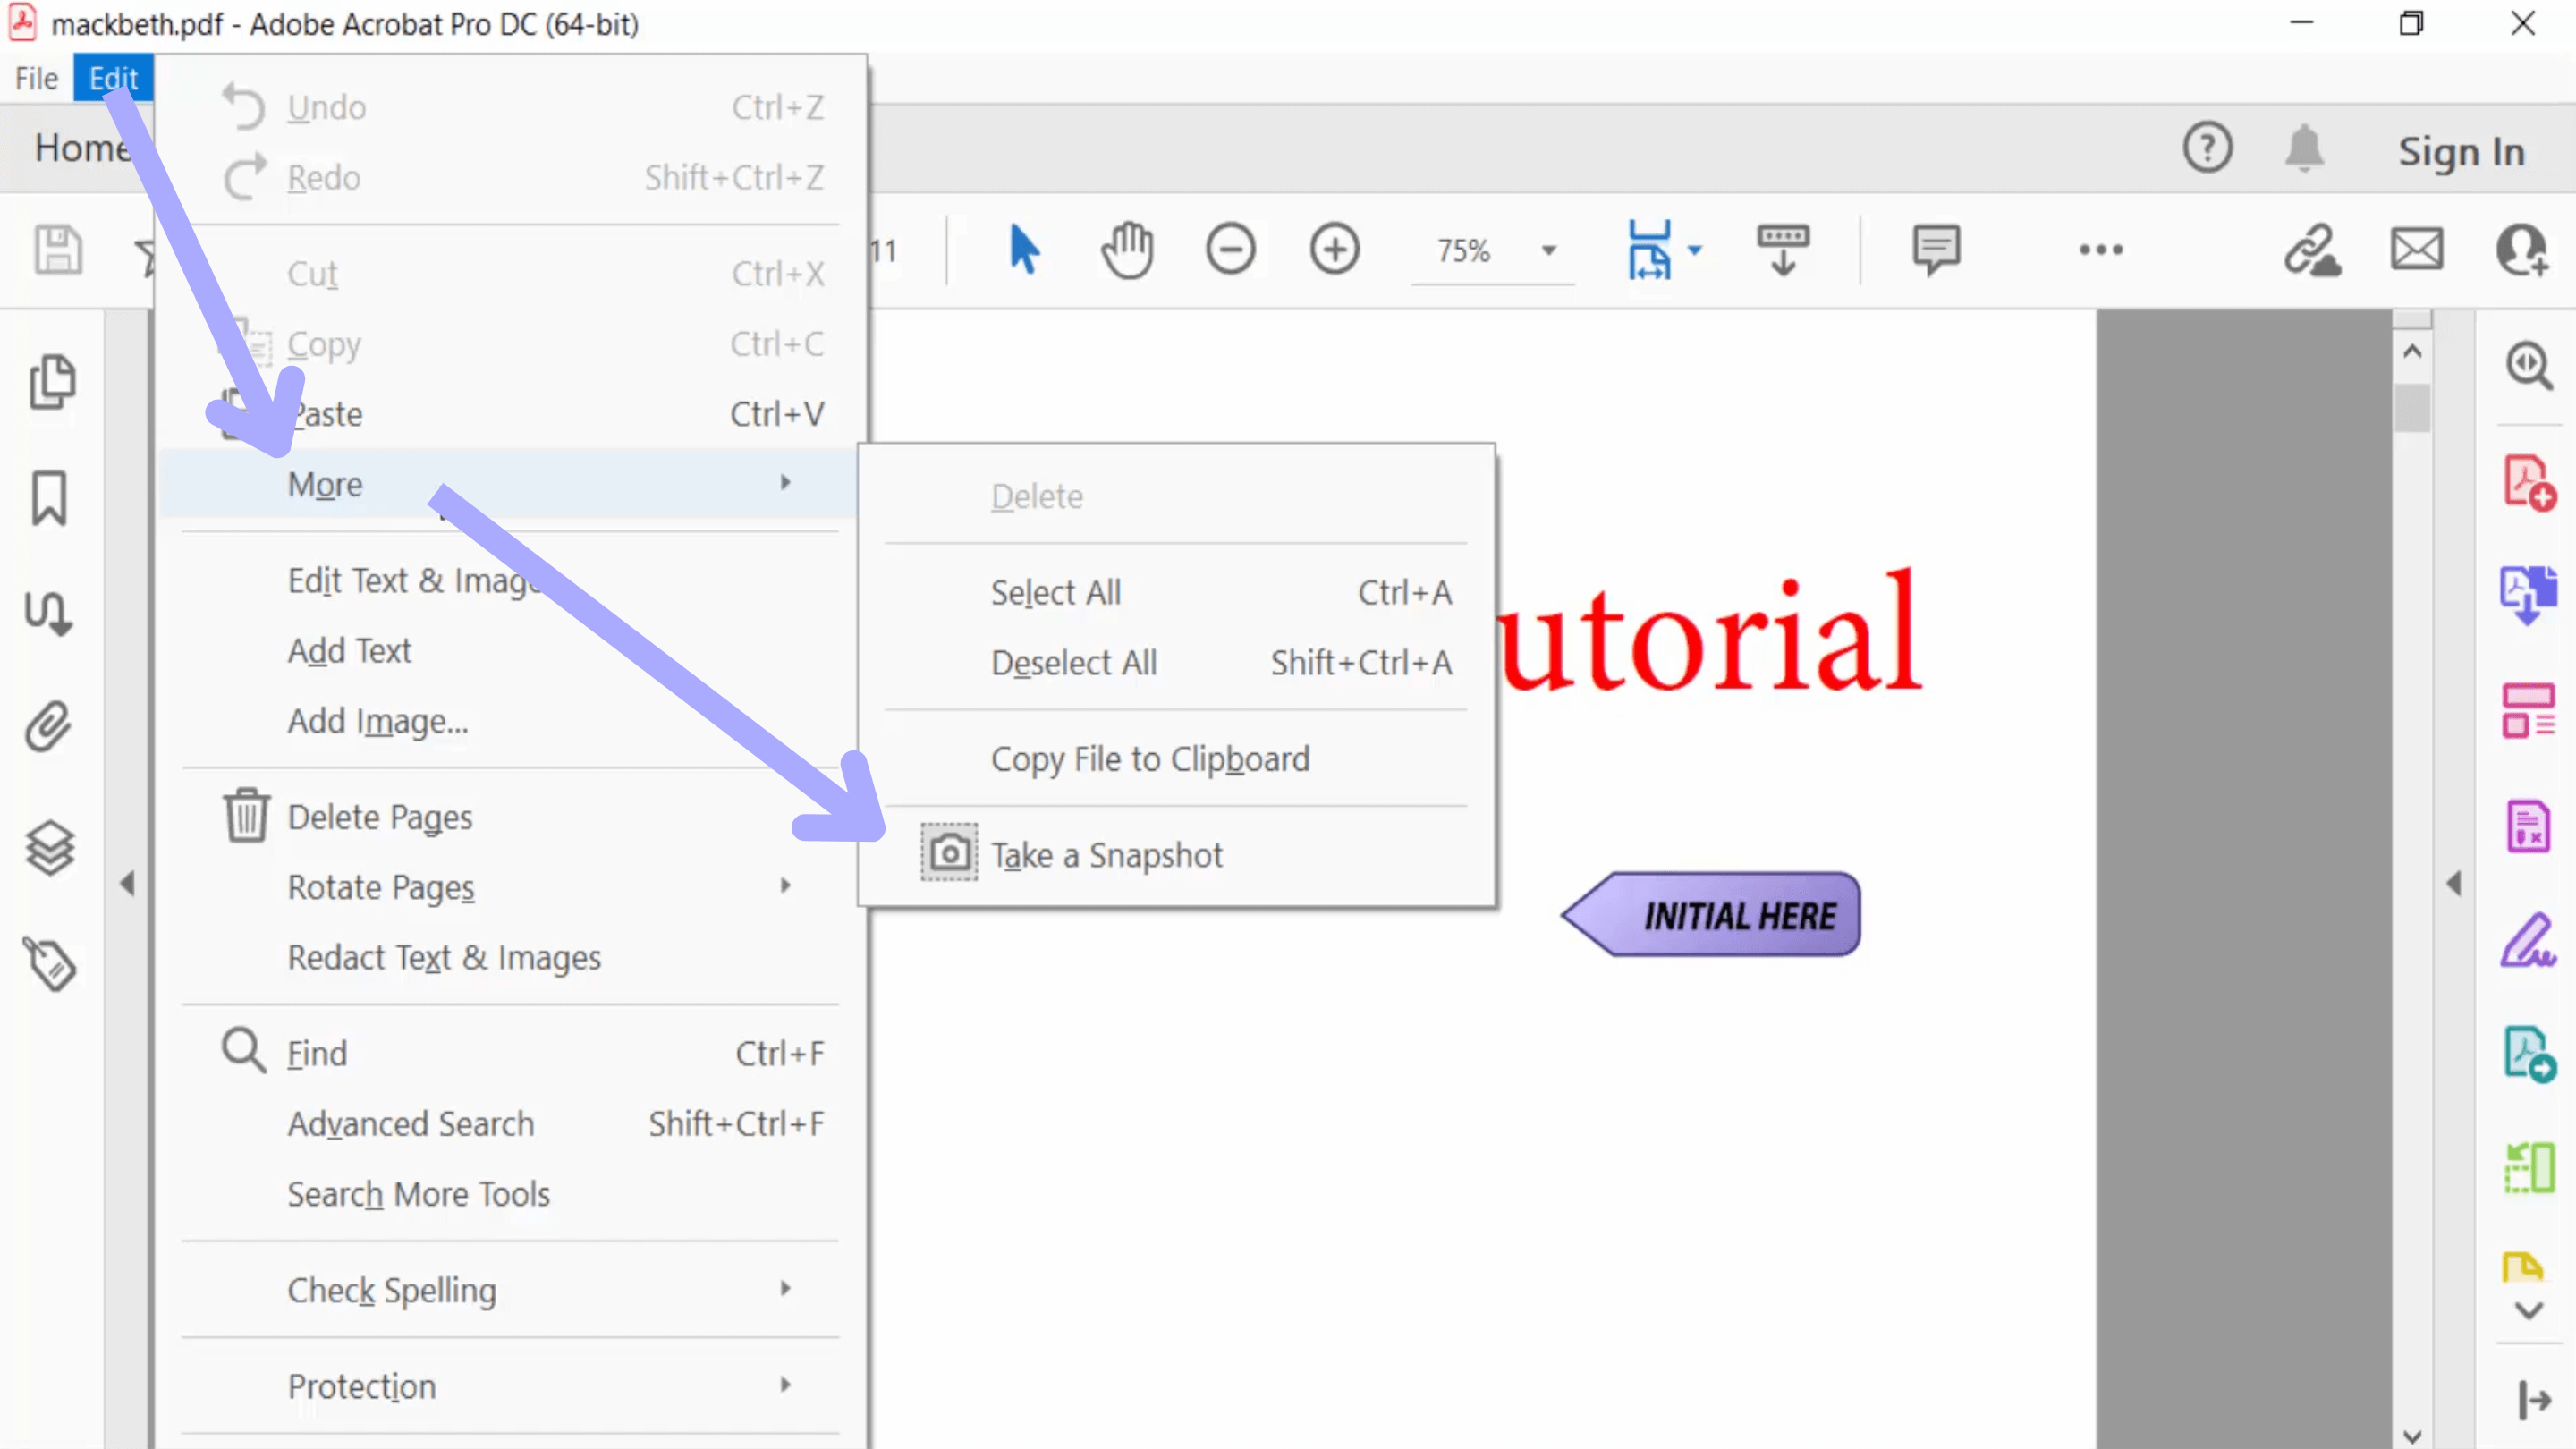
Open the PDF in Adobe Acrobat. Select Edit > More > Take a Snapshot.
Step 2: Capture the Required Area
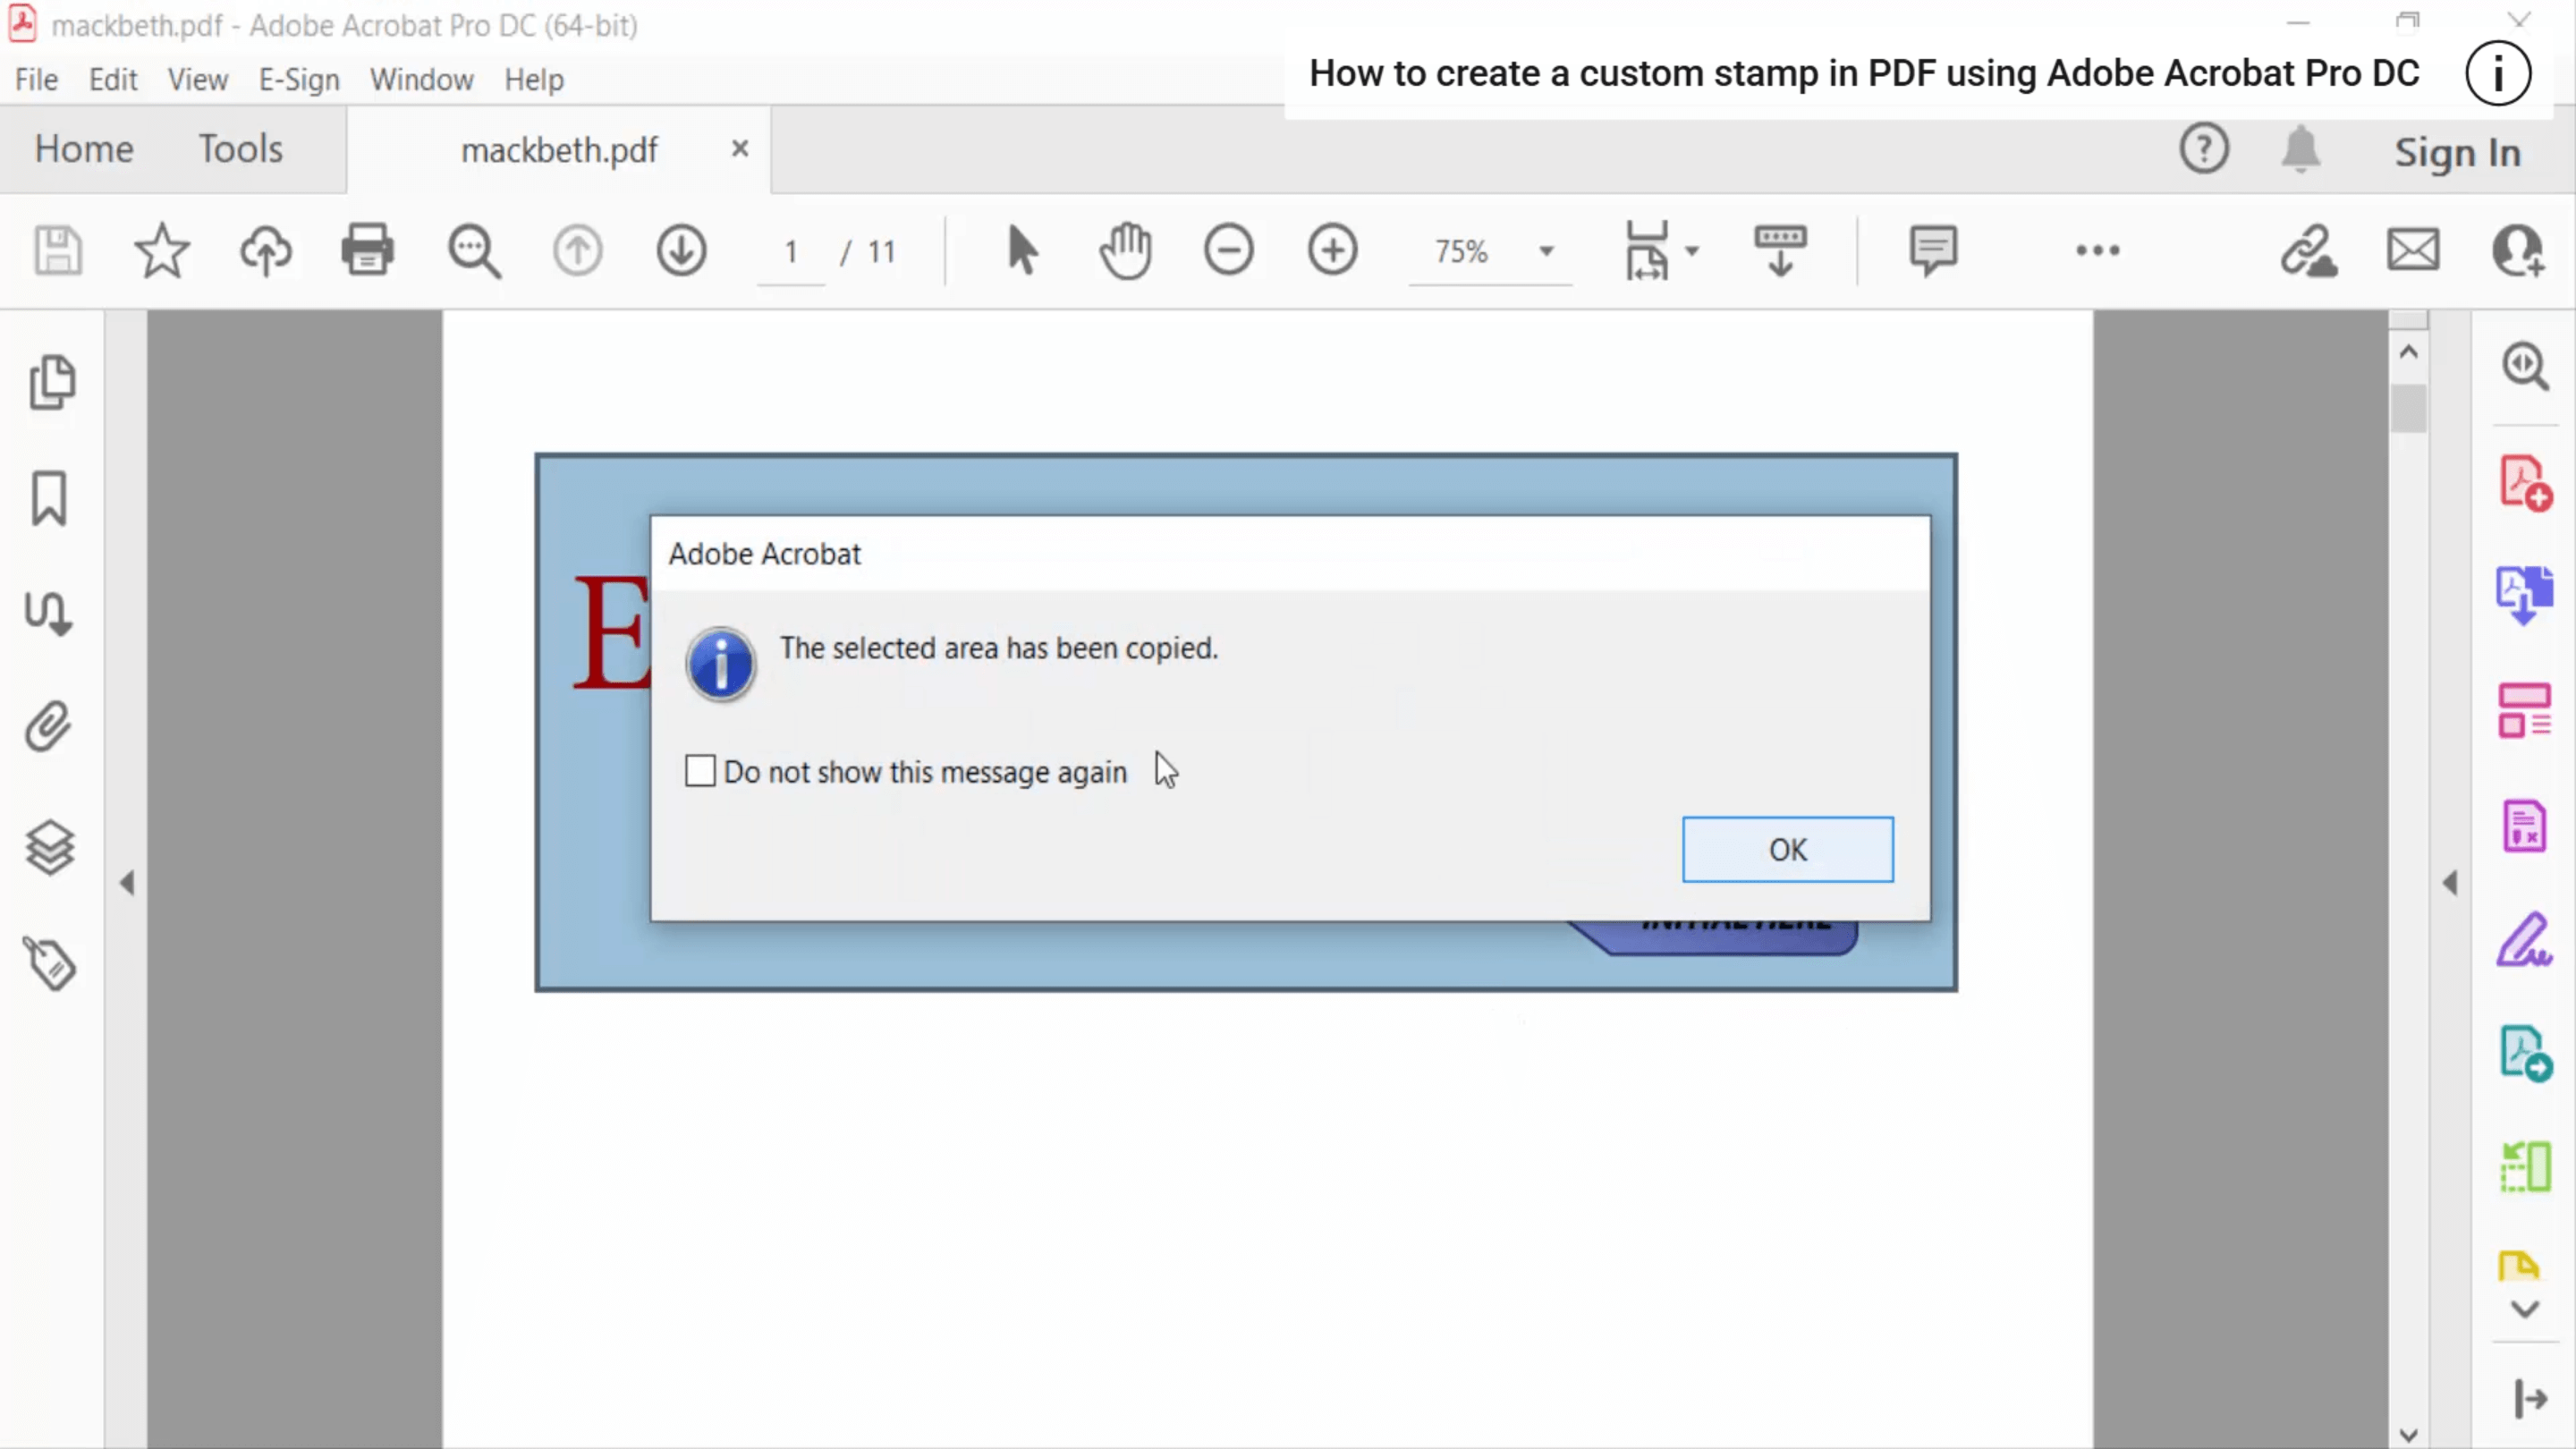
Drag over the content you need. The selected area is copied to the clipboard, ready to paste into another application. Press Esc to return to normal PDF navigation.
Part 3. Adobe Acrobat Snapshot Tool Missing or Not Working
If Take a Snapshot is unavailable or does not work as expected, check these common causes:
| Problem | What to Do |
|---|---|
| The Snapshot tool is missing | Make sure the PDF is open in the Acrobat desktop app. On Windows, check Menu > Undo, Redo & more. On Mac, check Edit > Undo, Redo and More. You can also try right-clicking the PDF page. |
| The old toolbar button is gone | Toolbar options vary by Acrobat version and interface. Use the menu or right-click route instead of relying on an older toolbar layout. |
| Nothing appears after taking a snapshot | The selection is copied to the clipboard rather than saved as a file. Paste it into Paint, Preview, Word, or an image editor, and then save it. |
| You cannot copy content | Open Document Properties > Security and review the Document Restrictions Summary. The PDF owner may have disabled content copying. |
| The tool remains active | Press Esc to exit Snapshot mode and return to the regular cursor. |
Part 4. How to Print a Selected Area with the Snapshot Tool
You can also use Snapshot when you only want to print part of a PDF page:
- Activate Take a Snapshot and drag over the area you want to print.
- Open File > Print.
- Under the print options, choose Selected graphic.
- Adjust the size or fit setting if necessary, and then print.
Part 5. FAQs About Snapshot in Adobe Acrobat
Q1. Can I Add the Snapshot Tool to the Adobe Acrobat Toolbar?
Toolbar customization and available buttons vary by Acrobat version and interface. If a Snapshot button is unavailable, open the tool from Menu or Edit, or right-click the PDF page when that option appears.
Q2. Is There an Adobe Acrobat Snapshot Shortcut?
Acrobat does not provide one consistent default shortcut for opening the Snapshot tool across all versions. Use the menu or right-click route to start it. Press Esc to exit Snapshot mode.
Q3. How Do I Save an Adobe Acrobat Snapshot?
Acrobat copies the selected area to your clipboard. Paste it into Paint, Preview, Word, or another image-compatible application, and then use that application's Save or Export command.
Part 6. A More Flexible Adobe Snapshot Alternative: UPDF
Adobe's Snapshot tool is useful when you only need an image of part of a page. If you also need selectable text or want to turn a capture into a PDF, UPDF offers a more flexible workflow on Windows and Mac. Right-click and drag over any PDF area, then choose Copy as Image or Copy as Text. This is useful when a chart should remain visual but a paragraph needs to be reused or edited.
UPDF can also send a selected area to UPDF AI for explanation and create a new PDF from a selection, window, screen, or clipboard. For more detailed capture options, see this guide to using a PDF snipping tool.
| Need | Adobe Acrobat Snapshot | UPDF |
|---|---|---|
| Copy a selected area | Copies it as an image | Copies it as an image or text |
| Create a PDF from a capture | Requires extra steps | Supports selection, window, screen, and clipboard |
| Understand selected content | Not part of the Snapshot tool | Can send the selection to UPDF AI |
UPDF is free to download and try. It also includes PDF editing, annotation, conversion, OCR, organization, and protection tools, making it a practical Adobe Acrobat alternative for everyday PDF work.
Windows • macOS • iOS • Android 100% secure
Final Thoughts
The Adobe Acrobat Snapshot tool has not disappeared, but its location depends on the Acrobat version and operating system. Once you select an area, remember that Acrobat copies it to the clipboard instead of saving a separate image automatically. If you want to copy a selection as text, analyze it with AI, or create a PDF directly from a capture, try UPDF for a more versatile workflow.








 Enya Moore
 Lizzy Lozano
 Enola Davis
 Delia Meyer