Are you stuck weighing up the differences between JPEG and PNG files, and which format to choose when storing your digital images? Look no further, as this article will reveal everything you should know when it comes down to JPG versus PNG. This article was researched by UPDF, a powerful and user-friendly tool for managing and editing PDFs, which is available to download for free! Among its many features, this software allows you to seamlessly convert between file types. Read on for our easy to follow step-by-step guide on how to convert between JPEG and PNG files.
What is a JPEG File?
JPEG - also known as JPG - is the most common way to store digital photographs and images. JPEGs go through a lossy compression process to reduce the size of the image which saves storage space, allowing for faster transmission and download speeds as well as faster performance when viewing photos. This means that using JPEG is ideal for everyday use and still produces a high quality image, but can risk sacrificing some of the original picture quality such as the sharpness of some edges and lines.
The JPEG standard was created by the Joint Photographic Experts Group during the rise of digital photography in the early 90’s. The aim of its creation was to allow the compression and storage of high quality images, offering a more manageable smaller file size. A JPEG file can hold up to 16 million colors while retaining its smaller size, meaning it is the most popular file for photographers and web publishers. Photographers often choose to use JPEG when uploading their work to the internet, as it will take less time to open in the browser without losing much quality. Similarly, web publishers and bloggers also see the benefits of using this file type as the faster their web pages load, the faster the content can be accessed.
What is a PNG File?
PNG - short for Portable Network Graphics - is a high quality graphic file format, widely used for storing and transferring images as well as displaying digital images on websites. PNG images use lossless compression, meaning that all original image data is retained, resulting in a higher quality image. This retention of original quality does mean that the file will take up more room in your hard drive and can lead to slower loading times for web pages.
PNG files were created as the next evolution of the GIF format, which only supported 256 colors amongst a number of other drawbacks. PNGs support up to 16 million colors and can be opened in a huge number of programs without a license as there is no patent. Imperative to graphic designers and illustrators, PNG files offer transparency which allows the ability to upload irregular images, logos and illustrations on top of an external background colour. PNGs are also a great option when uploading graphics and charts to a website, as there is no risk of any vital information being obscured by quality loss due to all original file data being preserved.
JPG vs PNG - The Key Differences
The main difference between JPG and PNG is their compression process, which this article will explain in more detail later on. But how does this affect their image size and quality, among other attributes? Simply put, JPEGs sacrifice a little of their original image quality in exchange for faster processing times and taking up less storage space, making for a smaller file size, whereas PNGs have longer download and processing speeds but retain all original image data and quality within a larger file size.
As mentioned, JPEG files are a popular choice for images produced by digital photography and are a great option for images with complex colors and shading, as their considerably decreased file size makes for faster upload times as well as more efficient web page responsiveness. PNGs are better for pictures with textual or iconic graphics as well as line drawings due to the fact that none of the quality will be lost. PNG files are a better option for graphic designers and illustrators, as these files allow for transparency or semi transparency - a huge benefit in web design and in logo and design creation. In short, a general rule for knowing whether to use JPEG versus PNG is that JPGs are the optimal choice for photographs, whereas PNG files are best for graphics.

Understanding the Compression Processes of JPG and PNG
Digital images and files are often compressed in order to decrease their size or to change various characteristics, ie. the file type, resolution or dimensions, without losing too much of its data. The JPEG file undergoes "lossy" file compression, which reduces the file size by removing its information and not restoring it to its original form. This is therefore also known as irreversible compression. The loss of data during this process is usually not obvious and still results in a high quality file; however, the more the file is compressed, the more data is lost and the reduction in quality will become visible.
On the other hand, the PNG image uses "lossless" file compression. This compression method restores all of the file data in its original form, meaning that when a picture’s file size is compressed in this way its quality remains the same. The file can also be decompressed to its original standard without losing any data - for this reason it is also known as reversible compression. Lossless file compression does not reduce the file size as much as lossy compression, meaning it requires more storage space but retains more of the image quality.
How to Convert JPEG and PNG Formats to Each Other
Now that we understand the difference between JPEG and PNG formats and the key uses for each file type, how can we convert JPEG to PNG and vice versa? You can do this in just a few clicks by downloading UPDF and taking advantage of its innovative conversion features.
Windows • macOS • iOS • Android 100% secure
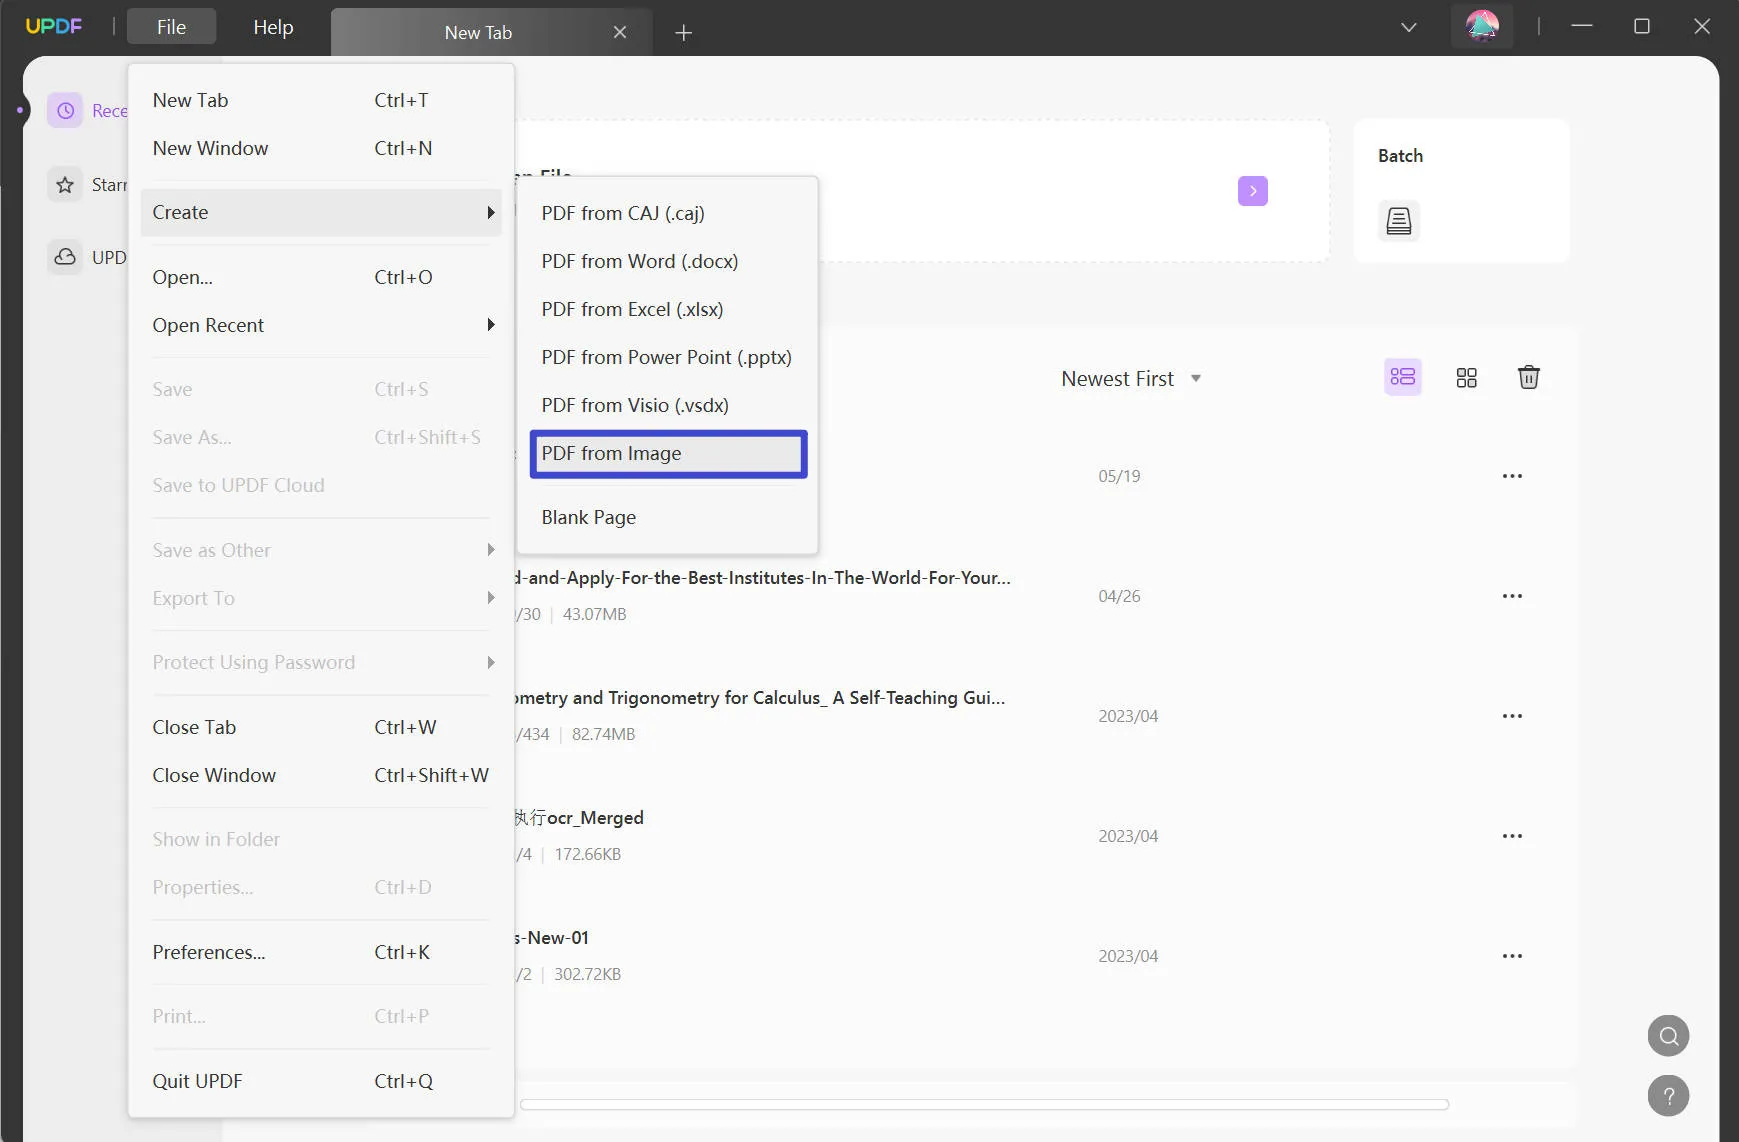
Step 1: After downloading UPDF, you’ll need to first of all convert your JPEG or PNG file to a PDF. Simply click "File" from the top menu bar, select "Create" > "PDF from Image", and choose the file that you would like to convert. To save some time, you can also make use of the very efficient drag and drop feature in the main interface.
Step 2: Now that your file has been converted into a PDF, you might want to save this as an individual file on your computer; just go to "Save as Other" then "Save" in the right-hand-side panel.
If you only wish to have a PDF formate of your JPG or PNG file, you can stop there - using UPDF for file conversion is as quick as that! If you’d like to continue to convert your JPEG to a PNG or the other way around, follow these simple last steps.
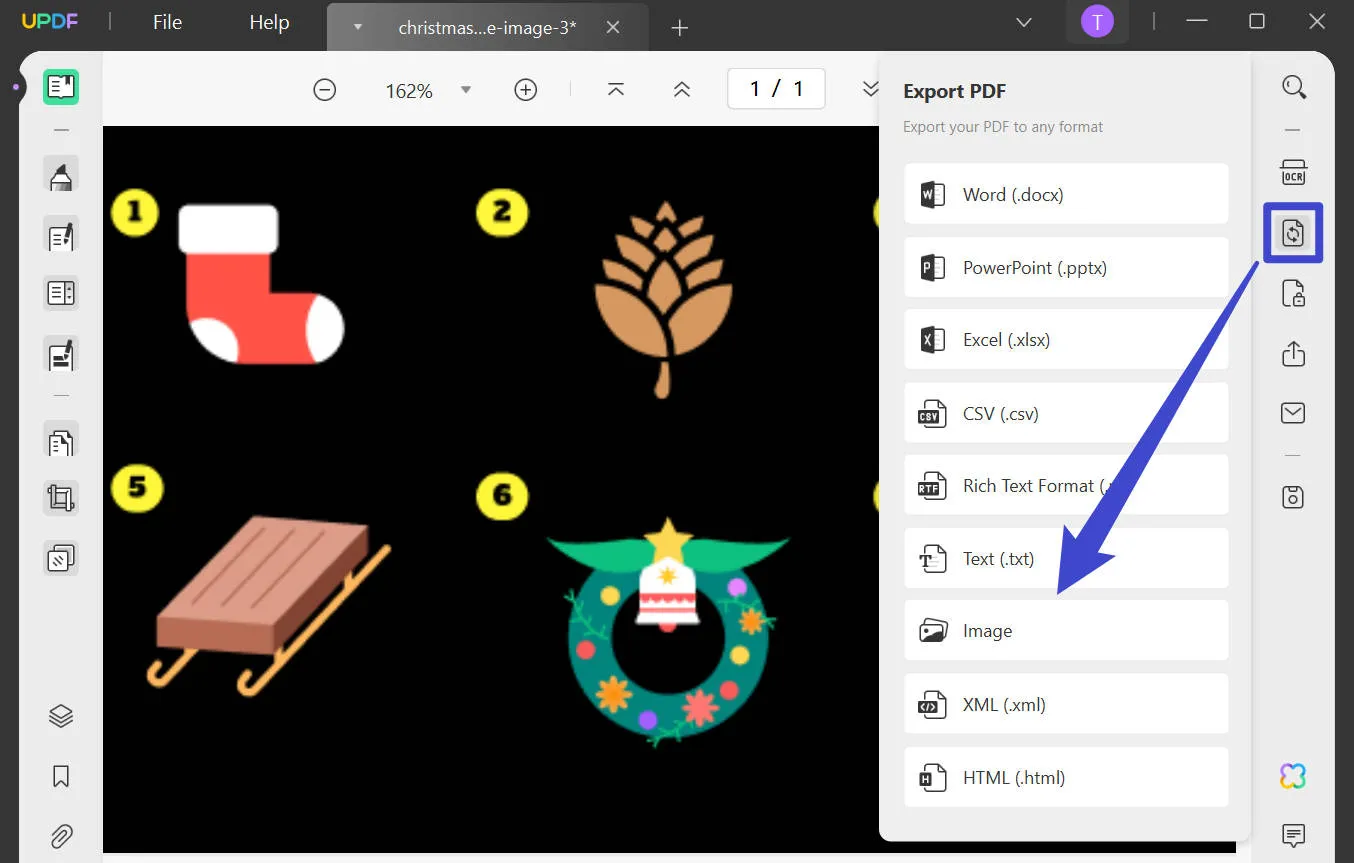
Step 3: On the right-hand-side panel, click "Export PDF" then choose "Image". Once this menu pops up, select your desired format from the second drop-down box and hit "Export".
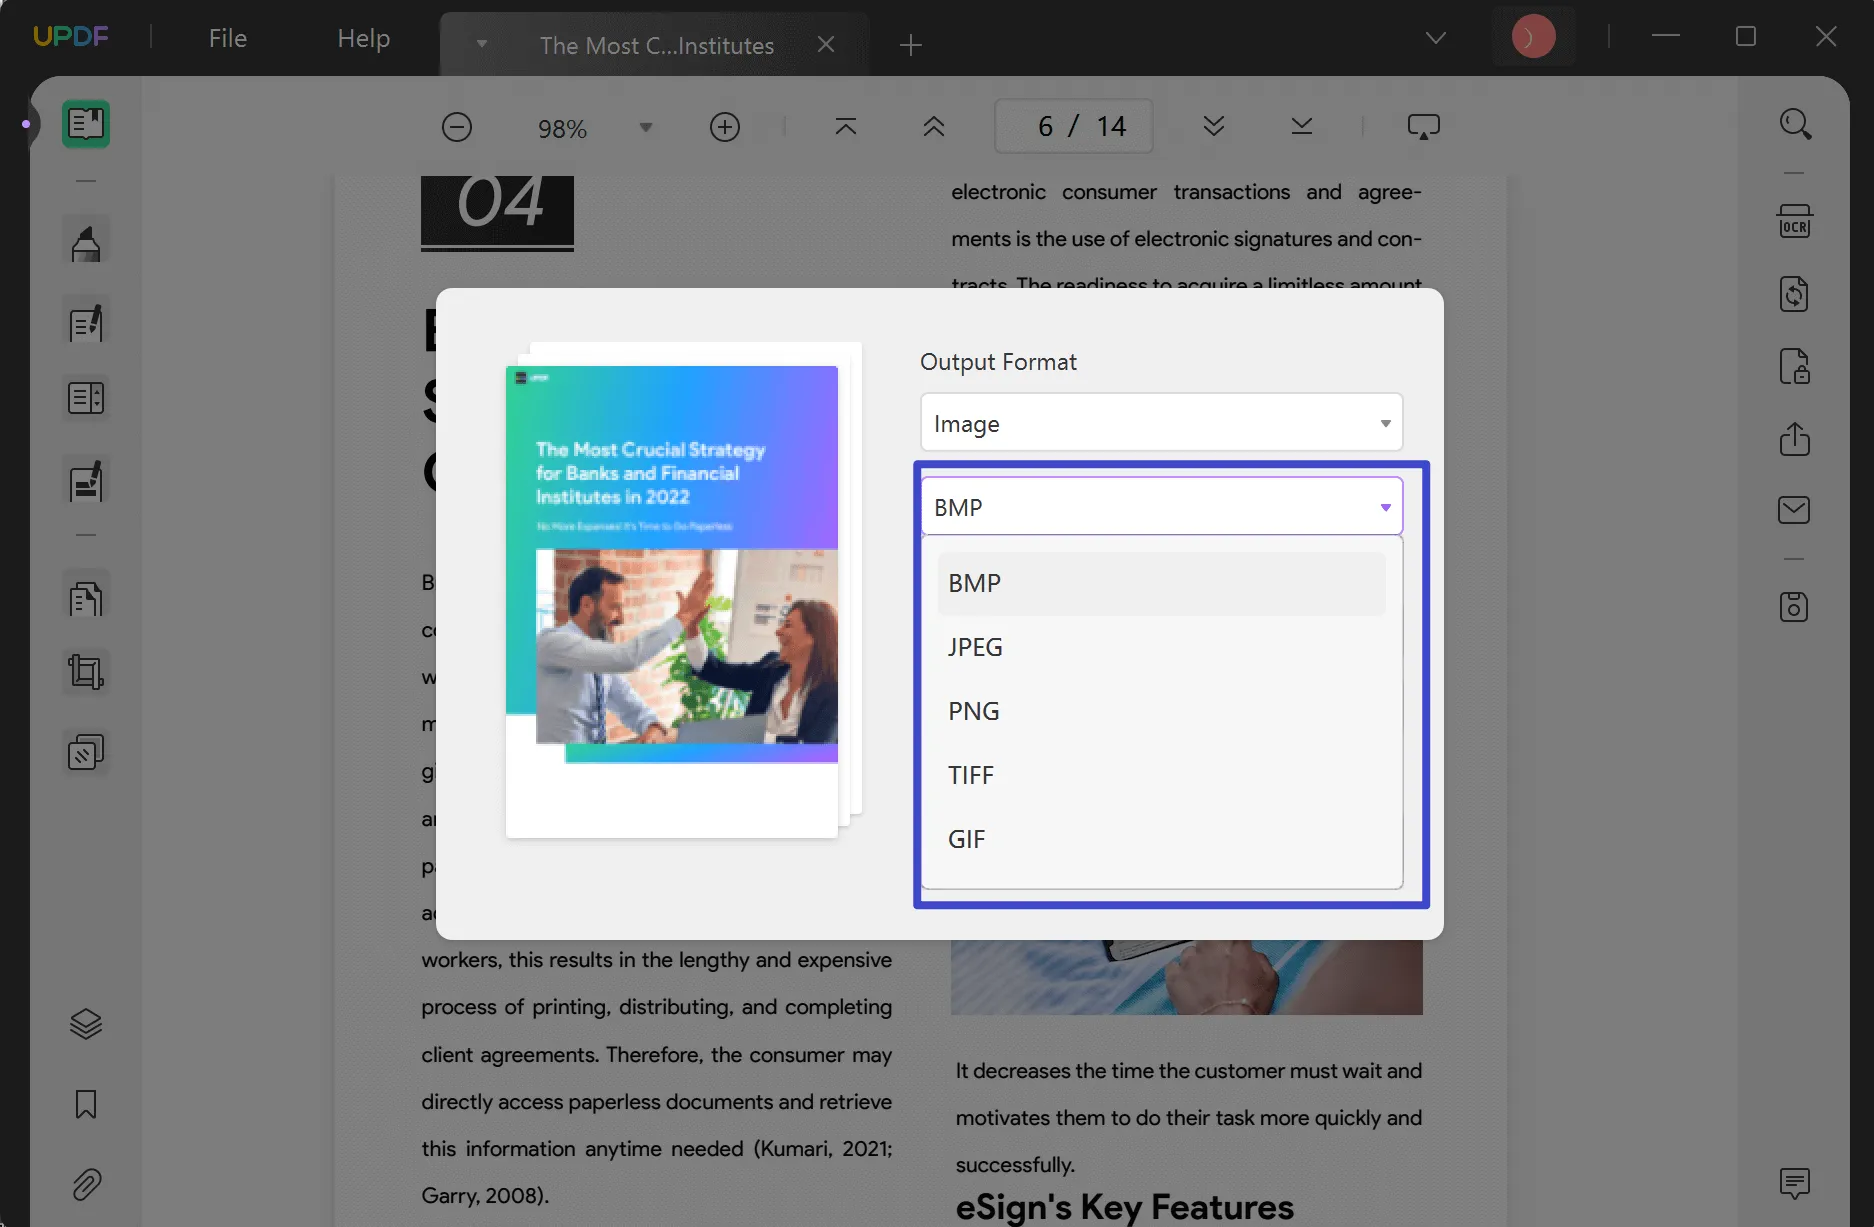
Step 4: Make sure you’ve saved your new file, and voilà! You’ve successfully converted your image format.
This seamless and user-friendly way of converting file formats is one of the many reasons to download the UPDF software and ensure you upgrade to UPDF Pro. As well as unlimited PDF file conversion via an easy-to-use interface, you’ll enjoy many more useful features such as unlimited batch conversion, all annotation tools, the ability to edit PDF texts, images and links, as well as a generous 10GB of UPDF Cloud storage.
Windows • macOS • iOS • Android 100% secure
Conclusion
Understanding the nuances between JPEG and PNG is essential for effective image management; while JPEG files take up less storage space and download faster, PNG files prioritise quality compression and sharpness. Whether it involves everyday photography, web design or graphic creation, it’s important to know the difference between these two file formats and how to convert from one to the other. For easy file conversion within a versatile and powerful PDF converter, why not try UPDF? Read How-To-Geek’s impartial and detailed review for an unbiased perspective on UPDF and everything you need to know about this all-in-one solution to your PDF needs.
 UPDF
UPDF
 UPDF for Windows
 UPDF for Mac
 UPDF for iPhone/iPad
 UPDF for Android
 UPDF AI Online
 UPDF Sign
 Edit PDF
 Annotate PDF
 Create PDF
 PDF Form
 Edit links
 Convert PDF
 OCR
OCR PDF to Word
 PDF to Image
 PDF to Excel
 Organize PDF
 Merge PDF
 Split PDF
 Crop PDF
 Rotate PDF
 Protect PDF
 Sign PDF
 Redact PDF
 Sanitize PDF
 Remove Security
 Read PDF
 UPDF Cloud
 Compress PDF
 Print PDF
 Batch Process
 About UPDF AI
 UPDF AI Solutions
 AI User Guide
 FAQ about UPDF AI
 Summarize PDF
 Translate PDF
 Chat with PDF
 Chat with AI
 Chat with image
 PDF to Mind Map
 Explain PDF
 Scholar Research
 Paper Search
 AI Proofreader
 AI Writer
 AI Homework Helper
 AI Quiz Generator
 AI Math Solver
 PDF to Word
 PDF to Excel
 PDF to PowerPoint
 User Guide
 UPDF Tricks
 FAQs
FAQs UPDF Reviews
 Download Center
 Blog
Blog Newsroom
 Tech Spec
 Updates
 UPDF vs. Adobe Acrobat
 UPDF vs. Foxit
 UPDF vs. PDF Expert





 Enya Moore
 Delia Meyer


