Have you ever needed to measure a distance in a PDF? This is very common if you're working with PDFs of architecture blueprints, garden layouts, construction plans, and other space-based documents. It can be very challenging to figure out the exact dimensions in your PDF, especially if they're not written very clearly, or if the measurements are missing entirely.
To solve this problem, you can use the Adobe Acrobat measure tool to quickly create accurate measurements in a PDF. In this article, we will show you how to use the Adobe Acrobat measure tool to create measurements of distance, perimeter, and area, along with step-by-step instructions on this process. Also, we will show you one Acrobat alternative measurement tool - UPDF to help you measure your PDF in an easier and cheaper way. You can click the below button to test it if you prefer using a better option.
Windows • macOS • iOS • Android 100% secure
Part 1. What Features Does Adobe Acrobat Measure Tool Have?
Adobe Acrobat allows you to measure the distance, perimeter, or area of objects on PDFs. You can also use the measuring tools to measure the spaces between elements in your PDF, or the margins of a document before sending it to a professional printer.
The distance tool allows you to make one measurement, from point A to point B. This is a simple tool, and you just need to click at the first point, and then click at the second point.
The perimeter tool allows you to measure around something at multiple points, such as around a triangle, rectangle, or unusual shape. All you need to do is click at each point that you're measuring, and then double-click the last point when you're done.
The area tool lets you measure the area within a set of lines that you draw on the PDF. You can click as many points as you need, and then make sure to connect the last point to the first point to complete the area measurement.
Part 2. How to Use Adobe Acrobat Pro Measuring Tool?
The Adobe Acrobat measuring tool is fairly easy to use. Just follow the below guide.
Step 1 - Open the Measuring Tool
When you open a PDF in Adobe Acrobat, the measuring tools don't automatically open. To activate the measuring tools, click on "Tools" in the upper left part of Adobe's menu.
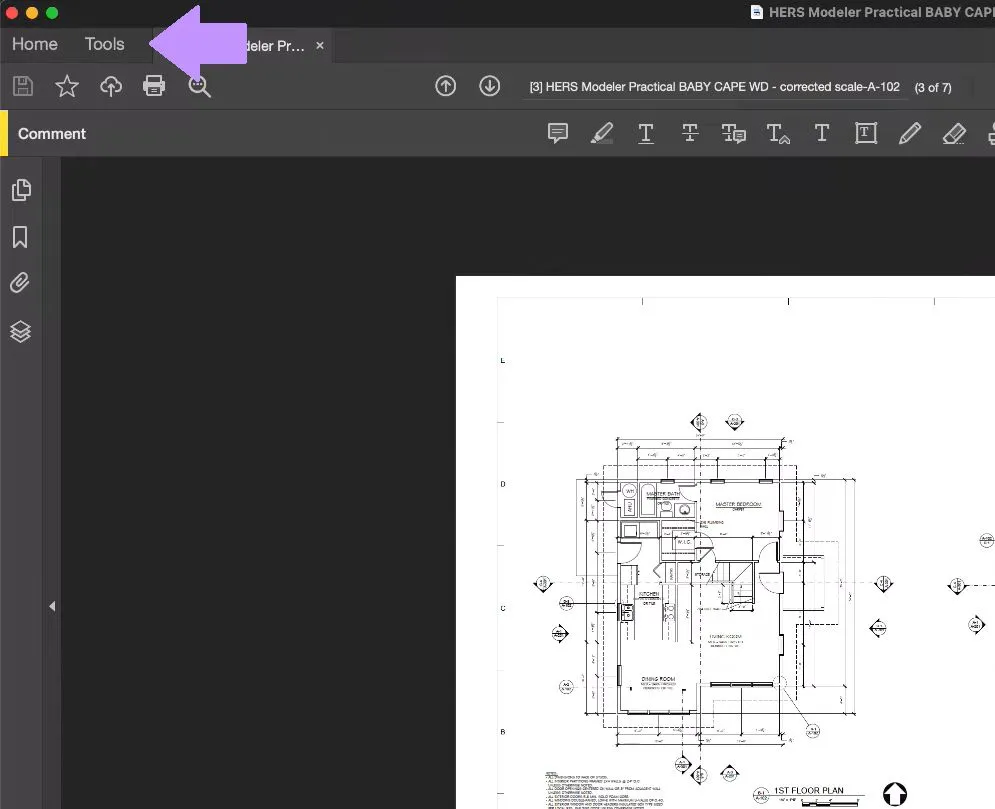
In the tools section, click on "Measure", and this will take you back to the PDF, and the measuring tools will open at the top of the workspace.

Step 2 - Set the Measuring Scale
Before you can measure anything in your PDF, you will need to set the correct measuring scale so that your measurements are accurate. Right-click anywhere on the PDF, and select "Change Scale Ratio and Precision".
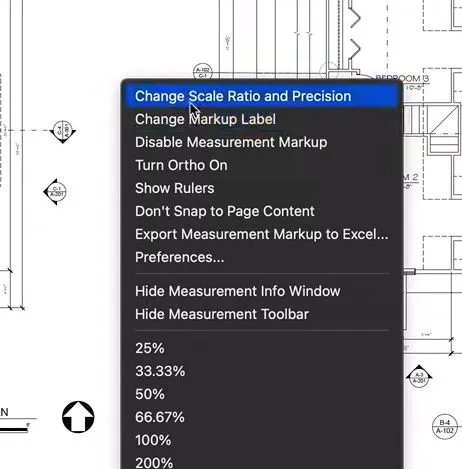
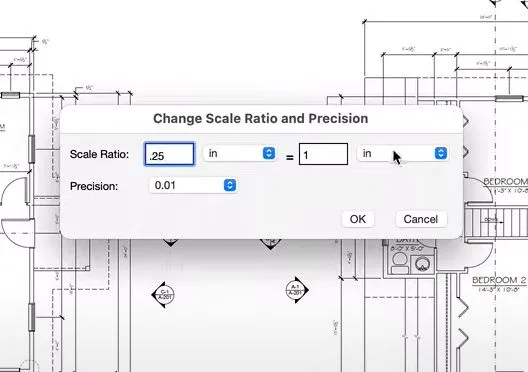
This will open a box where you can set the correct scale for your document, including changing the unit of measurement, such as inch, foot, meter, etc. When you're satisfied with your measuring scale, click "OK".
Step 3 - Select the Measuring Tool
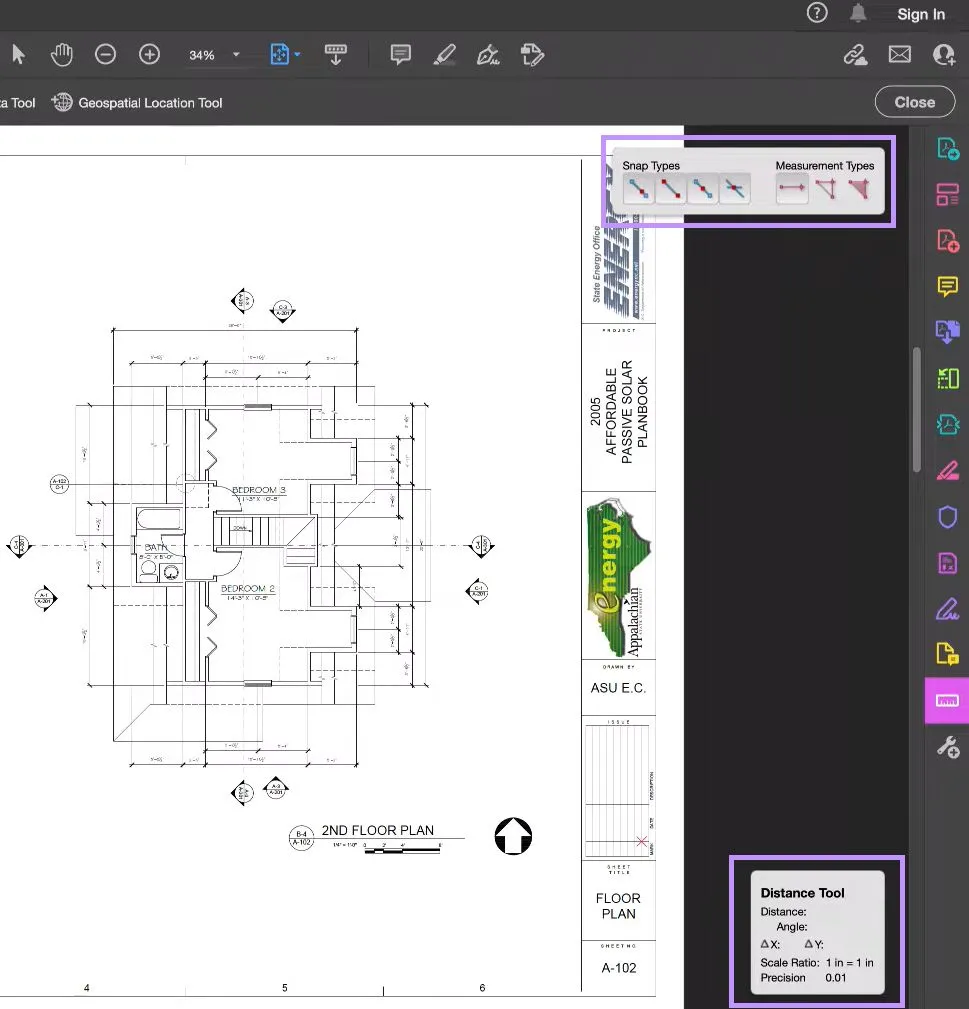
On the Adobe Acrobat workspace, you will see the measuring tools (distance, perimeter, and area in the top right corner). You can also see "Snap Types", which are settings that determine where your lines snap to. You can select Snap to Paths, Snap to Endpoints, Snap to Midpoints, or Snap to Intersections.
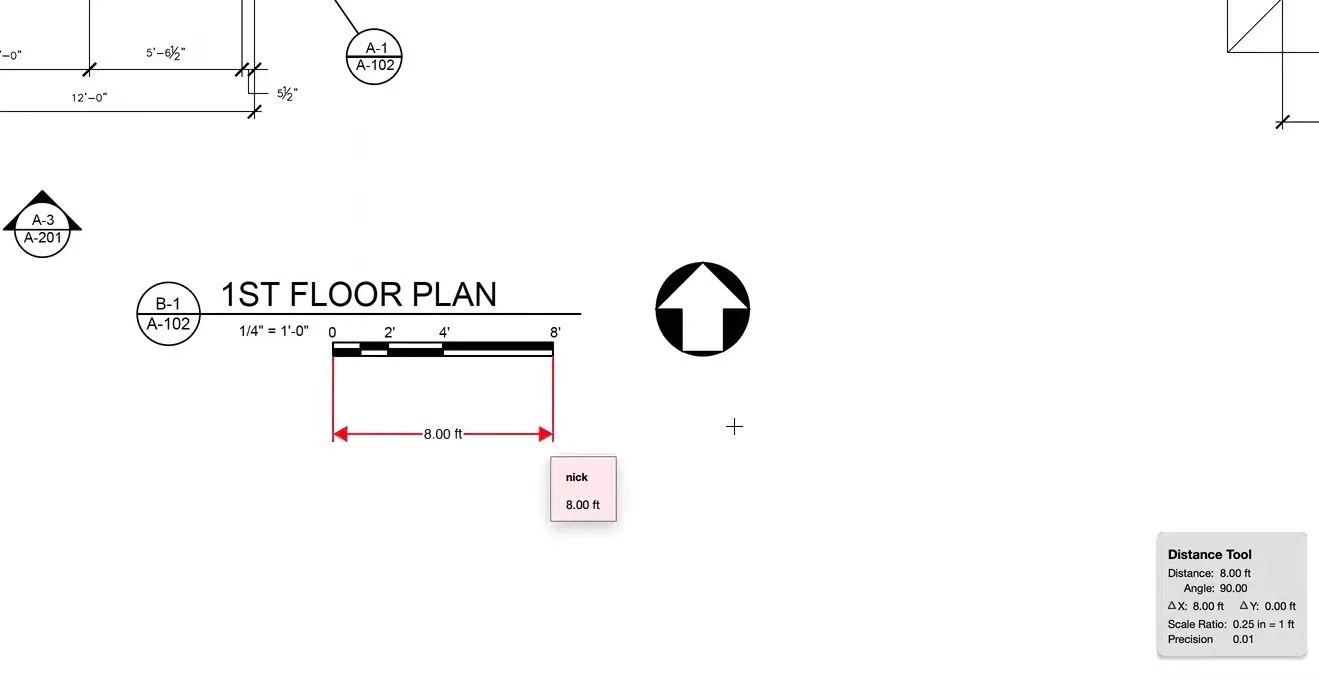
On the bottom right of the workspace, you can see the distance tool, which includes information about the distance, angle, x-axis, y-axis, scale ratio, and precision.
Step 4 - Measure Distance
To measure distance in PDF, select the Distance tool. Click at point A to start your distance measurement, and then click at point B to finish the measurement. If you need to cancel the measurement before it's done, you can click "Escape".
After clicking on point A and point B, you can then drag the measurement away from the line you were measuring. This ensures you can see the measurement, and it's not hidden by a line.
Step 5 - Measure Perimeter
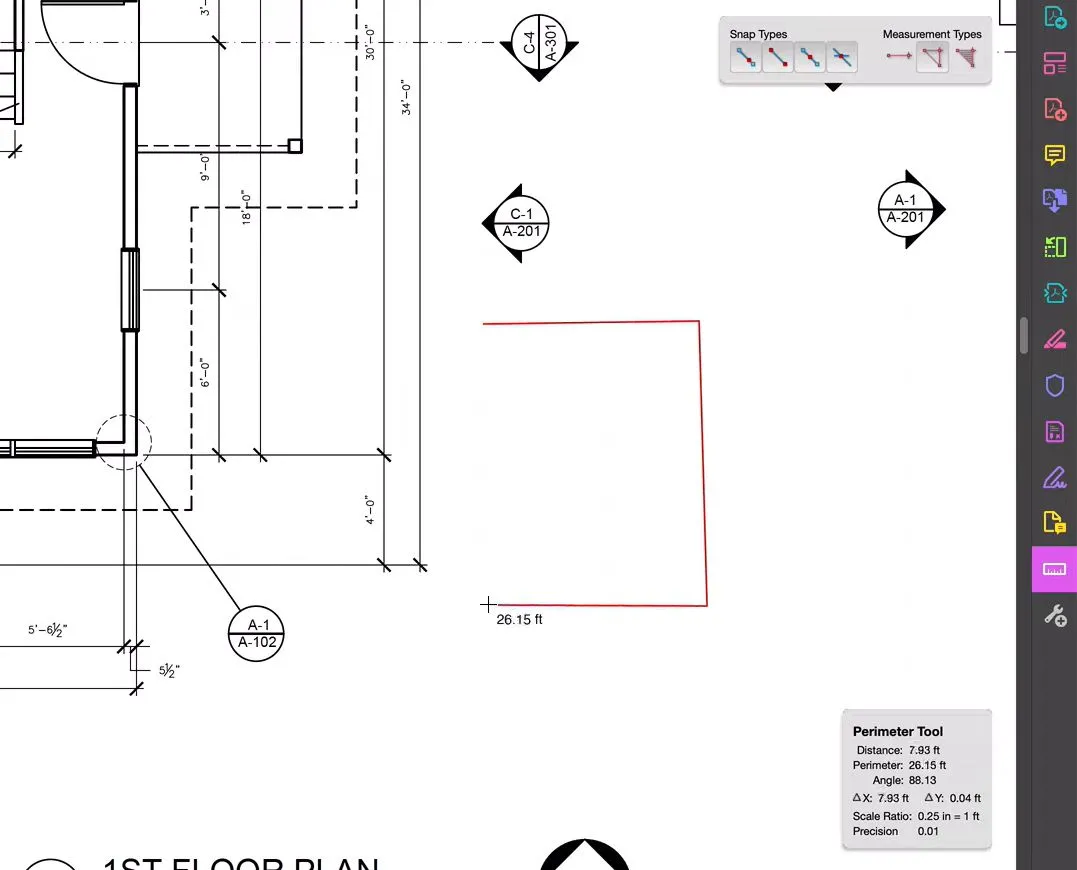
To measure the perimeter in Adobe Acrobat, you can make as many clicks as you need to measure the perimeter around a shape. Start by clicking at the beginning of the perimeter, and then click again at each point along the perimeter where the measurement needs to change direction.
As you draw your perimeter, you will see the measurement continue to increase with each new line added.
To finish a perimeter measurement, you can either double-click, or you can right-click and select "Complete Measurement".
Step 6 - Measure Area
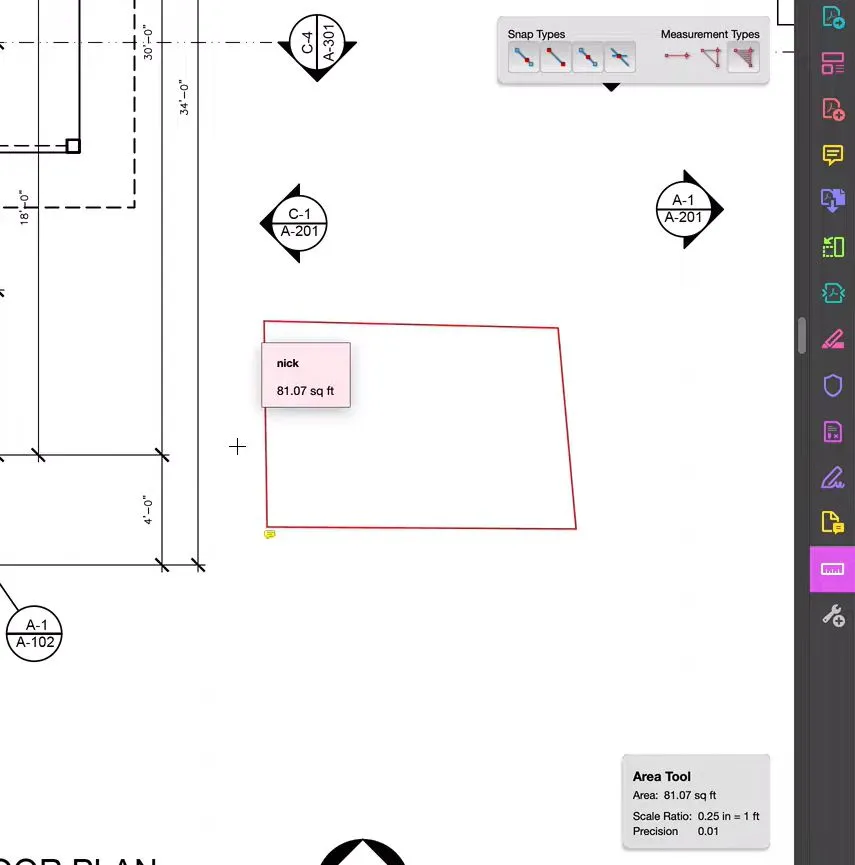
Select the area tool, and click wherever you want to start your area measurement. Then, click as many times as you want to include the total area that you want to measure. When you're done, make sure that the final line connects to the first line that you started, so you have an enclosed shape.
Once you've connected the final line to the first measuring point, you will see a square pop-up with the total area measurement.
Step 7 - Save PDF
When you've made all the measurements that you need, click the "Save" icon in the top left corner of Adobe Acrobat.
Part 3. Why is Adobe Acrobat Measure Tool Not Working?
While Adobe Acrobat is usually reliable, you may have the problem of Adobe Acrobat measure tool not working. And here are two major problems that you might run into, and how you can solve them:
Measurements are incorrect: If your measurements are incorrect, you probably have not set the scale according to the plans that you're working with. To fix this problem, right-click anywhere on the PDF you're measuring, and select "Change Scale Ratio and Precision". From here, you can set the correct scale and units of measurement that you need for your PDF.
Measurement tool keeps crashing: If Adobe Acrobat crashes every time you try to use the measurement tool, then you probably need to update your software. To do this, click "Help" > "Check for Updates", and then update your software. You can also try simply restarting Adobe Acrobat to see if that helps.
Part 4. Bonus Tip: The Best Adobe Acrobat Measure Tool Alternative
Adobe Acrobat can have an expensive monthly subscription and it may not work from time to time, so if you need an alternative to Adobe Acrobat for measuring in PDF, then we highly recommend trying UPDF. UPDF has all of the same measuring features to Adobe Acrobat, such as measuring distance, perimeter, and area, but also has some added features, such as being able to name and customize your measurements. UPDF is also more affordable than Adobe Acrobat and has many powerful features to help you read, annotate, and customize your PDFs.
Curious to try out UPDF and see how the measuring tool compares to Adobe Acrobat? Click the button below to download UPDF and start your free trial today.
Windows • macOS • iOS • Android 100% secure
How to Use Adobe Acrobat Measure Tool Alternative?
Using UPDF to measure distance, perimeter, and area in a PDF is very simple. Follow these easy steps to complete the process.
Step 1 - Select the Measuring Tool
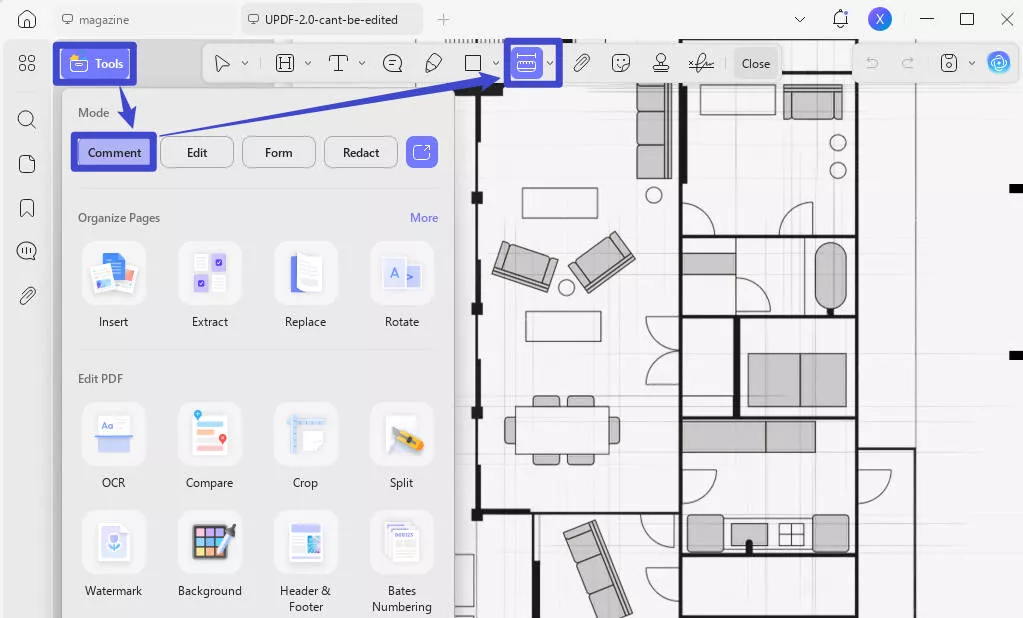
In UPDF, open your PDF by dragging and dropping it into the "Open File" box. Then, click "Comment" in "Tools"on the left side, and then from the tools at the top, select "Distance Tool". We'll look at how to do each kind of measurement: distance, perimeter, and area.
Step 2 - Measure Distance
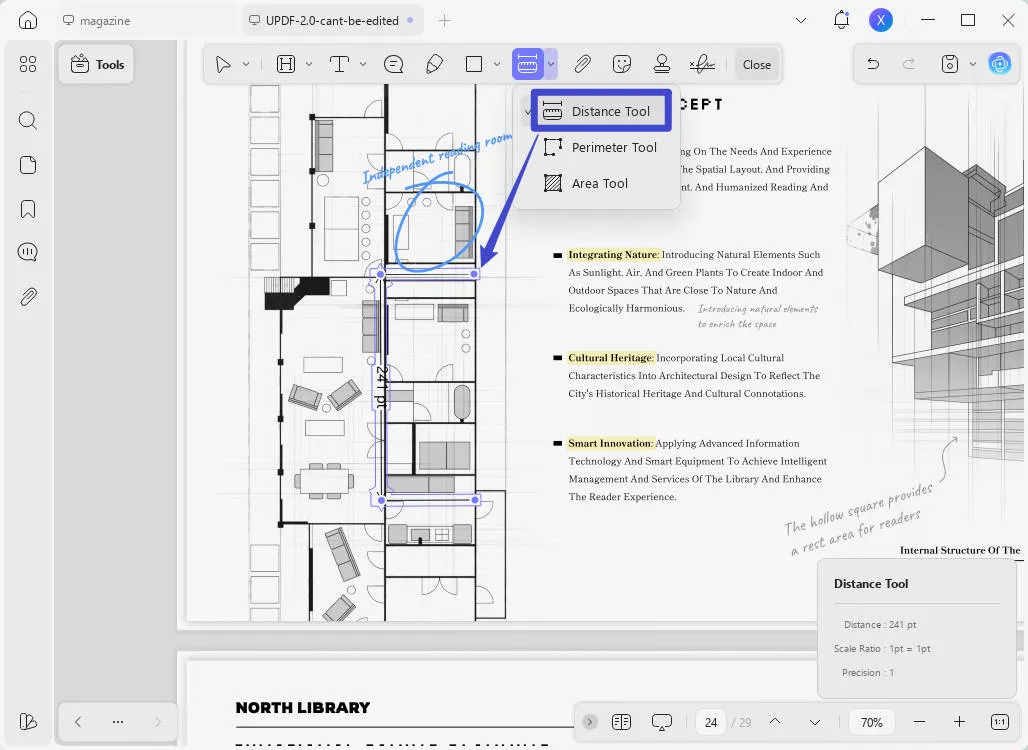
Select the "Distance Tool". Click on point A where you want to begin the measurement, then click on point B where you want to end the measurement. As you draw your line, you will see the distance tool in the lower right corner giving information about your measurement.
You can click again to end the measurement, or you can then drag the line away from the distance you were measuring so you can see it more clearly.
Step 3 - Measure Perimeter
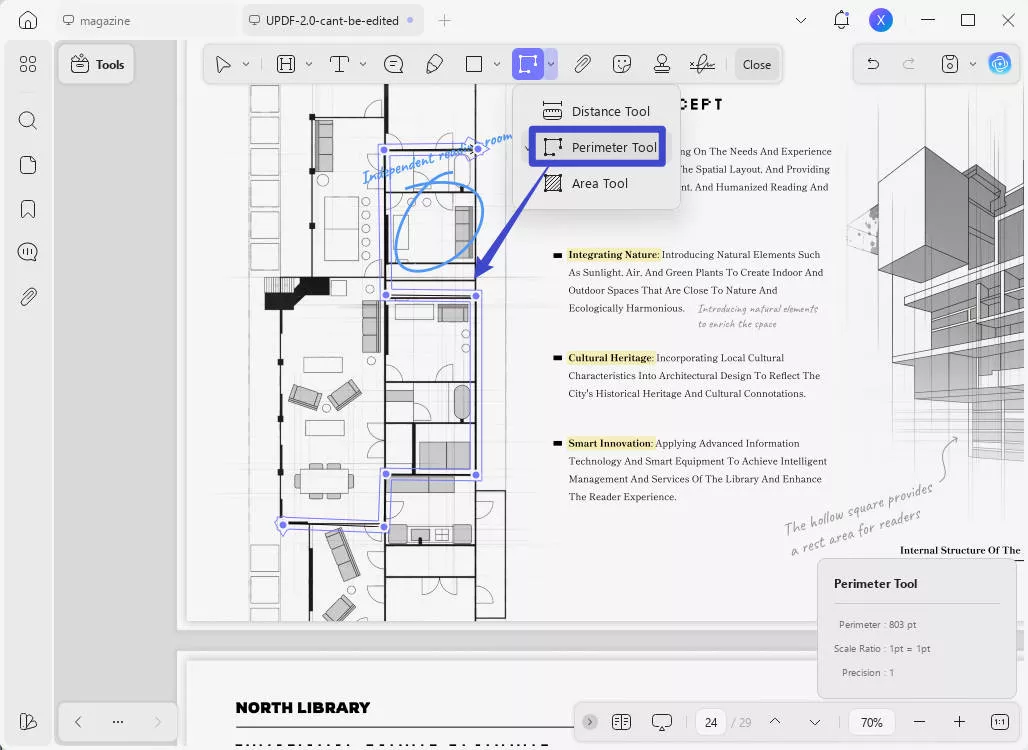
From the measuring tools, select "Perimeter Tool". Click at point A, where you want to start the perimeter measurement, and then click at every place where you want to add a new measuring point. When you're ready to stop measuring the perimeter, doule click the final point to finish the measurement.
Step 4 - Measure Area
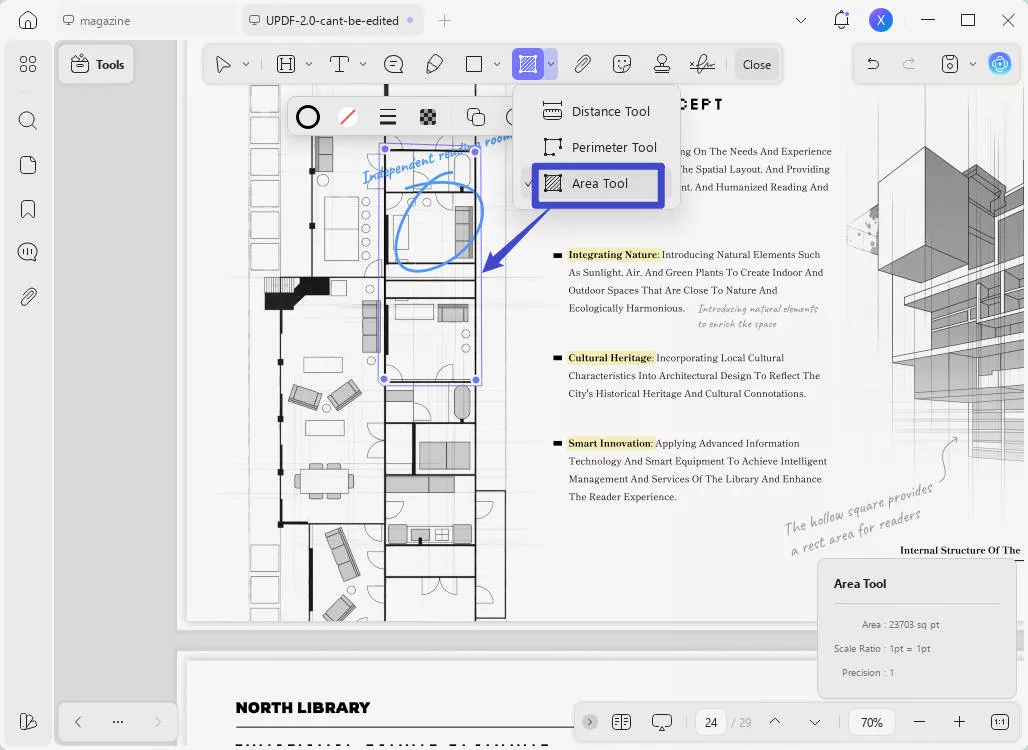
Select the "Area Tool" from the measuring tools. Choose a starting place for the area and click there. Then, click on each corner of the area that you're measuring. The area tool will change shape and adjust with each new click. After clicking the final point in the area you want to measure, doule click the final point to finish the measurement.
Step 5 - Customize Measurements
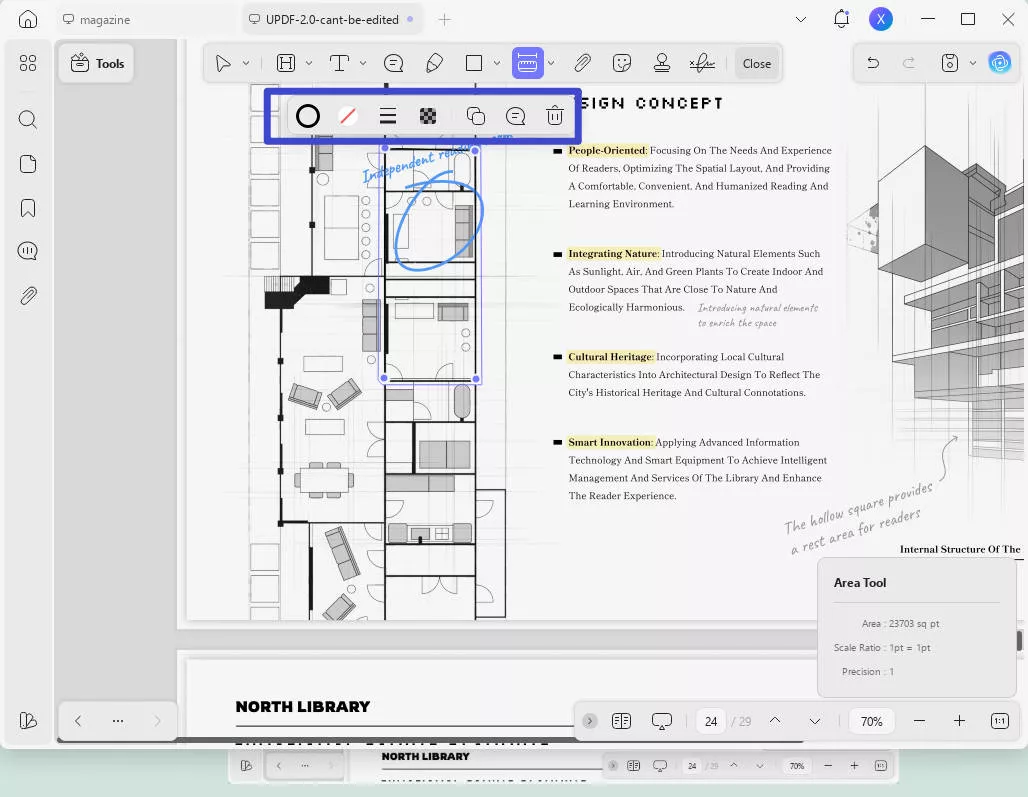
After you've taken a measurement, you can then customize the properties. Click on the measurement, you can then change the line color, opacity, and thickness. Additionally, you can choose "Note" to add notes about the measurement.
Step 6 - Save File
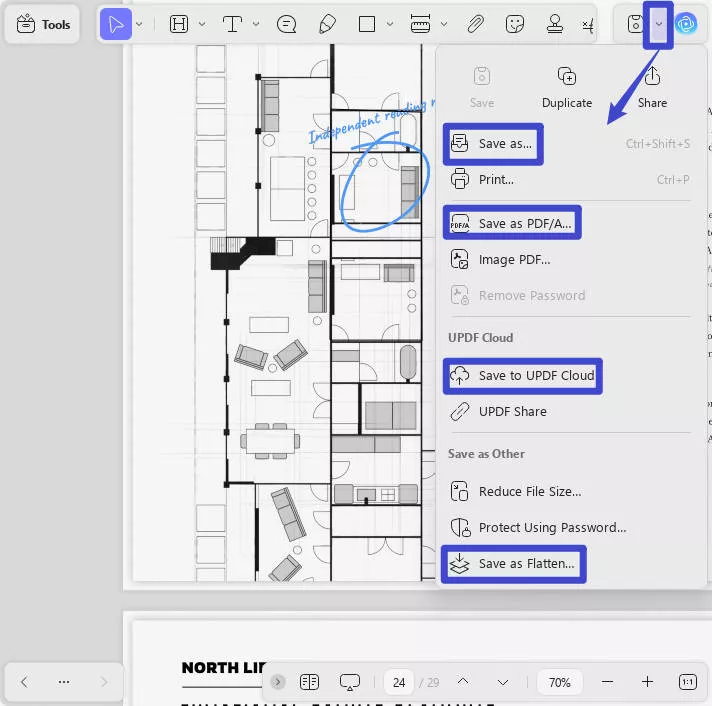
Once you've made all the measurements you need, click the narrow next to "Save" on the right side, and choose your preferred method to save your PDF.
Except measuring PDF, UPDF has many other features that can help you with work or study. UPDF has many annotation tools to help you study, such as highlighting, adding sticky notes, fun stickers, and comments. UPDF also has an OCR feature to convert text images into editable text, editing features to help you customize your PDFs, security features such as password protection, and AI tools to translate, summarize, and generate content.
You can learn more about UPDF by reading this review from Howtogeek to know why UPDF is better than Adobe Acrobat, and when you're ready to try all of UPDF's features, click the button below to start your free trial!
Windows • macOS • iOS • Android 100% secure
Final Thoughts
You can use the Adobe Acrobat measure tool to measure distances, and perimeters in a PDF and create accurate measurements quickly and effectively with Adobe Acrobat. However, if Adobe Acrobat is too expensive to you, you can also use UPDF to measure distance, perimeter, and area, along with using all of UPDF's other PDF tools.
Click the button below to download UPDF and start your free trial today. If UPDF is what you are looking for, you can upgrade to pro version at a big discount by clicking the below picture.
Windows • macOS • iOS • Android 100% secure
 UPDF
UPDF
 UPDF for Windows
 UPDF for Mac
 UPDF for iPhone/iPad
 UPDF for Android
 UPDF AI Online
 UPDF Sign
 Edit PDF
 Annotate PDF
 Create PDF
 PDF Form
 Edit links
 Convert PDF
 OCR
OCR PDF to Word
 PDF to Image
 PDF to Excel
 Organize PDF
 Merge PDF
 Split PDF
 Crop PDF
 Rotate PDF
 Protect PDF
 Sign PDF
 Redact PDF
 Sanitize PDF
 Remove Security
 Read PDF
 UPDF Cloud
 Compress PDF
 Print PDF
 Batch Process
 About UPDF AI
 UPDF AI Solutions
 AI User Guide
 FAQ about UPDF AI
 Summarize PDF
 Translate PDF
 Chat with PDF
 Chat with AI
 Chat with image
 PDF to Mind Map
 Explain PDF
 Scholar Research
 Paper Search
 AI Proofreader
 AI Writer
 AI Homework Helper
 AI Quiz Generator
 AI Math Solver
 PDF to Word
 PDF to Excel
 PDF to PowerPoint
 User Guide
 UPDF Tricks
 FAQs
FAQs UPDF Reviews
 Download Center
 Blog
Blog Newsroom
 Tech Spec
 Updates
 UPDF vs. Adobe Acrobat
 UPDF vs. Foxit
 UPDF vs. PDF Expert





 Enrica Taylor
 Enola Miller

 Enola Davis
