The best way to document and present Revit models is by exporting them to PDF format. PDF files are compatible with almost all devices we use today and are easy to share anywhere. You can export Revit to PDF to share/present sheets like floorplans, sections, and elevations. So, if you are also looking for how to export Revit sheet to PDF, then you are reading the right article. In this guide, we will explore the two best ways to convert Revit to PDF, along with a practical PDF editor and reader, UPDF. Users can simply click the button below to access a free trial. Let's dive in the methods!
Windows • macOS • iOS • Android 100% secure
Method 1. Revit to PDF by Exporting
Before the Revit 2022 release, the software didn't have a built-in option to do Revit export PDF. The only option was to print as PDF using an external PDF driver such as Microsoft Print to PDF. However, Autodesk introduced the PDF export function with the release of Revit 2022.
If you want to export one or multiple views or sheets from Revit to PDF, then the export function is the best way to do so. Follow the below steps to export Revit sheet to PDF with the built-in PDF export function:
Step 1. Click the File tab from the top and then click Export > PDF Export.
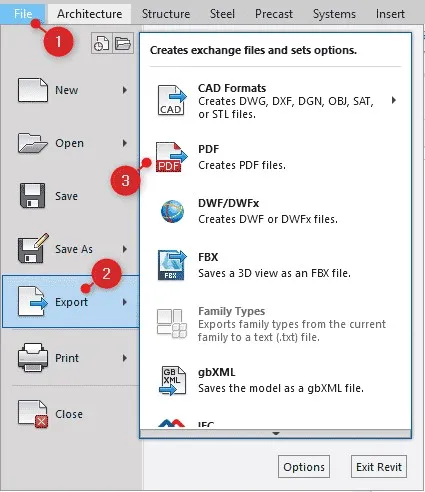
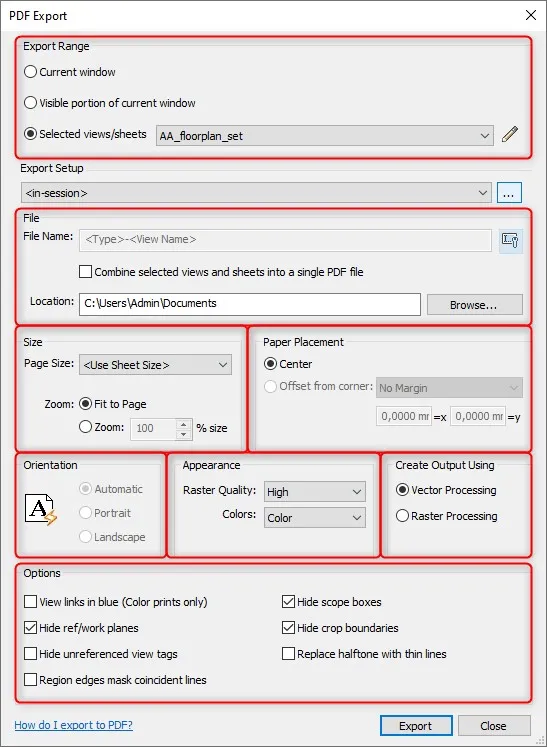
Step 2. Select the sheets/views to export. You can choose:
- Current Window: This option will only export the content of the current active view.
- Visible Portion of Current Window: This option will only export the visible portion of the current window.
- Selected Views/Sheets: This option allows you to select all the views and sheets you want to export.
Step 3. Set up the "Export Setup". You can click the drop-down to select a saved export setup or click the "3-dots" icon to save the active setup.
Step 4. Now, specify the file options for the PDF export. For that:
- Set the file name and naming rules by clicking the "settings" icon (when creating multiple PDF files).
- If you want to create a single PDF file for all views/sheets, tick the relevant checkbox beneath the file name section.
- Specify the location on your PC where you want to export Revit to PDF.
- Customize the size, paper placement, orientation, appearance, and other settings as per your preference.
Step 5. Lastly, click "Export" to complete the export of selected sheets/views from Revit to PDF.
This way, you can leverage Autodesk Revit export PDF function to convert Revit to PDF effortlessly.
Once you have the PDFs of Revit models, the next thing is to share them with others to collaborate and gather feedback. You can do all with UPDF.
UPDF is a powerful PDF document collaboration tool. It allows you to share the PDFs with others via email or links. Once shared, others can annotate, comment, and provide their feedback in real time. This way, you can have a fast and enhanced collaborative experience and make better decisions. Therefore, download UPDF and use it to access, share, and collaborate on exported PDFs.
Windows • macOS • iOS • Android 100% secure
Sheet Is Not Exported to PDF, What to Do?
Despite following all the above steps, sometimes the sheet is not exported to PDF. The common reason behind this issue is that the sheet is corrupted. However, you can easily fix it by following the below steps:
- Create a new sheet in Revit.
- From the original sheet, remove views.
- Place the views on the new sheet.
- Export the sheet to PDF.
This way, you can create a replica of the faulty sheet and eradicate the issue of the sheet not exporting to PDF.
Method 2. Revit to PDF by Printing
The second method to convert Revit to PDF is by using the Print function. In fact, this was the only way to export the Revit sheet to PDF before 2022. This function is a bit similar to the above export function. However, you will use the default print PDF drive from Microsoft.
Follow the below steps to perform Revit print to PDF:
Step 1. Click the File tab from the top and then click Print > Print.
Step 2. In the print window, you will see options similar to those you saw in the export function. So, here is how to customize the settings:
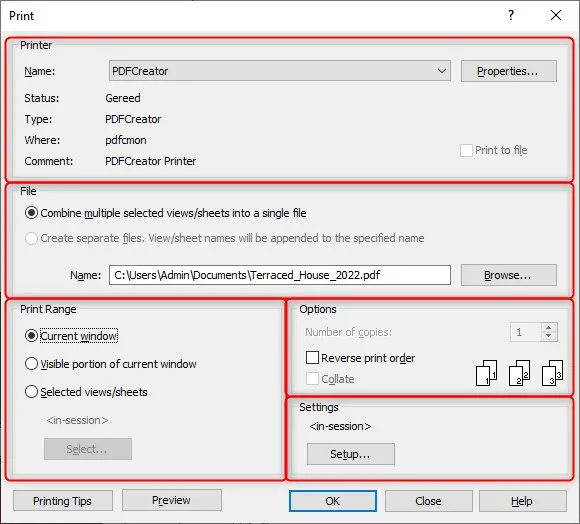
- Under the "File" section, specify whether you want to create a single PDF file of all sheets or separate files for each sheet. Also, specify the location where to save the file(s).
- Under the "Print Range" section, specify if you want to get the print of the whole current window, the current window's visible portion, or selected sheets/views.
- Under the "Options" section, you can reverse the print order and collate in case of multiple copies.
- Under the "Settings" section, click "Setup". It will open a new window from where you can set other print-related settings like paper size, orientation, placement, and much more.
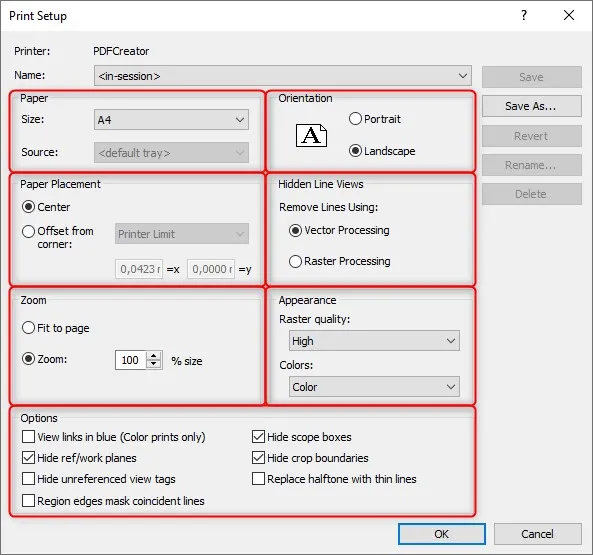
Once you have customized all the settings, click the "OK" button to export Revit to PDF.
Why Is Revit Not Printing to PDF?
Sometimes, when you execute the print function, you may see the print progress bar, but it does not create a PDF even after waiting for minutes. The common reason behind this issue is a corrupted Windows user profile.
To tackle this issue, you must verify that the Windows user profile is the reason behind the issue. For that, log into Windows through another Windows profile and follow the above steps to perform Revit print to PDF. If you are successful, then set up a new Windows profile to eradicate the issue in the future.
Part 3. Bonus: The Best Tool for CAD Collaboration: Effective Reviews and Annotations After Revit to PDF Conversion
One of the main purposes behind Revit export PDF is to share and collaborate on CAD. Therefore, it is important to use the best tool that offers the best CAD collaboration experience. This is exactly what you can get with UPDF.
As mentioned earlier, UPDF is a dedicated PDF collaboration tool that incorporates all the features for effective reviewing and annotations. With UPDF, you can share the CAD PDF-based file with everyone instantly and then let them share their opinions directly on the file using its annotation functions.
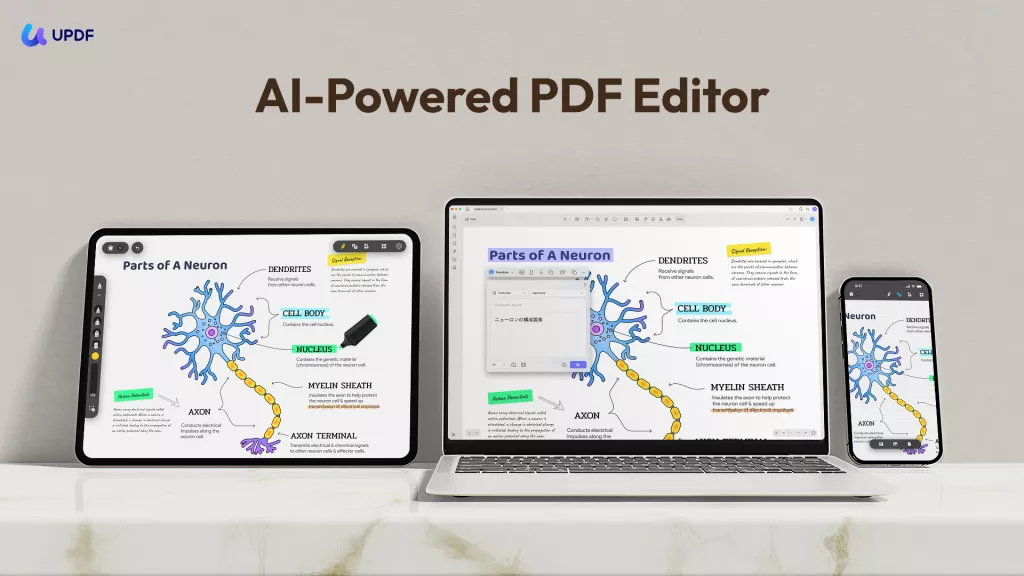
Additionally, UPDF recently released the measuring feature, which enables you to make accurate edits to your CAD designs.
How UPDF can facilitate the best CAD collaboration after Revit print to PDF is evident from its below key features:
- It allows you to share the CAD PDF file as a shareable link or email.
- It offers extensive annotation options with which reviewers can highlight, draw, mark, strikethrough, and add comments, sticky notes, and much more.
- It displays all the reviews and annotations of all participants in real time to have a collaborative review process.
- It offers different viewing options (page layouts, scrolling options, and light/dark modes) for enhanced CAD viewing experience.
In short, UPDF is an all-in-one tool for effective CAD collaboration without relying on multiple tools. Therefore, elevate your CAD collaboration experience with UPDF today by clicking the download button below.
Windows • macOS • iOS • Android 100% secure
Part 4. FAQs About Revit to PDF
Q1. Why does Revit take so long to export PDF?
When the geometry for non-rectangular crop regions is passed to the printer, it can make the print processor produce a significantly large data volume. Once this happens, it can make the Revit take too long to export PDF.
Q2. Can you link PDF to Revit?
Yes, you can link PDF to Revit. The Revit 2021 came with a built-in "Link" feature to allow users to link PDFs and images to their Revit projects. To link PDF to Revit, click the "Insert" tab from the Revit toolbar and then tap "Link PDF". Afterward, specify the PDF to link.
Q3. How do I export a layered PDF from Revit?
To export a layered PDF from Revit, you have to use AutoCAD as an intermediary tool. Here's how to export a Revit sheet to PDF with layers:
- Export the Revit sheet/view to DWG file format.
- Open the DWG file with AutoCAD.
- Click Ctrl + P and select "DWG To PDF.pc3" printer.
- Click "PDF Options" and make sure the "Include layer information" checkbox is ticked.
- Customize the other options as you like, such as plot style, scale, sheet size, etc.
- Click "Preview" to preview the output and then tap "Print".
Conclusion
Revit to PDF is a common request made by users when they have to document and present models. Therefore, you can easily export Revit sheet to PDF using the above two methods, i.e., export and print functions. Once done, you can optimize the collaboration and review process by using UPDF. UPDF's click-based sharing, extensive annotation options, and real-time collaboration can enhance your CAD collaboration experience significantly. Therefore, perform Revit export/print to PDF and then leverage UPDF for the best collaborative experience.
Windows • macOS • iOS • Android 100% secure
 UPDF
UPDF
 UPDF for Windows
 UPDF for Mac
 UPDF for iPhone/iPad
 UPDF for Android
 UPDF AI Online
 UPDF Sign
 Edit PDF
 Annotate PDF
 Create PDF
 PDF Form
 Edit links
 Convert PDF
 OCR
OCR PDF to Word
 PDF to Image
 PDF to Excel
 Organize PDF
 Merge PDF
 Split PDF
 Crop PDF
 Rotate PDF
 Protect PDF
 Sign PDF
 Redact PDF
 Sanitize PDF
 Remove Security
 Read PDF
 UPDF Cloud
 Compress PDF
 Print PDF
 Batch Process
 About UPDF AI
 UPDF AI Solutions
 AI User Guide
 FAQ about UPDF AI
 Summarize PDF
 Translate PDF
 Chat with PDF
 Chat with AI
 Chat with image
 PDF to Mind Map
 Explain PDF
 Scholar Research
 Paper Search
 AI Proofreader
 AI Writer
 AI Homework Helper
 AI Quiz Generator
 AI Math Solver
 PDF to Word
 PDF to Excel
 PDF to PowerPoint
 User Guide
 UPDF Tricks
 FAQs
FAQs UPDF Reviews
 Download Center
 Blog
Blog Newsroom
 Tech Spec
 Updates
 UPDF vs. Adobe Acrobat
 UPDF vs. Foxit
 UPDF vs. PDF Expert







 Enola Davis
 Enid Brown

 Delia Meyer
 Enola Miller