 UPDF
UPDF
 UPDF for Windows
 UPDF for Mac
 UPDF for iPhone/iPad
 UPDF for Android
 Nomostar
 UPDF AI Online
 UPDF Sign
 IvyCraft
 Edit PDF
 Annotate PDF
 Create PDF
 PDF Form
 Edit links
 Convert PDF
 OCR
OCR PDF to Word
 PDF to Image
 PDF to Excel
 Organize PDF
 Merge PDF
 Split PDF
 Crop PDF
 Rotate PDF
 Protect PDF
 Sign PDF
 Redact PDF
 Sanitize PDF
 Remove Security
 Read PDF
 UPDF Cloud
 Compress PDF
 Print PDF
 Batch Process
 About UPDF AI
 UPDF AI Solutions
 AI User Guide
 FAQ about UPDF AI
 Summarize PDF
 Translate PDF
 Chat with PDF
 Chat with AI
 Chat with image
 PDF to Mind Map
 Explain PDF
 PDF AI Tools
 Image AI Tools
 AI Chat Tools
 AI Writing Tools
 AI Study Tools
 AI Working Tools
 Other AI Tools
 AI Bookmark Generation
 AI Bookmark Summary
 AI Watermark Generation
 AI Background Generation
 AI Sticker Generation
 AI Stamp Generation
 AI Editing Suite
 UPDF Copilot
 AI Page Management
 AI Semantic Search
 PDF to Word
 PDF to Excel
 PDF to PowerPoint
 Enterprise Solution
 Enterprise Sign
 Enterprise AI
 Enterprise Plan
 Enterprise User Guide
 Enterprise Webinar
 IT
IT Education
 Construction
 Financial Service
 Healthcare
 Insurance
 Legal
Legal Manufacturing
 Government
 Researchers & PhDs
 Solopreneurs & Freelancers
 Lawyers & Legal Professionals
 Real Estate Agents & Brokers
 Education Solution
 Customer Stories
 User Guide
 UPDF Tricks
 FAQs
FAQs UPDF Reviews
 Download Center
 Blog
Blog Newsroom
 Tech Spec
 Updates
 UPDF vs. Adobe Acrobat
 UPDF vs. Foxit
 UPDF vs. PDF Expert

Apple Wallet only accepts .pkpass files. A standard PDF won't go in directly — no matter how clear the barcode looks. Here are the three methods that actually work on a current iPhone:
Method 1 (fastest): Use Pass2U Wallet — free, reads the barcode from your PDF, creates a pass in under a minute.
Method 2 (privacy-first): Use NeatPass — on-device AI, no cloud upload, converts PDF to Wallet pass in 20 seconds.
Method 3 (desktop): Use WalletPass Chrome extension — drag, convert, scan QR code with your iPhone.
If you're working with a physical paper ticket, Part 2 also covers how to scan and archive the full ticket in UPDF before you process the barcode — so you end up with both a functional wallet pass and a complete visual record of the original ticket.
Windows • macOS • iOS • Android 100% secure
Part 1. 3 Methods to to Add a PDF to Apple Wallet
You can't add a PDF to Apple Wallet directly since the app supports only .pkpass files. Pass2U Wallet, NeatPass and WalletPass, are available free on the App Store, solves this by reading the barcode from your PDF and creating a compatible wallet pass.
| Method | Best For | Privacy | Platform | Time |
|---|---|---|---|---|
| Pass2U Wallet | Most users, free | Data not sent to server (per developer) | iOS | 1–2 min |
| NeatPass | Privacy-conscious users | On-device ML, no cloud | iOS | 20 sec |
| WalletPass | Users processing PDFs on desktop | Desktop extension | Chrome + iPhone | 30 sec |
Warning
⚠️All three methods require the PDF to contain a supported barcode type (QR code, Aztec, PDF417, Code 128). PDFs with Code 39 or other unsupported barcodes cannot be converted to Wallet passes.
Let’s see how you can do it in easy steps.
Method 1: Adding PDF to Apple Wallet with Pass2U
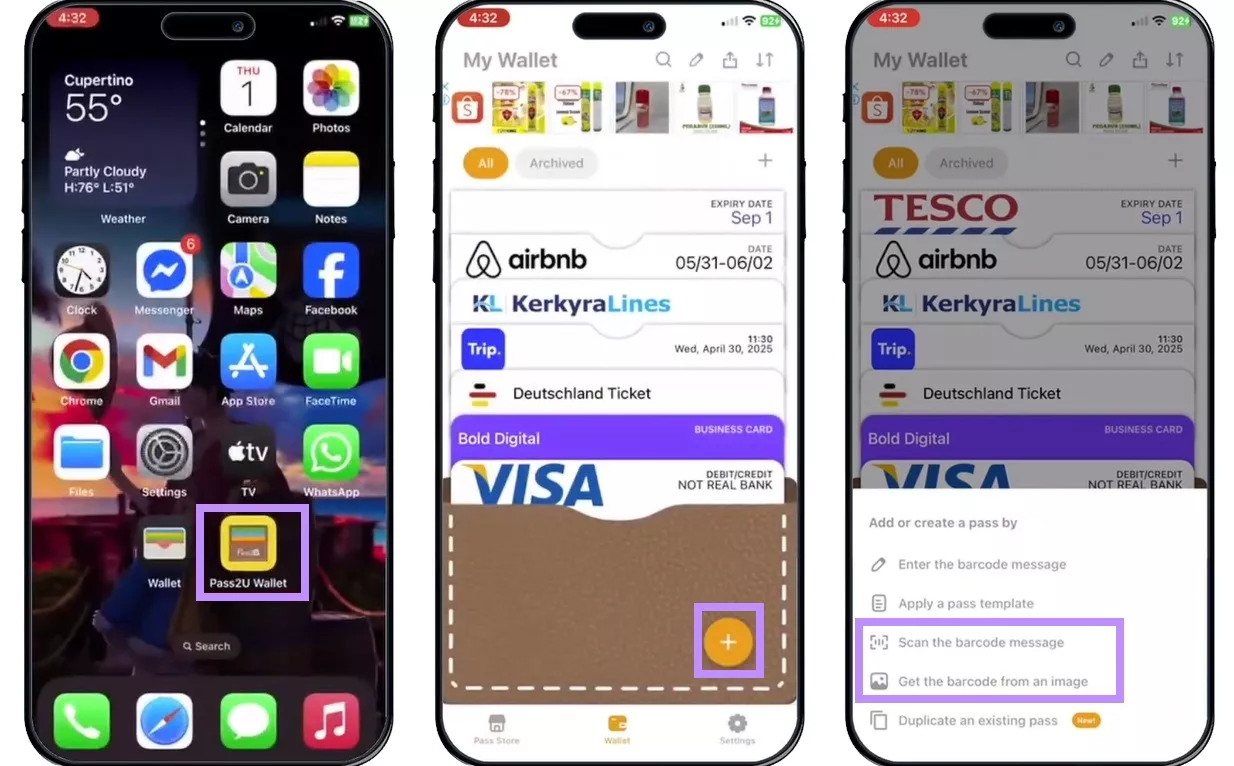
Step 1: Download and install the Pass2U app from the App Store. Open the Pass2U app and click the “+” sign. Click on “Scan the barcode message” or “Get the barcode from the image” option.
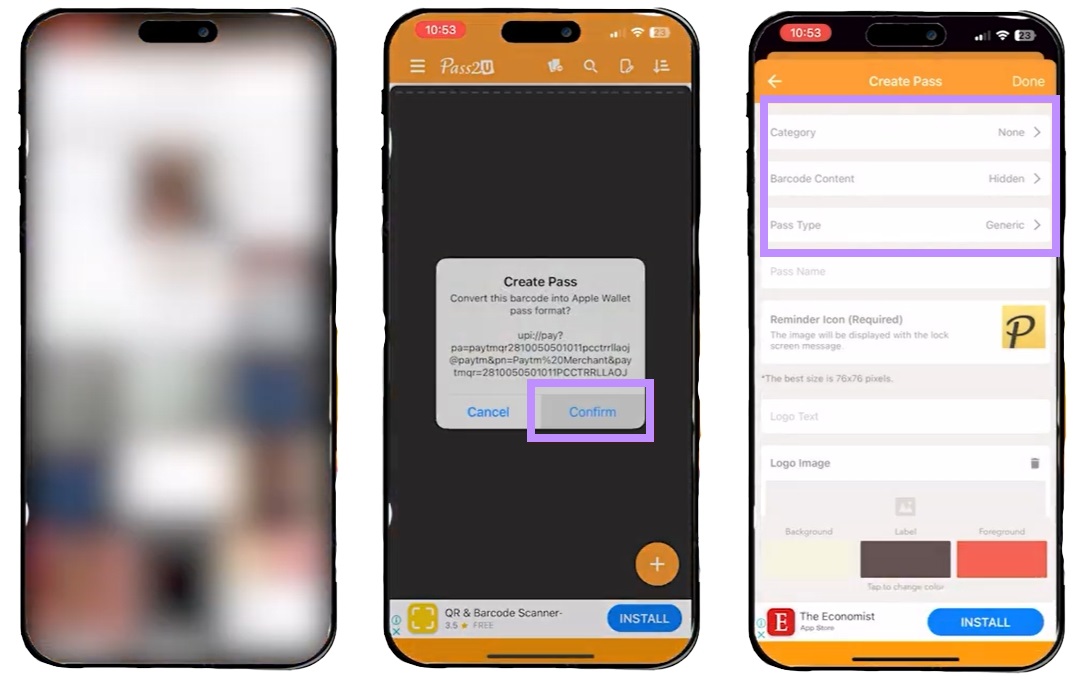
Step 2: Select the PDF you want to add to the Apple Wallet and choose the image with the pass. You'll see a prompt to convert this pass to Apple Wallet format. Click "Confirm."
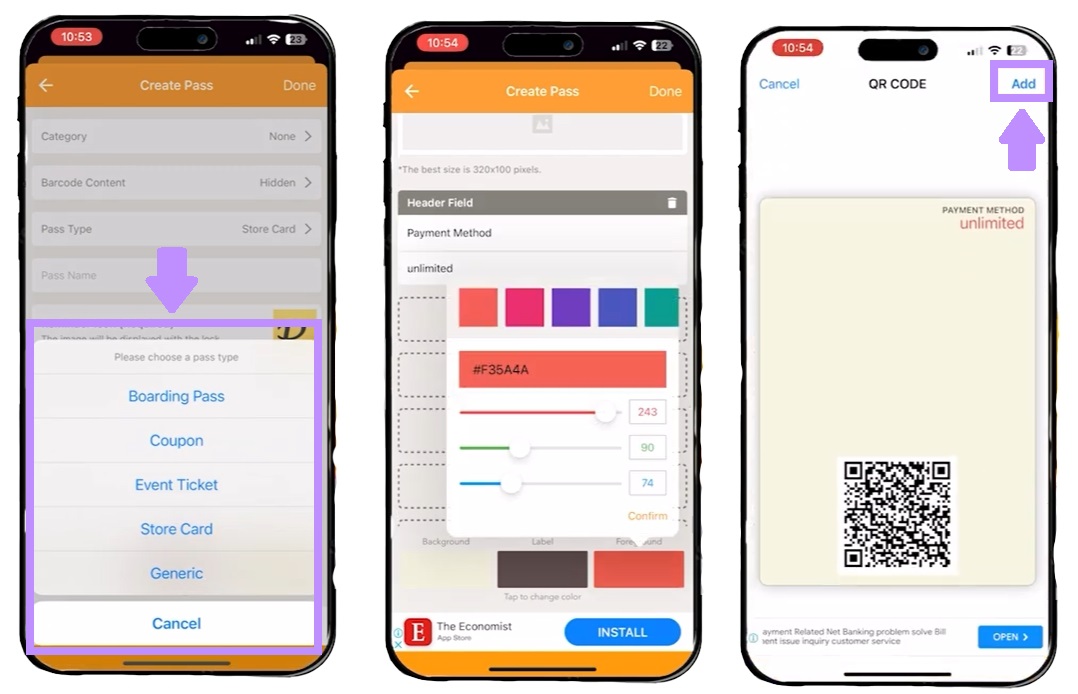
Step 3: Choose the details like Category, Barcode content, pass type, etc. Click on “Done” to set the details. Then review your pass and click “Add” to add it to Apple Wallet.
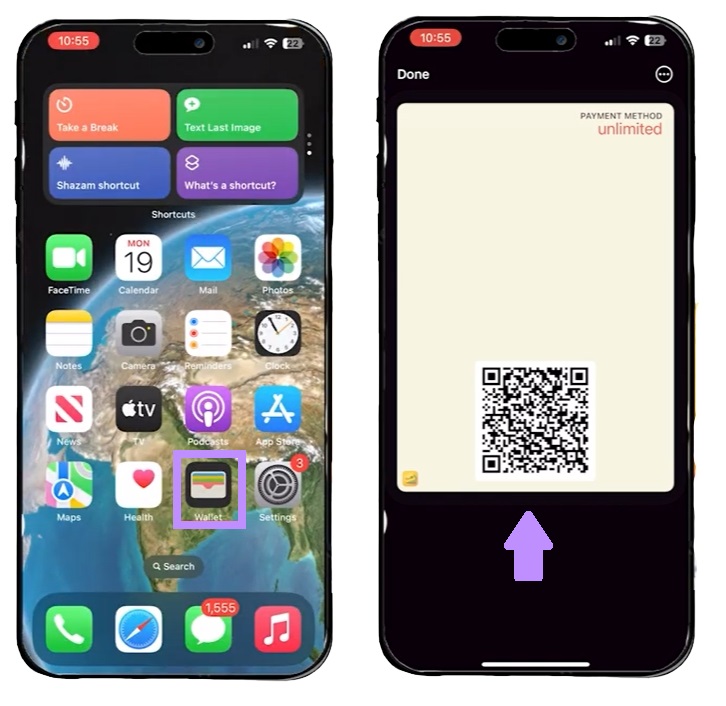
Step 4: Open the Apple Wallet and check your newly added pass.
Method 2: Adding PDF to Apple Wallet in NeatPass (Privacy-First, On-Device)
NeatPass converts PDF tickets to Apple Wallet passes entirely on your iPhone — no cloud upload, no server processing. The app uses on-device machine learning to extract ticket data.
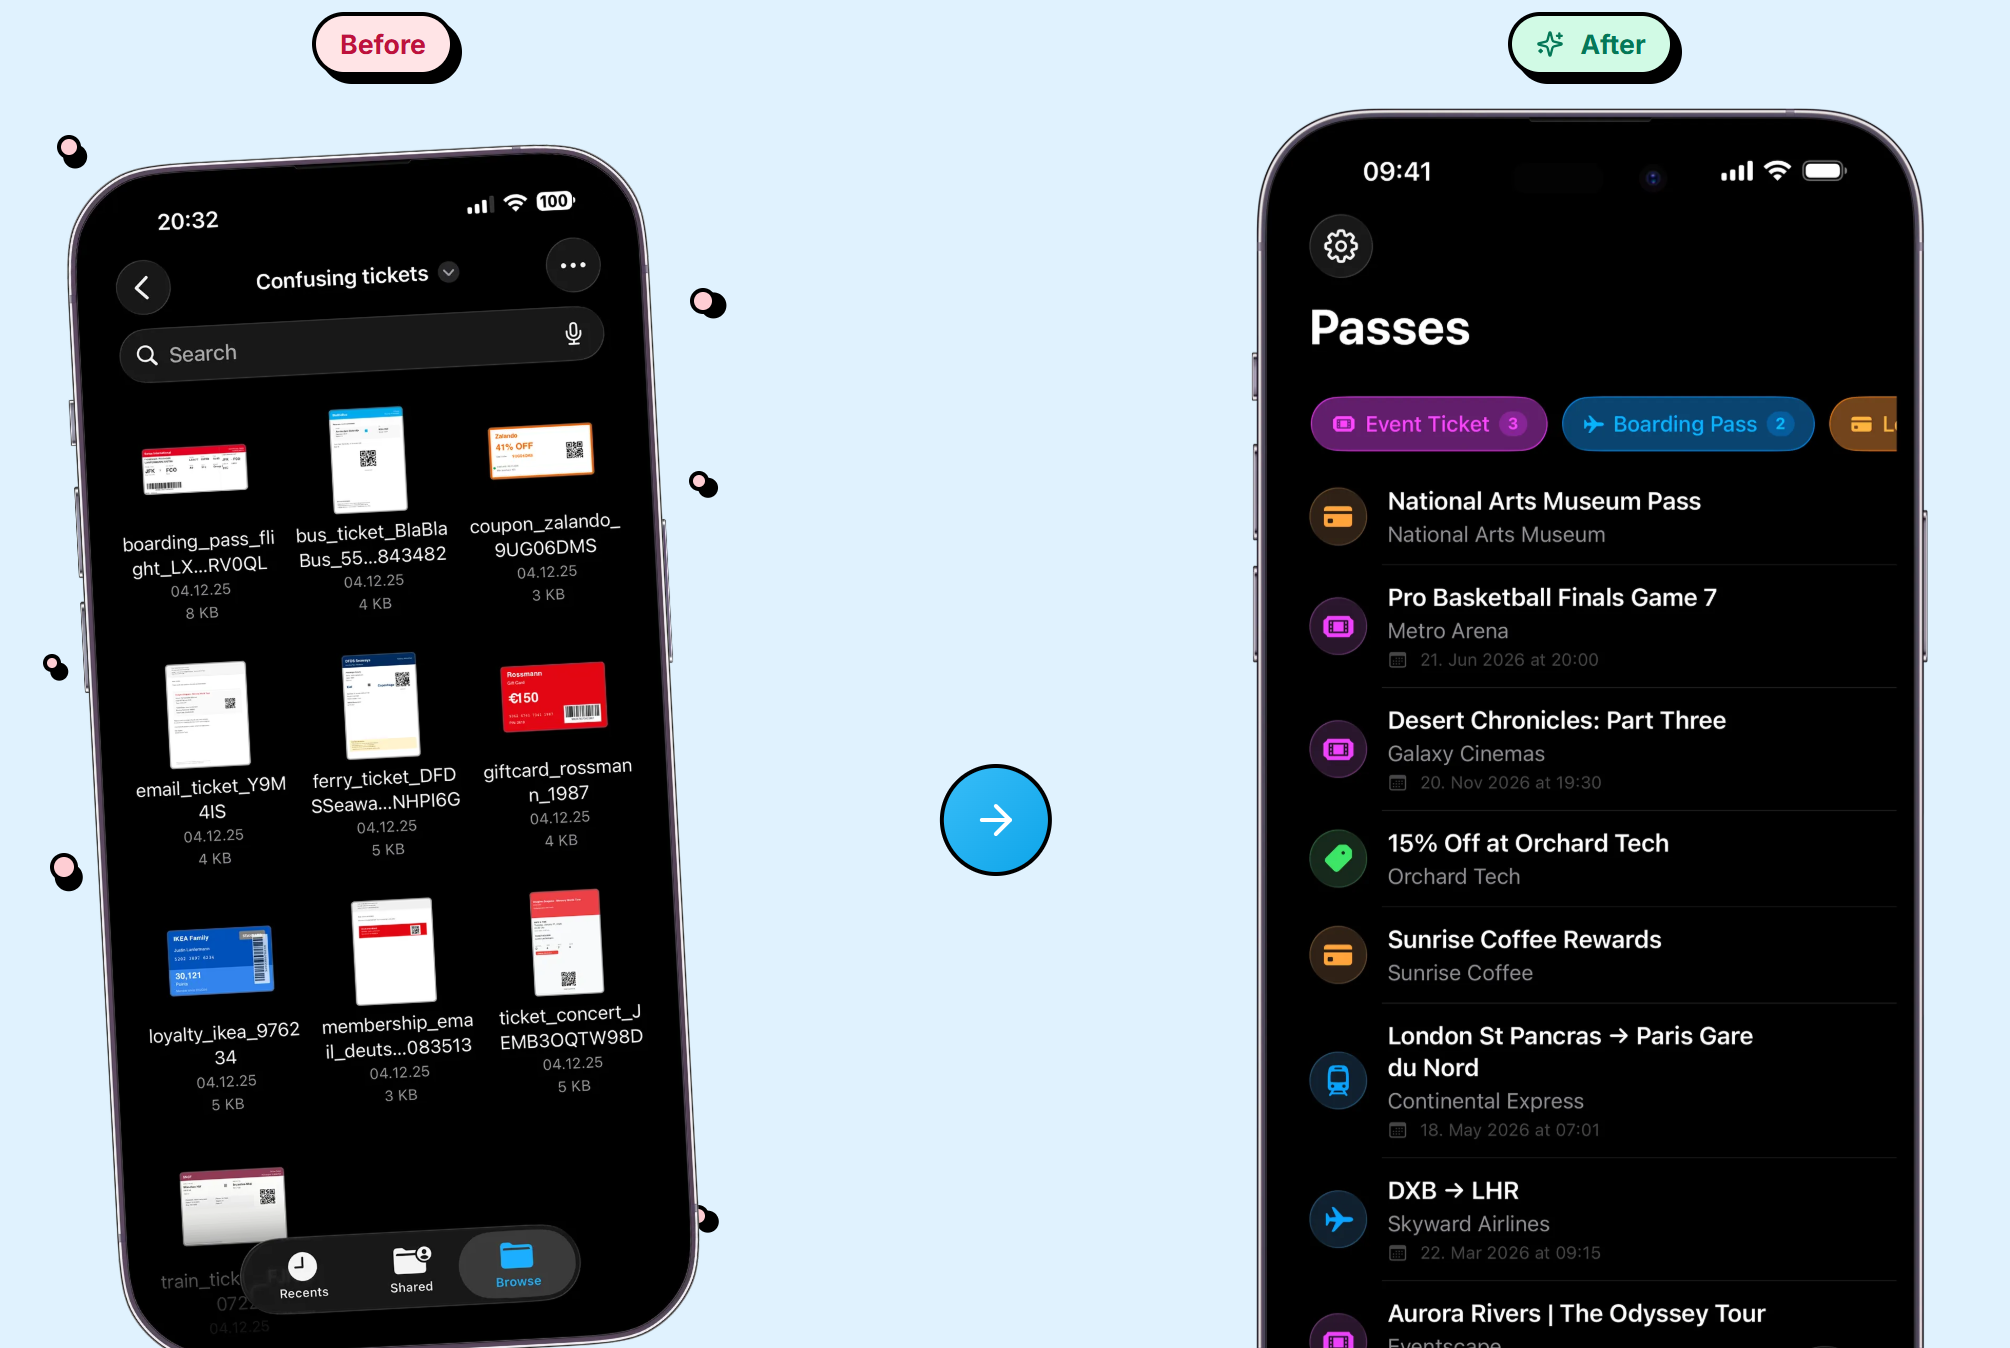
Step 1. Download NeatPass from the App Store.
Step 2. Open the app and tap the + button.
Step 3. Select your PDF from Files, email, or share it via the share sheet.
Step 4. NeatPass automatically extracts the ticket information.
Step 5. Tap Add to Wallet — the pass appears in your Apple Wallet.
This method is best for users handling sensitive documents (boarding passes with personal details, event tickets with account numbers) who don't want to upload to a third-party server.
Method 3: Adding PDF to Apple Wallet via WalletPass (Desktop Chrome Extension)
If your PDF is on your computer, WalletPass lets you convert it without transferring the file to your phone first.
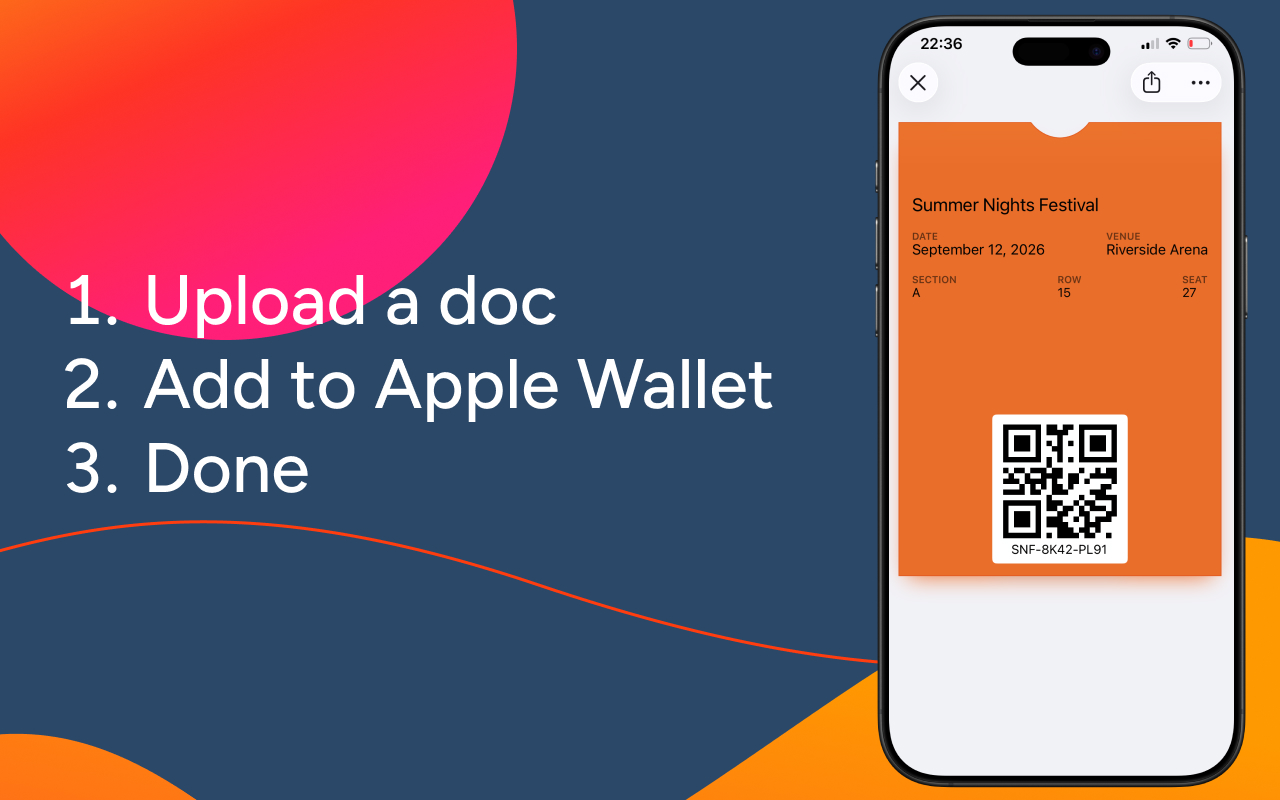
Step 1. Install the WalletPass Chrome extension.
Step 2. Drag and drop your PDF into the extension.
Step 3. Click Convert — a QR code appears.
Step 4. Scan the QR code with your iPhone camera.
Step 5. The pass opens in Apple Wallet — tap Add.
This method is best for users who receive PDF tickets via email on their computer and want to avoid the email-yourself-to-your-phone routine.
Part 2. Before You Convert — Check the PDF First
Most PDF tickets work fine with the methods above. But some PDFs have problems that make conversion fail:
- Blurry or distorted barcode — Pass2U and NeatPass need a clear, complete barcode
- Wrong page — A 12-page itinerary where only page 4 has the barcode
- Scanned physical ticket — The barcode is part of an image, not a vector
UPDF handles all three. Open the PDF, check the barcode quality, extract just the page you need, and export it as a clean image before running it through Pass2U or NeatPass.
Download UPDF for free — no subscription required to get started.
Windows • macOS • iOS • Android 100% secure
1. For Digital PDF Tickets
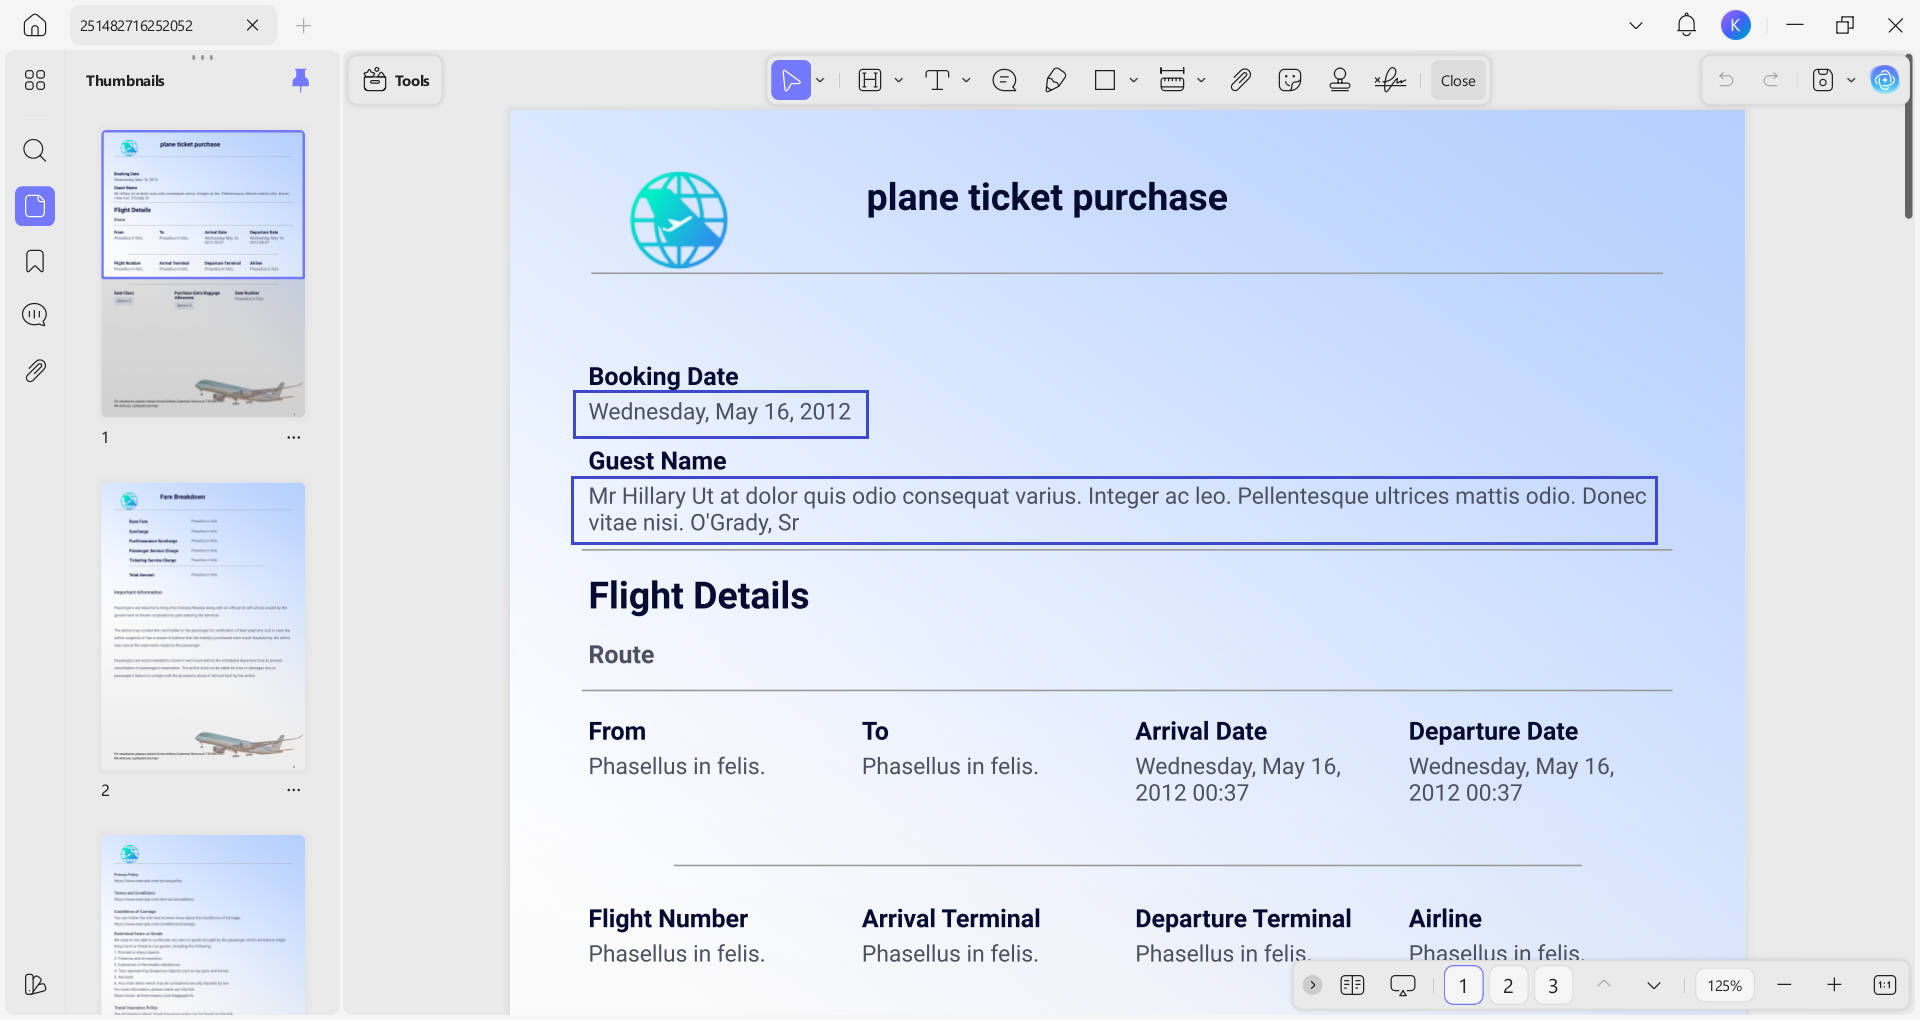
Before running Pass2U, open your PDF ticket in UPDF to confirm the details — flight number, event date, seat number — and check that the barcode area is clearly visible. UPDF runs on Windows, Mac, iOS, and Android, so you can open the ticket on whichever device is at hand.
1.1 Steps to View PDF Tickets On PC:
Step 1: Open UPDF on your computer and click “Open Files.”
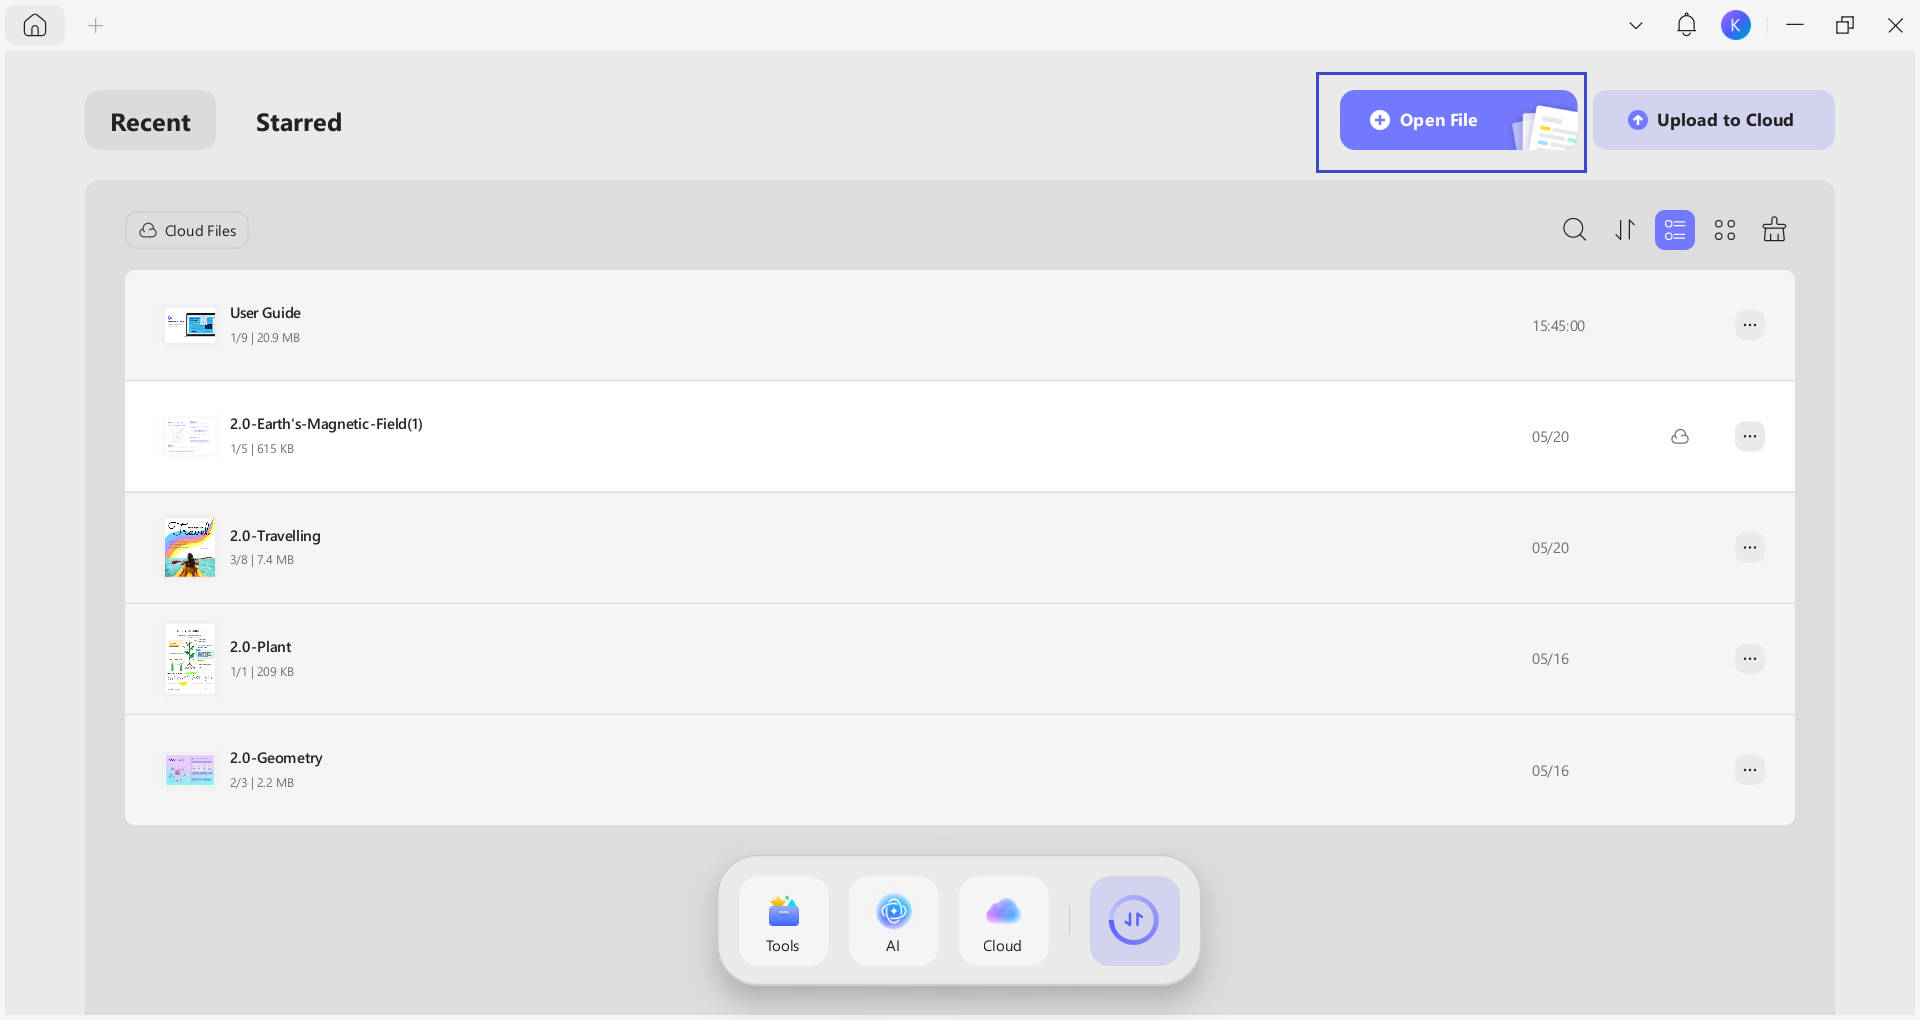
Step 2. Select your PDF ticket file to import it.
Step 3. Review the ticket, e.g. check dates, names, seat numbers, and confirm the barcode is undistorted and fully visible before proceeding to Pass2U.
1.2 Steps to View PDF Tickets On Mobile:
Step 1: Install UPDF from the App Store/Play Store and open it.
Step 2: Click the “+” icon and import the PDF ticket to UPDF from your local files, Photo gallary, computer, or Cloud Drive.
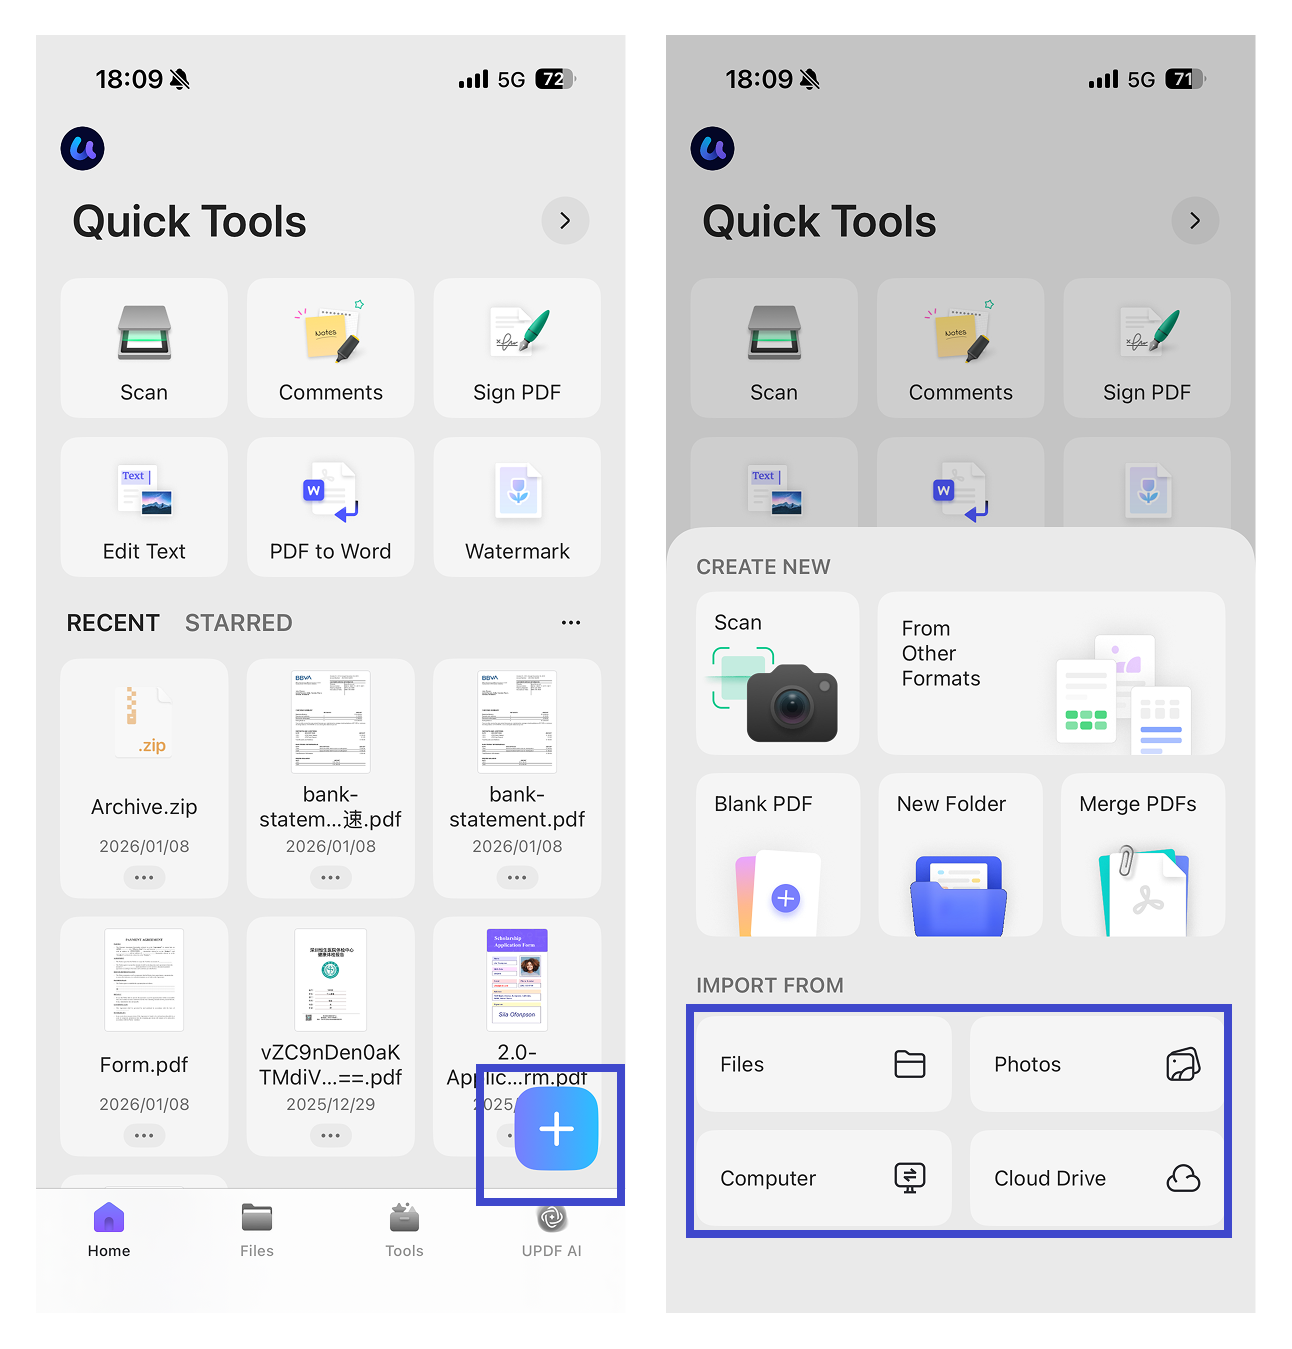
Step 3: Pinch to zoom in on the barcode area and confirm it's sharp and complete — Pass2U needs a clear barcode to generate your wallet pass correctly.
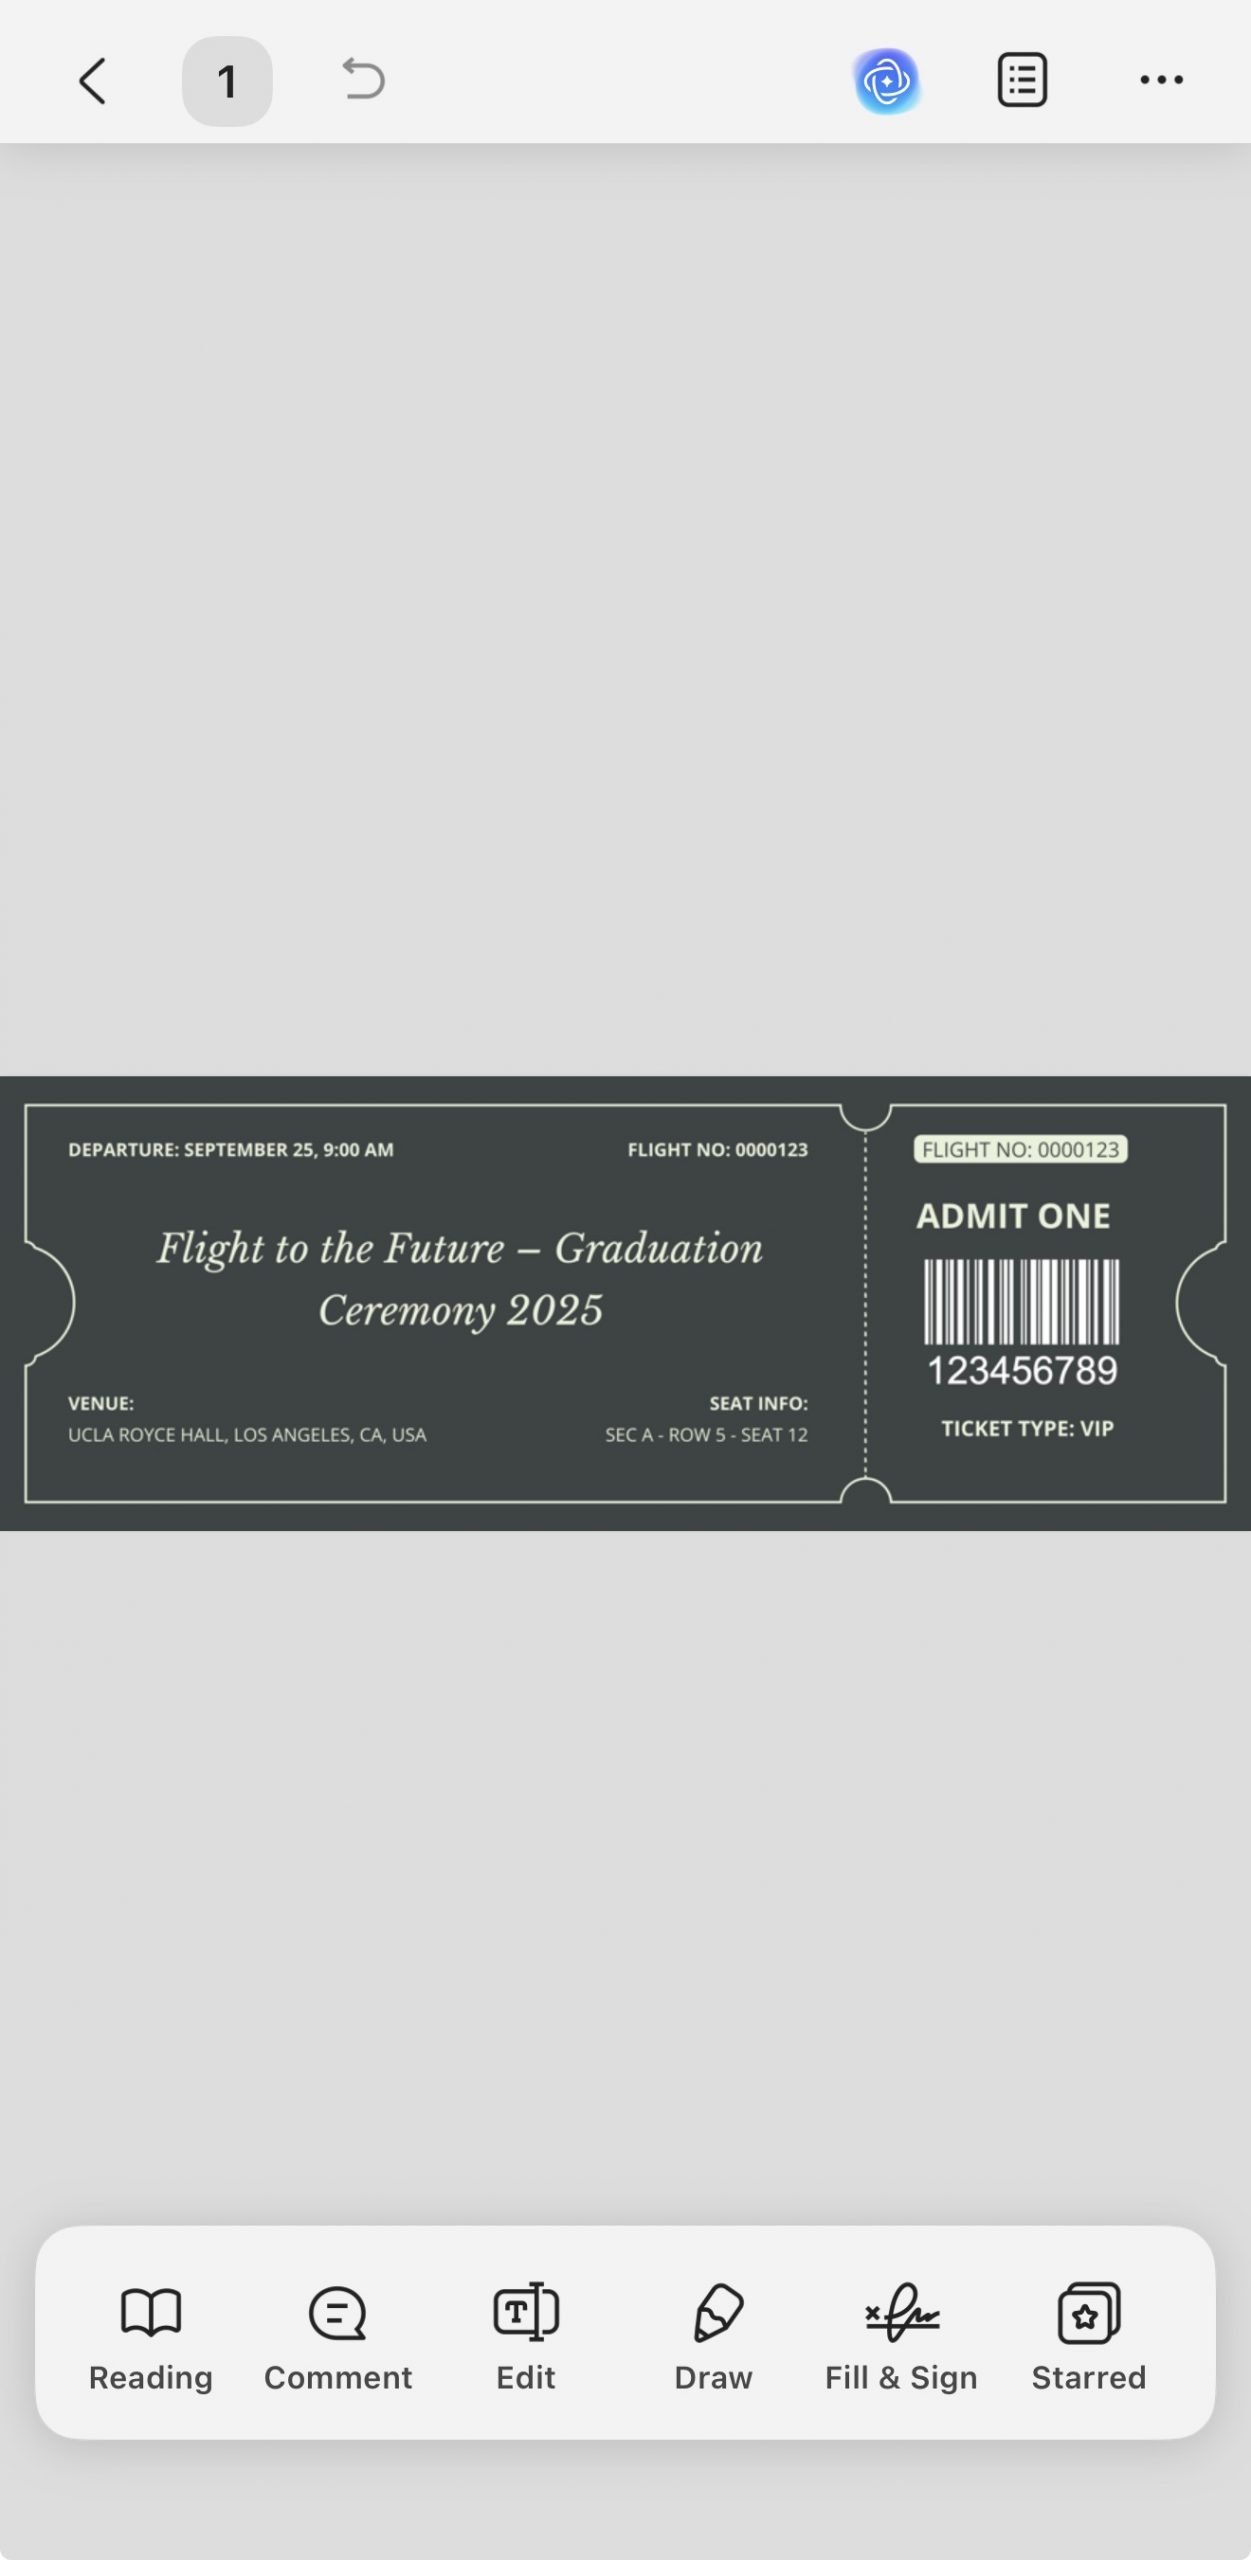
2. For Physical Paper Tickets
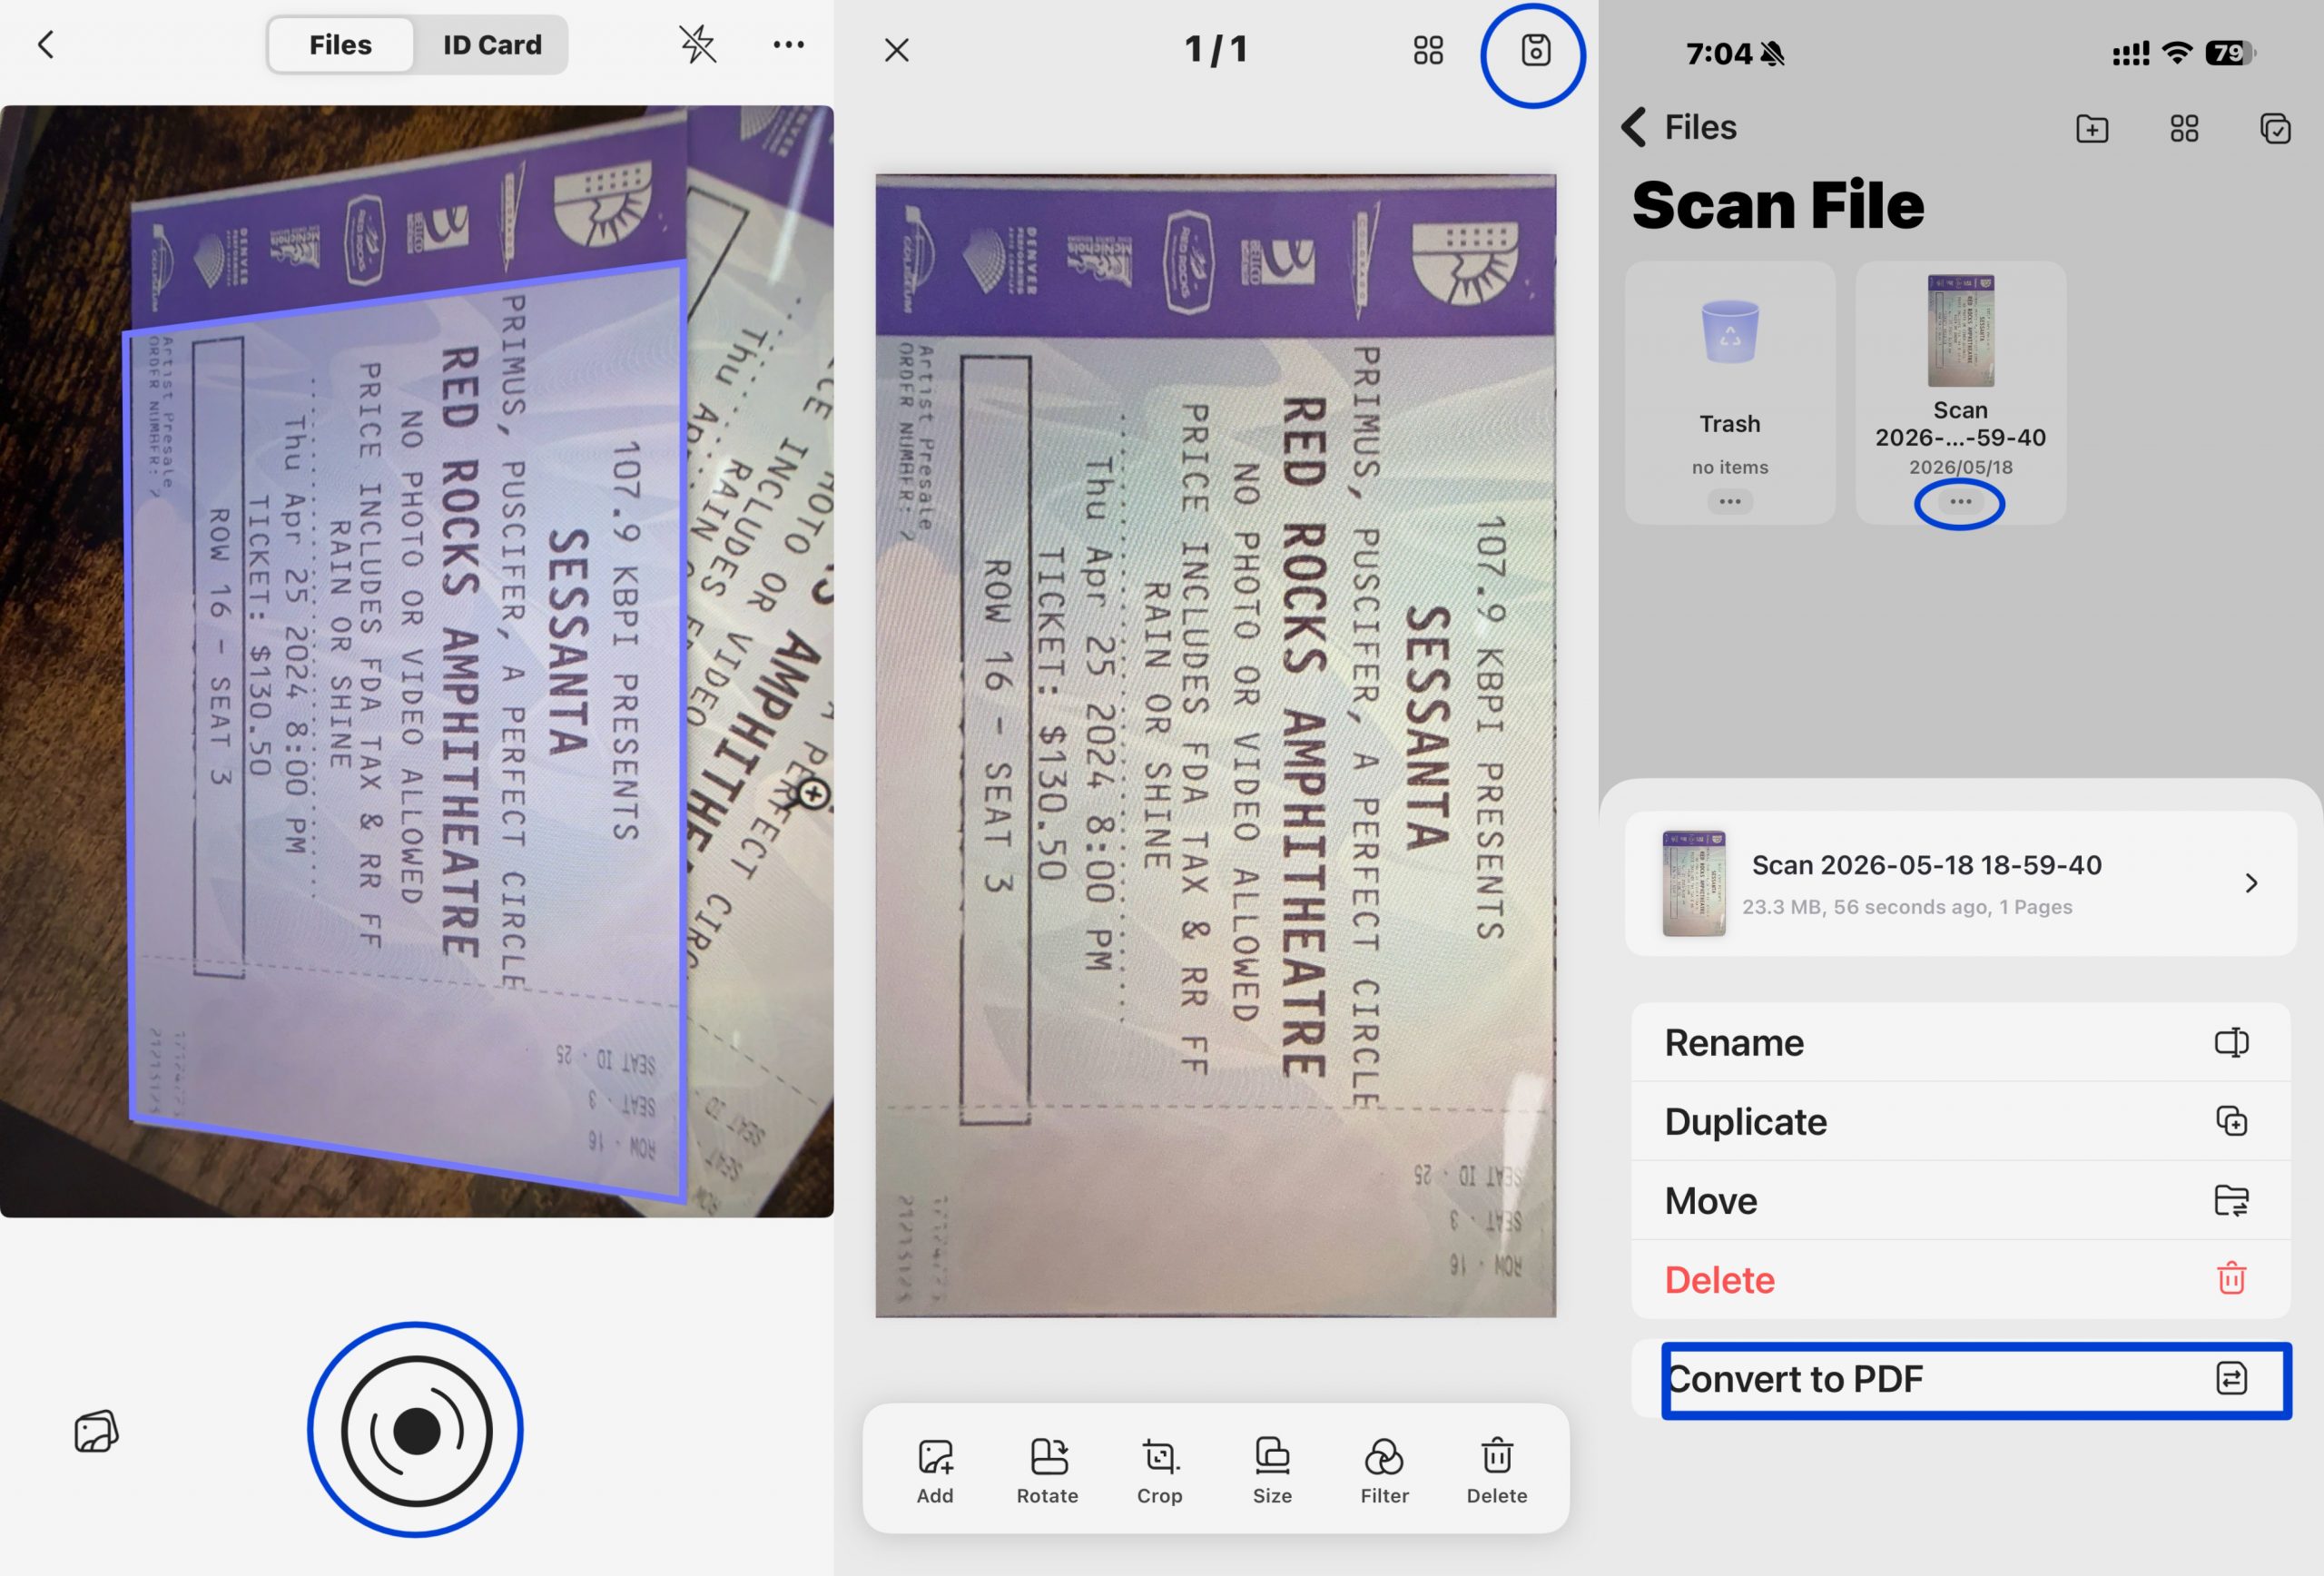
Pass2U scans only the barcode from a physical ticket — enough to create the wallet pass, but the ticket's full design, artwork, and layout are not preserved. For tickets with sentimental or archival value — festival passes, concert stubs, sports event tickets — scan the complete ticket with UPDF first to keep a permanent visual record.
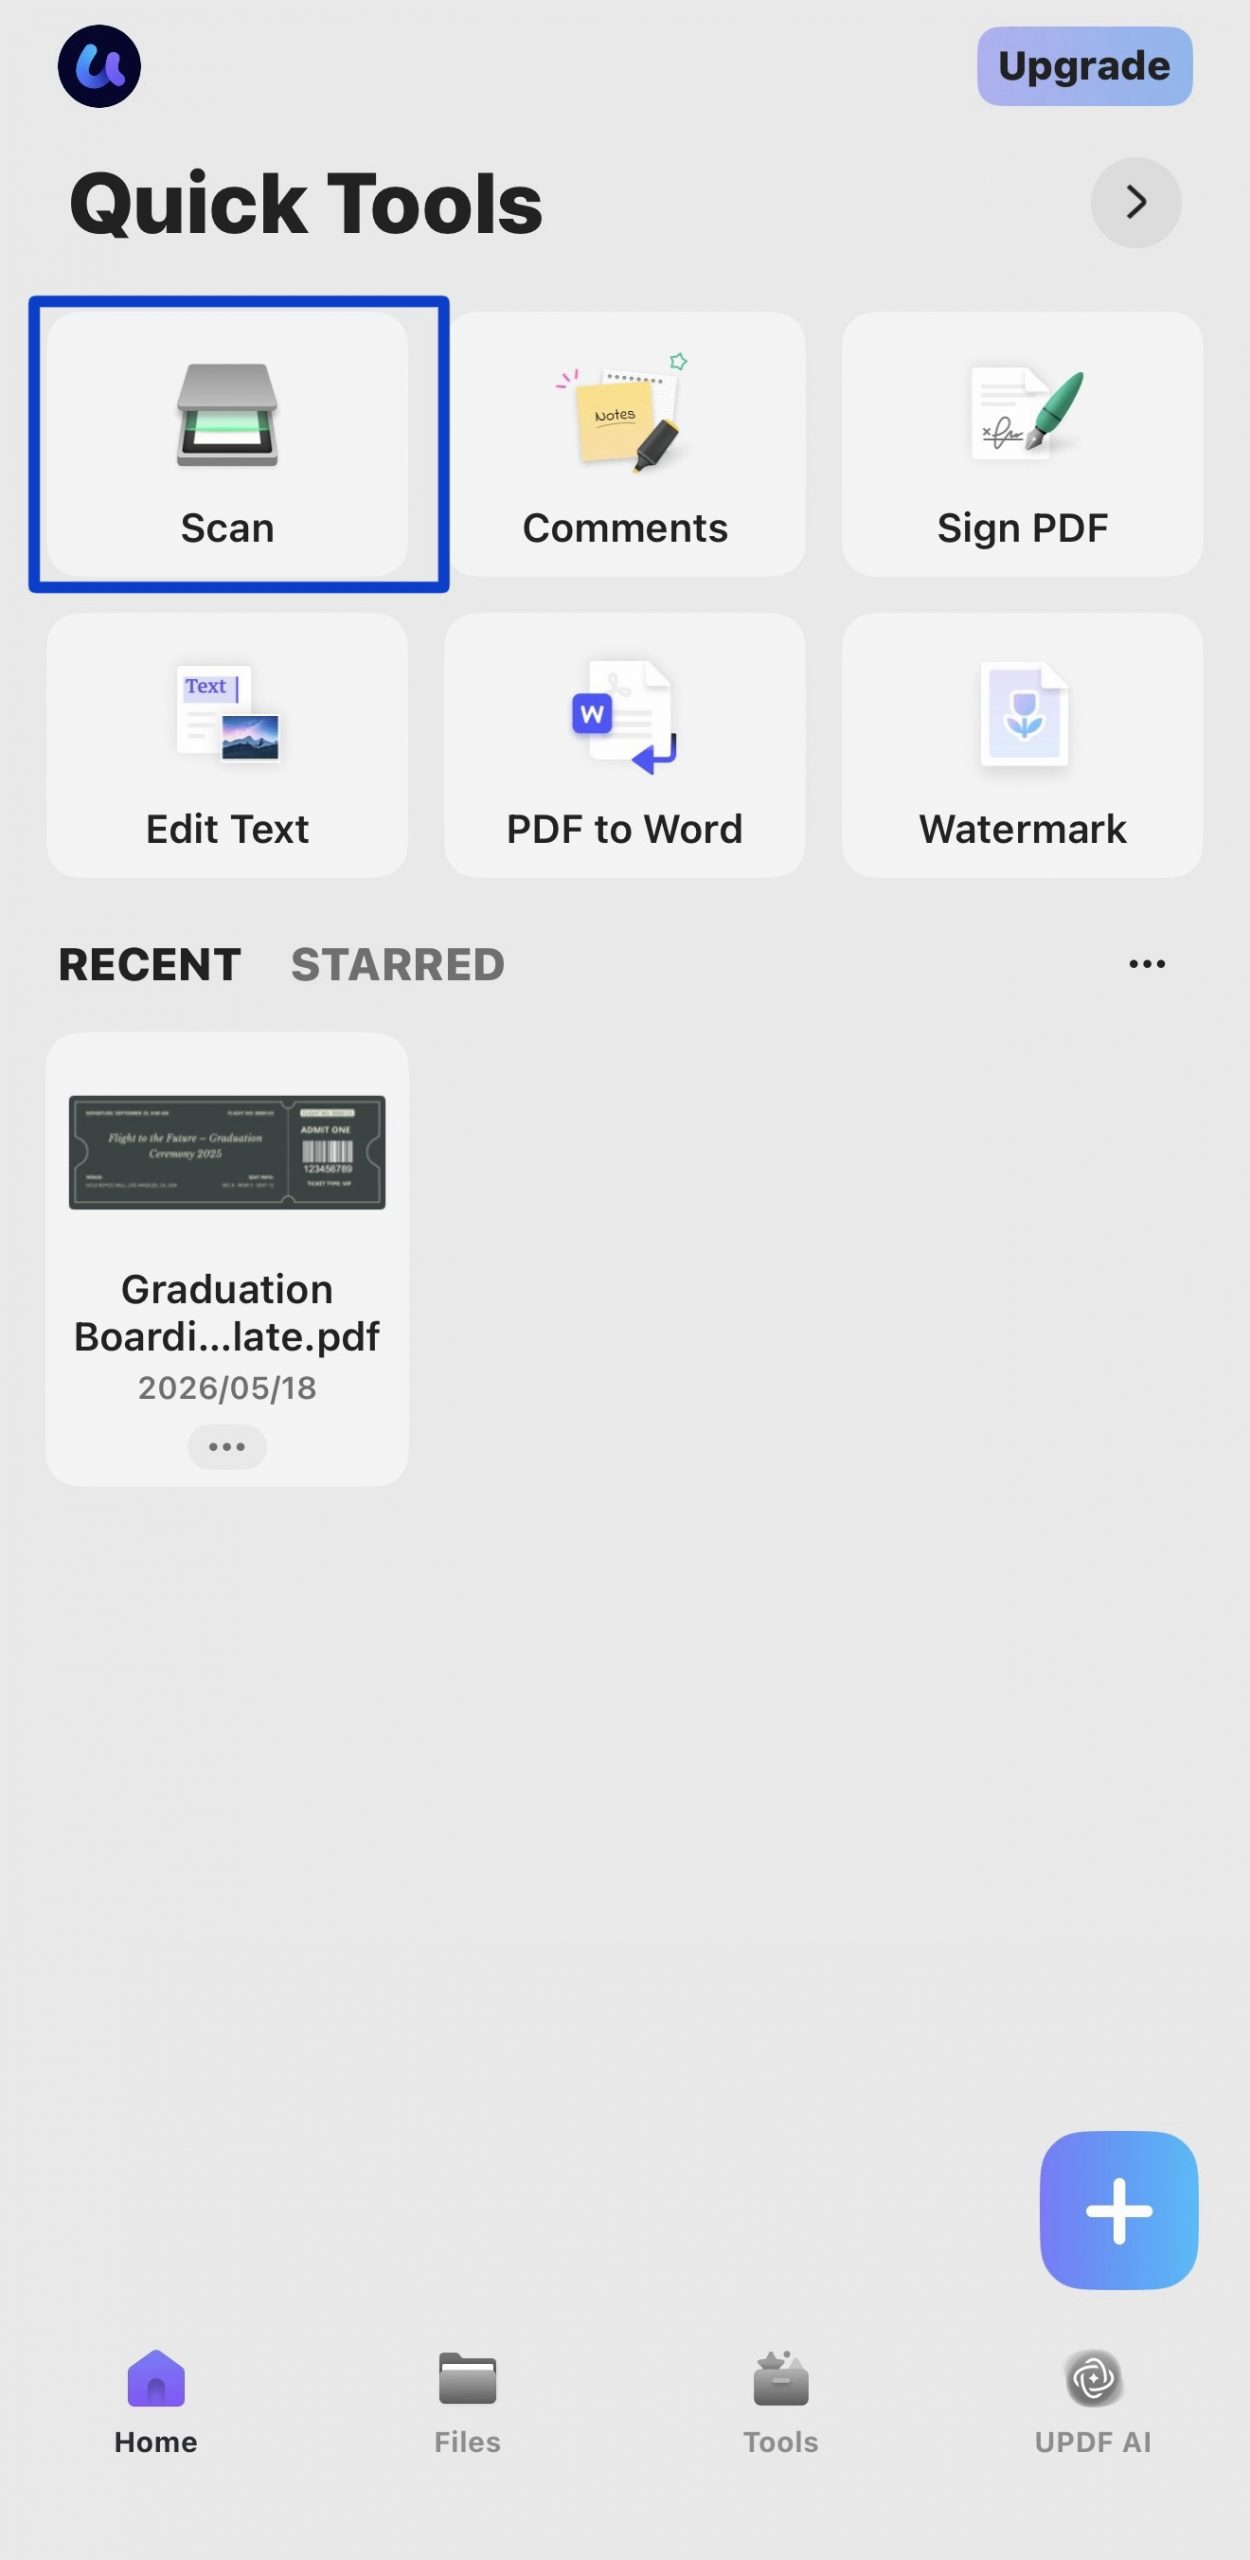
Step 1. Open UPDF on your mobile device and tap the scan icon on the home screen.
Step 2. Position the physical ticket flat and capture it. Then, save the scan as a PDF with the full ticket design intact.
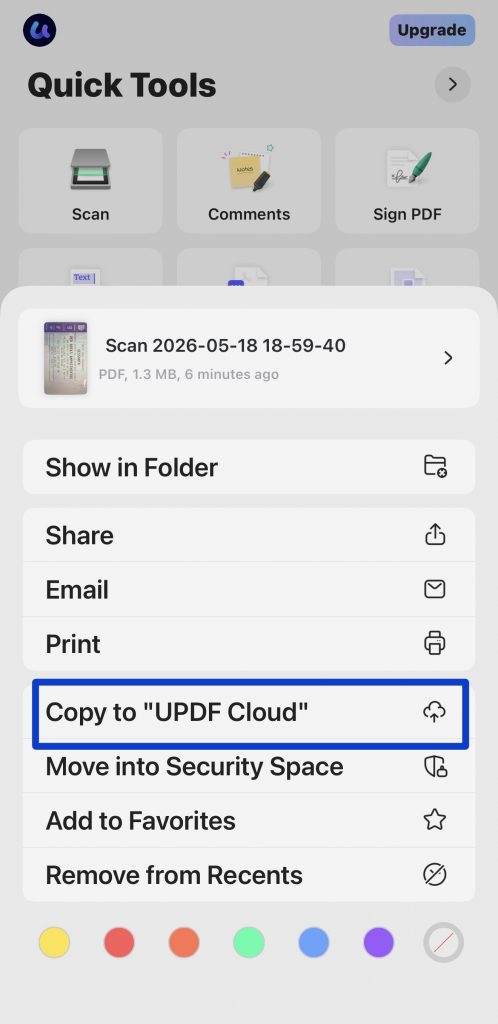
Step 3. Go to the "Home" page, click the three-dot option of the PDF file, and select "Copy to 'UPDF Cloud'" to sync automatically via UPDF Cloud. This makes the file accessible on your Mac, Windows PC, or any other device whenever needed.
Travelers with multi-page booking confirmations, conference attendees with long PDF packets, or anyone whose barcode won't scan. Download UPDF now to solve all these troubles.
Windows • macOS • iOS • Android 100% secure
Part 3. Benefits of Adding PDF Tickets to Apple Wallet
Adding a PDF to Apple Wallet has several benefits that can simplify your life and reduce stress. It helps in better organization and centralized storage for your tickets. Let's see some advantages of that:
1. Centralized Storage of Tickets
All of your tickets are held in one easy place with an Apple Wallet. You don't need to go through email or apps to get to them.
2. Better Organization
Apple Wallet sorts out your passes by date, so you can readily access the required ones. Apple Wallet also provides timely reminders and notifications for near-future events or flights. So, you can better keep up with your schedule.
3. Peace of Mind
Physical tickets are easily lost, damaged, or forgotten. You can eliminate this risk by holding them in an Apple Wallet. Your digital tickets are always safe and readily available.
4. Quick and Easy Access
Apple Wallet works perfectly with your device, making it easy to access your tickets quickly. This is especially helpful in busy places like airports or concerts.
5. Eco-Friendly Solution
Storing tickets digitally removes the need for printed copies — a straightforward step toward reducing paper waste across dozens of events and trips.
Part 4. FAQs
1. How Do I Add Documents to My Apple Wallet?
If the document is supported, look for an "Add to Apple Wallet" button in your email, app, or notification and tap it. If no such button appears, contact the issuer or use Pass2U Wallet to manually create a compatible pass from the barcode.
2. Can Anything be Added to Apple Wallet?
You can add boarding passes, event tickets, vouchers, rewards cards, transit cards, loyalty cards, and some government-issued IDs depending on your region.
3. How do I Add a QR Code to My Apple Wallet?
You can add a QR code to the Apple Wallet if supported. The QR code is present on a boarding pass or a ticket. Look for the "Add to Wallet” icon. It will simply add it to your wallet.
If that doesn’t work, use the Pass2U Wallet App to scan the QR code and make a pass for Apple Wallet.
4. What barcode types are supported?
QR code, Aztec, PDF417, and Code 128 (Code 128 not supported on Apple Watch). Code 39 and other barcode types cannot be added to Wallet.
5. Will iOS 27 add native PDF support to Wallet?
According to recent reports, iOS 27 will allow users to scan QR codes directly in the Wallet app and create passes without third-party tools. Check your iOS version.
Conclusion
Apple Wallet's .pkpass requirement means PDFs need an extra conversion step — Pass2U, NeatPass and WalletPass handle that cleanly by reading the barcode from your PDF. For physical tickets, you can use UPDF to scan and archive the full ticket design for your records. The scanned PDF syncs across your devices via UPDF Cloud, so your ticket collection stays accessible wherever you are.
Download UPDF for free and start archiving your tickets across all your devices — no subscription required to get started.
Windows • macOS • iOS • Android 100% secure







 Lizzy Lozano
 Grace Curry
 Enya Moore