 UPDF for Windows
 UPDF for Mac
 UPDF for iPhone/iPad
 UPDF for Android
 UPDF AI Online
 UPDF Sign
 Edit PDF
 Annotate PDF
 Create PDF
 PDF Form
 Edit links
 Convert PDF
 OCR
OCR PDF to Word
 PDF to Image
 PDF to Excel
 Organize PDF
 Merge PDF
 Split PDF
 Crop PDF
 Rotate PDF
 Protect PDF
 Sign PDF
 Redact PDF
 Sanitize PDF
 Remove Security
 Read PDF
 UPDF Cloud
 Compress PDF
 Print PDF
 Batch Process
 About UPDF AI
 UPDF AI Solutions
 AI User Guide
 FAQ about UPDF AI
 Summarize PDF
 Translate PDF
 Chat with PDF
 Chat with AI
 Chat with image
 PDF to Mind Map
 Explain PDF
 PDF AI Tools
 Image AI Tools
 AI Chat Tools
 AI Writing Tools
 AI Study Tools
 AI Working Tools
 Other AI Tools
 PDF to Word
 PDF to Excel
 PDF to PowerPoint
 User Guide
 UPDF Tricks
 FAQs
FAQs UPDF Reviews
 Download Center
 Blog
Blog Newsroom
 Tech Spec
 Updates
 UPDF vs. Adobe Acrobat
 UPDF vs. Foxit
 UPDF vs. PDF Expert
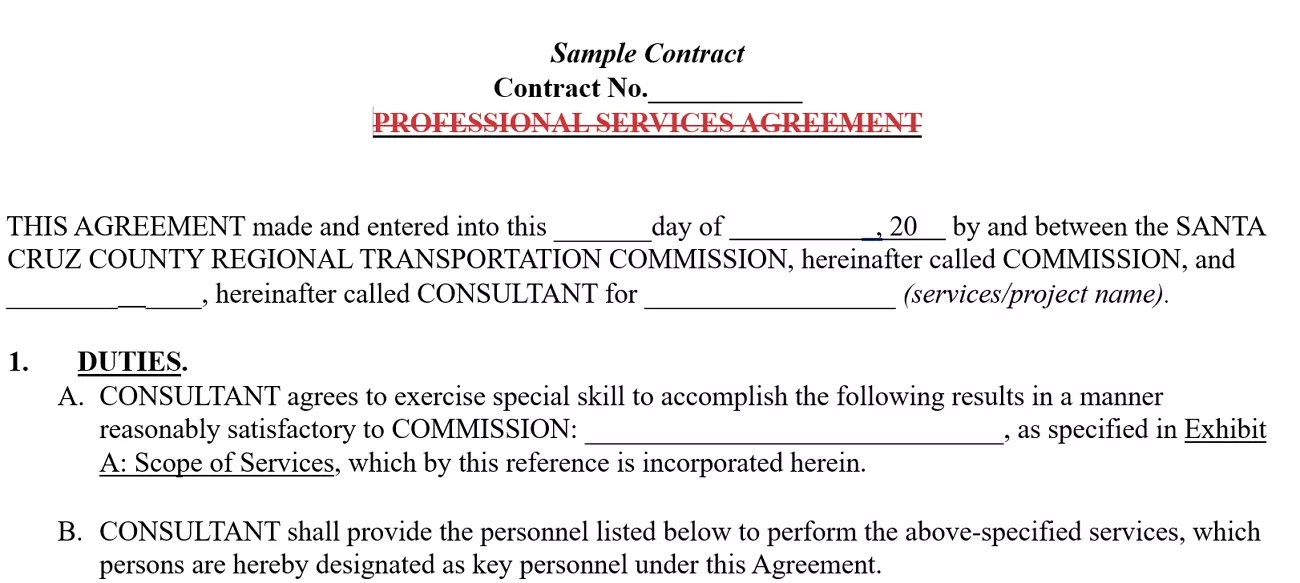
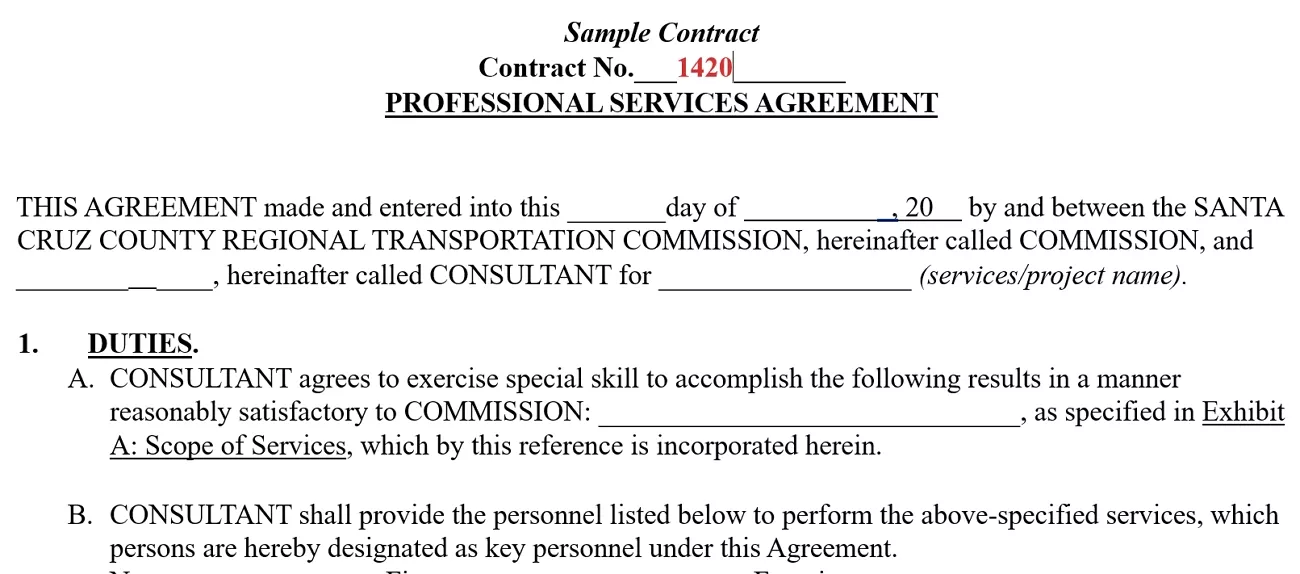
When working with legal contracts and agreements, I often struggled to track all revisions under tight professional deadlines. Each version of a document required careful comparison, which sometimes caused mistakes I could not correct later. This is where I started looking for a reliable document comparison method to maintain accuracy during reviews.
Understanding blackline vs. redline helped me identify the version showing changes and the finalized clean copy. In this article, I will explain how I create and finalize these documents using UPDF. You can click the button below to download. By reading to the end, you will learn how to revise and handle all document comparisons.
Windows • macOS • iOS • Android 100% secure
Part 1. What is Redlining?
Redlining is a traditional markup method I use to show document changes and highlight additions and edits. This method enables me to review documents and keep track of all edits made by collaborators. It enhances my work routine since it is easy to determine what has been modified in a document.
1. Historical Context: Origin from Physical Red Ink Editing
Redlining started long ago when I first learned that editors used red ink to mark changes on paper. I saw how this method allowed writers and reviewers to quickly understand what content needed revision. Over time, I noticed the practice evolved into digital formats while keeping the principle of highlighting changes in red.
2. Technical Approach: How I Use Redlining
When working with documents, understanding blackline vs. redline helps me track edits and stay organized. Now, let’s look at how I apply these techniques step by step.
- Deletions (Strikethroughs): I mark removed text with strikethroughs to see what has been deleted.
- Additions (Red or Underlined): Highlight added text in red or underline it to identify new content easily.
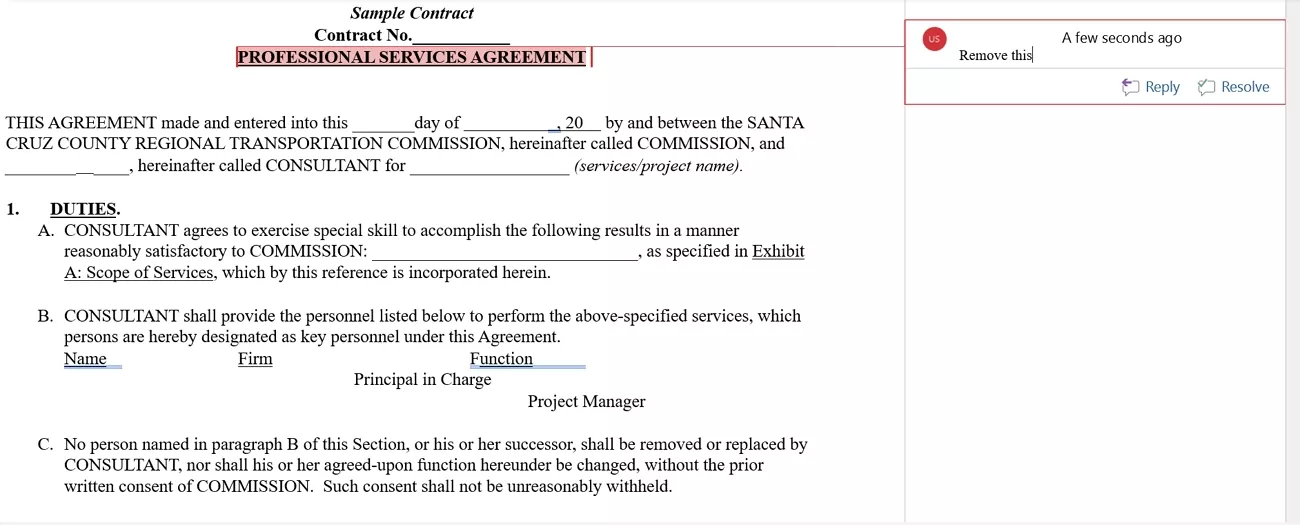
- Comments and Annotations (Margins): I place comments in the margins to explain or clarify changes for myself and collaborators.
3. Advantages of Redlining
Now, let’s explore the main benefits I’ve experienced when using redlining to manage document revisions.
- I can see all changes in a document clearly and track every revision with full confidence.
- Comparing old and new wording allows me to understand updates quickly and avoid missing important details.
- Sharing redlined documents with my team lets me get feedback and approval for edits faster.
- Using redlining helps me find errors before I finalize documents and ensures total accuracy for work.
4. Common Use Cases
Redlining helps me in several key situations, and below are the main areas where I use it most often.
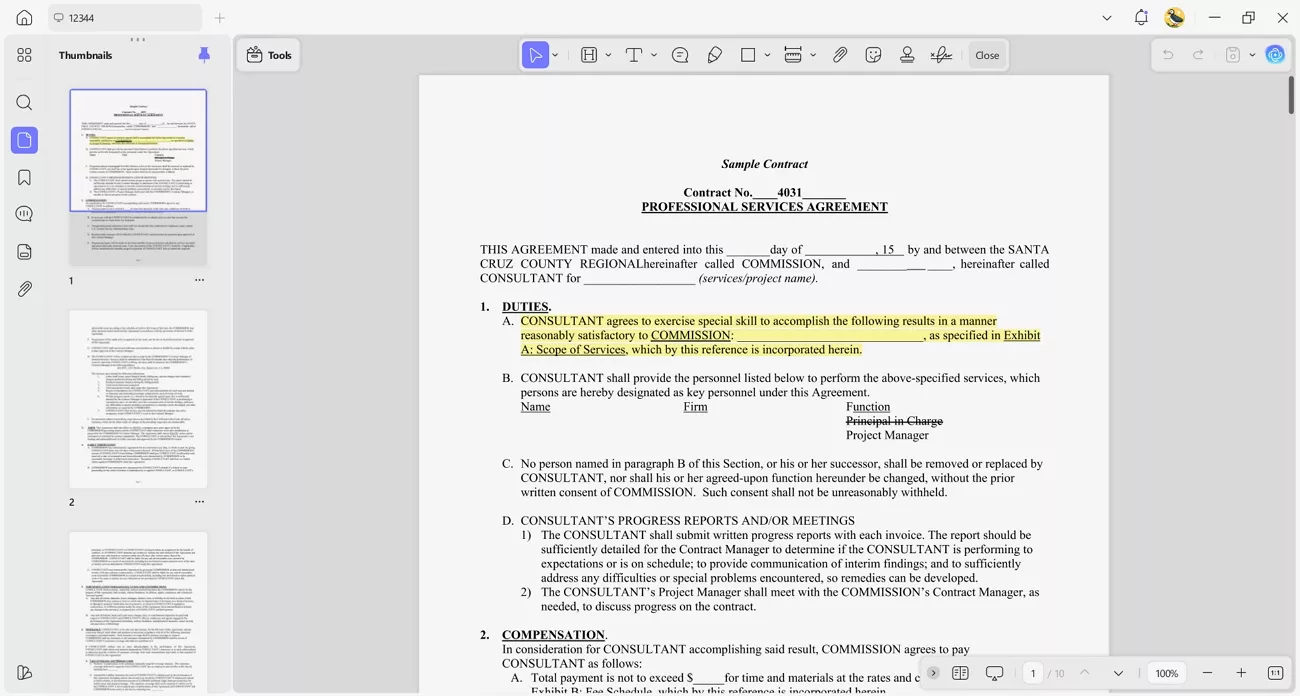
- Contract Negotiations: The alteration and revision of contracts is evident before a final contract.
- Legal Document Reviews: Every edit in legal documents can be checked for accuracy and completeness.
- Manuscript Editing: Revisions in manuscripts are visible and manageable to maintain clarity throughout the editing process.
For Example: A team examines a research manuscript where multiple authors suggested revisions, and the redline clearly shows all proposed edits.
Part 2. What is Blacklining?
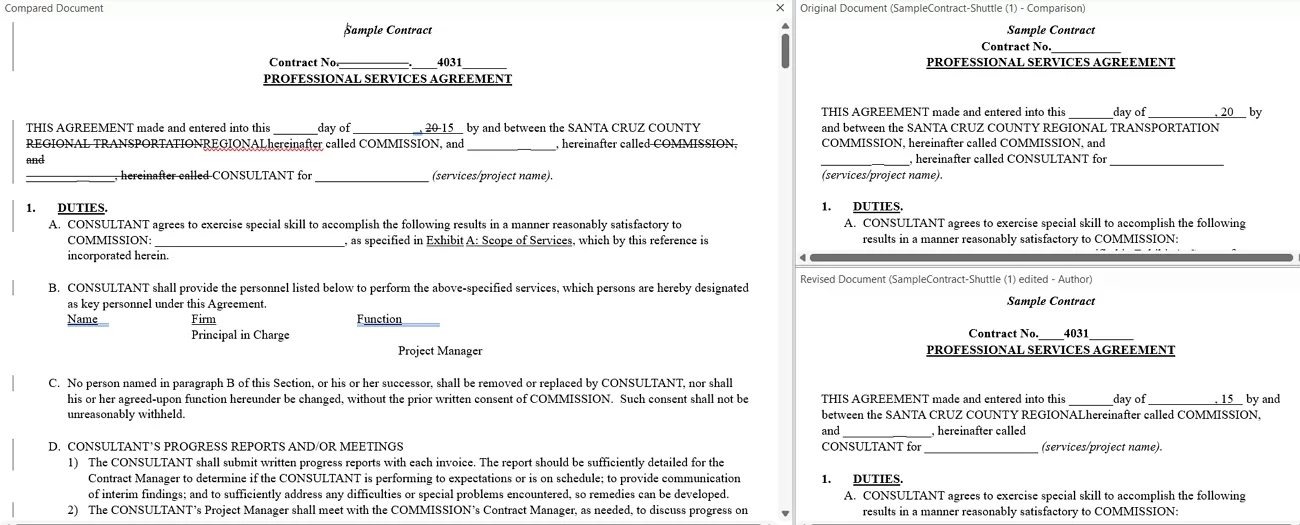
When I work with documents, I often use a blackline to see the changes between versions. It helps me track edits and make sure nothing important is missed. Depending on my goal, I might use it as a final clean version or as a detailed comparison output. Now, let me share the two main situations in which I use a blackline.
1. Blackline as “Final Clean Version” (Most Common)
In this case, I prepare the blackline as a polished document with all changes incorporated. I don’t show the tracked edits, so it’s easy to read and ready for official submission. It gives me confidence that the final version reflects all necessary updates.
2. Blackline as “Blackline Comparison Output”
Sometimes, I need to show exactly what changed between versions. Here, I keep all tracked changes visible so I or others can review additions, deletions, and modifications. This approach helps me ensure transparency and gather feedback before finalizing the document.
3. How it Differs From Redlining
In my experience, understanding the distinction between these two methods is crucial for managing document revisions. Look at the table below to compare blackline vs. redline:
| Feature | Blacklining | Redlining |
| Purpose | Highlights all changes between document versions | Marks edits and suggestions in a draft |
| Method | Automated comparison using software | Manual edits or track changes |
| Visibility | Shows all modifications digitally; may blend in on black-and-white prints | Shows changes clearly; noticeable on black-and-white documents |
| Use Case | Final review and submission | Editing or collaborative review |
Part 3. How to Create Blackline and Redline Documents?
After comparing blackline vs redline, I started exploring ways to create easy-to-review legal documents. Now, let’s go step by step on how I create redline and blackline versions, using both Word and PDF formats.
1. Redline Documents – Showing Revision Marks
To create redline documents, I rely on tools that track every change made to the text. This lets me see what was added and modified to make review and collaboration easier.
In Word
Now, look at the steps below to create a redline document using a Word document:
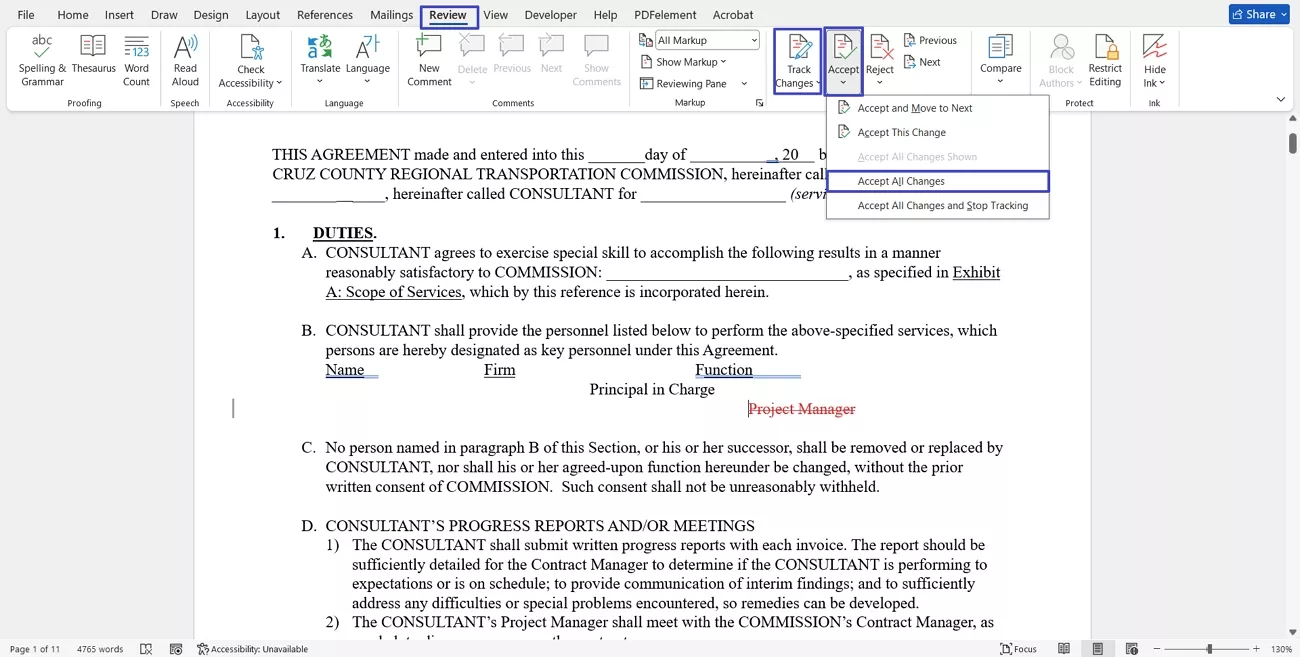
Step 1. Once you open a legal document in Word, press the “Review” tab and expand the “Track Changes” option. In the sub-menu, click the “Track Changes” option to enable this option.
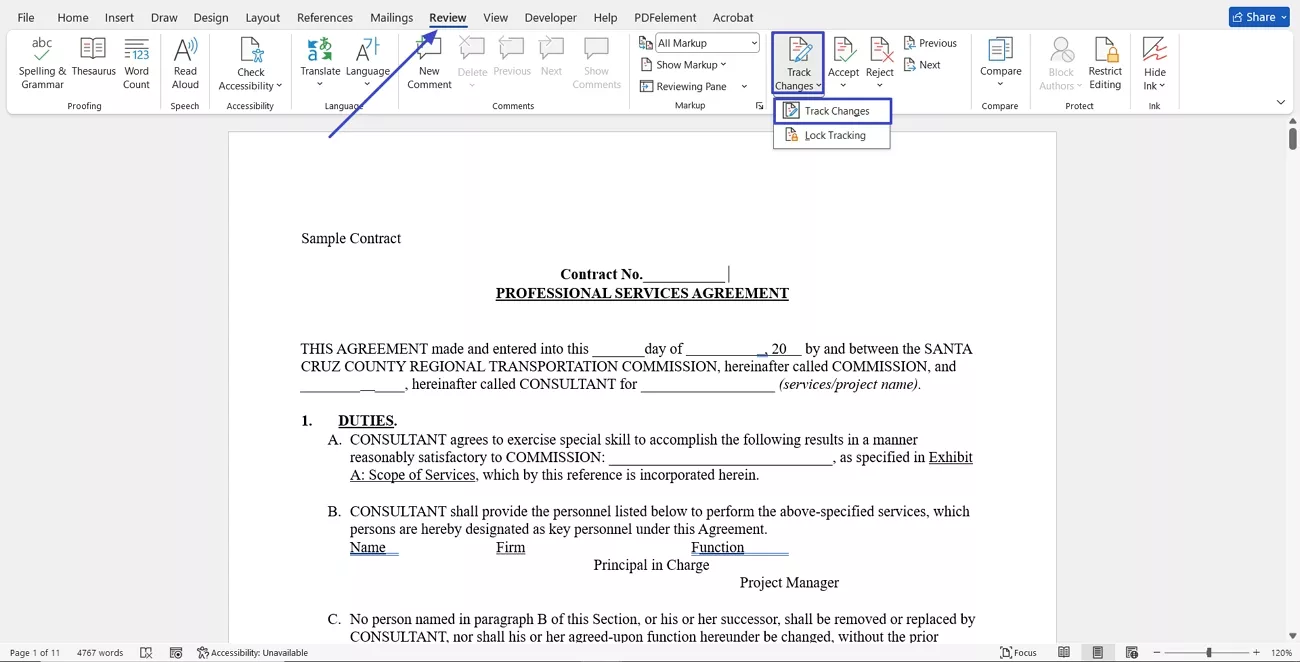
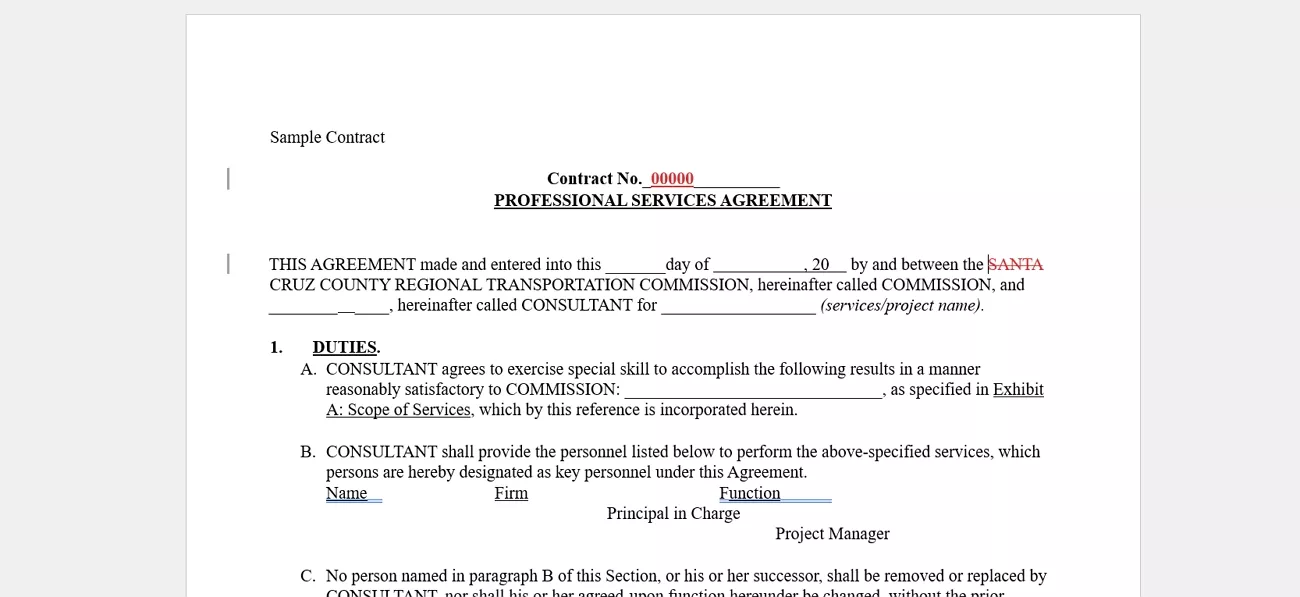
Step 2. Now, the deleted content will appear in the strikethrough format and additions will appear in red.
In PDF
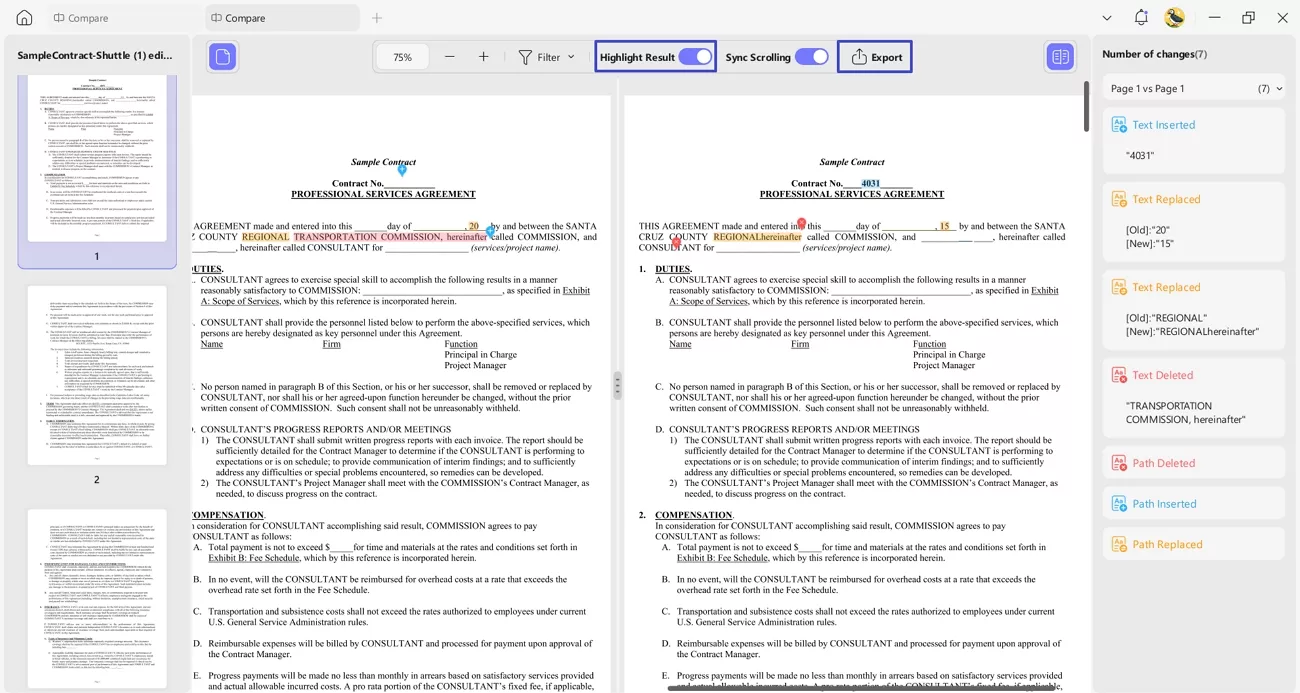
For my legal document, I often work with PDFs since they maintain structure and remain consistent across devices. Follow the steps below to see how I compare PDF versions and highlight changes using UPDF:
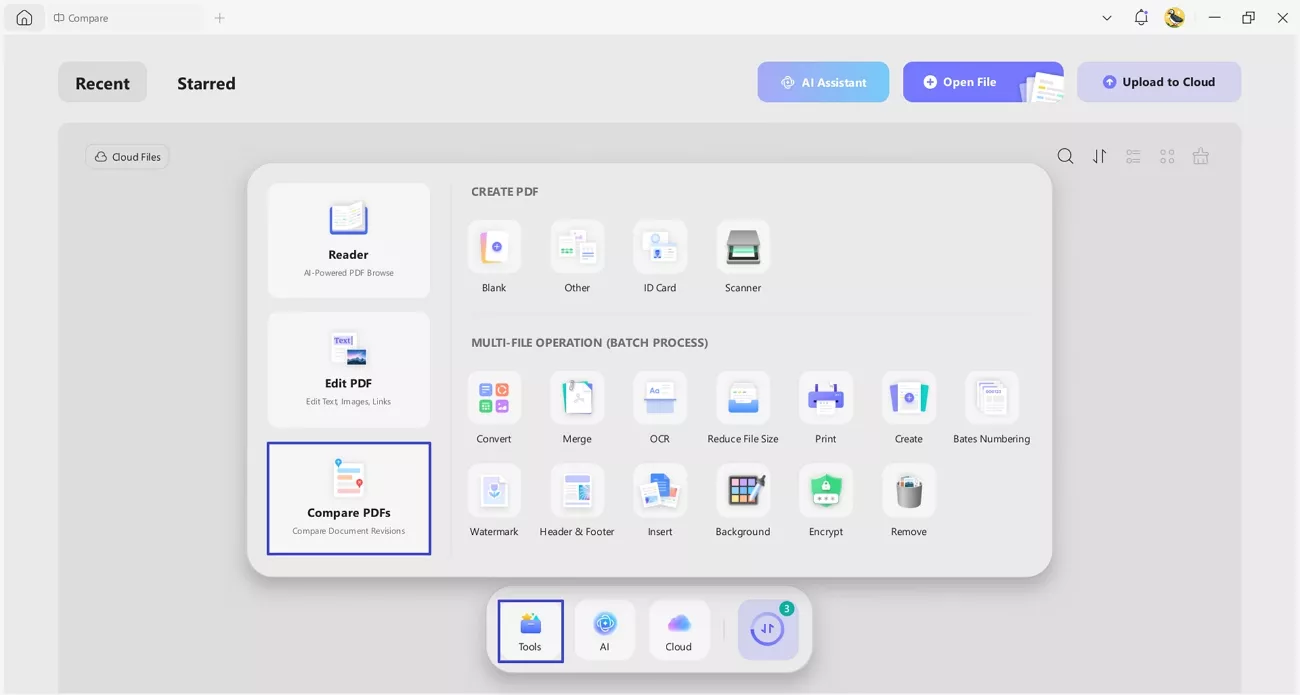
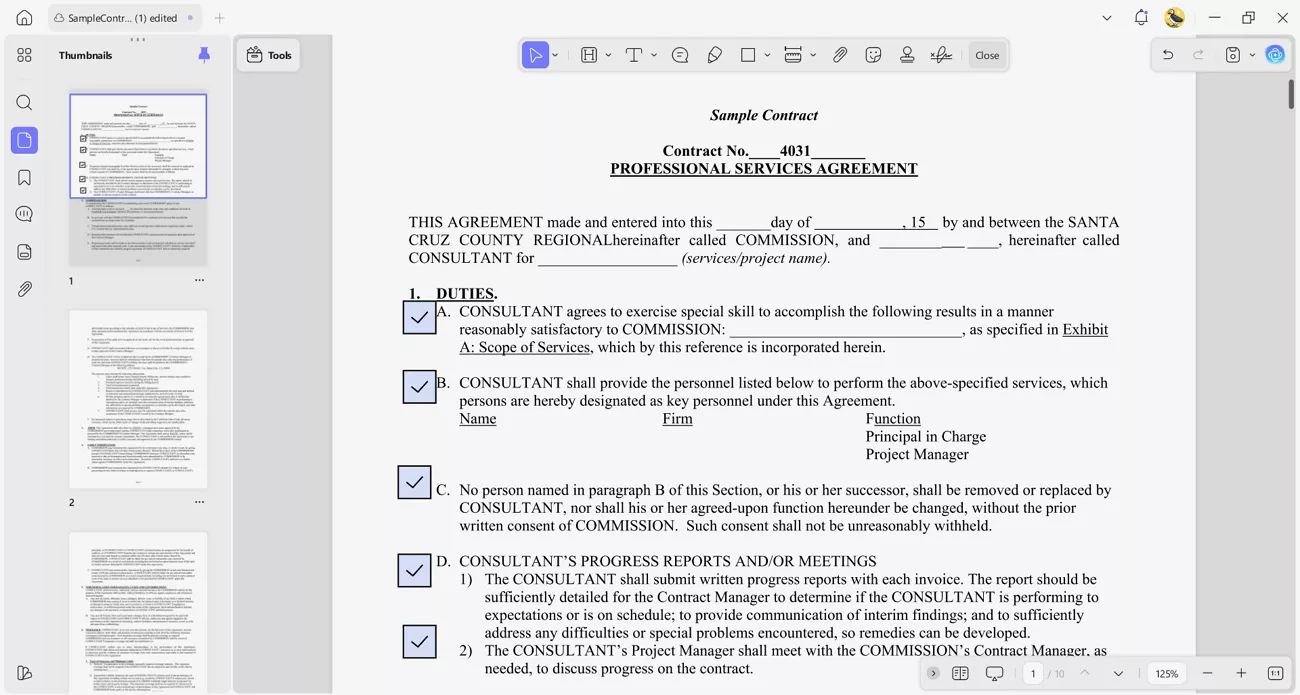
Step 1. Access Compare Feature in UPDF
Once you enter the main interface, press the “Tools” button and click the “Compare PDFs” option on the left side to access the feature.
Windows • macOS • iOS • Android 100% secure
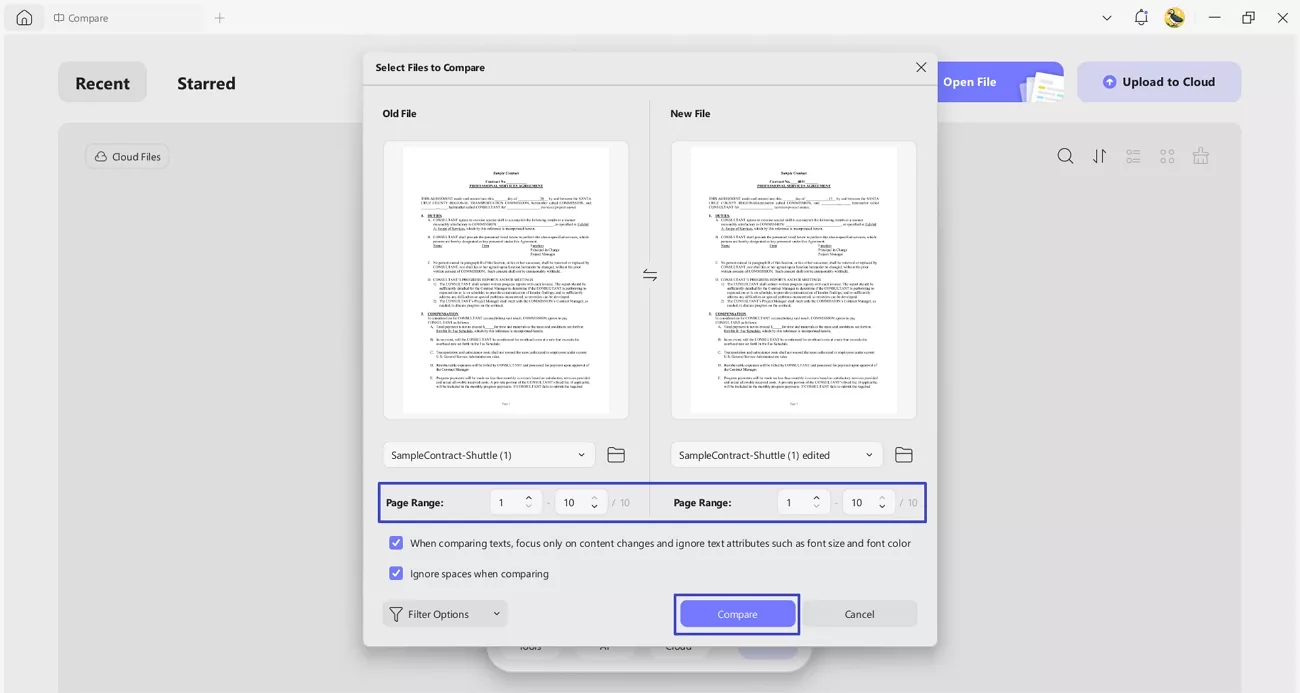
Step 2. Import Original and Revised PDF
Next, import both files into the “Old File” and “New File” sections, choose the page range, and click the “Compare” button to start comparing documents.
Step 3. Highlight Results and Export Revised PDF
Next, enable the “Highlight Results” option to turn on colorful highlights on changes made. After reviewing the changes, press the “Export” option to export the PDF with highlights.
Best Tool to Use
After repeatedly struggling with comparing PDF versions and tracking revisions clearly, I started looking for a tool that could handle document changes properly. Legal documents often require both redline reviews and clean blackline versions, so accuracy and control mattered to me. That search is what led me to try UPDF, and it quickly changed how I handle blackline vs. redline workflows.
Moreover, UPDF manages PDF comparison and revision tasks smoothly from start to finish. Its comparison and annotation tools let me highlight changes, review edits, and export either marked redline files or clean blackline versions with ease.
About UPDF:

Windows • macOS • iOS • Android 100% secure
2. Blackline Documents – Final Version or Black-and-White Comparison
Blackline documents are what I rely on once revisions are complete and the document needs a professional final form. Now, I will show how I create both the final clean version and the black-and-white comparison version to track all changes.
Blackline as Final Clean Version (Most Common Use)
This version of a blackline shows a finalized document with all revisions incorporated and no visible markup. Let’s learn how to create it step by step in Word and PDF.
In Word
Now, go through the steps below to create a final blackline document in Word:
Instructions. Once you open a document with enabled track changes, press the “Review” tab and expand the “Accept” option. Next, press the “Accept all Changes” option and click the “Track Changes” button to disable it. Lastly, save this blackline version with no visible markups.
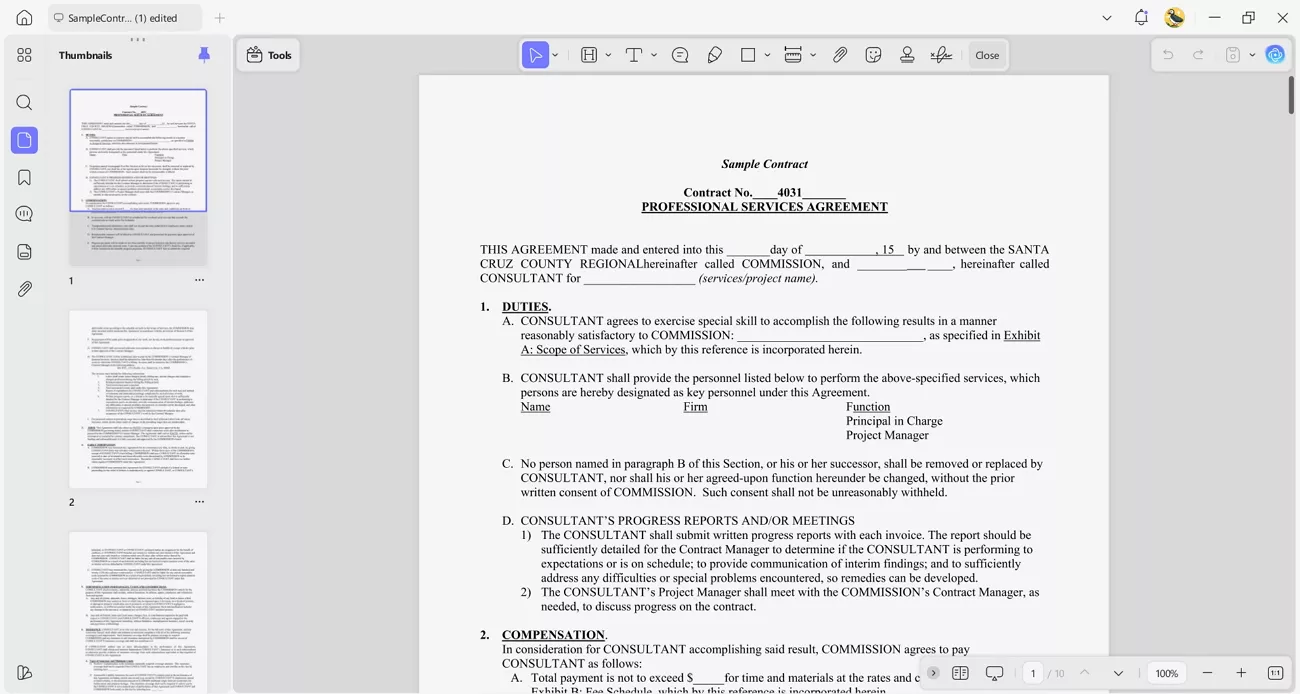
In PDF
For PDF, the final clean version displays all revisions without any visible markup or comments. Using UPDF, it is easy to review and ensure the document is ready for professional submission or sharing. After confirming accuracy, the PDF can be saved in UPDF as the approved blackline document.
Windows • macOS • iOS • Android 100% secure
Blackline as Black-and-White Comparison (Differences Shown in Black Only)
This blackline version displays all changes in plain black, showing edits clearly without color distractions. Now, let’s explore how to create it in Word and PDF while understanding blackline vs redline.
In Word
Adhere to the steps below to see how you can create a black-and-white comparison in Word:
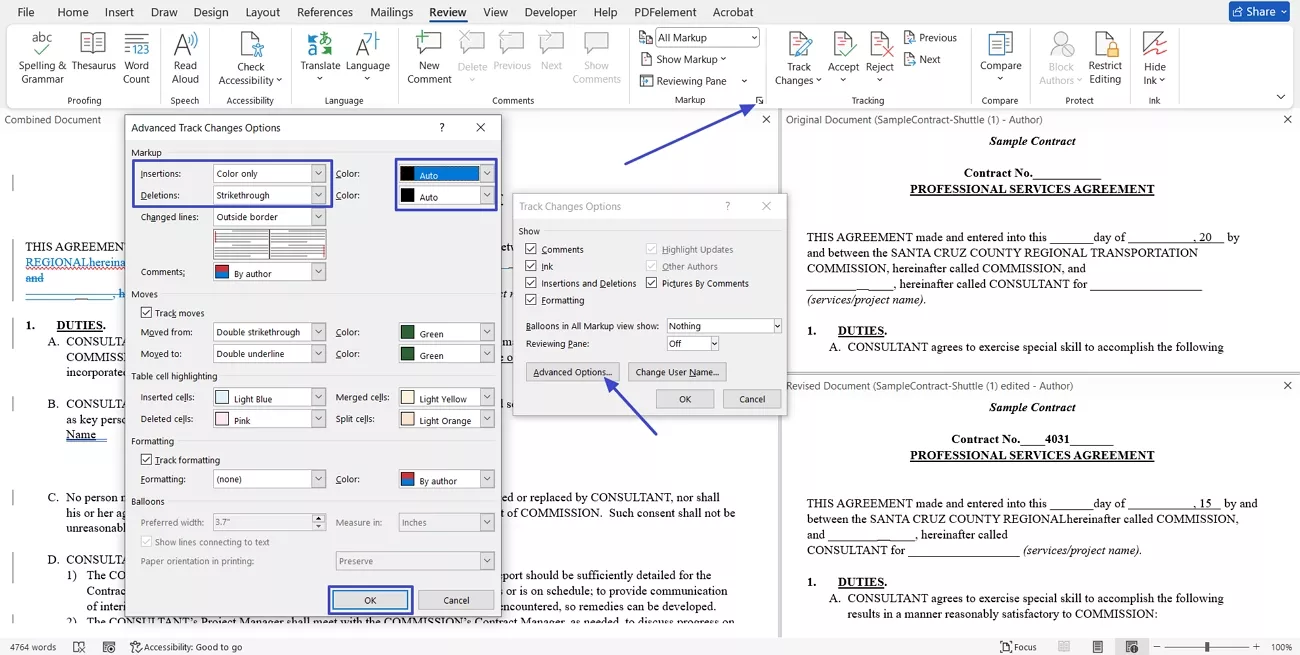
Step 1. First, press the “Review” tab in Word, click the “Compare” option, and use the “Combine” option to combine the original and revised documents for comparison.
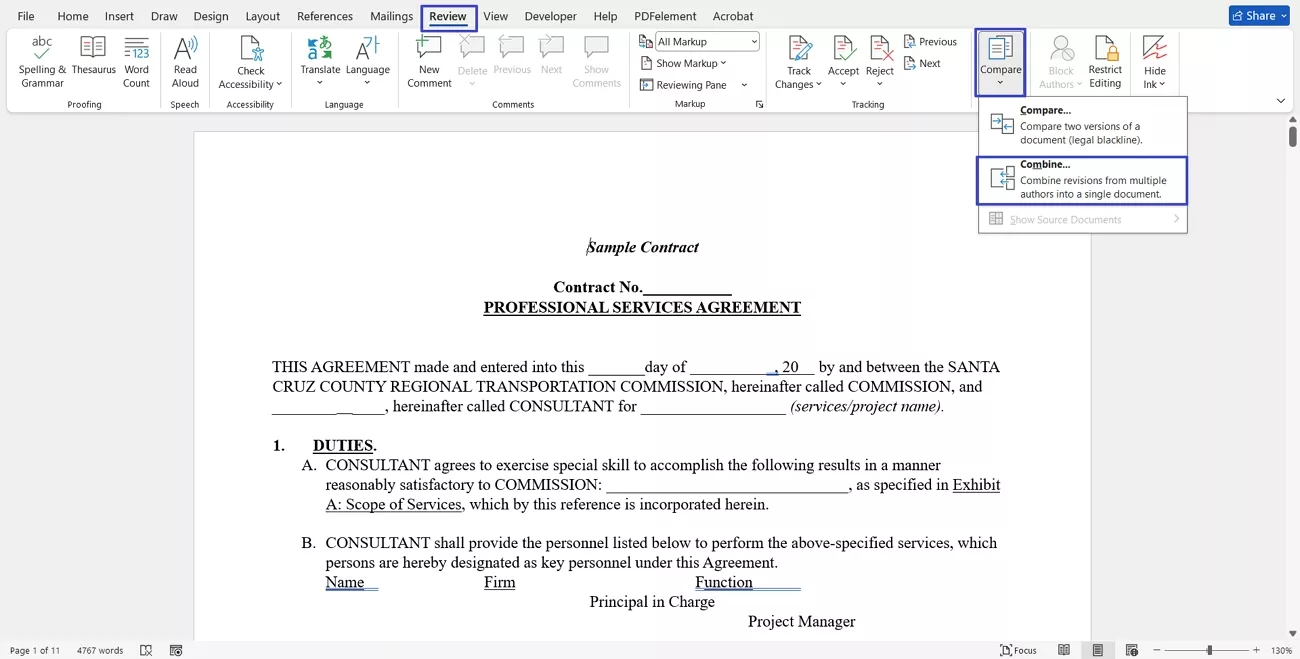
Step 2. Next, import both the original and revised documents and click the “Ok” button.

Step 3. Afterwards, press the “Change Tracking Options” icon and click the “Advanced Options” button in the pop-up window. In the next pop-up, choose “Strikethrough” in the “Deletions” option and select “Color Only” in the insertions section. Choose the black color for both and press the “OK” button. Once done, save the comparison document.
In PDF
Next, follow the steps below to create a black-and-white blackline in PDF using UPDF:
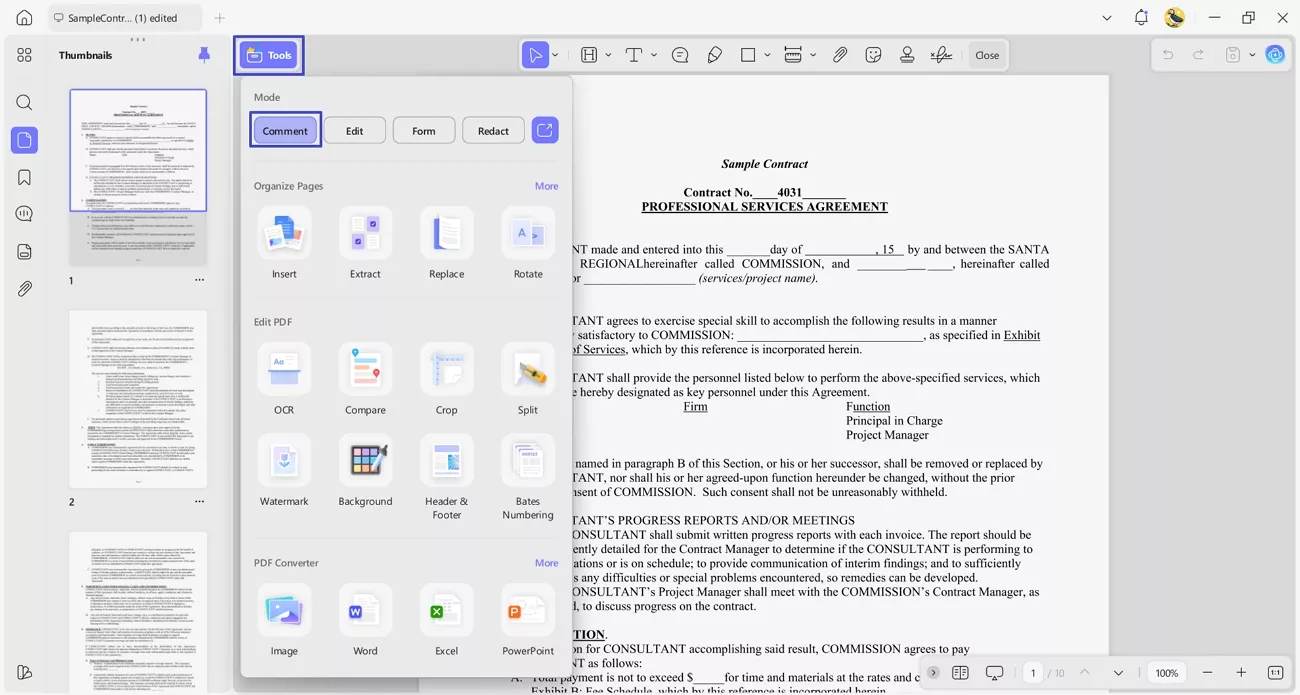
Step 1. Access the Comment Feature in UPDF
Once you open a document in UPDF, press the “Tools” option and click the “Comment” option to access the annotation feature.
Windows • macOS • iOS • Android 100% secure
Step 2. Annotate the Revisions
Next, choose the “Highlight” icon and select the “Strikethrough” option for deletions and the “Underline” option for changes. Afterwards, select the text that you want to annotate and choose the “Black” color in the floating pop-up.

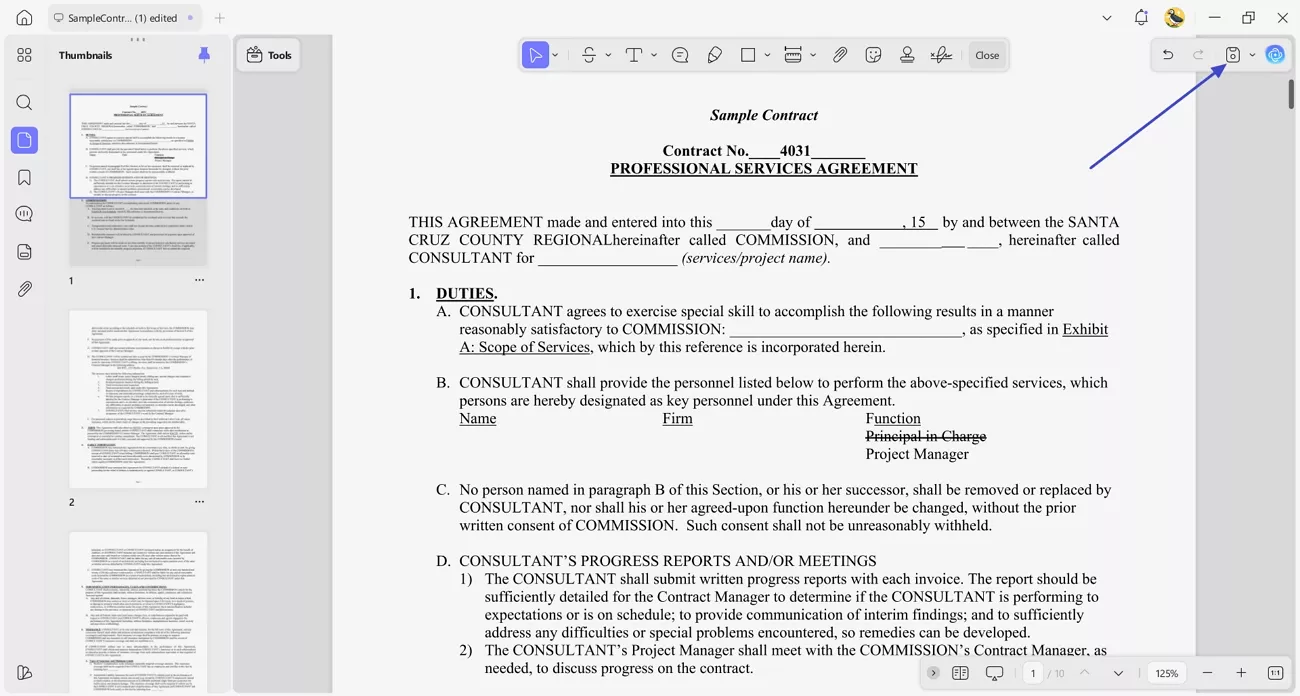
Step 3. Save the Document
Once done, press the “Save” icon in the top right corner to export the document.
3. Bonus Tip: Using UPDF’s Insert and Replace Text Annotations
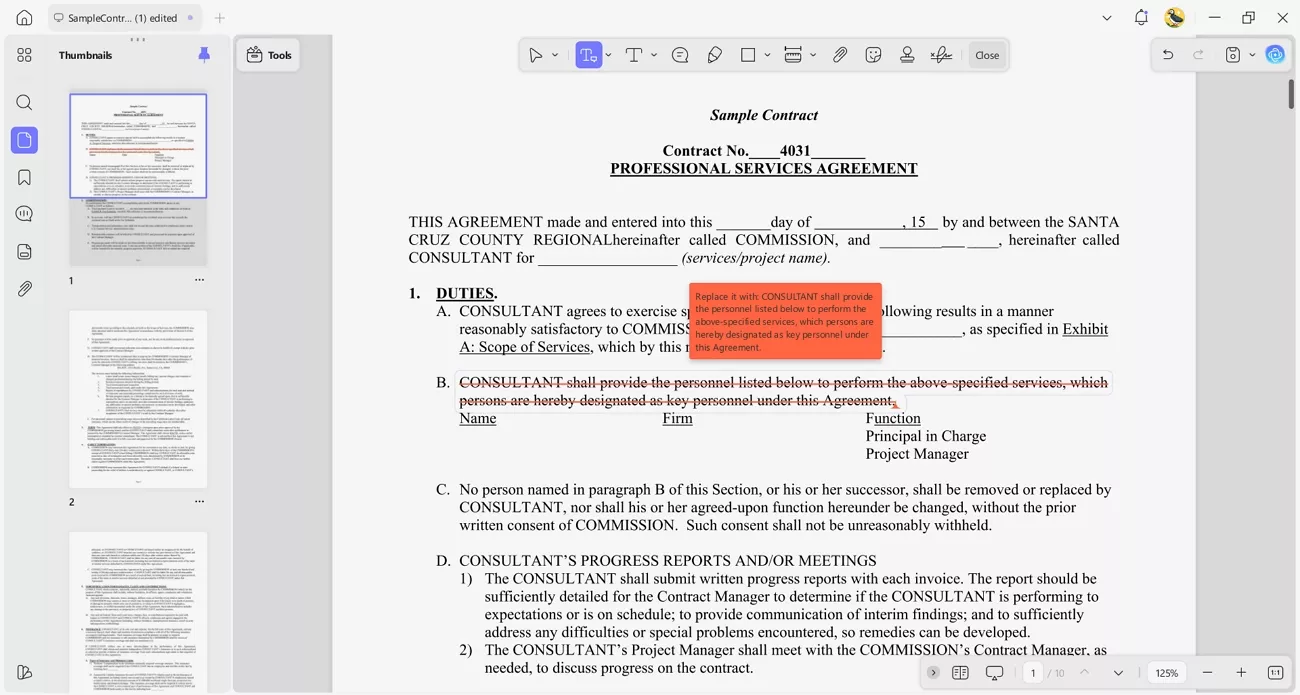
UPDF’s insert and replace text annotations make revising documents fast and precise. I can add new text or replace existing content directly within the PDF without switching tools. This feature saves time and keeps all changes tracked and easy to review. Go through the simple steps below to apply these annotations using UPDF:
Windows • macOS • iOS • Android 100% secure
Step 1. To insert the text, press the “Highlight” icon and click the “Insert Text” option. Next, select the text and enter the additions to make an annotation. Similarly, to replace the text, select the “Replace Text” option, select the text that needs to be replaced.
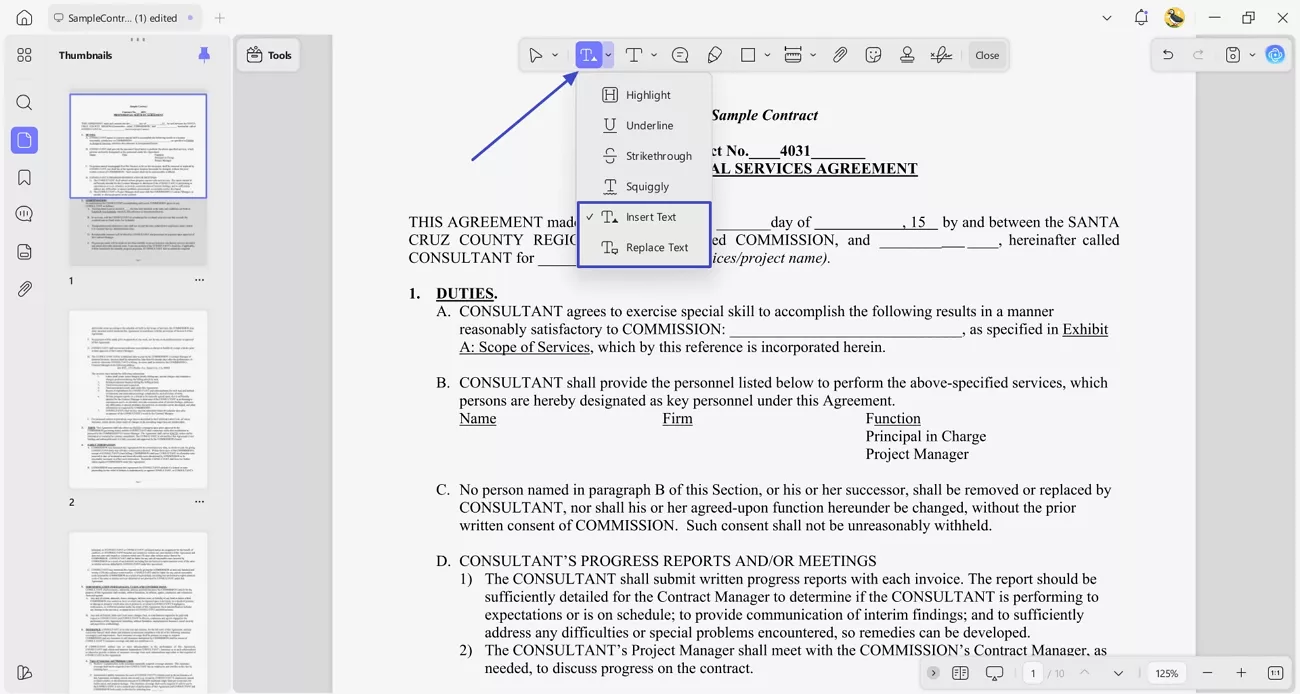
Step 2. Next, enter the text in the pop-up box that needs to be replaced.
4. Other UPDF’s Core Features
Having compared blackline vs redline and learned how to create these documents, let’s look at the other core features that make UPDF Desktop and Mobile an all-in-one tool. Mobile users could download UPDF from App Store and Google Play.
Windows • macOS • iOS • Android 100% secure
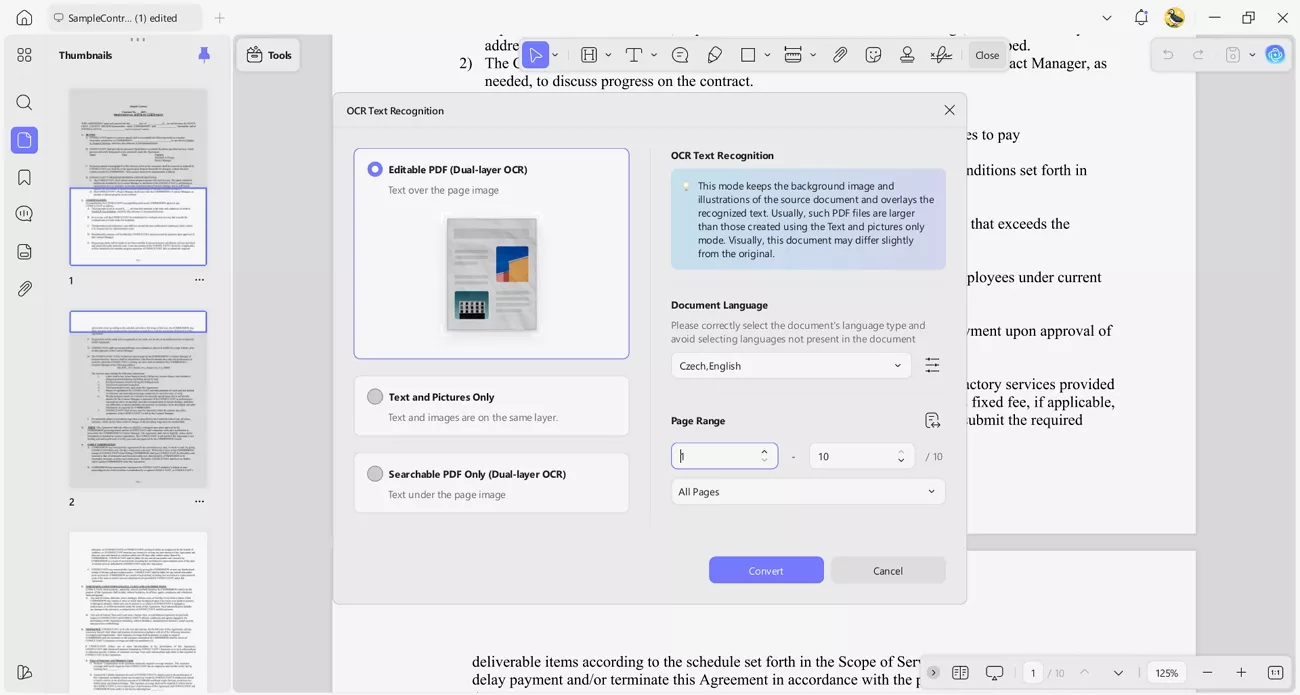
- Scan to PDF and Powerful OCR: I can digitize paper documents using UPDF’s scanning feature.
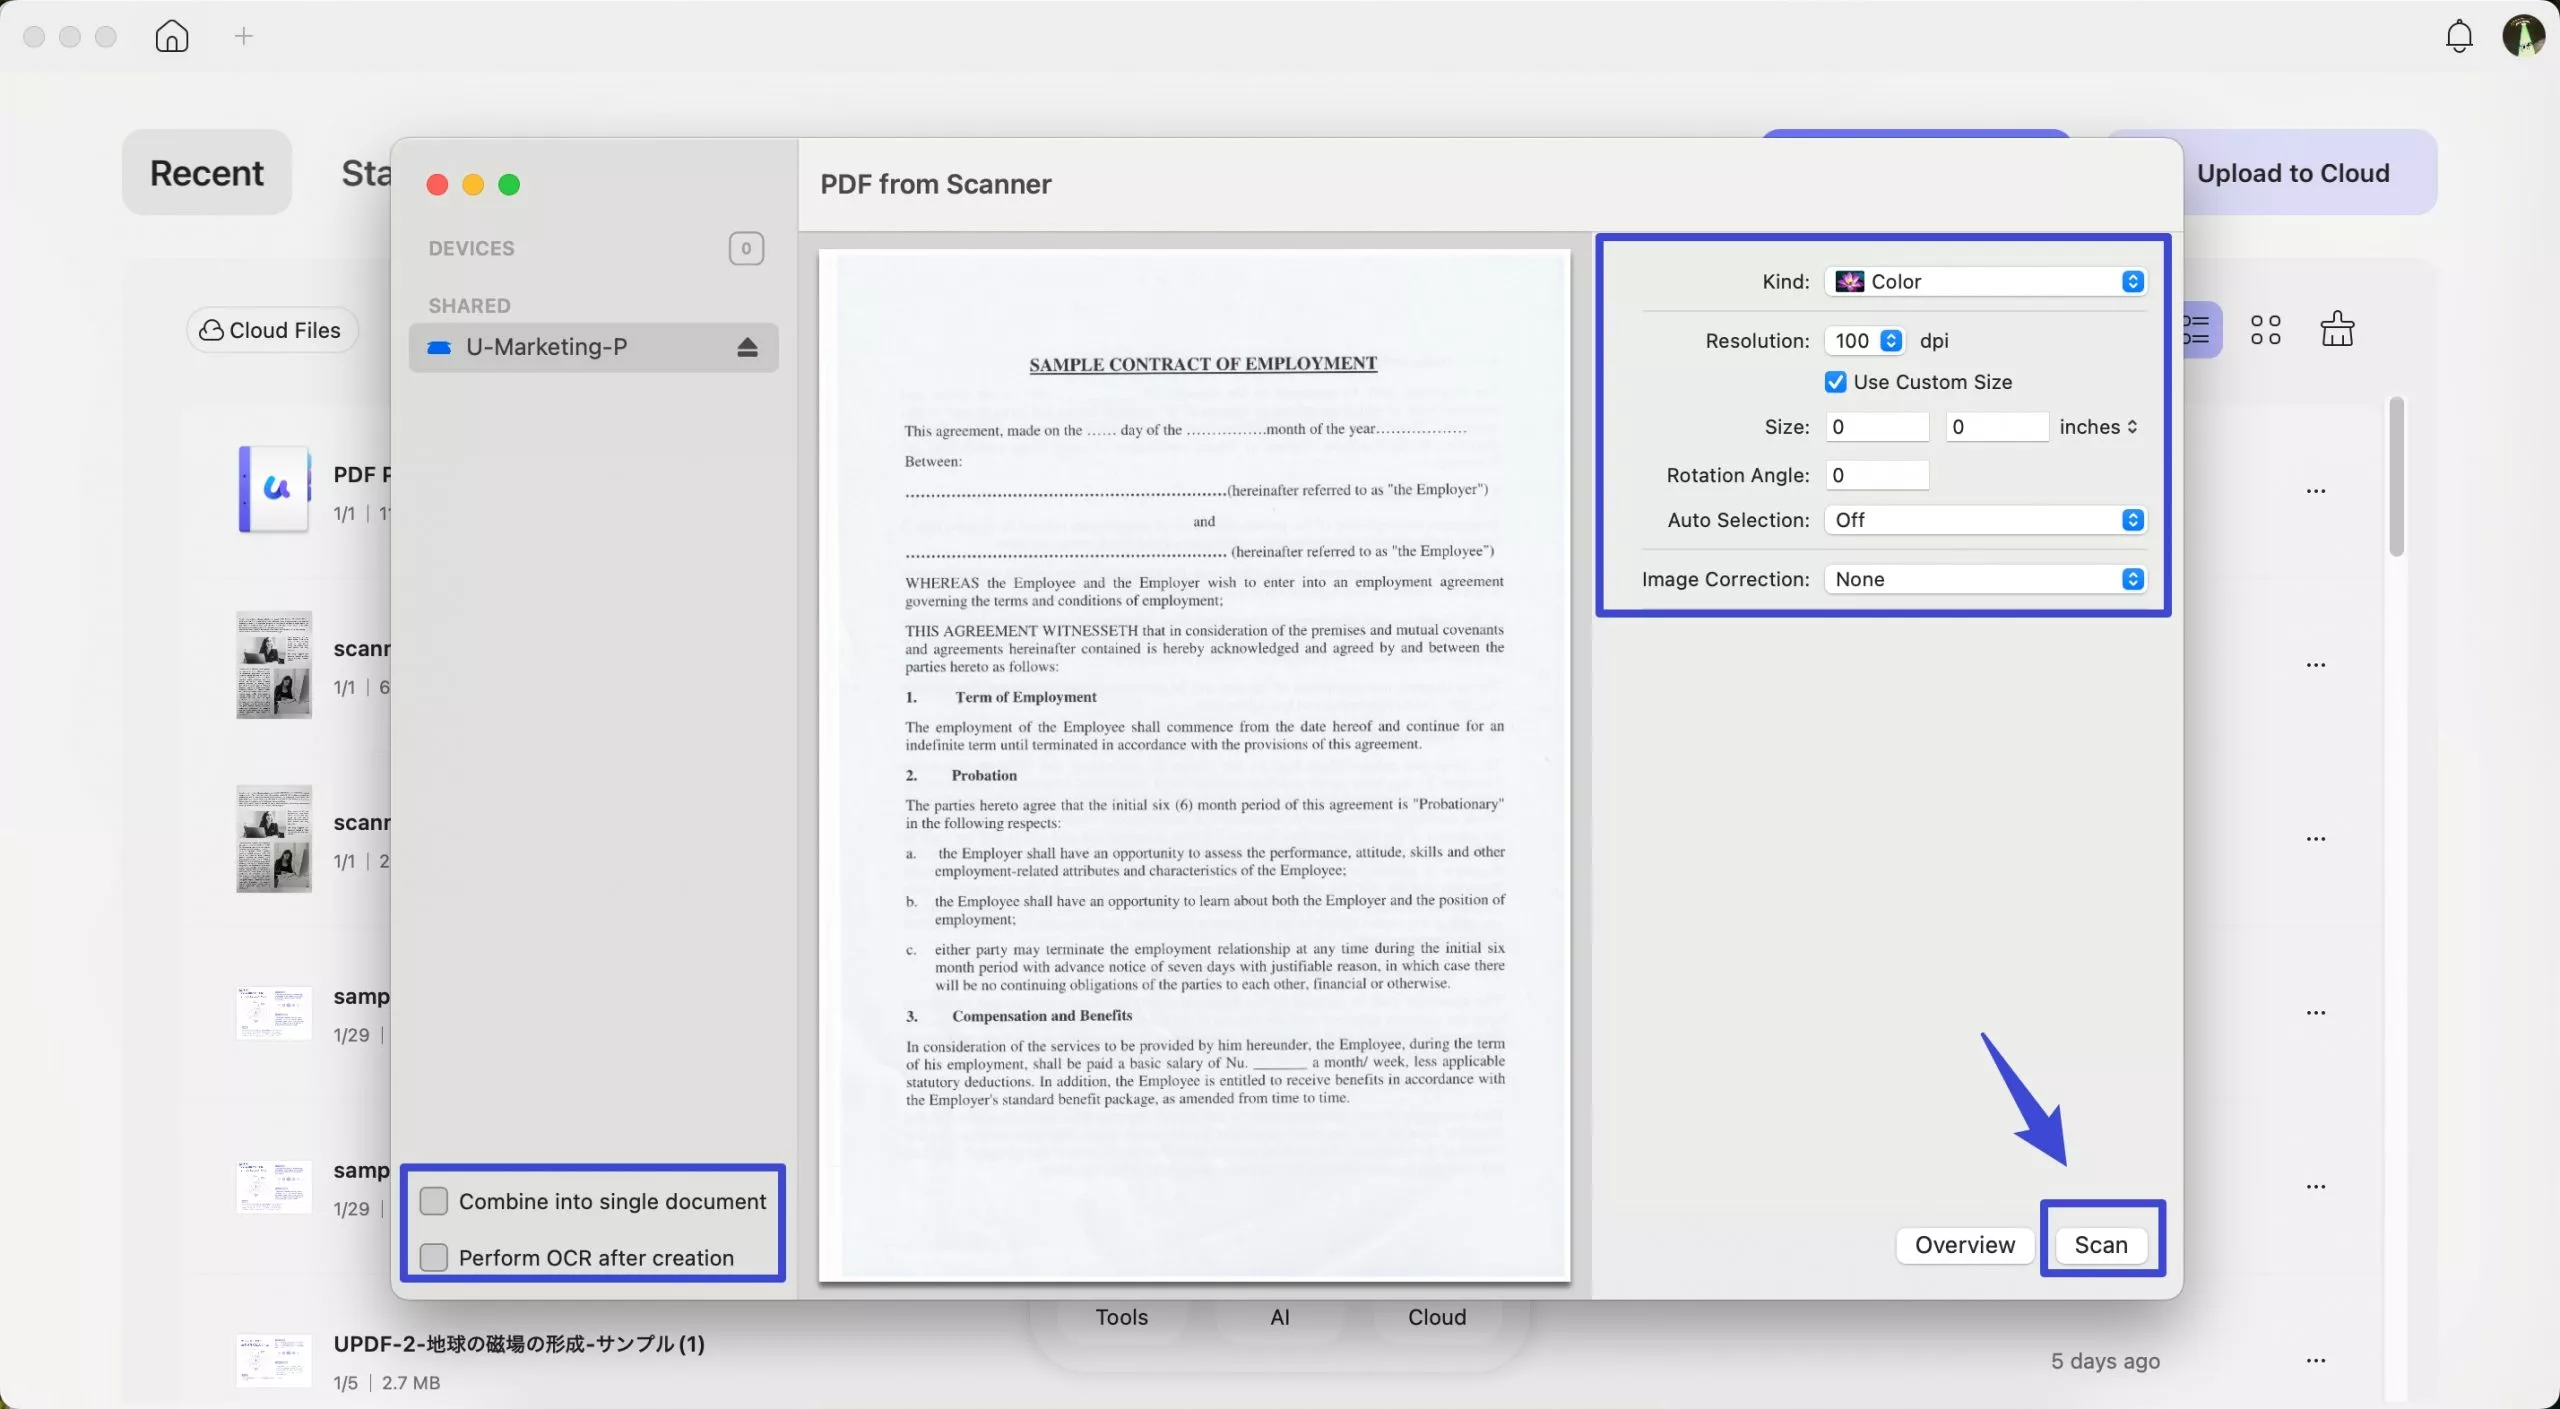
The OCR tool allows me to convert scanned documents into editable text, recognizing 38 languages and making revisions easy.
- Cloud Sync and Device Flexibility: UPDF Cloud lets me sync files across multiple devices seamlessly.
On mobile, Dropbox integration, UPDF Cloud on mobile, and iCloud on iOS make it easy to access the same documents anywhere. One license covers Windows, Mac, iOS, and Android, which keeps my workflow consistent across devices.
- Document Management: With UPDF, I can merge, split, and rotate pages. Adding tilted watermarks is easy, and I can set different headers and footers for specific legal pages.
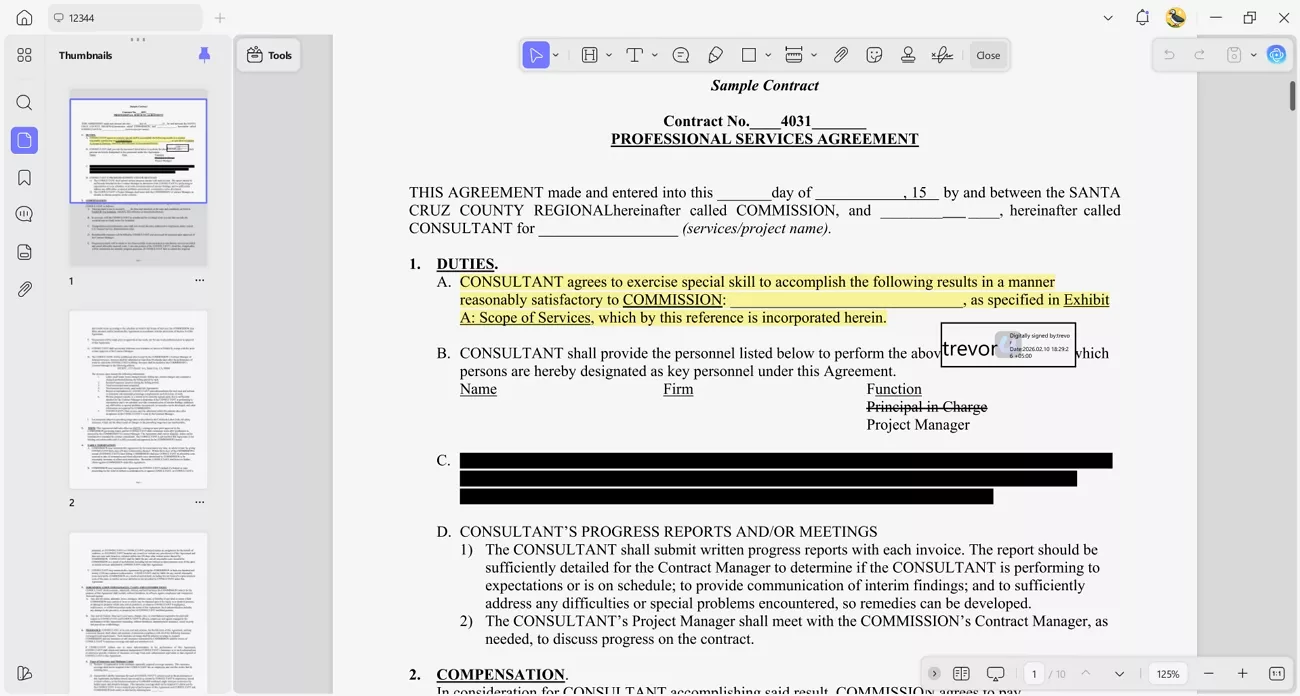
- Security and Signing: I can protect sensitive documents with strong passwords.
It allows me to redact confidential information and add electronic signatures for secure approvals.
- UPDF AI: This feature helps me understand difficult terms, generate content, and check documents for accuracy. It can translate entire documents and chat with images, which is now available on iOS.
- Fill Forms and Agreements: UPDF makes filling forms fast and accurate. The form field recognition feature identifies fields in PDFs to save me time when working with agreements.
Windows • macOS • iOS • Android 100% secure
Part 4. FAQs
Does Adobe have a redline tool?
Yes, Adobe Acrobat allows me to redline PDFs using the Compare Files feature or by adding annotations. I can highlight text, insert comments, or use strikethroughs to indicate deletions to create a redline version for review.
Can you accept redline changes in PDF?
No, redline changes in a PDF cannot be accepted automatically. Each change must be reviewed and applied manually using a PDF editor.
What is the difference between redline and track changes?
Redline visually shows edits, deletions, and additions, often in color or with annotations. Track Changes, usually in Word, automatically records all edits and comments, allowing me to accept or reject changes systematically. Redline is more for review, while Track Changes is for managing the editing process.
Conclusion
To conclude, this article explored the key differences between blackline vs. redline workflows and how each method helps manage document revisions. While both methods are useful, blackline is ideal for final submissions and redline works best for detailed reviews. For a smoother workflow, I recommend using UPDF to manage both redline and blackline documents accurately.
Windows • macOS • iOS • Android 100% secure


 Enola Davis
 Italo Rossi
 Enid Brown
 Enrica Taylor
- to_potato