The macOS offers a range of built-in features that allow you to customize Mac desktop elements to enhance the desktop environment. You can easily modify the desktop wallpaper, interface colors, icons, widgets, and more. Moreover, you can transform your Mac into a reflection of your style by personalizing your images, adjusting the toolbar, selecting the perfect notification sound, and making other system-level changes.
If you want to add a personal touch to your Mac and make it yours, this guide is the perfect fit for you. This comprehensive article will discuss how you can easily customize desktop themes, icons, widgets, toolbar, and background and how to utilize the Magnet app to make your work more effective.
Part 1. How to Customize Mac Desktop Via Mac Settings
There are various ways on how to customize a Mac desktop look, but utilizing the system settings and making the necessary changes can help avoid any file deletion damage. From themes to widgets, countless things can be modified. However, before doing that, every user must know the required steps. So, in this part, we will discuss the necessary steps to help you save time.
How to Customize Mac Desktop Themes?
Themes are the limelight of your Mac interface. The more attractive the themes are, the more motivated a user will be when doing the necessary work. If you haven’t changed the themes before, now is the time to explore the steps guided below and customize Mac desktop themes:
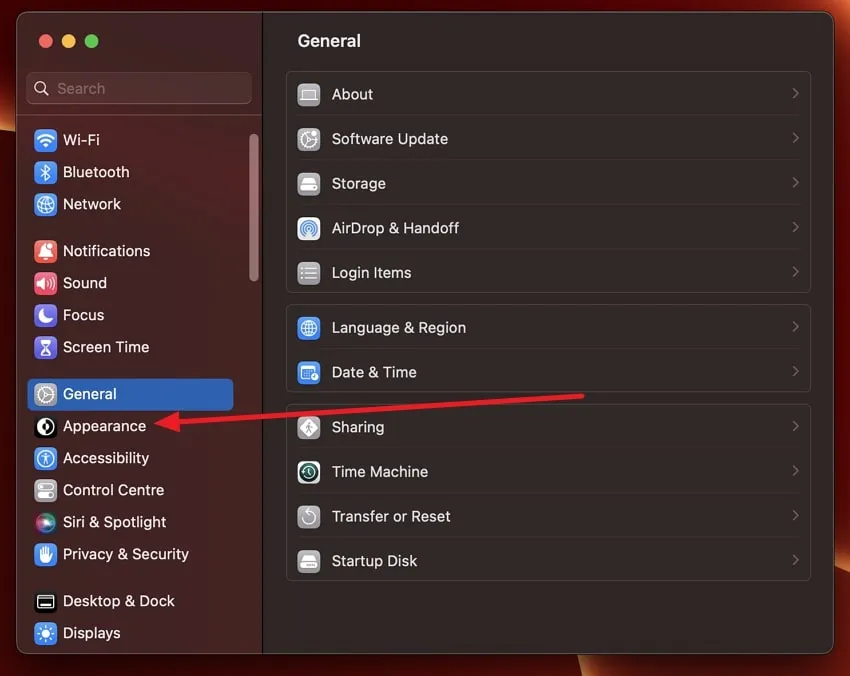
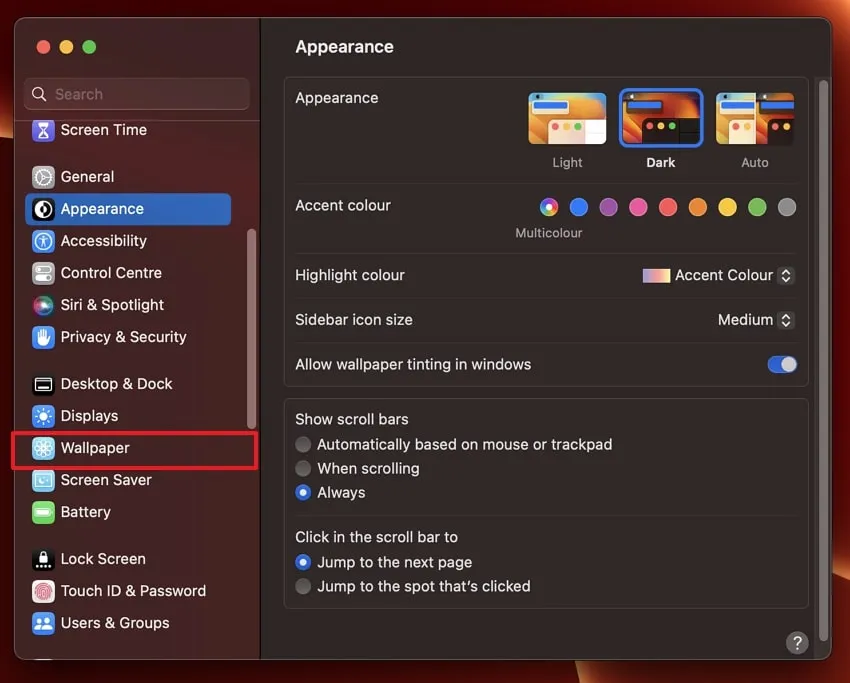
Step 1: Unlock your Mac device, and on the desktop interface, press the Apple icon at the top left corner. Afterward, as the drop-down menu appears, click "System Settings” and then hit the "Appearance" option in the left side panel to open the Appearance settings.
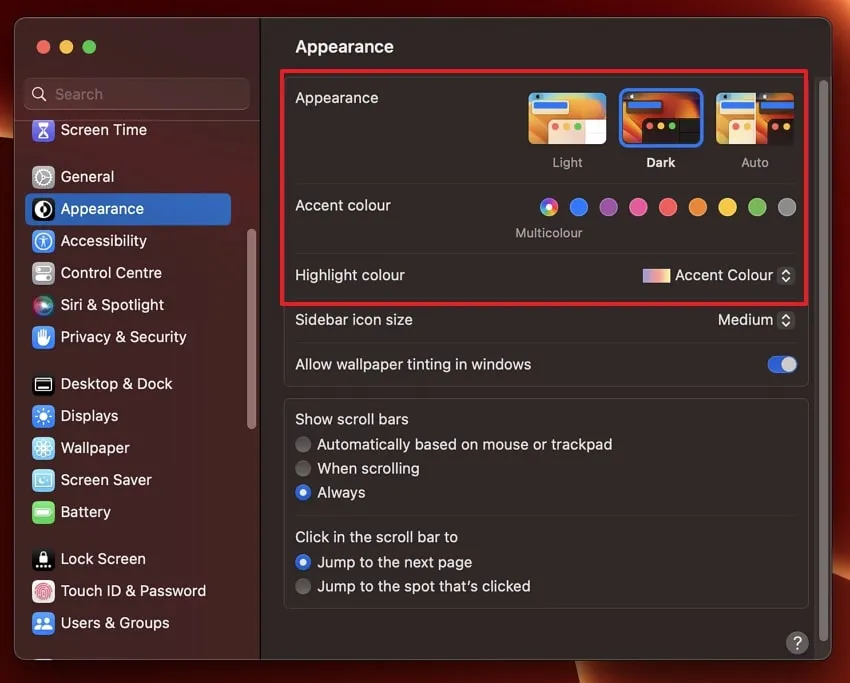
Step 2: Following this, you change the theme to “Light,” “Dark,” and “Auto.” Moreover, you can also change the “Accent Color” and “Highlight Color” to make any further changes to the theme.
How to Customize Mac Desktop Icons?
Users often get bored of seeing old icons on their Mac desktops. However, you can customize desktop icons on Mac to look more attractive and give your device a new look when you open it. Following are the steps to make this work out:
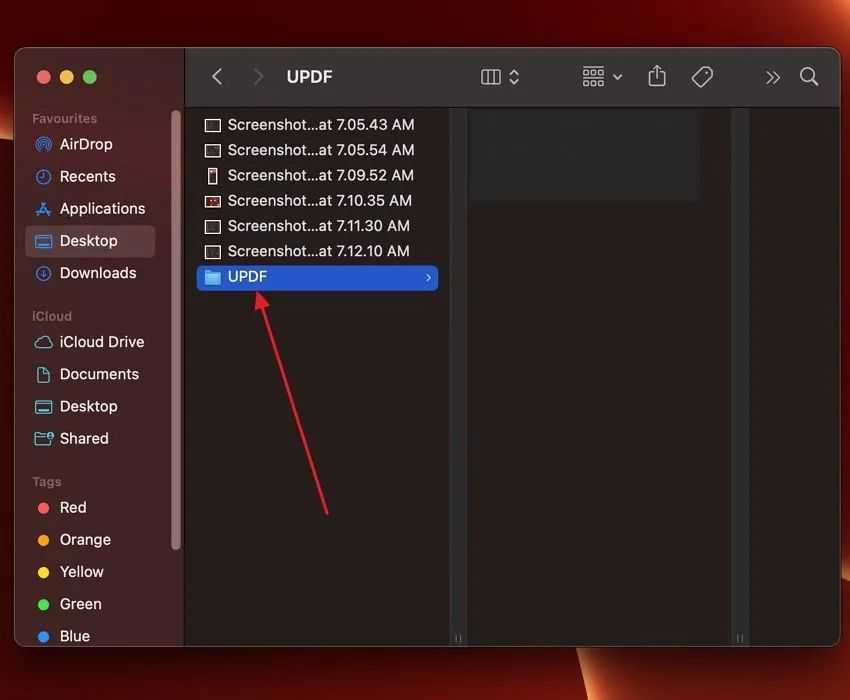
Step 1: The first step is to locate the folder you want to customize. Head to the "Finder" at the screen's bottom left corner, select the required folder and open the drop-down menu.
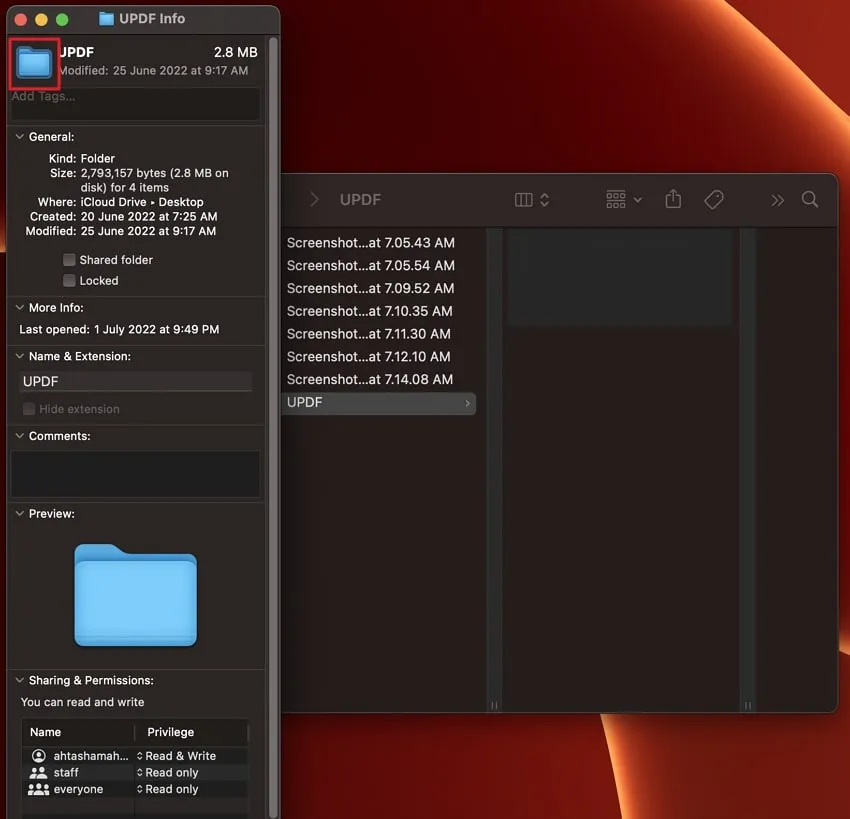
Step 2: From the menu, hit the "Get Info" option, and it will open the folder window. Afterward, tap the folder icon at the top-left corner. If you have already downloaded a .icn extension, drag and drop it onto the folder icon to customize it.
How to Customize Mac Desktop Widgets?
Do you love widgets in your Mac notification center but need to familiarize yourself with adding or customizing them? In this section, we will tell the detailed steps of how to add or remove them along with customization:
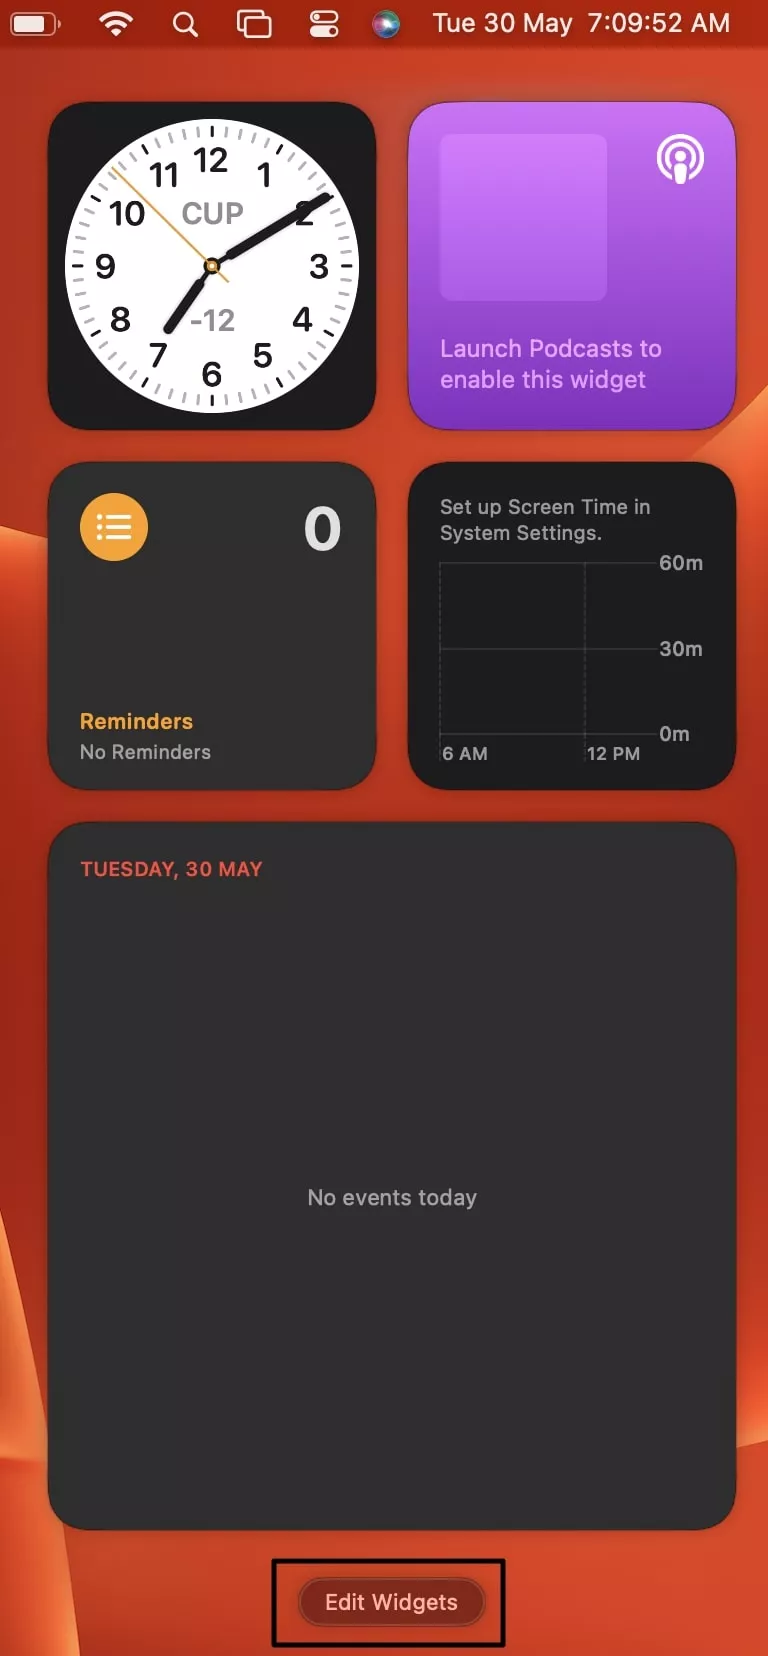
Step 1: Navigate to the top right corner of the screen, click on time and date, and scroll down to the last widget. Finally, tap the "Edit Widgets" option to open the widgets menu.
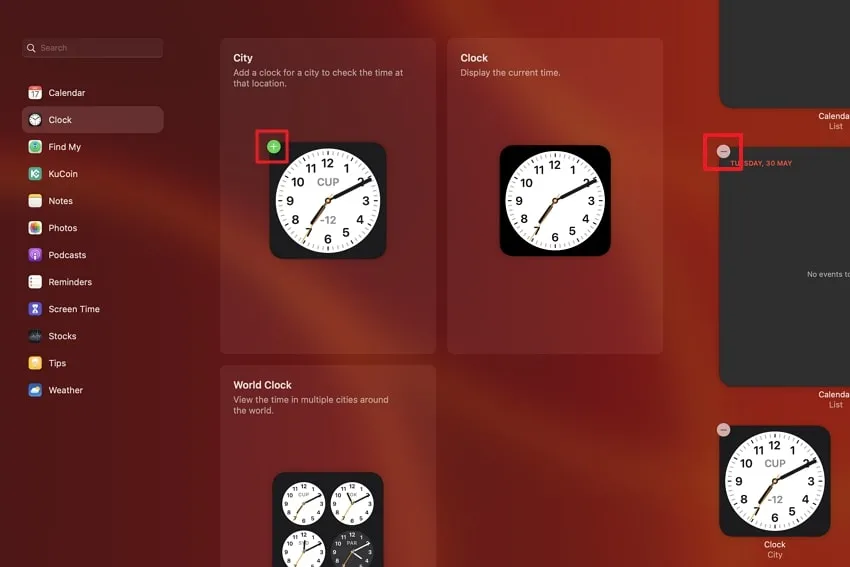
Step 2: Now, you can customize the widgets by tapping the "+" sign to add them and the "-" sign to remove any. Also, tap on the widgets to see more options like watchlist names and details.
How to Customize Mac Desktop Toolbar?
While navigating folders and files on the desktop using Mac can make you feel good. But simultaneously, the toolbar at the top of the screen can be very irritating. Most of the time, you want it to hide to get a clean desktop interface. With the steps below, you can now customize and control your Mac toolbar:
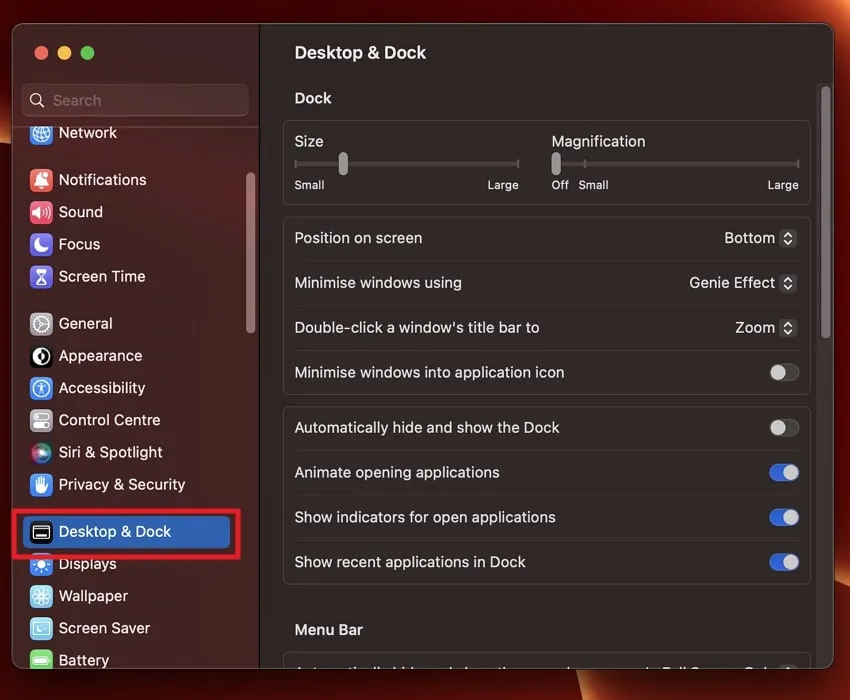
Step 1: Click the Apple icon at the top left corner and access the System Settings. Afterward, select the "Desktop & Dock" option in the left side panel. It will open all the available options to modify the Desktop and Dock.
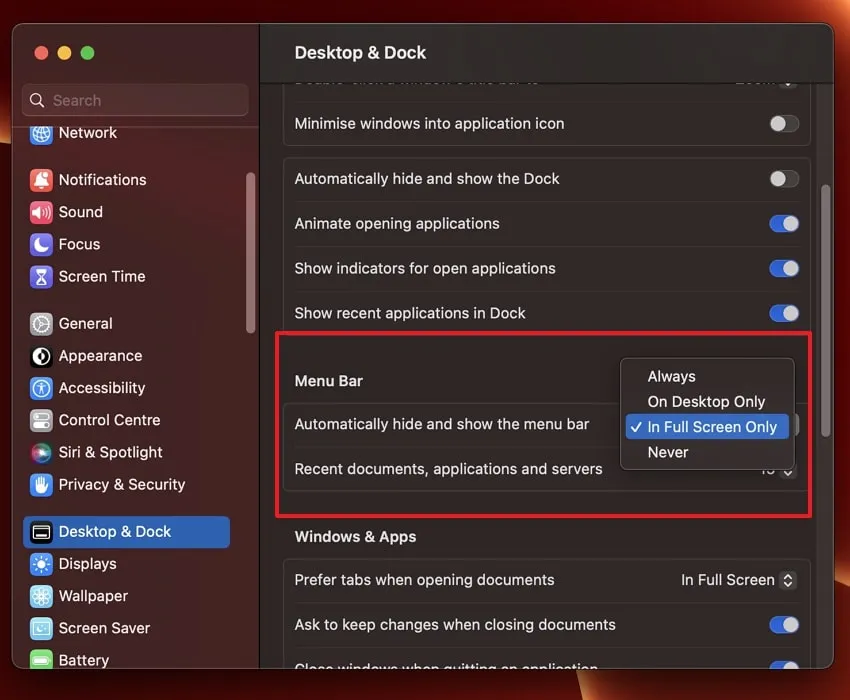
Step 2: Then, in the right-side panel, scroll down to find the "Menu Bar" section. Here you select and customize the toolbar the way you want. You can select whether to show, hide, or do both on particular interfaces. Moreover, you can also have a tab limit ranging from none to 50 as per need.
How to Customize Desktop Background on Mac?
There are many instances where you want to change the Mac desktop background to make it more appealing. You can change the background image within seconds if you are familiar with the steps. Head below to learn how to customize a Mac desktop background smoothly:
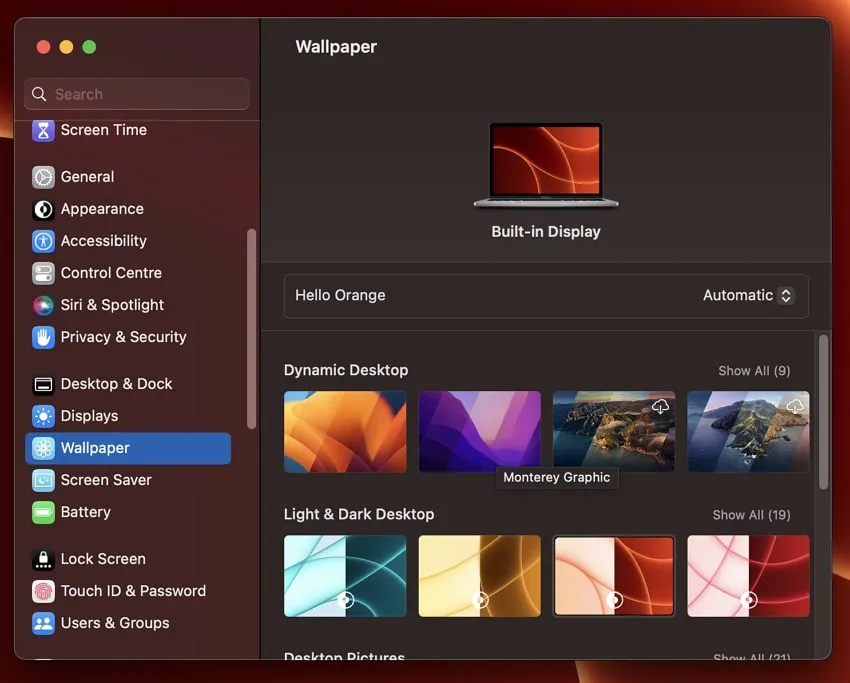
Step 1: Move the cursor to the top left corner and tap the Apple icon. As the drop-down menu opens, head to "System Settings" and scroll down to find the "Wallpaper" option. Tap it to open the Wallpaper menu.
Step 2: You can now select any wallpaper from different categories. These include "Dynamic Desktop," "Light & Dark Desktop," and "Desktop Pictures." Moreover, you can also customize the colors or "Auto-Rotate" wallpaper if you need to.
Part 2. How to Customize Mac Desktop Aesthetic Using Magnet
When multitasking on your Mac, having an organized desktop layout can greatly impact you. That is where Magnet comes in. Available on the App Store, Magnet is a powerful tool that enables you to customize your Mac desktop aesthetic and effortlessly arrange your app windows exactly how you want them. With Magnet, arranging your windows becomes much smoother.
Simply drag an app window to the edge of your display. You can instantly size it to occupy half of the screen. If you prefer a quartered layout, drag the window to one of the corners, and it will snap into place. These convenient arrangements emit the need for constant app switching and significantly enhance your workspace efficiency.
Let's learn how to take control to customize Mac desktop aesthetic and effortlessly organize your app's window to maximize productivity and streamline your workflow:
Step 1: Get the Magnet app from the App Store and download it. Following this, the Magnet tool icon will be displayed in the menu bar of your Mac.
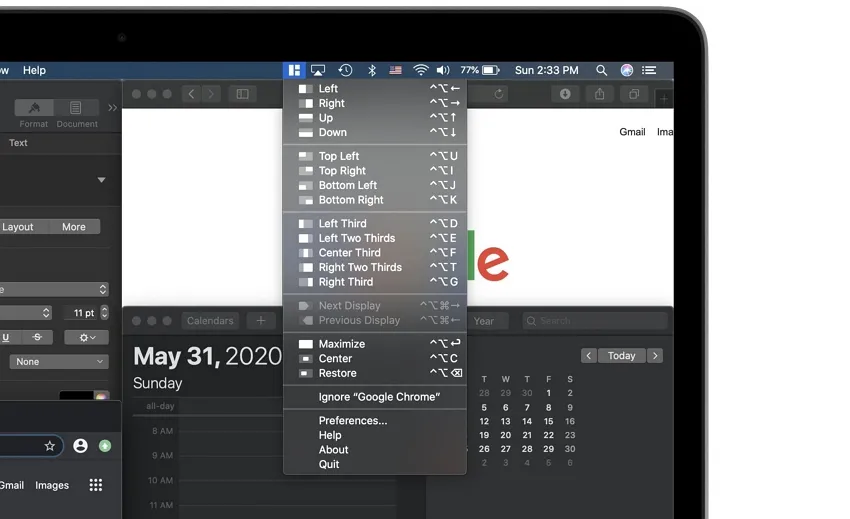
Step 2: Afterward, tap on the Magnet icon, and here you will get a list of positions to customize your desktop aesthetic into. Some of the options are the following:
- Left, right, up, and down
- Top left and right
- Bottom right and left
- Left third and two thirds
- Right two-thirds and third
- Center third
Step 3: Moreover, you can also "Maximize," "Center," and "Restore" the window. In addition, you can also tap on the "Ignore Google Chrome" option to customize your desktop more.
Part 3. How to Manage PDF Files on Mac Desktop
UPDF is a PDF editor tool that is a powerful, user-friendly, and innovative tool that empowers users to handle their PDF documents efficiently. One of the standout features of UPDF is its cloud functionality. With UPDF Cloud, you can securely store your PDF files online, allowing you to access them from anywhere. This means you no longer have to worry about carrying your files on external drives.
Windows • macOS • iOS • Android 100% secure
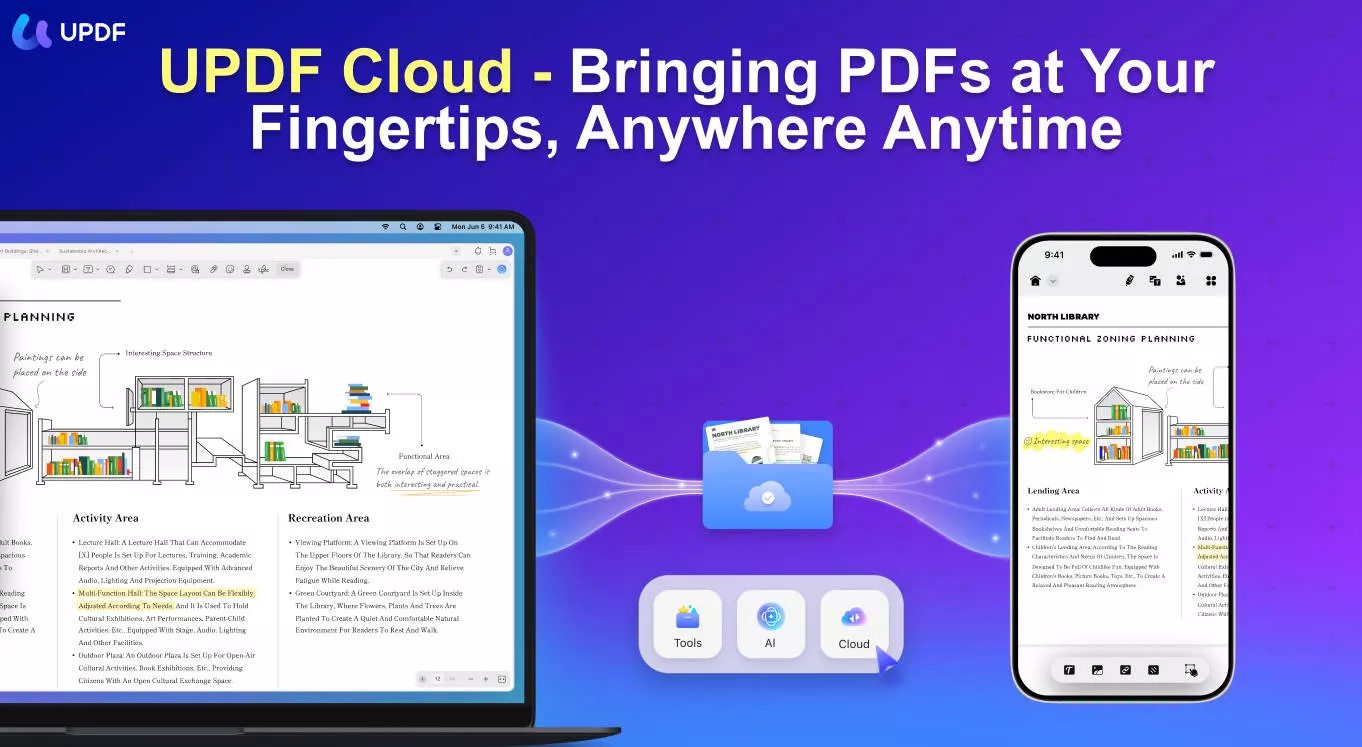
However, the UPDF Cloud goes beyond storage. It also lets you edit your PDF files directly within the cloud environment. Furthermore, UPDF offers a batch-processing feature that allows you to simultaneously work with multiple PDF files. Instead of handling each file individually, you can merge them into a single folder or document.
Steps to Learn Uploading and Batch Processing PDF Files
Keeping your files safe is the major need of this generation. To put this thought in the best possible way, UPDF introduced UCloud. In addition, with batch processing, you can do your tasks faster. Head to the steps below to learn more about both:
Method 1: UPDF Cloud
Step 1: Navigate UPDF Tool and Explore UPDF Cloud
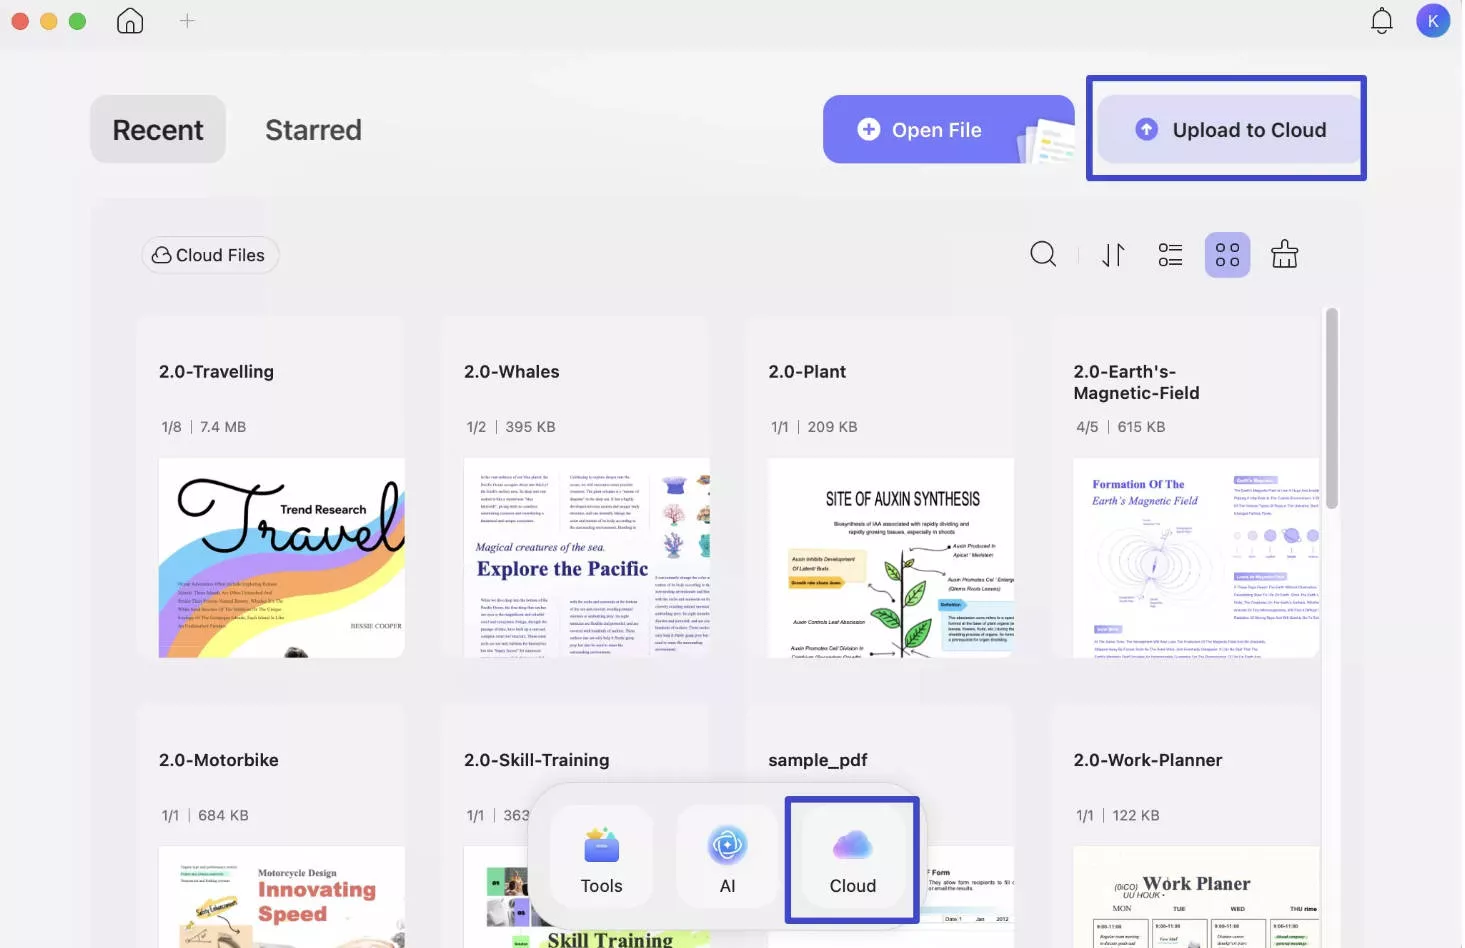
Find the UPDF software on your Mac and double-tap it to open its interface. Continuing this, move the cursor to the left sidebar and select "Cloud" to start uploading files.
Windows • macOS • iOS • Android 100% secure
Step 2: Upload Your Files and Make Any Changes
Next, click the "Upload to cloud" option to find the required PDF file and "Open" it. The file will now automatically be uploaded within seconds. However, you can now "Open," "Download," "Delete," or "Rename" the files if needed. You can also start the files to keep them as a priority.
Method 2: Batch Combine
Step 1: Explore the Tool and Insert Batch Combine
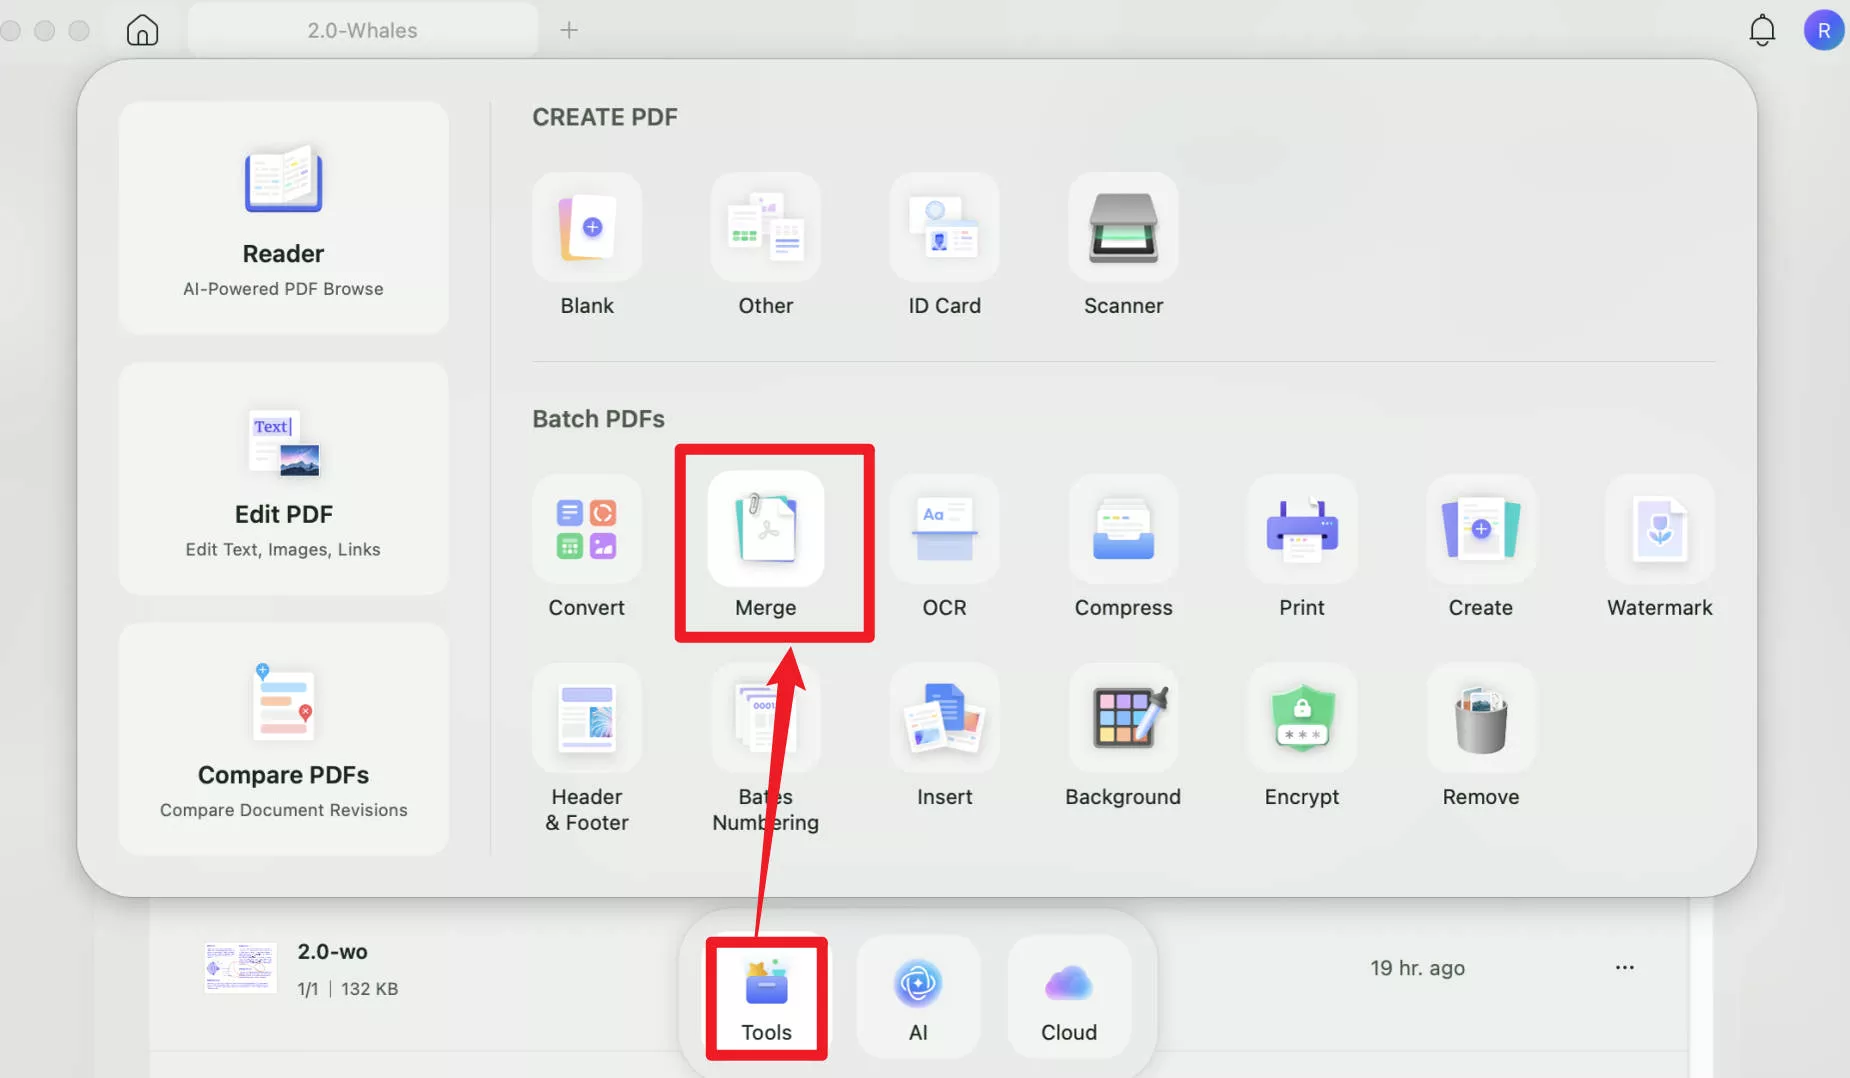
Open the UPDF tool for macOS and make sure that the "Tools" option is selected in the bar on the left side. Next, tap the "Merge" feature, which will forward you to the next window.
Windows • macOS • iOS • Android 100% secure
Step 2: Add Files as Per Need
The next step is to choose the "Add Files" button. It will open a drop-down menu which means that users can "Add File," "Add Open Files," and "Add Folders" based on preferences. Once you add files, tap on three dots and customize the file.
Step 3: Adjust the Files Position and Apply the Changes
Once the files are all open, drag and drop the file to adjust the position. You can also add more documents by using the "+Add Files" button and then start the process by pressing the "Apply" button at the bottom right corner. Next, choose the location where you want to save the combined file.
Final Words
Summing up, customizing a Mac desktop is a fantastic way to personalize and create a workspace that reflects your style and preferences. In this detailed article, we have explored various aspects related to customization, from changing wallpapers and icons to organizing files and optimizing productivity. In comparison, numerous tools and techniques are available to customize your Mac desktop.
It is essential to have a reliable and efficient PDF editor to streamline your file organization and management. In this regard, we highly recommend the UPDF PDF editor. Combining the power of Mac customization and the convenience of UPDF, you can transform your desktop into a visually stunning and highly functional workspace.
Windows • macOS • iOS • Android 100% secure
 UPDF
UPDF
 UPDF for Windows
 UPDF for Mac
 UPDF for iPhone/iPad
 UPDF for Android
 UPDF AI Online
 UPDF Sign
 Edit PDF
 Annotate PDF
 Create PDF
 PDF Form
 Edit links
 Convert PDF
 OCR
OCR PDF to Word
 PDF to Image
 PDF to Excel
 Organize PDF
 Merge PDF
 Split PDF
 Crop PDF
 Rotate PDF
 Protect PDF
 Sign PDF
 Redact PDF
 Sanitize PDF
 Remove Security
 Read PDF
 UPDF Cloud
 Compress PDF
 Print PDF
 Batch Process
 About UPDF AI
 UPDF AI Solutions
 AI User Guide
 FAQ about UPDF AI
 Summarize PDF
 Translate PDF
 Chat with PDF
 Chat with AI
 Chat with image
 PDF to Mind Map
 Explain PDF
 Scholar Research
 Paper Search
 AI Proofreader
 AI Writer
 AI Homework Helper
 AI Quiz Generator
 AI Math Solver
 PDF to Word
 PDF to Excel
 PDF to PowerPoint
 User Guide
 UPDF Tricks
 FAQs
FAQs UPDF Reviews
 Download Center
 Blog
Blog Newsroom
 Tech Spec
 Updates
 UPDF vs. Adobe Acrobat
 UPDF vs. Foxit
 UPDF vs. PDF Expert




 Enrica Taylor
 Enola Miller
 Delia Meyer
