With the rise of digitization, it has become a norm to store all of your essential hard documents in PDF form. To do that, the most commonly used tool is a photo-to-PDF scanner due to its high accuracy and quick working. It is an efficient solution for turning physical photographs into high-quality digital PDFs.
While there are many photo scanner to PDF tools available, selecting the right one for all your devices is essential. This extensive guide will take a look at the best photo-to-PDF scanner app for iOS devices and how to use it.
Part 1. The Best Photo to PDF Scanner for iPhone and iPad
As you usually deal with documents and images of a sensitive nature when scanning, having a trusted and reliable tool matters a lot. Plus, scanning photos to PDF can be a challenging task that is often complicated by many issues. These include image distortion, poor quality, and the need for multiple scans to capture both sides of documents.
For iOS users, UPDF is an intuitive photo scanner to PDF solution to create a high-quality digital archive. With this app, you can effortlessly scan multiple images and compile them into a single PDF. Additionally, UPDF allows you to scan the front and back sides of IDs, driver licenses, or bank cards to a single-page PDF. Click the button below to get a free trial.
Windows • macOS • iOS • Android 100% secure
These features ensure your scans are well-organized and professionally presented, making UPDF stand out:
In-Depth Tutorial on How to Scan Photos to PDF via UPDF
For any general document or picture you want to turn in a PDF document, utilize the in-depth guide given below:
Step 1. Initiate the Scanner in UPDF to Scan Images
After ensuring that the UPDF app is installed and running on your iOS device, access the "Scanner" option within the app from the lower right corner. Now, hit the "Camera icon and start scanning the documents or images by placing them in front of the phone. The app will automatically take the needed image if "Auto Capturing" is enabled.
Step 2. Save the Scanned File by Using Convert to PDF
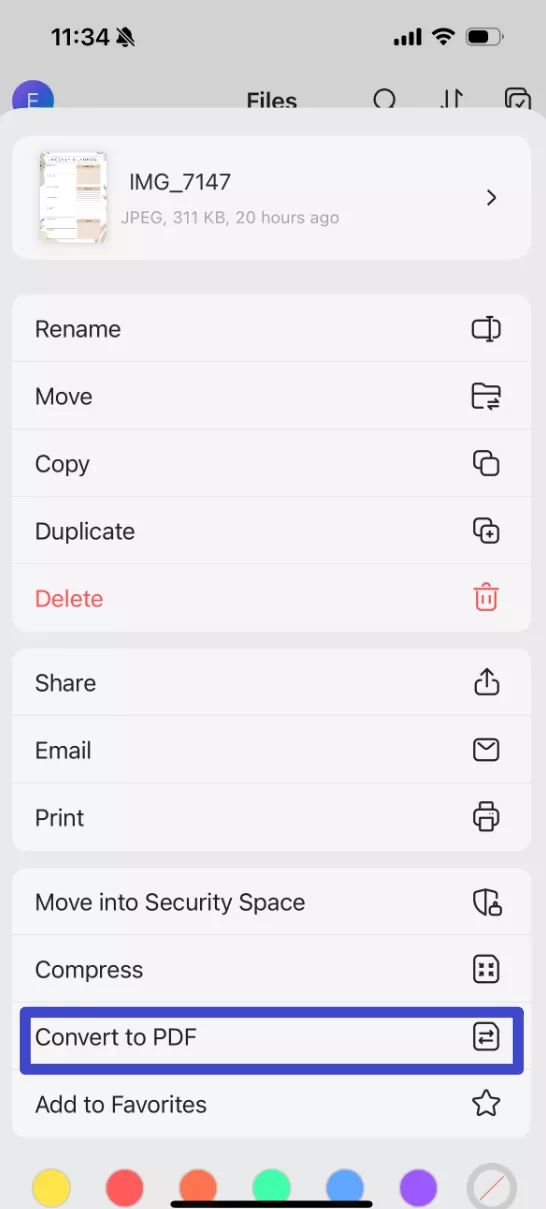
After the photo is taken, tap "Done" if it is satisfactory or utilize "Retake" or "Reset." You can later rotate the image or crop it along with applying filters. When you are done, hit the "Download" icon from the upper-right corner to save it to "My Scans." Once it is saved there, access the file by pressing the three dots and utilizing "Convert to PDF" to turn your file into PDF.
Extensive Manual on How to Scan ID Card/Bank Card to One Page PDF
Since you need to scan both sides of an ID to the same page, you can employ UPDF to do that via the following steps:
Step 1. Get Your ID Card and Scan Its Front and Back
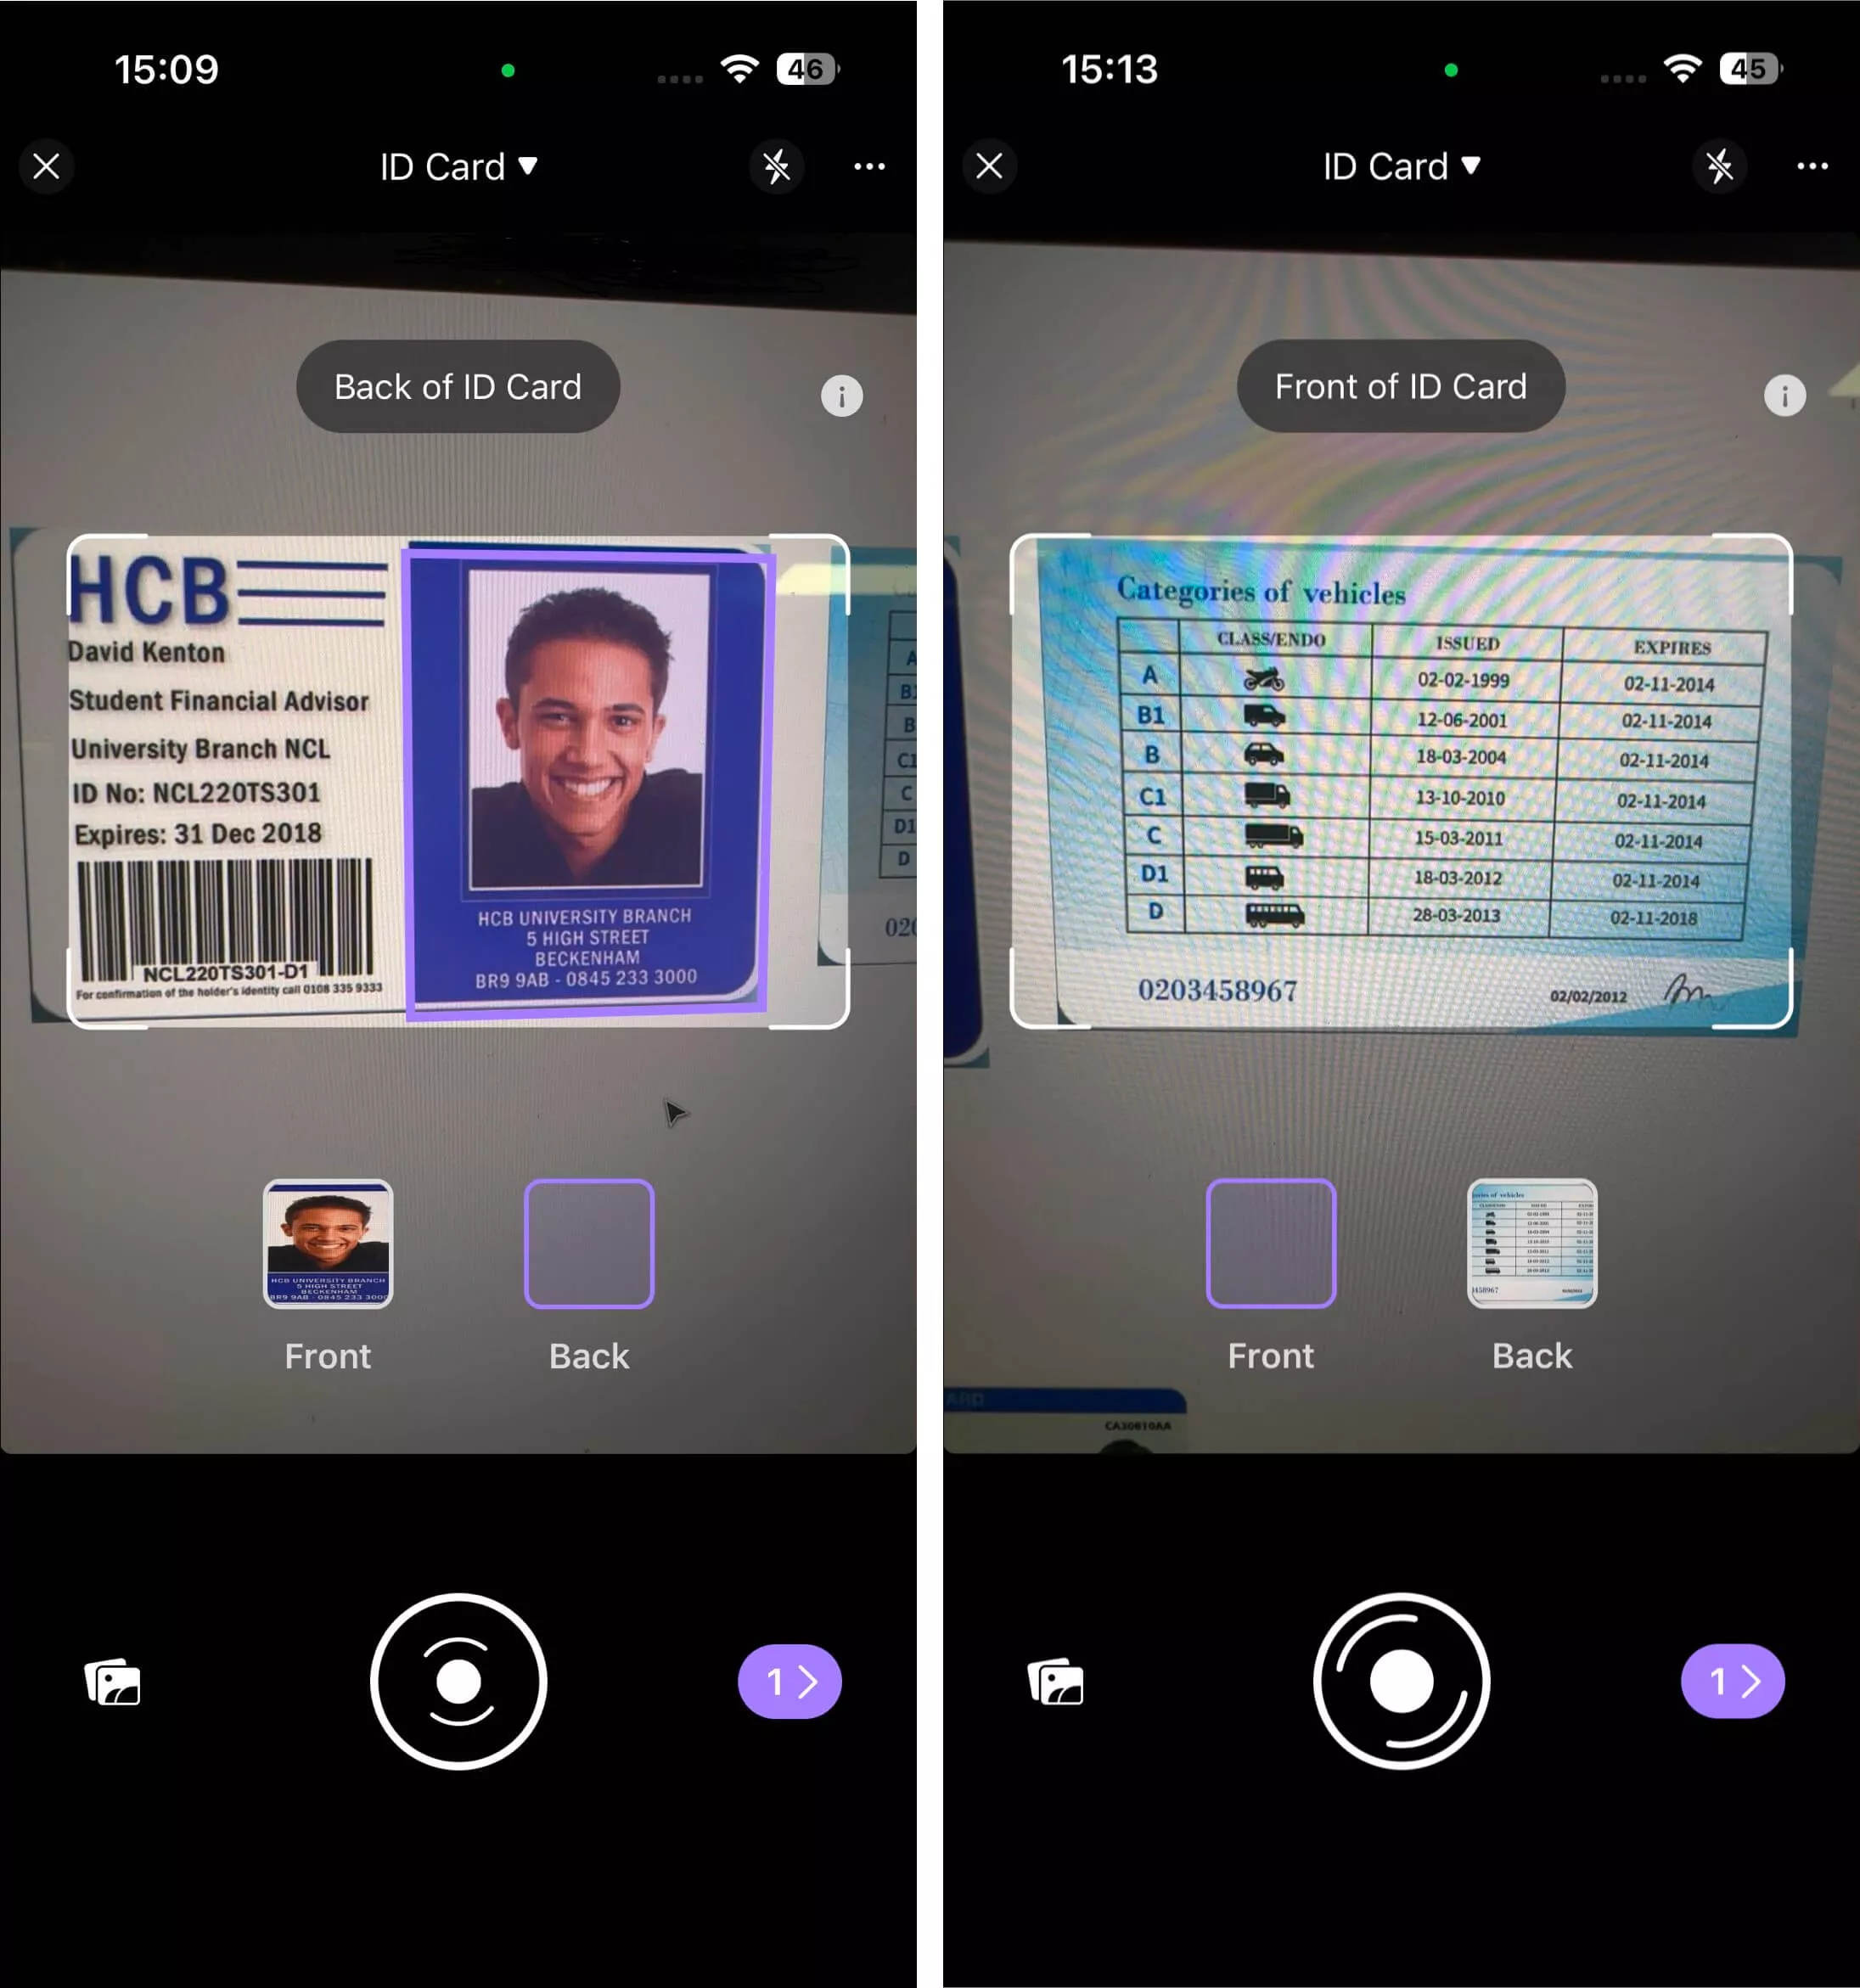
When you tap the camera icon from the "Scanner" option in UPDF, you will get to choose between "Document" and "ID Card" modes. Here, tap "ID Card" and point the device camera on your ID card's front side to take an image for "Front." Repeat the procedure to take another photo for the "Back" option.
Step 2. Turn Your Scanned ID Card Images into PDF
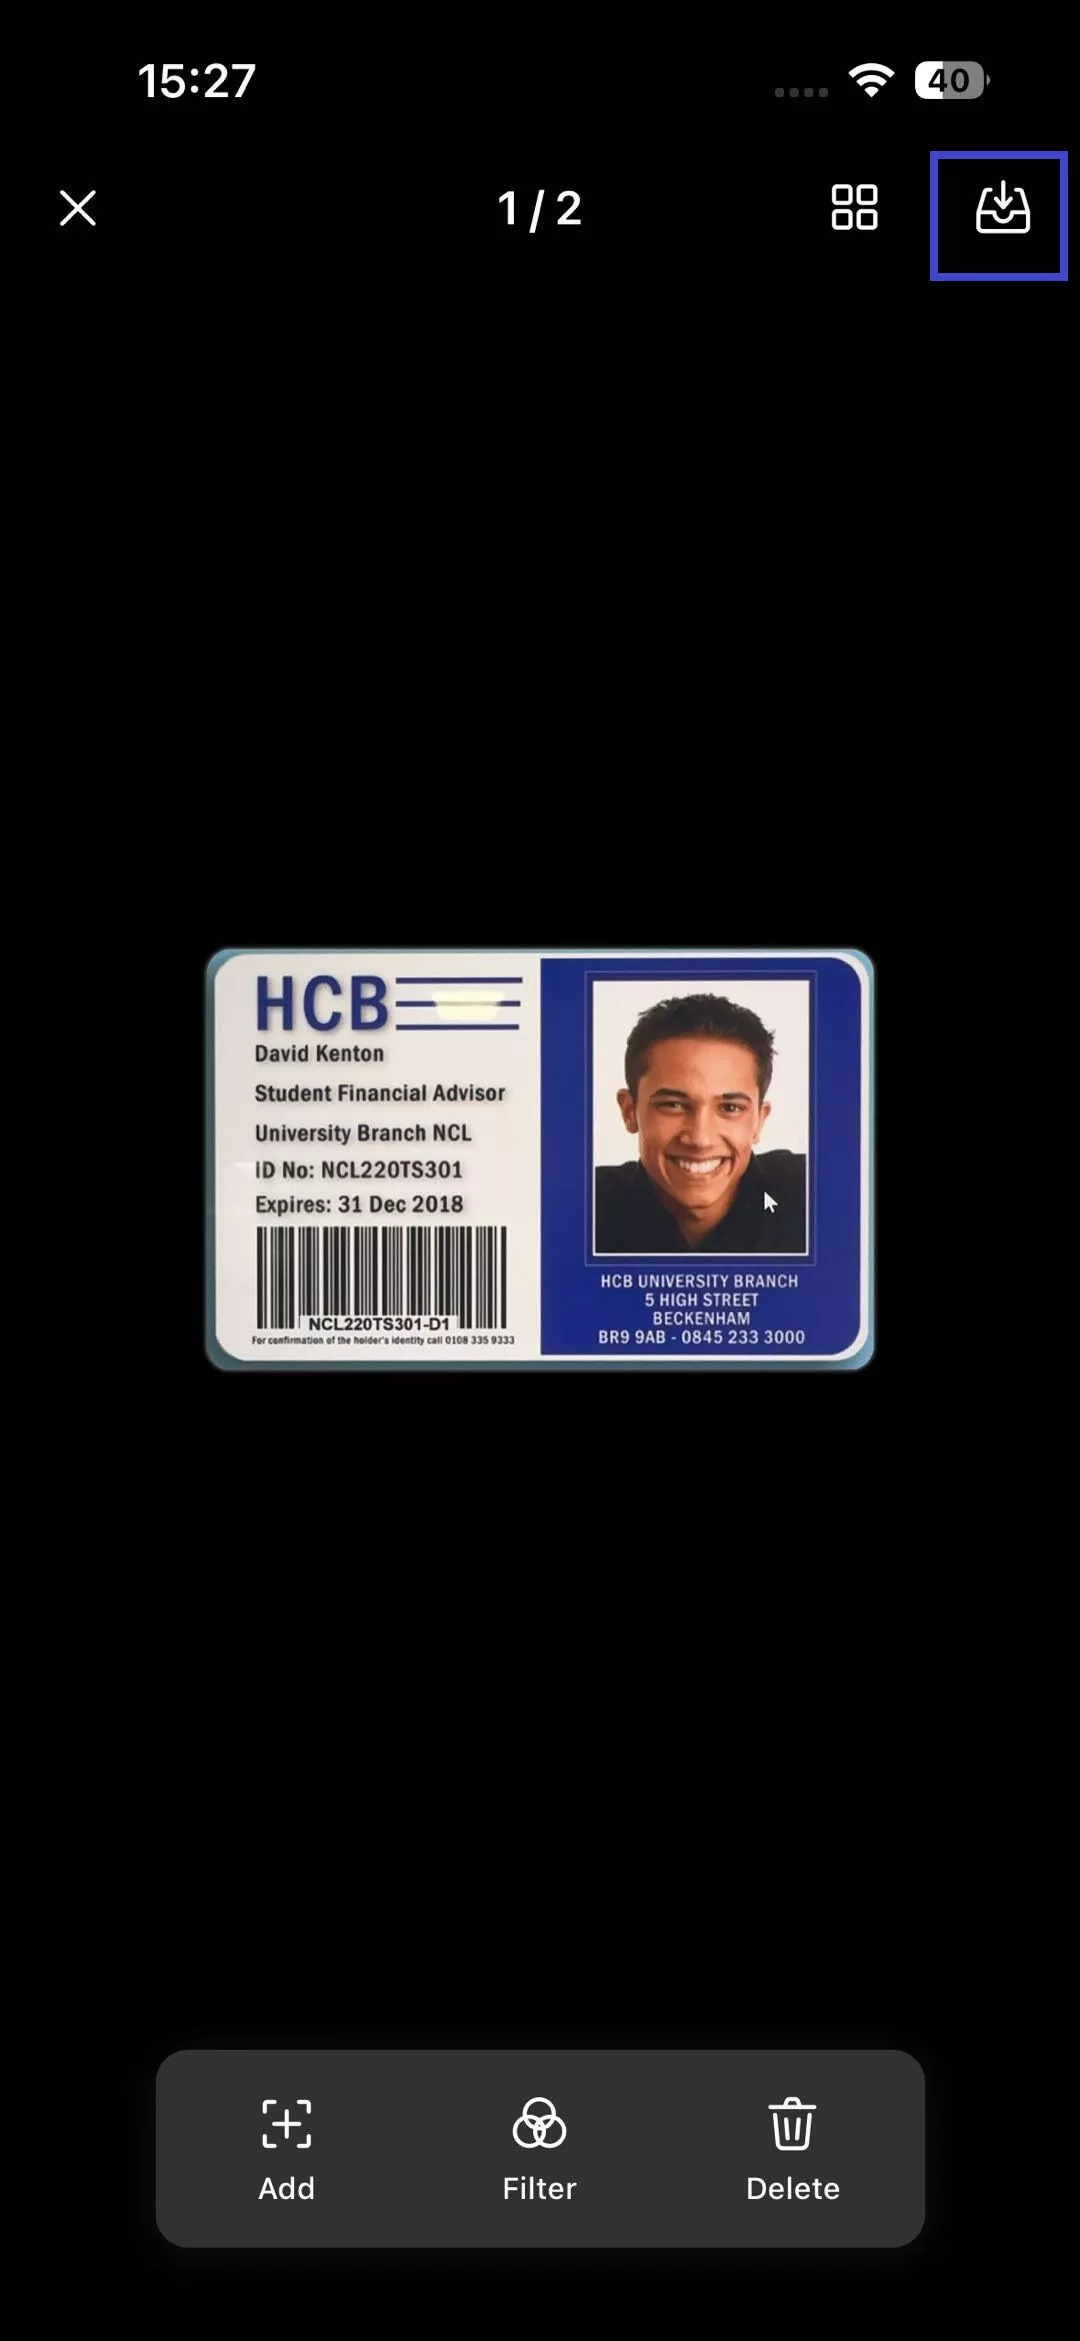
Once both sides are scanned, you can preview them on the screen to see if you want to retake them. When satisfied, tap the "Download" icon from the top right corner to save the scanned card to "My Scans." Following this, you can convert it into a PDF document using the provided options in the same section.
To learn more about UPDF, you can watch the video below.
What Else UPDF Can Do For You
In addition to its robust photo and ID card scanning capabilities, UPDF offers a range of other impressive features for iOS users:
- Advanced PDF Editing: Easily edit text, images, and annotations within your PDF files.
- Document Annotation: Add highlights, comments, and drawings to enhance your PDFs.
- File Conversion: Convert PDFs to various formats such as Word, Excel, and PowerPoint.
- Organize and Merge PDFs: Combine multiple PDFs into one or rearrange pages as needed.
This robust photo-to-PDF scanner app is full of a lot more advanced features.
Part 2. Converting Scanned PDFs to Editable/Searchable Format After Photo to PDF Scanner
The story doesn't end here once you have converted all of your hard documents or images into digital documents via photo to PDF scanner. There is a chance you might find that you need to make the content editable or searchable. This is particularly important for managing scanned documents efficiently, allowing for easy text extraction and modifications. However, doing this on your mobile phone is not likely possible.
To remedy that, UPDF offers a robust OCR feature designed to transform scanned PDFs into editable and searchable documents for its desktop apps. This functionality is ideal for enhancing the usability of your scanned files, allowing you to search for text, make edits, and organize information. Along with OCR, the program is full of premium features ranging from creating interactive forms to advanced AI tools.
Elaborate Instruction for Converting Your Scanned Documents into Editable PDFs
After you have your scanned files from your iOS device to your Mac through UPDF Cloud or any other method, follow these steps to make them editable:
Step 1. Access Recognize Text Using OCR in UPDF
Download UPDF on your Windows or Mac computer - the OCR feature is available in these two versions.
Windows • macOS • iOS • Android 100% secure
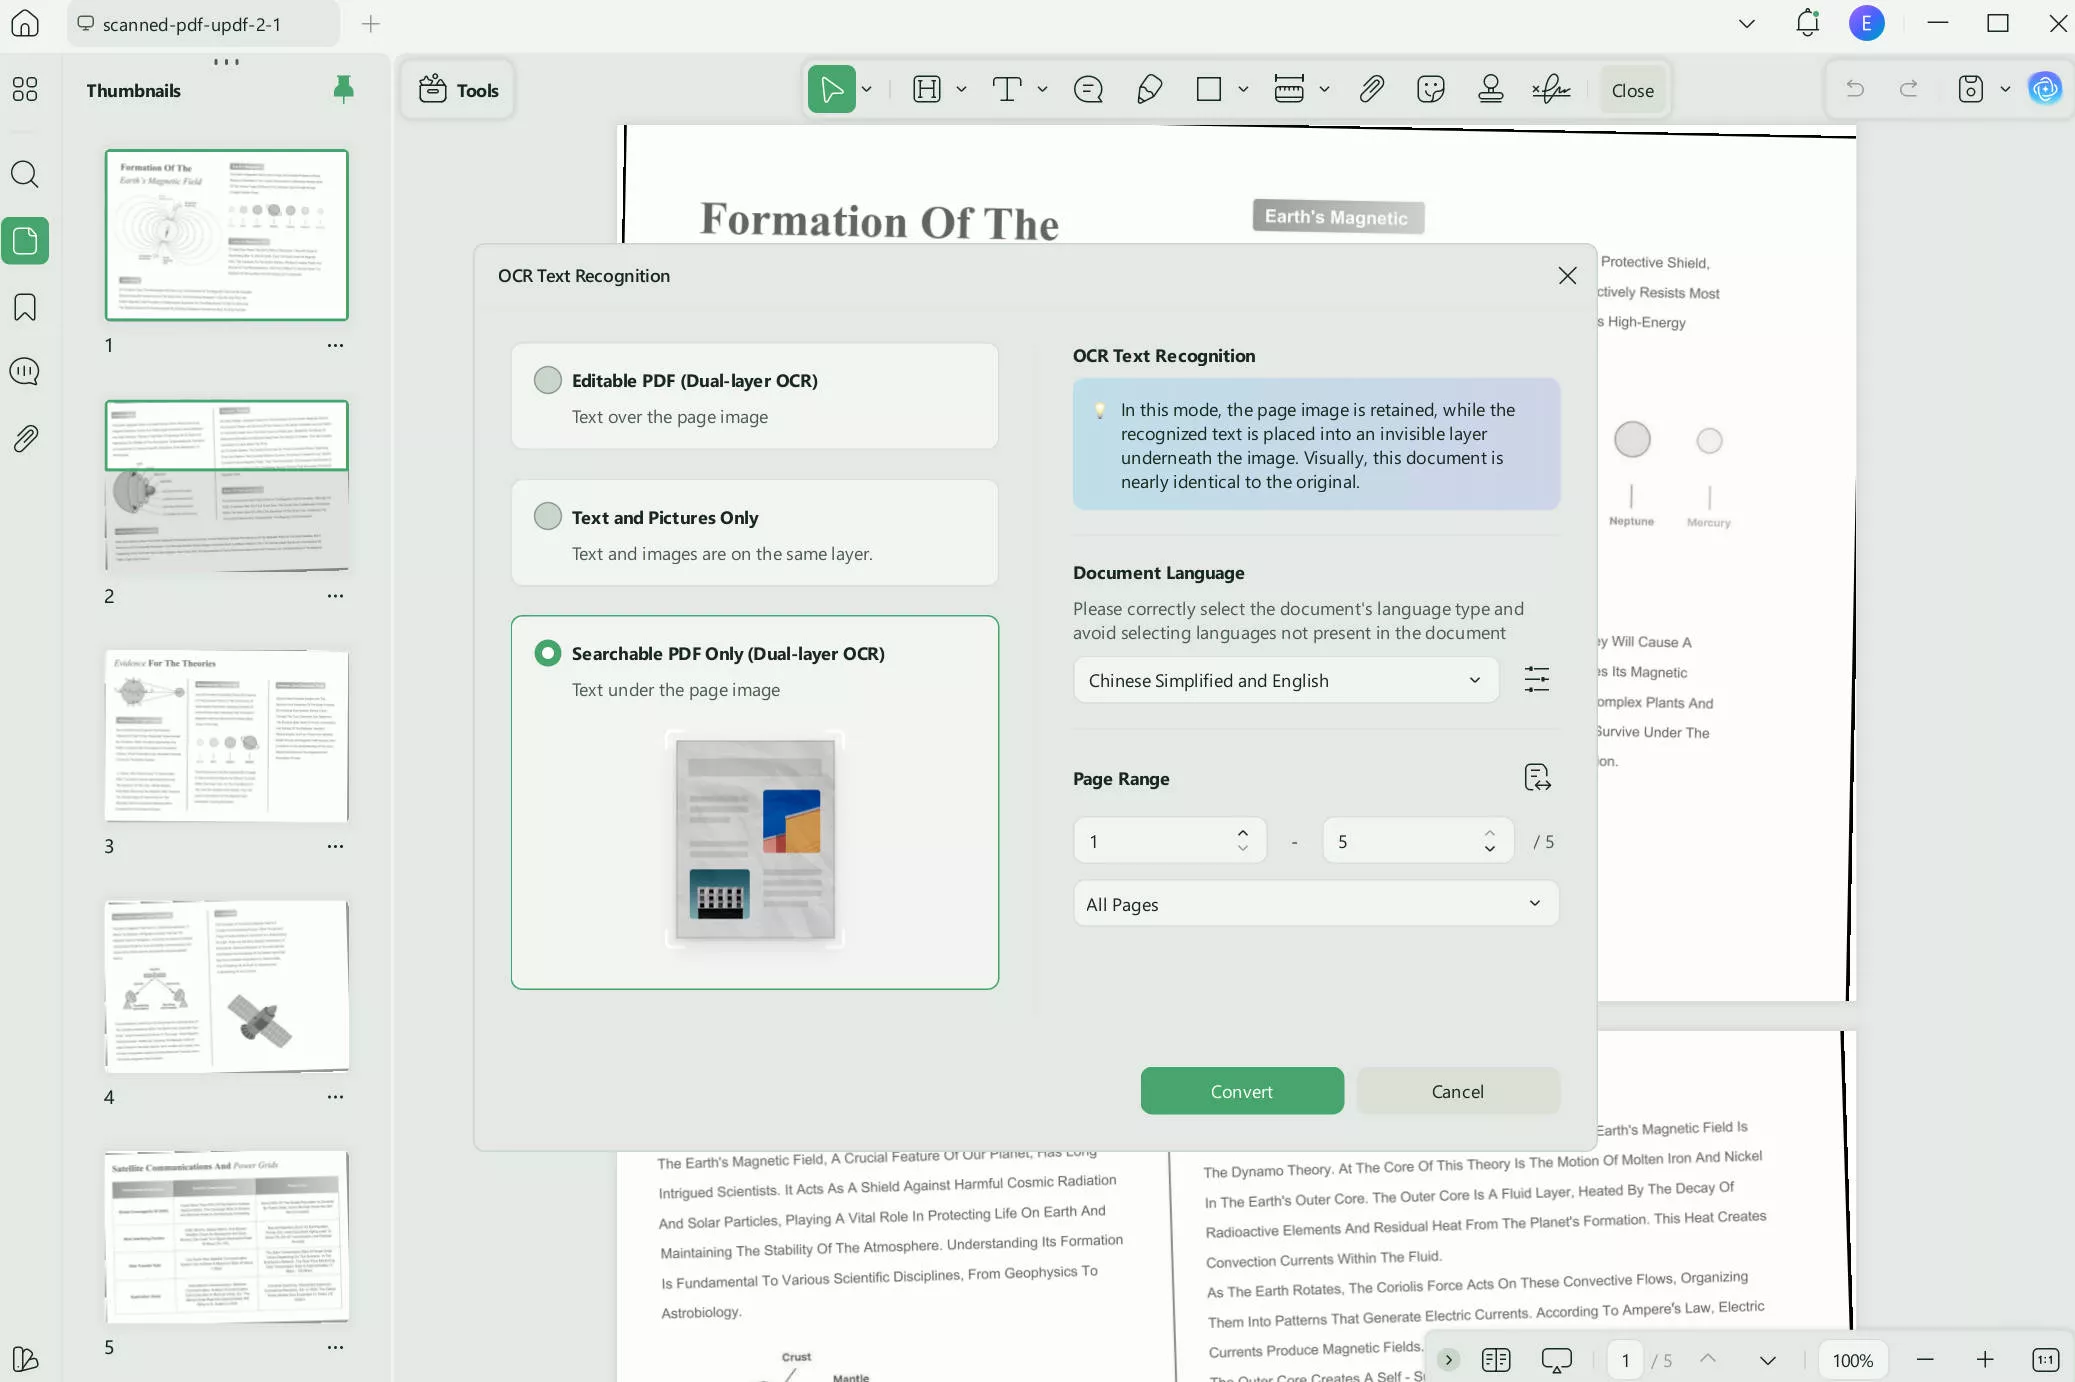
You need to open your scanned PDF into the platform and access the "Recognize Text Using OCR" option on the right. As a window pops up, select the "Document Type" as "Searchable PDF" and define the "Layout" out of 3 available options. You are also provided with 38 different choices of "Document Language" from the same window.
Step 2. Save the New File to Perform OCR
Define the "Image Resolution" along with the page range that needs to be made editable through OCR. With all the OCR settings defined, use the "Convert" button and save the file for completing the process.
Detailed Guidelines on Creating PDFs from Scanners via UPDF on Windows
Making a new PDF document using the PNG to PDF scanner option to scan your images or documents directly via Windows is also possible. UPDF is the way to do that without facing any issues and exercising maximum control by utilizing the following guide:
Step 1. Access PDF from Scanner in UPDF
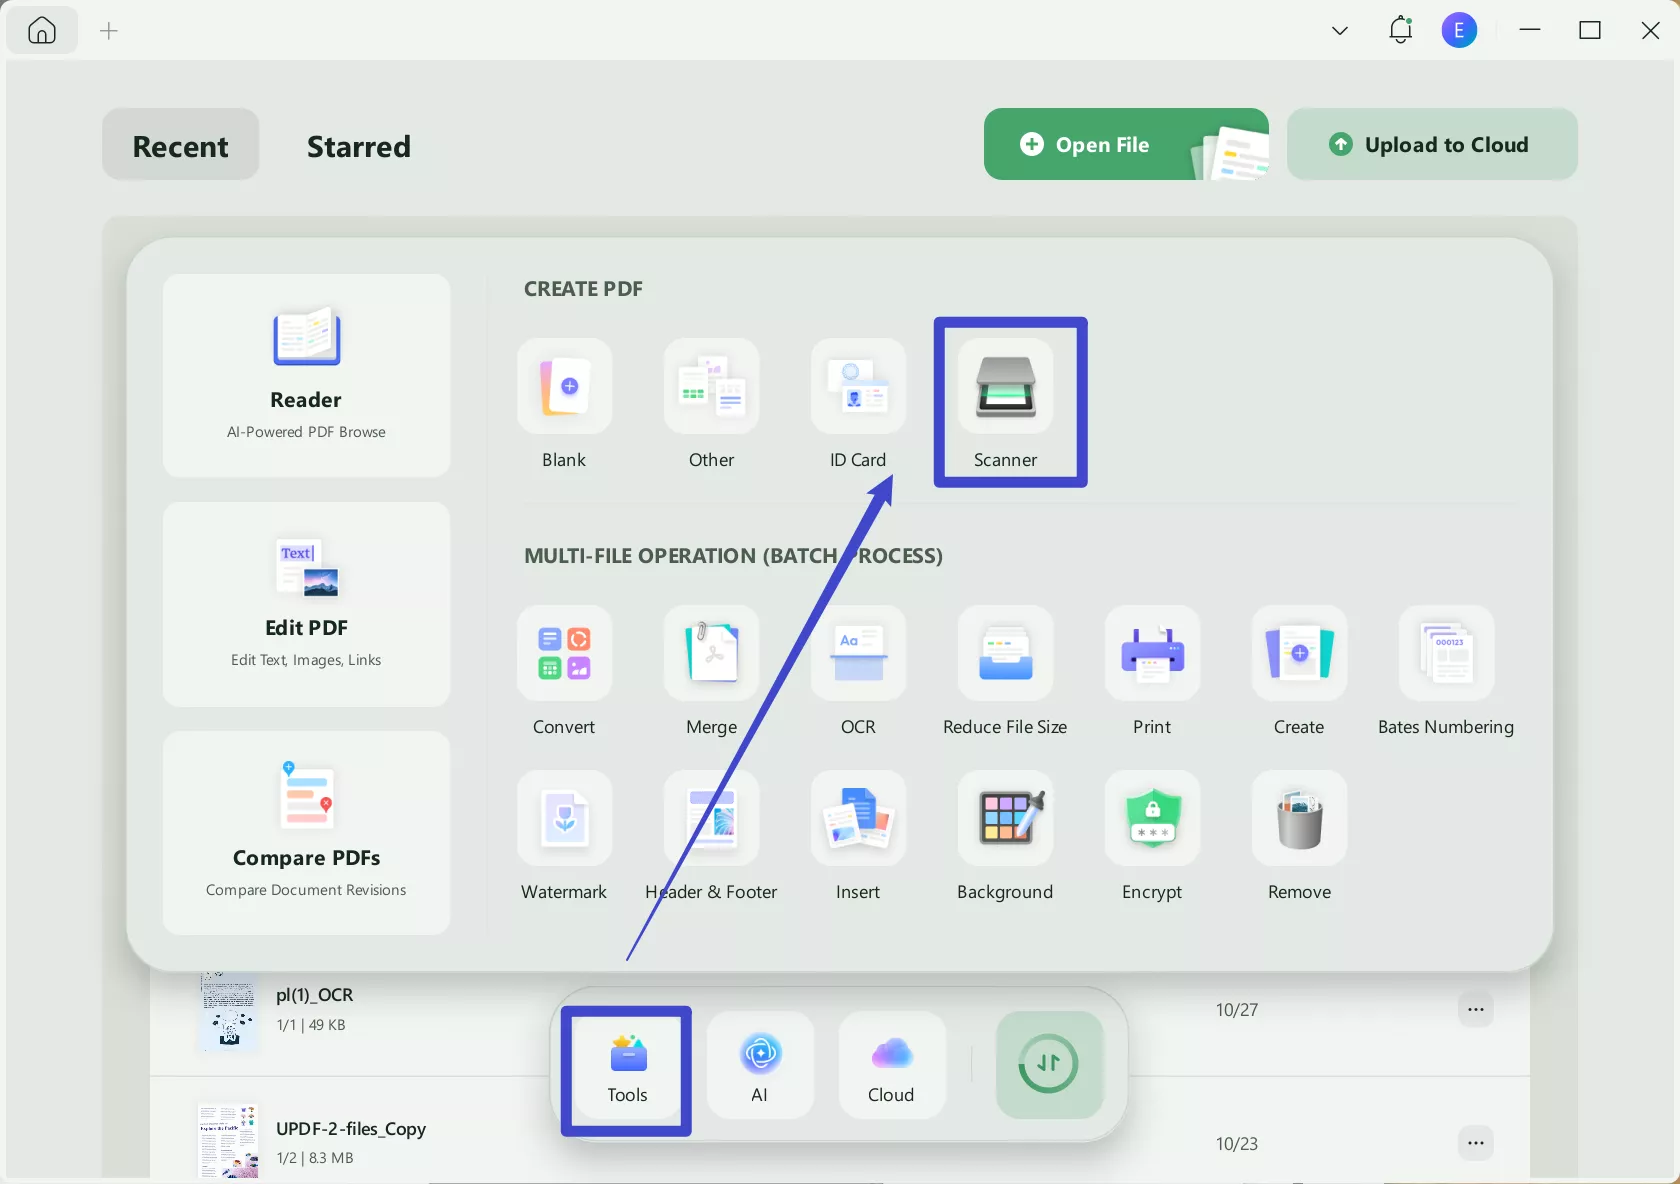
Begin by launching UPDF on your Windows computer and accessing the "Tools" button at the bottom. Here, hover the cursor over the "CREATE PDF" option and choose "Scanner" from the list of available options. At this point, ensure a scanner to scan photos is attached to your computer.
Step 2. Select the Scanner Type and Related Settings
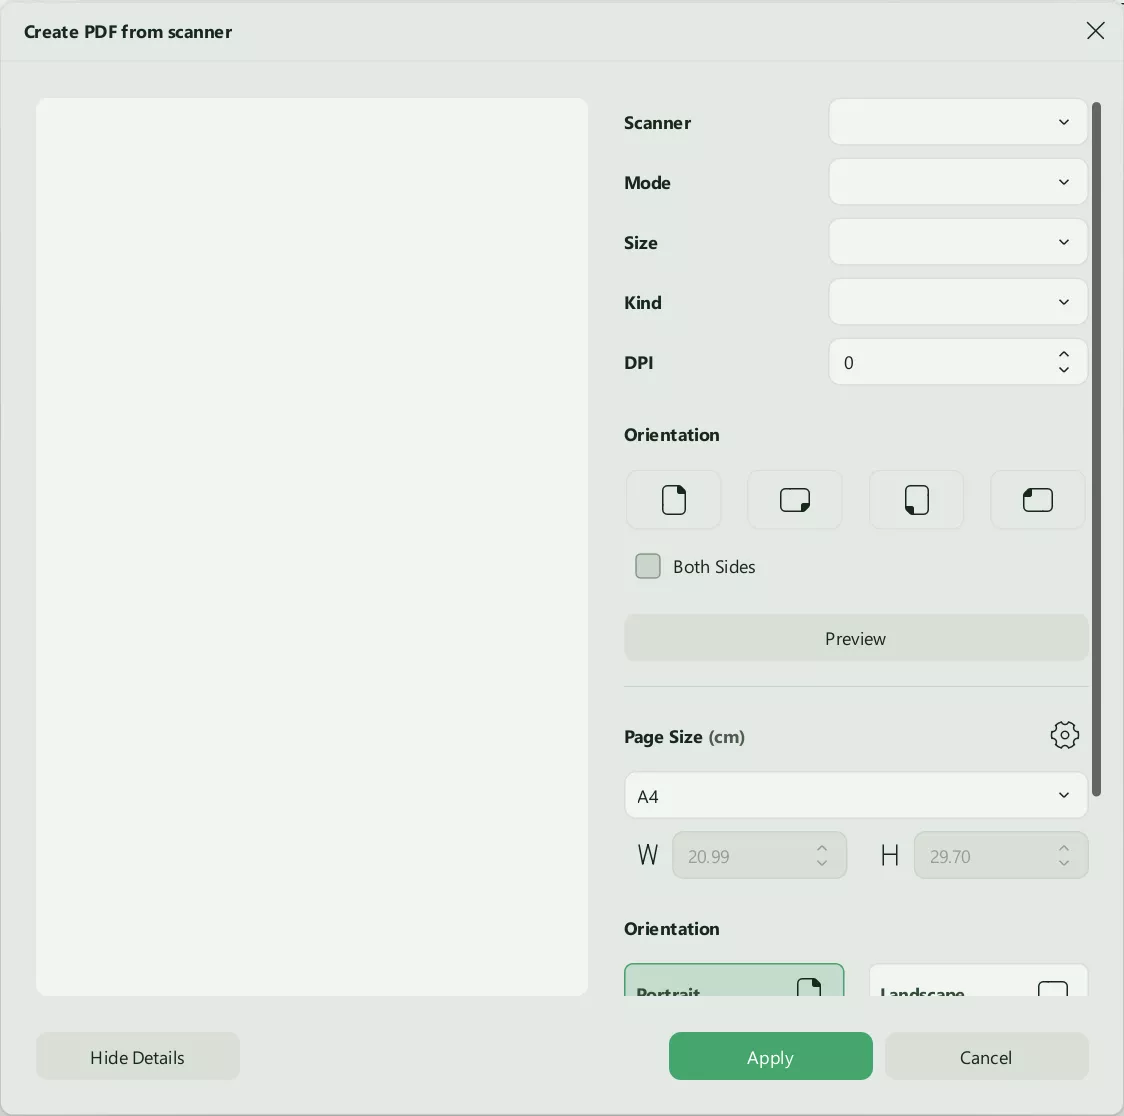
When you access the "Create PDF from scanner" window, choose the "Mode" of your scanner between "Flatbed" and "Document Feeder." For flatbed choices, proceed to define "Kind" and "File Setting" to select the color and size of the pages. As for the document feeder, select options for "Paper Size," "Kind," and "Orientation."
Step 3. Preview the Expected PDF and Initiate Scanning
Once you have defined the settings for the scanner, you can "Preview" the expected result of the scanned documents. After that, decide if you want to combine the scanned images into one PDF and run OCR. Lastly, hit "Scan" to kickstart the process, and the new file will automatically open in UPDF after completion.
Part 3. FAQs About Photo to PDF Scanner
Scanning your images and hard documents into editable PDF files can be a complex process to master. Answered below are some of the FAQs people have about the JPG to PDF scanner apps:
1. What is a scanned PDF?
It is a digital document created by scanning a physical page, image, or photo using a scanner. The scanned image is then saved as a PDF file containing pictures of the original document rather than editable text. With tools like UPDF, you can apply OCR to make the text within a scanned PDF searchable and editable.
2. How to convert a photo into a document like word?
To do that, you can first use UPDF to scan your images into a PDF file on your iOS device. Refer to Part 1 for detailed steps of this procedure. To convert, open it in UPDF on the desktop to select the "PDF Export" option and Choose "Word" as the output format. After that follow the on-screen prompts to complete the conversion while visiting this link for a detailed guide.
3. How can I scan a document and save it as a PDF?
You can do it using UPDF on your Windows computer with an attached scanner. With the " PDF from Scanner" feature, you can easily digitize your physical documents and convert them directly into PDF files. To learn more about this feature, check out the UPDF for Windows User Guide and refer to Part 2 of this article for related content.
Conclusion
In summary, converting photos to PDFs has become an essential task in today's digital world. With photo-to-PDF scanner apps like UPDF, this process is more accessible and efficient than ever. From scanning photos and ID cards to making PDFs editable and searchable, it offers a comprehensive solution tailored to your needs. Since it is available for all devices, UPDF provides flexibility and functionality for handling all documents.
Windows • macOS • iOS • Android 100% secure
 UPDF
UPDF
 UPDF for Windows
 UPDF for Mac
 UPDF for iPhone/iPad
 UPDF for Android
 UPDF AI Online
 UPDF Sign
 Edit PDF
 Annotate PDF
 Create PDF
 PDF Form
 Edit links
 Convert PDF
 OCR
OCR PDF to Word
 PDF to Image
 PDF to Excel
 Organize PDF
 Merge PDF
 Split PDF
 Crop PDF
 Rotate PDF
 Protect PDF
 Sign PDF
 Redact PDF
 Sanitize PDF
 Remove Security
 Read PDF
 UPDF Cloud
 Compress PDF
 Print PDF
 Batch Process
 About UPDF AI
 UPDF AI Solutions
 AI User Guide
 FAQ about UPDF AI
 Summarize PDF
 Translate PDF
 Chat with PDF
 Chat with AI
 Chat with image
 PDF to Mind Map
 Explain PDF
 Scholar Research
 Paper Search
 AI Proofreader
 AI Writer
 AI Homework Helper
 AI Quiz Generator
 AI Math Solver
 PDF to Word
 PDF to Excel
 PDF to PowerPoint
 User Guide
 UPDF Tricks
 FAQs
FAQs UPDF Reviews
 Download Center
 Blog
Blog Newsroom
 Tech Spec
 Updates
 UPDF vs. Adobe Acrobat
 UPDF vs. Foxit
 UPDF vs. PDF Expert




 Enola Miller
  Enola Davis