Many scenarios urge the need to rotate images. You may want to fix the orientation of a captured image, rotate scanned documents, or adjust the alignment of images for design purposes. Since rotating images is a common practice, there are many ways/tools to rotate images horizontally or vertically. That's what we will cover in this guide. However, if you want to rotate an image or document to 90 or 180 degrees, then UPDF is the simplest tool to use. So, you can skip this guide, install UPDF on Windows/Mac/smartphone, and rotate the image right away.
Windows • macOS • iOS • Android 100% secure
Part 1. Identify Your Needs and Choose the Right Solution
When it comes to rotating images, there are many variations. So, it's important that you identify your needs and choose the right solution, as follows:
- You aim to rotate an image to 90 or 180 degrees – Read Part 2 of this guide.
- You aim to rotate an image to any angle – Read Part 3 of this guide.
So, head to the right part of this guide to learn how to rotate images online or offline.
Part 2. Free Methods: Rotate Images to 90 or 180 Degrees
Since the most common image rotation requests are related to rotating to 90 or 180 degrees, there are multiple free ways to get it done. Let's uncover those methods in detail:
1. Rotate Images Through Windows' Built-in Feature
Windows has a built-in feature to rotate images to the left/right 90 or 180 degrees. Follow the below steps to rotate images through Windows' built-in feature:
Step 1. Open the Windows File Explorer and go to the folder where the image is saved.
Step 2. Right-click the image and then select one of the options, i.e., Rotate right or Rotate left. You will notice that the image gets rotated 90 degrees in the right or left direction, as specified.
Step 3. To rotate the image 180 degrees, right-click the image and click the "Rotate right" or "Rotate left" twice.
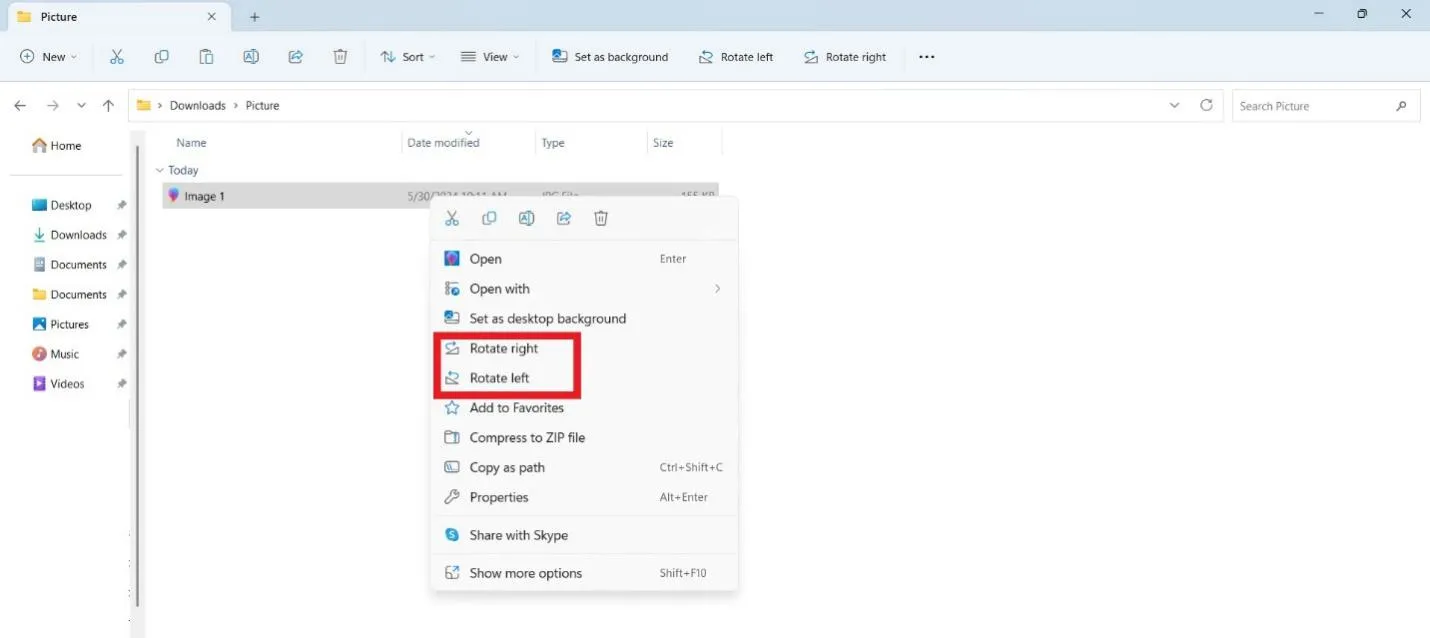
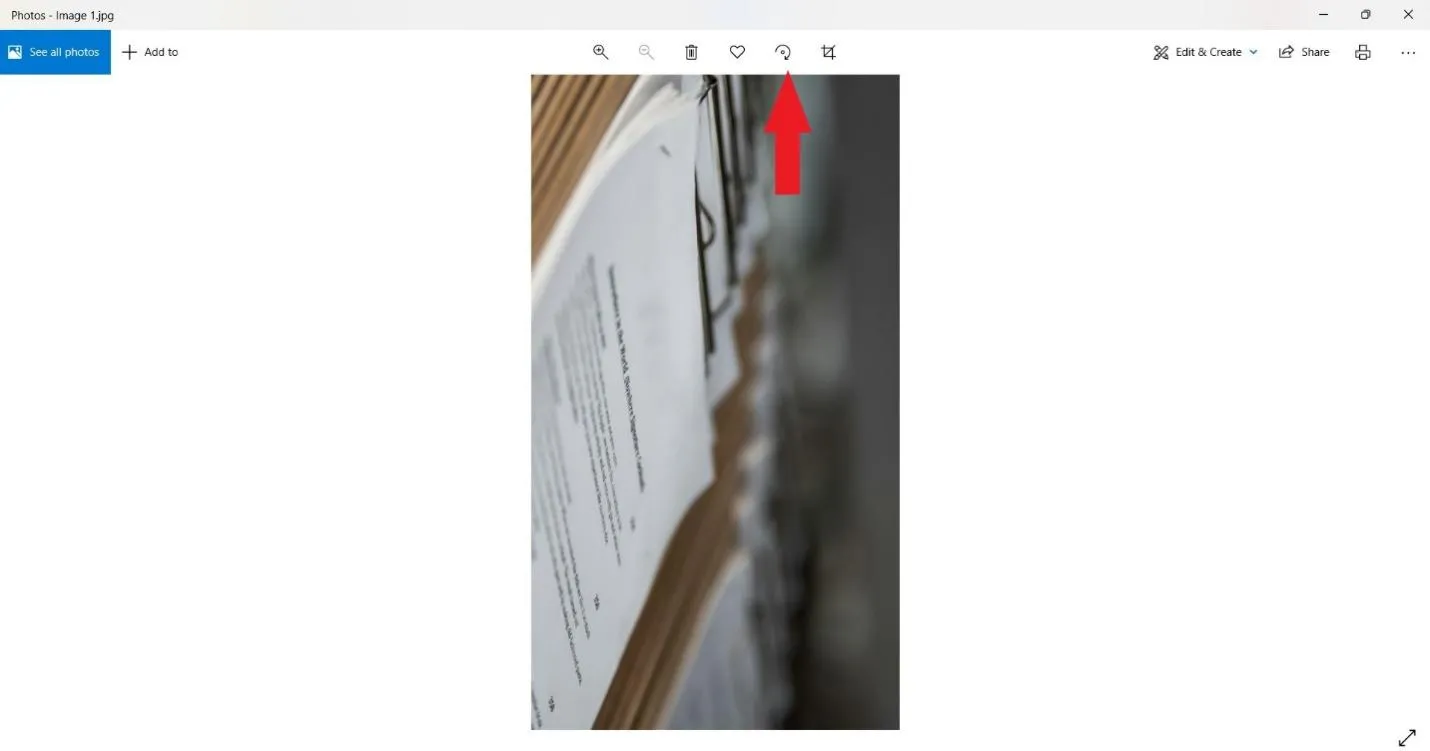
This way, you can easily rotate images using the Windows built-in feature. Alternatively, you can also open the image in the Windows Photos app and use the rotate option to get the 90 or 180 degree rotation.
2. Rotate Images Through Mac's Built-in Feature
Just like Windows, Mac also has a built-in feature to rotate images. Here's how to rotate images on Mac with its built-in feature:
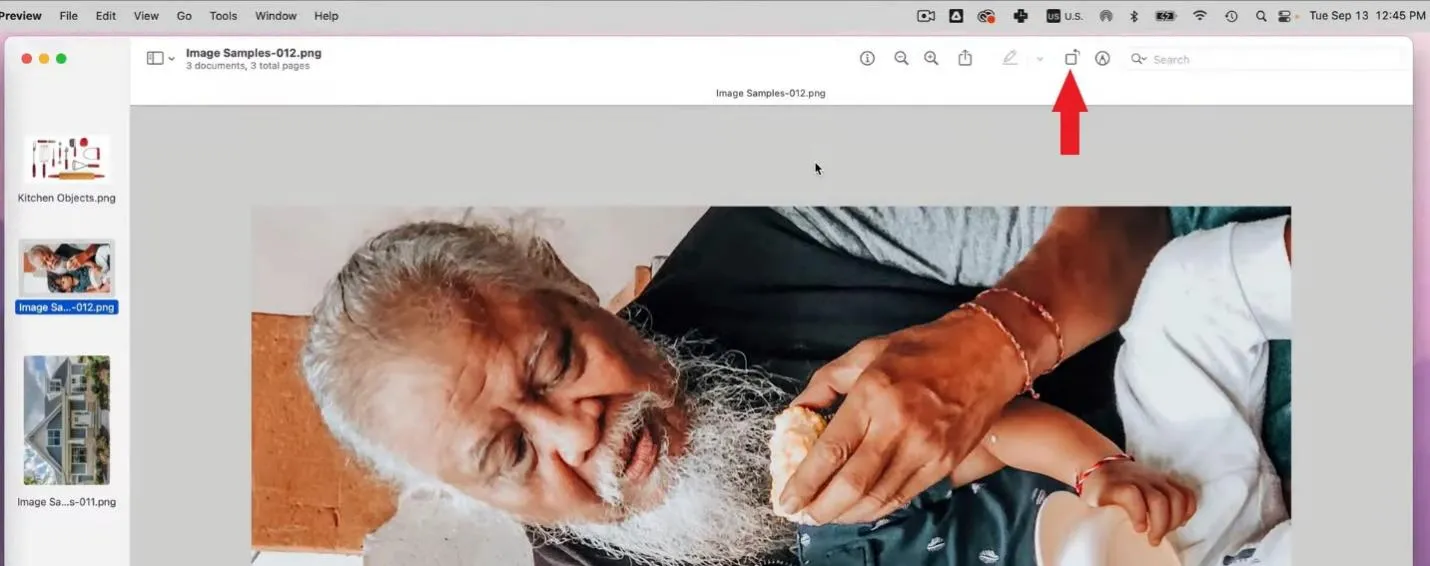
Step 1. Launch the Preview app on your Mac and open the image file to rotate.
Step 2. Follow one of the options below:
- Rotate an image: Click the "Rotate Left" icon from the top to rotate the image to the left. Continue pressing it to keep rotating the image.
To rotate the image to the right, press and hold the "Option" key and click the "Rotate Right" icon until you are done rotating.
- Flip an image: Go to the "Tools" tab from the top and select either "Flip Horizontal" or "Flip Vertical".
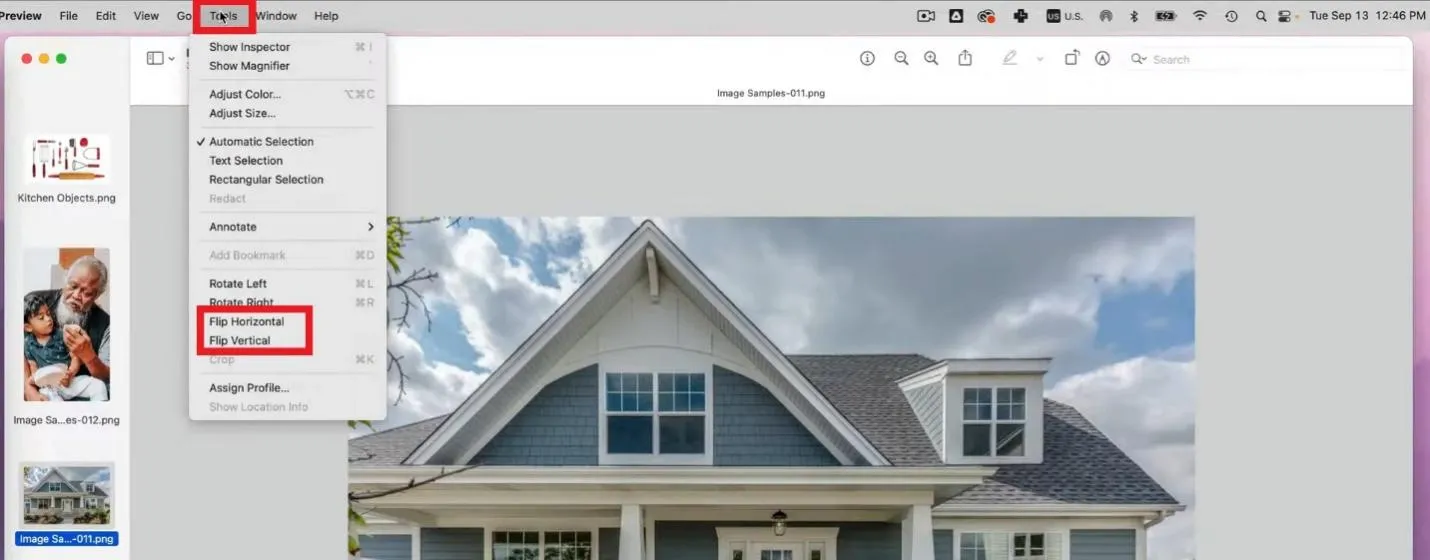
This way, you can rotate images on Mac using its built-in feature.
3. Rotate Images Using UPDF
UPDF offers another free and effective way to rotate images. It is a powerful PDF tool that allows you to rotate document pages or even images in 90 and 180 degrees. There are two ways to rotate images using UPDF, as follows:
Method 1. Using the "Organize" Feature / Method 1. Convert the Image to PDF and Rotate
Step 1. Install and launch UPDF on your Windows/Mac computer. Click Tools > Other > PDF from Image. Select the image file to rotate.
Windows • macOS • iOS • Android 100% secure
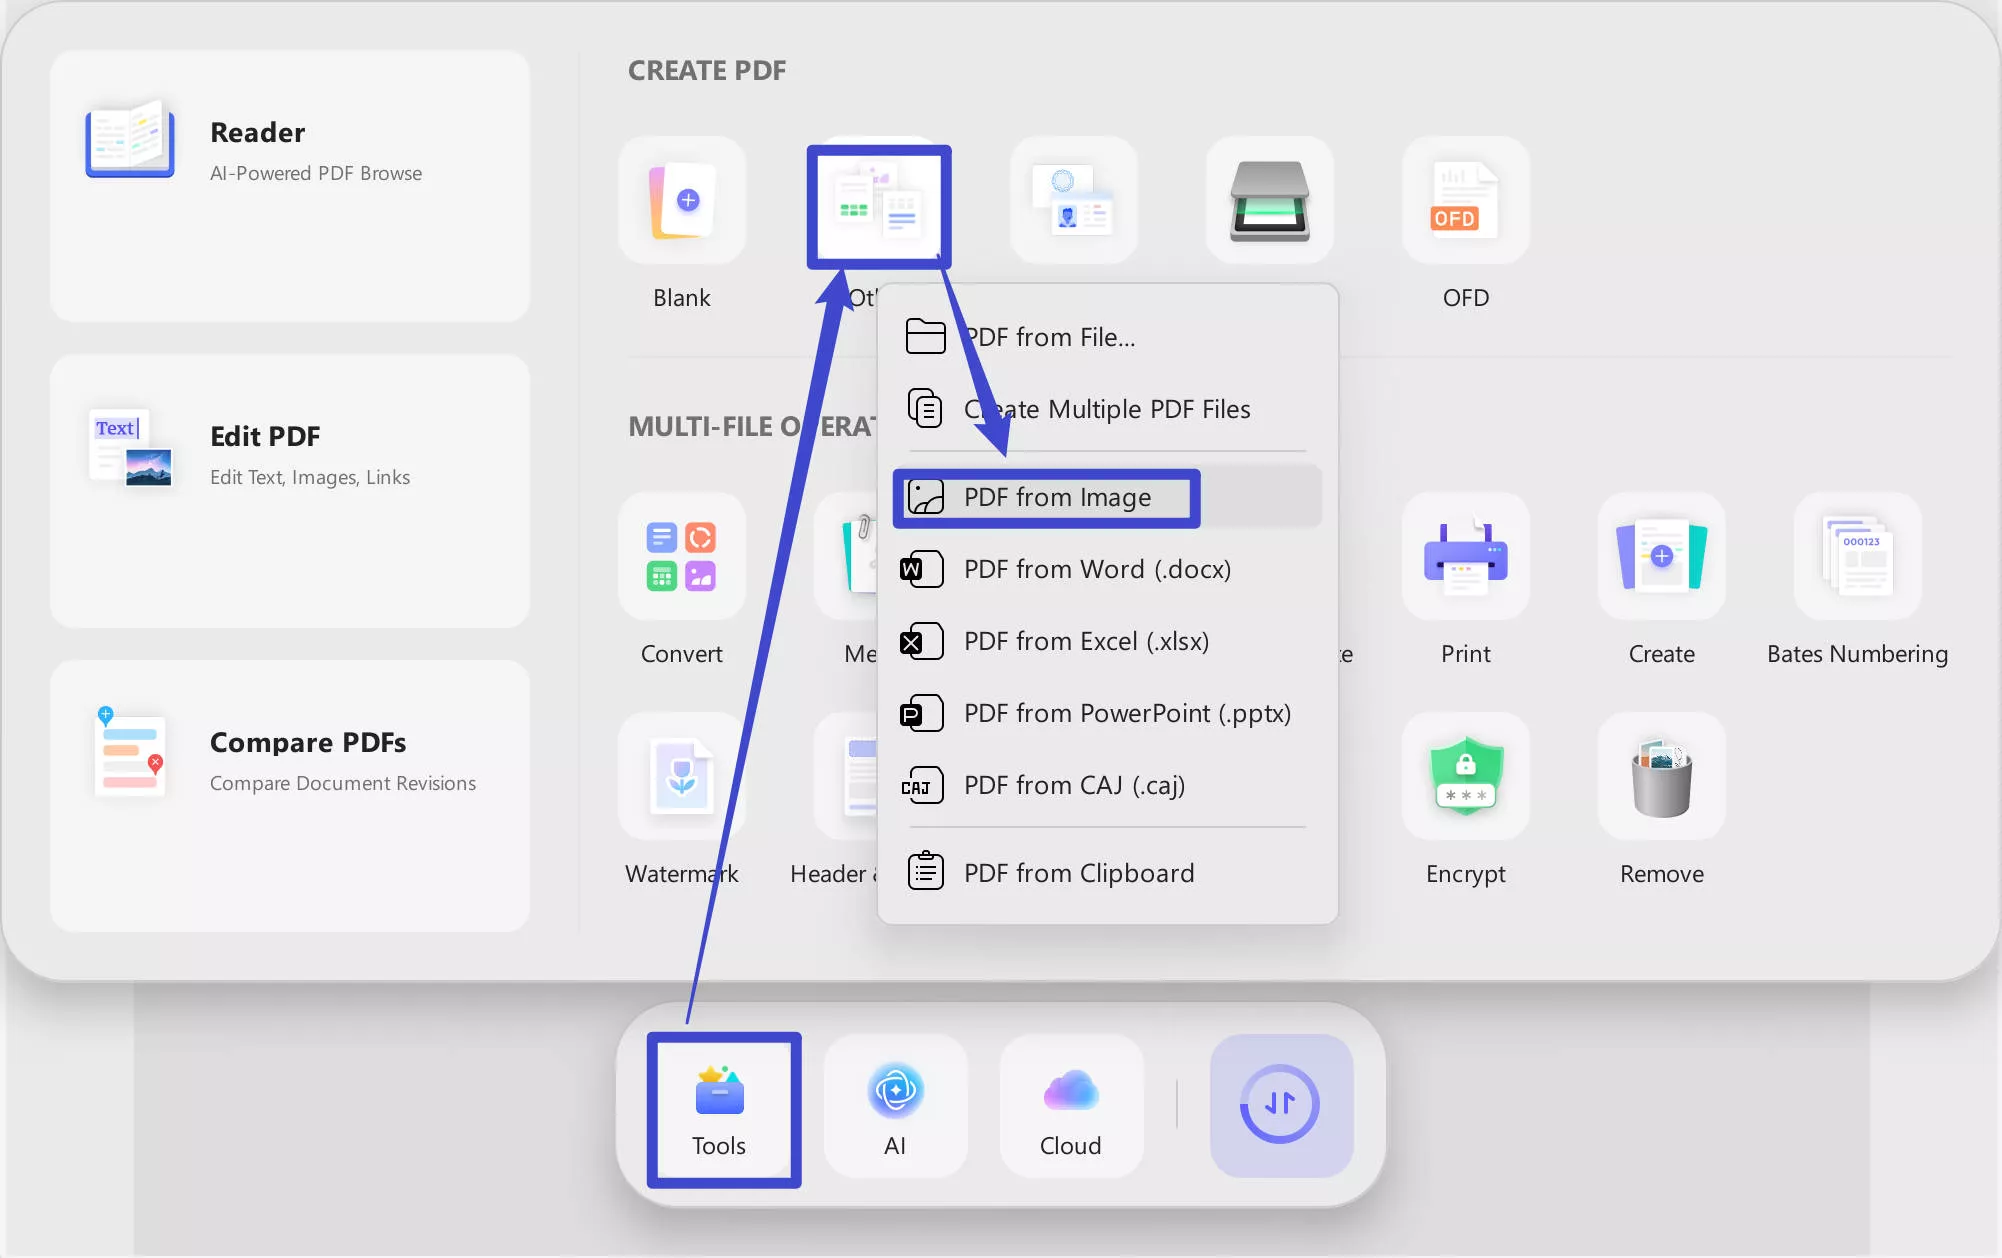
Note: You can select multiple images at once and create a single PDF file. Afterward, you can rotate them separately or in a combined way.
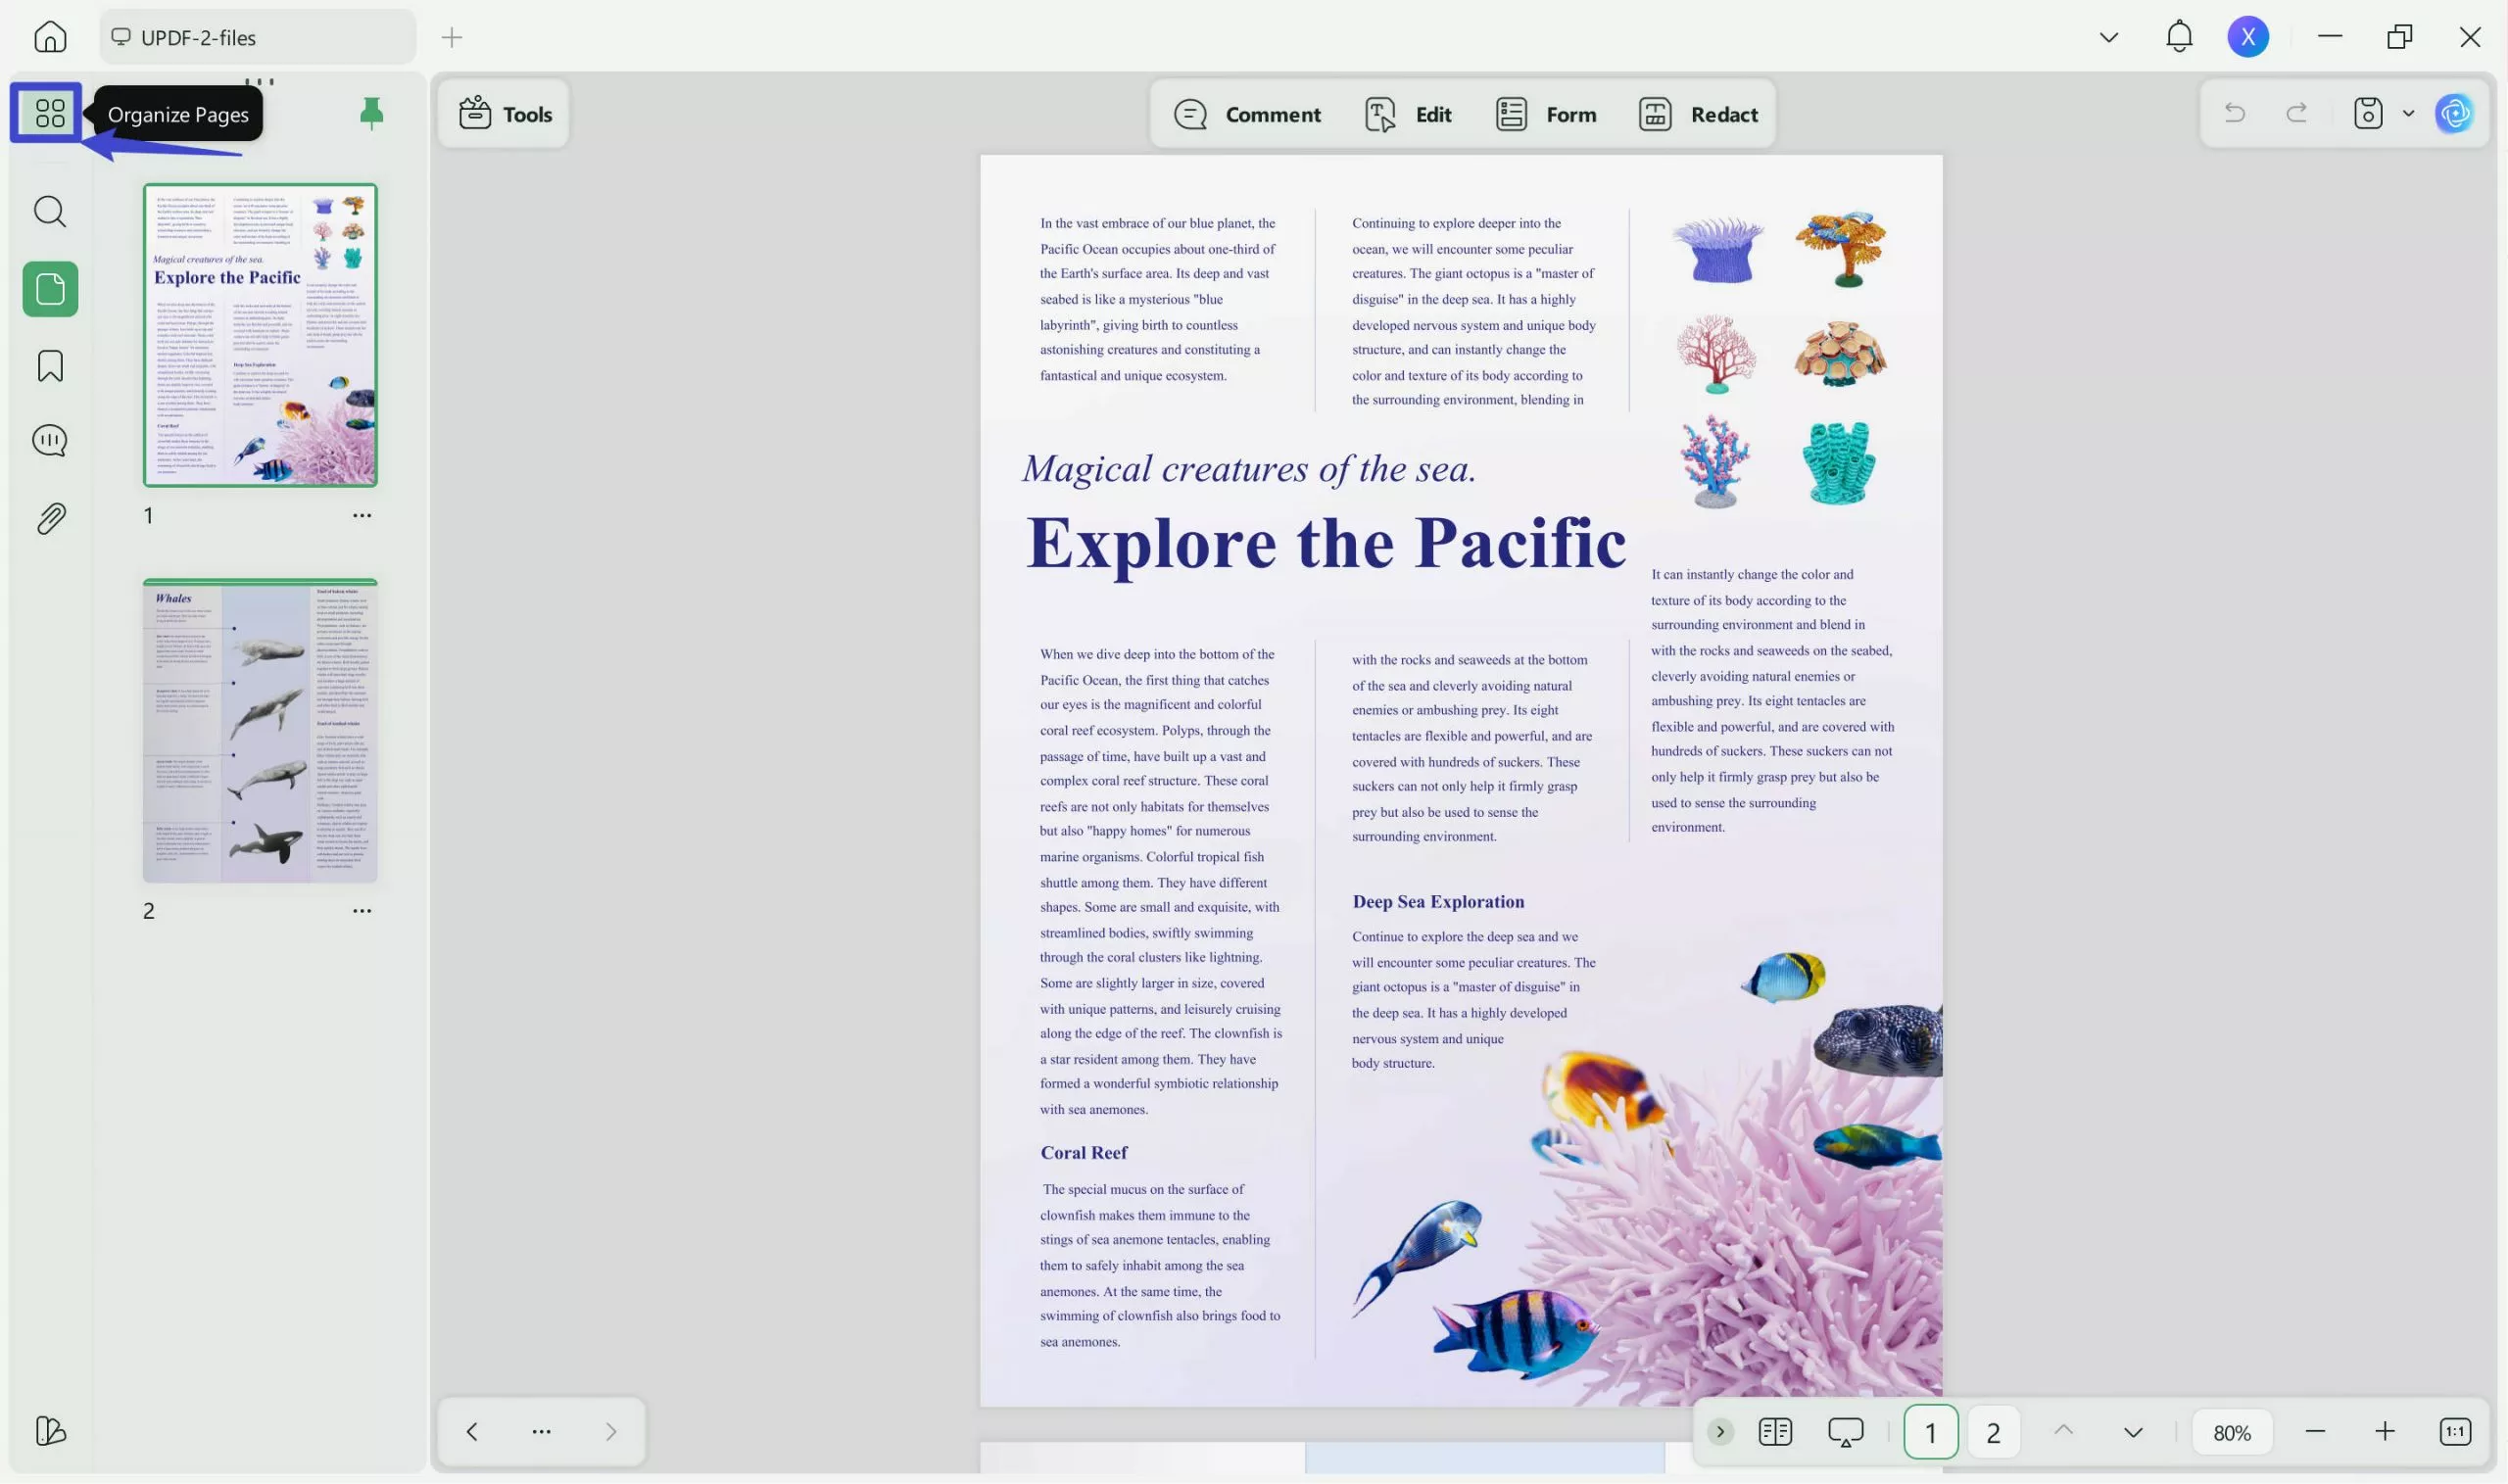
Step 2. Once the image has been converted to PDF, click the "Organize Pages" option from the left sidebar.
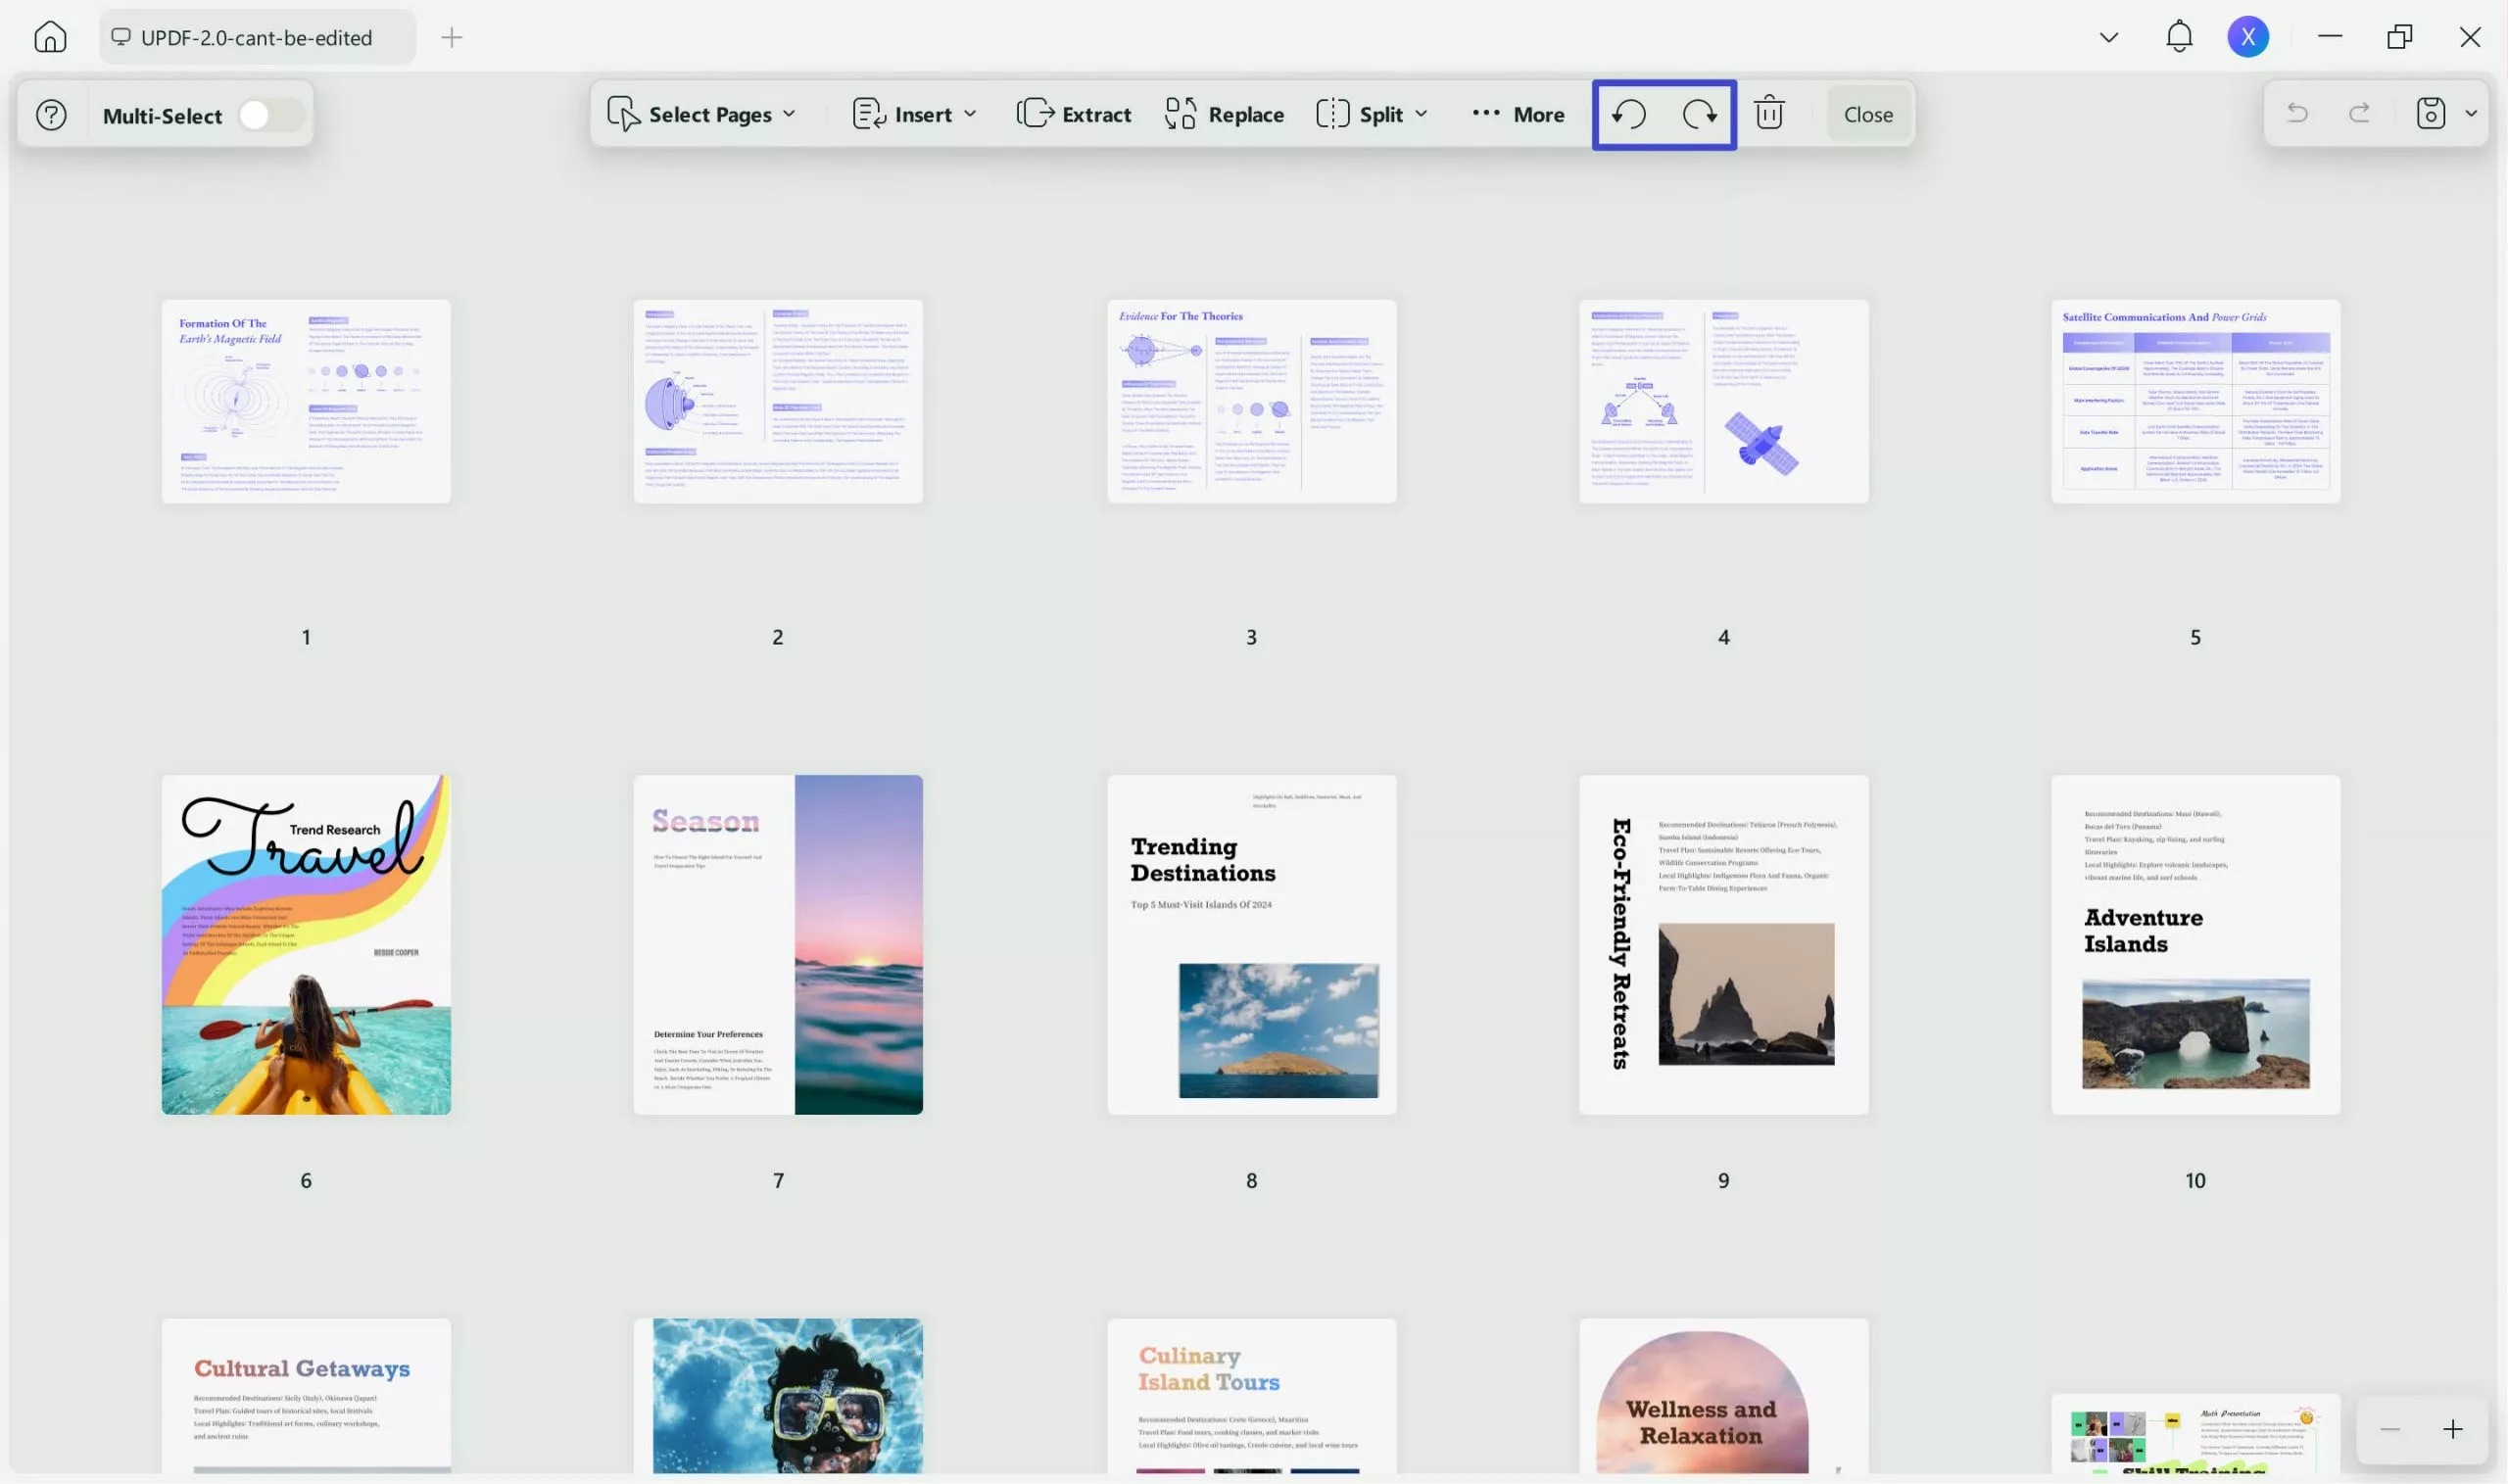
Step 3. Use the "Rotate Clockwise" or "Rotate Counterclockwise" options from the top bar to rotate it to 90 or 180 degrees.
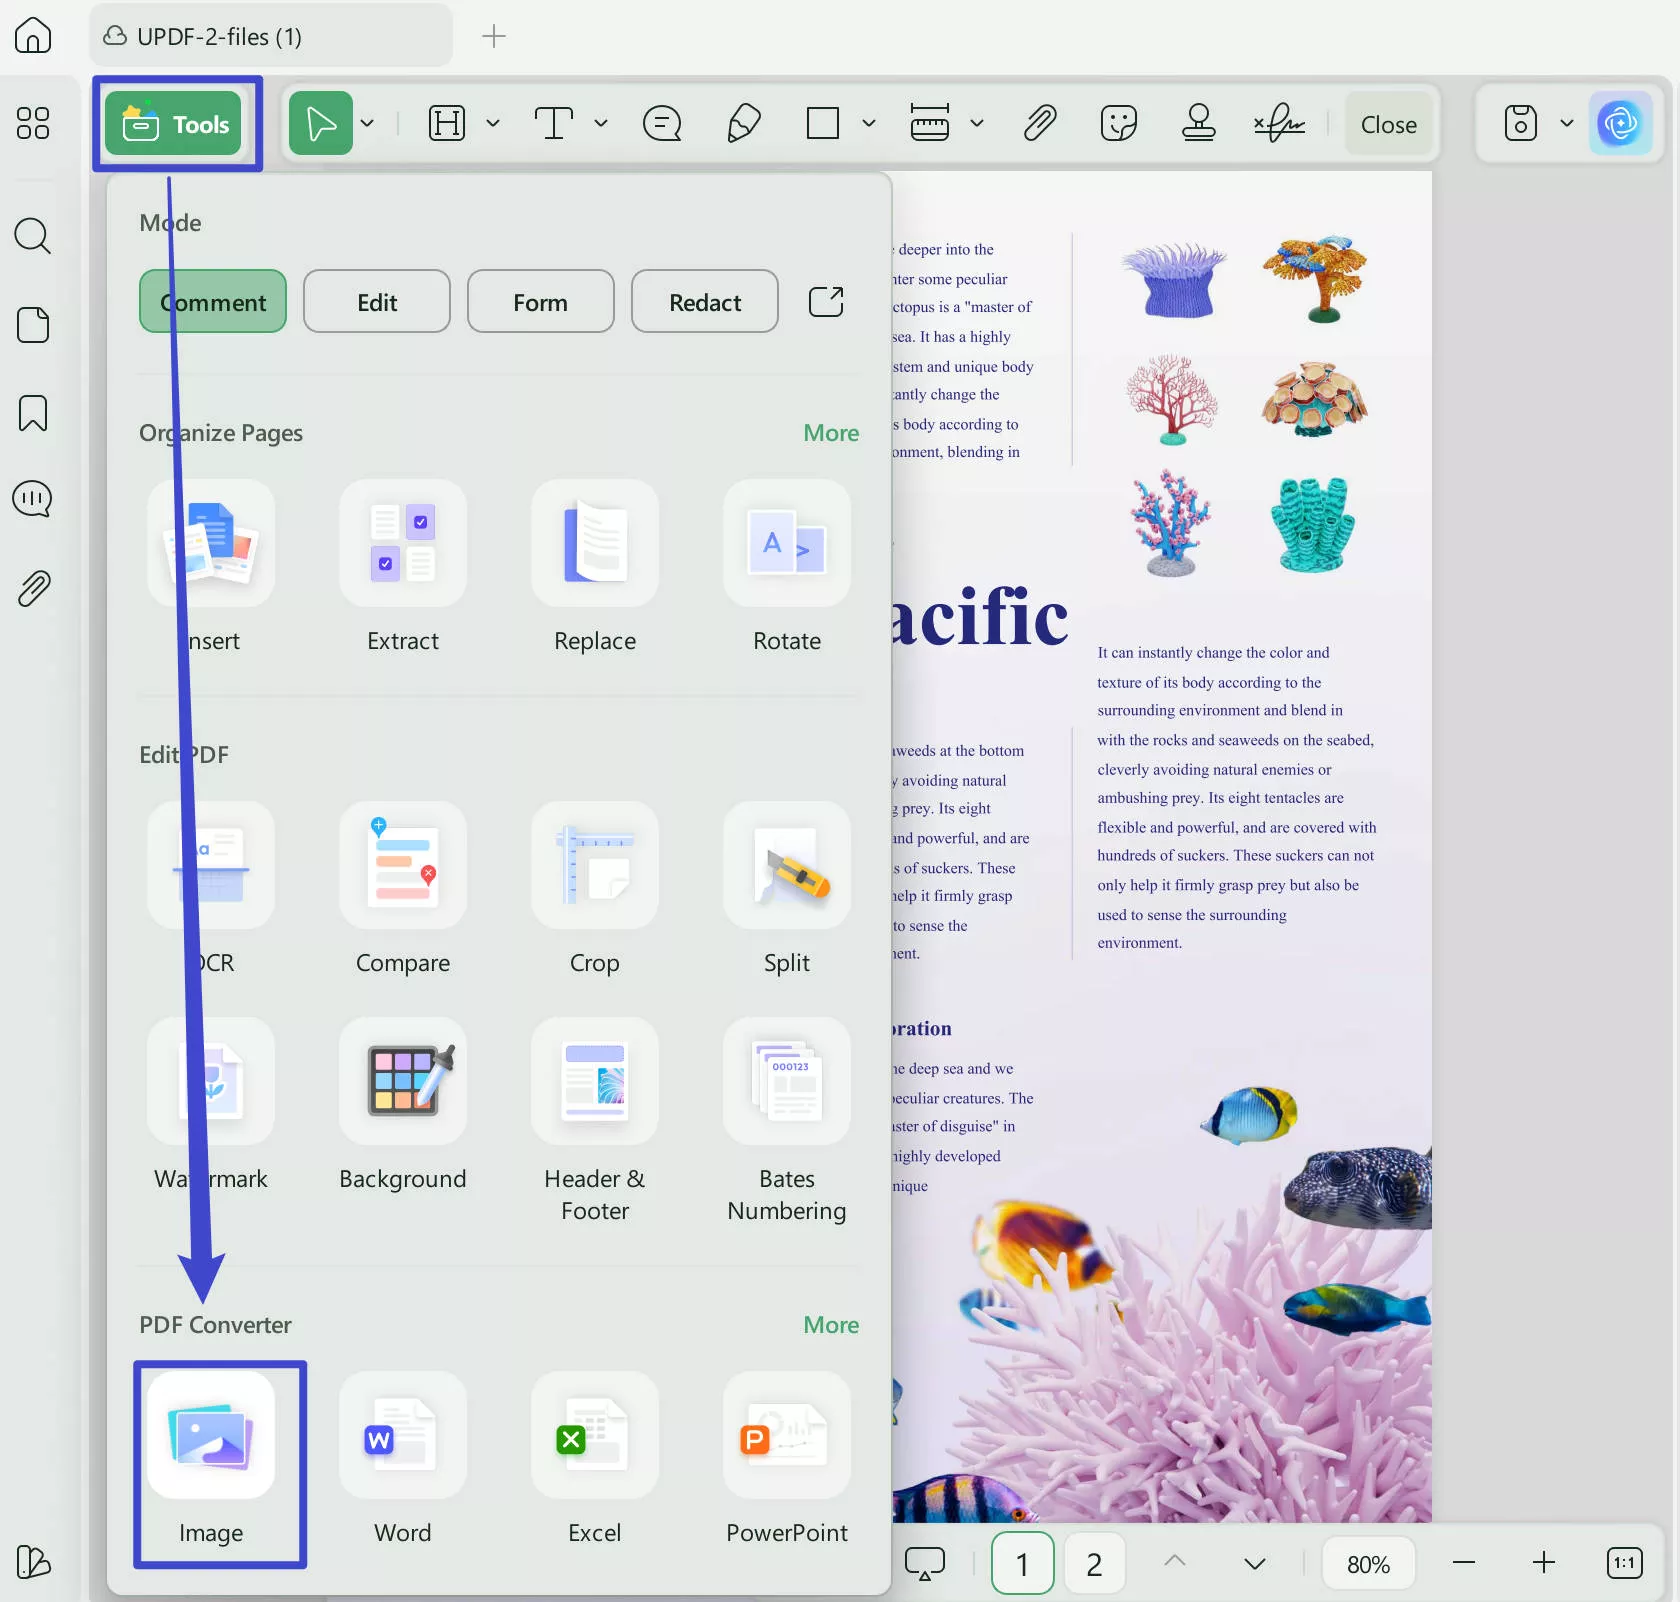
Step 4. Once the PDF is rotated into the desired orientation, you can save it back as an image. For that, click the "Tools" option from the right sidebar and select "Image".
Method 2. Using the "Edit" Feature
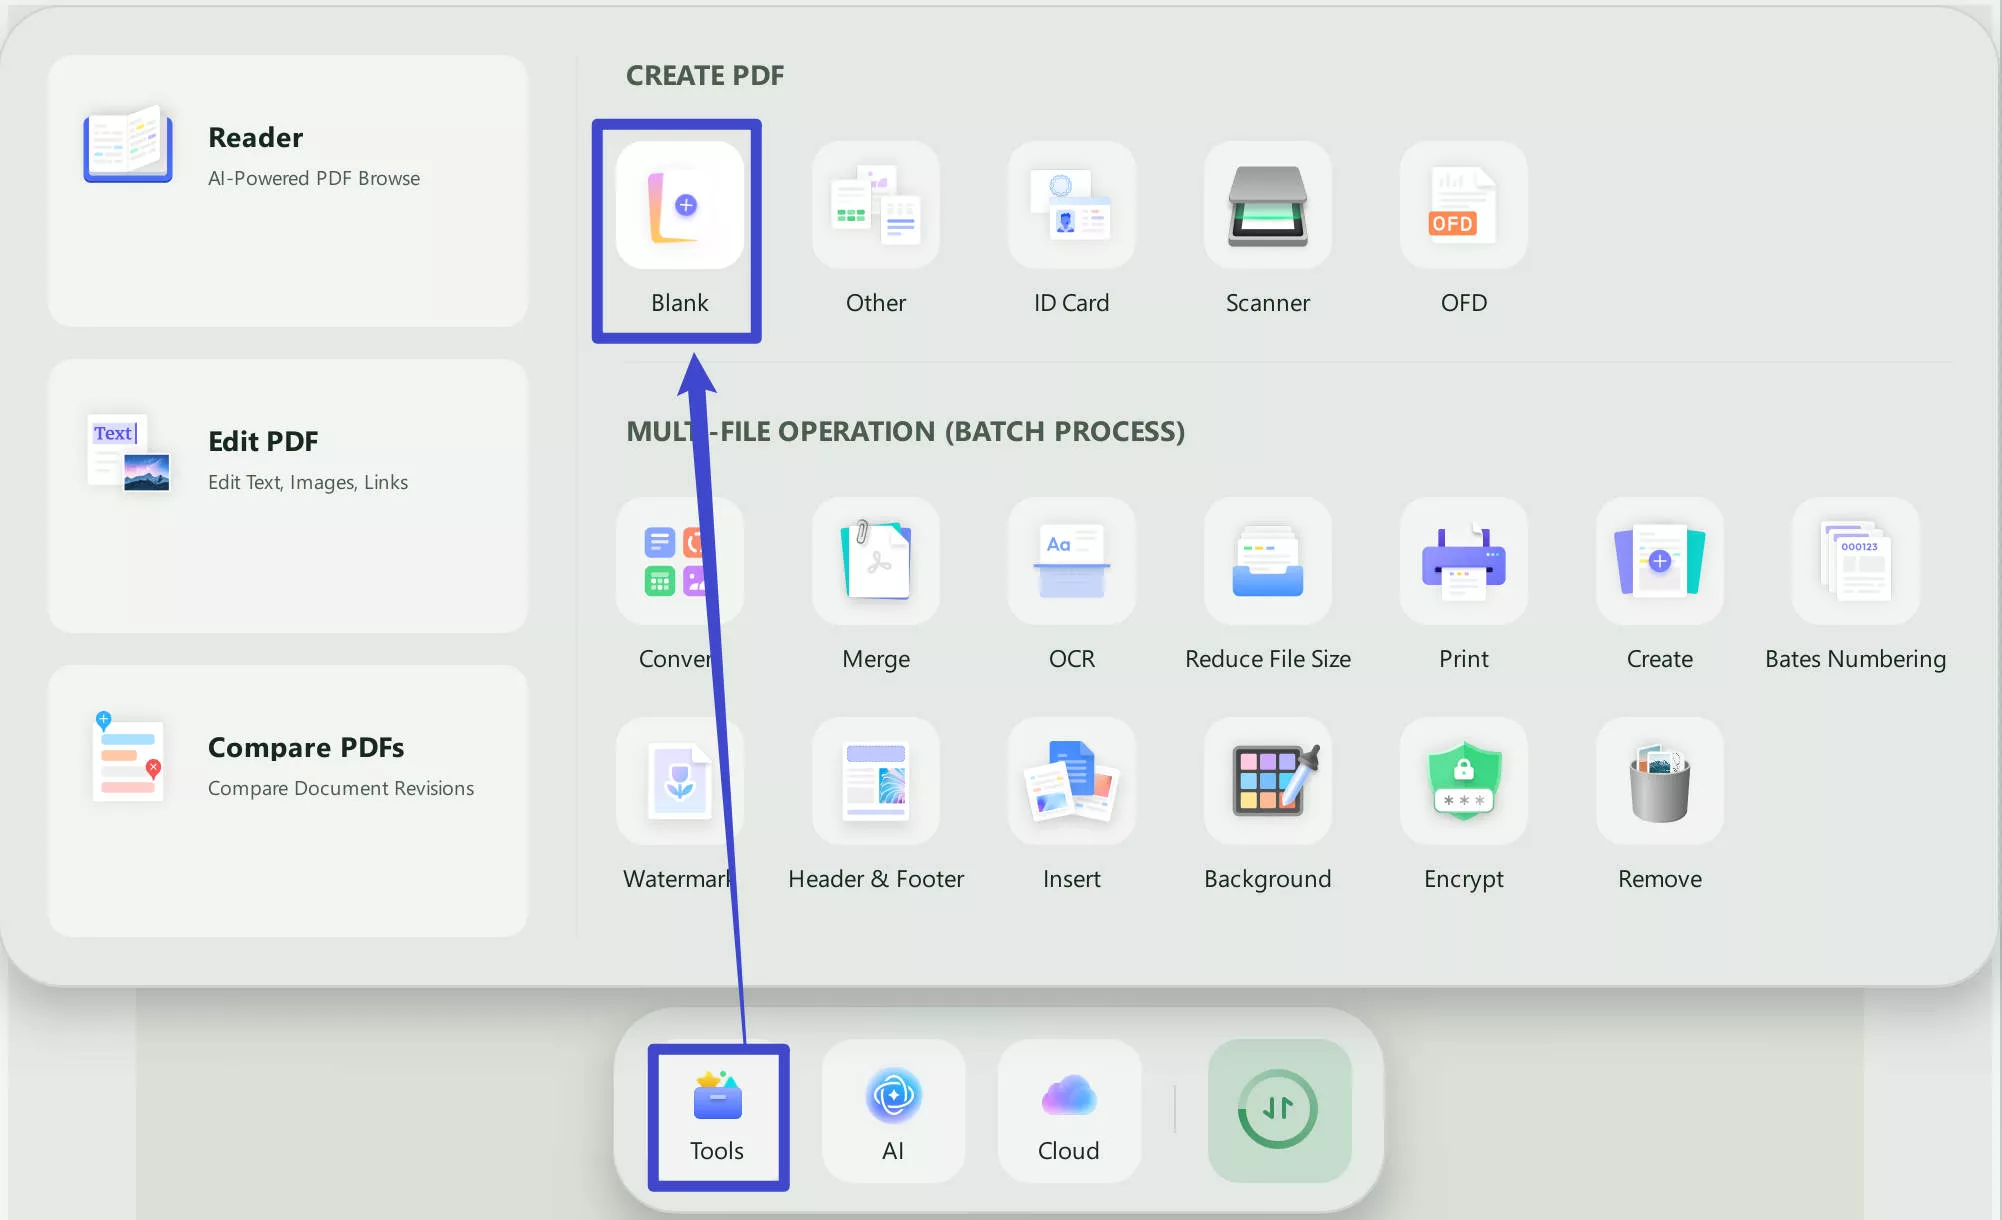
Step 1. Launch UPDF and click Tools > Blank to create a blank PDF.
Step 2. Drag and drop the image file into the blank page.
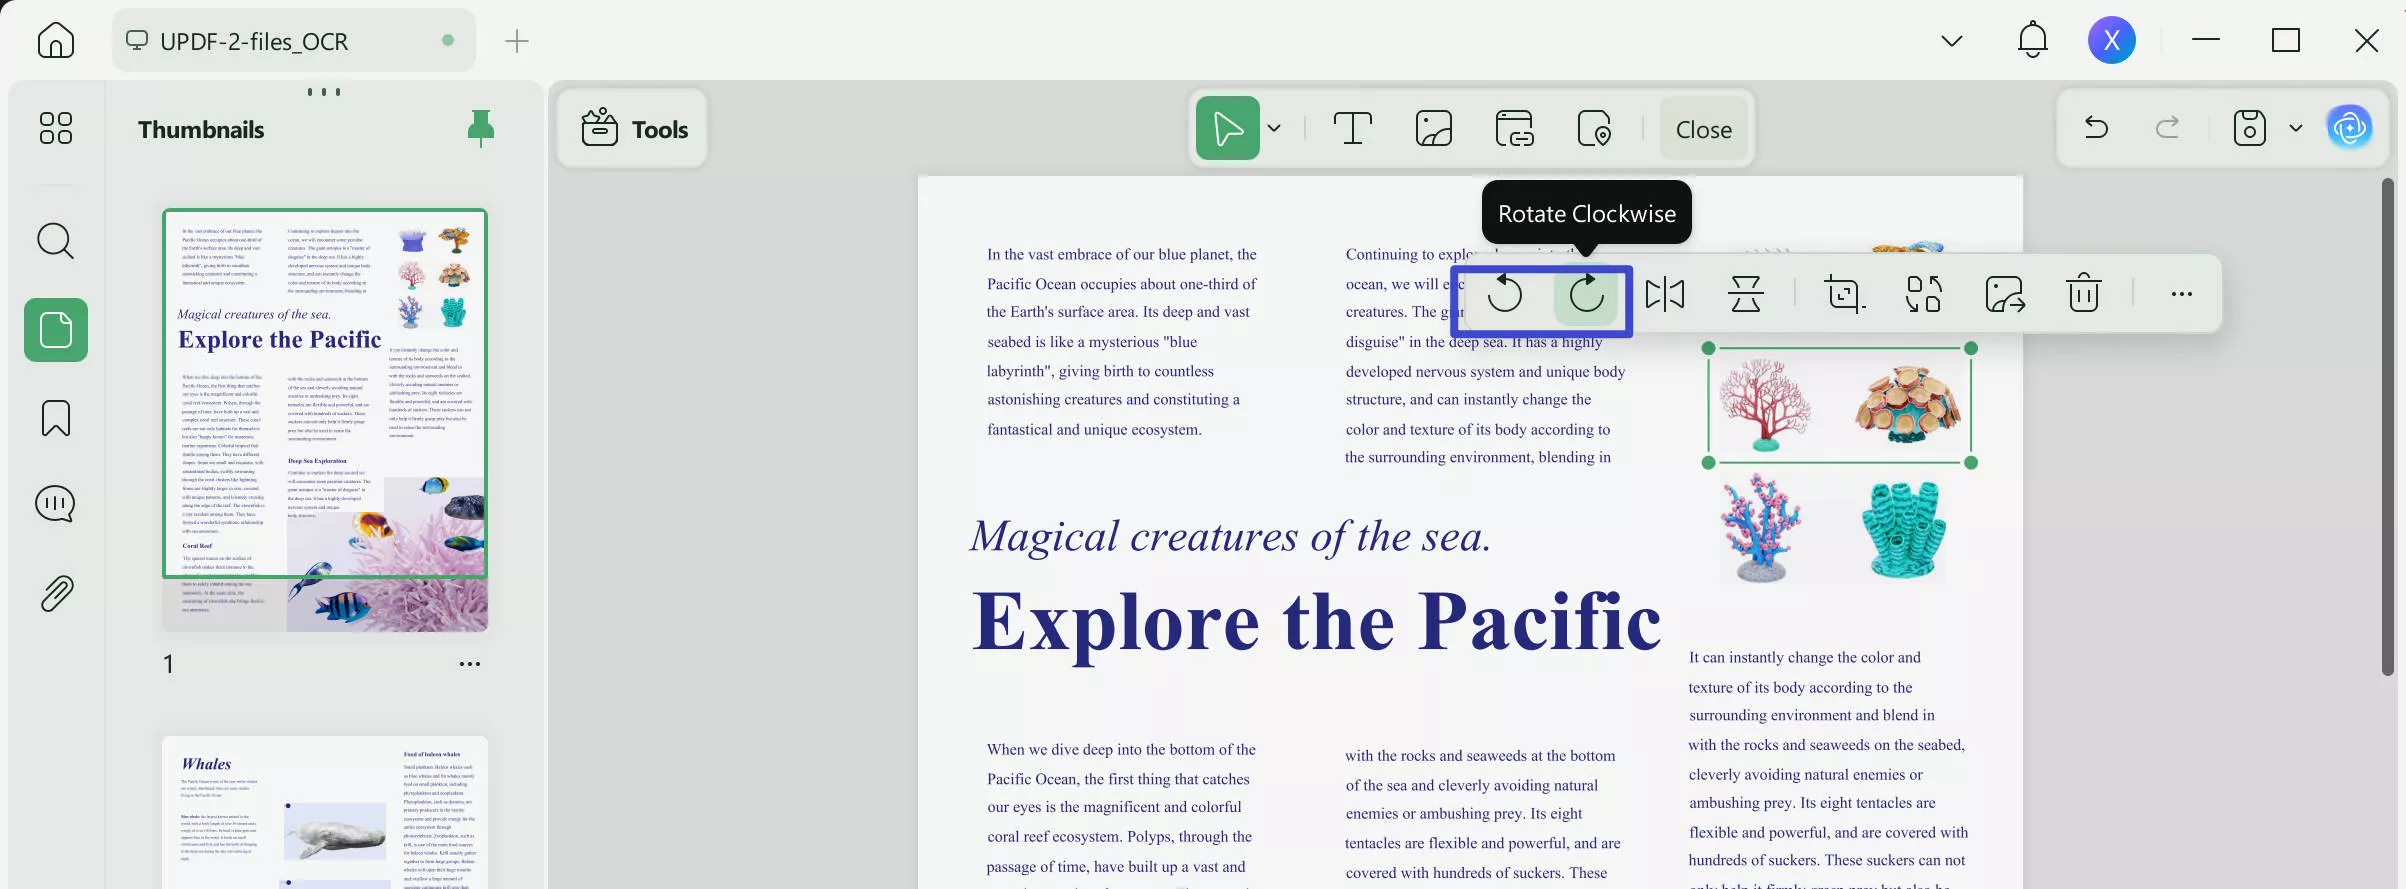
Step 3. Once the image is added to the PDF file, tap on it and then use the "Rotate Clockwise" or "Rotate Counterclockwise" options from the small pop-up window to rotate it to 90 or 180 degrees.
Step 4. After rotating the image in the desired direction, click the "Tools" option from the right sidebar and select "Image" to save the file in image format.
That's it! This way, you can rotate single or multiple images with UPDF. Since UPDF is a PDF editor tool, it has many other features to offer. To learn more about it, read Part 4 of this guide.
Part 3. Free Method: Rotate Images to Any Angle
Other than rotating images to 90 or 180 degrees, there are occasions when you want to rotate images freely to any angle. The below ways will help you rotate images online to any angle:
1. Using Figma
Figma is an online design tool to create interactive user interface prototypes collaboratively. Its design capabilities also support rotating images freely to any angle. Here's how to rotate image online to any angle with Figma:
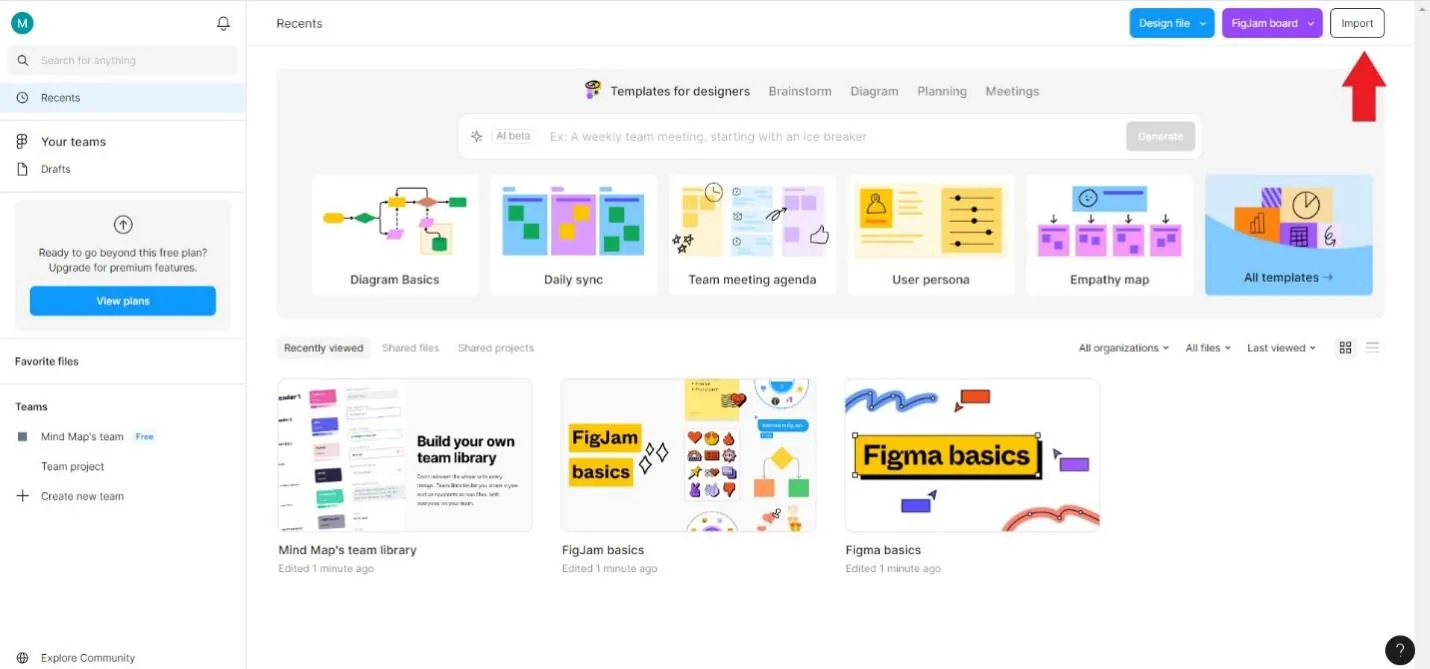
Step 1. Go to the Figma official website and create an account. Once you are in the main dashboard, click the "Import" button from the top right corner and upload the image to rotate.
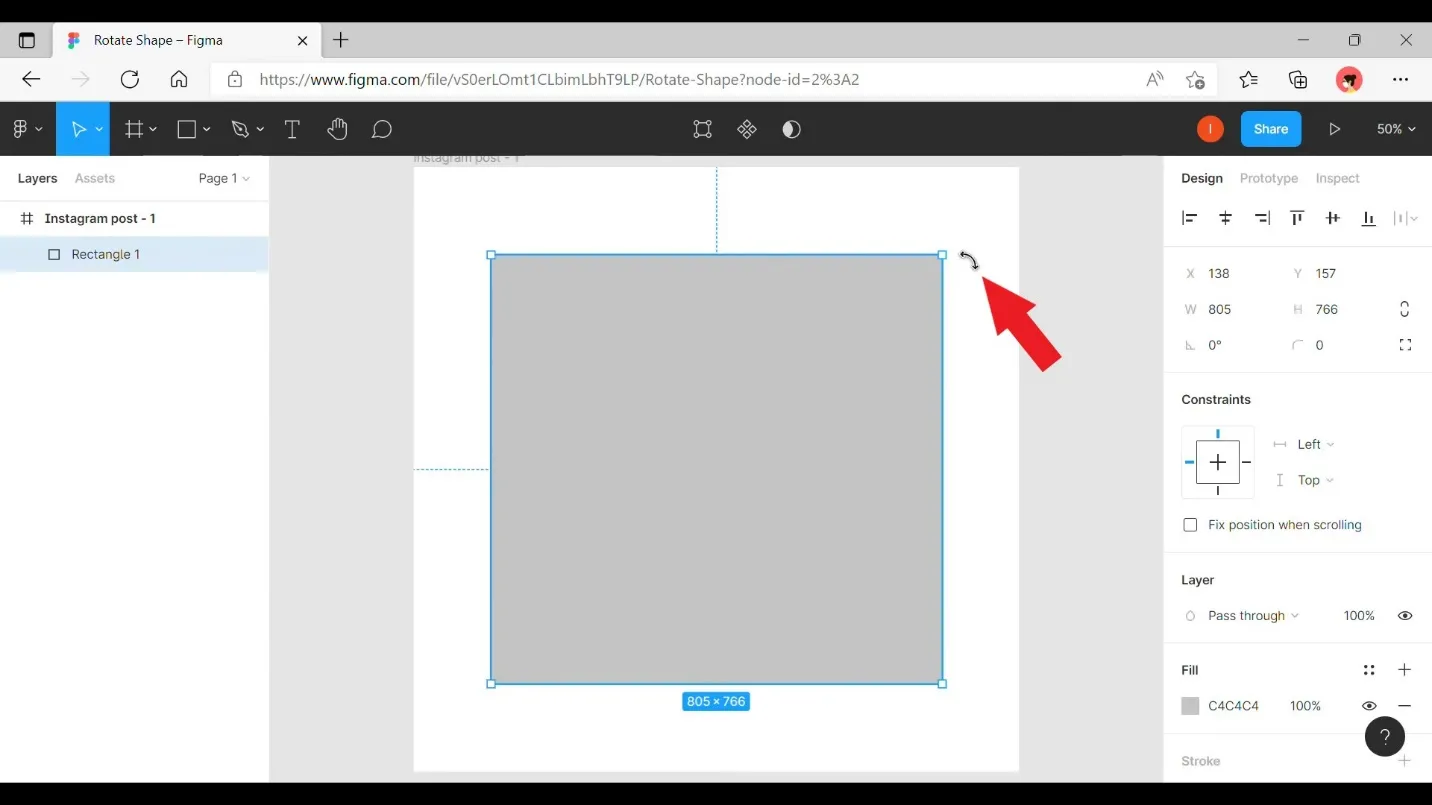
Step 2. Once uploaded, select the image and move the mouse cursor to the corner of the image until the rotation cursor appears.
Step 3. Click and rotate the image freely in any direction.
Step 4. Download the rotated image back to your computer.
This way, you can easily rotate images online to any angle with Figma.
2. Using Canva
Canva is a well-reputed online graphic design tool. Its intuitive interface also allows you to rotate images freely. You can rotate it upside down, sideways, tilt left or right, and more. To rotate images online with Canva, follow the below simple steps:
Step 1. Go to the Canva website, sign up, and start a new project.

Step 2. Upload the image you want to rotate. You can drag and drop the image onto the canvas.
Step 3. Select the image and then find the rotate handle on the bottom or side of the image. Drag the handle to rotate the image freely.
Step 4. After finalizing the image position, download the file back to your computer.
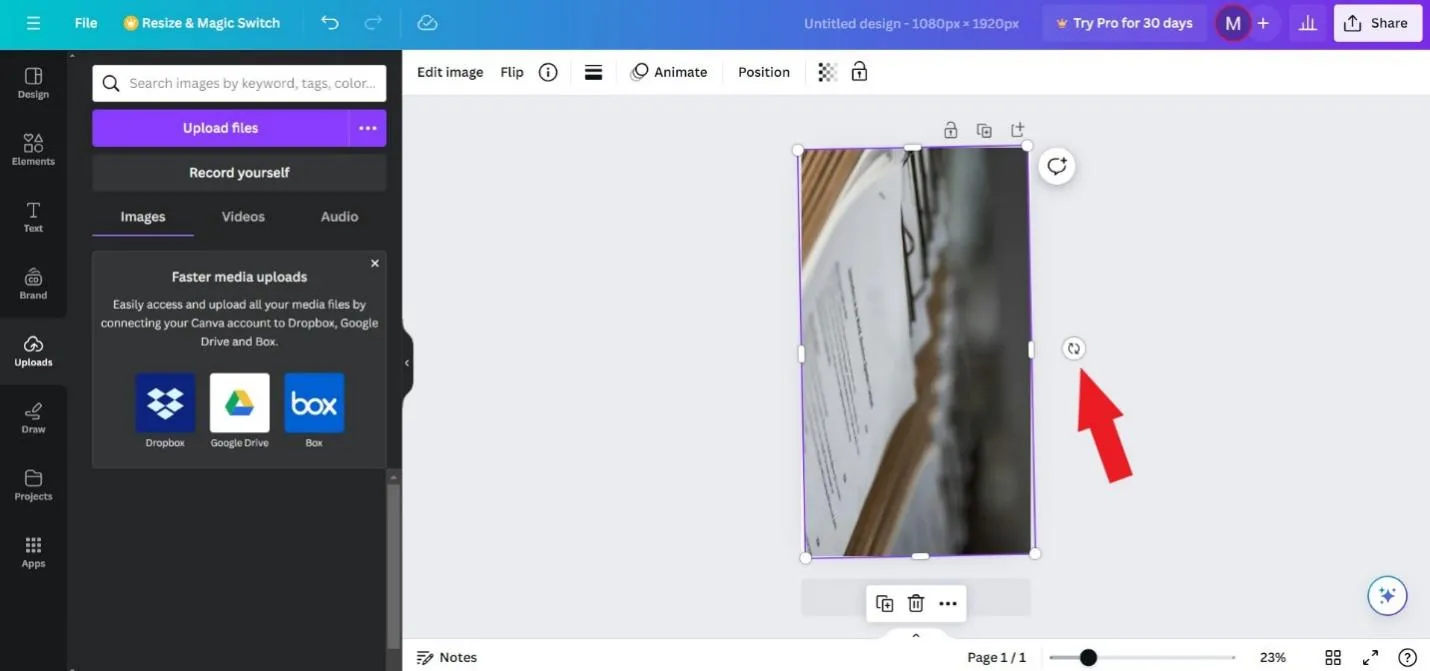
So, that's how simple it is to rotate images to any angle with Canva.
Part 4. Bonus: UPDF – Your Ultimate Tool for Handling Documents
Now that you have learned how to rotate images in any direction, let's give you a bonus tip of the day that's going to be very useful in your day-to-day handling of documents.
Above, we have discussed UPDF as one of the ways to rotate images 90 or 180 degrees. However, that's just one of the extensive set of features UPDF has to offer.
UPDF is a comprehensive PDF editor tool. It provides all the basic to advanced features to handle PDF-related activities. Here's a quick glimpse of what else you can get with UPDF:
- Read PDFs in different page layouts or scrolling modes.
- Edit PDF text, links, images, backgrounds, and more.
- Convert PDF to Word, image, Excel, CSV, PowerPoint, RTF, and more.
- Annotate PDF by highlighting, strikethrough, drawing, underlining, marking, or adding stamps/stickers.
- Get AI assistant (UPDF AI) to get AI-powered instant summaries, explanation, and translation of PDF content.
- Organize PDF pages by rearranging, rotating, removing, adding, splitting, cropping, or extracting.
- Protect PDF via a password.
- Fill PDF forms or sign PDF digitally or electronically.
- OCR PDF to get editable PDF from scanned PDF.
- Compress PDF to reduce the file size.
- Batch process PDF to combine, print, encrypt, convert, and insert multiple PDFs at the same time.

Overall, UPDF offers all the modernized and advanced features to handle PDF documents proficiently. The best part is that UPDF and its above features are accessible across four major platforms, i.e., Windows, Mac, iOS, and Android.
So, why shouldn't this tool be at your disposal? Test out UPDF with its free trial or head straight to its pricing page to grab the tool at the discounted rate right away.
Windows • macOS • iOS • Android 100% secure
Part 5. FAQs About Rotating Images
Q1. How do I flip an image?
1.Open the image with the Windows Photos app.
2.Enter the "Edit" mode.
3.Click the "Flip" button to flip the image.
4.Save the file after flipping.
Q2. Does flipping mean to rotate the picture?
Although flipping belongs to picture rotation, it is slightly different from rotating a picture. When you flip a picture, the picture turns over either horizontally or vertically. So, it becomes a mirror picture. On the other hand, when you rotate an image, it moves left/right around the axis but keeps the same face towards you.
Q3. How do I rotate a picture 90 degrees right?
1.Open the picture with the Windows Photos app.
2.Click the "Rotate" icon from the top bar. It will rotate the picture 90 degrees right.
Conclusion
Image rotation is an important skill to master to set the right image orientation. Above, we have discussed in detail multiple ways to rotate images online/offline. Now, you can choose any method that suits you and follow the steps accordingly. However, we do recommend installing UPDF, as it not only provides a way to rotate images but also offers extensive PDF-related features. It's a single tool with which you can rotate images or read/edit/annotate/convert PDFs effortlessly. So, don't miss out on the chance to have a powerful tool at your disposal. Download UPDF and have the best experience handling images/documents.
 UPDF
UPDF
 UPDF for Windows
 UPDF for Mac
 UPDF for iPhone/iPad
 UPDF for Android
 UPDF AI Online
 UPDF Sign
 Edit PDF
 Annotate PDF
 Create PDF
 PDF Form
 Edit links
 Convert PDF
 OCR
OCR PDF to Word
 PDF to Image
 PDF to Excel
 Organize PDF
 Merge PDF
 Split PDF
 Crop PDF
 Rotate PDF
 Protect PDF
 Sign PDF
 Redact PDF
 Sanitize PDF
 Remove Security
 Read PDF
 UPDF Cloud
 Compress PDF
 Print PDF
 Batch Process
 About UPDF AI
 UPDF AI Solutions
 AI User Guide
 FAQ about UPDF AI
 Summarize PDF
 Translate PDF
 Chat with PDF
 Chat with AI
 Chat with image
 PDF to Mind Map
 Explain PDF
 Scholar Research
 Paper Search
 AI Proofreader
 AI Writer
 AI Homework Helper
 AI Quiz Generator
 AI Math Solver
 PDF to Word
 PDF to Excel
 PDF to PowerPoint
 User Guide
 UPDF Tricks
 FAQs
FAQs UPDF Reviews
 Download Center
 Blog
Blog Newsroom
 Tech Spec
 Updates
 UPDF vs. Adobe Acrobat
 UPDF vs. Foxit
 UPDF vs. PDF Expert





 Enid Brown
 Enola Davis
 Engelbert White
 Lizzy Lozano
