Hiding or locking photos on your iPhone can come in handy for numerous reasons. Perhaps there are some old photos that you want to lock away and not appear when you're scrolling through the photos. Or maybe there is a photo that you don't want someone else who has access to the device to see.
There are a few ways that you can lock or hide the photos and here will look at 3 of the most effective. Let's get started with the best way to lock photos on your iPhone 17.
Way 1. How to Lock Hidden Photos on iPhone with UPDF
If you want to simplify the process of locking your photos, the best option is to use a document management tool like UPDF for iOS that also doubles up as a photo management solution. UPDF has a feature known as Security Space that is protected by the device's passcode or Face ID. Once you add the photos to this Security Space, they will not be accessible without a passcode or Face ID.
This is the highest level of security that you can use to protect any photo. You can add your photos to the Security Space using these simple steps:
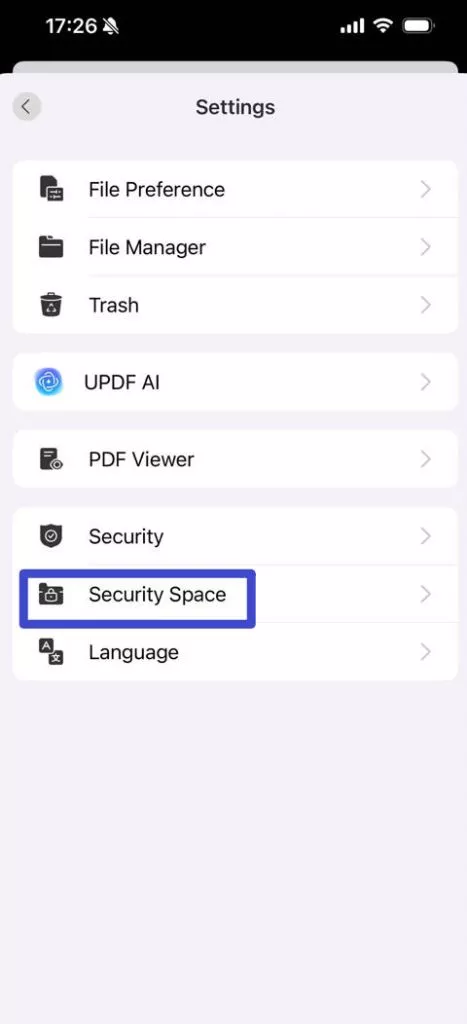
Step 1: Download UPDF with the below button and then initiate UPDF. Find "Settings" in your iPhone.
Windows • macOS • iOS • Android 100% secure
Step 2: Select "Security Space" and when prompted, authenticate access to the Space using Face ID or your passcode.
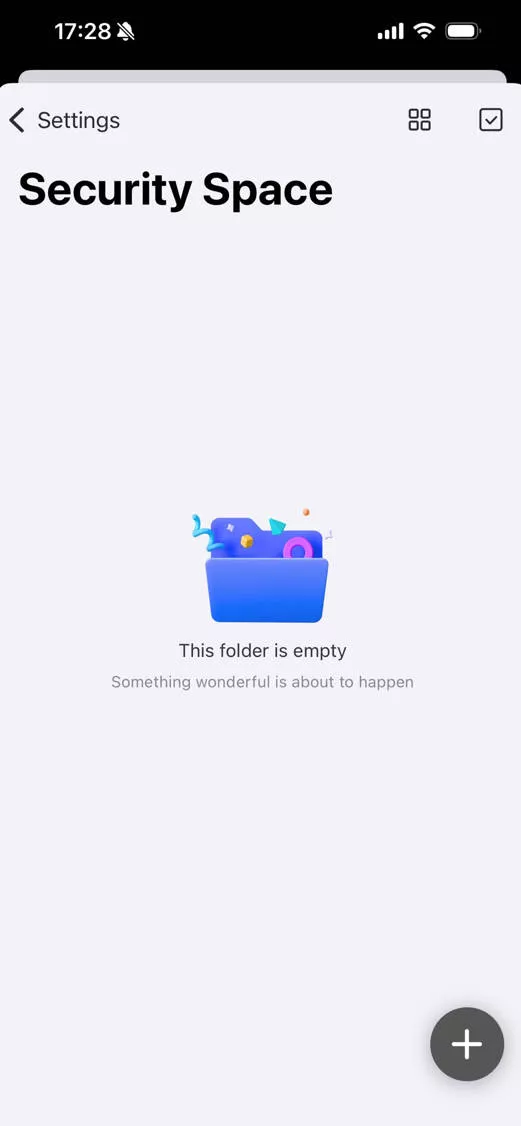
Step 3: Now tap on the "+" symbol at the bottom-right corner and choose one of the import options depending on where the photo is saved on your device.
Here's a breakdown of UPDF just some of these features:
- If you work with a lot of different documents, UPDF is the best way to manage them all. It is the one-stop solution to create, edit, annotate, upload, and download documents of all kinds including images in various formats, PDF, PowerPoint, Excel, Word, and many more.
- With it, you can scan a paper document or an image to PDF, and also extract the text from it using the OCR feature.
- It has fantastic annotation features that allow you to edit text in PDF, draw, and even highlight some of the text on your documents. Annotate PDF make users' life easier, you can even use your finger or stylus to sign the PDF document.
- This is perhaps the only document management tool that comes with a built-in smart scanner. This scanner creates PDFs by simply scanning a photo, document, note, whiteboard, or even a receipt. Once it is scanned, you can rotate, crop, or filter it before creating the PDF.
- It has a simple and intuitive user interface to make all these processes quick and easy.
If you still haven't downloaded UPDF, the below button can help you. Check more information of UPDF objectively on this website.
Bonus
Windows • macOS • iOS • Android 100% secure
Way 2: How to Lock Pictures on iPhone with the Photos App
If you don't want the photos to appear in your Library, you can move them to a Hidden Album. If you are using a device running iOS 26, you can take this a step further and turn off the Hidden Album so that the photos are completely hidden.
Here's how to hide photos on your iPhone 17.
Step 1: Open photos on your device.
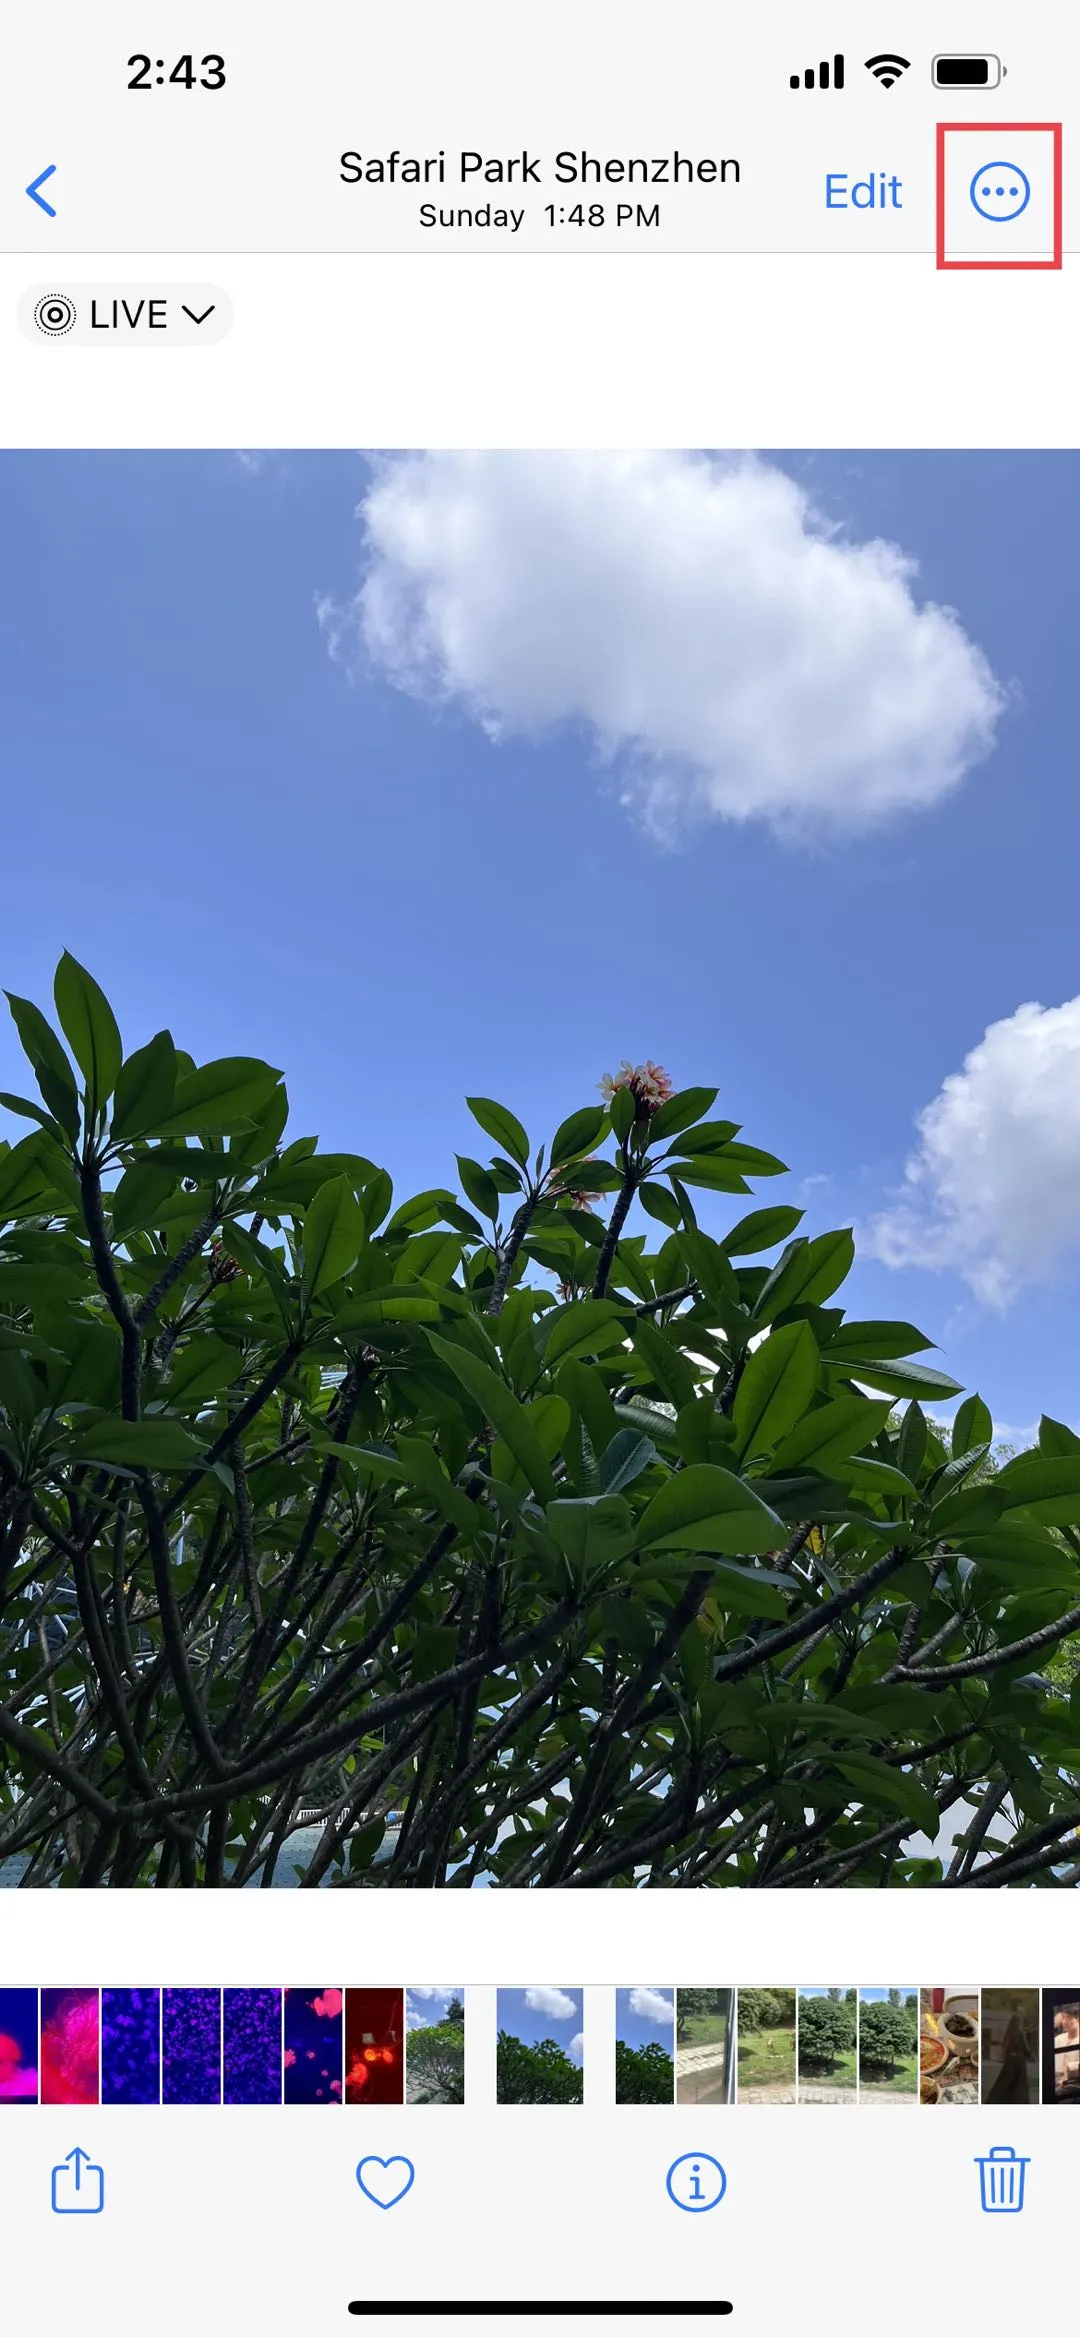
Step 2: Select the photo that you would like to hide and then tap on the three dots in the upper right corner.
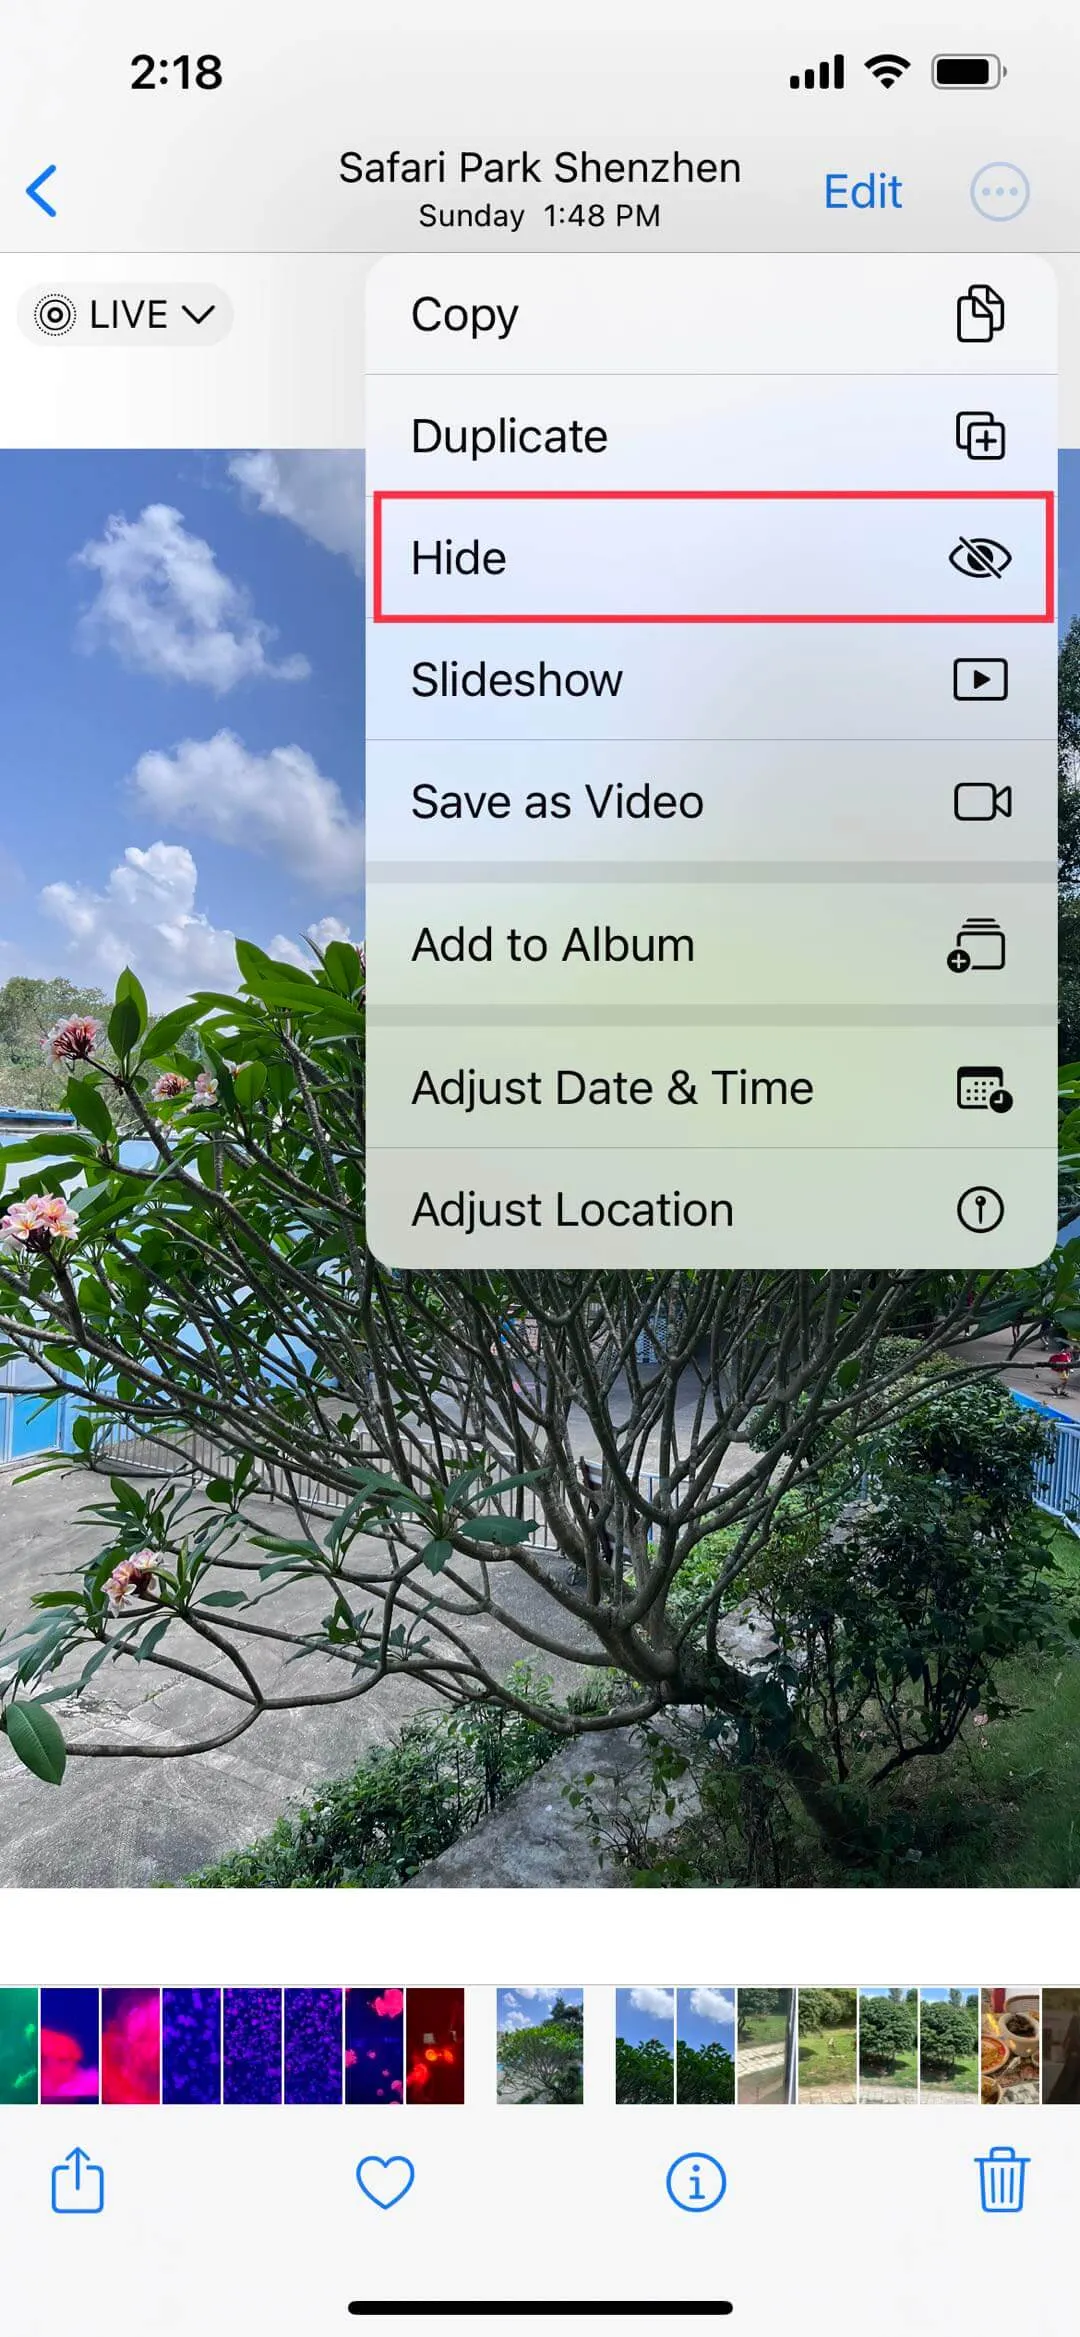
Step 3: Tap "Hide" and then confirm that you would like to hide the photo.
Step 4: Then there will be a notification to tell you that this photo will be hidden, but can be found in the hidden album. Click "Hide Photo".
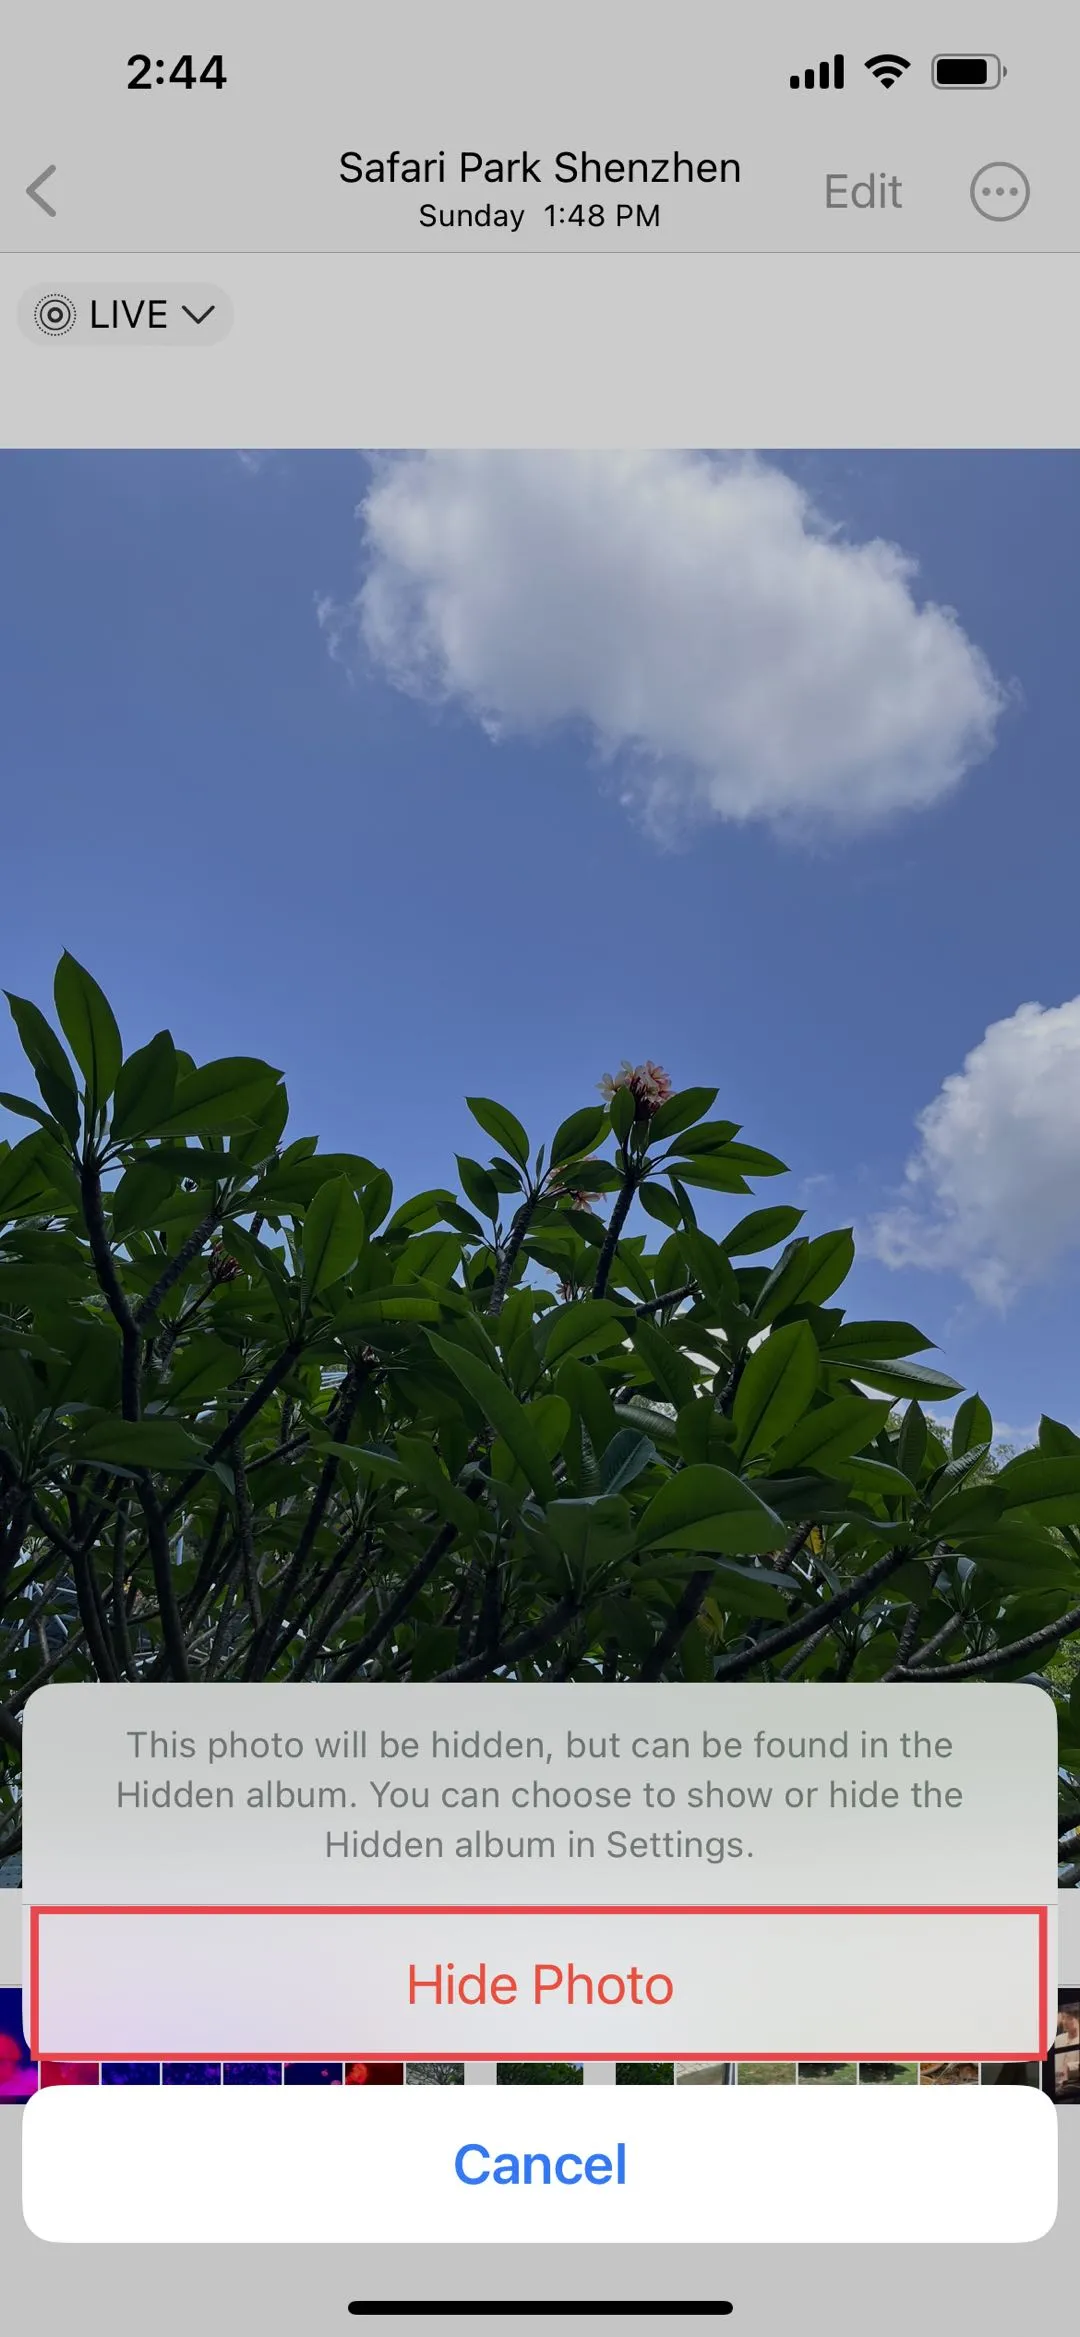
Once this is done, the photo will not appear in your library, other albums, photo widget, or even on your home screen until you unhide it. But as useful as this solution is, it has several disadvantages:
Disadvantages:
- To begin with, anyone who uses the device can easily access the hidden photos by simply unhiding them or accessing the hidden album.
- This solution also lacks the additional layer of security that you get from using Face ID or a passcode, making it less ideal for sensitive documents.
Way 3: How to Lock Photos on iPhone with the Notes App
If you want a solution that gives you a little bit more security than just hiding the photos, you can lock the photos using the Notes app. The process is as simple as just transferring the photos to a Note and just like that they will be locked. Here's a step-by-step guide:
Step 1: Open the Notes App on your iPhone 17.
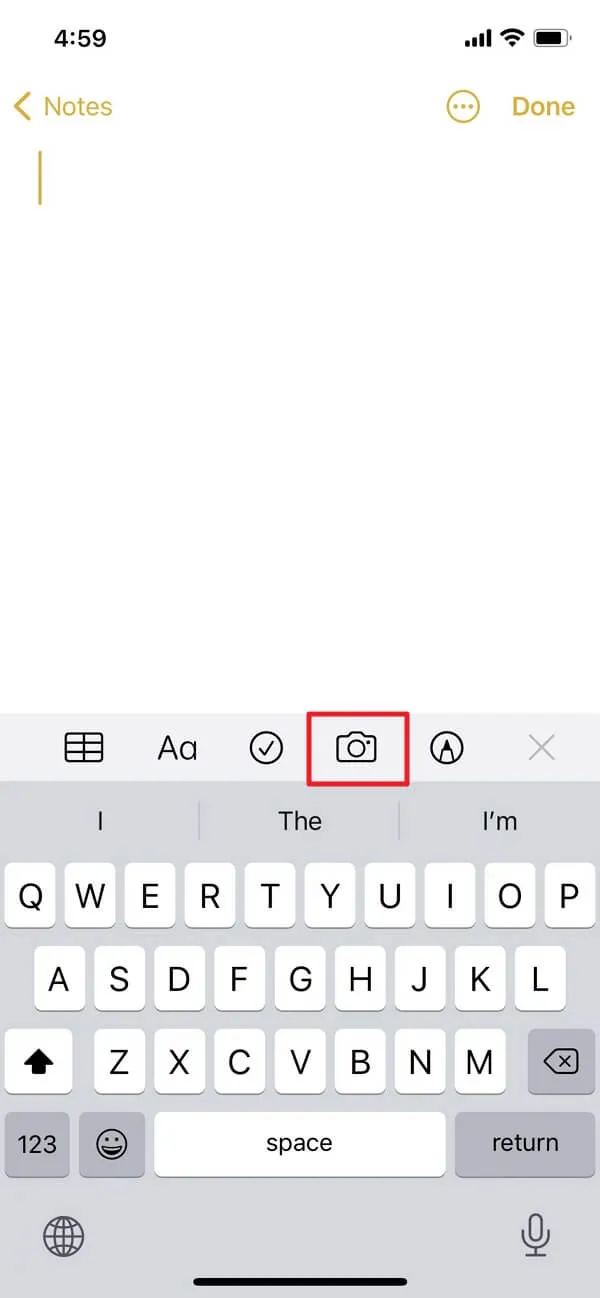
Step 2: Create a new Note. Then tap on the camera icon above the keyboard.
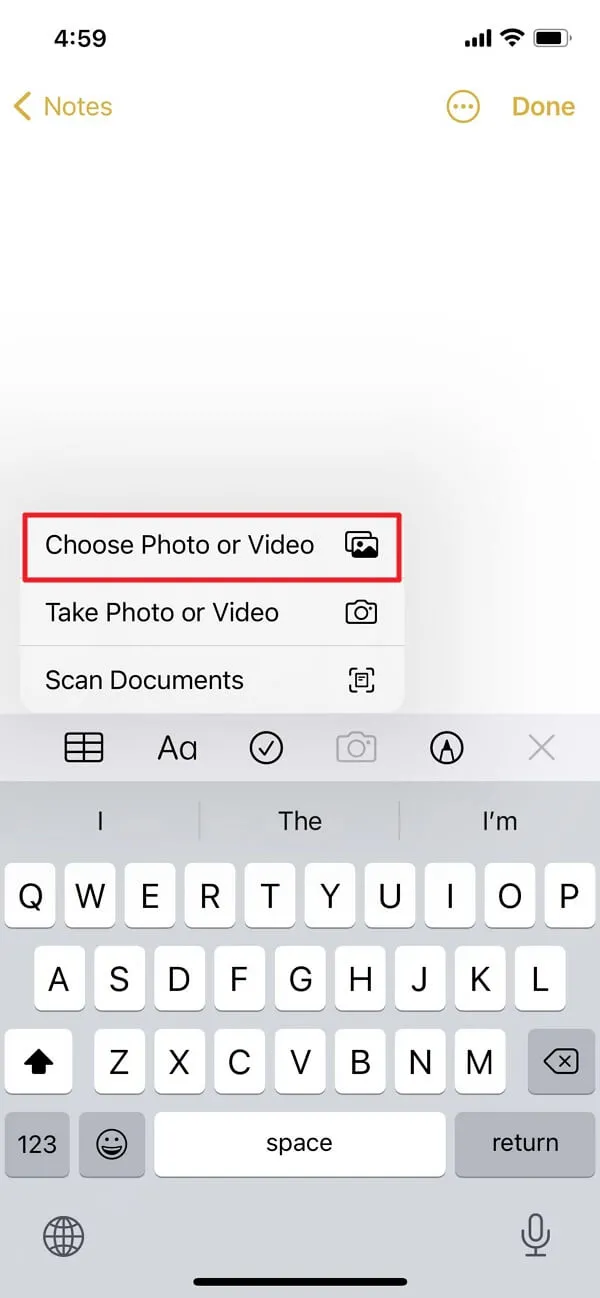
Step 3: Tap "Choose Photo or Video".
Step 4: Select the photos that you want to lock and then tap "Add".
Step 5: Tap on the three dots at the top-right corner of the Note and then choose "Lock".
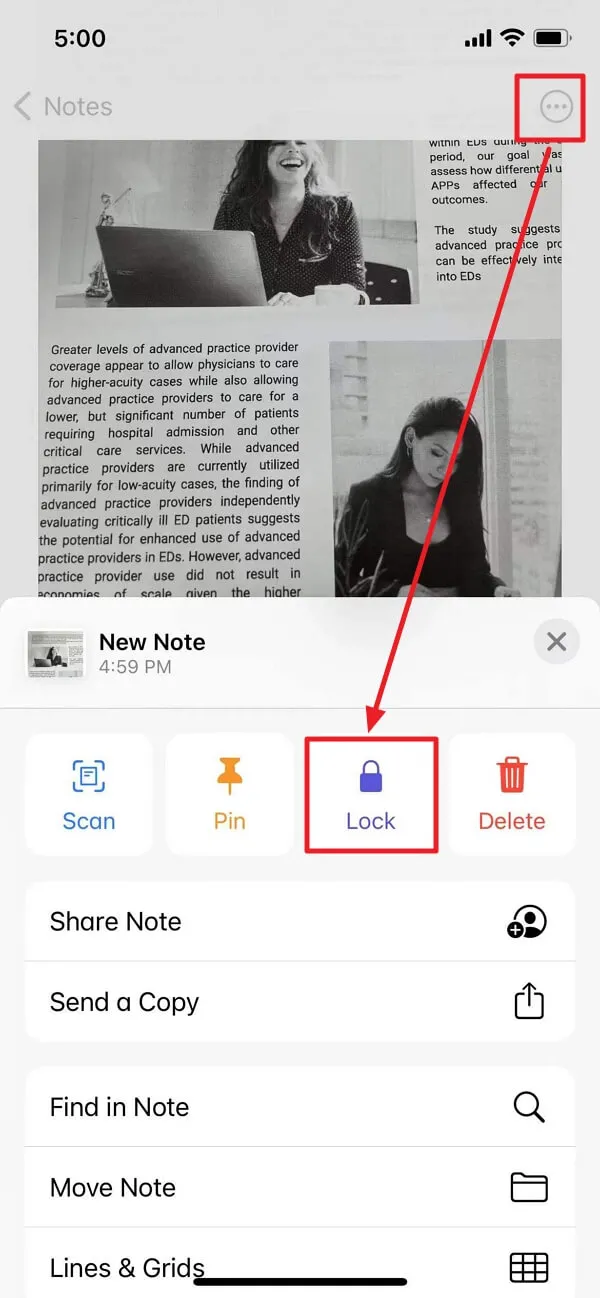
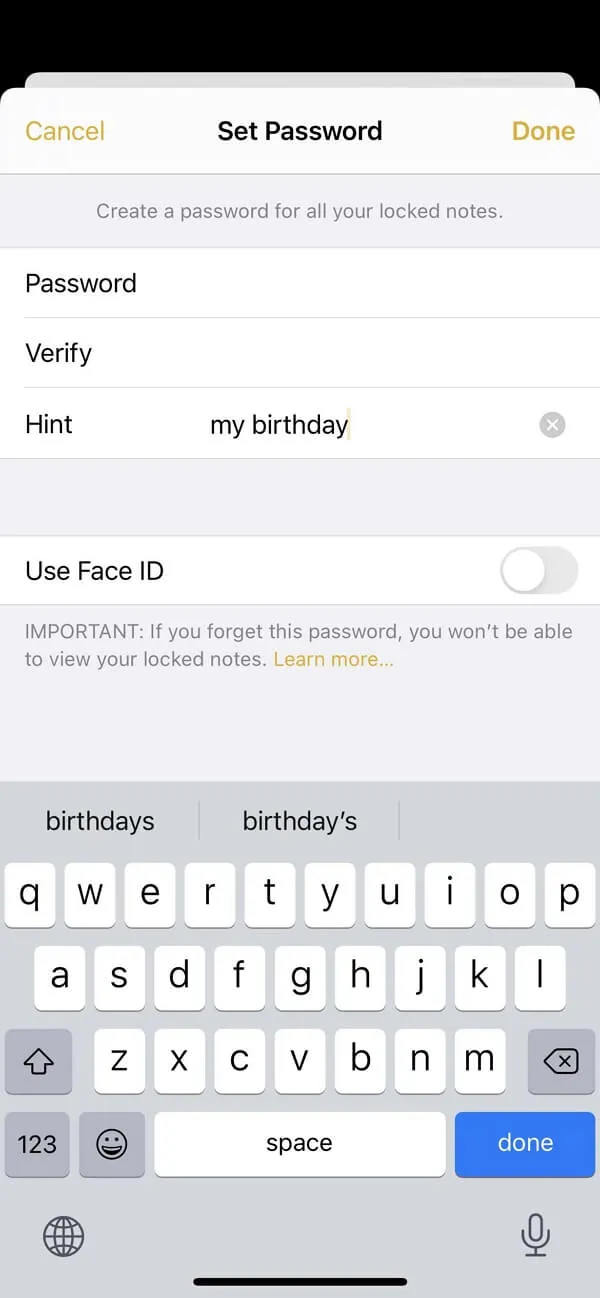
Step 6: You will be prompted to create a password for the locked images. Create a password and then enter it again to verify it. You can also protect the photos using Touch ID or Face ID.
Step 7: Tap on the padlock at the top-right until you see that the padlock is locked. This will indicate that the Note is locked.
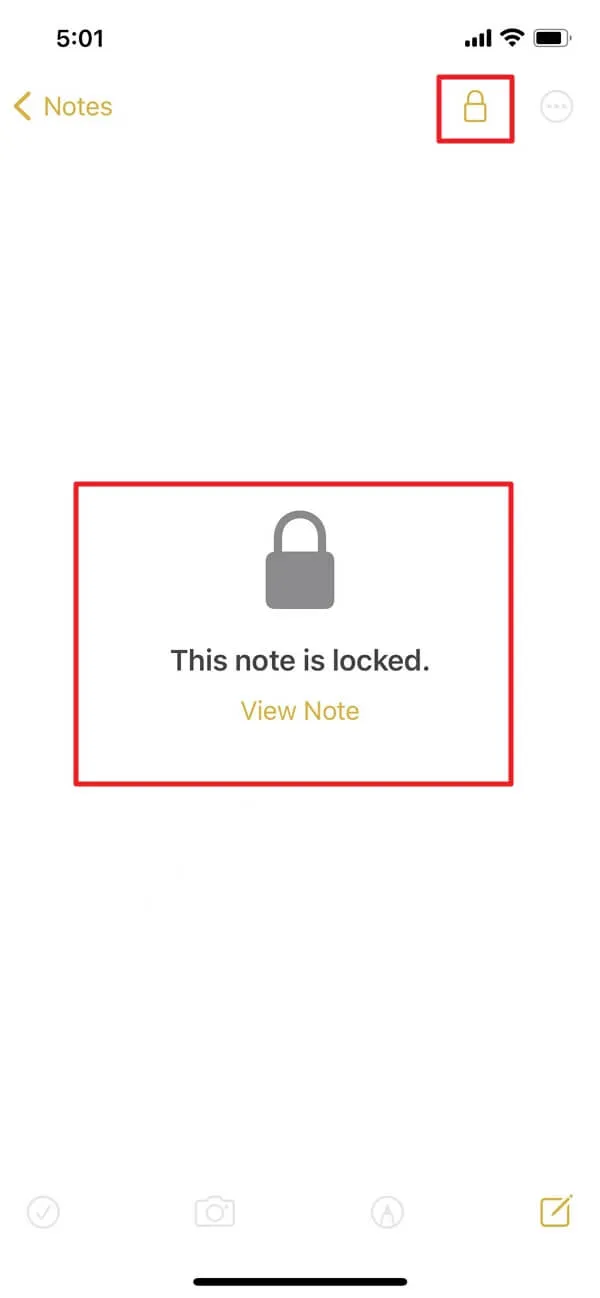
To see the images locked in the Note, you will need to click "View Note" and then enter the password. Tap on the padlock icon again if you would like to keep the photos locked. To unlock the Note, tap on the three dots at the top and choose "Remove".
Conclusion
We have provided three methods in this article for you to lock photos on your iPhone. UPDF and its Security Space provide the ultimate way to protect and lock any photos on your device that you don't want anyone else to see. But this app is so much more than that with a versatile feature that allows you to manage not just photos, but all other types of documents directly on your device. Download it today and enjoy the journey with UPDF! Also, you can check the price of UPDF here.
Windows • macOS • iOS • Android 100% secure
 UPDF
UPDF
 UPDF for Windows
 UPDF for Mac
 UPDF for iPhone/iPad
 UPDF for Android
 UPDF AI Online
 UPDF Sign
 Edit PDF
 Annotate PDF
 Create PDF
 PDF Form
 Edit links
 Convert PDF
 OCR
OCR PDF to Word
 PDF to Image
 PDF to Excel
 Organize PDF
 Merge PDF
 Split PDF
 Crop PDF
 Rotate PDF
 Protect PDF
 Sign PDF
 Redact PDF
 Sanitize PDF
 Remove Security
 Read PDF
 UPDF Cloud
 Compress PDF
 Print PDF
 Batch Process
 About UPDF AI
 UPDF AI Solutions
 AI User Guide
 FAQ about UPDF AI
 Summarize PDF
 Translate PDF
 Chat with PDF
 Chat with AI
 Chat with image
 PDF to Mind Map
 Explain PDF
 Scholar Research
 Paper Search
 AI Proofreader
 AI Writer
 AI Homework Helper
 AI Quiz Generator
 AI Math Solver
 PDF to Word
 PDF to Excel
 PDF to PowerPoint
 User Guide
 UPDF Tricks
 FAQs
FAQs UPDF Reviews
 Download Center
 Blog
Blog Newsroom
 Tech Spec
 Updates
 UPDF vs. Adobe Acrobat
 UPDF vs. Foxit
 UPDF vs. PDF Expert






 Enola Miller

 Delia Meyer
 Enola Davis