In the digital era, PDF files have become the go-to standard for sharing data in the original layout. The article highlights the convenience of converting files to PDF at your fingertips.
This guide will walk you through the best solution to the Mac Print to PDF missing tool. By the end of this article, you'll know everything you want to learn about printing files to PDF on Mac. So, without further ado, let's delve into and discover the wonders of PDF files.
How to Print to PDF on Mac with UPDF?
Converting digital content to PDF on Mac devices can be a daunting task. UPDF for Mac is an all-in-one transformative application with a simple design and edge-cutting features. It allows users to effortlessly edit, convert, annotate, and print PDF files on Mac. The AI-integrated software streamlines the workflow and makes files more manageable.
UPDF is a strong software suitable for handling complex tasks. Here is a step-by-step guide to print to PDF on Mac.
Step 1: Open the File on UPDF
Download and install the UPDF application on your Mac by clicking the button below:
Windows • macOS • iOS • Android 100% secure
Once installed, click on the 'Open File' in the main interface to upload the file to the software.

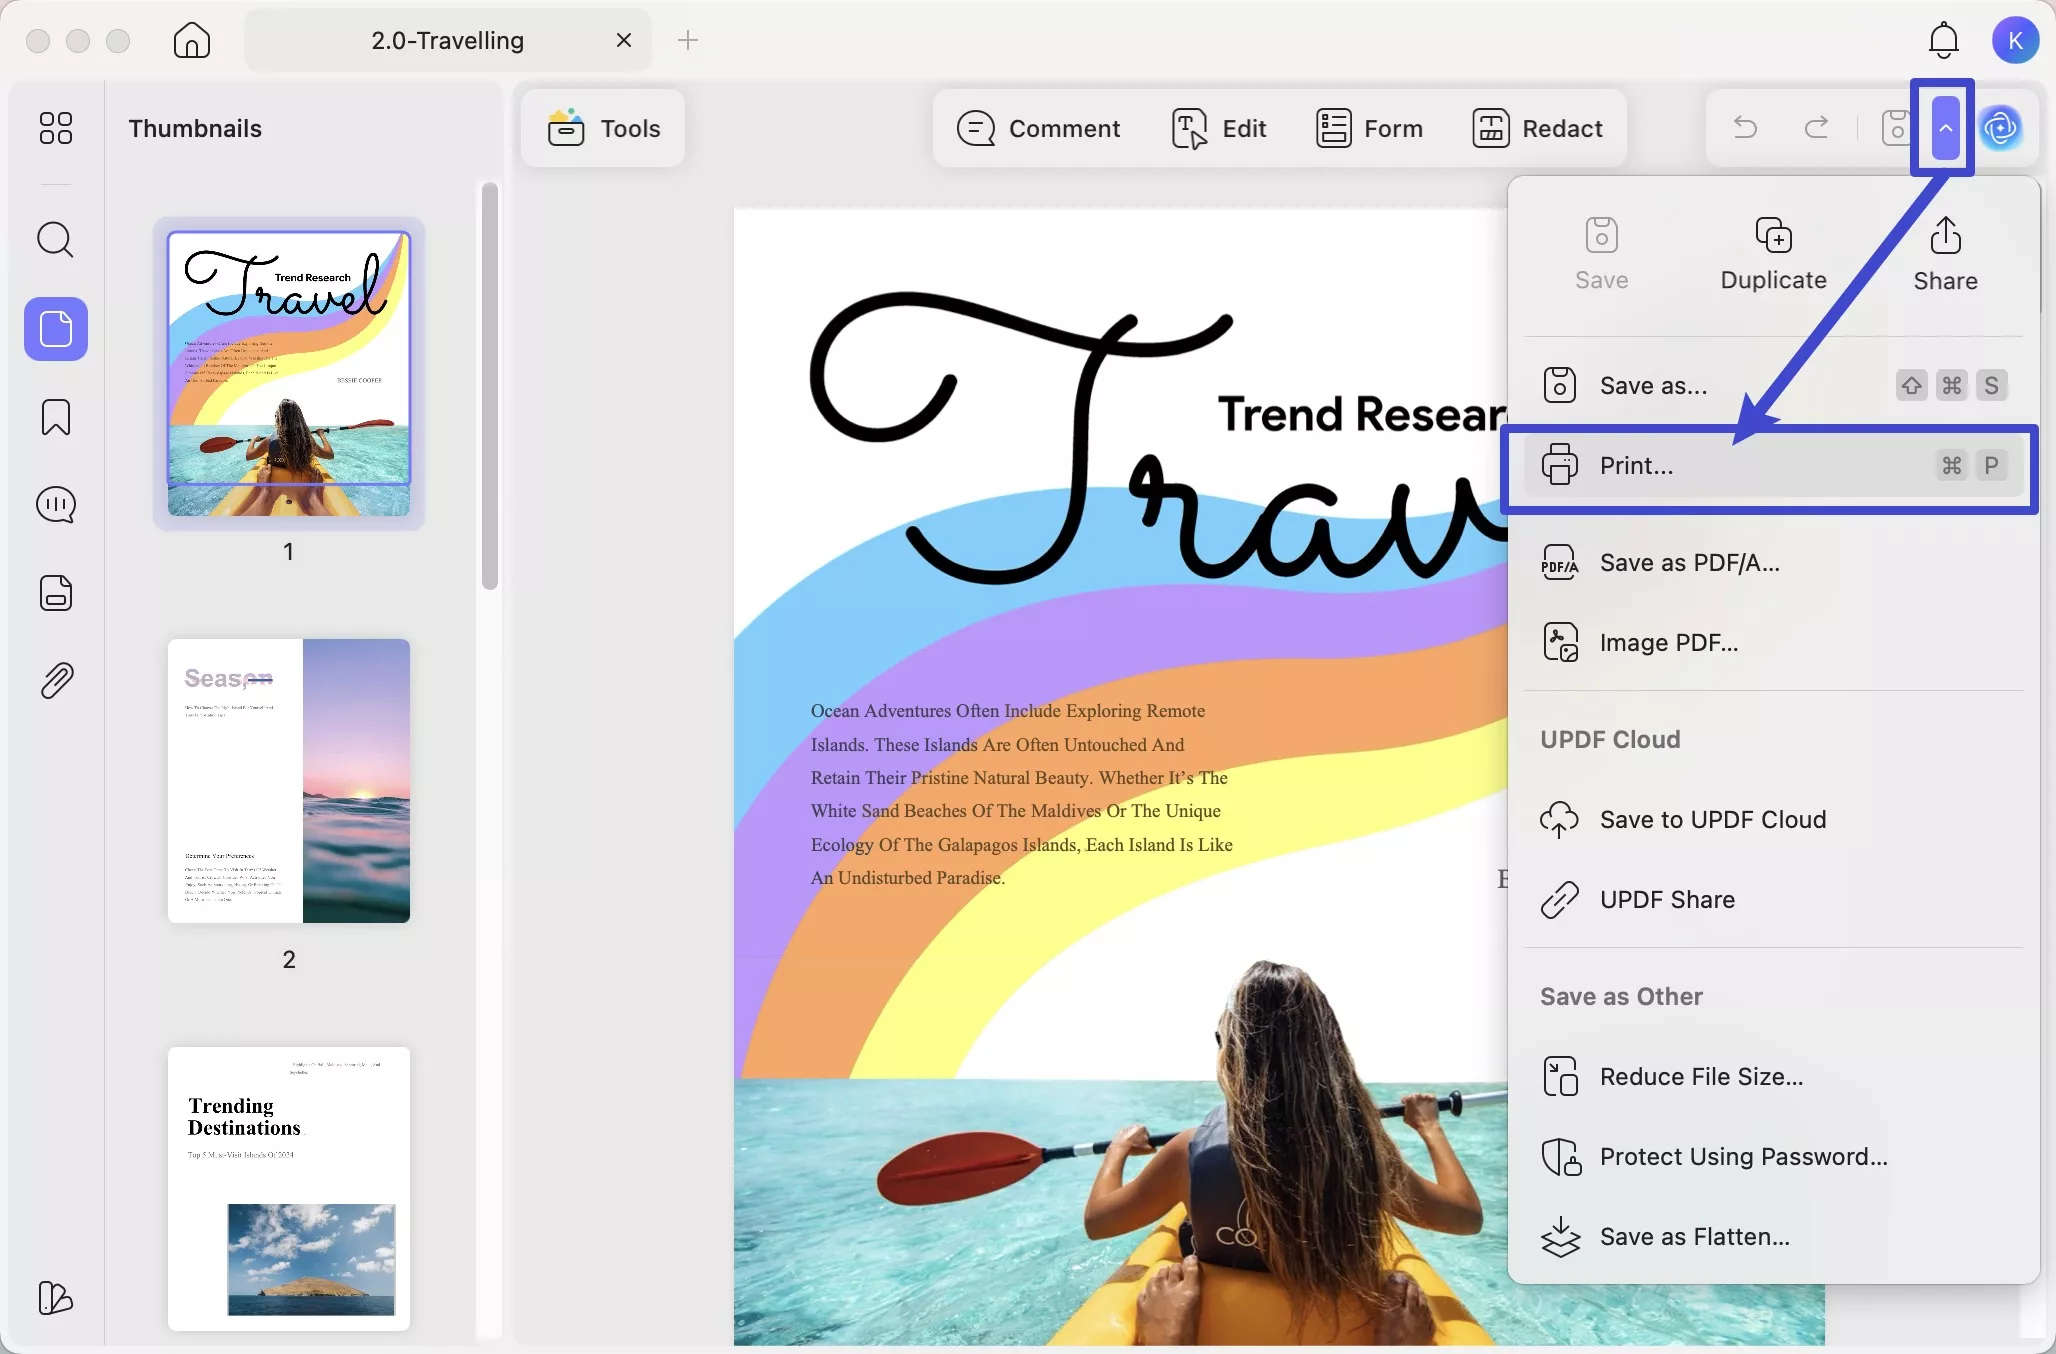
Step 2: Print the File
Once the file opens, click on the narrow next to "Save" > Click 'Print'. Alternatively, you can press Command + P to open the print settings window.
Step 3: Print to PDF on Mac
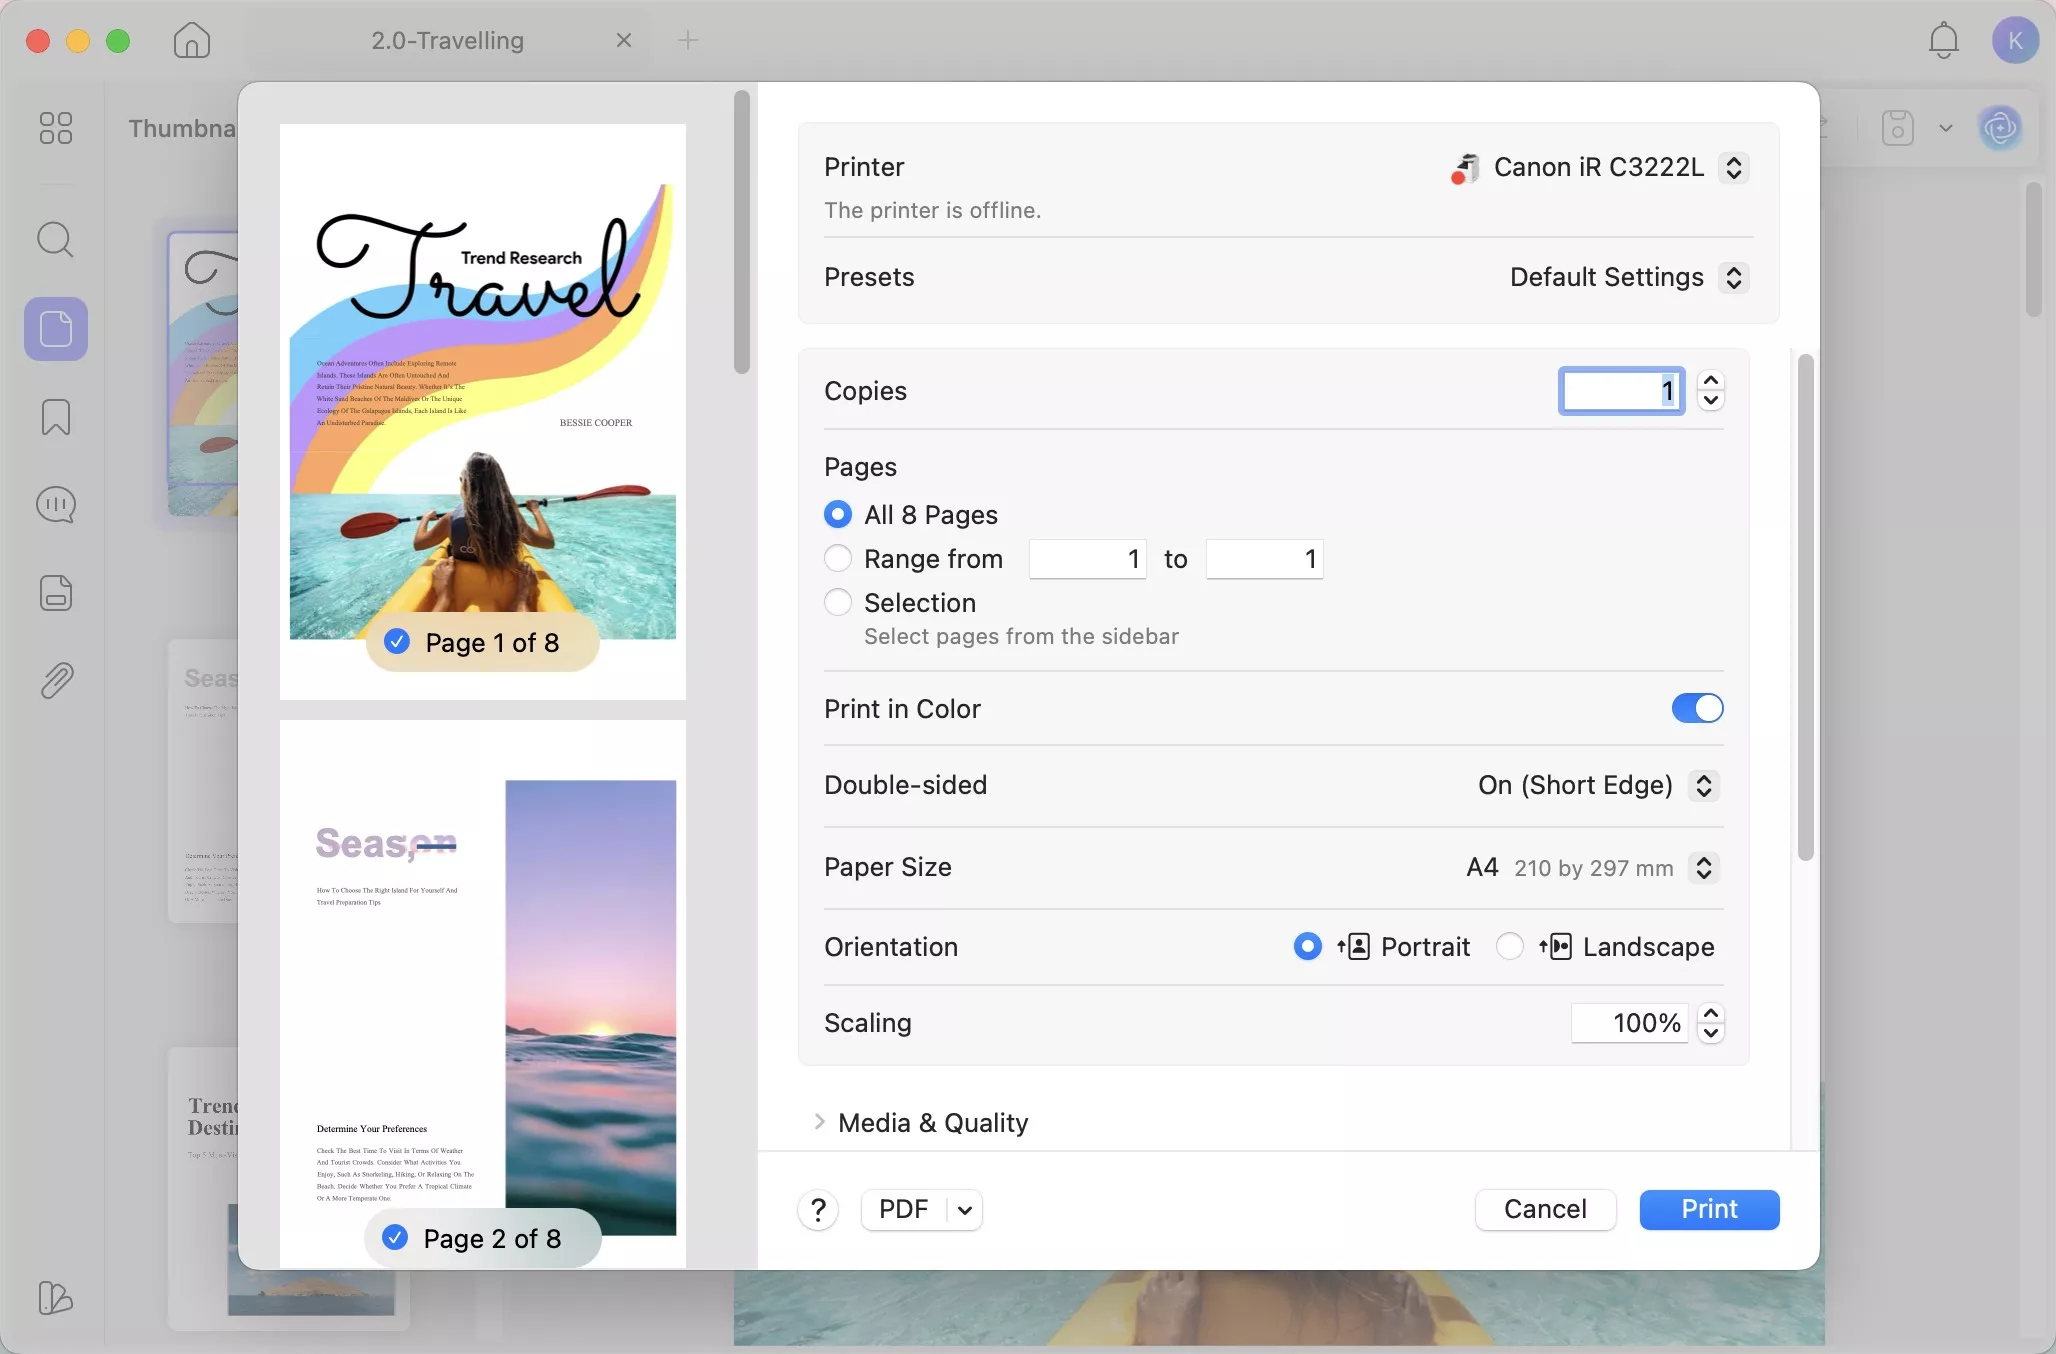
In the pop-up window, adjust the printer settings.
- Click on the Custom Scale and add a percentage to scale the document.
- Select the pages to print and adjust the sizing and handling.
- Select if you want to print the page on both sides.
Now click 'Print' and choose a file name for your document, add a local destination on your Mac, and click 'Save'.
UPDF instantly saves your file in PDF format and is now ready for use. The file can now easily be viewed or printed without any format changes.
UPDF has many other features, you can read this UPDF review article or watch the below video to learn more.
Also Read: How Print PDF on Mac?
How Do I Print Other Files to PDF on Mac With Other Methods?
Printing Files to PDF on Mac is very straightforward. You can easily do it in two ways. Let's explore each with a detailed step-by-step guide to follow.
1. Print Files to PDF with Preview
In the Preview app, you can collectively print all or selected pages. You can view and print the document even without the app that created it.
- On your Mac, open the document file in the Preview app. If there are multiple files, you can open them in one Window.
- Next, click 'View > Thumbnails'. Command-click the thumbnails for the pages you want to print.
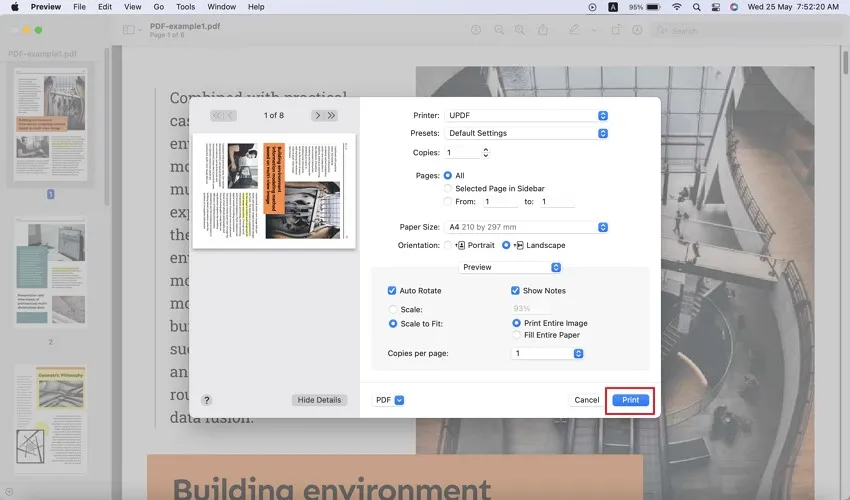
- In the upper left corner, click 'File > Print'.
- Modify the printing settings by adjusting the page size, fit, number, and orientation. To include any notes in the print, click Show Notes in the preview section. You can scale the page and choose Copies per page.
- Next, click the 'PDF' button and select 'Save as PDF' from the drop-down menu. Click 'Print' and add a file name, select the destination, and click Save.
It just takes these five simple steps to Save files to PDF with the Preview. But the next method is even simpler.
2. Print Files to PDF with Browser
To Print Files to PDF in your browser, here are three steps.
- Click on Save as PDF. Choose a name and location for your PDF file and click Save.
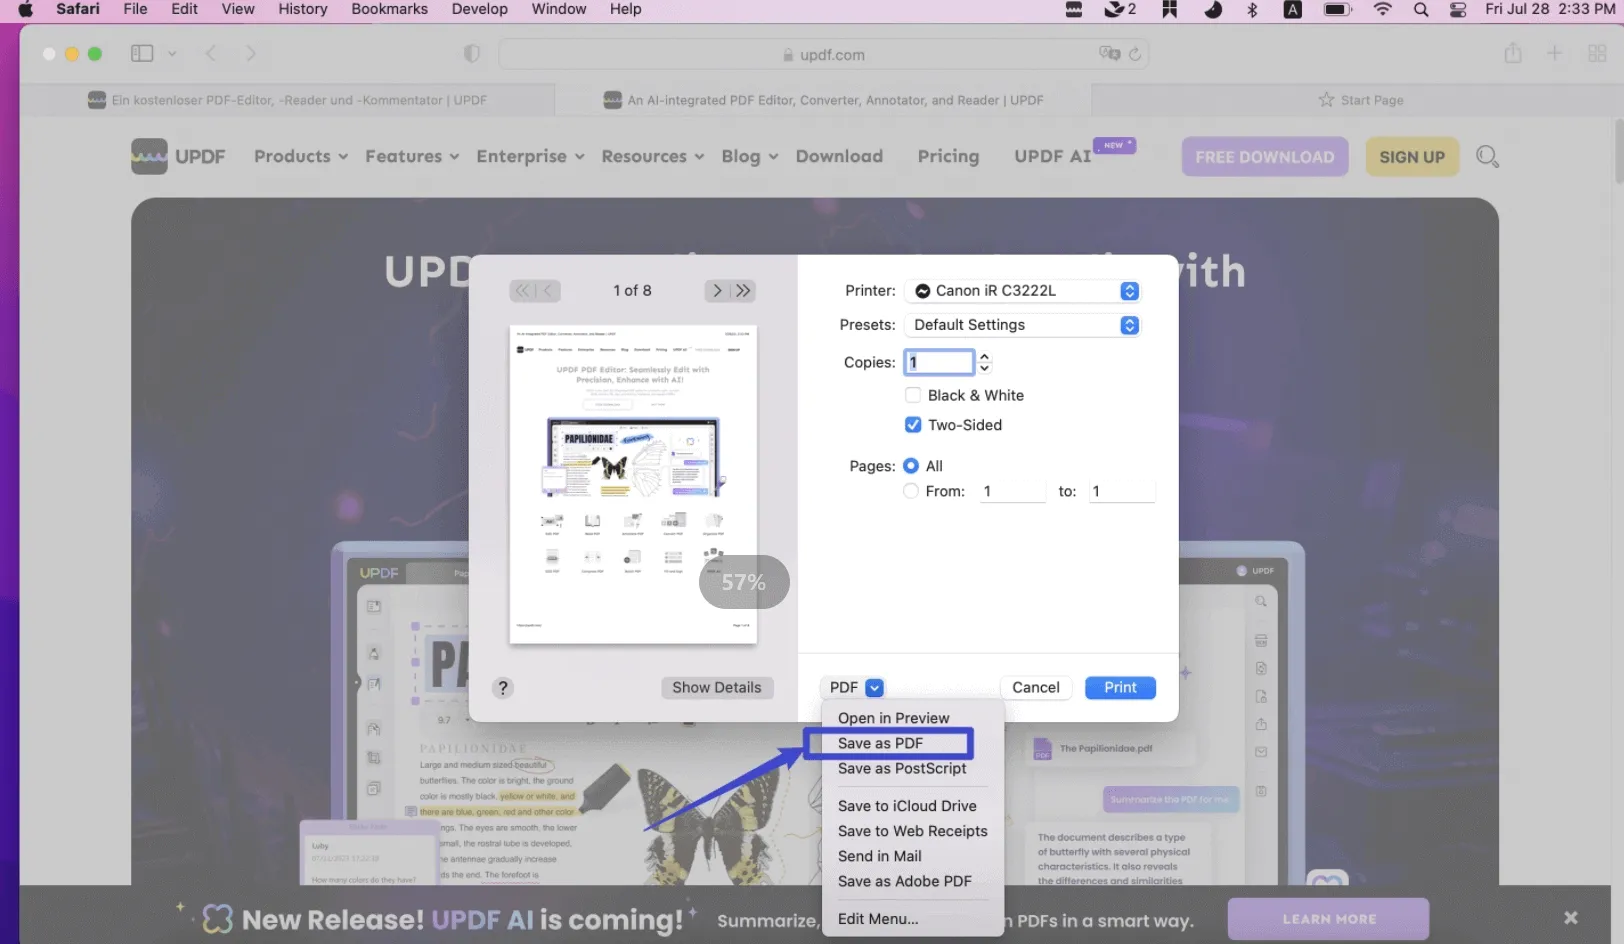
And that is all! It just takes three steps to Print Files to PDF from the browser.
What is the Difference between Print to PDF vs. Print PDF?
Users often confuse the two common features: Print to PDF and Print PDF. It's time to solve this mystery forever.
Print PDF
Print PDF is the simple button to print out a PDF immediately on paper. You can need to connect your printer. This will show a preview and print the document in its exact form.
Print to PDF
In comparison, the Print to PDF feature is more versatile. It lets you save the document as a PDF file. You can customize the file and adjust the printing settings, such as orientation, pages, margins, fit, etc. However, this will not print the document. The file will be saved as a ready-to-print document whenever you need it.
In easy terms, Printing to PDF is a more convenient way of storing files that can be easily manipulated later. Whereas the Print PDF is an instant PDF printer.
How Can I Change the Mac Print to PDF as Default Printer?
No, you cannot add Mac Print to PDF as the default printer. It is not recognized as a printer and is simply an extended feature for printing files. However, you can create a shortcut for this feature on your Mac as an alternative.
Creating a Shortcut for Print to PDF on Mac
Go to the System Preferences > Keyboard Shortcuts > Shortcuts. You can create a shortcut for Save to PDF. You can use the Keyboard Shortcut or press Command + P to save files as PDF instantly.
Although you cannot set up Print to PDF as your default printer, here is how to choose and change your default printer on Mac 13.0.
Set Up Default Printer on macOS 16.0
If no printer is selected, the first printer added becomes your default printer.
- Go to the Apple Menu, select System Settings, and click Printers and Scanners.
- On the right, click on the 'Default Printer' pop-up menu.
- If you want the same device to be your default printer, choose one from the available list. Remember that the default printer does not change after printing with a different device.
- If you want the default printer to be the last printer device you used, select Last Printer Used. This can change depending on your workplace and the printer last connected.
FAQs on Printing to PDF on Mac
Before we end this article, here are the answers to some frequently asked questions.
1. How do I enable print to PDF on Mac?
Print to PDF is enabled through the printing menu on Mac. Follow these instructions:
- Go to the 'File' Menu and select 'Print'.
- In the new window, select 'Printers and Scanners ' Save as PDF' from the drop-down menu of the 'PDF' option.
- Choose a destination for the PDF document and save it.
2. Why is print to PDF not an option on Mac?
Due to some security and technical features, the Print to PDF feature has been disabled on macOS X Snow Leopard (v10.6) and later versions. Apple has restricted Adobe's functionality, limiting it to Save as PDF only.
3. Can you print to PDF if you don't have Adobe on Mac?
If you don't have Adobe Acrobat on your Mac, you can use UPDF to help you. It is a comprehensive solution for all PDF-related problems on Mac or Windows.
Conclusion
The article has exhaustively discussed printing to PDF on Mac. If you are exploring wider options to edit and manage PDF files, UPDF is the strongest contender out there. The software can easily handle complex PDF demands like compensating for the Mac OCR missing tool.
While exploring the difference between Print to PDF and Print PDF, the article has guided you to use UPDF. It is the best bet you can make to manage your digital content easily. Click the below button to try it now.
Windows • macOS • iOS • Android 100% secure
 UPDF
UPDF
 UPDF for Windows
 UPDF for Mac
 UPDF for iPhone/iPad
 UPDF for Android
 UPDF AI Online
 UPDF Sign
 Edit PDF
 Annotate PDF
 Create PDF
 PDF Form
 Edit links
 Convert PDF
 OCR
OCR PDF to Word
 PDF to Image
 PDF to Excel
 Organize PDF
 Merge PDF
 Split PDF
 Crop PDF
 Rotate PDF
 Protect PDF
 Sign PDF
 Redact PDF
 Sanitize PDF
 Remove Security
 Read PDF
 UPDF Cloud
 Compress PDF
 Print PDF
 Batch Process
 About UPDF AI
 UPDF AI Solutions
 AI User Guide
 FAQ about UPDF AI
 Summarize PDF
 Translate PDF
 Chat with PDF
 Chat with AI
 Chat with image
 PDF to Mind Map
 Explain PDF
 Scholar Research
 Paper Search
 AI Proofreader
 AI Writer
 AI Homework Helper
 AI Quiz Generator
 AI Math Solver
 PDF to Word
 PDF to Excel
 PDF to PowerPoint
 User Guide
 UPDF Tricks
 FAQs
FAQs UPDF Reviews
 Download Center
 Blog
Blog Newsroom
 Tech Spec
 Updates
 UPDF vs. Adobe Acrobat
 UPDF vs. Foxit
 UPDF vs. PDF Expert

