 UPDF for Windows
 UPDF for Mac
 UPDF for iPhone/iPad
 UPDF for Android
 Nomostar
 UPDF AI Online
 UPDF Sign
 IvyCraft
 Edit PDF
 Annotate PDF
 Create PDF
 PDF Form
 Edit links
 Convert PDF
 OCR
OCR PDF to Word
 PDF to Image
 PDF to Excel
 Organize PDF
 Merge PDF
 Split PDF
 Crop PDF
 Rotate PDF
 Protect PDF
 Sign PDF
 Redact PDF
 Sanitize PDF
 Remove Security
 Read PDF
 UPDF Cloud
 Compress PDF
 Print PDF
 Batch Process
 About UPDF AI
 UPDF AI Solutions
 AI User Guide
 FAQ about UPDF AI
 Summarize PDF
 Translate PDF
 Chat with PDF
 Chat with AI
 Chat with image
 PDF to Mind Map
 Explain PDF
 PDF AI Tools
 Image AI Tools
 AI Chat Tools
 AI Writing Tools
 AI Study Tools
 AI Working Tools
 Other AI Tools
 AI Bookmark Generation
 AI Bookmark Summary
 AI Watermark Generation
 AI Background Generation
 AI Sticker Generation
 AI Stamp Generation
 AI Editing Suite
 UPDF Copilot
 AI Page Management
 AI Semantic Search
 PDF to Word
 PDF to Excel
 PDF to PowerPoint
 User Guide
 UPDF Tricks
 FAQs
FAQs UPDF Reviews
 Download Center
 Blog
Blog Newsroom
 Tech Spec
 Updates
 UPDF vs. Adobe Acrobat
 UPDF vs. Foxit
 UPDF vs. PDF Expert
Were you scrolling through social media platforms and found something interesting? Yeah, you may save the post within a specific platform, like Instagram, etc., but to get offline access, you must capture a screenshot.
That's not the only case when you get to browse for the answer to how to screenshot on Mac; there can be bundles of other reasons, too. You can capture a screenshot to share with others or for later reference.
In short, whatever the reason left you wondering how to take a screenshot on Mac, the point is, what's the answer to this query? Here we have got you covered! Hop inside this article and clear your confusion about how to screenshot on MacBook and more. What are you waiting for? Let's dive right into it!
What Actually a Screenshot Is?
Before getting into the details of the procedure for capturing a screenshot on Mac, let's first learn about what a screenshot is.
A screenshot, screengrab, or screencap is an image depicting the content displayed on your device. It enables you to capture what you are viewing on your screen and use it later for reference or sharing.
How Do I Take a Screenshot on Mac?
When taking a screenshot on Mac, you have three possibilities: a screenshot of the whole screen, a single window, or the desired portion of the Window. Hop on below for detailed guidelines on how to screenshot on a MacBook or a Mac!
1. Capture the Entire Screen on Mac
- Press and hold the keys; Shift + Command + 3 to capture your entire Mac screen.
- Right after the screenshot is captured, you will see a thumbnail popping up in your Mac screen corner.
- Click on it to edit your recently captured screenshot, or wait until it gets saved on your device.

2. Capture a Selected Area on Mac
- Press and hold Shift, Command, and 4 keys together to capture a selected area on Mac.
- Select the area of the screen you wish to capture using the crosshair. To navigate your selection, press and hold the space bar when dragging. However, to cancel taking a screengrab, hit the Esc key.
- Release your trackpad button or mouse to take a screenshot.
- Wait for the screenshot to get saved for editing it. The alternative way is to click on the thumbnail in the screen corner.

3. Capture a Single Window on Mac
- Go to the Window or menu you want to take a screenshot of.
- Now, press and hold the Shift, Command, 4, and Space Bar together. Your pointer will instantly change into a Camera icon. Hit Esc to cancel capturing a screenshot if you want.
- Proceed with clicking the Window you need to capture.

Tip: Do you want to exclude Window's shadow when capturing a screenshot? As you click, press and hold the Option key.
- To edit your screenshot, wait for it to be saved on your device or click on the thumbnail popping on the screen corner.
If you are still confused about the steps, you can go to Apple official site to learn more.
Can I Capture a Screenshot on Mac and Save it as PDF?
Want to capture a screenshot on Mac and convert it into a PDF right away? Get your hands on the UPDF for Mac! This amazing all-in-one tool for PDF will enable you to not only capture screenshot and save it, but you can later edit them the way you like. What else does one need?
Windows • macOS • iOS • Android 100% secure
Impressive Features of UPDF
Here, we have listed some of the impressive features of UPDF, answering the query of why we call UPDF an all-in-one solution for all of your PDF concerns. Let's get into them!
View PDF
UPDF can significantly enhance your PDF viewing and reading experience with the extensive tool it boosts. These tools enable you to:
- Set your page layout as per your choice
- View PDF in protective viewing mode
- Enjoy an amazing slideshow experience
- Set up several tabs across UPDF
- Sail through the PDF document conveniently.
Edit PDF
With this tool, you can not only edit the text in the PDF, but you can also edit images and links. Moreover, adding backgrounds and watermarks is also accessible with this fantastic PDF tool.
Organize PDF
The next feature is its swift PDF organizing power. It allows you to add, delete, rotate, crop, rearrange, reorder, split, replace, or extract PDF pages. In short, you get all that you dire to have to make your PDF worth presentable.
Annotate PDF
If you ever get to review PDF files, you must be aware of how much annotating tools are helpful. UPDF makes a great PDF annotation tool that enables adding comments, stamps, stickers, and shapes to the PDF. You can also sign and share the annotated PDF via a link.
Convert PDF
Using this versatile PDF tool, you can convert your PDF into 14 different file formats, including Word, Excel, Image, etc. UPDF ensures that all conversions are fast and accurate. To your surprise, it enables you to convert five PDF files for free!
OCR PDF Conversion
Want to convert your scanned PDF document into real editable text formats? UPDF has got you covered this time, too. It uses advanced OCR technology that supports 38 languages to accurately read each word on the scanned PDF and convert it into editable real text.
You can use any of the three layouts available for conversion, i.e., Text under the page image, Text over the page image, and Text and pictures only.
Windows • macOS • iOS • Android 100% secure
Comprehensive Guidelines on How You Can Use UPDF to Create PDF from Capture?
Let's now have a look at the detailed guidelines on how to take a screenshot on MacBook and convert it into PDF using UPDF!
Step 1: Download and Install UPDF
The very first step is to visit UPDF's official website and download and install UPDF. Once you are done with installing the software, launch it and move to the next step.
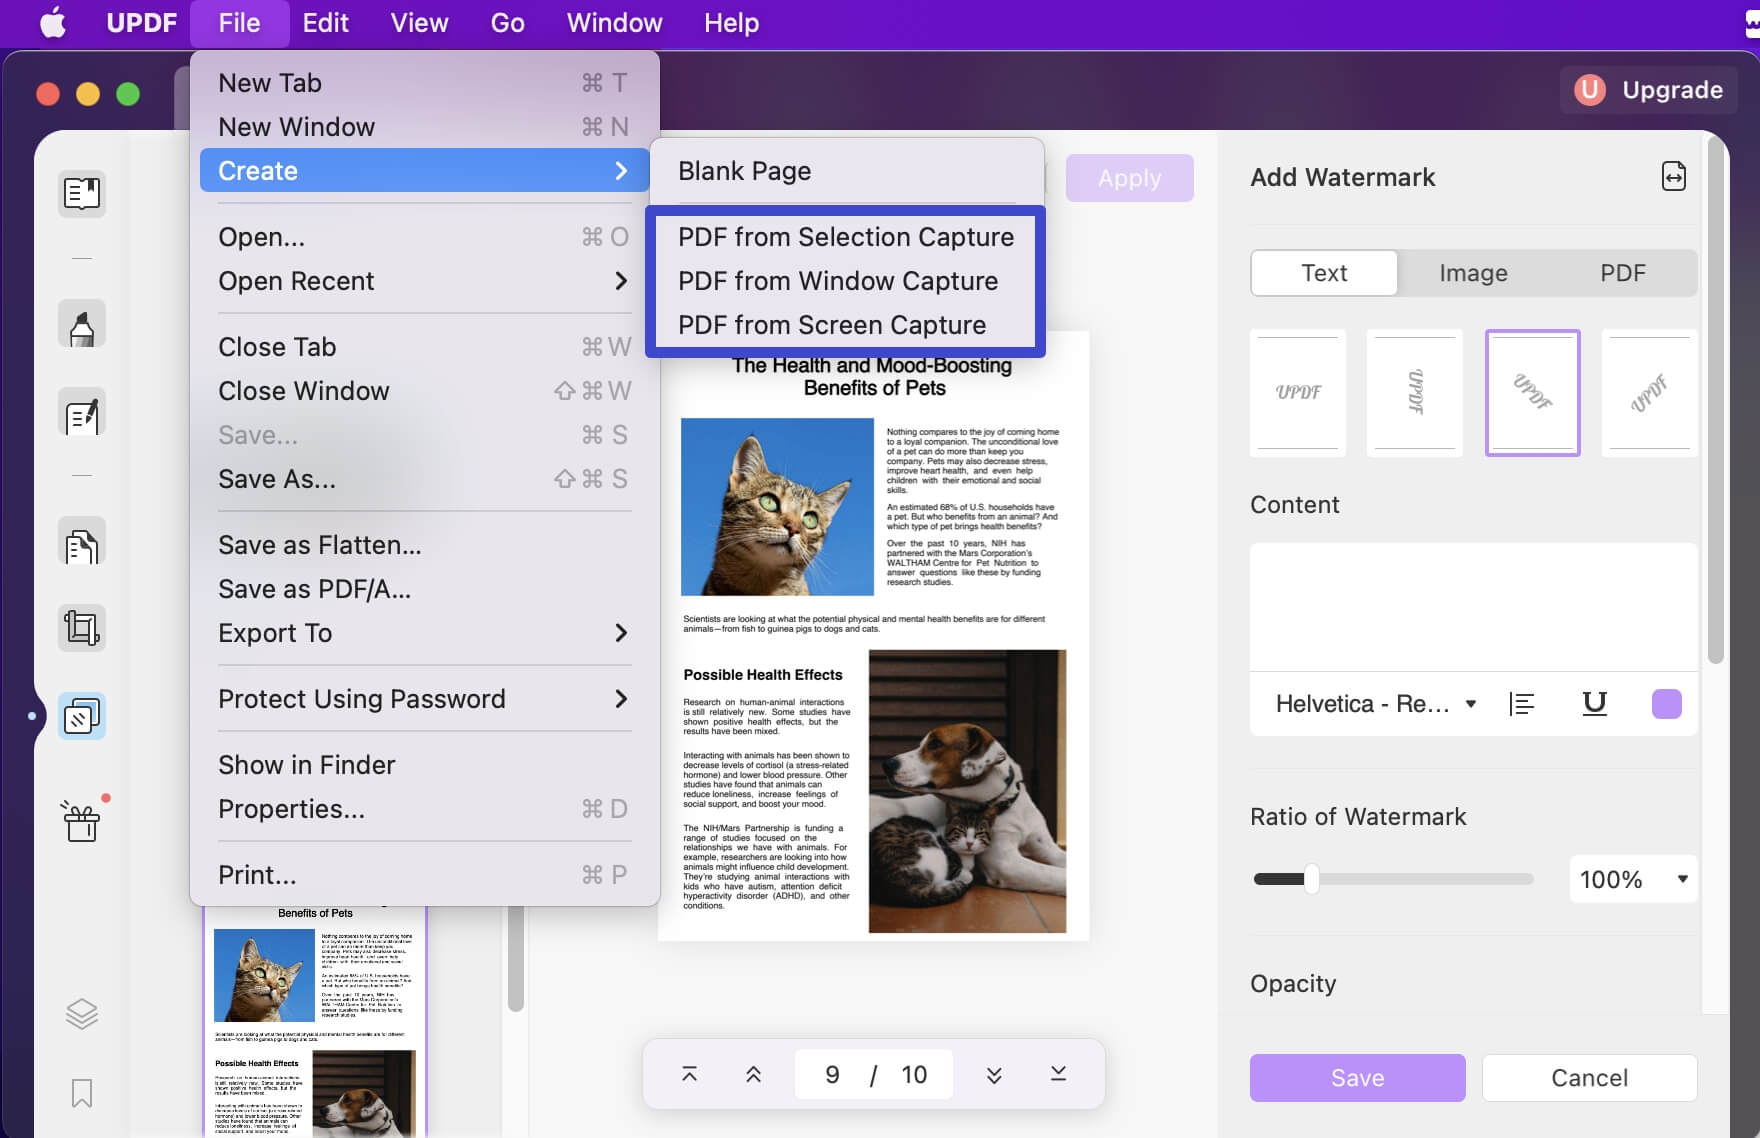
Step 2: Go to "File > Create"
Navigate to the "File" option and click on it. Proceed with selecting choose. You can also access the "Create" option by clicking on the UPDF icon on the menu bar.
Step 3: Capture Screenshot and Save as PDF
After choosing to Create option, you see three options:
1. PDF from Selection Capture
This option will allow you to capture a part of your Mac screen. Here is how you can do so:
- Navigate the cropping tool to your desired screen part via dragging.
- When done, release your mouse hold to capture a screenshot and create a PDF.
2. PDF from Window Capture
The second option, i.e., PDF from Window Capture, will capture an entire window. Just select the window you need to take a screenshot of, and that is it! Your screenshot will be captured and converted into a PDF.
3. PDF from Screen Capture
This last option will take a screenshot of your whole screen. Just click on this option, and UPDF will capture a screenshot for you, converting it into a PDF.
Next, UPDF will ask you about the name of the recently created PDF and the location where you want to save it. Fill in all the info and move to the next step.
Step 4: Edit and Save your PDF File
The next and last step is to edit and save your PDF file. UPDF gives you access to multiple PDF editing features that make working with PDF fun and convenient. When you are done editing, proceed with saving the PDF.
To save your PDF, go to the "File" section and hit "Save"!
Conclusion
In this comprehensive article, we have described all about how to screenshot on MacBook Pro or how to record screen on Mac. Moreover, we have also shed light on how UPDF helps take a screenshot on Mac and convert it into a PDF. You will surely find this article worth reading! Now you may download UPDF and have a try.
Windows • macOS • iOS • Android 100% secure


 Enid Brown

 Delia Meyer
