 UPDF for Windows
 UPDF for Mac
 UPDF for iPhone/iPad
 UPDF for Android
 Nomostar
 UPDF AI Online
 UPDF Sign
 IvyCraft
 Edit PDF
 Annotate PDF
 Create PDF
 PDF Form
 Edit links
 Convert PDF
 OCR
OCR PDF to Word
 PDF to Image
 PDF to Excel
 Organize PDF
 Merge PDF
 Split PDF
 Crop PDF
 Rotate PDF
 Protect PDF
 Sign PDF
 Redact PDF
 Sanitize PDF
 Remove Security
 Read PDF
 UPDF Cloud
 Compress PDF
 Print PDF
 Batch Process
 About UPDF AI
 UPDF AI Solutions
 AI User Guide
 FAQ about UPDF AI
 Summarize PDF
 Translate PDF
 Chat with PDF
 Chat with AI
 Chat with image
 PDF to Mind Map
 Explain PDF
 PDF AI Tools
 Image AI Tools
 AI Chat Tools
 AI Writing Tools
 AI Study Tools
 AI Working Tools
 Other AI Tools
 AI Bookmark Generation
 AI Bookmark Summary
 AI Watermark Generation
 AI Background Generation
 AI Sticker Generation
 AI Stamp Generation
 AI Editing Suite
 UPDF Copilot
 AI Page Management
 AI Semantic Search
 PDF to Word
 PDF to Excel
 PDF to PowerPoint
 User Guide
 UPDF Tricks
 FAQs
FAQs UPDF Reviews
 Download Center
 Blog
Blog Newsroom
 Tech Spec
 Updates
 UPDF vs. Adobe Acrobat
 UPDF vs. Foxit
 UPDF vs. PDF Expert
Many times, we lose track of headers when analyzing large spreadsheets. Excel lets us fix that by locking rows so that they remain visible while we scroll. In this guide, we will learn how to lock a row in Excel with simple clicks for better data readability. Moreover, if you have tables in PDF format, we will also show you how to convert PDFs to Excel using UPDF PDF converter and view data with preserved formatting.
Windows • macOS • iOS • Android 100% secure
Part 1. Why Lock or Freeze Rows in Excel?
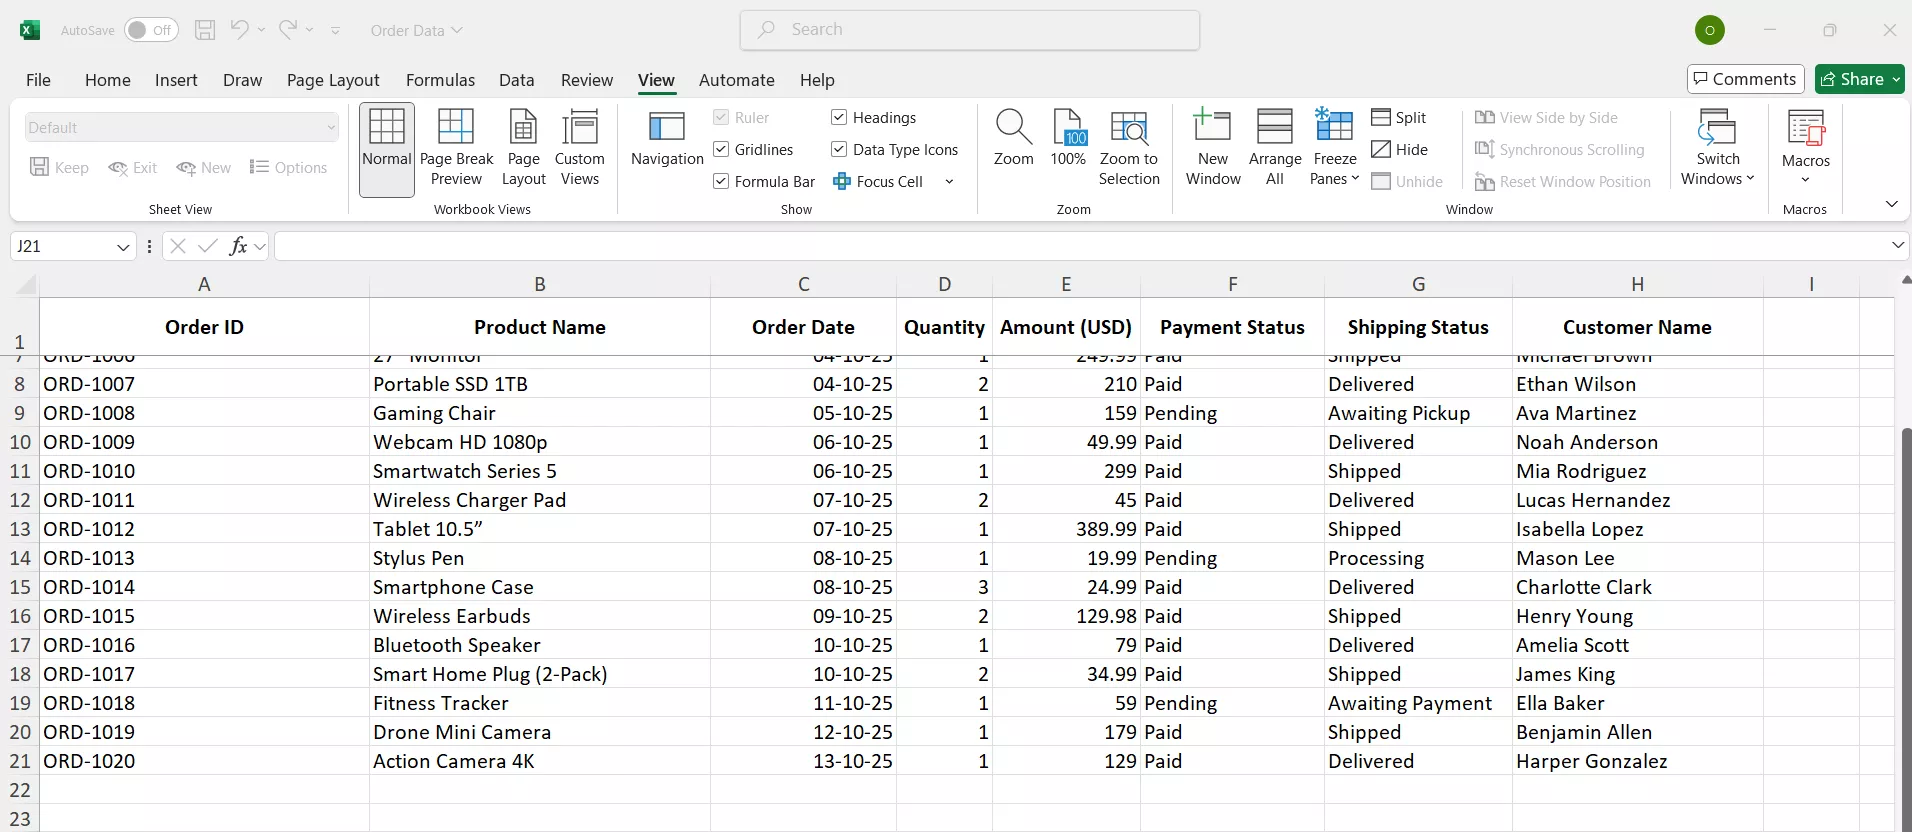
It is essential to lock or freeze rows in Excel to improve readability in large spreadsheets. Imagine that you are reading a long data sheet with hundreds of entries. When you scroll down a bit and the column headers disappear, it becomes harder to remember what each column represents.
However, once you have frozen the top row, you can keep important titles visible at all times. Alternatively, you can lock specific rows and columns to keep key reference data in view while analyzing or entering new information. This helps maintain context and enhance the productivity of accountants or analysts who deal with lengthy Excel files daily.
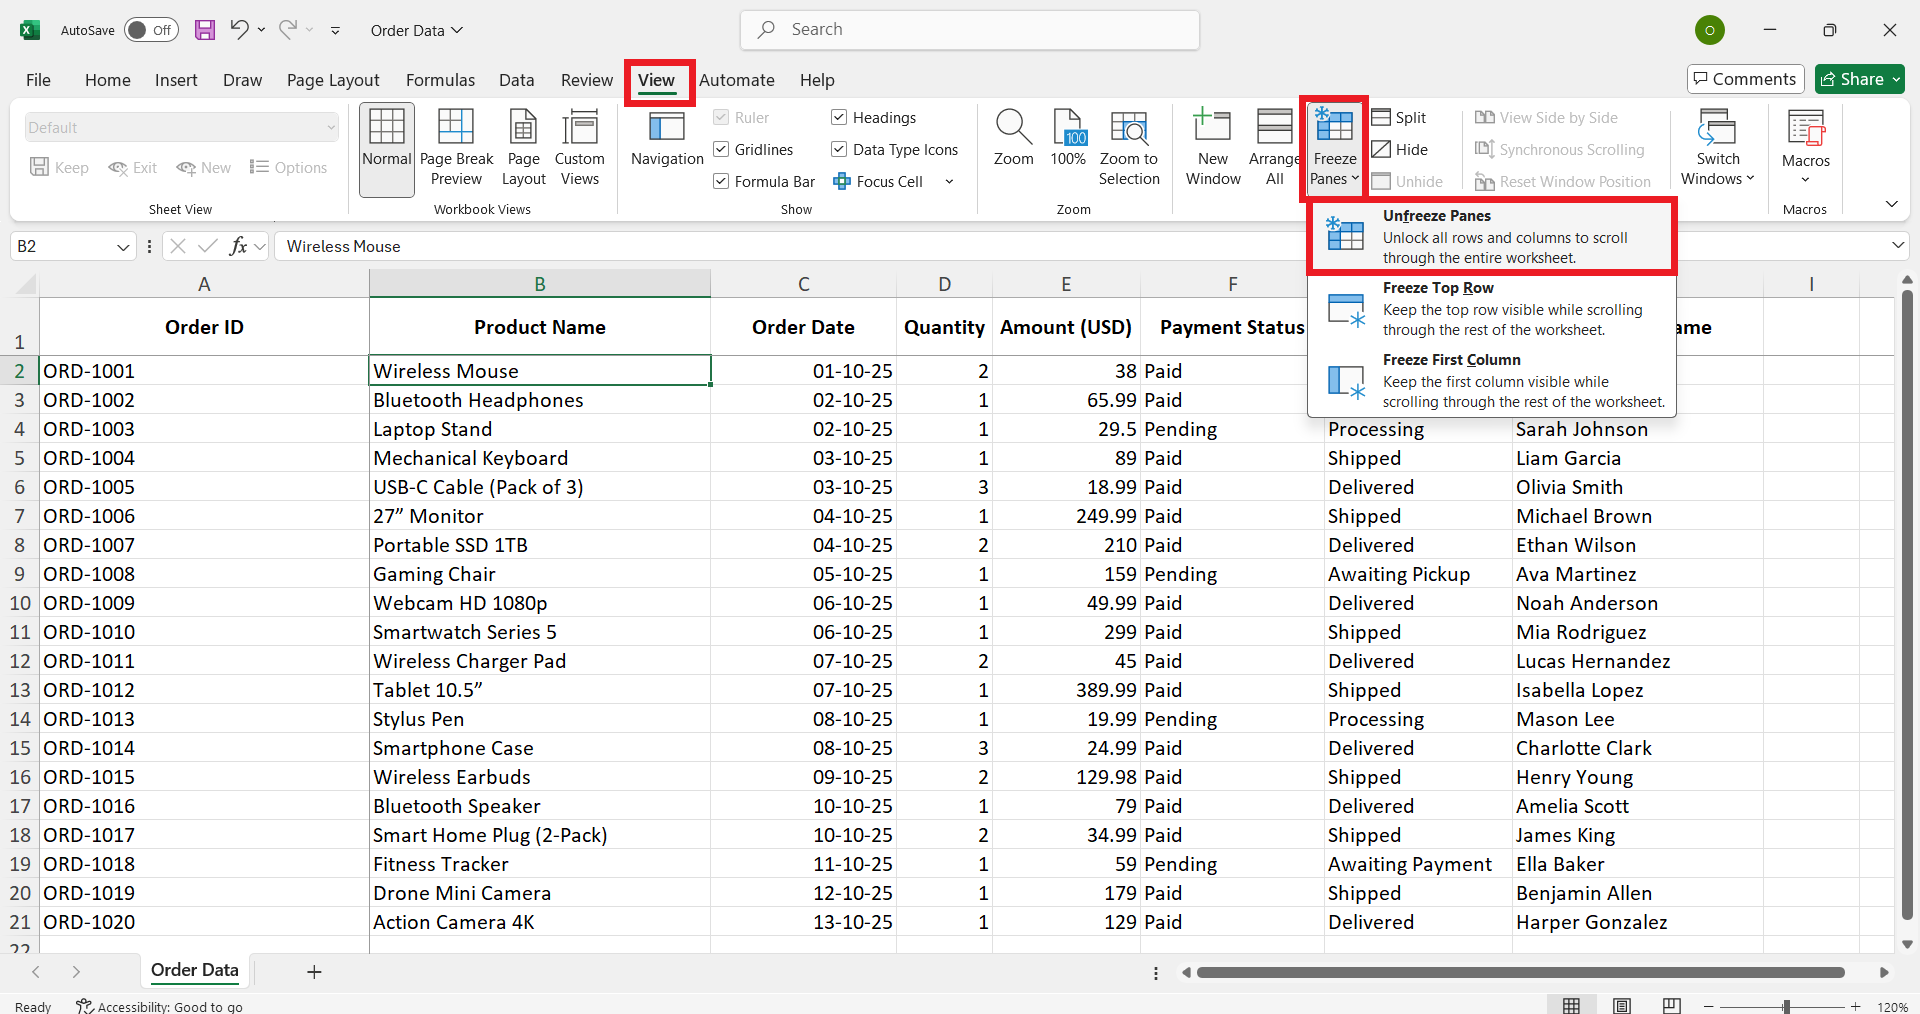
Part 2. How to Lock the Top Row in Excel?
Excel provides a click-based solution to lock the top row. Here's how to lock the top row in Excel in three clicks:
Step 1. Open your Excel file.
Step 2. Click the View tab on the top ribbon.
Step 3. Click Freeze Panes > Freeze Top Row.
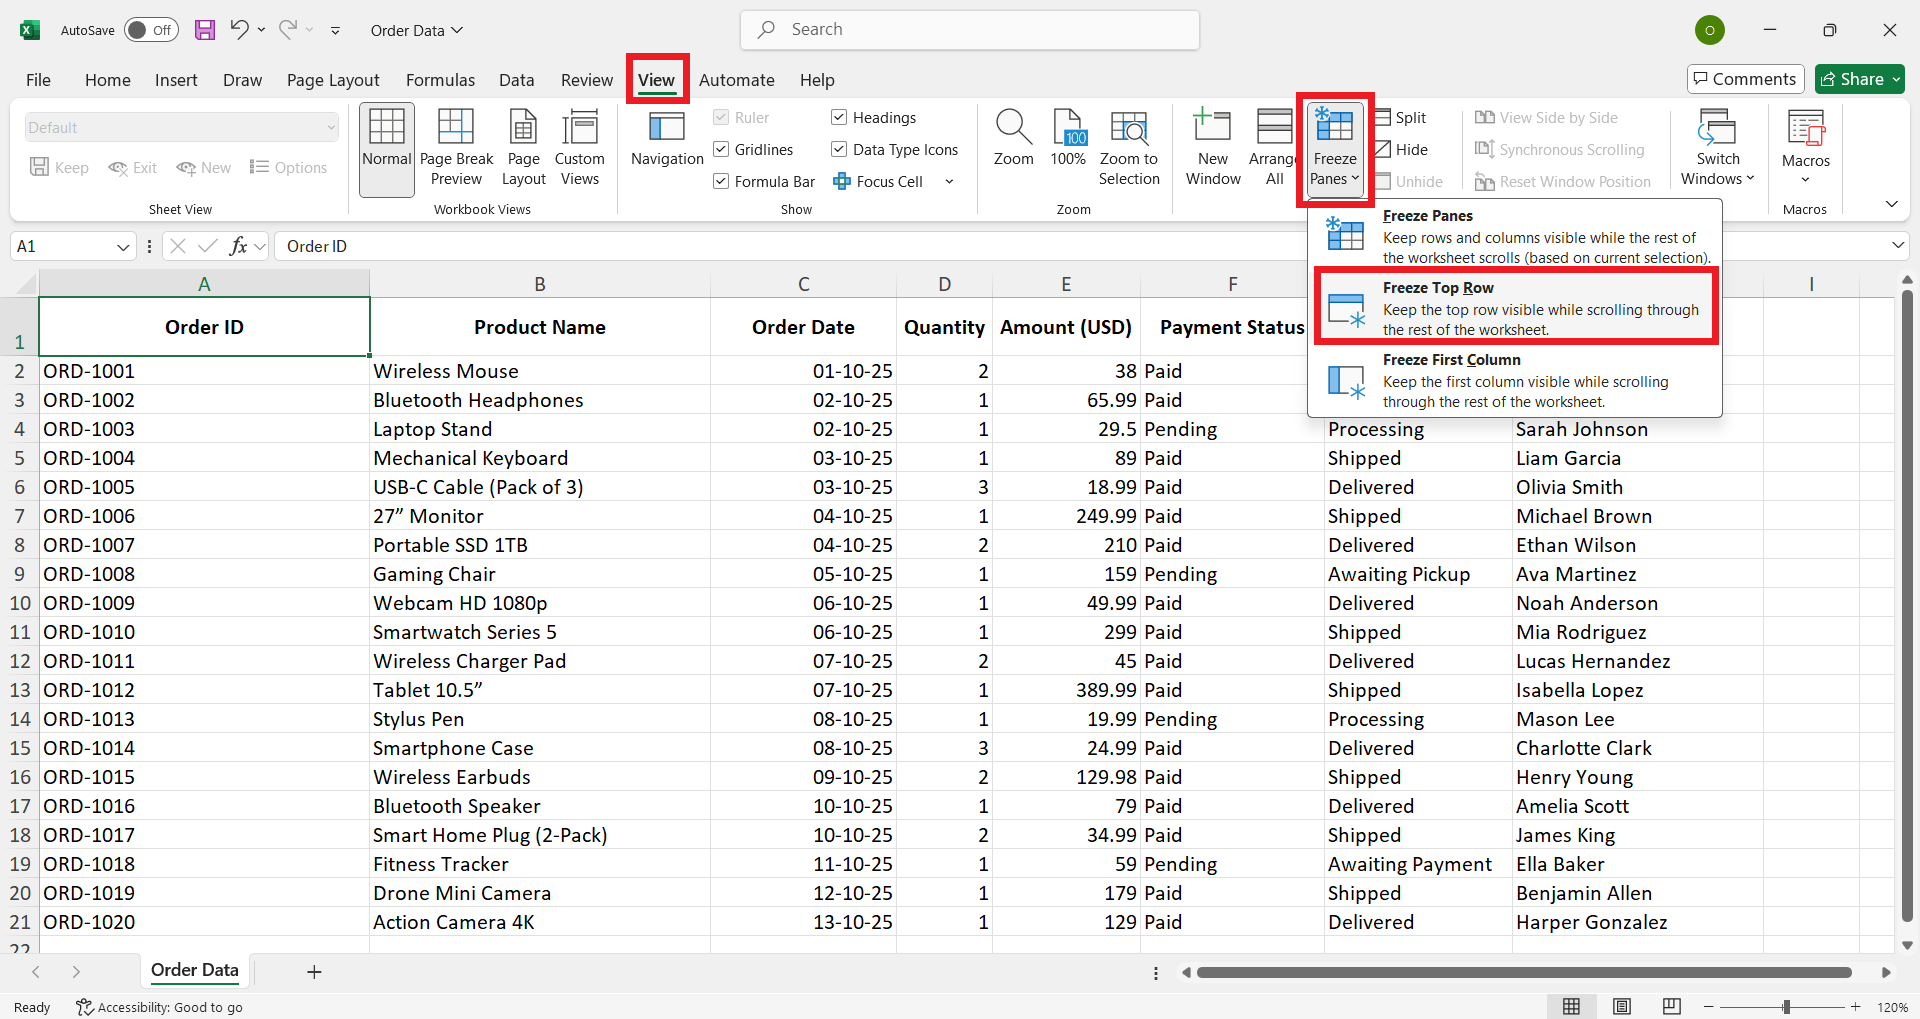
Now, your top row will stay fixed while you scroll through your spreadsheet.
Part 3. How to Freeze Multiple Rows?
Sometimes, you may want to freeze multiple rows for a specific analysis. Here's how to freeze rows in Excel:
Step 1. Select the row below the last one you want to freeze. For example, if you want to freeze rows 3 to 6, select row 7.
Step 2. Click View > Freeze Panes > Freeze Panes.
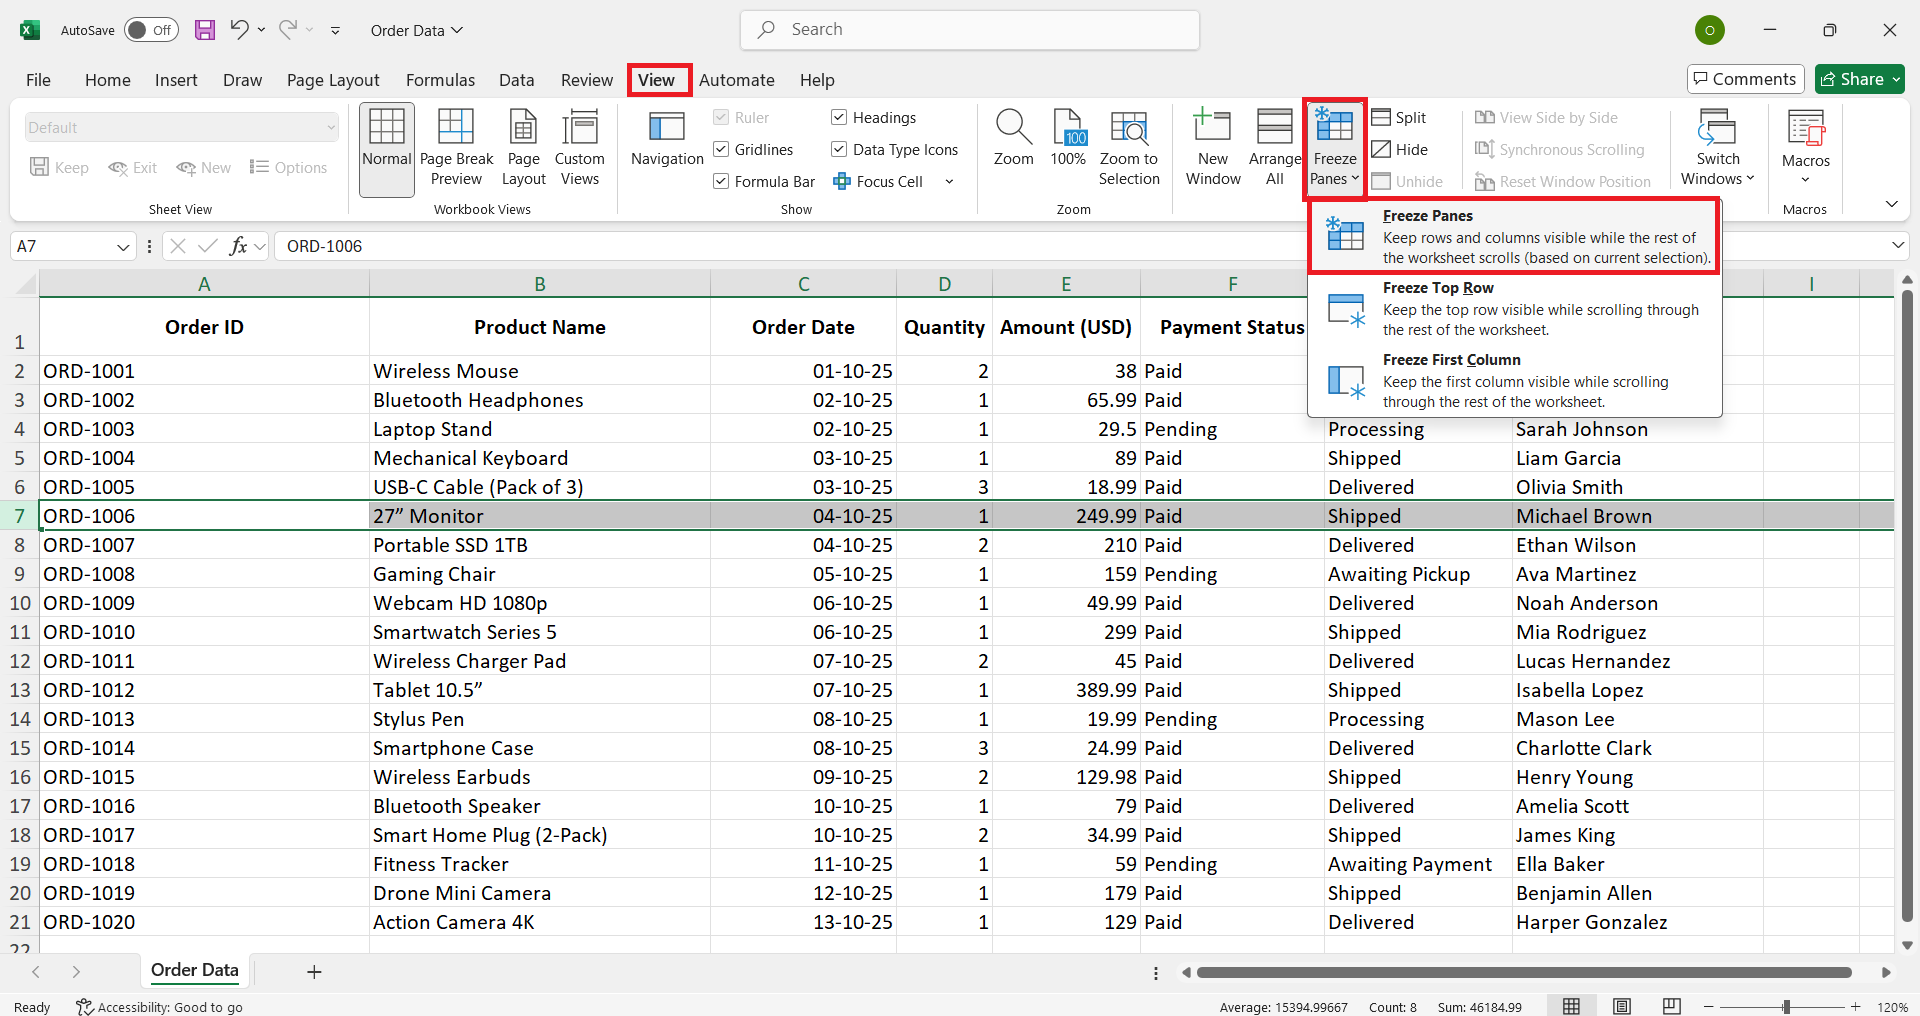
This will keep all selected rows locked while you scroll the sheet.
Part 4. How To Freeze Rows and Columns at the Same Time
Not just rows, Excel also lets you freeze both rows and columns simultaneously. It is useful when working with complex tables. Check out these steps to learn how to freeze rows and columns:
Step 1. Click on the cell below the rows and to the right of the columns you want to freeze. For example, select cell B2 if you want to free the first row and the first column.
Step 2. Click View > Freeze Panes > Freeze Panes.
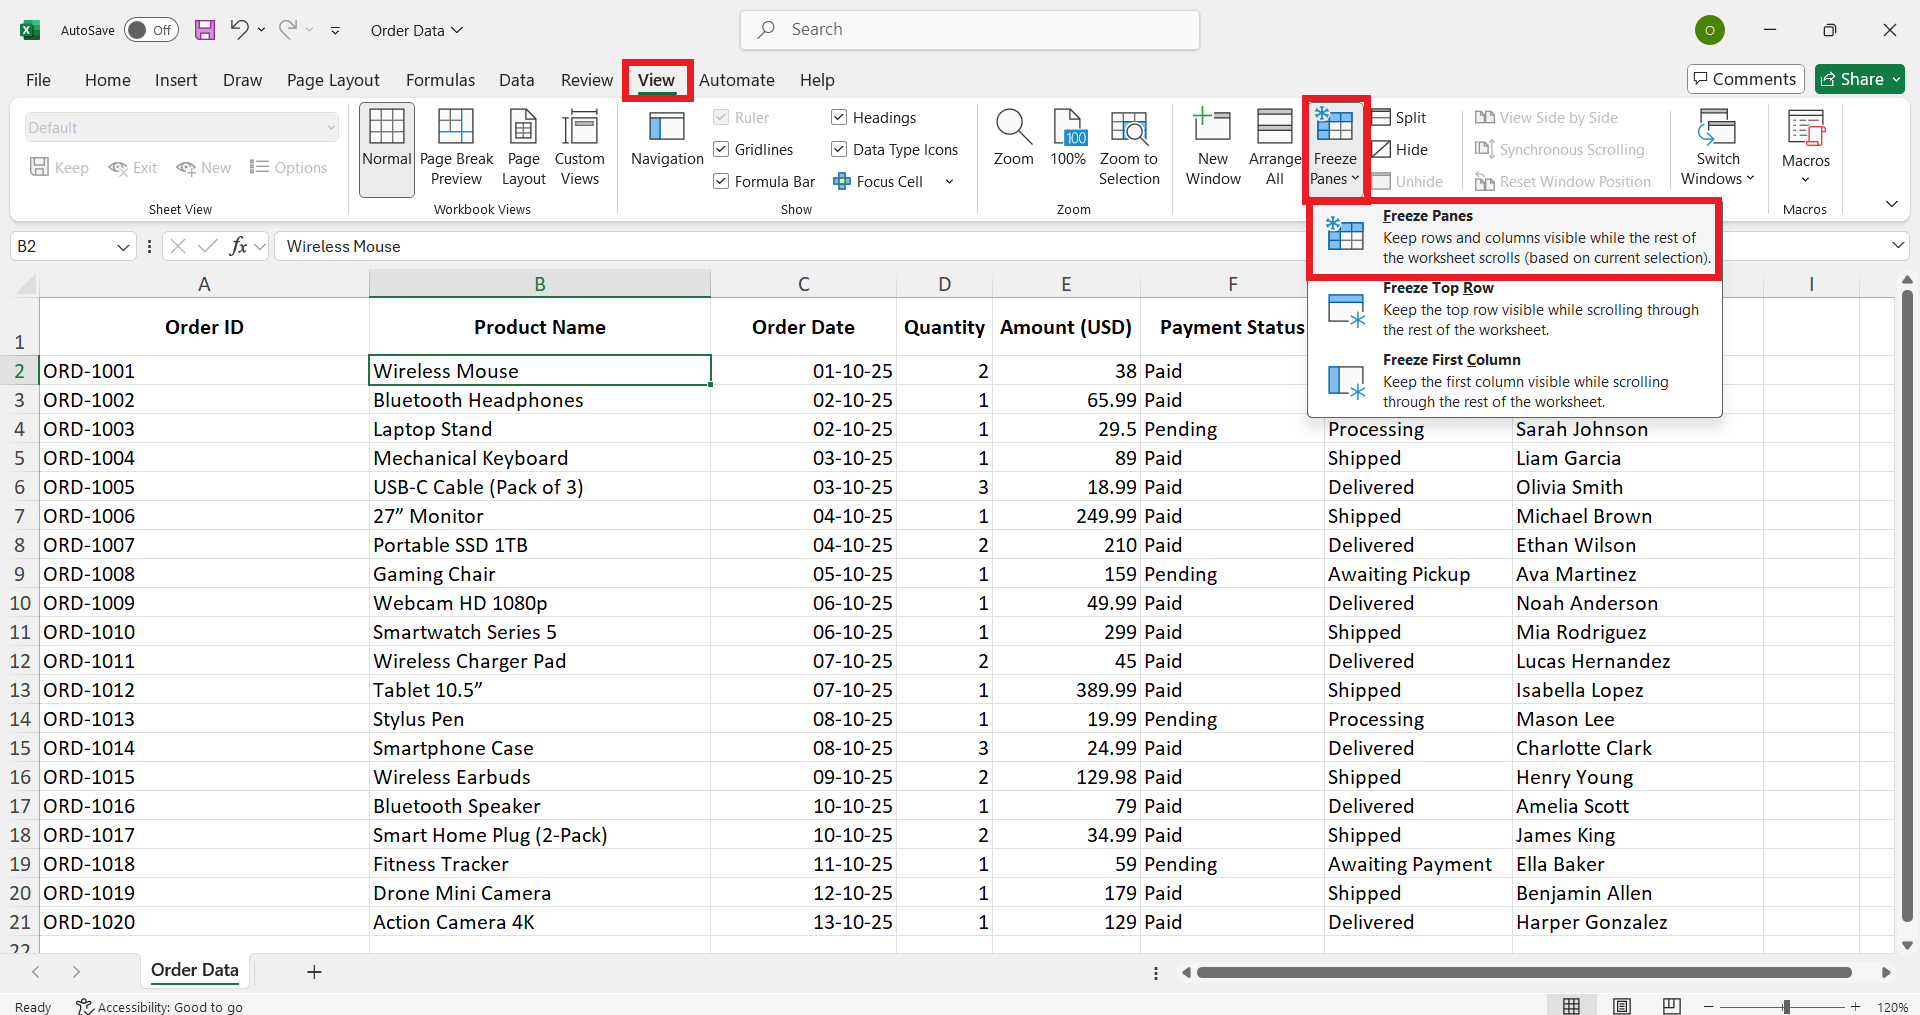
That's how you can smartly freeze both rows and columns and improve the Excel sheet analysis.
Part 5. How to Unfreeze Rows?
Knowing how to lock a row in Excel is one thing, but knowing how to unfreeze rows once the data no longer needs to stay fixed is just as important. So, here are the steps to unfreeze rows in Excel:
Step 1. Click the View tab on the top ribbon.
Step 2. Click Freeze Panes > Unfreeze Panes.
This way, your locked rows and columns will scroll freely.
Part 6. Bonus Tip: Convert Your PDF to Excel with UPDF
Many times, we receive reports or invoices in PDF format. Since PDFs cannot help in analyzing tables like in Excel, UPDF offers a much-needed solution to convert PDFs to Excel with original formatting preserved.
UPDF is a powerful PDF editor and conversion tool that provides a click-based interface to convert PDFs into editable Excel spreadsheets in seconds. It lets you perform conversion directly from your computer (Windows/Mac) or smartphone (iOS/Android).
Windows • macOS • iOS • Android 100% secure
You get three modes of converting PDF to Excel:
- Create a single worksheet for the document
- Create a worksheet for each table
- Create a worksheet for each page
Why choose UPDF to convert PDF to Excel:
- Convert PDF files to Excel with exceptional layout and formatting accuracy.
- Perform batch conversion to process multiple PDFs at once.
- Conduct OCR on scanned PDFs first to recognize text and tables before converting them into editable Excel sheets.
- Convert the entire PDF or specific pages to Excel.
- Support PDF to Excel conversion on Windows, Mac, iOS, and Android with dedicated apps.
Feel impressed? Download UPDF now and convert PDF to Excel with ease.
Windows • macOS • iOS • Android 100% secure
How to Convert PDF to Excel (PC & Mobile)?
For PC
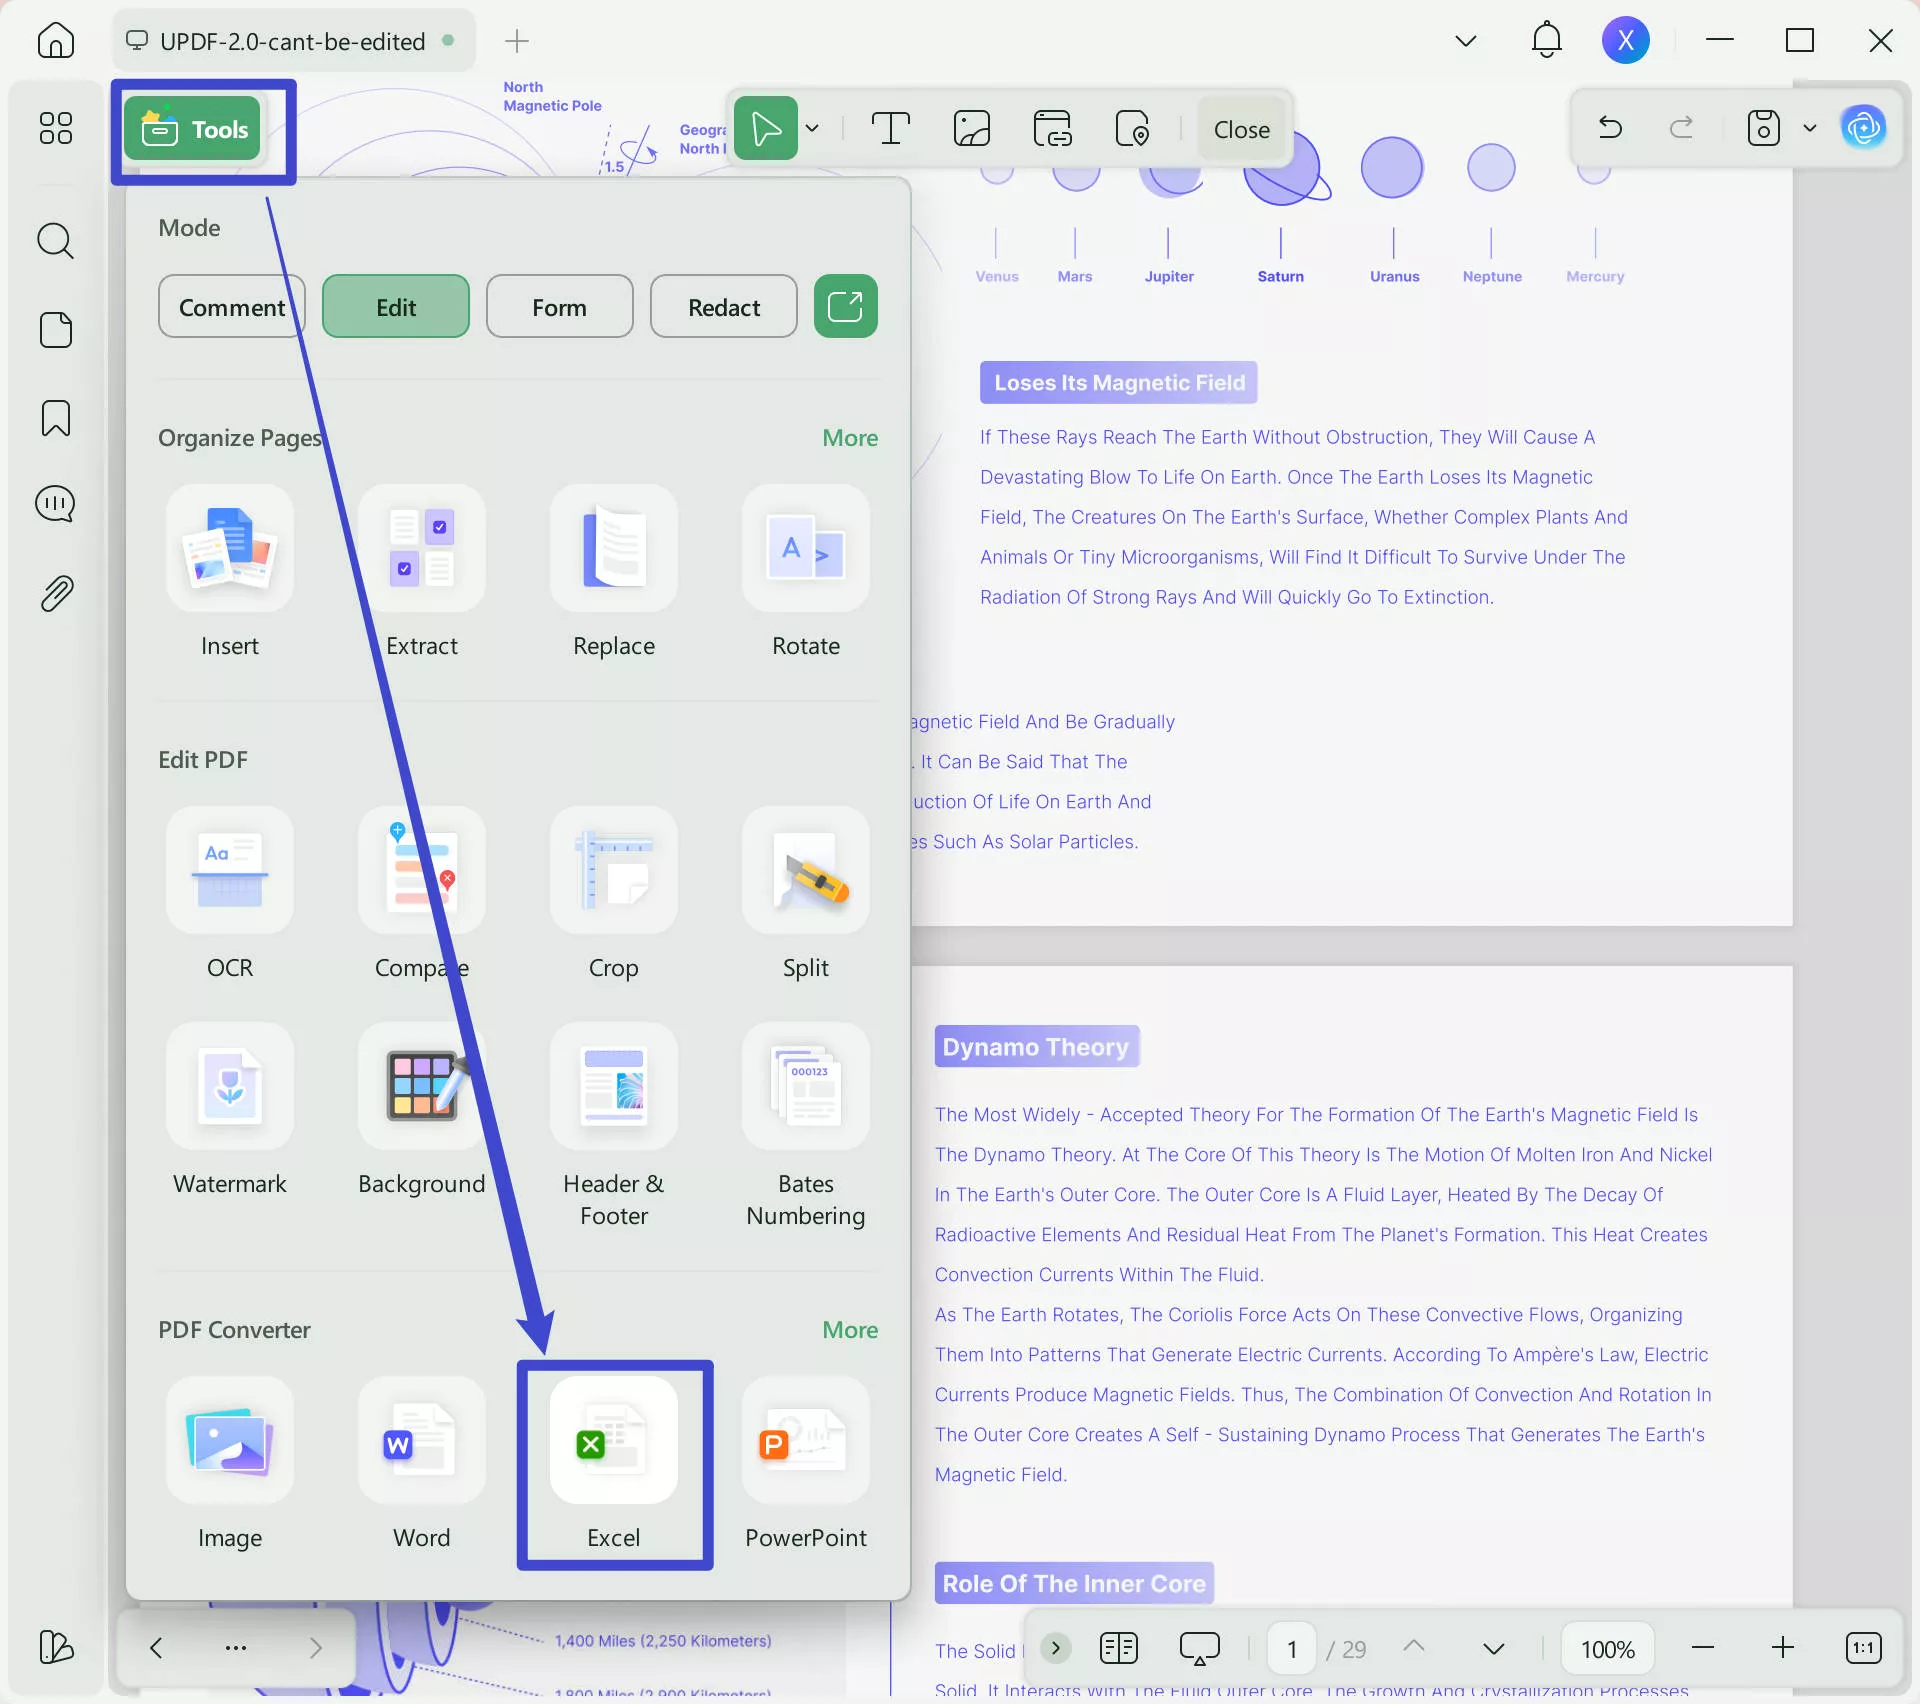
Step 1. Download and install UPDF on your Windows or Mac computer. Click Open File and import the PDF you want to convert.

Step 2. Click Tools from the left panel and tap Excel under the PDF Converter section.
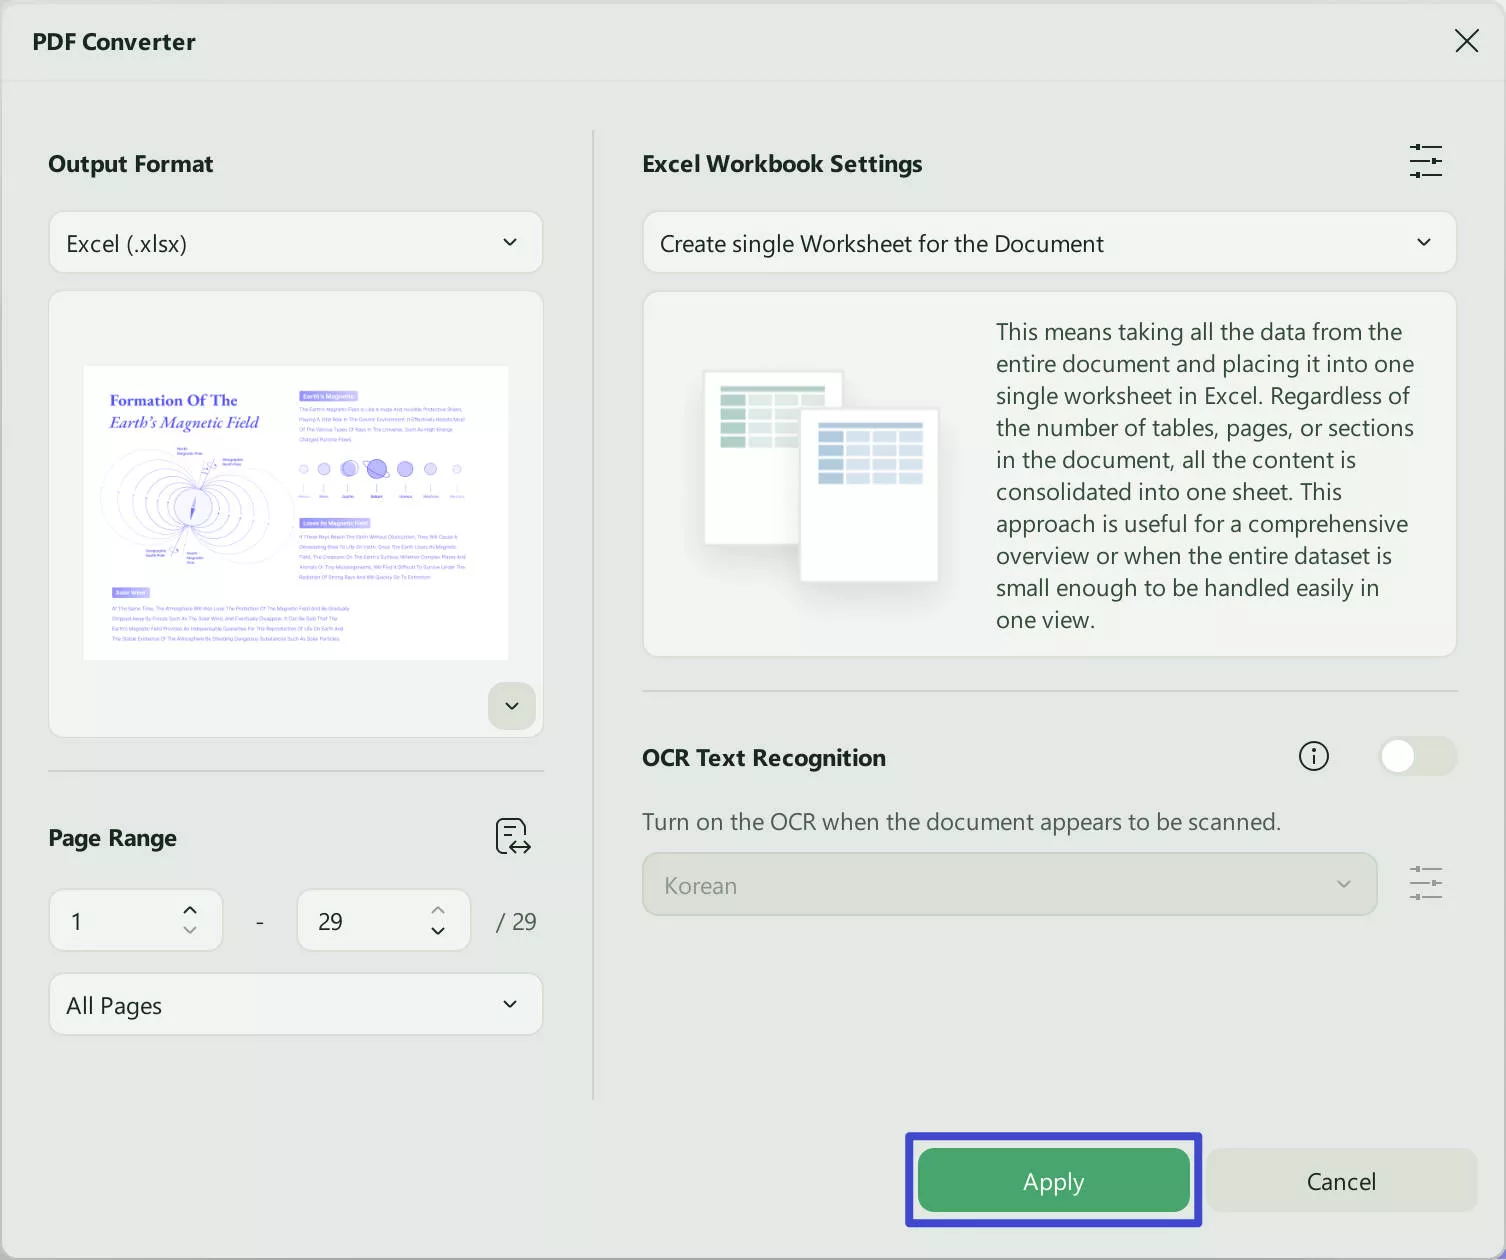
Step 3. Customize the conversion setting, including the Excel workbook settings, page range, and OCR. Once done, click Apply. Afterward, UPDF will convert and download the Excel file in seconds.
For Mobile
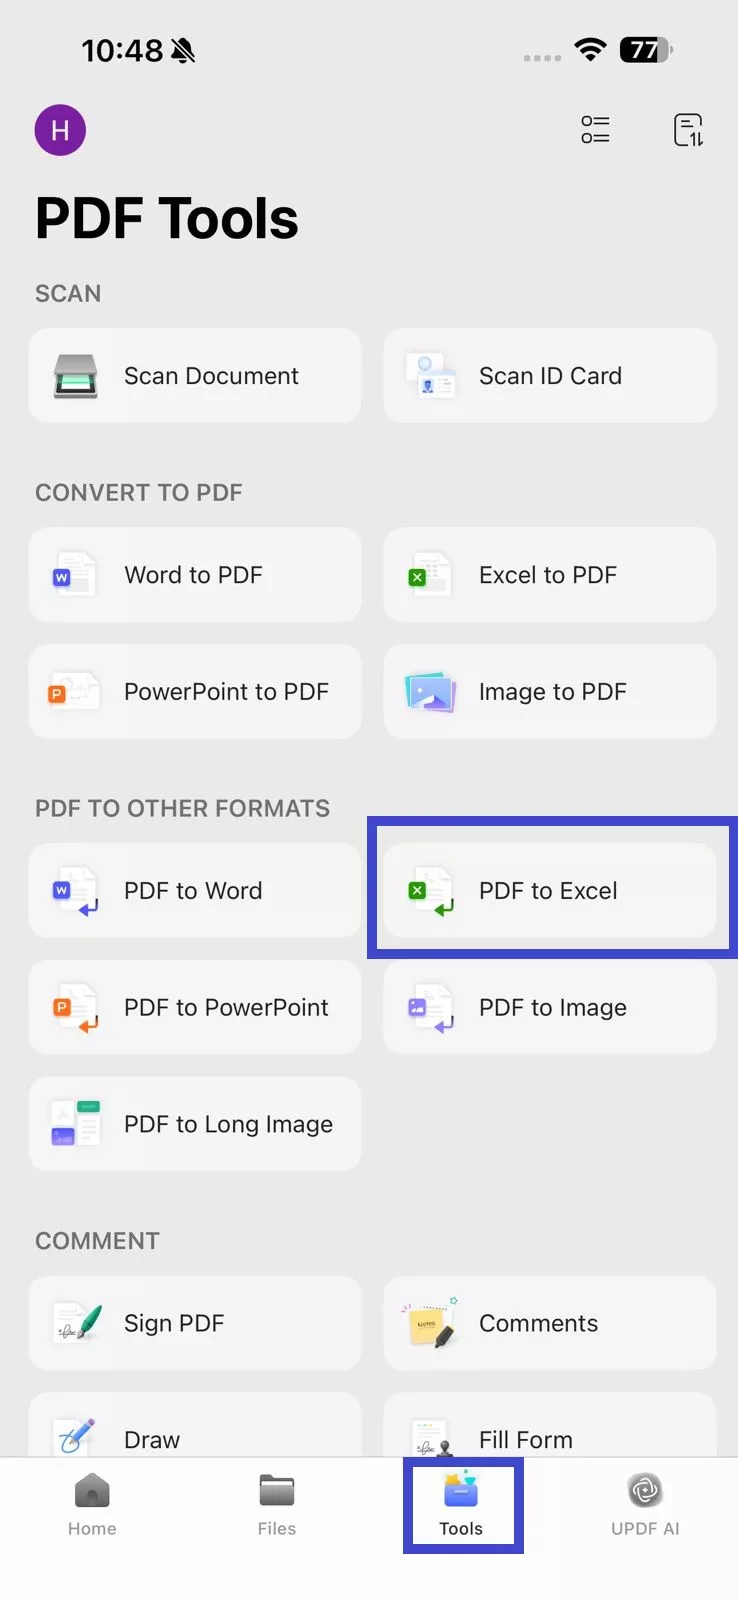
Step 1. Install and launch the UPDF app on your Android or iOS device. Click Tools from the bottom and select PDF to Excel.
Windows • macOS • iOS • Android 100% secure
Step 2. Customize the Excel conversion settings and click Done to complete the conversion.

How to Batch-Convert PDF to Excel?
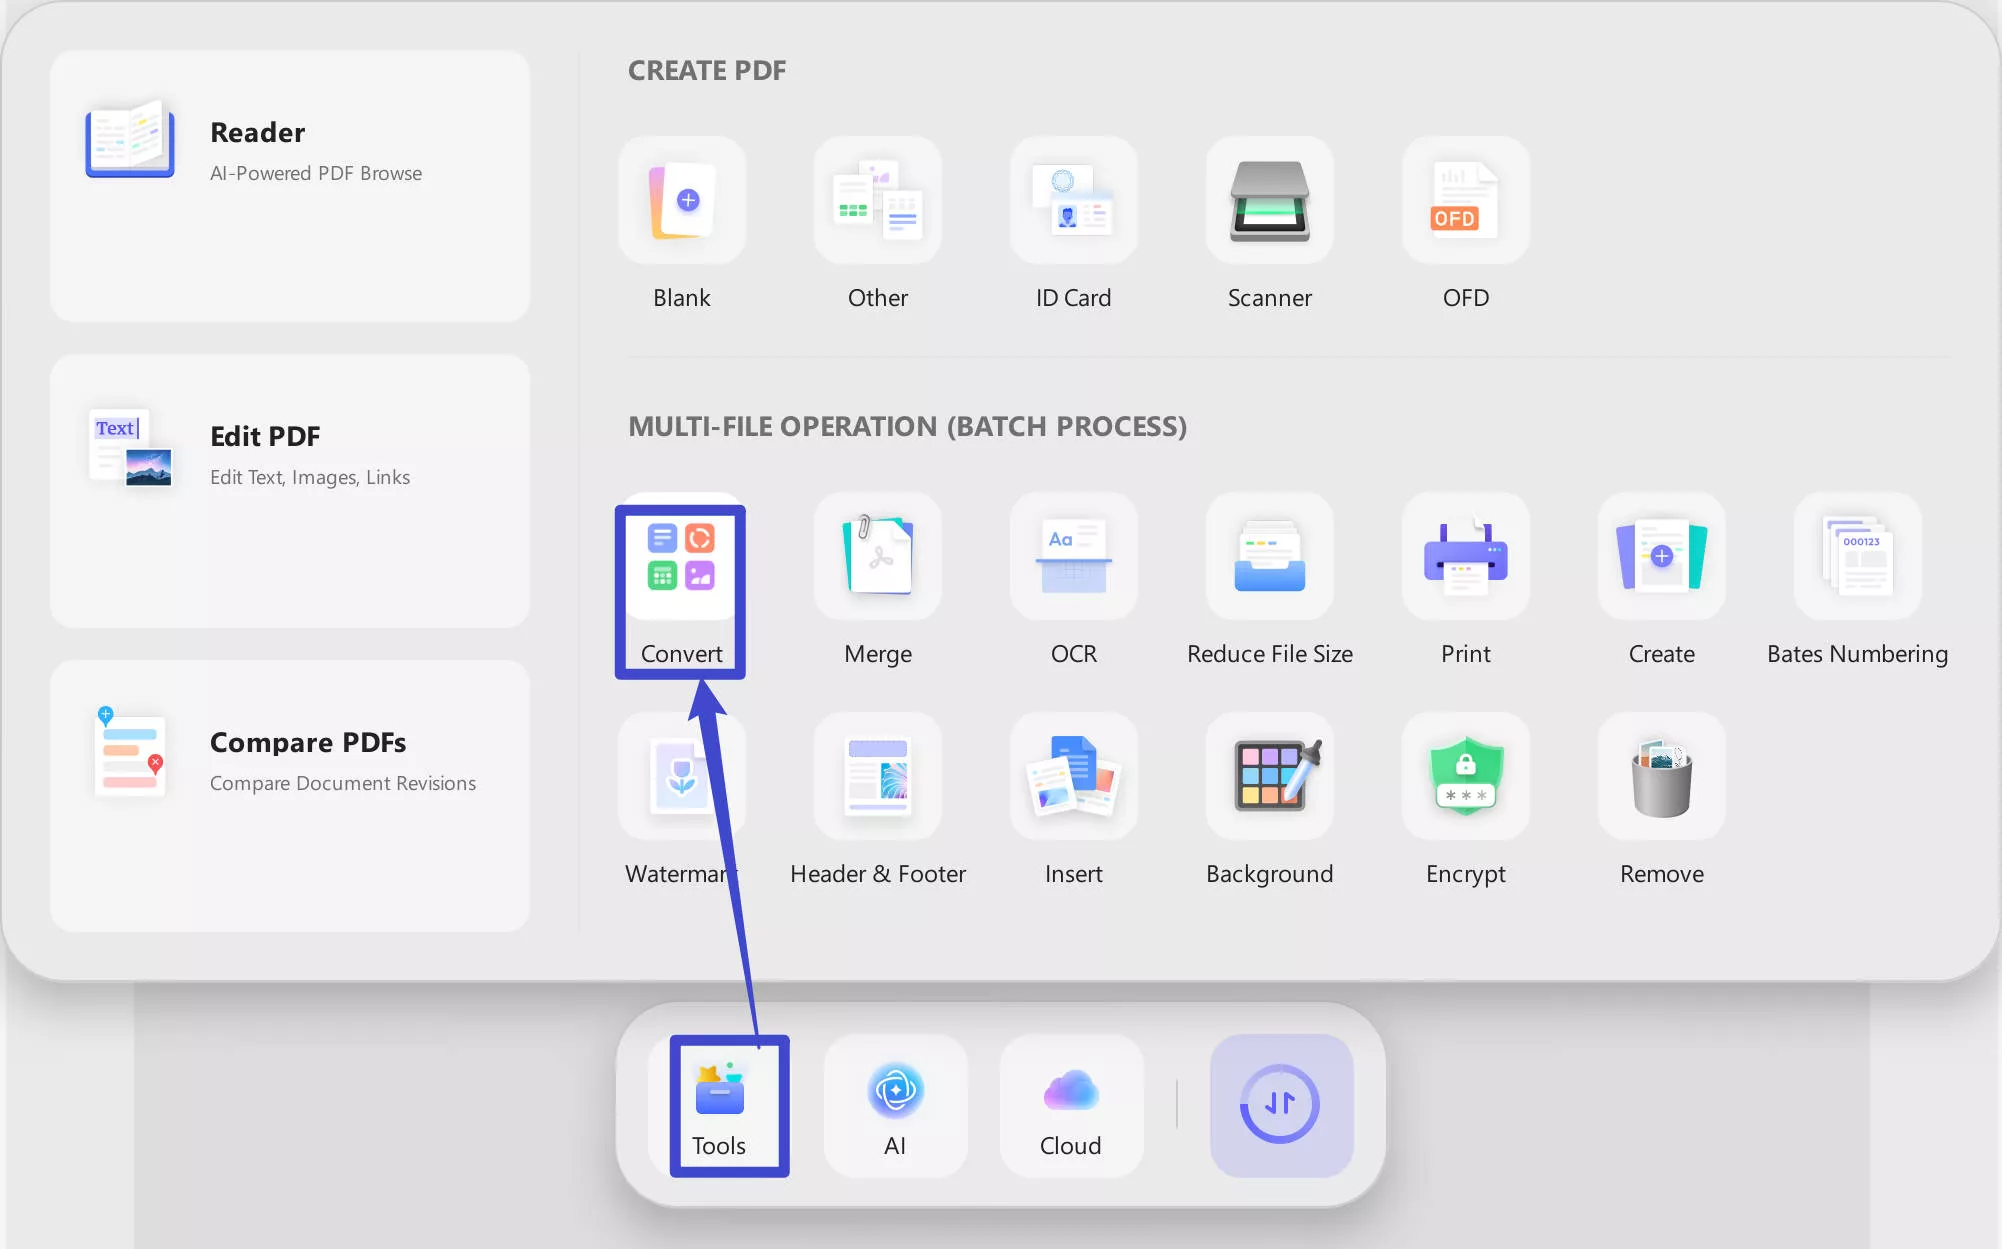
Step 1. Launch UPDF and click Tools > Convert.
Windows • macOS • iOS • Android 100% secure
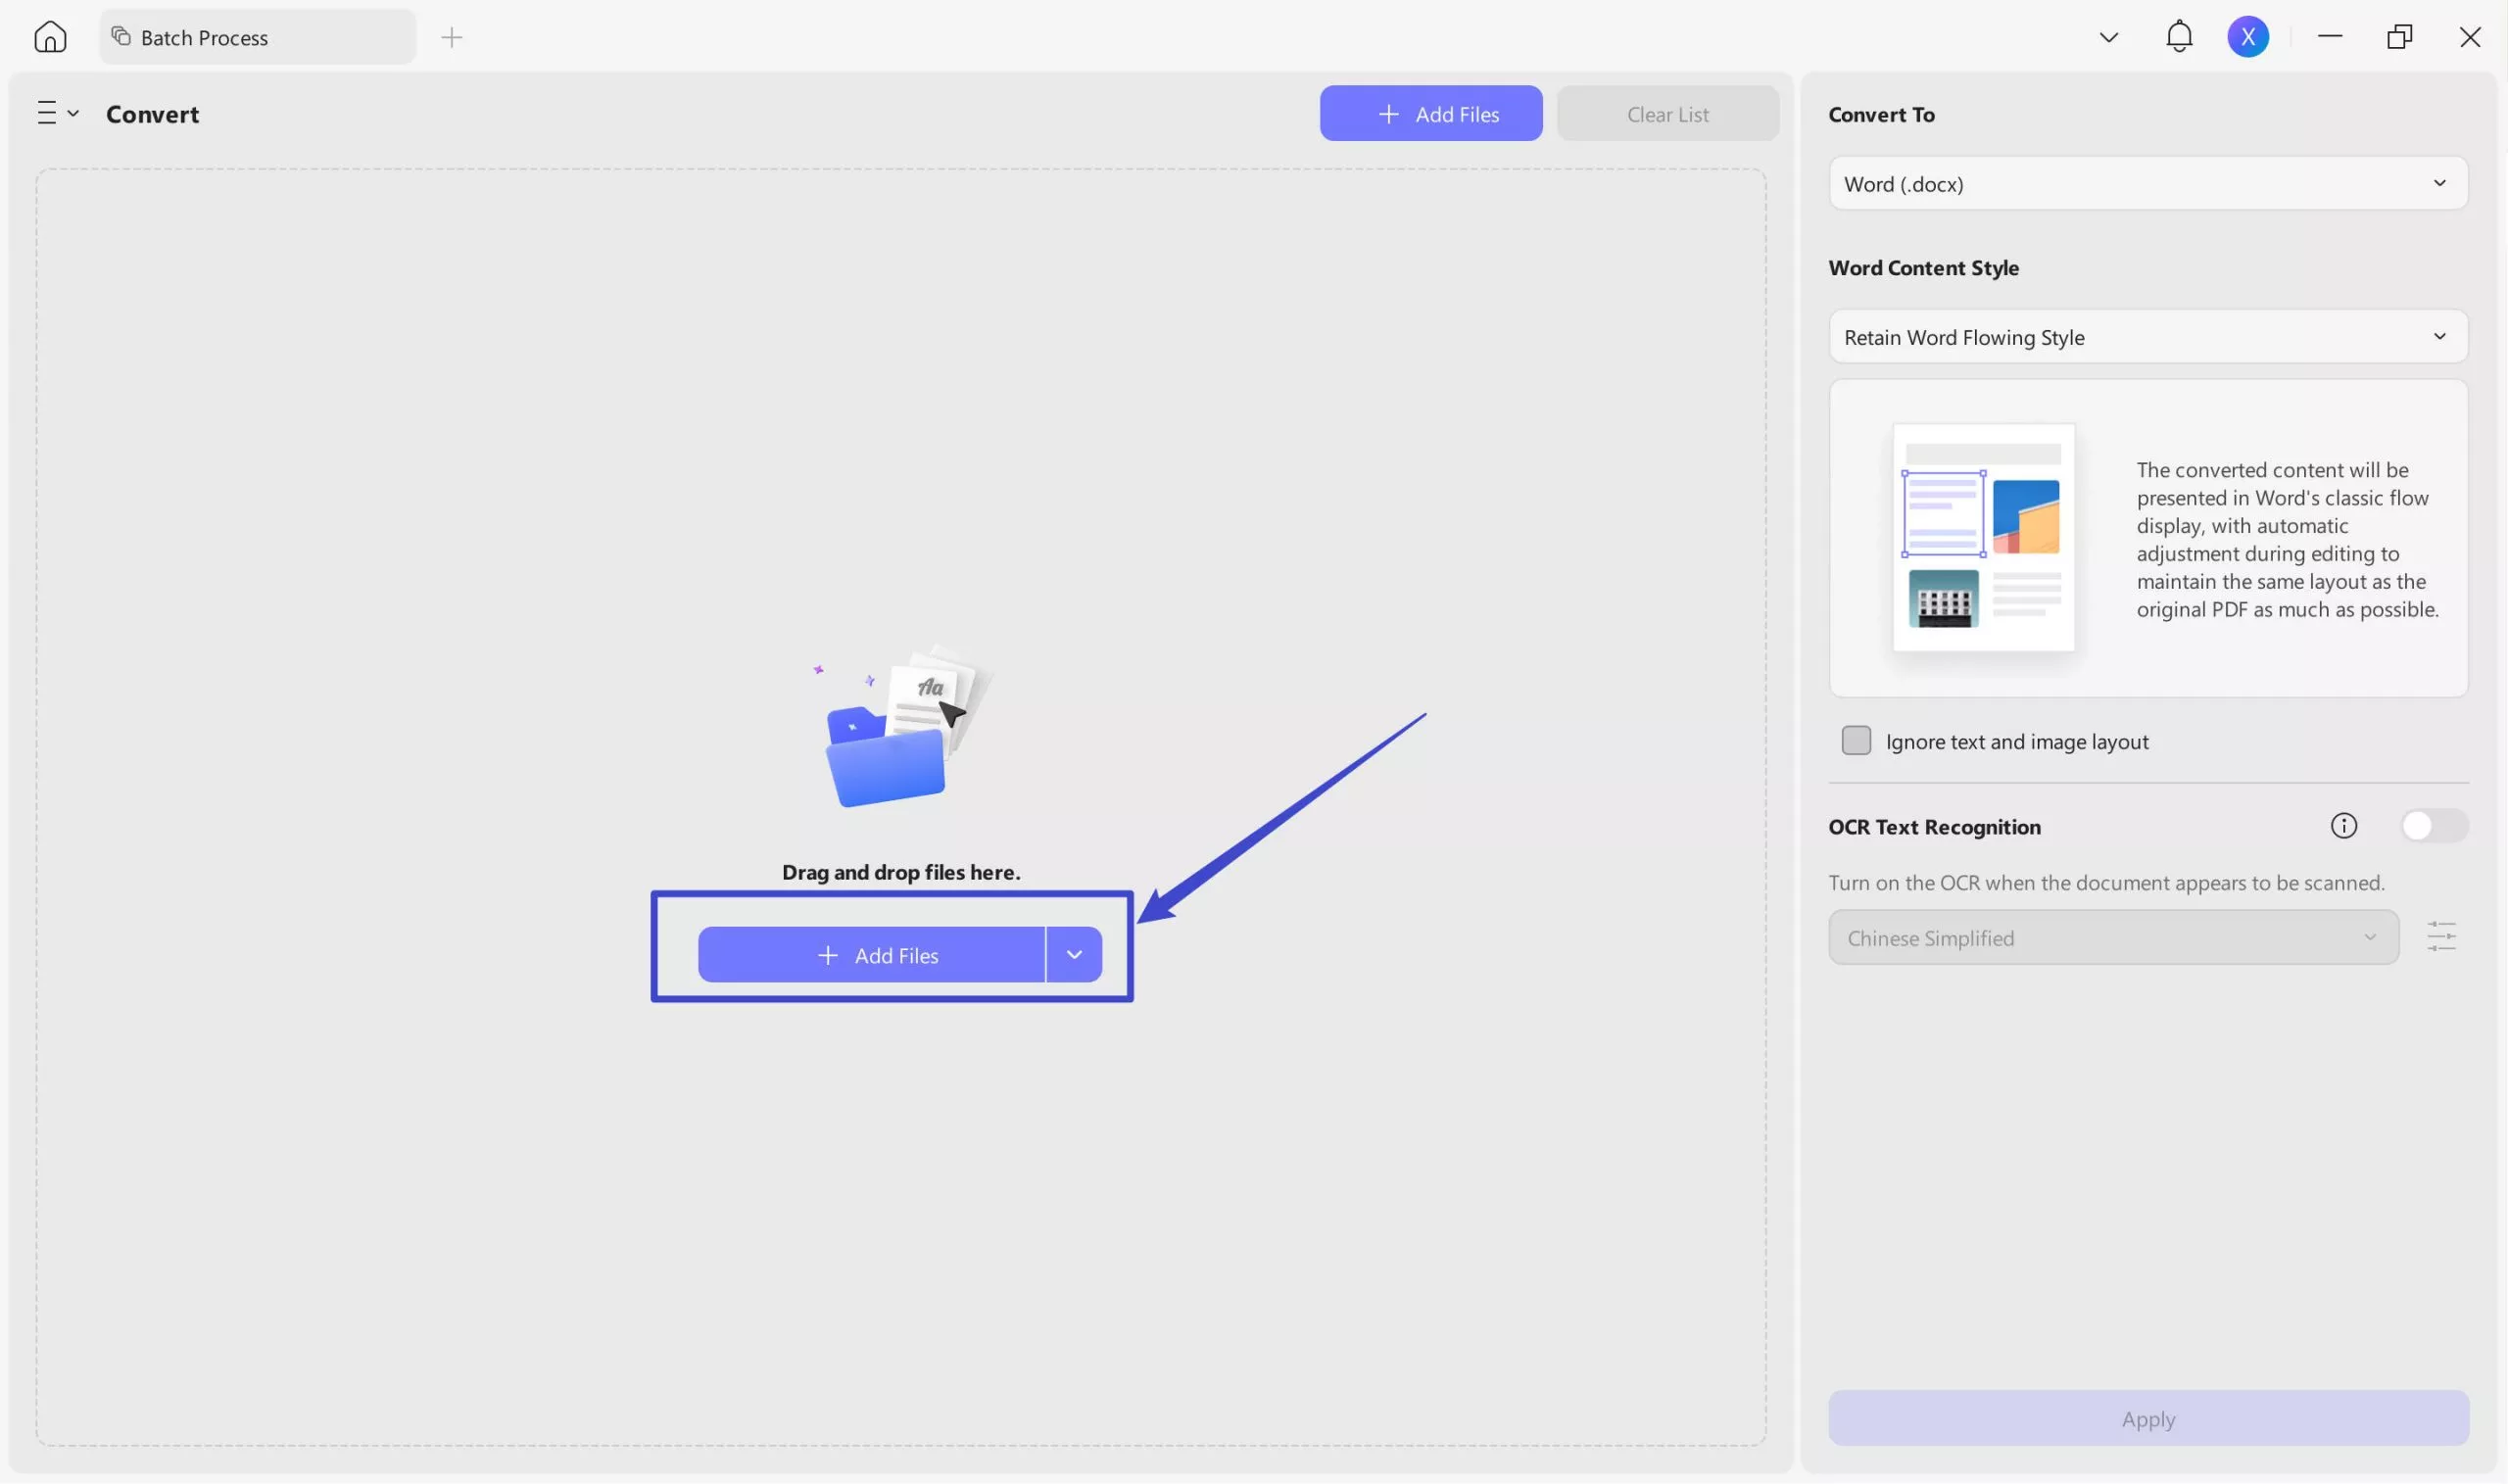
Step 2. Click Add Files and import all the PDFs you want to convert.
Step 3. Select Excel (.xlsx) as the conversion format. Also, adjust the Excel Workbook Settings and click Apply.
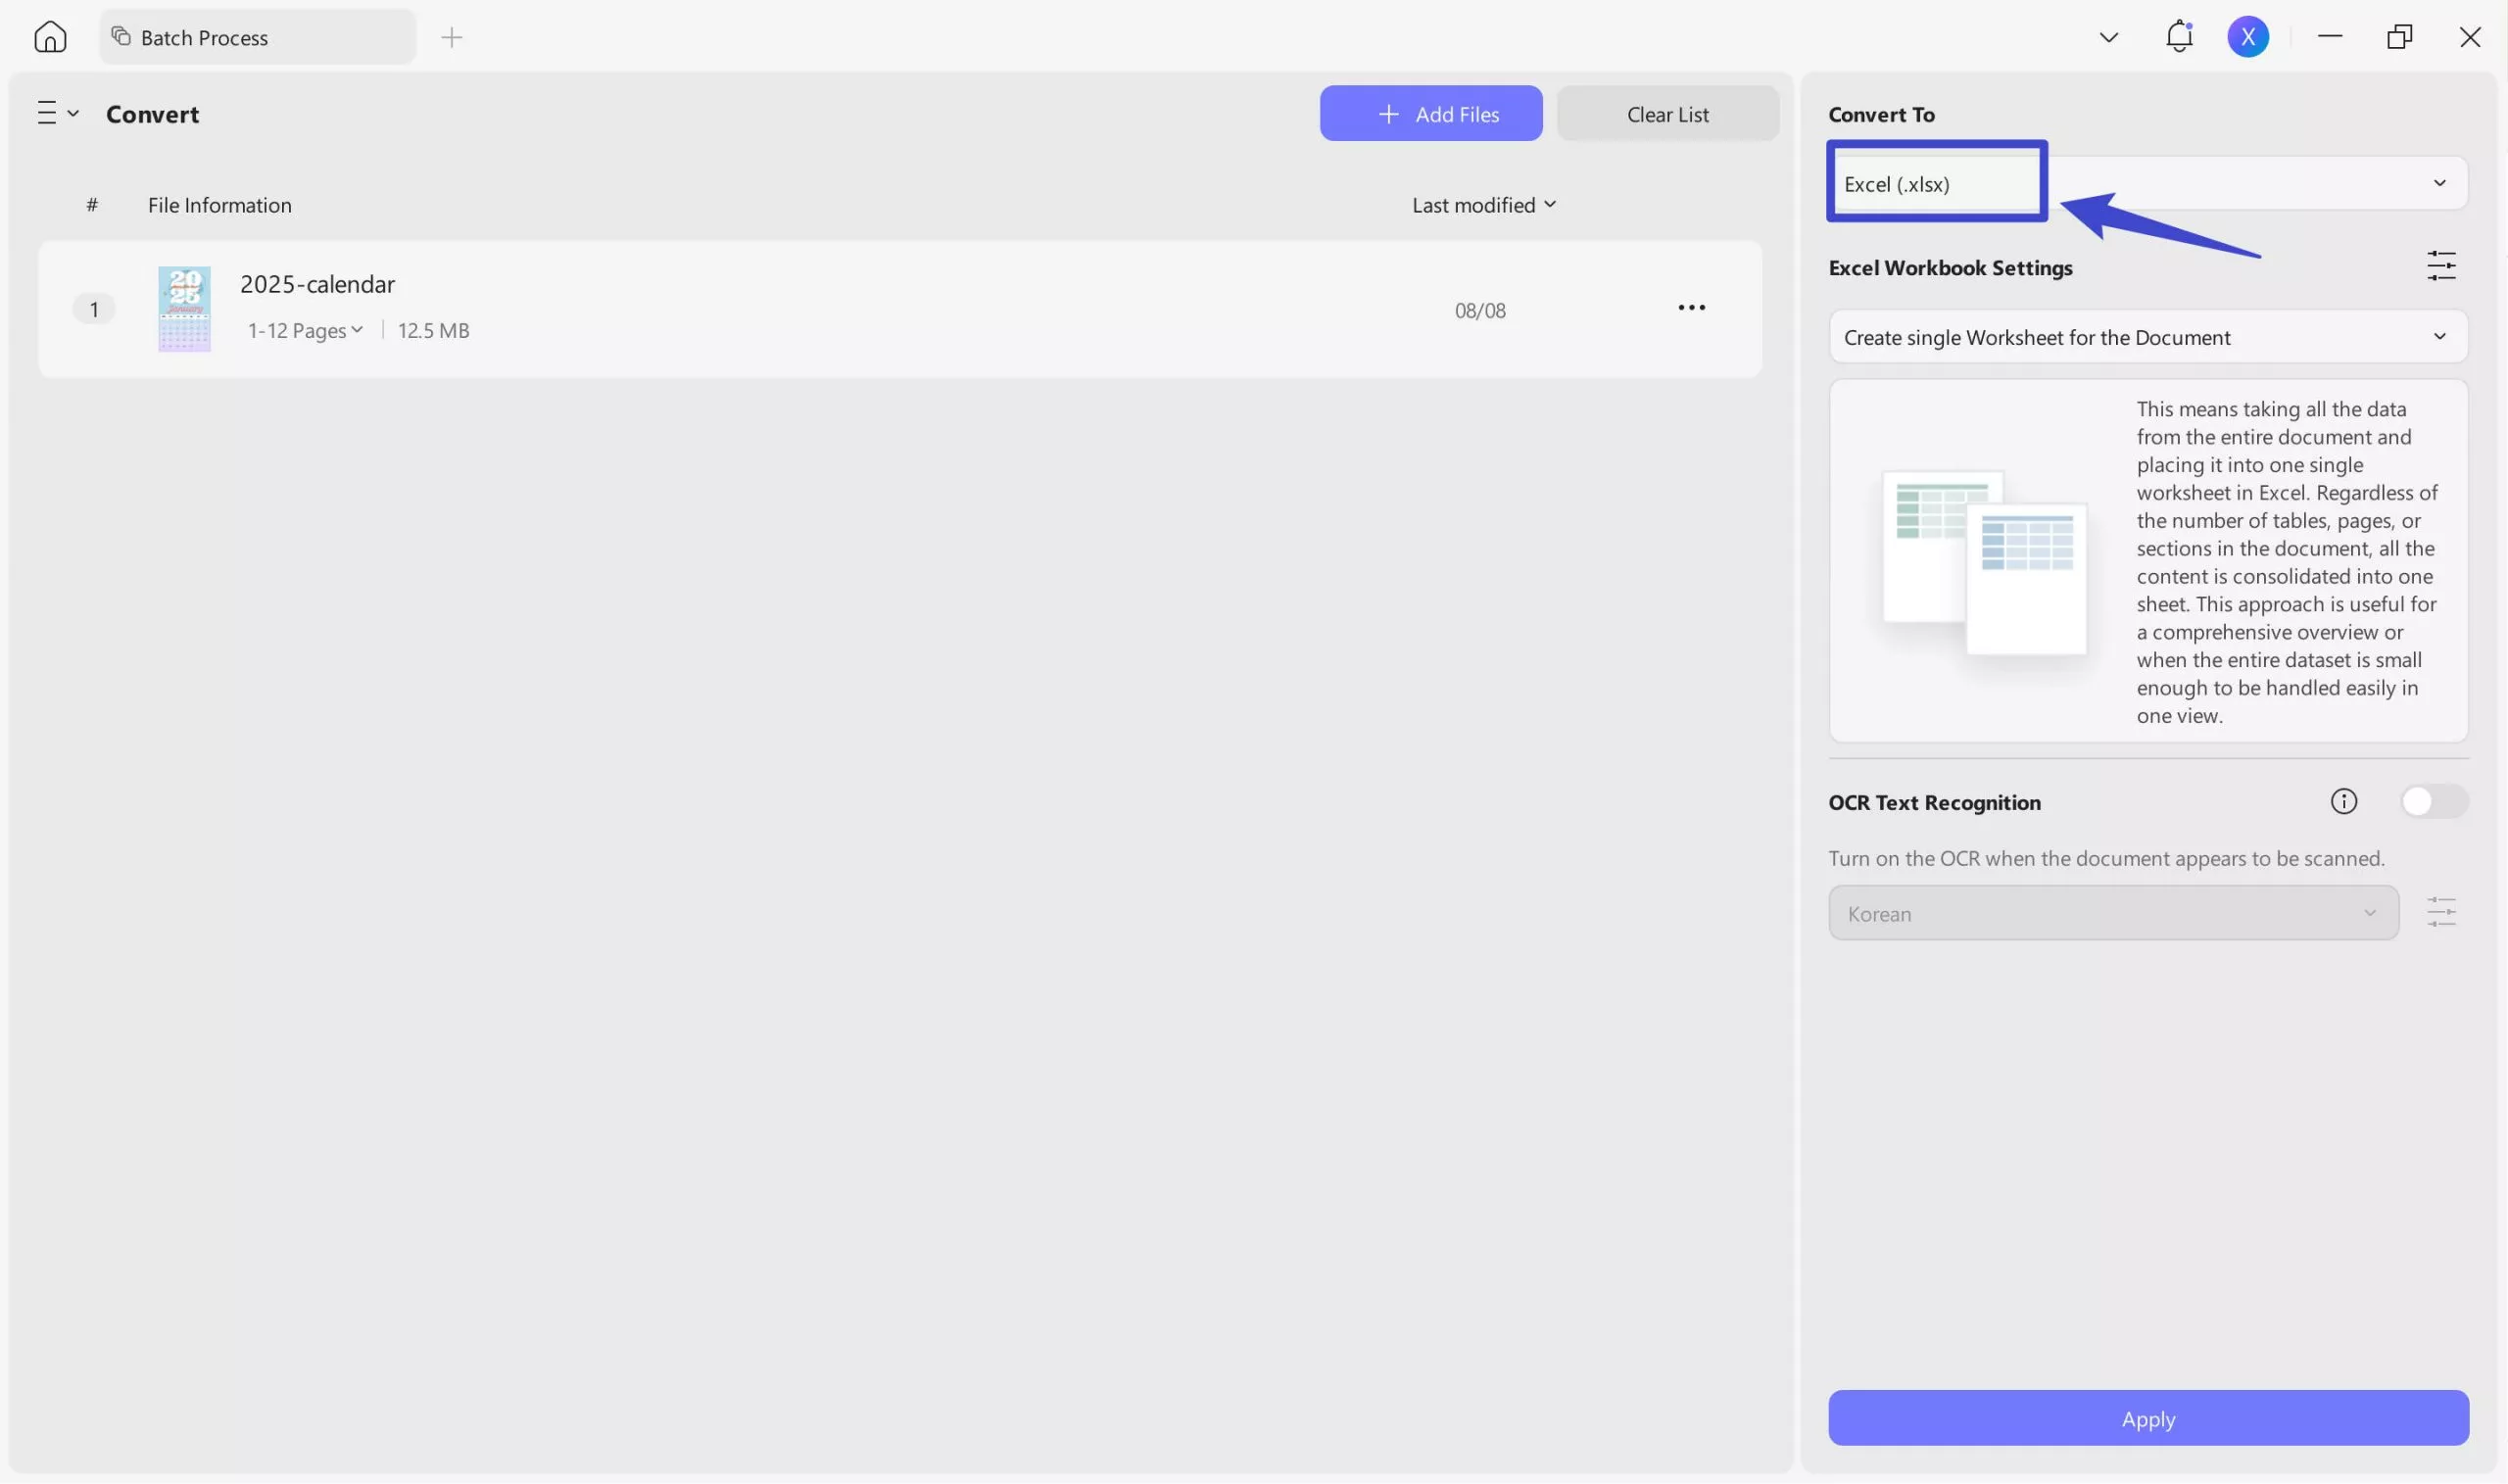
This way, all the PDFs will convert into Excel files and download automatically.
Conclusion
Knowing how to lock a row in Excel is an essential skill to master when you frequently deal with lengthy or complex spreadsheets. Above, we have learned different ways in Excel to freeze rows and columns. So, choose the right method based on your data needs to keep important headers or sections visible at all times. Plus, install UPDF on your devices to convert PDFs to Excel and access data with perfect formatting.
Windows • macOS • iOS • Android 100% secure


 Enid Brown


 Engelbert White