 UPDF for Windows
 UPDF for Mac
 UPDF for iPhone/iPad
 UPDF for Android
 UPDF AI Online
 UPDF Sign
 Edit PDF
 Annotate PDF
 Create PDF
 PDF Form
 Edit links
 Convert PDF
 OCR
OCR PDF to Word
 PDF to Image
 PDF to Excel
 Organize PDF
 Merge PDF
 Split PDF
 Crop PDF
 Rotate PDF
 Protect PDF
 Sign PDF
 Redact PDF
 Sanitize PDF
 Remove Security
 Read PDF
 UPDF Cloud
 Compress PDF
 Print PDF
 Batch Process
 About UPDF AI
 UPDF AI Solutions
 AI User Guide
 FAQ about UPDF AI
 Summarize PDF
 Translate PDF
 Chat with PDF
 Chat with AI
 Chat with image
 PDF to Mind Map
 Explain PDF
 PDF AI Tools
 Image AI Tools
 AI Chat Tools
 AI Writing Tools
 AI Study Tools
 AI Working Tools
 Other AI Tools
 PDF to Word
 PDF to Excel
 PDF to PowerPoint
 User Guide
 UPDF Tricks
 FAQs
FAQs UPDF Reviews
 Download Center
 Blog
Blog Newsroom
 Tech Spec
 Updates
 UPDF vs. Adobe Acrobat
 UPDF vs. Foxit
 UPDF vs. PDF Expert
It is annoying to face read-only restrictions in PowerPoint when there are important edits to be made. If you get the label ‘Always Open as Read-Only,’ it can prove to be an annoying setting when downloading the presentation to edit. Fortunately, it is easy to remove read only from PowerPoint files.
In this article, we are going to help you and show two efficient ways how to turn off the read-only settings of PowerPoint. By following these methods, you’ll recover full editing permissions on your presentations and documents with ease.
Moreover, if you have PDF file that is read only, you can use UPDF to remove it. You can download UPDF here and remove it now.
Windows • macOS • iOS • Android 100% secure
Why is my PowerPoint Read-only?
It is irritating to deal with a PowerPoint file that automatically opens in the ‘Read Only’ mode when you have tight schedules and plenty of changes to make.
There are several common reasons this might happen including:
· Marked as Final
In a PowerPoint presentation, if a file name is marked as final, it means that the content should not be modified any further. This is usually applied by the file’s author to avoid any accidental editing.
At the top of the file, there is often a yellow banner that says, ‘This file is marked as final’. To get past this, there is the conveniently labeled option “Edit Anyway,” that allows making changes and saves them in a new file.
· Protected with Always Open Read Only
Another typical reason is that the owner of the file made the file it to open as read-only every time. This option prevents accidental edits but if someone wants, they can make the file editable with one click. This is often applied to notify the users that it will be better to be careful before making any changes to the contents of presentation.
· Opened Directly from Email Attachment
You might open a PowerPoint file from an email attachment as a read-only file as a way of preventing accidental corruption of the original attached file. They do this as a measure of safeguard against probable malware that is sent through the email clients.
To fix this, right-click on the e-mail then save the attachment to your computer and open the e-mail with the saved file.
· Stored on Network Storage
Some files that are saved in servers or shared resources can be configured to open in 'read-only’. This is done as a check-out method to ensure that two or more users do not work on the same file at the same time causing data conflicts or distortions.
To edit the file, you would require checking it out or getting a copy locally that is edited on the system.
How to Remove Read Only from PowerPoint?
One of the easiest ways of making a PowerPoint presentation read-only is by marking it as the final version. When a file is marked as final, it does not allow users to gain editing access straight away. Even if someone opts for the edit anyway option, their changes are saved in a new file.
Our method will allow you to make changes to the same file without any problem. Here are the steps you need to follow:
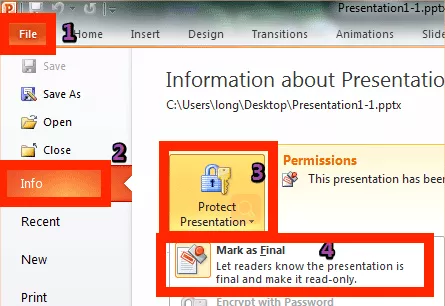
Step 1:
Locate the PowerPoint file icon on your computer and double-click to open it in MS PowerPoint. On the top, you will see a "Yellow Banner" mentioning that this is a read-only file. In this banner, there will be an "Edit Anyway” button that you need to click as it will give you file editing access.

Step 2:
Now, click “File" from the top and in the File, menu go to the "Info” section. Click the “Protect Presentation” dropdown button to see different file protection options. From the dropdown click the “Mark as Final” button to disable this option. Now, you can press “Ctrl + S” on your keyboard to save this file without any read-only restrictions.
Also Read: How to Print PowerPoint with Notes
How to Remove Always Open as Read-Only in PowerPoint?
Another option for making PowerPoint files read-only is by adding the always open as read-only protection method. Using this method has the same effect where it restricts users from making changes to the file. So, if you opt for editing, your changes will be saved in a new file.
We have the solution to this type of read-only protection as well.
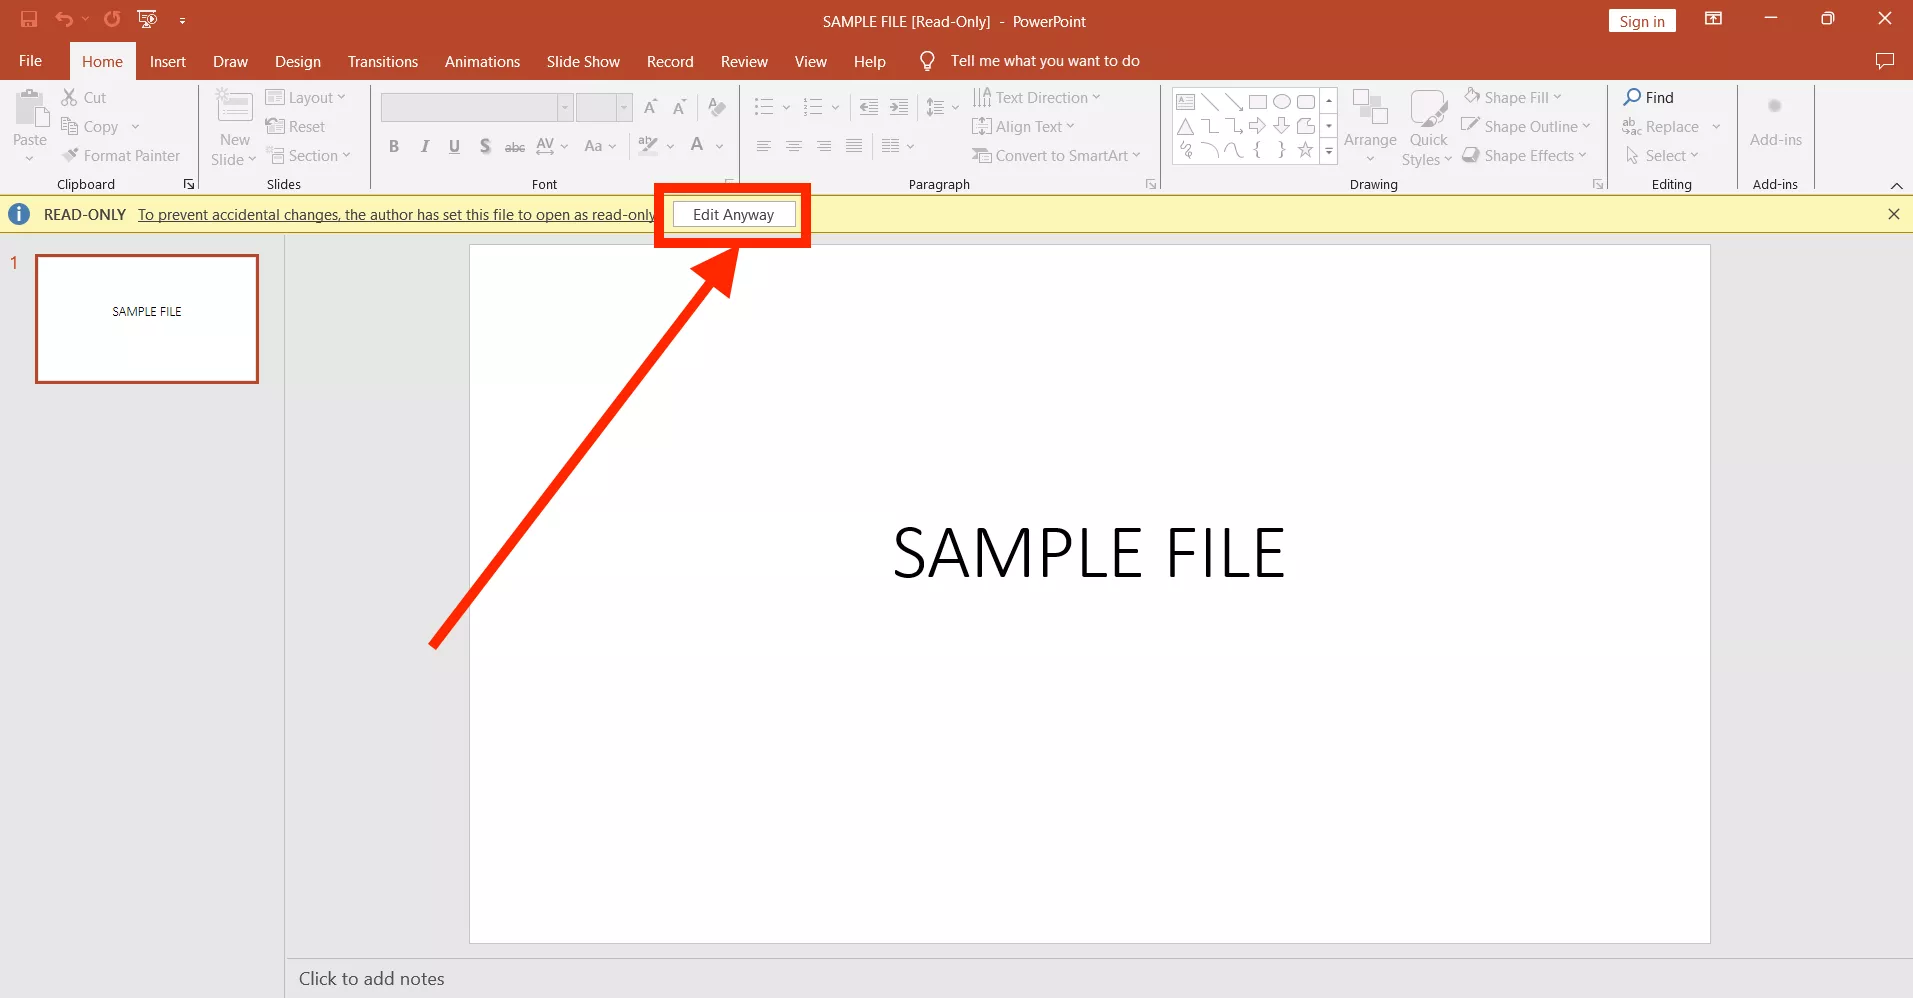
Step 1:
Double-click the “PowerPoint file icon” that comes with the always-open read-only protection enabled. The file will open it in read-only mode with a “Yellow Banner” on top mentioning its protection status. Click the “Edit Anyway” button in this banner to make the file editable.
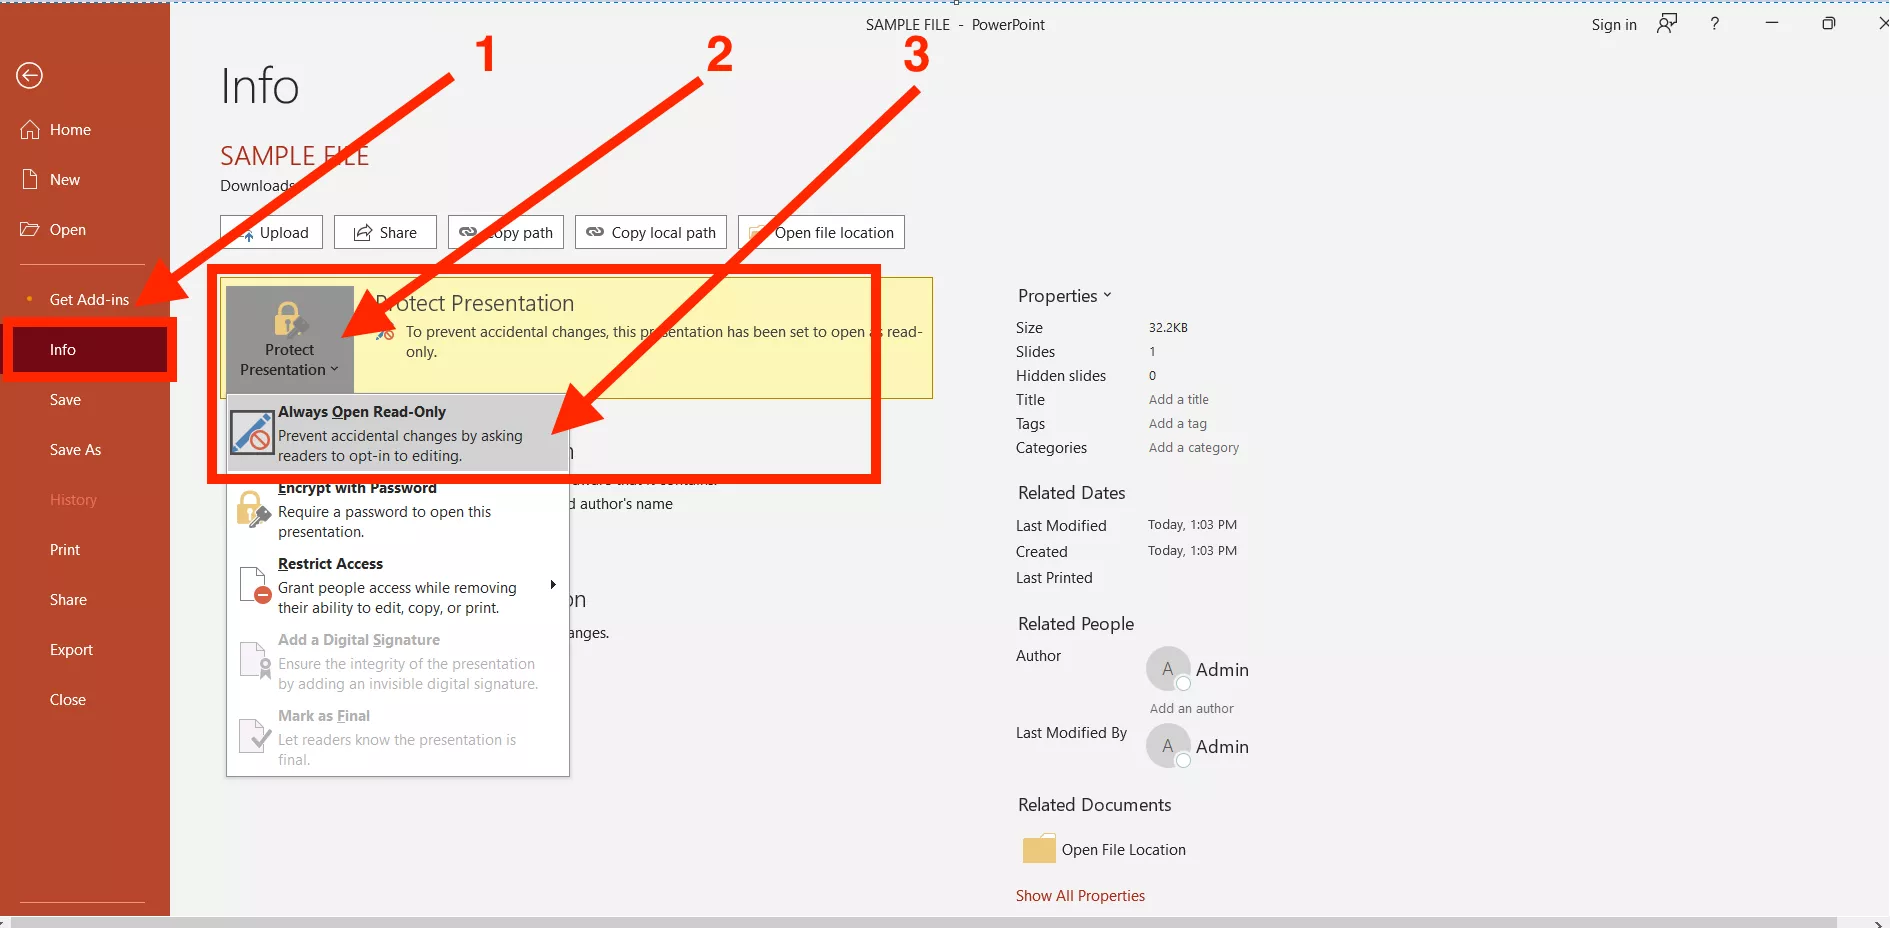
Step 2:
Now, you need to click “File" and in the file menu click the "Info" tab from the left side of the screen. Here you will see the "Protect Presentation” dropdown button. Click it to reveal different permission options and click the "Always Open Read-Only" button to disable this option. Now, go back to your document press "Ctrl +S” and save this PowerPoint file without any restrictions.
Also Read: How to Flip/Rotate a Picture in PowerPoint: As Easy As It Gets
Bonus Tip: How to Remove Read-Only from PDF?
PowerPoint presentations are among the most used file formats for documents in this digital era. Another highly used file format is PDF and just like PowerPoint, PDF files can also be protected with read-only permission.
When these protections are enabled, the file can only be opened and read and you cannot copy, edit, annotate, and do other things.
UPDF brings the solution to this problem by allowing users to add or remove protections from their PDF documents. With UPDF you can remove any type of protection from PDF documents. It requires you to have the password for that PDF document
UPDF also works for making image-only or scanned PDFs into editable PDFs using the OCR feature.
Let us have a look at the step-by-step process of removing read-only from PDFs using UPDF. First of all, click the below button to download UPDF on your computer.
Windows • macOS • iOS • Android 100% secure
Step 1:
Run the UPDF application on your computer with its desktop icon. On the UPDF home page, click "Open File" then select the PDF document that is read-only from the file explorer popup. Click that file to select it and click the "Open” button and it will open in UPDF. Here you can read the file contents, but it will not allow editing.
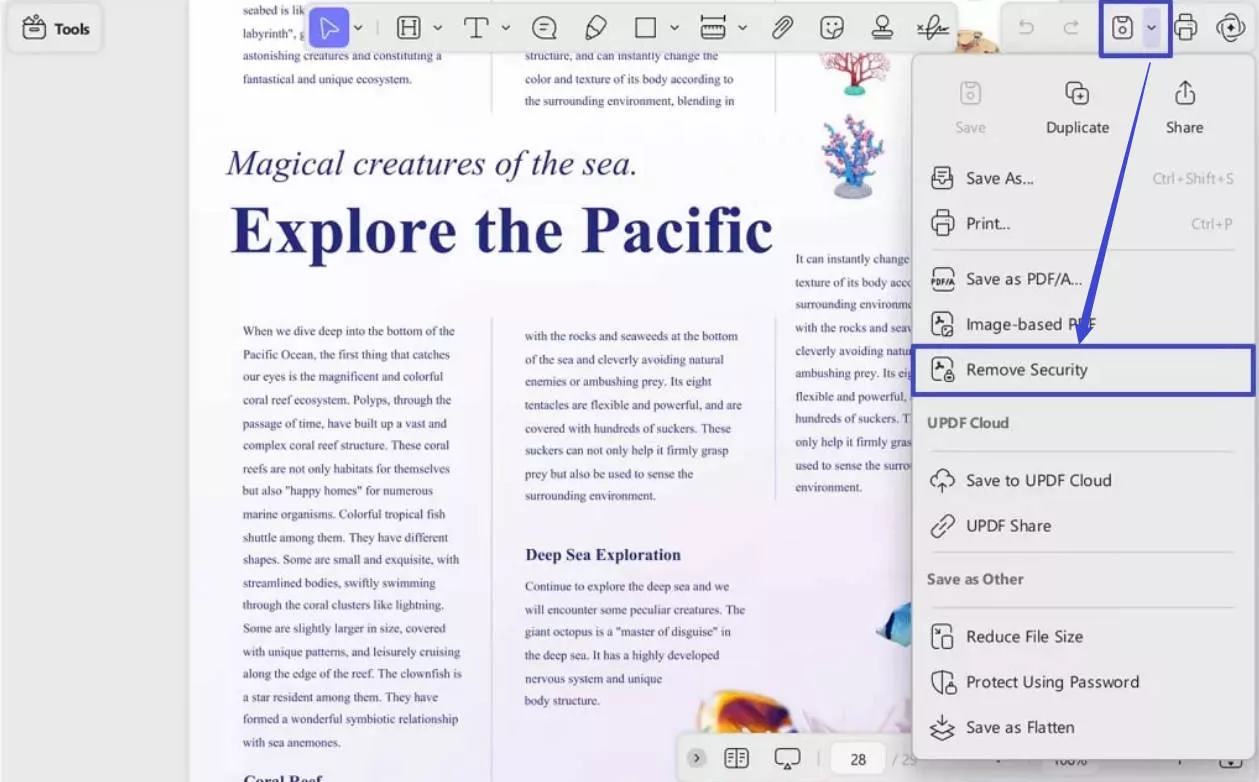
Step 2:
Move your cursor to the right menu pane and click the narrow next to "Save" and click “Remove Security”. UPDF will ask you to authenticate if you want to remove security from this file. Click “Remove” in the popup window prompt.
UPDF makes working with PDFs very simple and this is true for everything you can do with this useful tool. Learn more about the amazing features and usability offered by UPDF in the video below.
Download UPDF on your devices right now to try removing read-only restrictions from PDFs. Purchase UPDF Pro to get a premium experience with all its features unlocked.
Windows • macOS • iOS • Android 100% secure
Final Words
There is nothing as unproductive as having read-only restrictions on items such as PowerPoint presentations or PDFs. The methods which have been described here make it easy to remove read only from PowerPoint presentations. For PowerPoint, these methods are enough.
On the other hand, UPDF provides a strong function for handling and unlocking PDFs. With these guidelines, you can make sure that your files are still open and can be edited, hence keeping your work continuous.
UPDF also serves to add to your efficiency of working with documents and eliminate the problem that comes with read-only restrictions. Get the power over PDF files right now and edit them by downloading UPDF. If you want to know more about UPDF, you can read this review article.


 Engelbert White


