PowerPoint is one of the most used Microsoft software for professionals. Whether sharing ideas with your in-house team, pitching in front of investors, or presenting academic stuff, PowerPoint does it all. But, to ensure the confidentiality of your sensitive information, you need to password-protect PowerPoint presentations.
That's where UPDF comes in handy. Let's discuss what it means and how to password-protect PowerPoint files from unwanted intrusions.
Windows • macOS • iOS • Android 100% secure
Part 1. Password Protect PowerPoint: What Does It Mean?
When discussing how to password-protect PowerPoint presentations, it is important to understand that it employs encryption techniques to impose restrictions on various aspects of the file.
Restricting Access
Firstly, it involves restricting access to the presentation itself. Setting a password prevents unauthorized individuals from opening the file without the correct credentials. It is a protective barrier, ensuring only those with the appropriate authorization can view the content.
Limiting Editing Capabilities
It allows you to limit the editing capabilities of the presentation. By assigning a password to modify the file, you can prevent unauthorized alterations or modifications to the slides. This especially comes in handy when someone needs to maintain the originality and integrity of your content, safeguarding it from tampering.
Limiting Printing & Copying
Password protect PowerPoint can also limit the ability to print or copy the presentation's contents. By assigning a password to restrict printing or copying, you can prevent your slides' unauthorized duplication or distribution. It is especially valuable when dealing with sensitive information or proprietary data that needs to be closely guarded.
Controlling the Ability to Extract or Save Content
Password protection can extend to controlling the ability to extract or save the presentation's content. By setting a password for saving or exporting, you can prevent users from saving the file to alternative formats or extracting the content for unapproved purposes. It reinforces the protection of your intellectual property, reducing the risk of unauthorized distribution or misuse.
Part 2. Password Protect PowerPoint: A One-stop Solution to Restrict Editing, Printing, and Accessing
To maintain robust protection against unauthorized access to your PowerPoint files, it is essential to employ reliable security measures. One notable tool in this regard is UPDF, which offers a comprehensive suite of features, including file protection and seamless file sharing. However, before leveraging UPDF's protective capabilities, converting PowerPoint files to the widely-recognized PDF format is necessary. You can also use UPDF to play a slideshow or share PPT with others.
Windows • macOS • iOS • Android 100% secure
Some of the most impressive features of UPDF are:
- Extensive editing, allowing you to modify images, text, pages, links, etc.
- Present your presentation intuitively which enables you to highlight specific content in the slide while showing the slideshow.
- Modifying text size, color, font, etc., without changing the original format.
- Changes that you want in images, such as rotating, deleting, adding, replacing, etc.
- Attractive annotations, such as highlights, underlines, strikethroughs, stickers, etc.
- Convert your PDF document to a popular format, such as PowerPoint, Excel, etc, with OCR.
To protect your Presentation with a password, you have to convert your PPT to PDF first. Then, follow the steps below to set up a password for your presentation files.
Method 1. Setting Up a Password for Editing Permissions
Step 1: Download and launch UPDF on Windows and open the desired PDF file you want to protect.
Windows • macOS • iOS • Android 100% secure
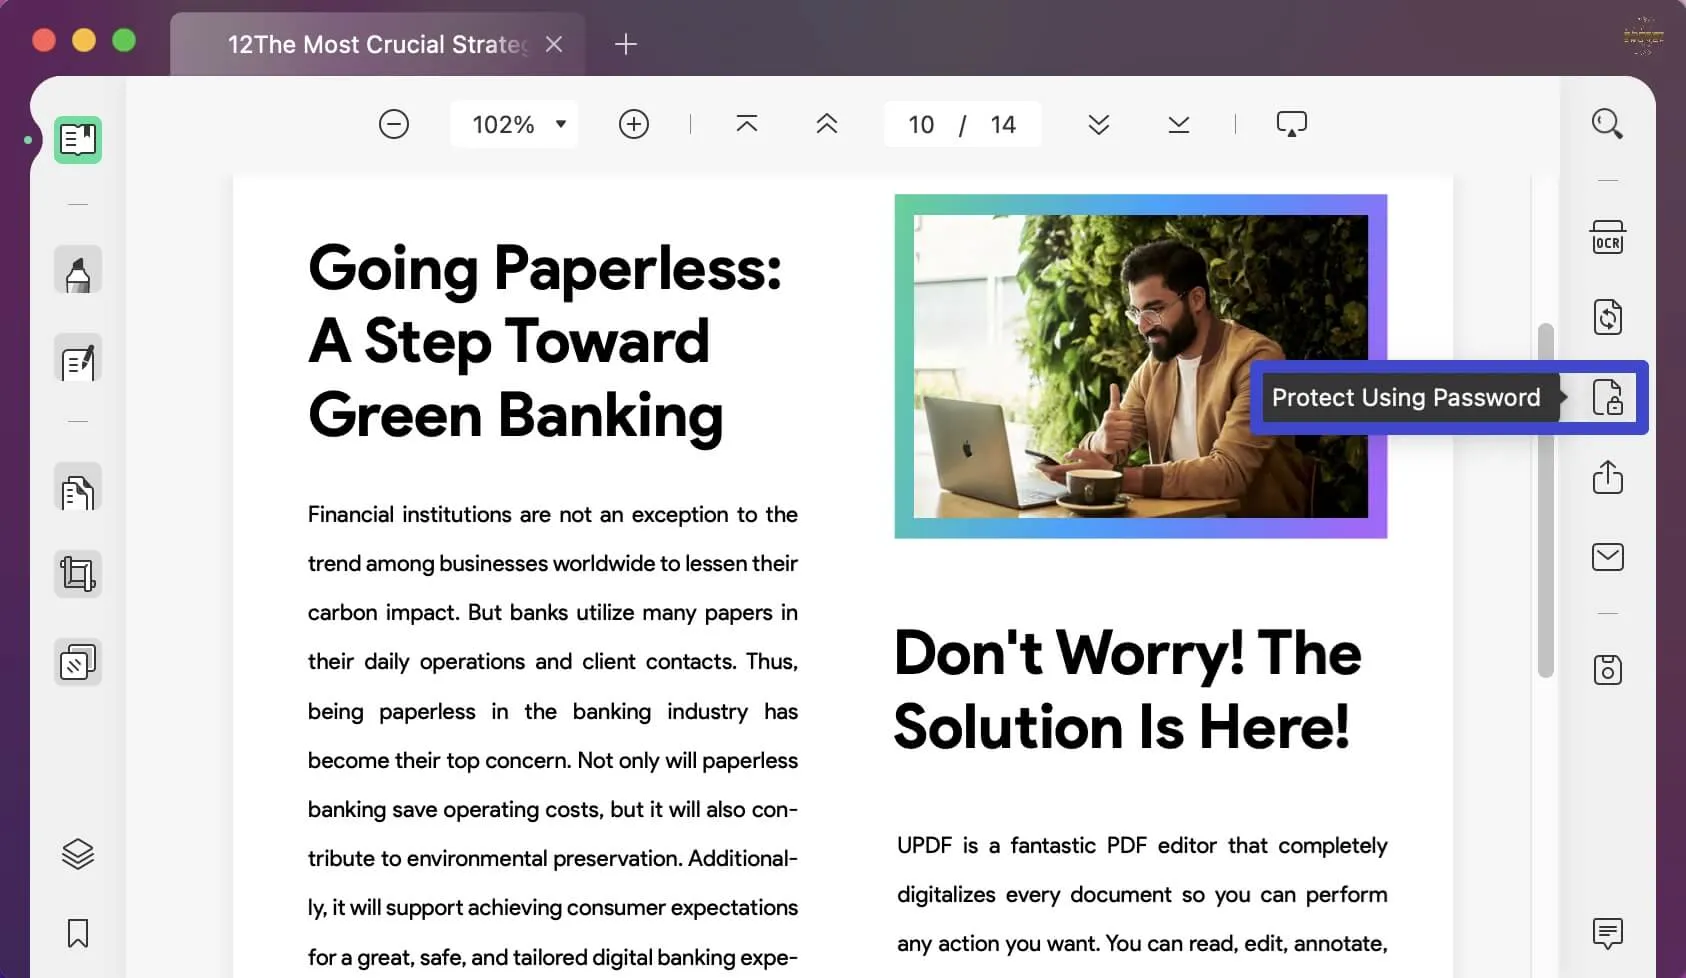
Step 2: Click Protect Using Password on the toolbar on the right. Open the Encrypt with Password option and click Permissions on the 2nd spot.
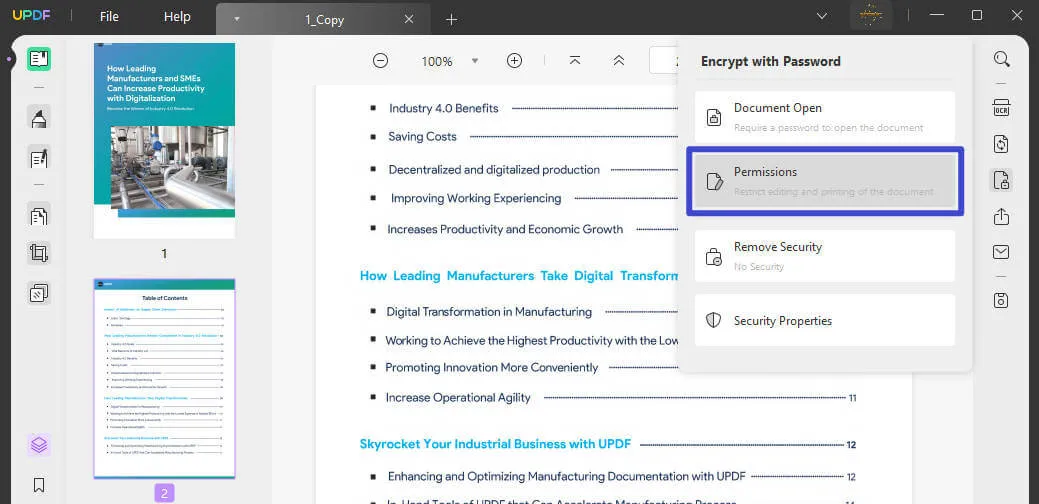
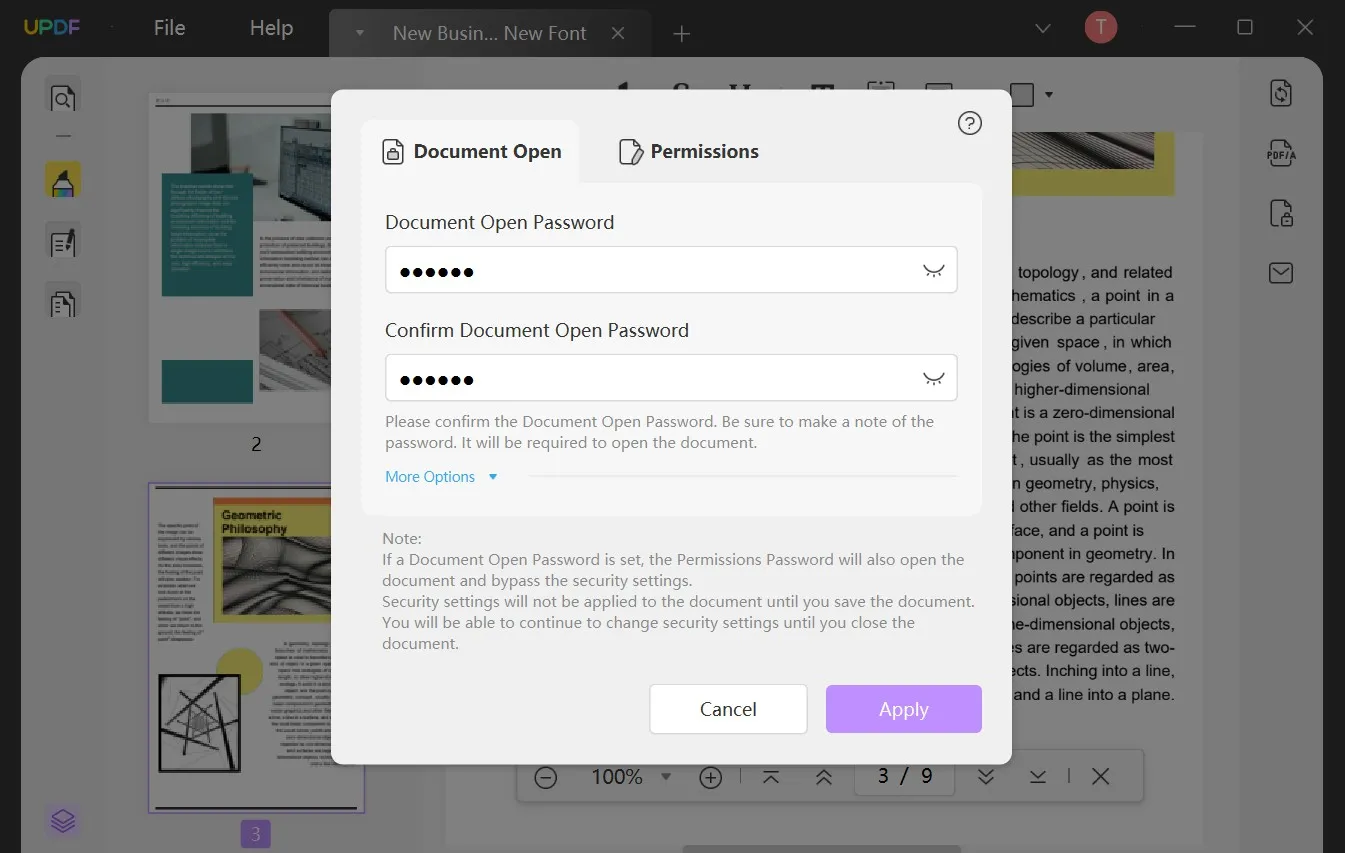
Step 3: Insert the password of your choice to protect your file. You'll also have to enter the password a second time to confirm encryption.
You can customize the restrictions placed on your file by clicking More Options. UPDF allows you to set editing, printing, and copying permissions separately.
- To prevent others from printing your file, open Printing Allowed and click Not Allowed.
- To restrict the copying, uncheck Enable copying of text, images, and other content.
- UPDF also lets you change to Encryption Level, including 128-bit RC4, 128-bit AES, and 256-bit AES.
Once you have calibrated the setting, click on the purple Apply button and lock the Editing, Printing, and Copying settings.
Method 2. Setting Up a Password for Editing Permissions
Here's another method to protect your PDF files from editing, copying, and printing in UPDF.
Step 1: Push the Share button on the right bar and turn on Disable Copy/Print/Download. Create a read-only link to your PDF document to share with others.
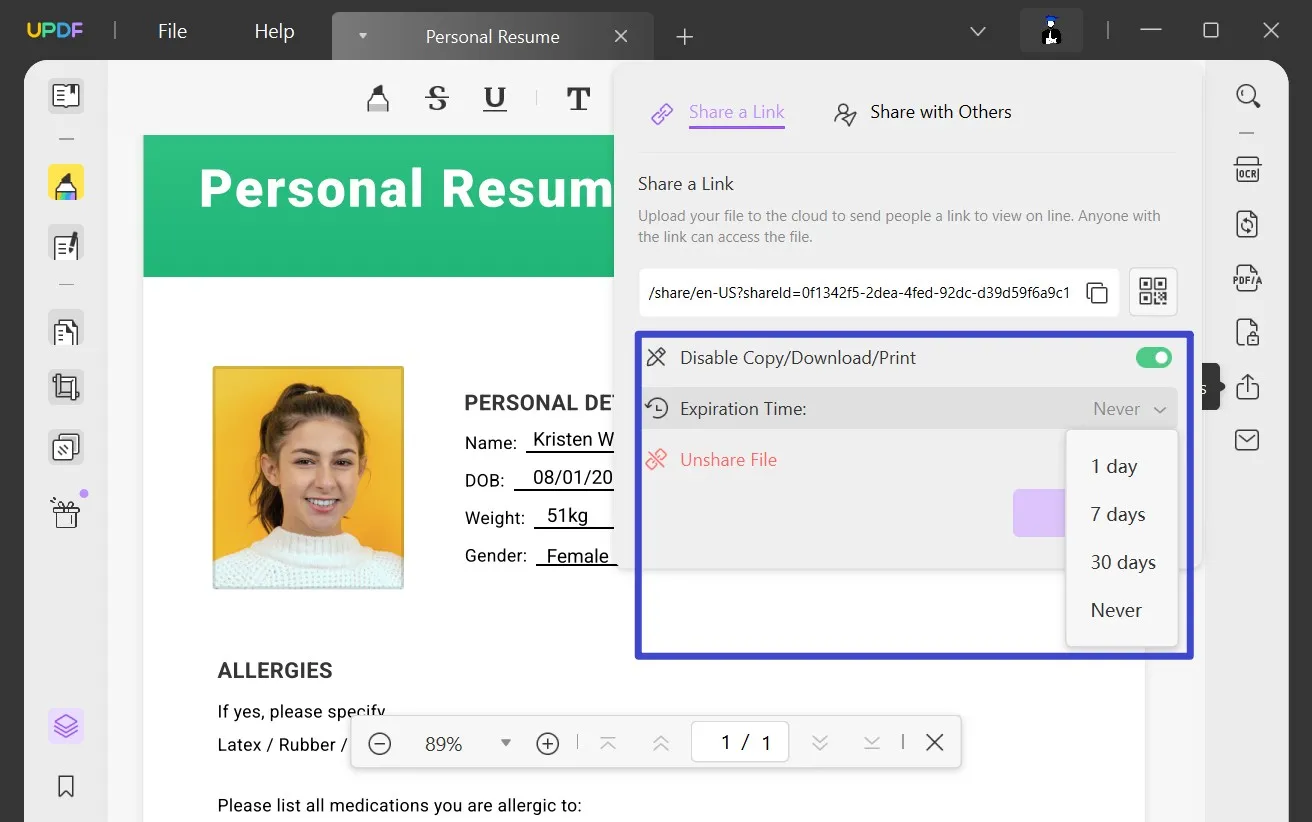
Step 2: Copy and share the link with others so they can only access a read-only version of your document.
Windows • macOS • iOS • Android 100% secure
Part 3. Password Protect PowerPoint with Other Common Ways (Restrict Editing/Accessing Only)
Besides using UPDF, there are some other methods you can try to protect your PowerPoint files.
Method 1. Setting Up a Password
Windows allows you to password-protect PowerPoint files with the following method:
- Click File to access the Backstage view.
- Click Info at the left bar and select Protect Presentation.
- Choose to Encrypt with Password in the drop-down menu. Enter the preferred password in the password box and select OK.
- PowerPoint will ask you to re-enter the password to confirm it.
- Push the Save button to save the file and bring the changes into effect.
Method 2. Restricting Access
This method prevents others from editing your PowerPoint files. Following it'll allow only specific people to edit your document. But, it won't password-protect PowerPoint. To restrict access, follow the first two steps in the first method and the steps described below.
- Open PowerPoint and click File to enter the backend view.
- Click Info on the left bar and open Protect Presentation, and click Restrict Access.
- A pop-up window will show up where you must click Restrict permission to this presentation.
- Now add the recipient's email address in the Read box, ensuring they cannot edit it. Hit OK at the bottom of the pop-up to confirm your choices.
By following this method, you have ensured that only specific users can read your document.
Part 4. FAQs About Password Protect PowerPoint
Q1. How can I remove a password from a PPT file?
- Open the PPT file, click Read-only recommend, and hit OK.
- Click Yes on the prompt that appears.
- Select File in the top-left corner and click Info in the drop-down menu.
- Click Protect Presentation > Encrypt with Password > Remove Password.
Q2. How do you password protect a PowerPoint presentation on a Mac?
Here's how to password protect PowerPoint on a Mac:
- Open MS PowerPoint on your Mac and click File > Passwords.
- Check Encrypt this presentation and require a password box.
- A new password field will open where you need to type and re-type the password to verify.
- Click Set Password and OK to save your commands.
Q3. Can I password protect a Microsoft PDF?
You can protect your Microsoft PDF with a password through different methods. The best among them is UPDF, a comprehensive PDF program with incredible features, such as editing, annotating, and sharing. You can also use the native methods provided by MS Windows.
Conclusion
Converting your PowerPoint files to PDF has many benefits, including flexibility, smaller size, and added security. Once you have done the conversion, using a robust PDF program like UPDF to encrypt your file is crucial. You only need to follow the aforementioned simple steps in UPDF to protect your converted files.
With its simple UI and intuitive features, you can quickly convert your PPT files to PDF. So, download it today and password-protect PowerPoint without any hassle.
Windows • macOS • iOS • Android 100% secure
 UPDF
UPDF
 UPDF for Windows
 UPDF for Mac
 UPDF for iPhone/iPad
 UPDF for Android
 UPDF AI Online
 UPDF Sign
 Edit PDF
 Annotate PDF
 Create PDF
 PDF Form
 Edit links
 Convert PDF
 OCR
OCR PDF to Word
 PDF to Image
 PDF to Excel
 Organize PDF
 Merge PDF
 Split PDF
 Crop PDF
 Rotate PDF
 Protect PDF
 Sign PDF
 Redact PDF
 Sanitize PDF
 Remove Security
 Read PDF
 UPDF Cloud
 Compress PDF
 Print PDF
 Batch Process
 About UPDF AI
 UPDF AI Solutions
 AI User Guide
 FAQ about UPDF AI
 Summarize PDF
 Translate PDF
 Chat with PDF
 Chat with AI
 Chat with image
 PDF to Mind Map
 Explain PDF
 Scholar Research
 Paper Search
 AI Proofreader
 AI Writer
 AI Homework Helper
 AI Quiz Generator
 AI Math Solver
 PDF to Word
 PDF to Excel
 PDF to PowerPoint
 User Guide
 UPDF Tricks
 FAQs
FAQs UPDF Reviews
 Download Center
 Blog
Blog Newsroom
 Tech Spec
 Updates
 UPDF vs. Adobe Acrobat
 UPDF vs. Foxit
 UPDF vs. PDF Expert




 Enola Miller
 Delia Meyer