PowerPoint is known as the tool to create slides for presentations, but its capabilities are not just limited to that. It is a versatile platform that empowers users to unleash their creativity in different ways. One such feature of PowerPoint worth knowing is its ability to create eye-catching posters of any size and dimension in the simplest way. With PowerPoint, you can create a visually appealing and resourceful poster with images, texts, and other graphical elements. So, if you are also enthusiastic about knowing how to create a Poster in PowerPoint, then this step-by-step guide unveils all the information you need. By the end of this article, you should have the knowledge and skills to create visually stunning posters with PowerPoint.
Part 1. Why Use PowerPoint to Create a Poster?
PowerPoint isn't famous for creating posters, so some might wonder why to create a poster in PowerPoint when there are other dedicated tools. PowerPoint has many good reasons to be your go-to tool for creating eye-catching posters. Some of the key ones are as follows:
- Familiarity: The user interface of PowerPoint and other Office apps is quite similar, so there is a high chance that you are already familiar with PowerPoint's interface and features. Owing to that, it makes it easy to start creating a poster through it.
- Feature-Rich Design Capabilities: PowerPoint integrates many design tools and features to create stunning posters. From text/image formatting to graphic elements, PowerPoint offers all the functionality users need to bring the poster idea to life.
- Easy-to-Use: PowerPoint also provides an easy-to-use and click-based interface, including pre-designed templates and drag-and-drop functionality. This makes it easy for any user to use the tool without training.
- Collaboration & Sharing: PowerPoint provides a seamless way to collaborate with others on a single file. Moreover, it allows sharing of the poster in different formats.
Overall, PowerPoint may not be reputed much for creating posters, but its rich design capabilities and the familiar intuitive interface make it a go-to tool for creating stunning presentations.
Part 2. 7 Simple Steps to Create a Poster in PowerPoint
Now that we know what makes PowerPoint shine as the poster creator, let's discuss the steps on how to create a power in PowerPoint. Follow the below steps one-by-one to create a complete poster in PowerPoint:
Step 1. Open a Blank Slide
Launch the PowerPoint software on your computer. From the main dashboard, click "Blank Presentation". Also, save the file to avoid losing the work by clicking File > Save as and then choosing the location where you want to save the file.
Step 2. Set the Poster Dimensions
You now have to set the dimensions of the poster. So, click the "Design" tab from the top and then click Slide Size > Custom Slide Size.

Choose "Portrait" as the layout and specify the width and height of the poster. Once done, click "OK".
Step 3. Add Picture
Now you can start designing your poster. The first thing is mostly adding an image to the poster. So, click the "Insert" tab from the top and click Pictures > This Device. Select and upload the picture into your poster.
Step 4. Add Text
The next thing you want to do is add the text you want to the poster. For that, you can use the Text Box to easily insert the text where you want. So, click the "Insert" tab from the top and click "Text Box". Afterward, use the mouse to drag the size of the text box and then type the content in the text.

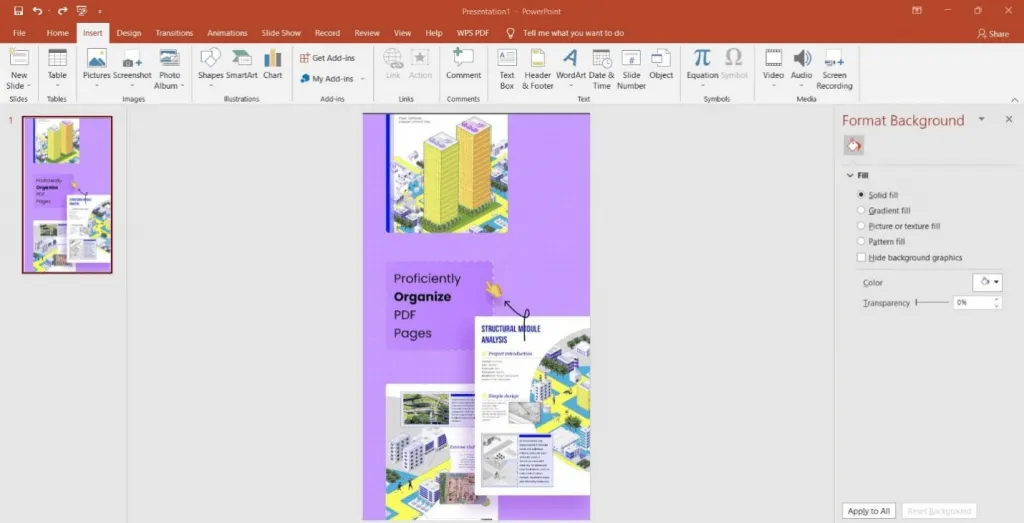
Step 5. Change Background
You can also change the background of your poster. You can use the color combination provided by PowerPoint or insert a specific background picture and set its transparency level accordingly. So, right-click the poster slide and select "Format Background". From the new right sidebar, select the appropriate option of your choice.

Step 6. Do Other Customizations
PowerPoint provides many design functionalities, such as adding shapes, adjusting colors, or applying special effects. So, customize your poster further as per your needs.
Step 7. Save the Poster as a PDF
Once you are done with all the design and customization, save the poster as PDF. Saving the poster in PDF format ensures its visual integrity and makes it easy to share, print, or view from different devices. So, click File > Save as. Name the file and select "PDF" as the format.
That's it! This way, you can easily create a visually-appealing poster in PowerPoint using its click-based, powerful functionalities.
Part 3. Bonus Tip: How to Print or Edit Poster PDF Easily
Once you have the poster in PDF format, you might be wondering how to print the poster with customized printing settings. Alternatively, you may want to make some changes to the PDF file of the poster. If you are struggling with these queries, then UPDF is the answer you need.
UPDF is an all-in-one PDF editor tool that provides a seamless way to edit the PDF by adding text, images, stickers, links, etc. Moreover, it also makes it easy and instant to print the poster PDF with desired settings, such as page size, orientation, rotation, etc.
Windows • macOS • iOS • Android 100% secure
Key Features of UPDF
- It can print PDFs as images with customized settings while preserving the fonts, layouts, and other design aspects.
- It makes it easy to edit texts, images, shapes, and other elements of the PDF.
- It allows annotating the PDF with highlighters, watermarks, stamps, e-signs, etc.
- It is compatible with Windows, Mac, iOS, and Android devices.
- It allows sharing PDFs as links or via emails.
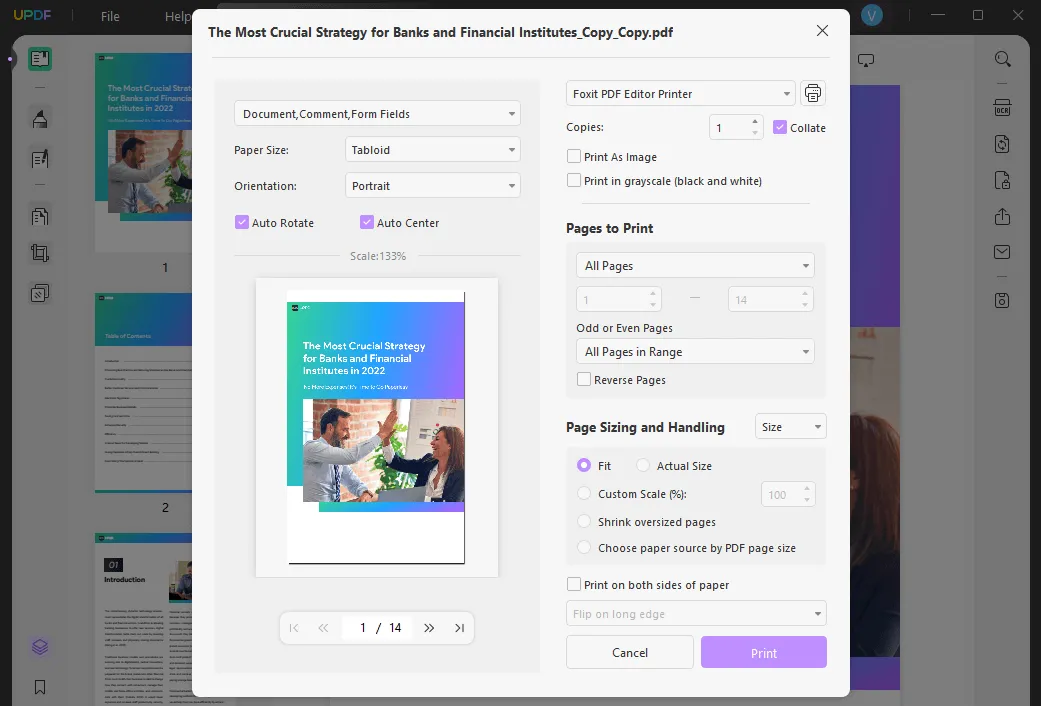
Follow the below steps to print the poster's PDF with UPDF:
- Download and launch UPDF on your computer. Open the poster PDF file by clicking the "Open File" button from the home screen.
- Click the "File" tab from the top and then click "Print".
- Customize the print settings as per your requirements and click the "Print" button.

This way, you can instantly print the poster PDF without losing the quality.
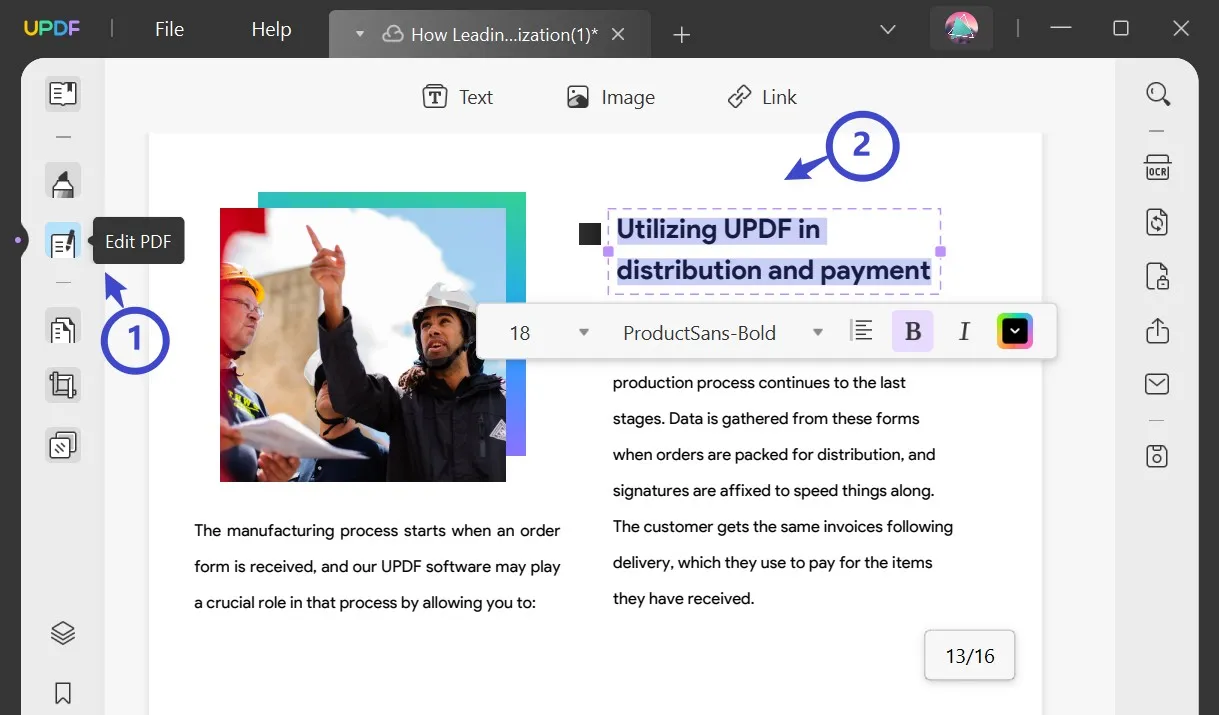
Similarly, if you want to edit the PDF, follow the below steps:
- Open the poster PDF file on UPDF.
- Click the "Edit PDF" icon from the left sidebar.
- Select the image or text you want to edit and start making changes.

This way, you can make changes to the poster PDF without hassle. Once done, you can save the customized file or print it out.
Windows • macOS • iOS • Android 100% secure
Wrapping Up
The diverse range of features of PowerPoint makes it more than just a presentation tool. Many users have found it attractive and useful in creating appealing posters. Above, we have discussed in detail how to create a poster in PowerPoint. By following the above steps, you can easily create stunning posters without any hassle. Once you have created the poster and its PDF, then UPDF serves as the ideal companion to print or edit the poster PDF efficiently. Its intuitive interface and feature-rich functionalities make it a hassle-free process to print or further customize the poster PDF.
 UPDF
UPDF
 UPDF for Windows
 UPDF for Mac
 UPDF for iPhone/iPad
 UPDF for Android
 UPDF AI Online
 UPDF Sign
 Edit PDF
 Annotate PDF
 Create PDF
 PDF Form
 Edit links
 Convert PDF
 OCR
OCR PDF to Word
 PDF to Image
 PDF to Excel
 Organize PDF
 Merge PDF
 Split PDF
 Crop PDF
 Rotate PDF
 Protect PDF
 Sign PDF
 Redact PDF
 Sanitize PDF
 Remove Security
 Read PDF
 UPDF Cloud
 Compress PDF
 Print PDF
 Batch Process
 About UPDF AI
 UPDF AI Solutions
 AI User Guide
 FAQ about UPDF AI
 Summarize PDF
 Translate PDF
 Chat with PDF
 Chat with AI
 Chat with image
 PDF to Mind Map
 Explain PDF
 Scholar Research
 Paper Search
 AI Proofreader
 AI Writer
 AI Homework Helper
 AI Quiz Generator
 AI Math Solver
 PDF to Word
 PDF to Excel
 PDF to PowerPoint
 User Guide
 UPDF Tricks
 FAQs
FAQs UPDF Reviews
 Download Center
 Blog
Blog Newsroom
 Tech Spec
 Updates
 UPDF vs. Adobe Acrobat
 UPDF vs. Foxit
 UPDF vs. PDF Expert


