Are you looking to add a professional touch to your PowerPoint presentations? With the help of voice-over or audio recordings, you can enhance your slides and engage your audience even more effectively. This content will show you how to easily record or add voice-over/audio to your PowerPoint presentations on both Windows and Mac platforms. The process is straightforward and user-friendly whether you use PowerPoint on Win or Mac. You can provide clear explanations, highlight key points, or add storytelling elements to your slides by incorporating voice narration. Let's dive in and learn how to record or add voice-over/audio to your PowerPoint presentations and other workarounds associated with the UPDF tool, ensuring a seamless experience across different devices and platforms.
Windows • macOS • iOS • Android 100% secure
Part 1. Why and When to Use Voice-over/Audio in PowerPoint Presentations?
Voice-over or audio recordings may be an excellent technique to improve your PowerPoint presentations and engage your audience. Here are reasons why you should utilize voice-over/audio in your PowerPoint presentations:
- Use audio recordings to offer clear and brief explanations of difficult subjects, making it easier for your audience to absorb the information presented.
- You may use voice-over/audio to highlight crucial points or takeaways your audience should pay attention to, making it simpler for them to recall and retain the information.
- Voice recordings can enhance your presentation by adding a storytelling element, making it more engaging and memorable for your audience.
- Including audio in your presentation might help those with visual impairments listen to the presentation rather than relying exclusively on visual clues.
No matter what your situations are, the methods to record voice-over or audio in PowerPoint are similar, but methods also vary depending on your operating system. Next, let’s talk about the different ways to record a voice-over on Windows and Mac.
Part 2. Adding Voice-over/Audio in PowerPoint on Windows
Voice-over or audio recording in PowerPoint on Windows is a quick and easy method to improve your presentations and engage your audience. You may offer comprehensive explanations, emphasize significant points, and add a professional touch to your presentation by adding narration to your slides. In this part, we'll show you the methods to record voice-over/audio in PowerPoint on Windows so you can produce high-quality, effective presentations that leave an impact.
Method 1: How to Record and Add a Voice-over/Audio for a Single Slide
If you are looking for a way to record voice-over for a single slide in your PPT, then follow the steps below:
- Open the PowerPoint presentation and select the slide you want to add a voice-over.
- Hit on the Insert tab and select audio in the Media section. From the drop-down menu, choose the Record Audio button.
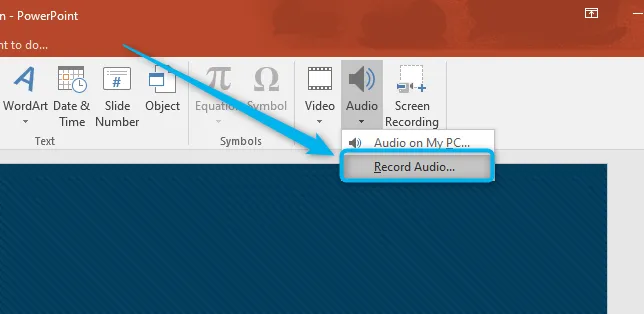
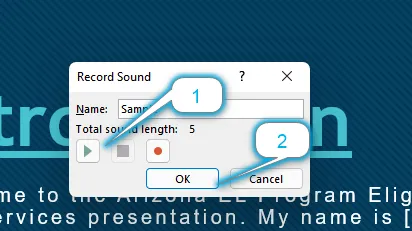
- In the Record Sound dialog box, type the name of your recording and click on the Record button.
- Start speaking into your microphone and click the Stop button when finished.
- Preview your recording by clicking the Play button.
- Click OK to save your recording and insert it onto the selected slide.
- To play the voice-over, click the Play button on the audio icon on the slide.
Method 2: How to Record and Add a Voice-over/Audio for an Entire Presentation
If you want to record a voice-over for all the pages in your PPT, then here are the steps to follow:
- Open the PowerPoint presentation and select the slide you want to add to the voice-over.
- Then, go to the View toolbar and click the Normal button in the Presentation Views region.
- Hit the Slide Show tab and locate the Set up section. Click on the Record Slide Show drop-down button.
- From the menu, you can choose either the Start Recording from the beginning of the Start Recording from the Current Slide Button.
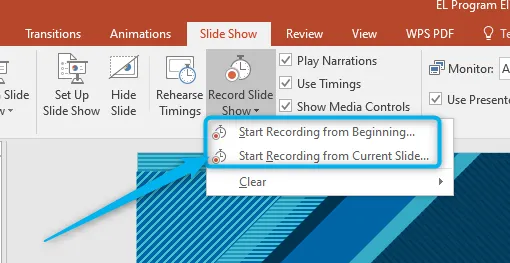
- In the Record Slide Show dialog box, select the Narrations and Laser Pointer option and click on Start Recording.
- Begin speaking into the microphone as you progress through your presentation. To advance to the next slide, use your keyboard's arrow keys.
- When finished, use the Esc key to end the recording.
- Preview your recording by playing the slideshow from the beginning of the current slide and then save your presentation to keep the voice-over/audio recording.
Method 3: Adding Audio from your Windows Device
The third method is perfect for people who want to add audio to PowerPoint from local storage. Here are the steps to follow:
- Open the PowerPoint presentation and select the slide you want to add the audio.
- Hit on the Insert tab and select audio in the Media section. From the drop-down menu, choose the Audio on My Pc button.
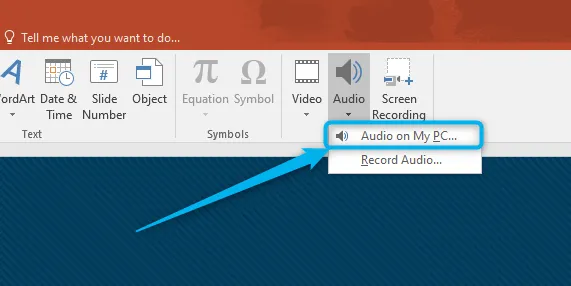
- Choose the audio file you want to add to your slide and press the Insert Button.
Part 3. Adding Voice-over/Audio in PowerPoint on Mac
If you are using a Mac computer and want to record a voice-over in PowerPoint, then keep reading this part, we will guide you through the steps to do so.
- Open the PowerPoint presentation and select the slide you want to add a voice-over.
- Hit on the Slide Show tab in the menu bar.
- From the drop-down menu, select Record Slide Show.
- In the Record Slide Show dialog box, check the box next to Slide and animation timings and click on the Start Recording button.
- Begin speaking into your microphone. Use the arrow keys to advance to the next slide when ready.
- When you finish recording the single slide, press the Esc key to stop recording.
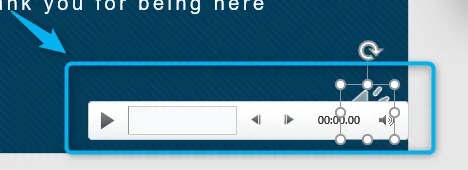
- To preview the voice-over, go to the slide you recorded on and click on the Play button in the control bar at the bottom.
- Click File, then Export to save the PowerPoint as a video.
Part 4. Bonus Tips About Voice-over in PowerPoint
#1 Tips for Creating Effective Voice-over/audio in PowerPoint Presentations
Creating great voice-over/audio in PowerPoint presentations is crucial for engaging your audience and presenting information with clarity and impact. Key tips can make your voice-overs/audio more clear and professional. This section will provide practical tips to help you create more effective voice-over/audio in PowerPoint presentations.
- Before recording your voice-over, review your script to ensure it runs properly and is easy to follow.
- Invest in a good microphone. Investing in a good microphone will guarantee that your voice is clear and simple to hear, therefore boosting the overall quality of your recording.
- Find a quiet area to record your voice-over/audio to reduce background noise and ensure your voice is the focus.
- Speak clearly and slowly: Speaking will help your audience comprehend and follow along with your presentation.
- Use pauses to emphasize essential points and allow your audience time to digest the material.
- Keep your voice-over/audio brief, eliminating extraneous or irrelevant material that might detract from the core message.
- Before concluding your presentation, preview your tape to verify it sounds clear and professional, making any required edits or tweaks.
#2 A Comprehensive Converter for Converting Files between PPT & PDF
Anyone who wishes to share presentations or papers with others will find it necessary to convert files between PPT and PDF. While several tools are available for this purpose, finding a complete and dependable converter can be difficult. With UPDF, you can convert PowerPoint presentations to PDF documents or vice versa fast and efficiently without compromising formatting or quality. In this part, we'll look at UPDF's capabilities and how to convert files between PPT and PDF.
Windows • macOS • iOS • Android 100% secure
Conclusion
Ultimately, recording and adding voice-over or audio to PowerPoint presentations may greatly improve your overall impact and engagement. By following our step-by-step instructions, you can create professional and engaging voice-overs that will leave a lasting impact on your audience. The method is straightforward and may be conducted within PowerPoint on either a Windows or a Mac device. Furthermore, UPDF is a fantastic tool for converting files between PPT and PDF. The application is a comprehensive tool that delivers high-quality and precise conversions. You may effortlessly convert your files with UPDF without fear of losing any formatting or quality.
Windows • macOS • iOS • Android 100% secure
 UPDF
UPDF
 UPDF for Windows
 UPDF for Mac
 UPDF for iPhone/iPad
 UPDF for Android
 UPDF AI Online
 UPDF Sign
 Edit PDF
 Annotate PDF
 Create PDF
 PDF Form
 Edit links
 Convert PDF
 OCR
OCR PDF to Word
 PDF to Image
 PDF to Excel
 Organize PDF
 Merge PDF
 Split PDF
 Crop PDF
 Rotate PDF
 Protect PDF
 Sign PDF
 Redact PDF
 Sanitize PDF
 Remove Security
 Read PDF
 UPDF Cloud
 Compress PDF
 Print PDF
 Batch Process
 About UPDF AI
 UPDF AI Solutions
 AI User Guide
 FAQ about UPDF AI
 Summarize PDF
 Translate PDF
 Chat with PDF
 Chat with AI
 Chat with image
 PDF to Mind Map
 Explain PDF
 Scholar Research
 Paper Search
 AI Proofreader
 AI Writer
 AI Homework Helper
 AI Quiz Generator
 AI Math Solver
 PDF to Word
 PDF to Excel
 PDF to PowerPoint
 User Guide
 UPDF Tricks
 FAQs
FAQs UPDF Reviews
 Download Center
 Blog
Blog Newsroom
 Tech Spec
 Updates
 UPDF vs. Adobe Acrobat
 UPDF vs. Foxit
 UPDF vs. PDF Expert




 Enola Miller