When you need to digitize important documents, ensuring that both sides are scanned is crucial for complete and accurate records. Whether you're managing essential paperwork or transitioning to a paperless lifestyle, capturing every detail of your double-sided documents is a must.
Thanks to advances in technology, scanning both sides of a document has become simpler and more accessible. In today's article, we'll guide you through two straightforward methods to scan both sides of your documents, using UPDF to help you achieve seamless digital copies. Prepare to enhance your document management skills and streamline your workflow with these efficient techniques.
Windows • macOS • iOS • Android 100% secure
But before we get into our detailed guide, we'll first do a quick overview of the traditional method below.
Part 1. Can I Scan a Document on Both Sides of the Same Paper?
Many people often find themselves needing to scan both sides of a single sheet of paper. While it's possible to do that with an app such as UPDF, people can also opt to use a duplex scanner if they want to do something more traditional. These specialized scanners are made to scan both sides of a document simultaneously, thereby reducing the time and effort required compared to conventional single-sided scanning.
However, while duplex scanners offer significant advantages, it also comes with a handful of limitations and cons that are essential to consider. The first thing is that duplex scanners tend to lean more on the expensive side which may not be feasible for all users, especially those on a tight budget.
Another factor is that indirect duplex methods can be slower than using applications, as the scanning process may involve additional steps that consume time. There is also a potential for the documents to be distorted or damaged during the scanning process, especially if the scanner is not calibrated correctly or if the documents are on the thicker side.
With this said, plenty of people often seek alternative methods, such as utilizing dedicated software for digitizing their documents. In the following part, we will be introducing a powerful tool that's perfect for your document scanning needs!
Part 2. How Do I Scan Two Sides of a Document at Once?
For a quick and smooth experience in scanning both sides of a document, the UPDF is an excellent option to consider. Its intuitive interface makes the process effortless, allowing you to easily scan ID cards and other important documents on a single page. With its advanced features, UPDF simplifies the scanning workflow while ensuring that you achieve high-quality results every time.
The benefits of using UPDF go far beyond just scanning. With its integrated cloud storage, you can keep your files organized and accessible from anywhere, eliminating the hassle of managing physical documents. The app also includes robust editing tools, enabling you to annotate, highlight, and modify your scanned documents effortlessly. The app also features the capability to connect to printers for direct prints within the app.
Ready to elevate your scanning game? Download the UPDF for iOS app today and discover how easy it can be to scan two-sided documents and IDs in just a few simple steps! Let's take a look at two of these easy methods below:
Windows • macOS • iOS • Android 100% secure
Method 1. Take Photos
Follow the steps below to capture a double-sided document to a PDF:
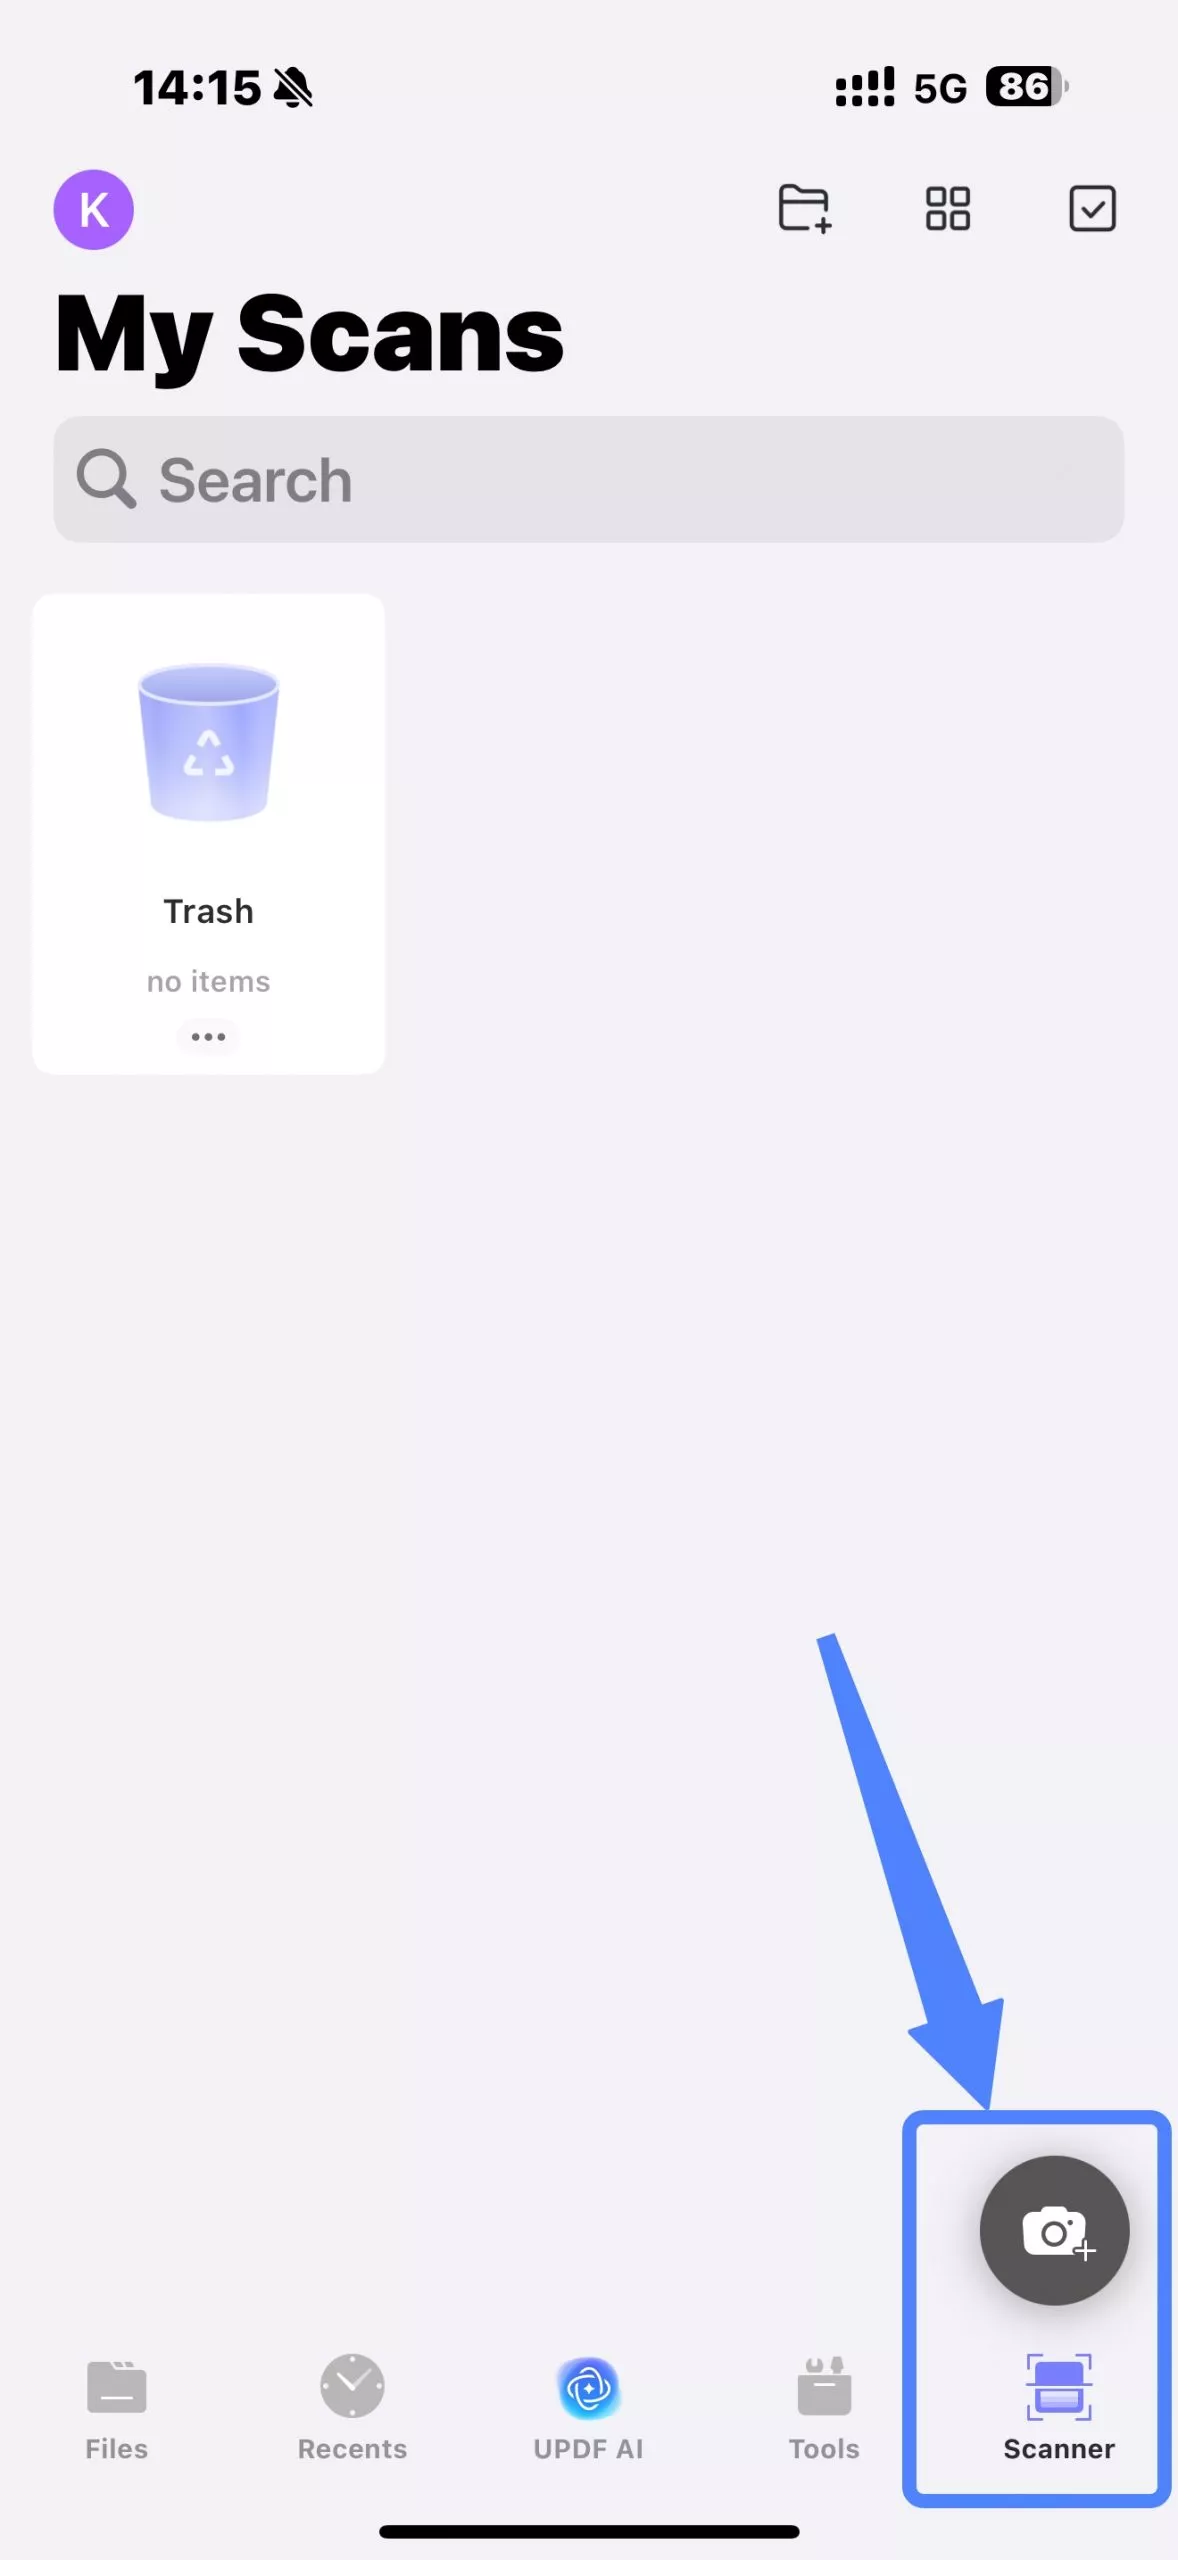
Step 1. After launching UPDF, click on the “Scanner” mode in the bottom right corner. Then tap on the "Camera" icon.
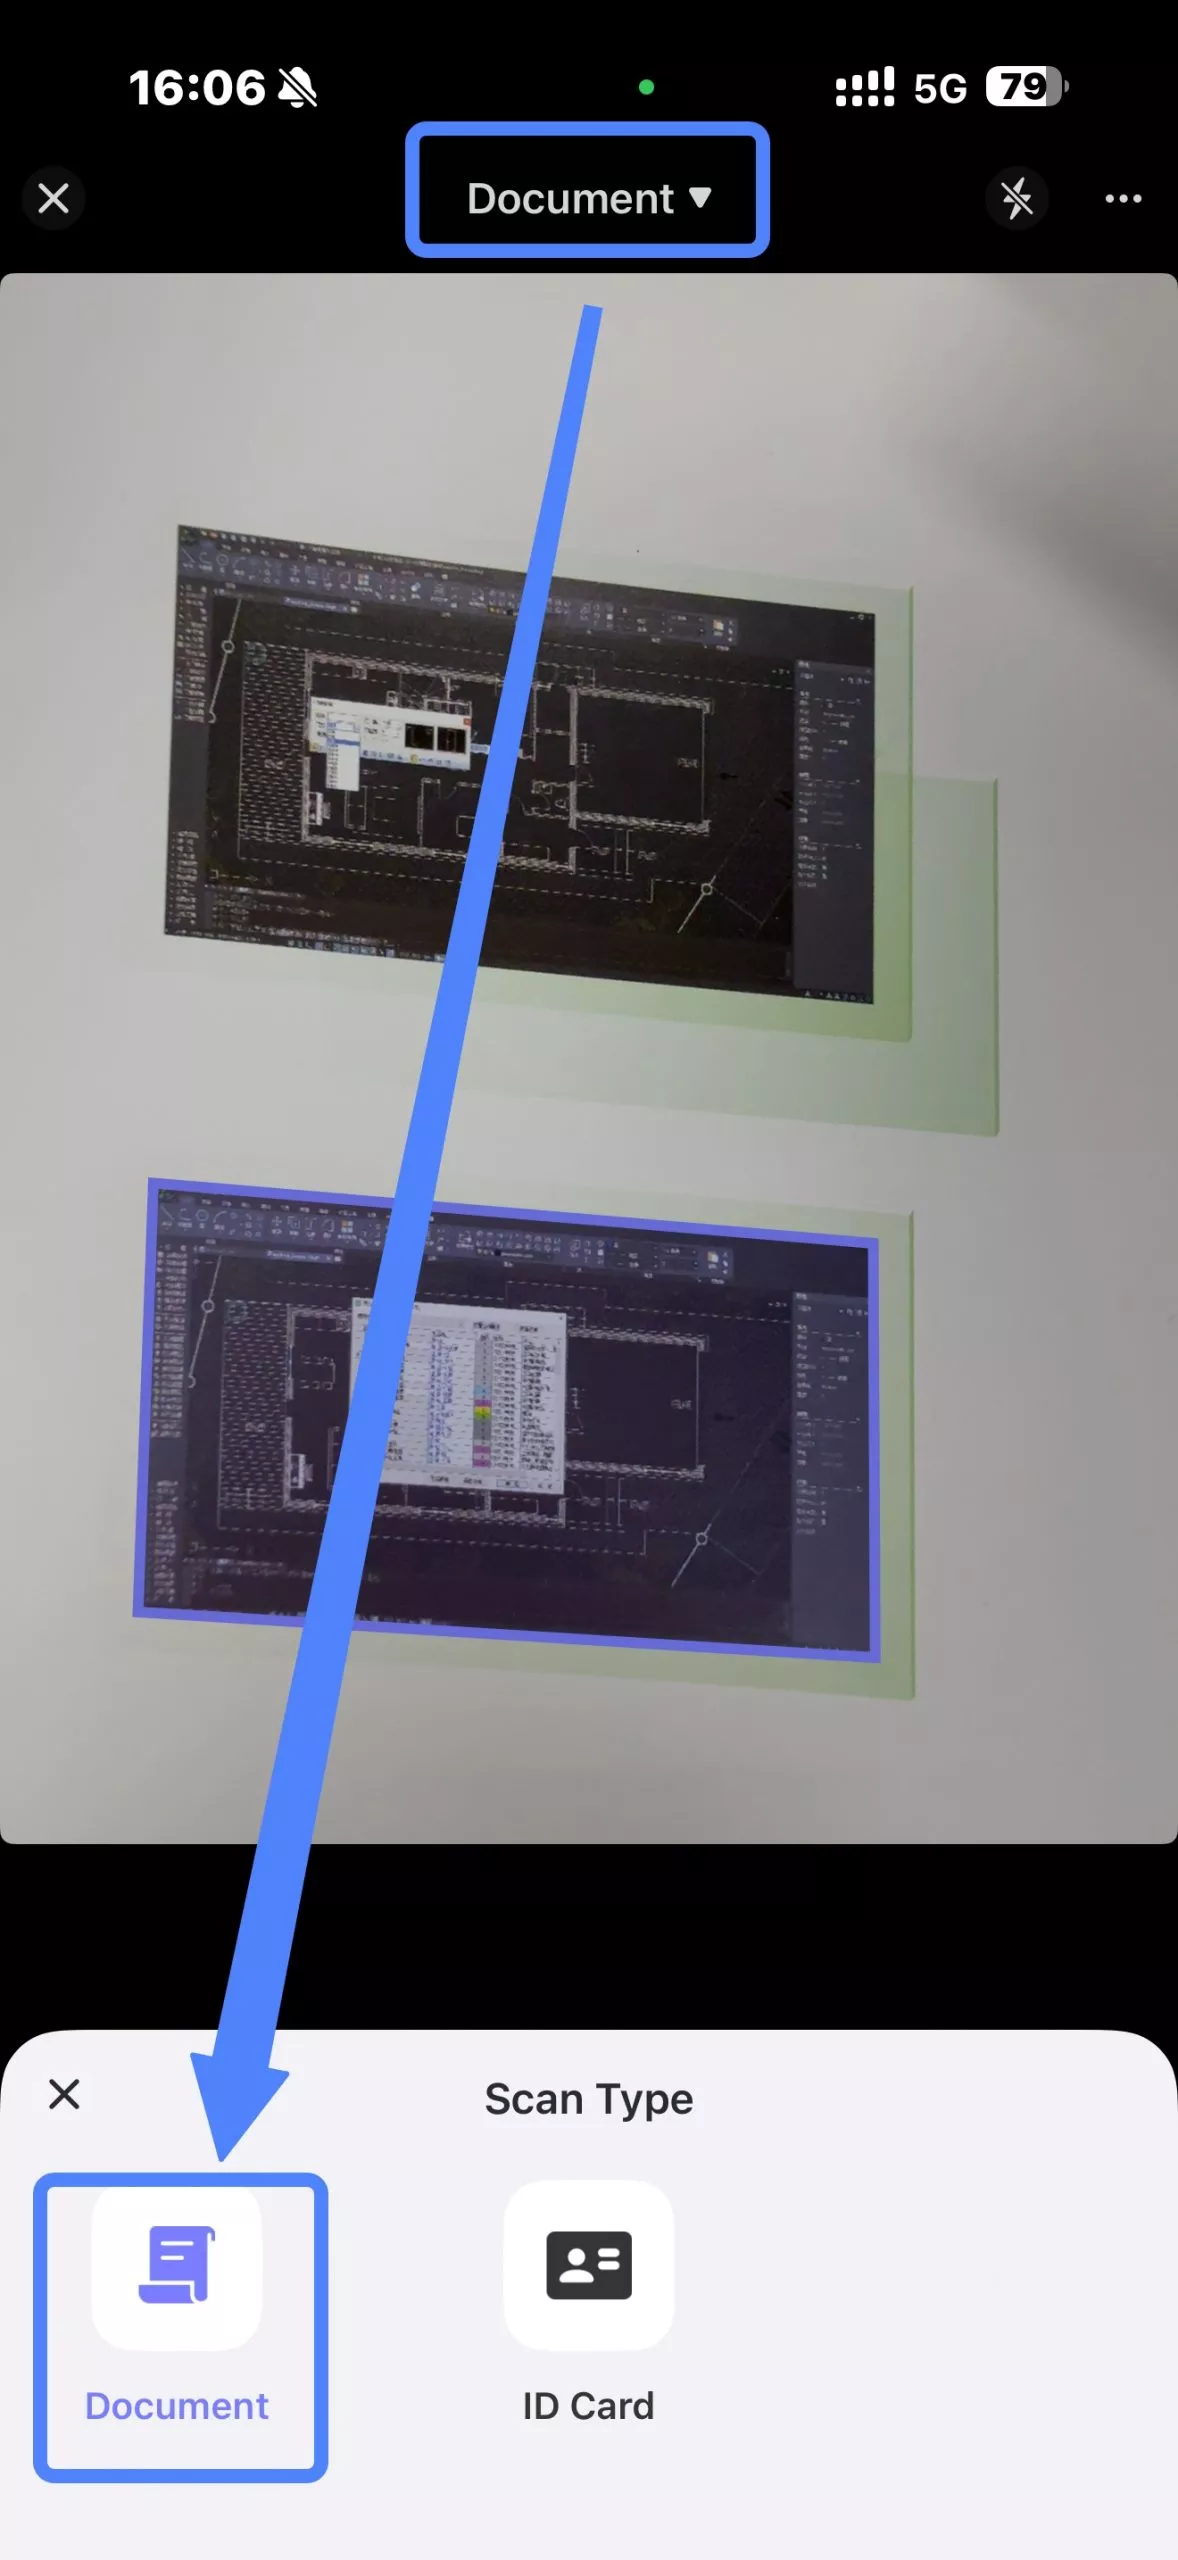
Step 2. Click on the drop-down icon at the top and select the type of document you will be scanning. You are given the options to choose between "Document" and "ID Card".
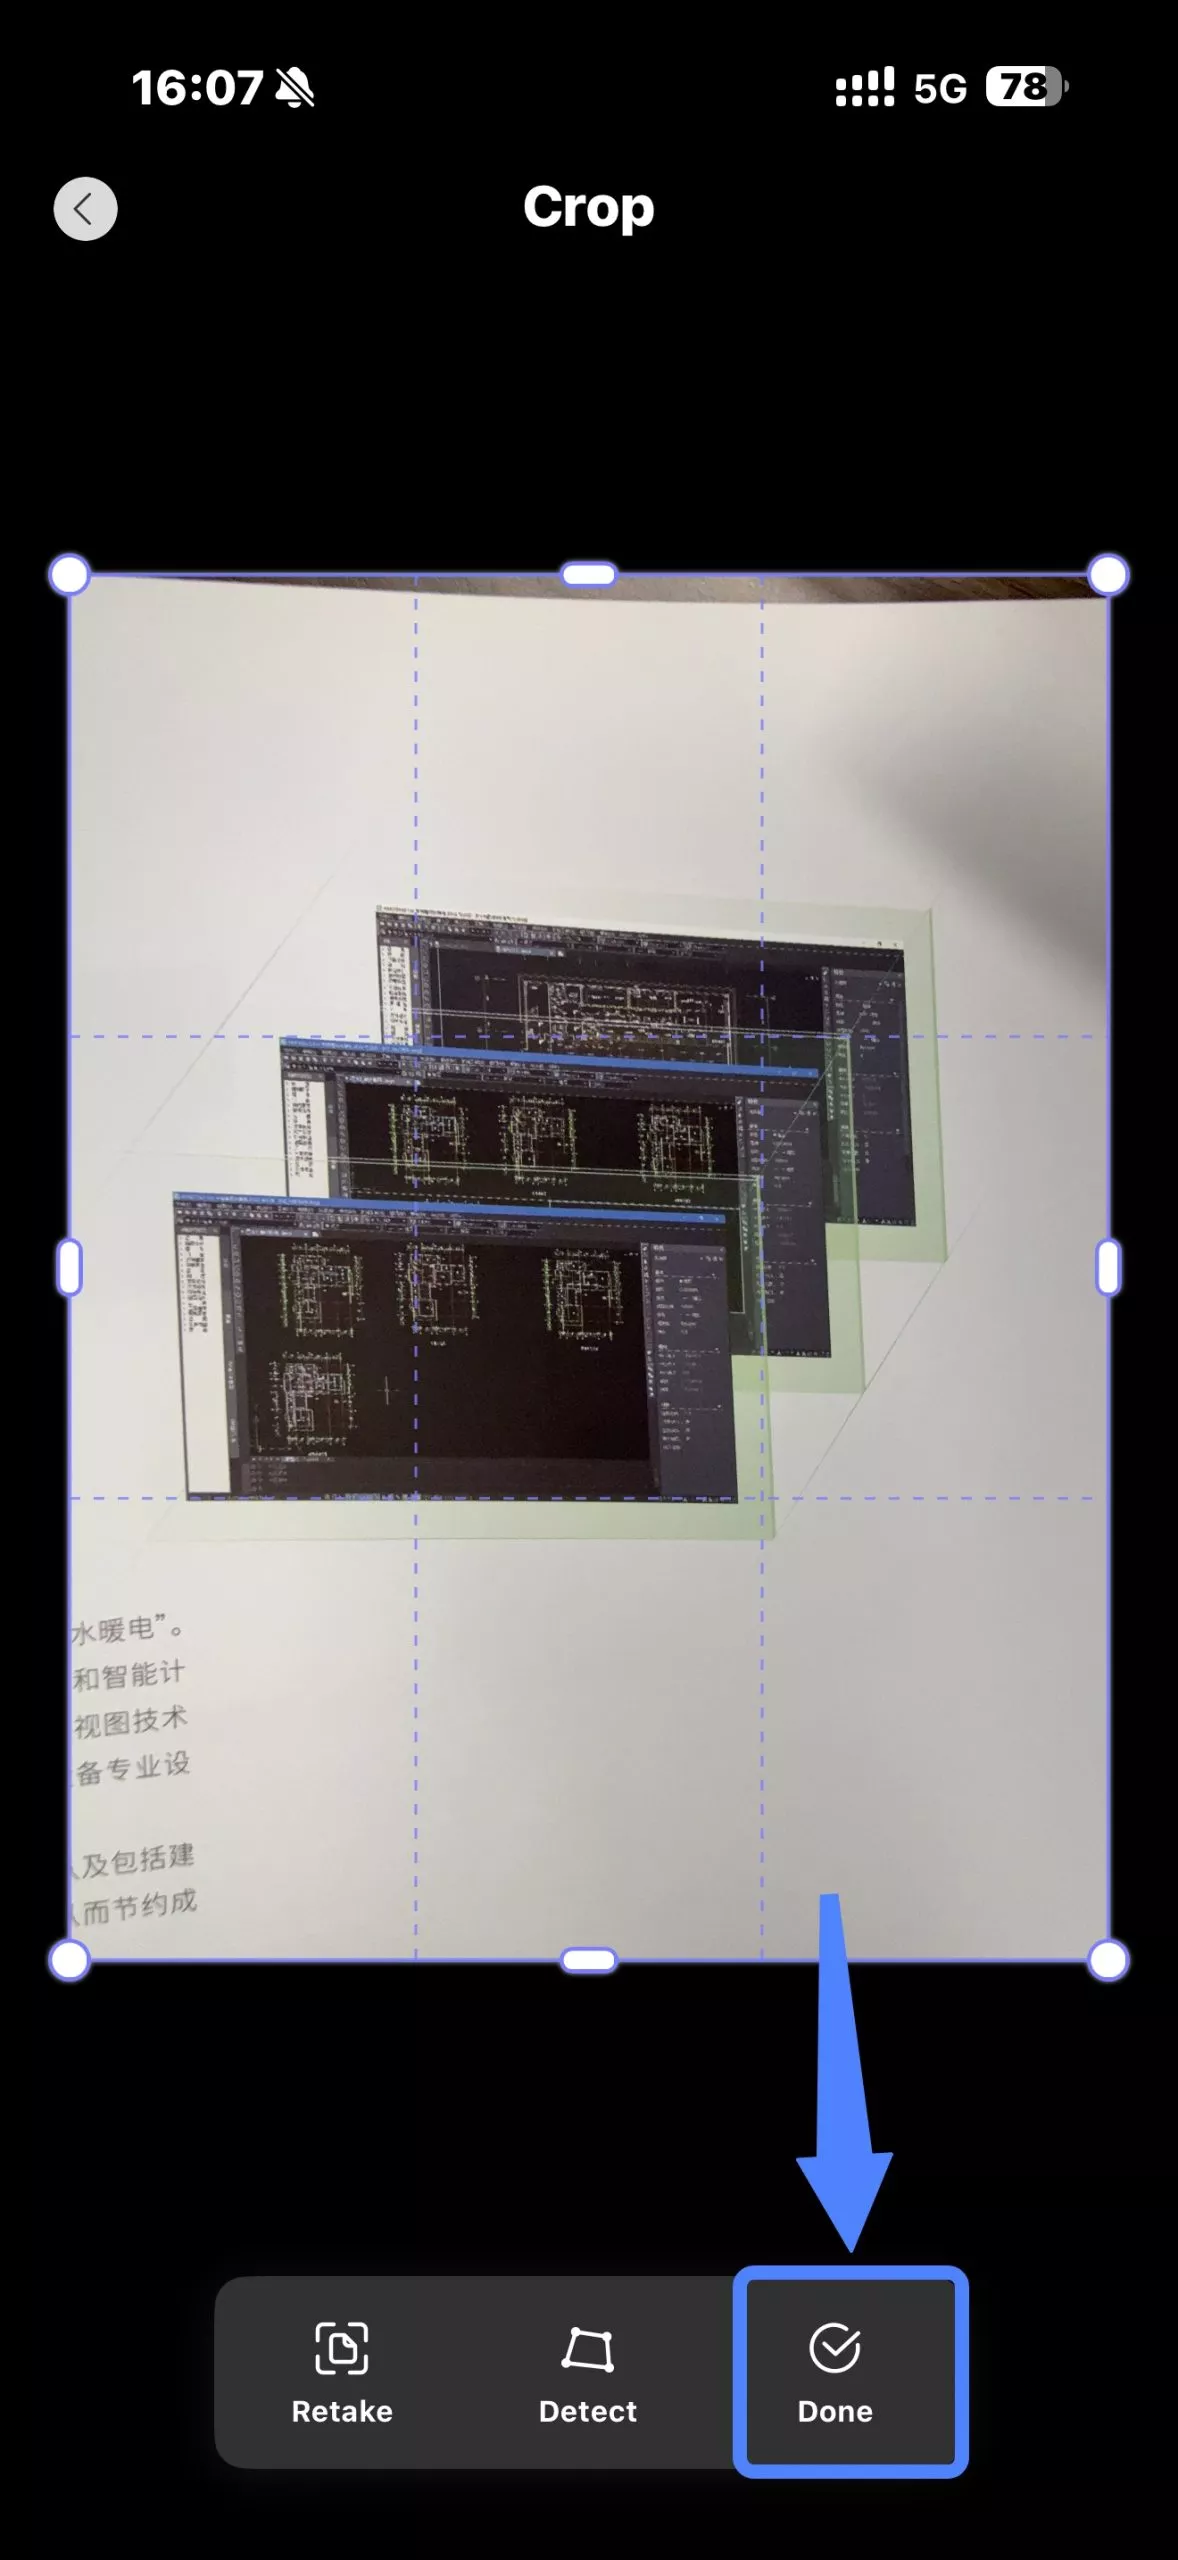
Step 2. Use your camera to capture the first side of your document. Once taken, press the "Done" option. You are then brought back to the camera to capture the second side of your document. If you're happy with the result, press "Done" once more.
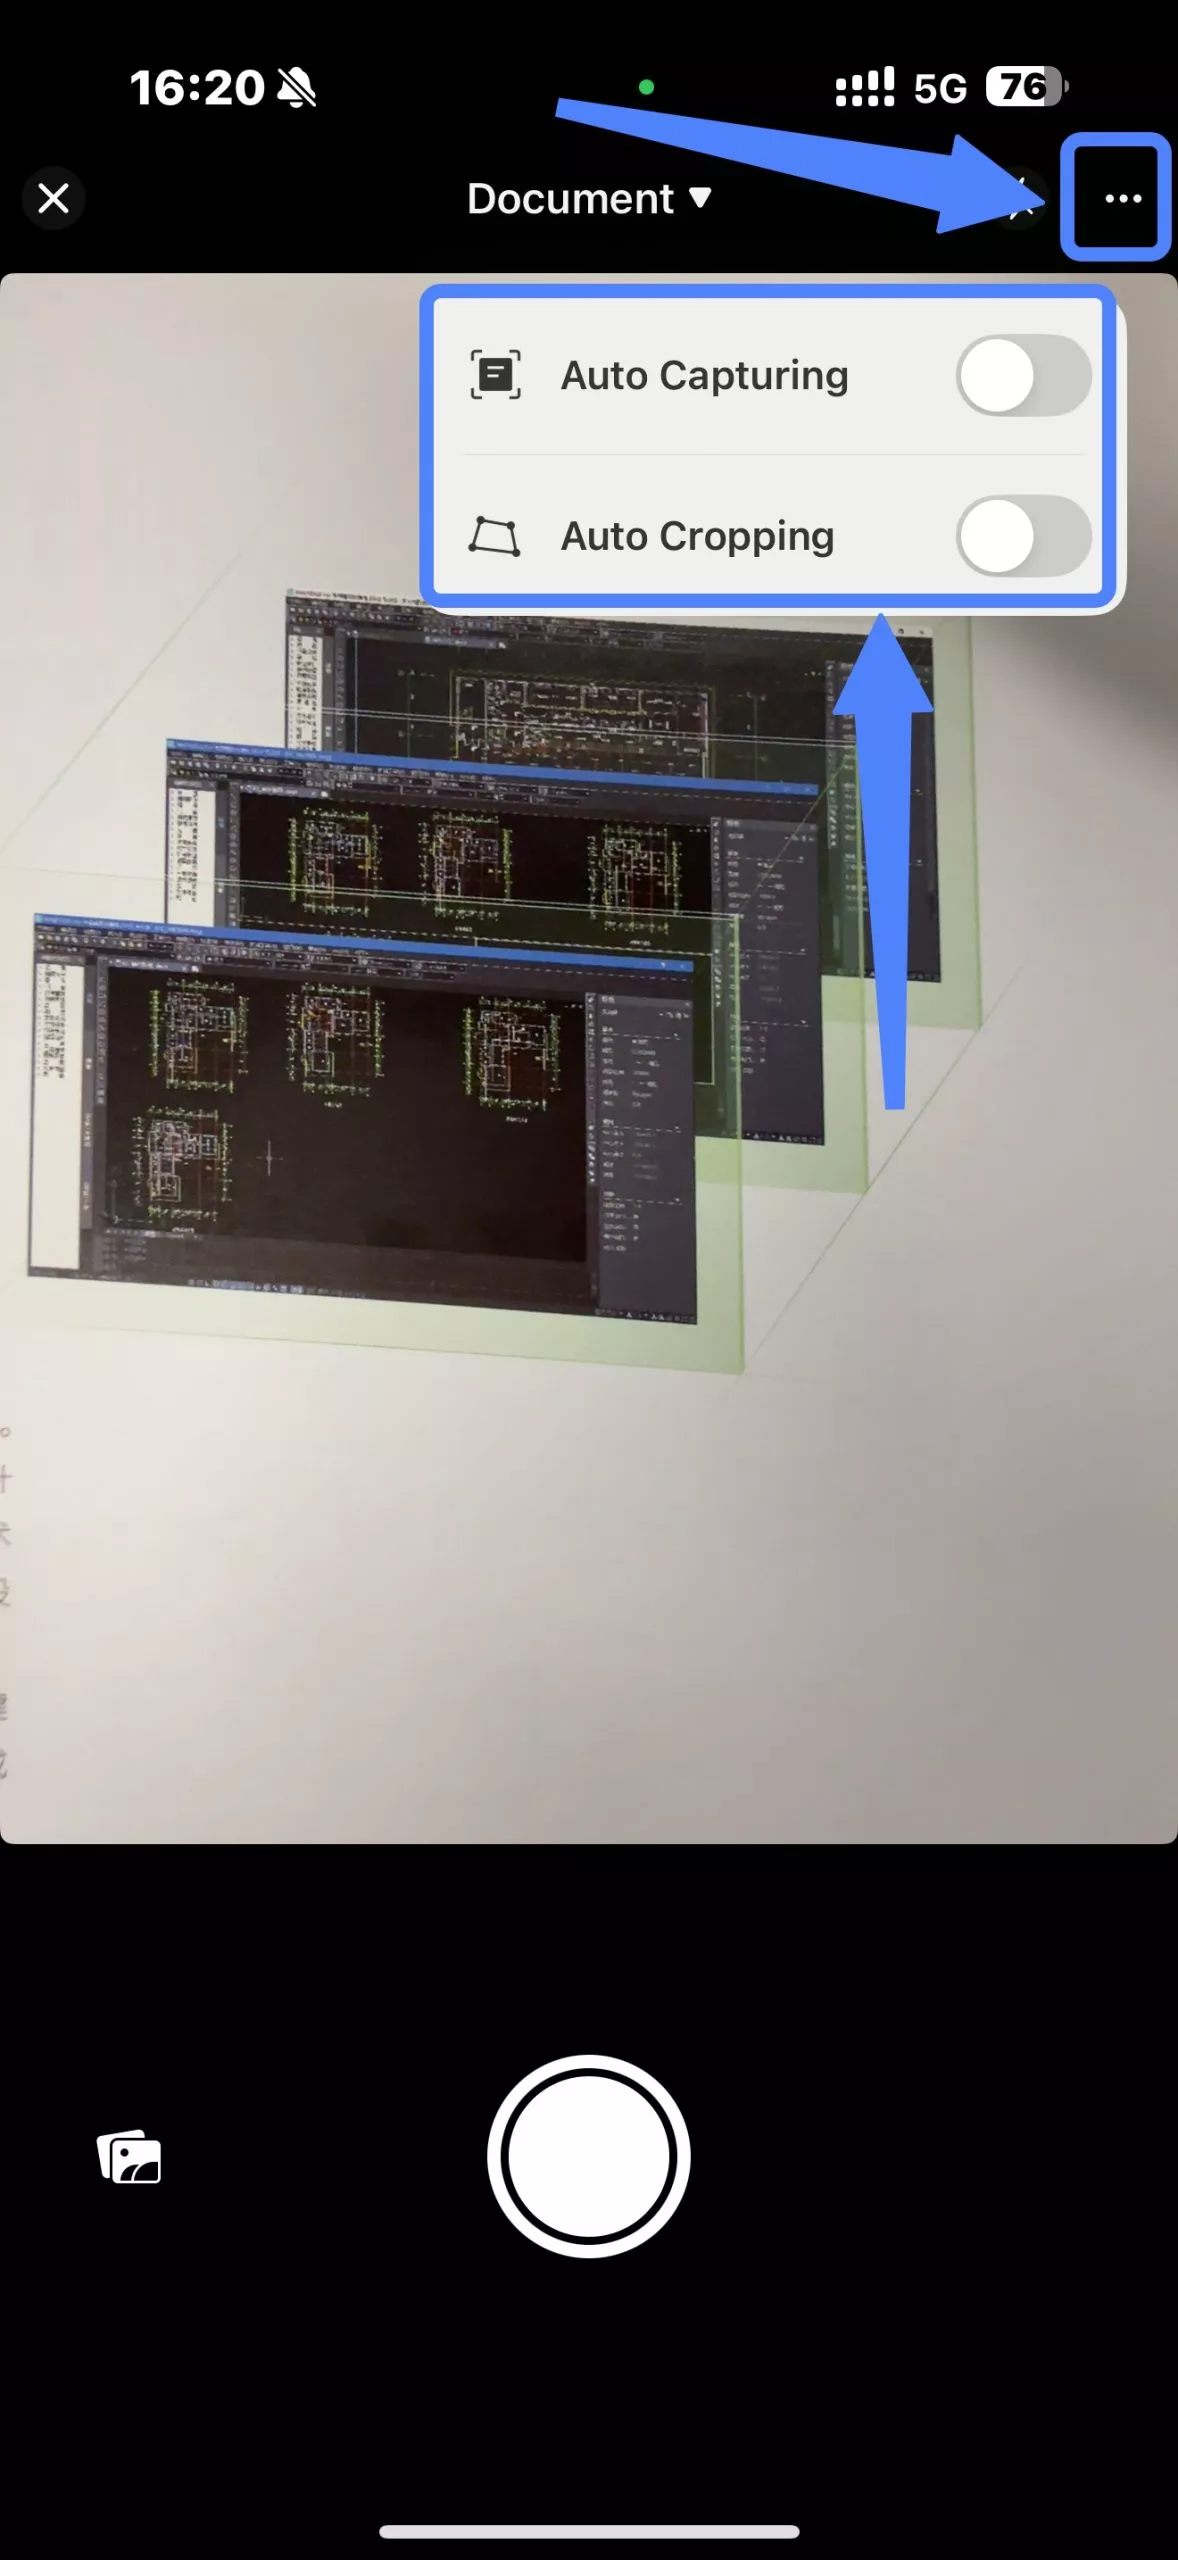
Tips:
Step 3. After capturing both sides of your document, tap on the arrow icon in the lower-right corner.
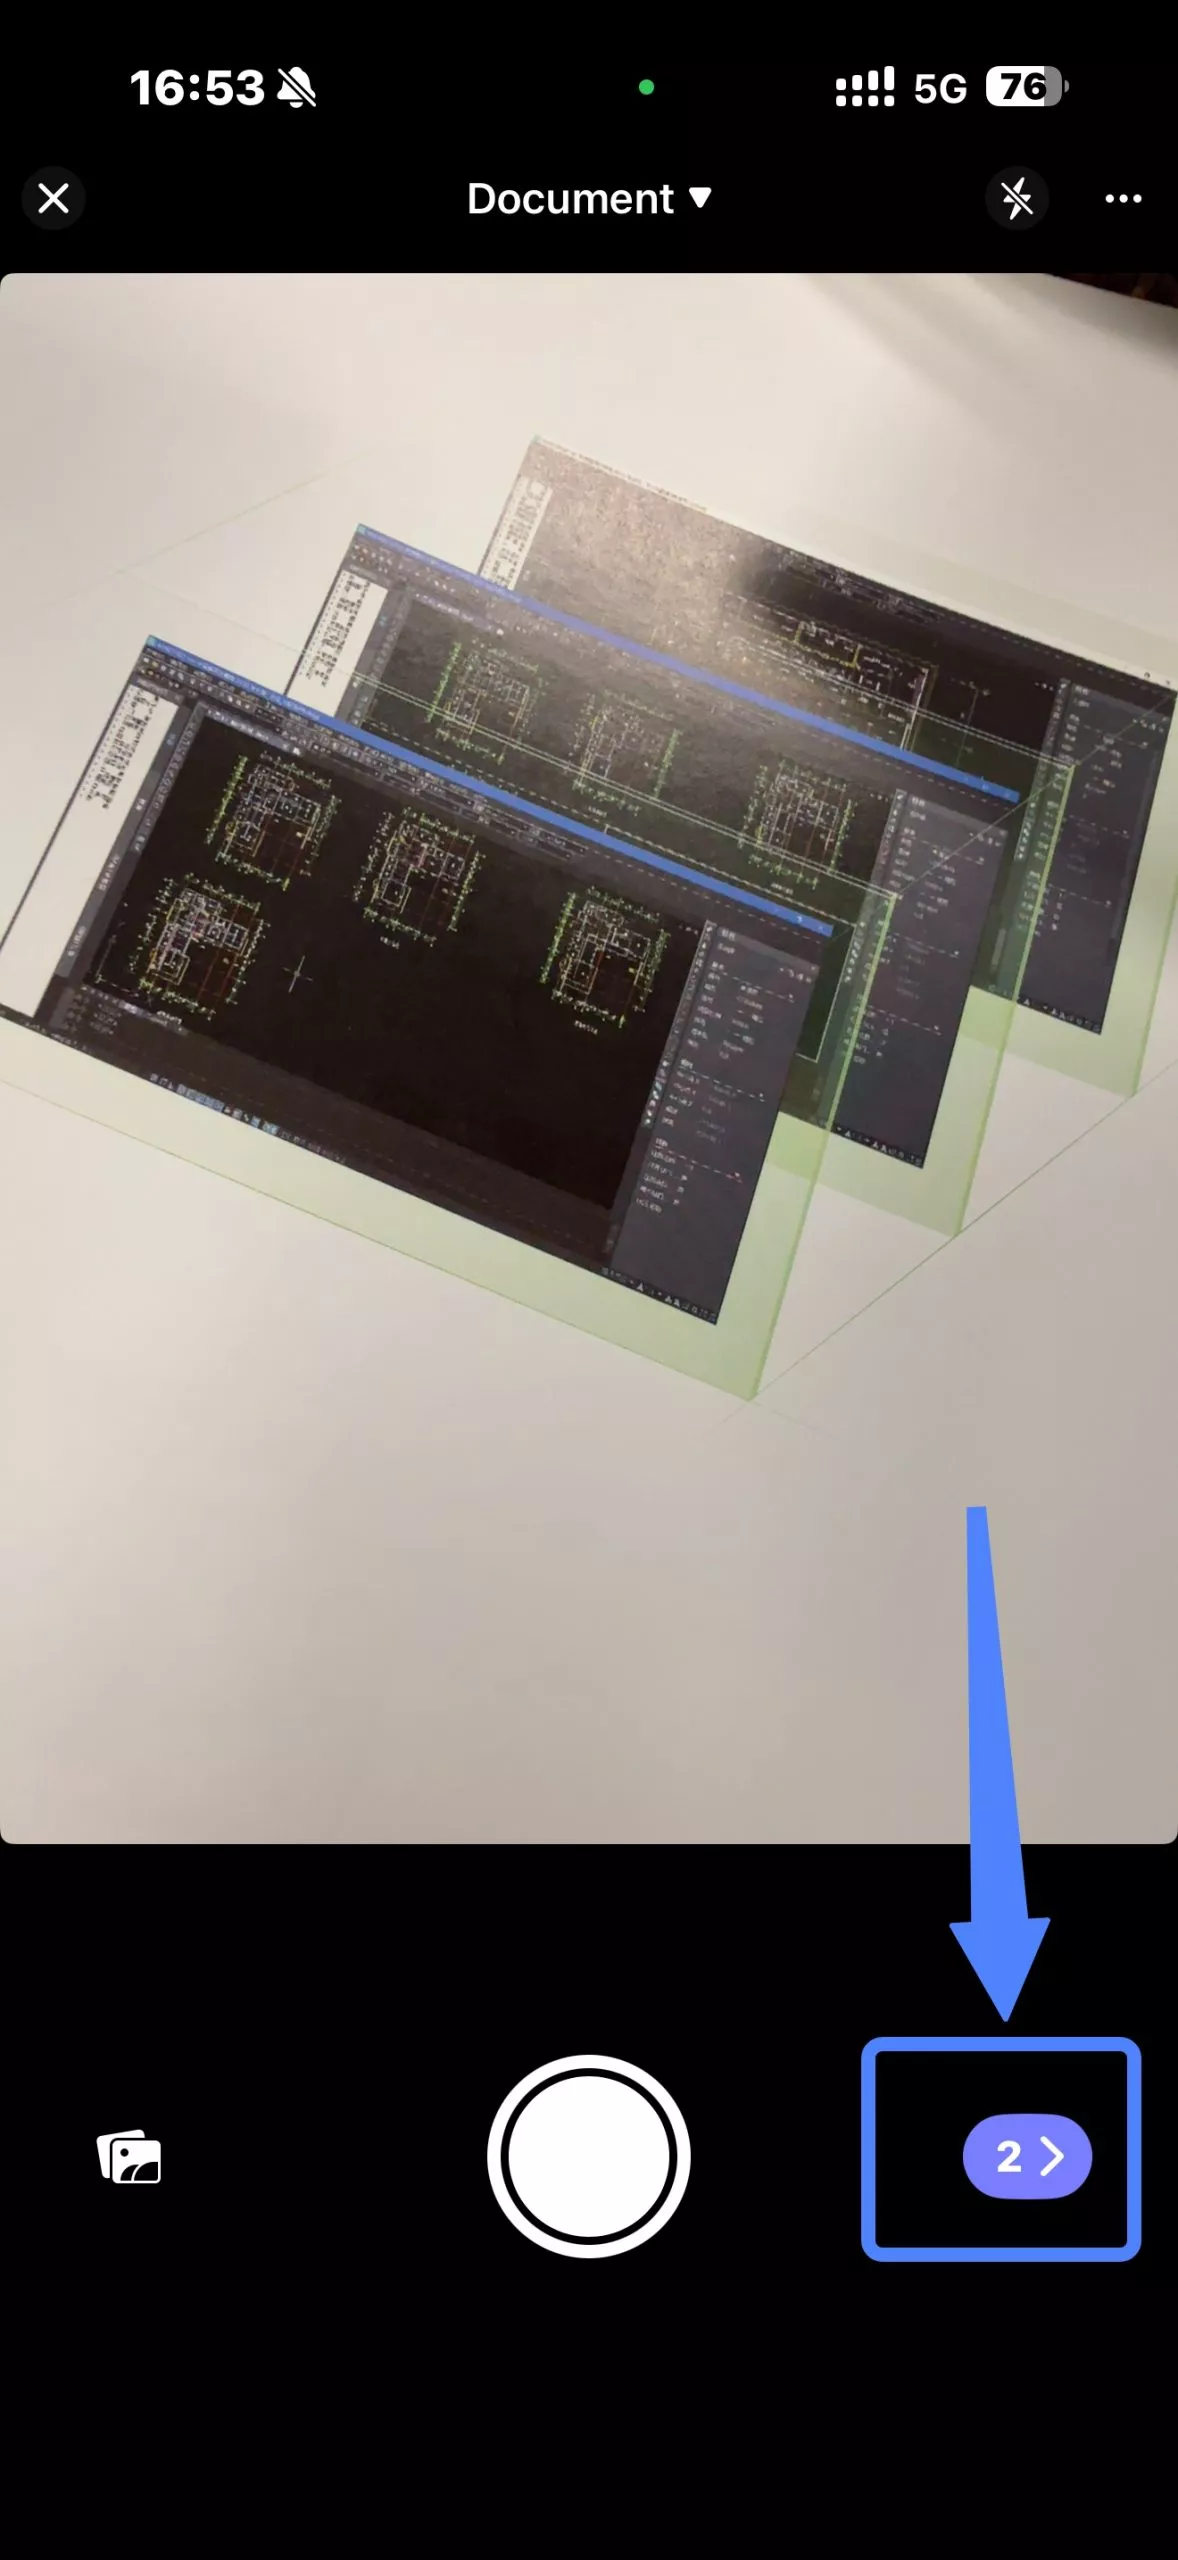
Step 4. On the next screen, you can add, rotate, crop, filter, or delete images. You can also specify the paper size by manually entering it or selecting from options such as A4, A5, A3, Letter, Legal, Ledger, and Tabloid. The "Filter" option allows you to select a style: Photo, Black & White, Color, or Grayscale.
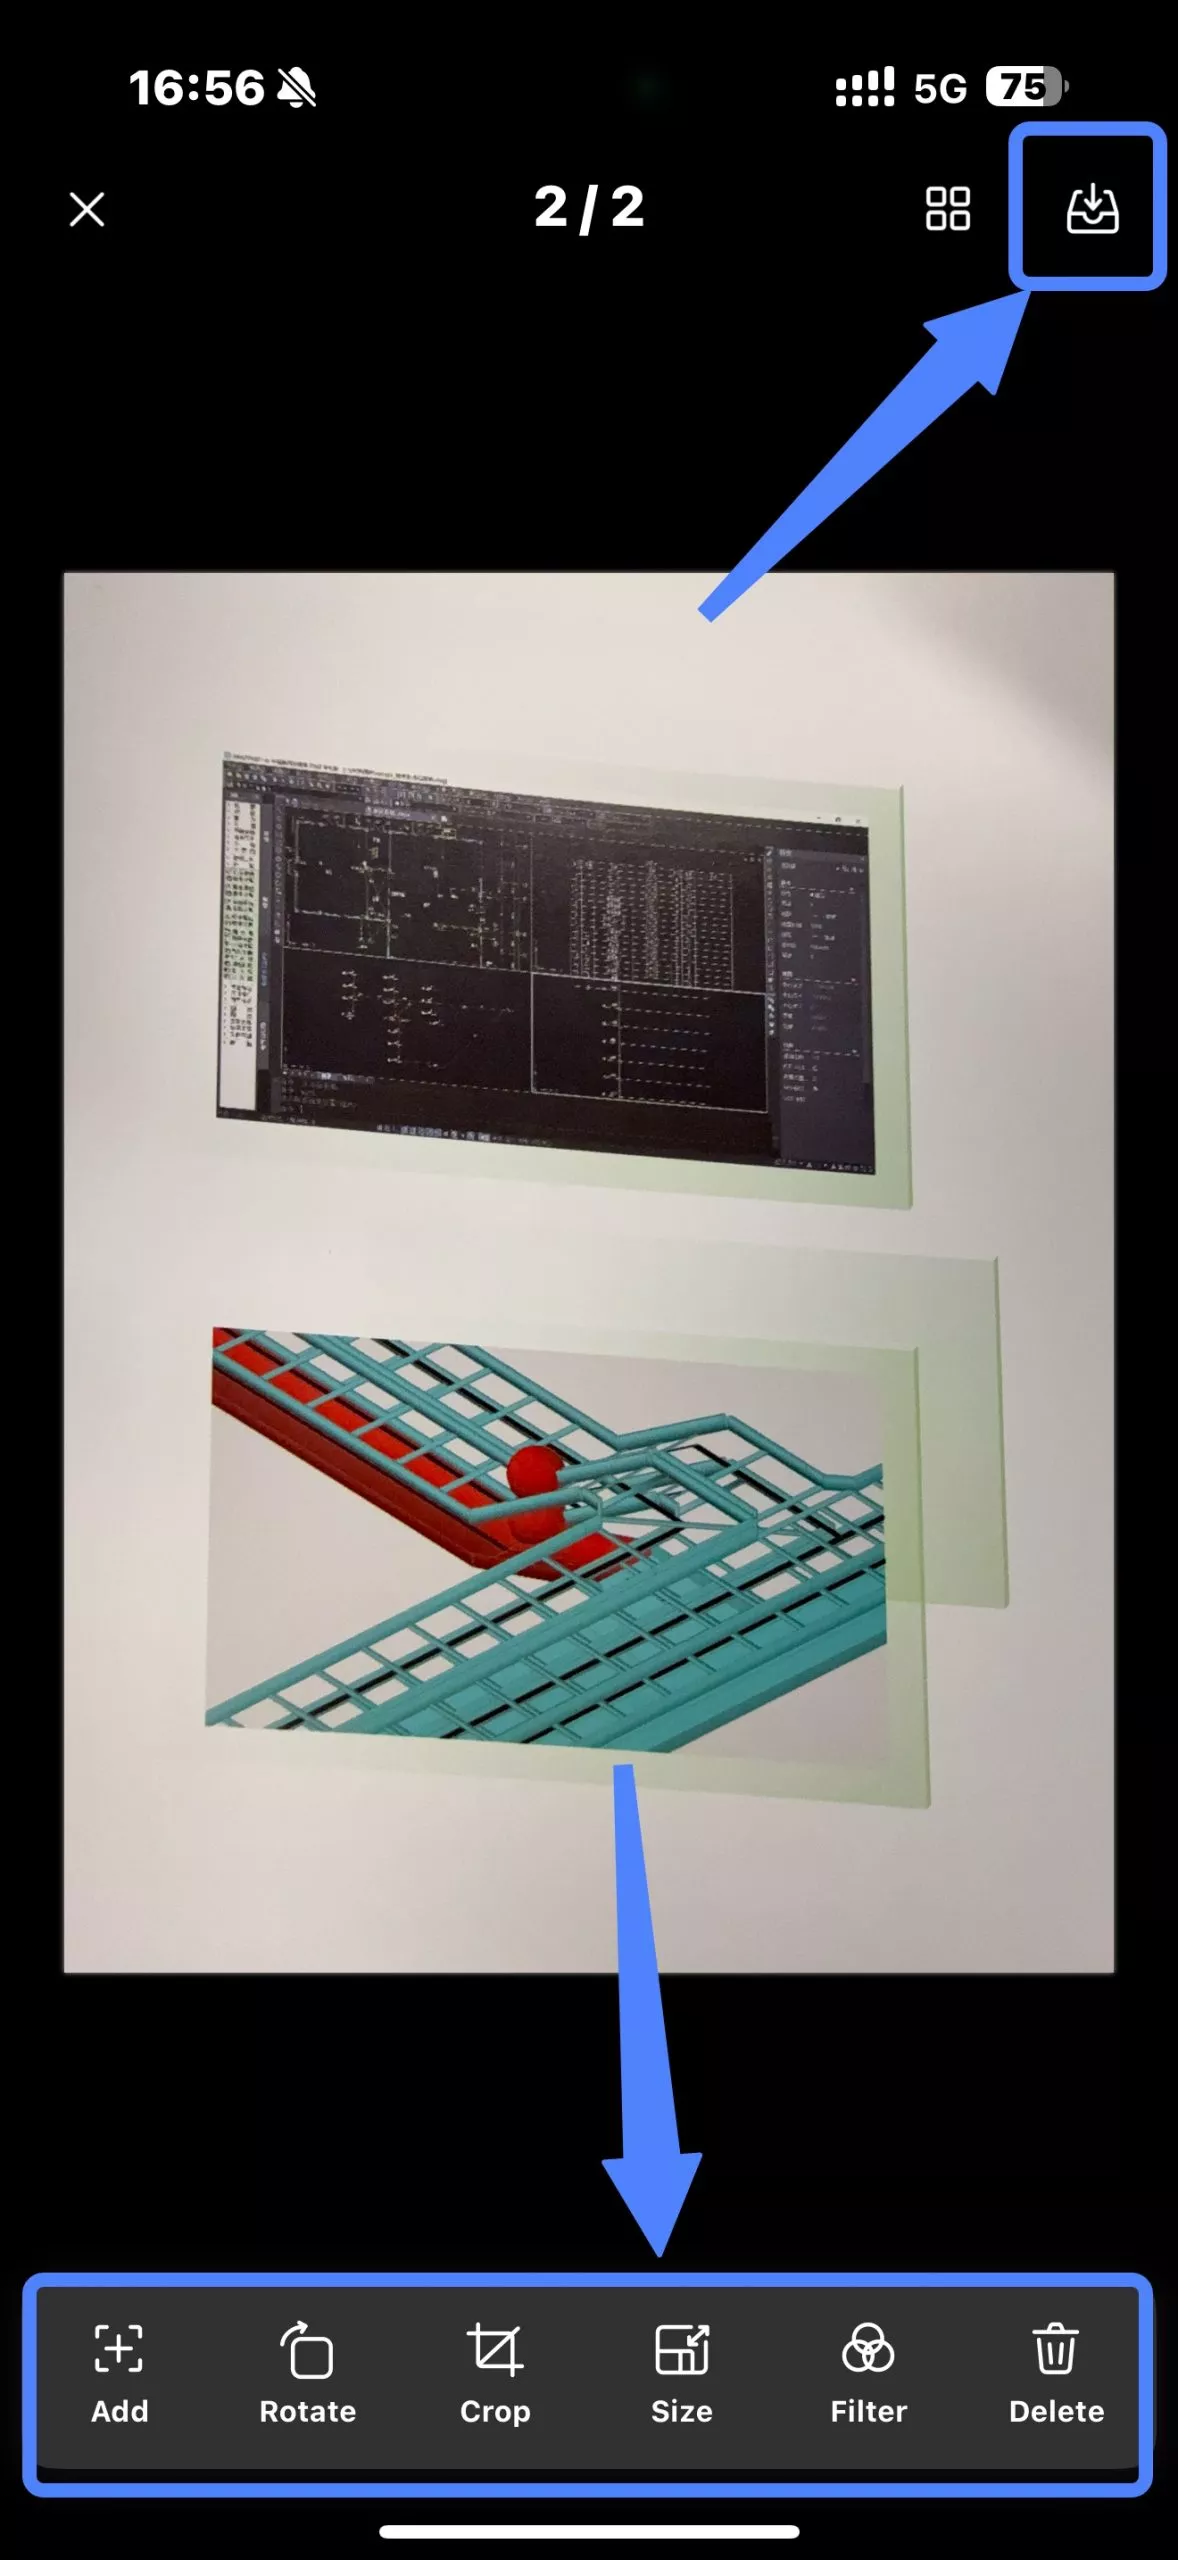
Step 5. Once you have finished customizing the settings, click the "Save" option to keep your document.
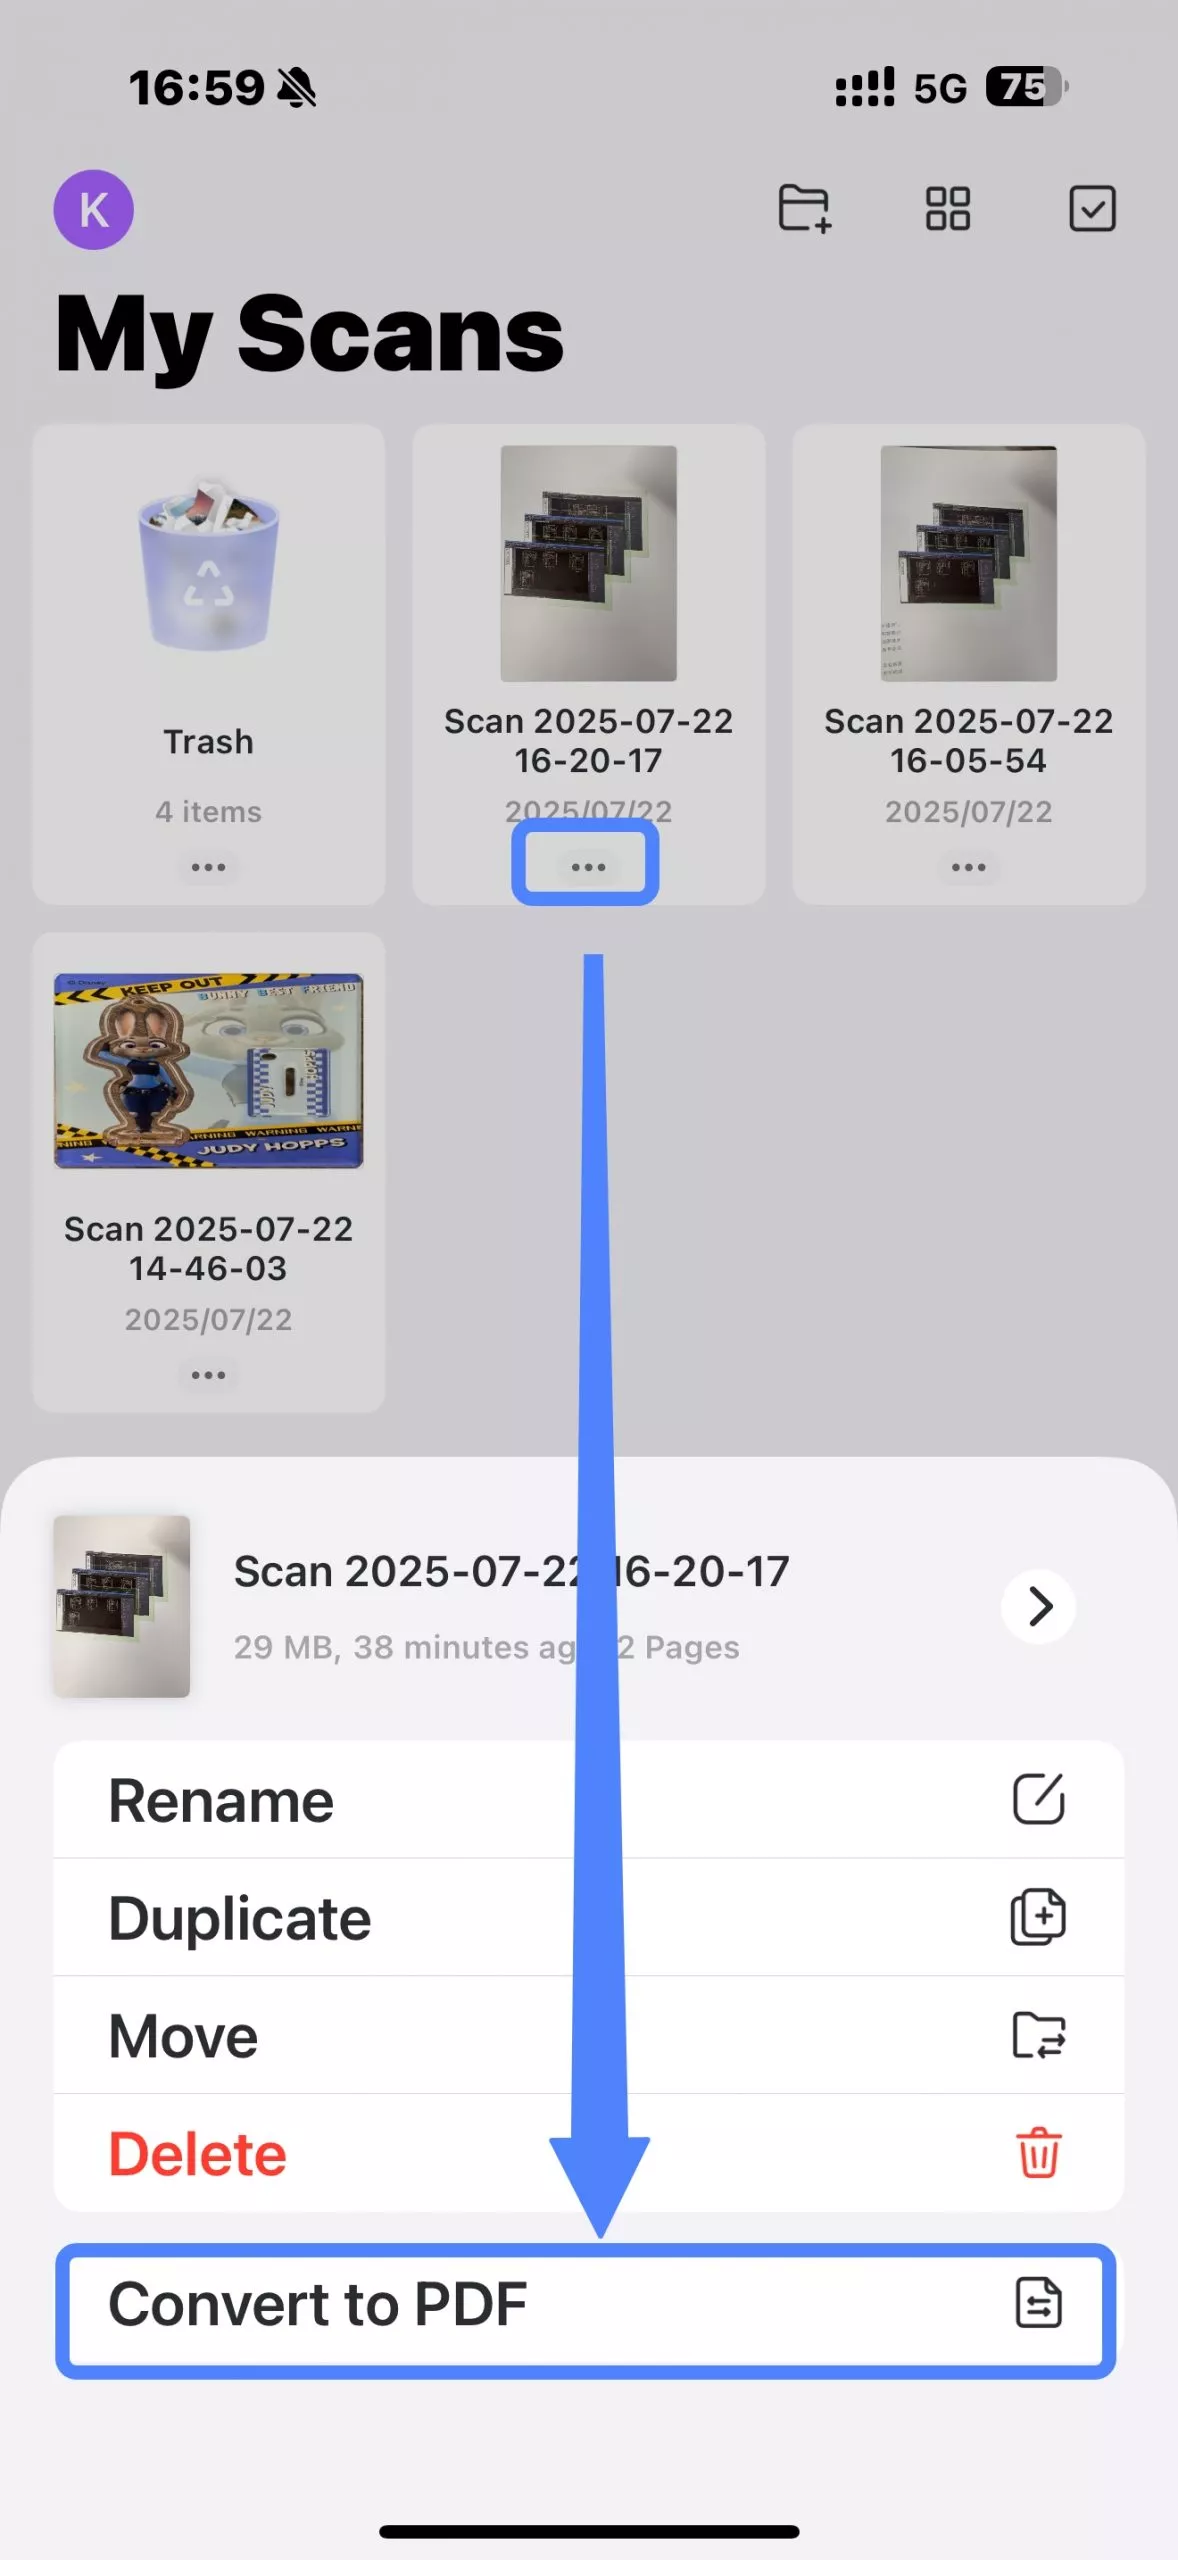
Step 6. UPDF will return you to the scanner tab interface. Click on the three dots next to your file and select "Convert to PDF." Your newly created PDF will be accessible in the "Files" tab.
For those who want to know how to scan both sides of your ID or identity card in one page, you may proceed with the same steps after choosing "ID" mode instead of "Document".
Also Read: How to Scan ID Card to PDF (Step by Step)
Notes:
Now, let's proceed to the second method.
Method 2. Select from the Gallery App
Step 1. Tap the "Gallery" icon in the bottom-left corner under the "Document" mode.
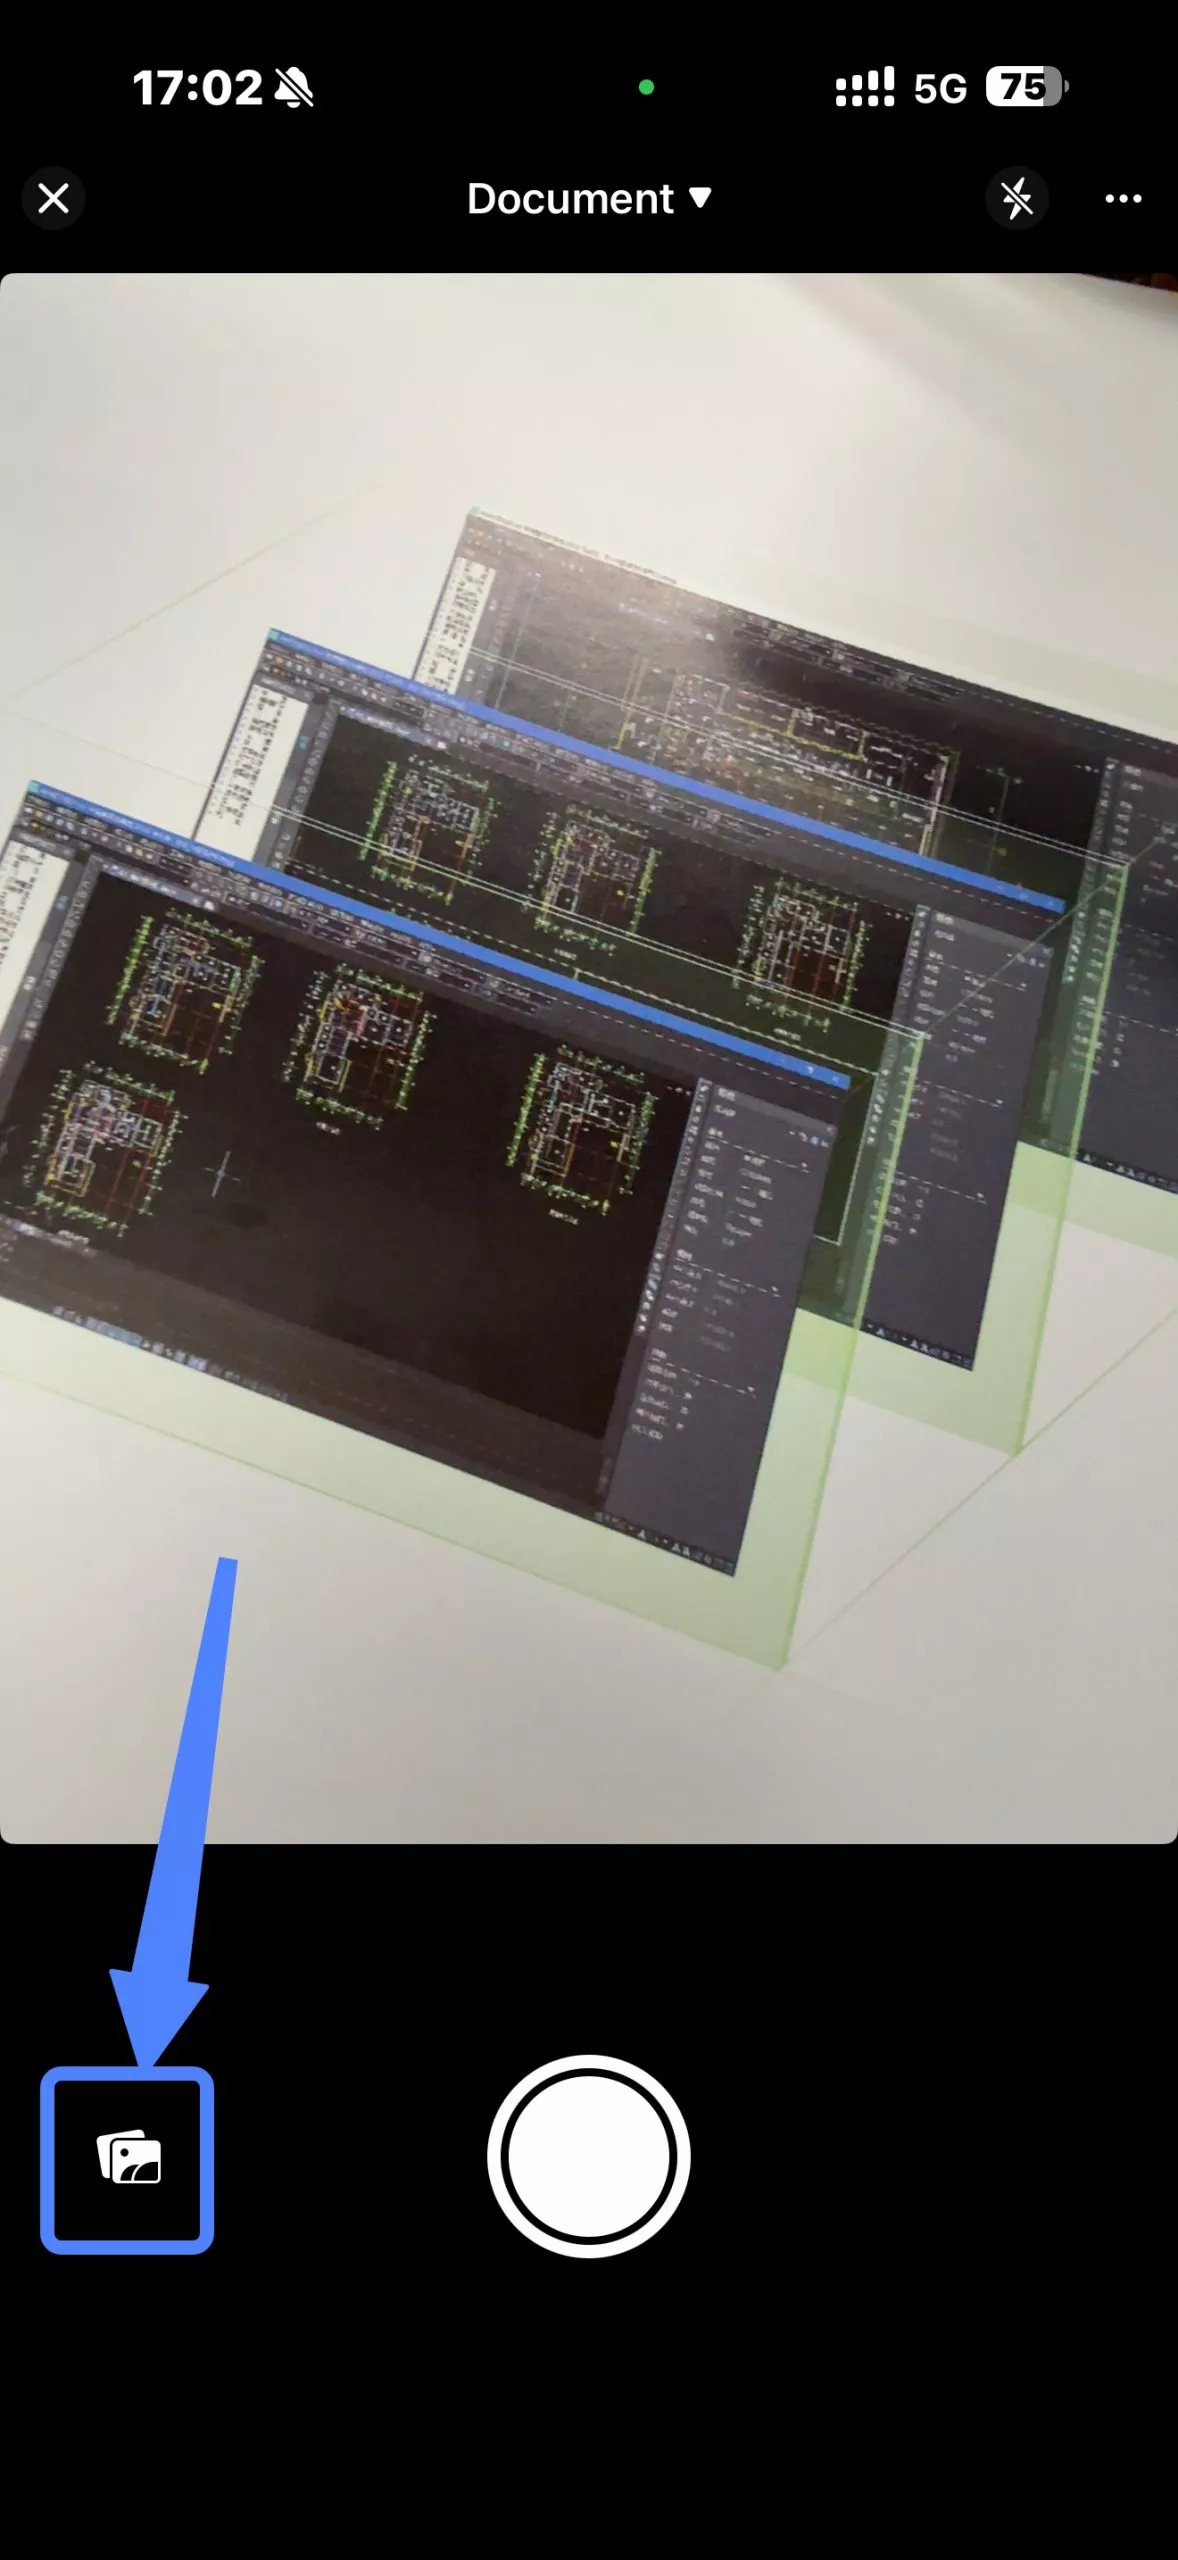
Step 2. Select the images of both sides of your document from your Photos or Albums section and tap "Add" on the top-right to import to UPDF.
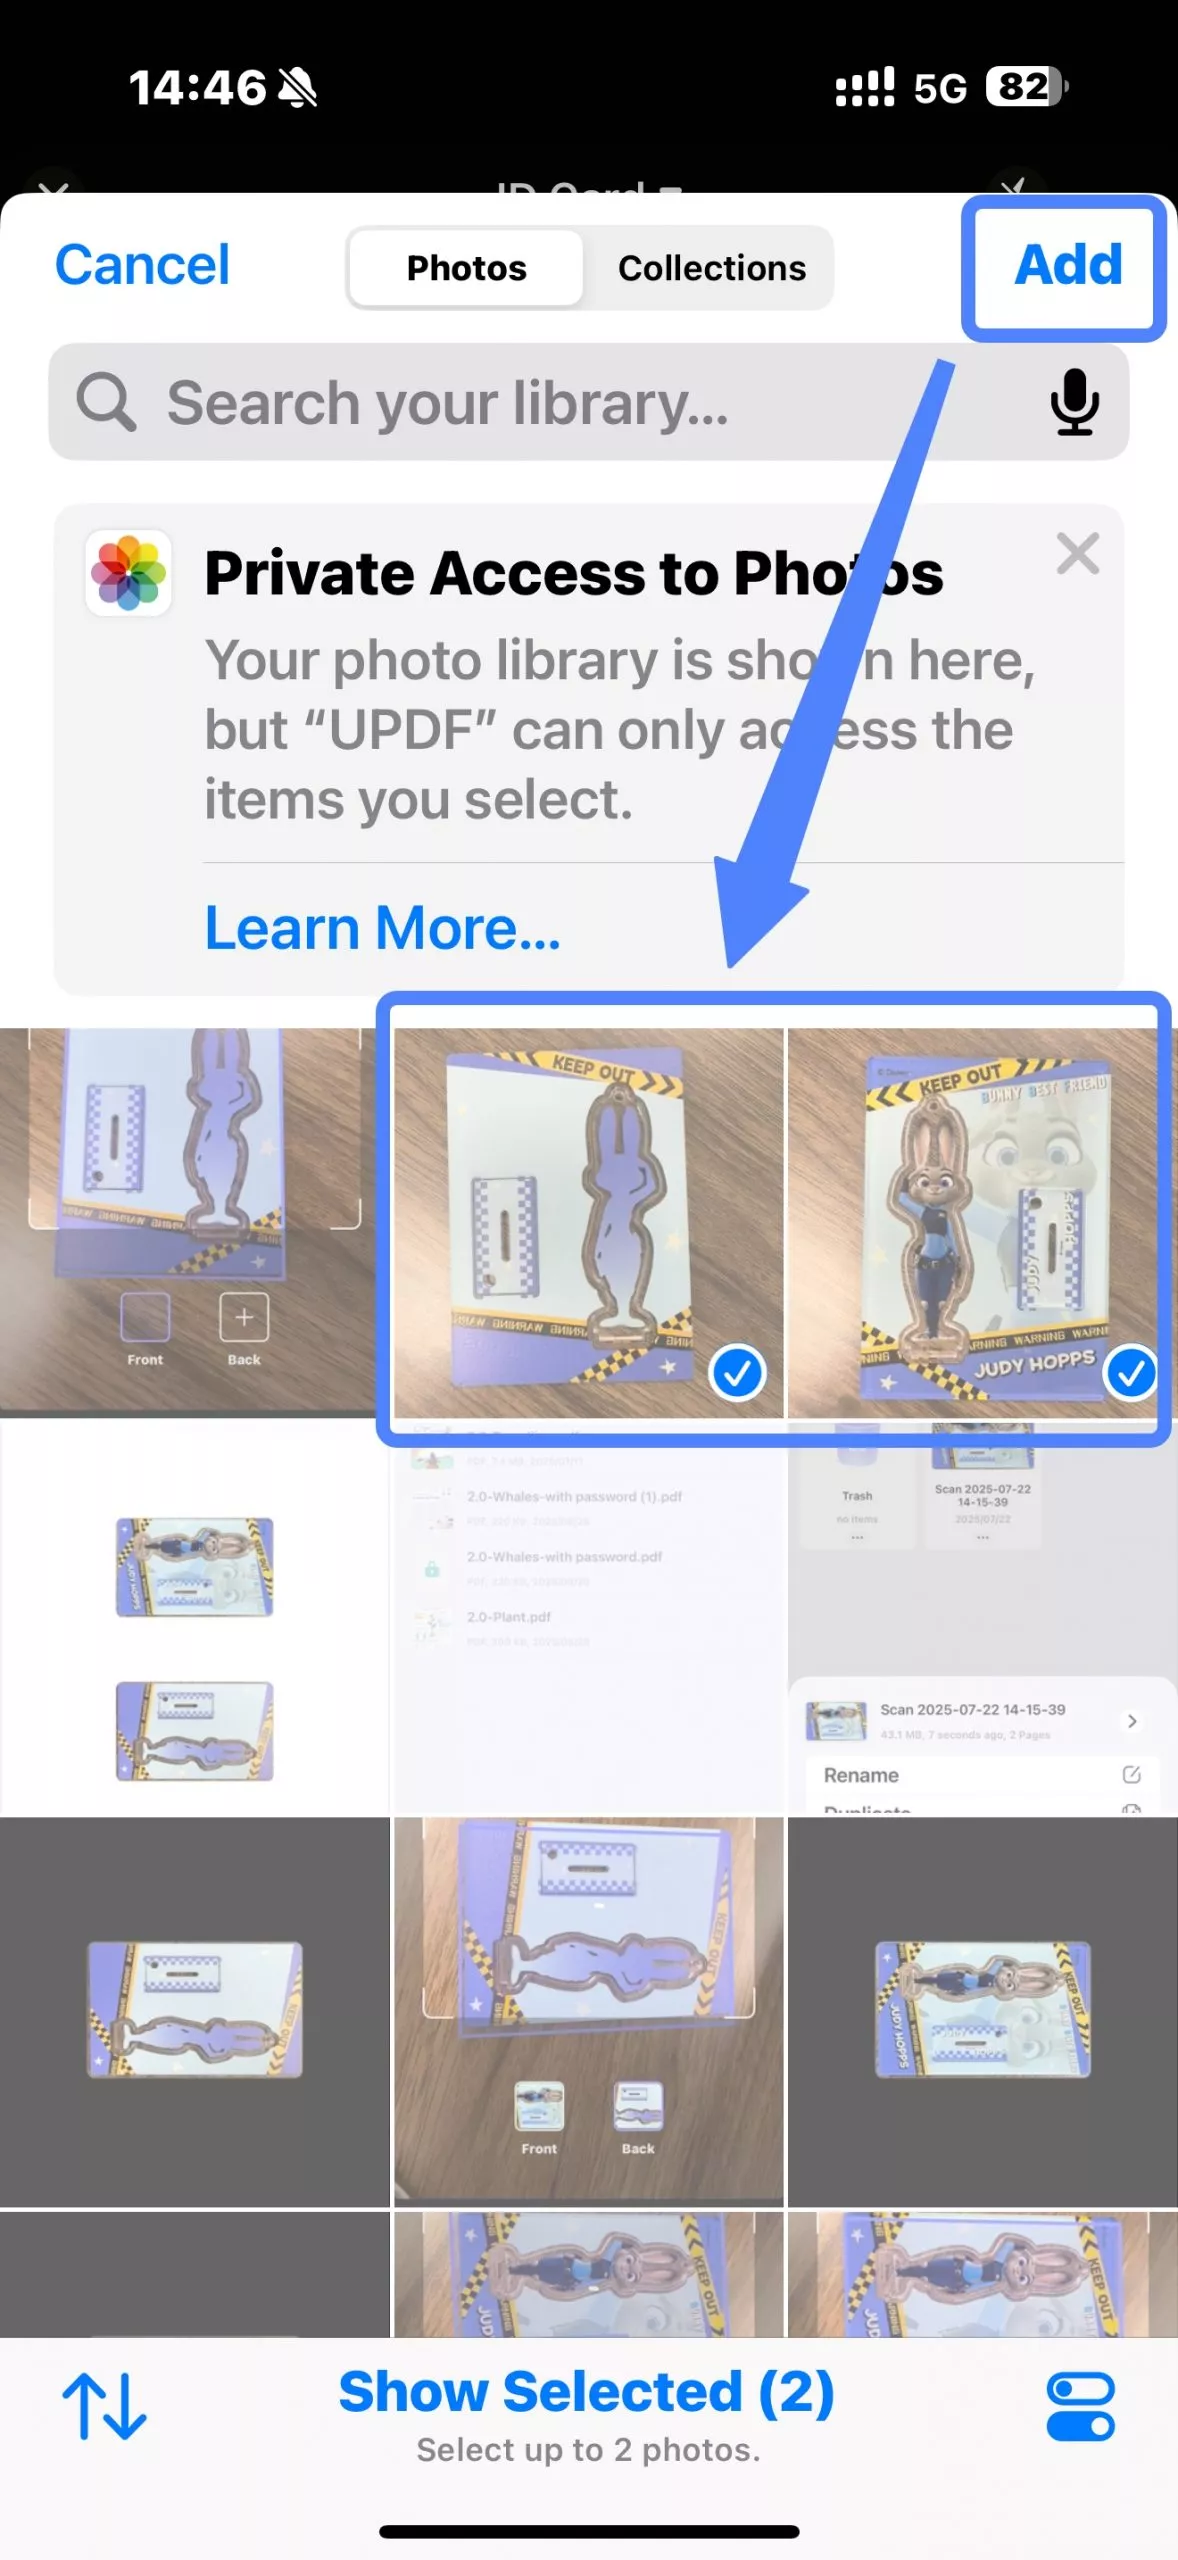
Step 3. If happy with choices, proceed to tap the arrows showing the number of active scans.
Step 4. You are now brought to the same screen mentioned in method 1, where you can now rotate or crop the image, add a filter, delete the scan, and add more images or scans.
Step 5. Finally, click "Save" to keep your document. You will be brought to the same home screen, and from there you can pick your recent scan, press the three dots and choose "Convert to PDF".

While you're here, you might be wondering if it's possible to print these PDFs from your iOS device. The answer is yes! To print just follow these simple steps below:
Step 1. Download and install the UPDF app on your device. Open the app and open the PDF file you wish to print.
Windows • macOS • iOS • Android 100% secure
Step 2. Click on the drop-down arrow on the top left corner and tap "Print".
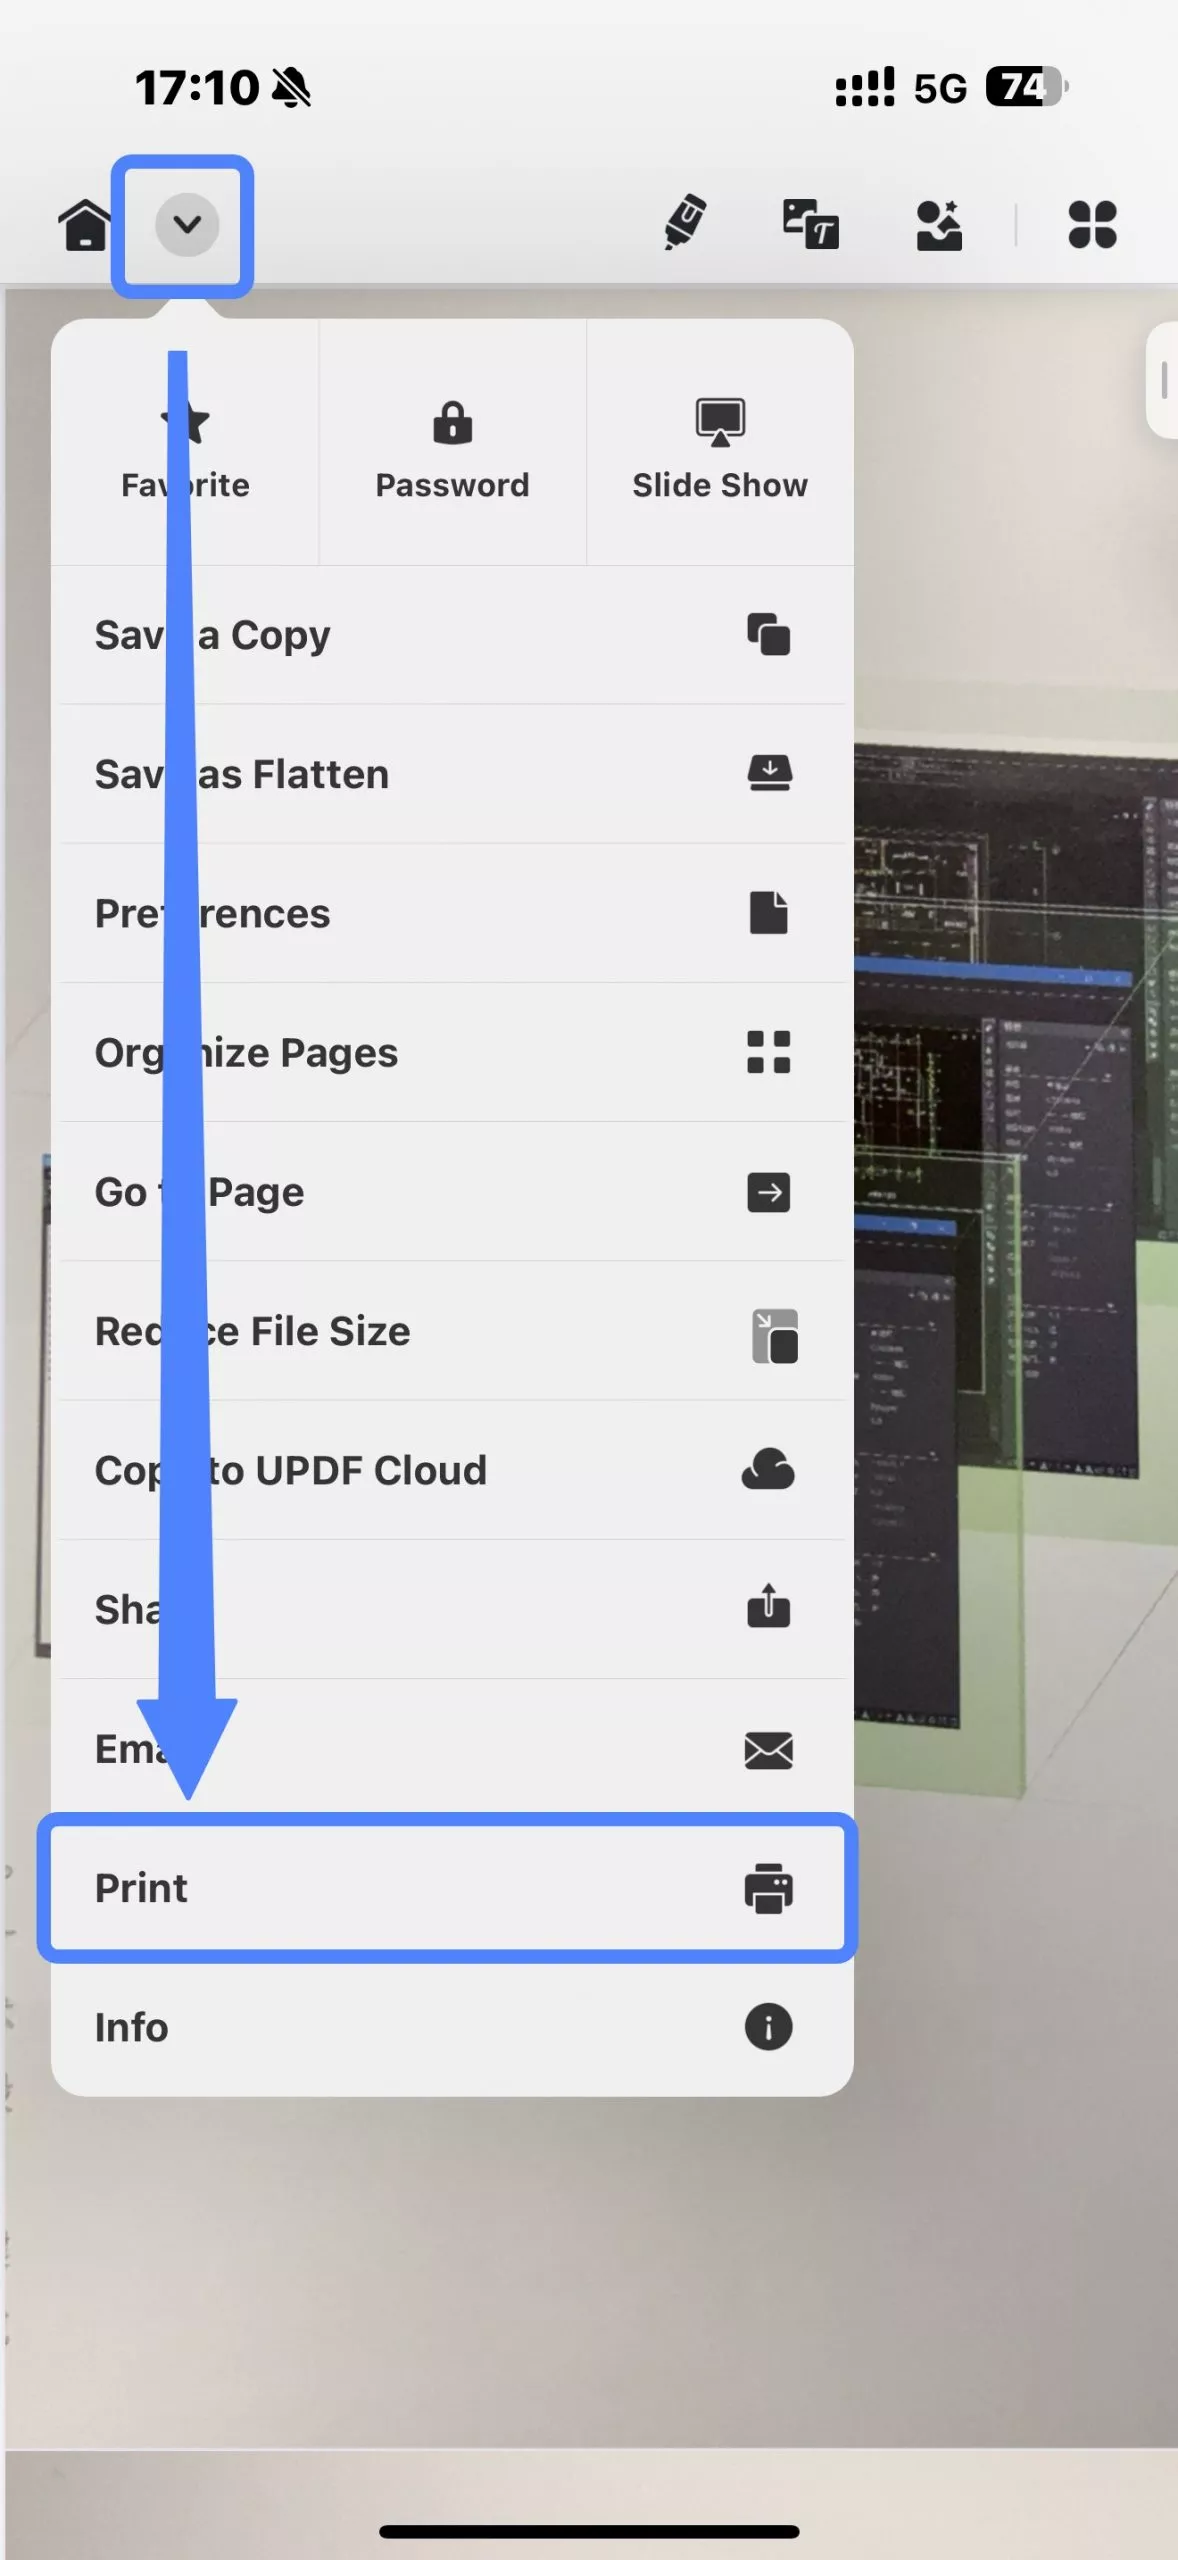
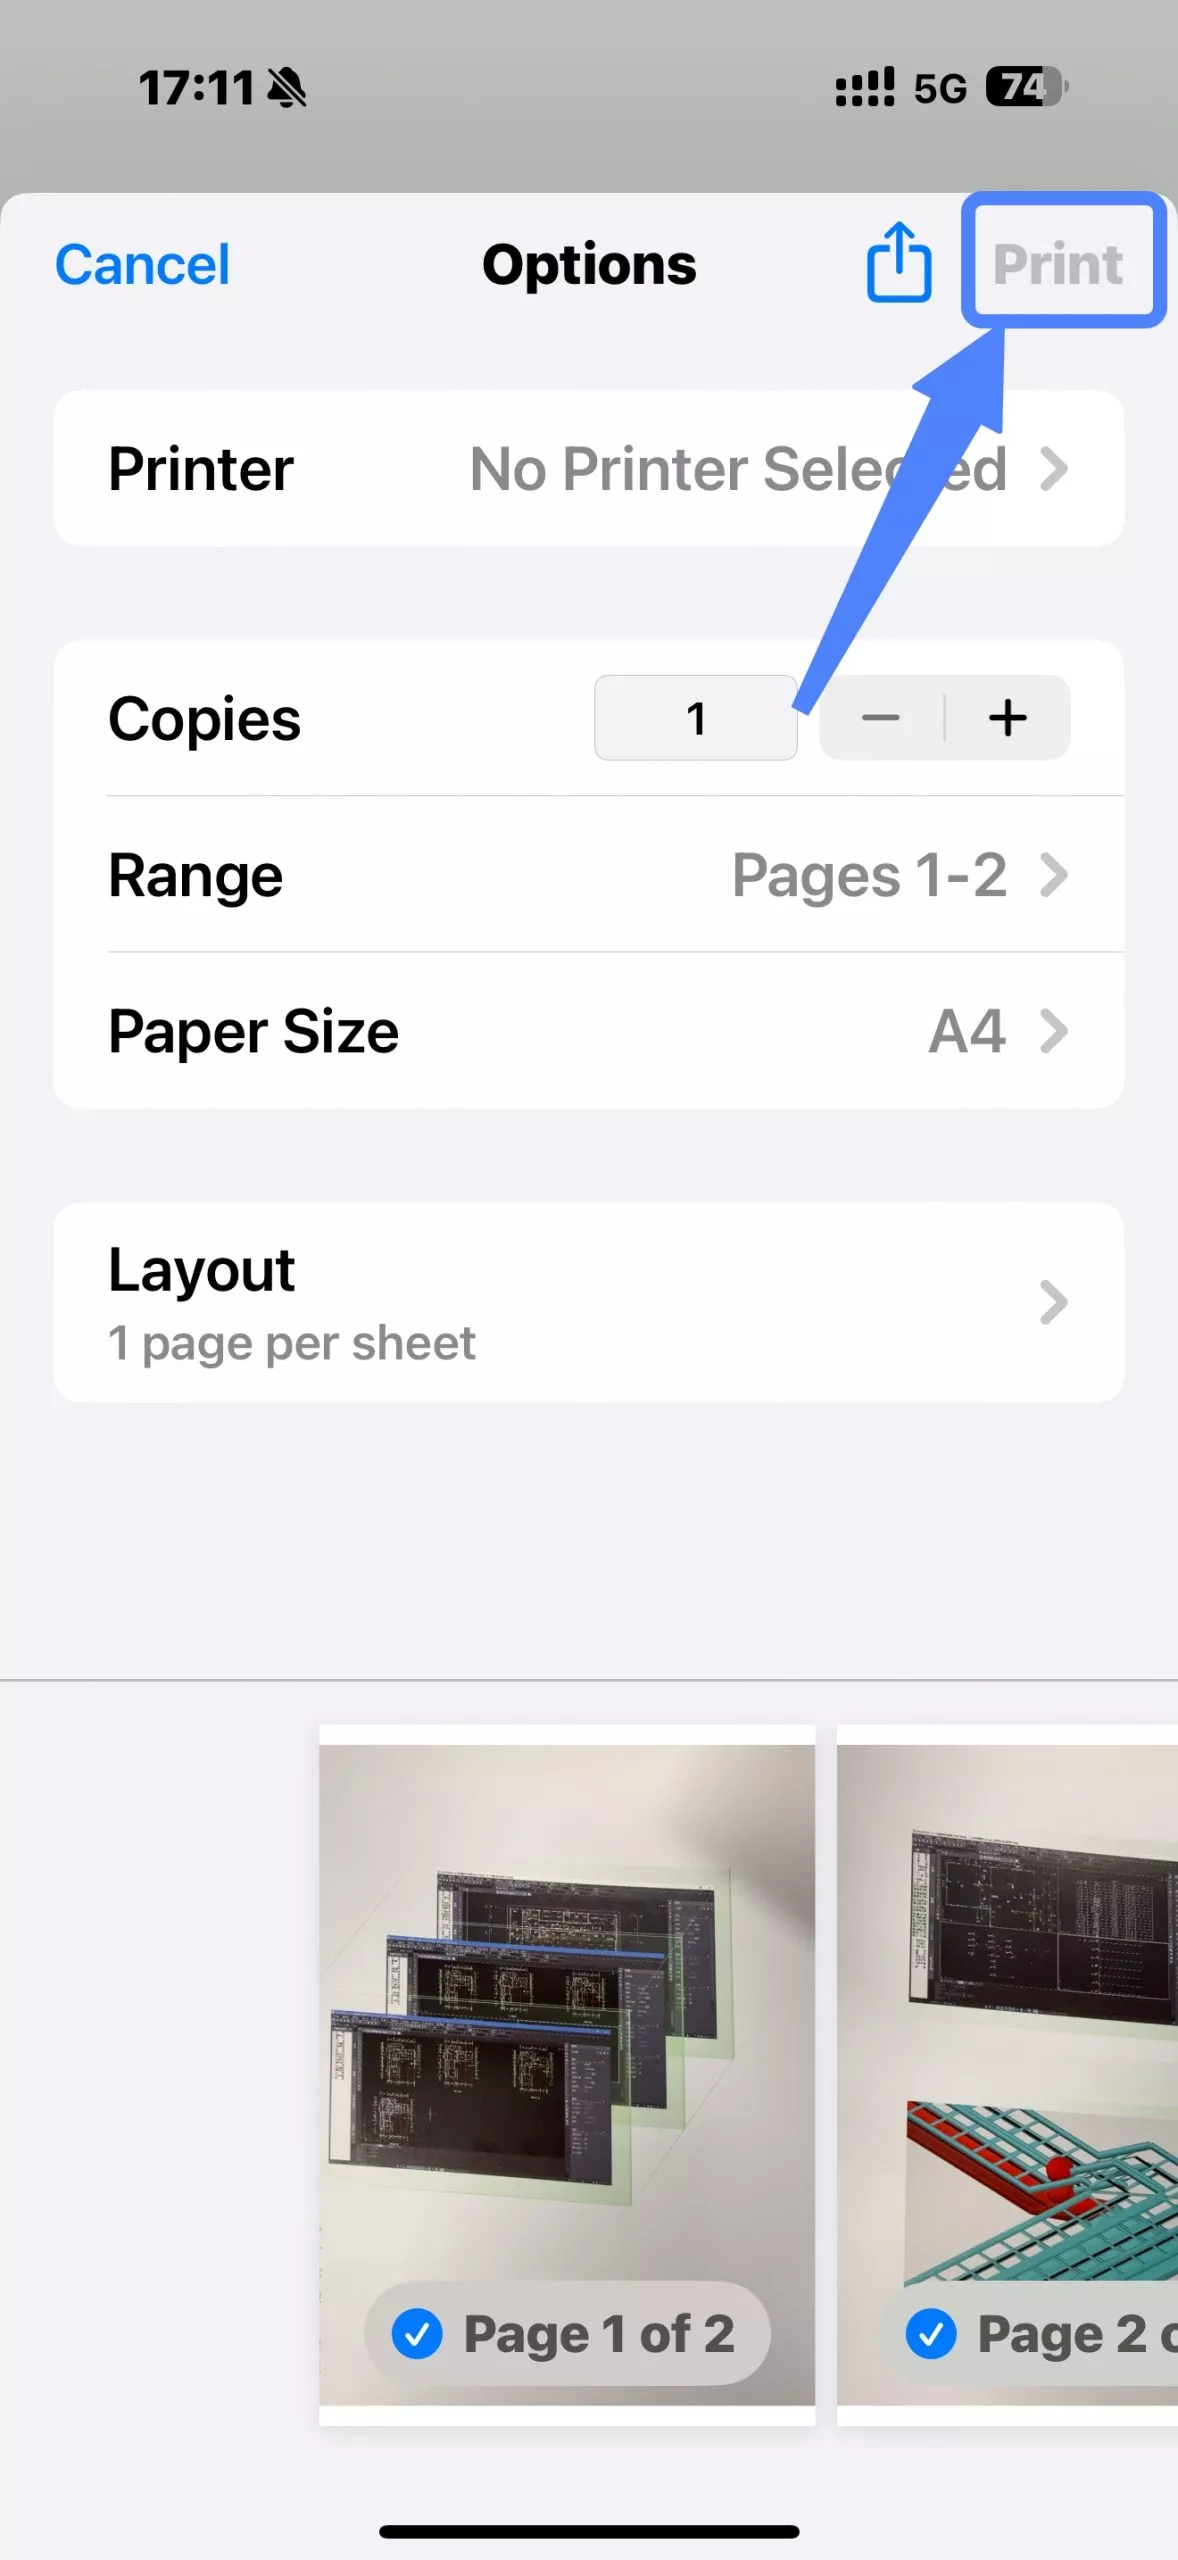
Step 3. In the printer setting window, select the printer you want to use.
Step 4. Adjust the remaining printing settings, such as the number of copies, paper type, layout, and pages. Once everything is set, tap the "Print" button to start printing your PDF immediately.
It's as simple as that! Whether you need to know how to scan all sides of your document or print them from the luxury of your iOS device, you should be all set now. Don't rush off just yet though, let's take a look at a few frequently asked questions in the next part.
Part 3. Extended Reading
How Can I Save PDFs for Easy Access Across Devices?
When working with scanned documents, it can be challenging to extract and edit text. Thankfully, UPDF offers a solution with its advanced Optical Character Recognition (OCR) feature. This tool allows users to convert scanned documents into searchable and editable formats, making it easier to manage and modify content. Available for download on both Windows and Mac desktop applications, the OCR feature can be accessed by following these simple steps:
- Download the UPDF Desktop App from the official website.
Windows • macOS • iOS • Android 100% secure
- Open the scanned document in UPDF.
- Click on the "OCR" button in "Tools".
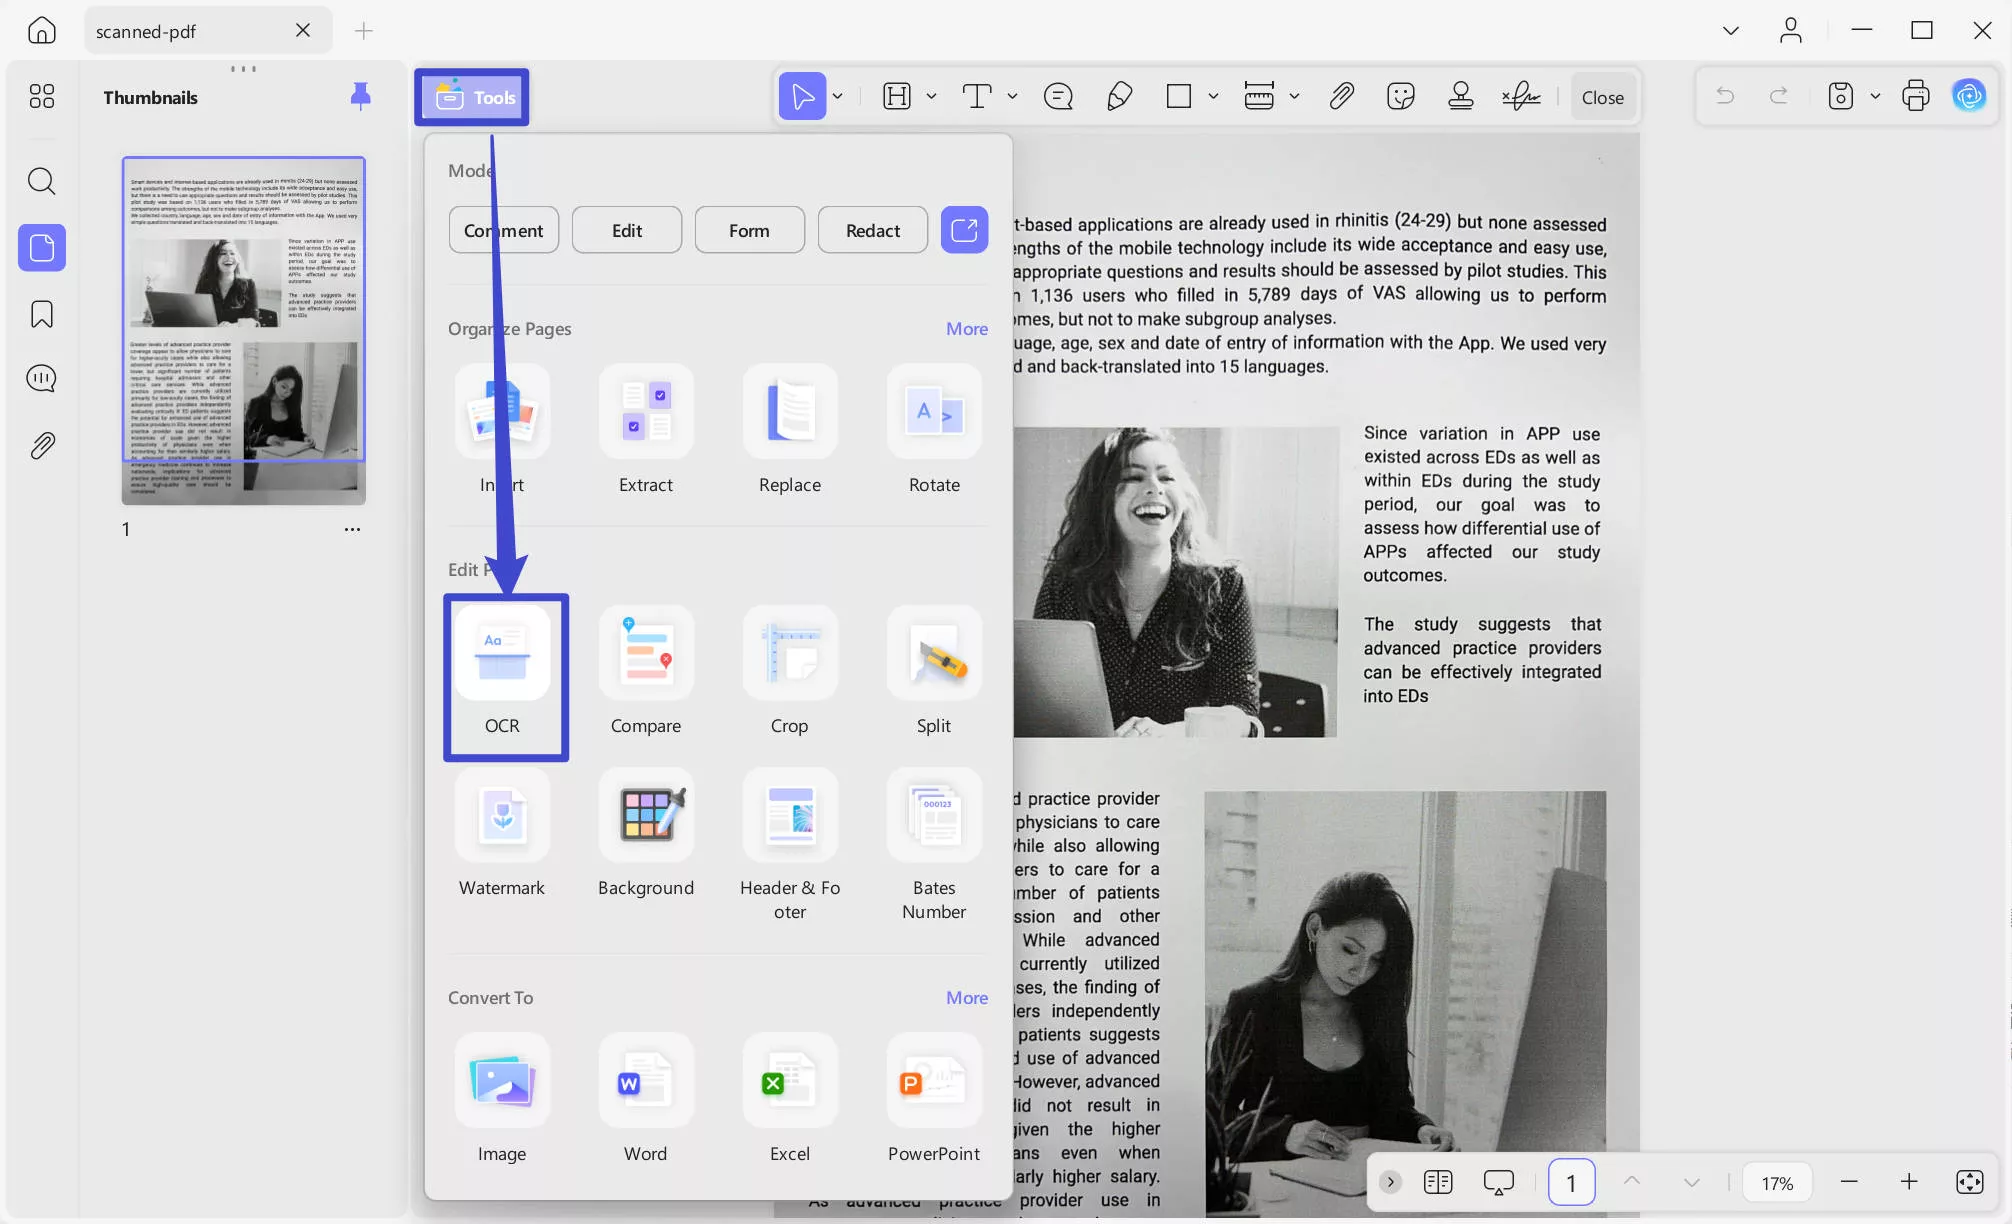
- Choose your document type, preferred document language and resolution for optimal performance.
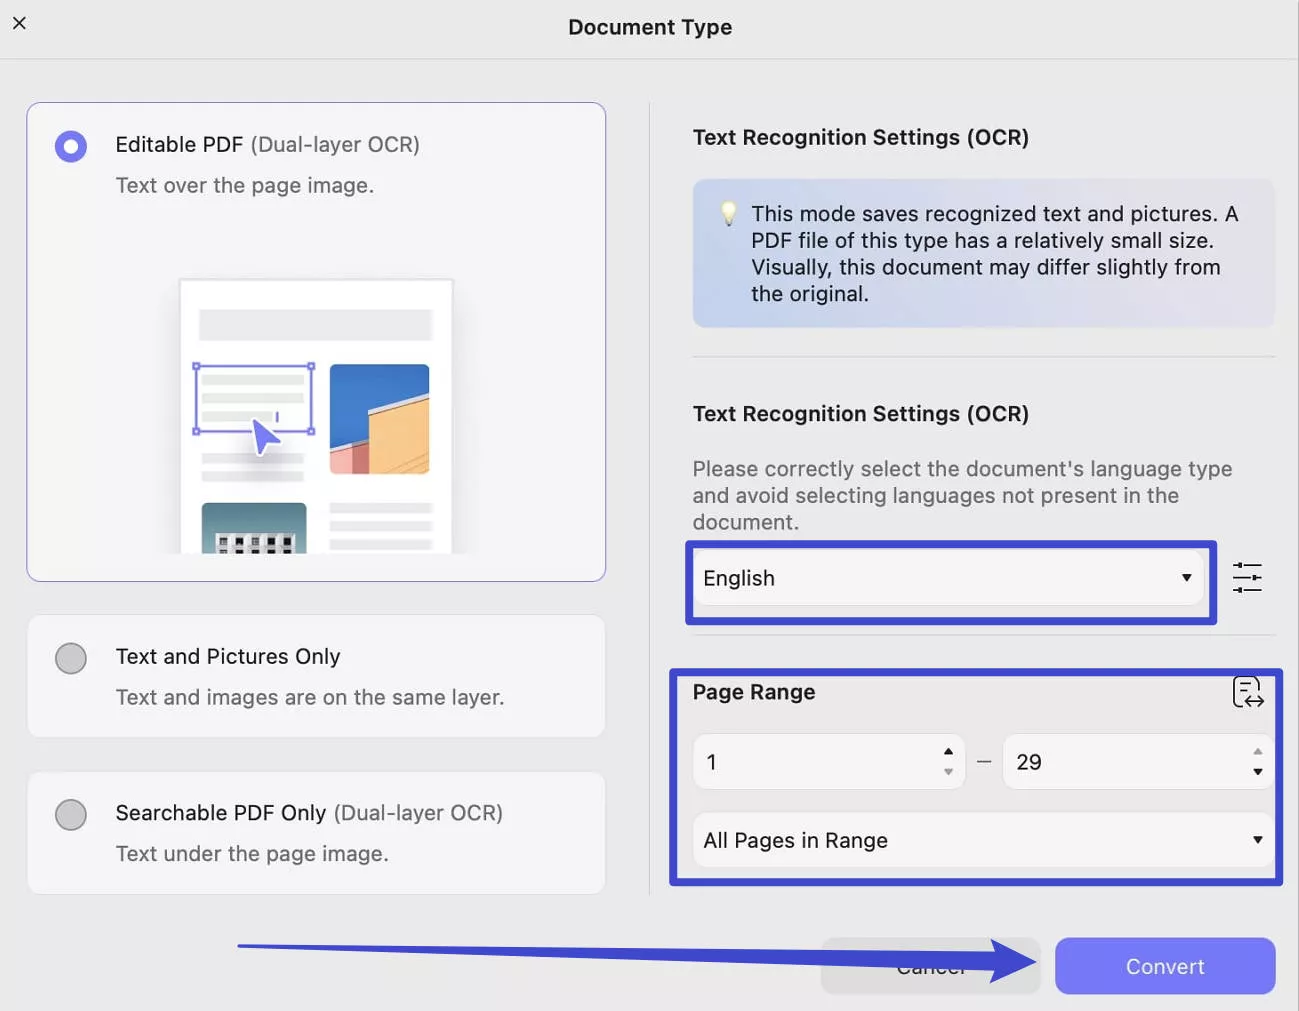
- Click "Convert" to initiate the text recognition process.
- Once completed, your documents become editable and searchable, hence improving accessibility.
How Can I Make Scanned Documents Searchable and Editable?
With the increasing need to access documents across multiple devices and platforms, it's essential to save your PDF files in a way that ensures easy and seamless access. UPDF simplifies this process with its Cloud feature, enabling users to save and sync documents efficiently. By creating an account and following the straightforward instructions within the app, you can effortlessly access your files from any device.
How Can I Sign on the Scanned Document Effortlessly?
For signing scanned documents like PDF, UPDF includes a dedicated Sign feature available in both desktop and mobile applications. For phone users, you can follow these steps in the app:
- Open the scanned document in UPDF.
- Select the "third" option available in the top-right tools menu. From the extended menu, select "Signature".
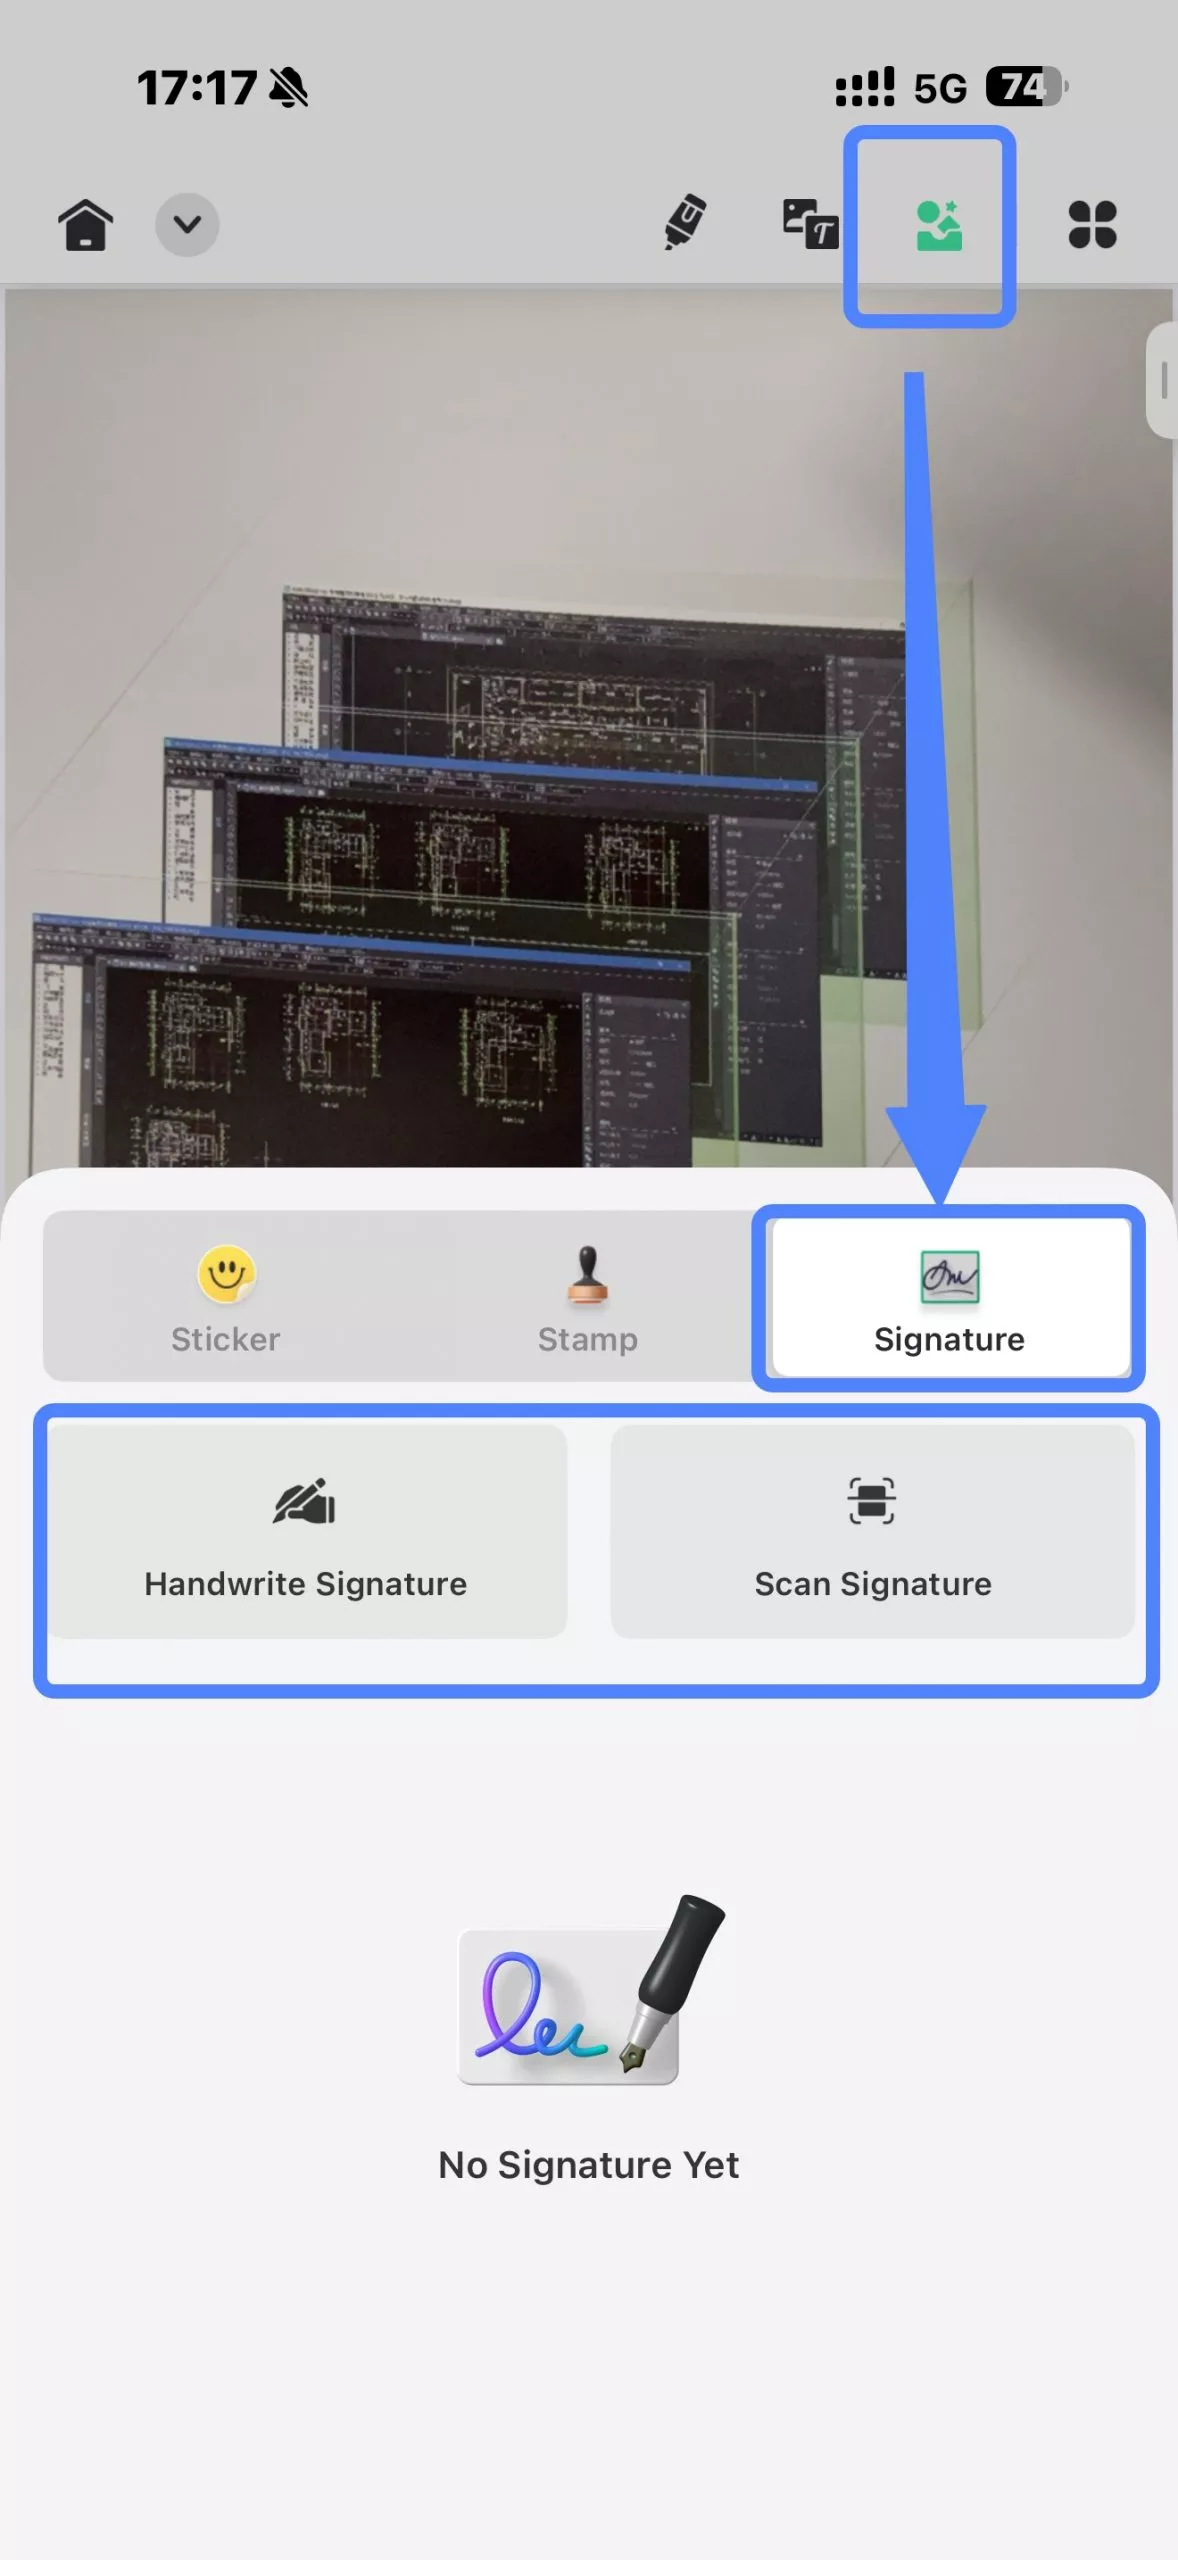
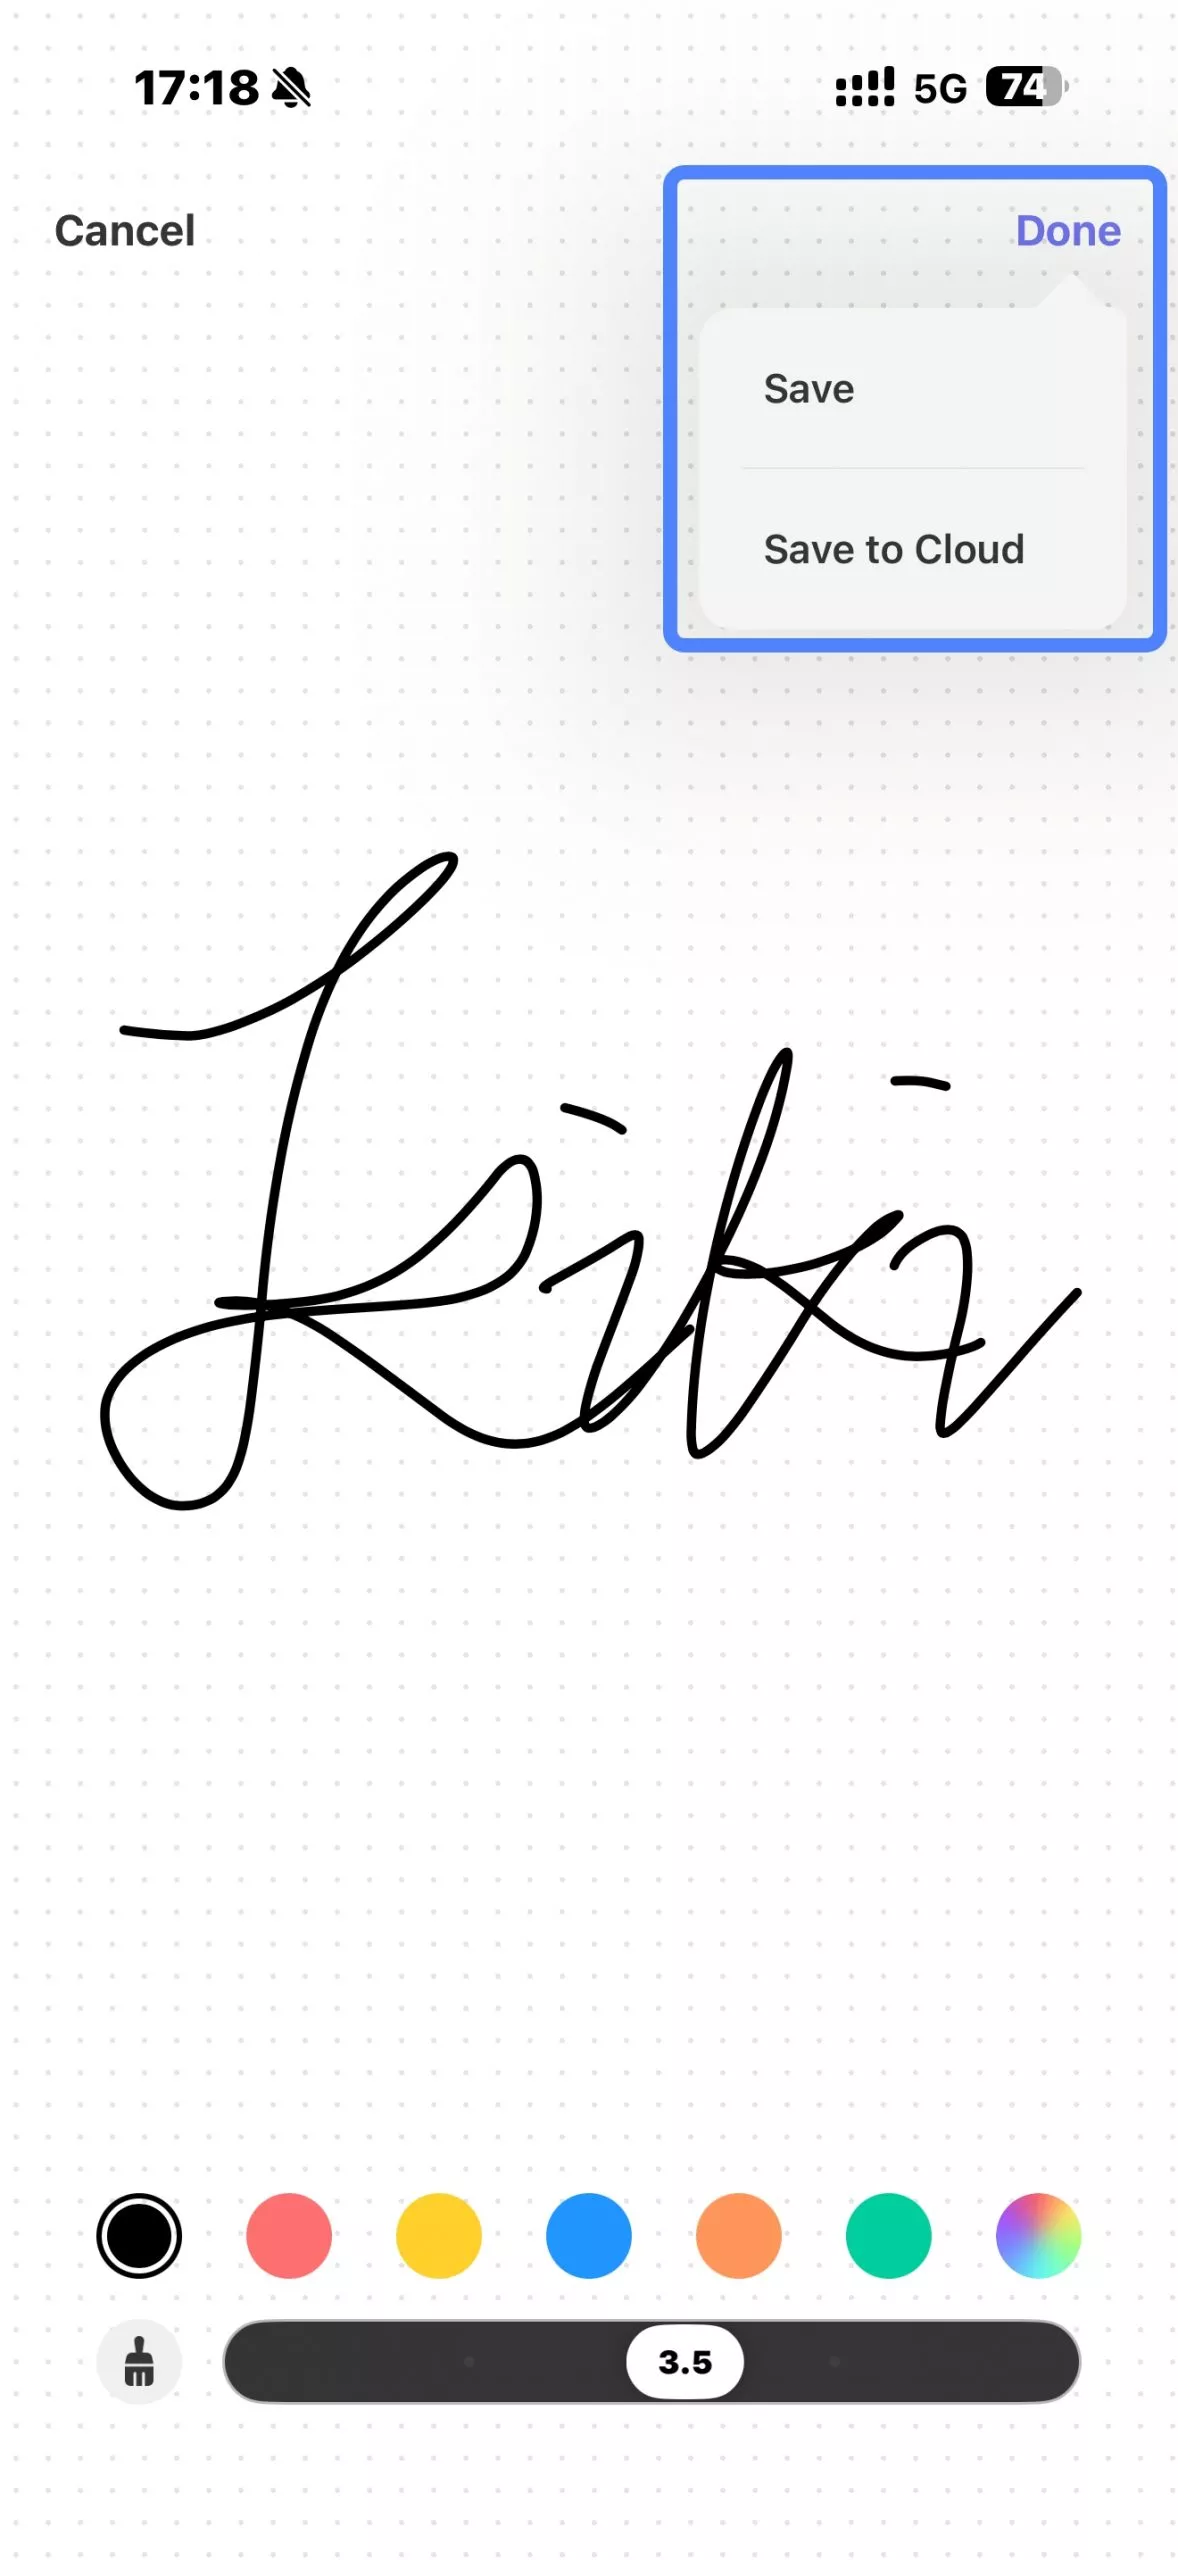
- Add Your Signature: You can either draw a signature or scan an image of your signature. If you choose "Handwrite Signature", you can draw on the pop-up window. Click "Done" to save and add your signature.
- Position the Signature: Once you're happy with your signature and have it saved, drag it to the desired location on the document.
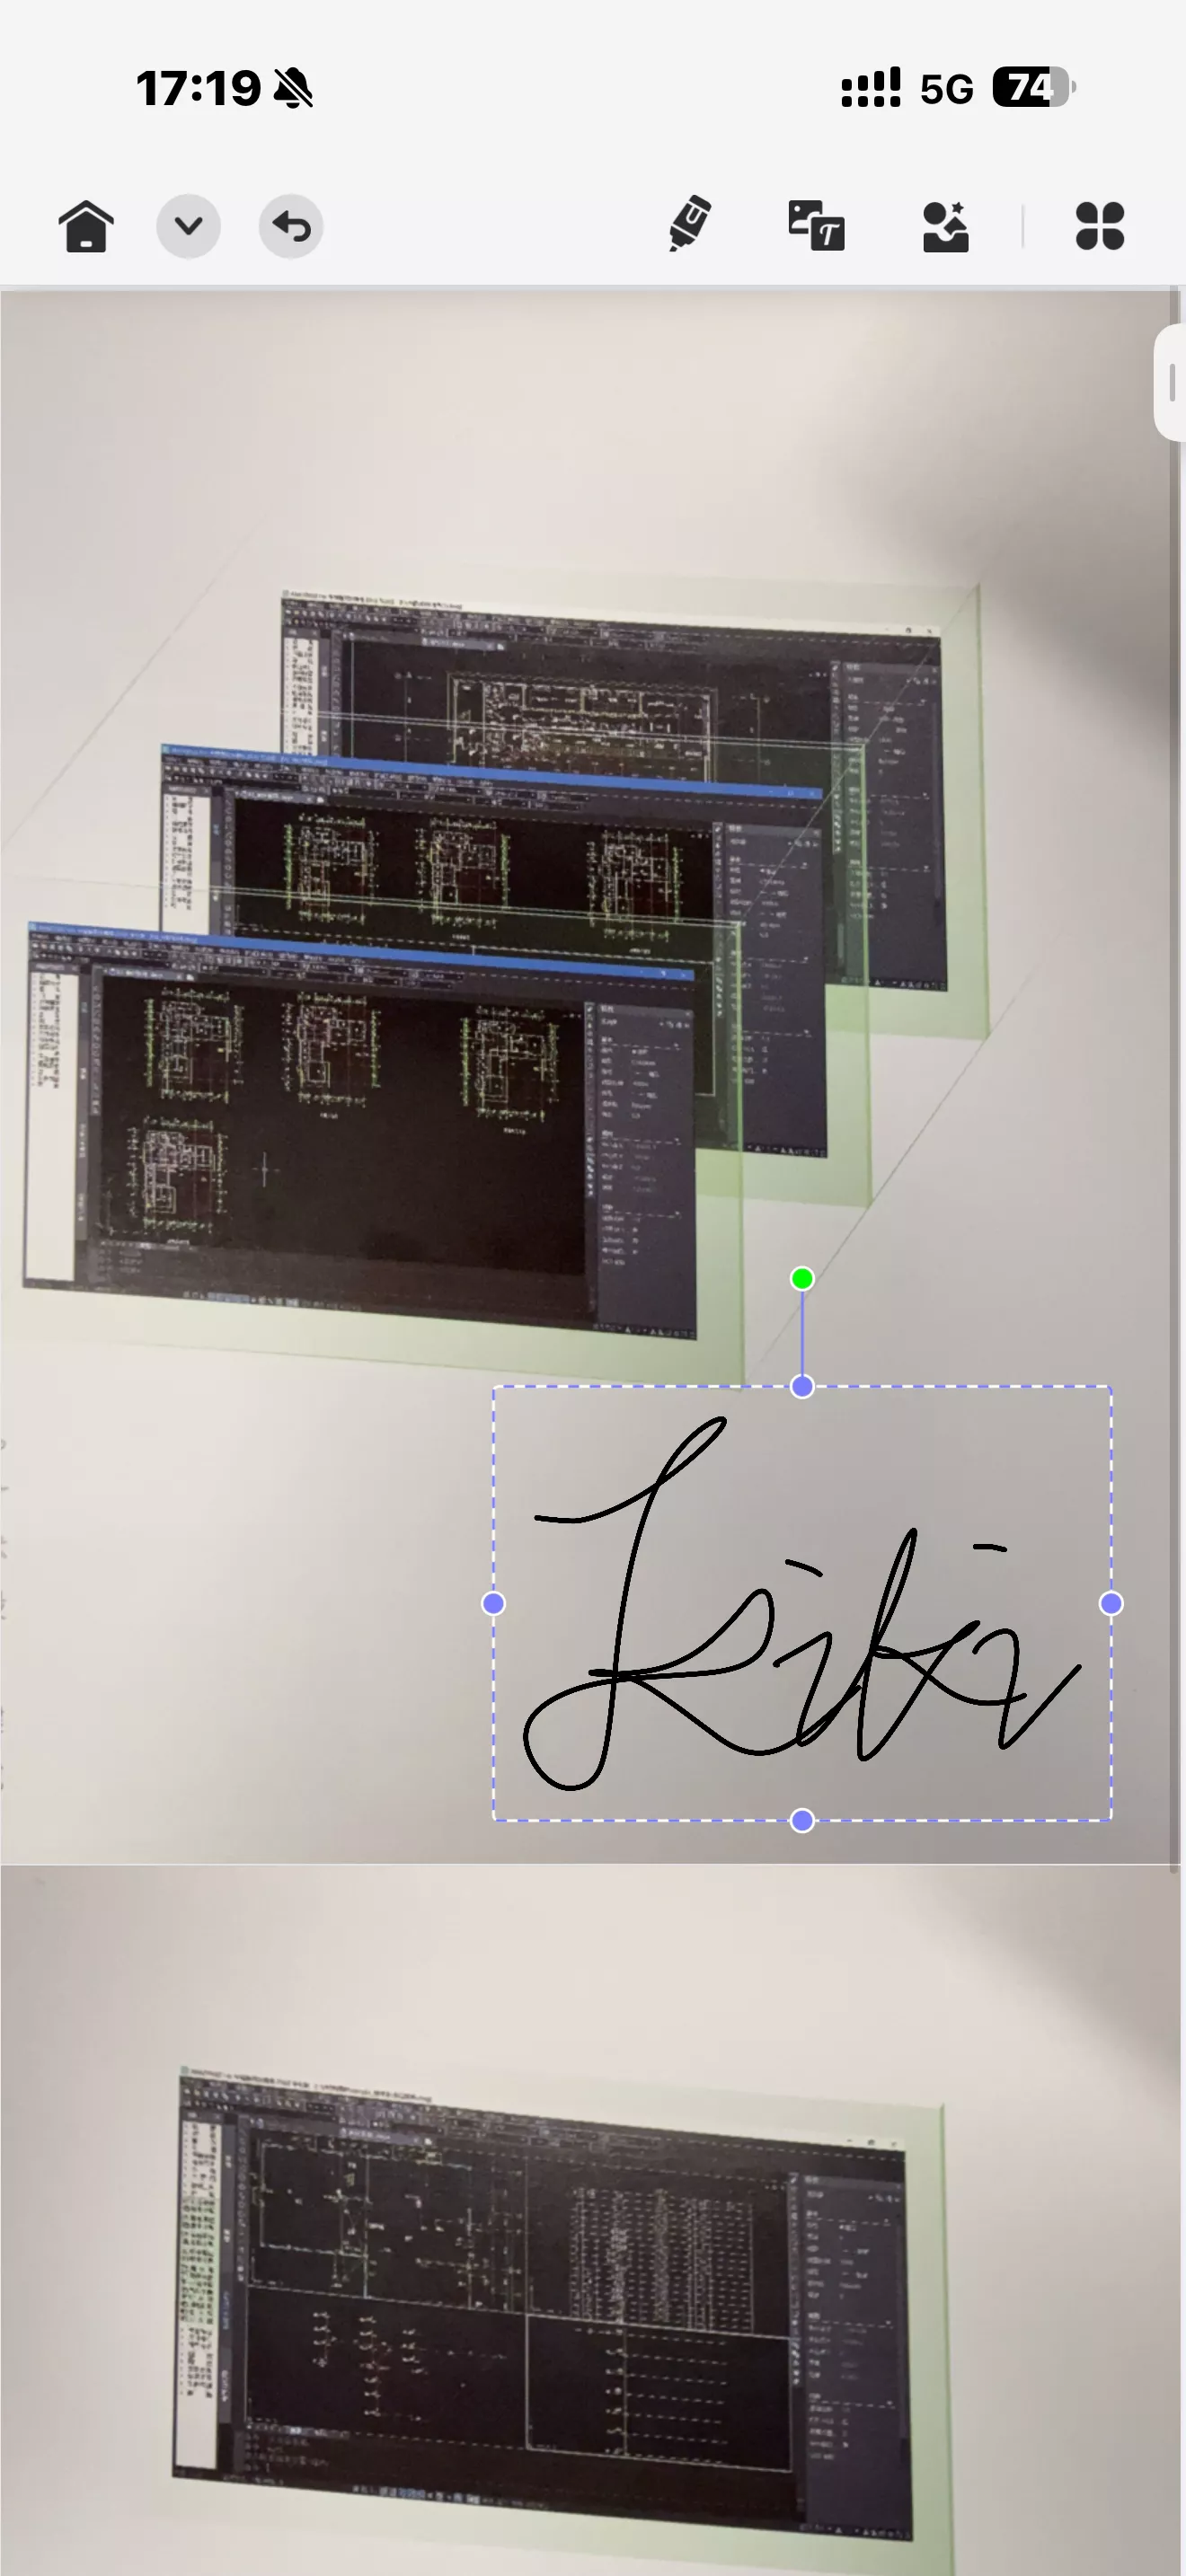
- Save the Document: Once signed, save the changes for future reference.
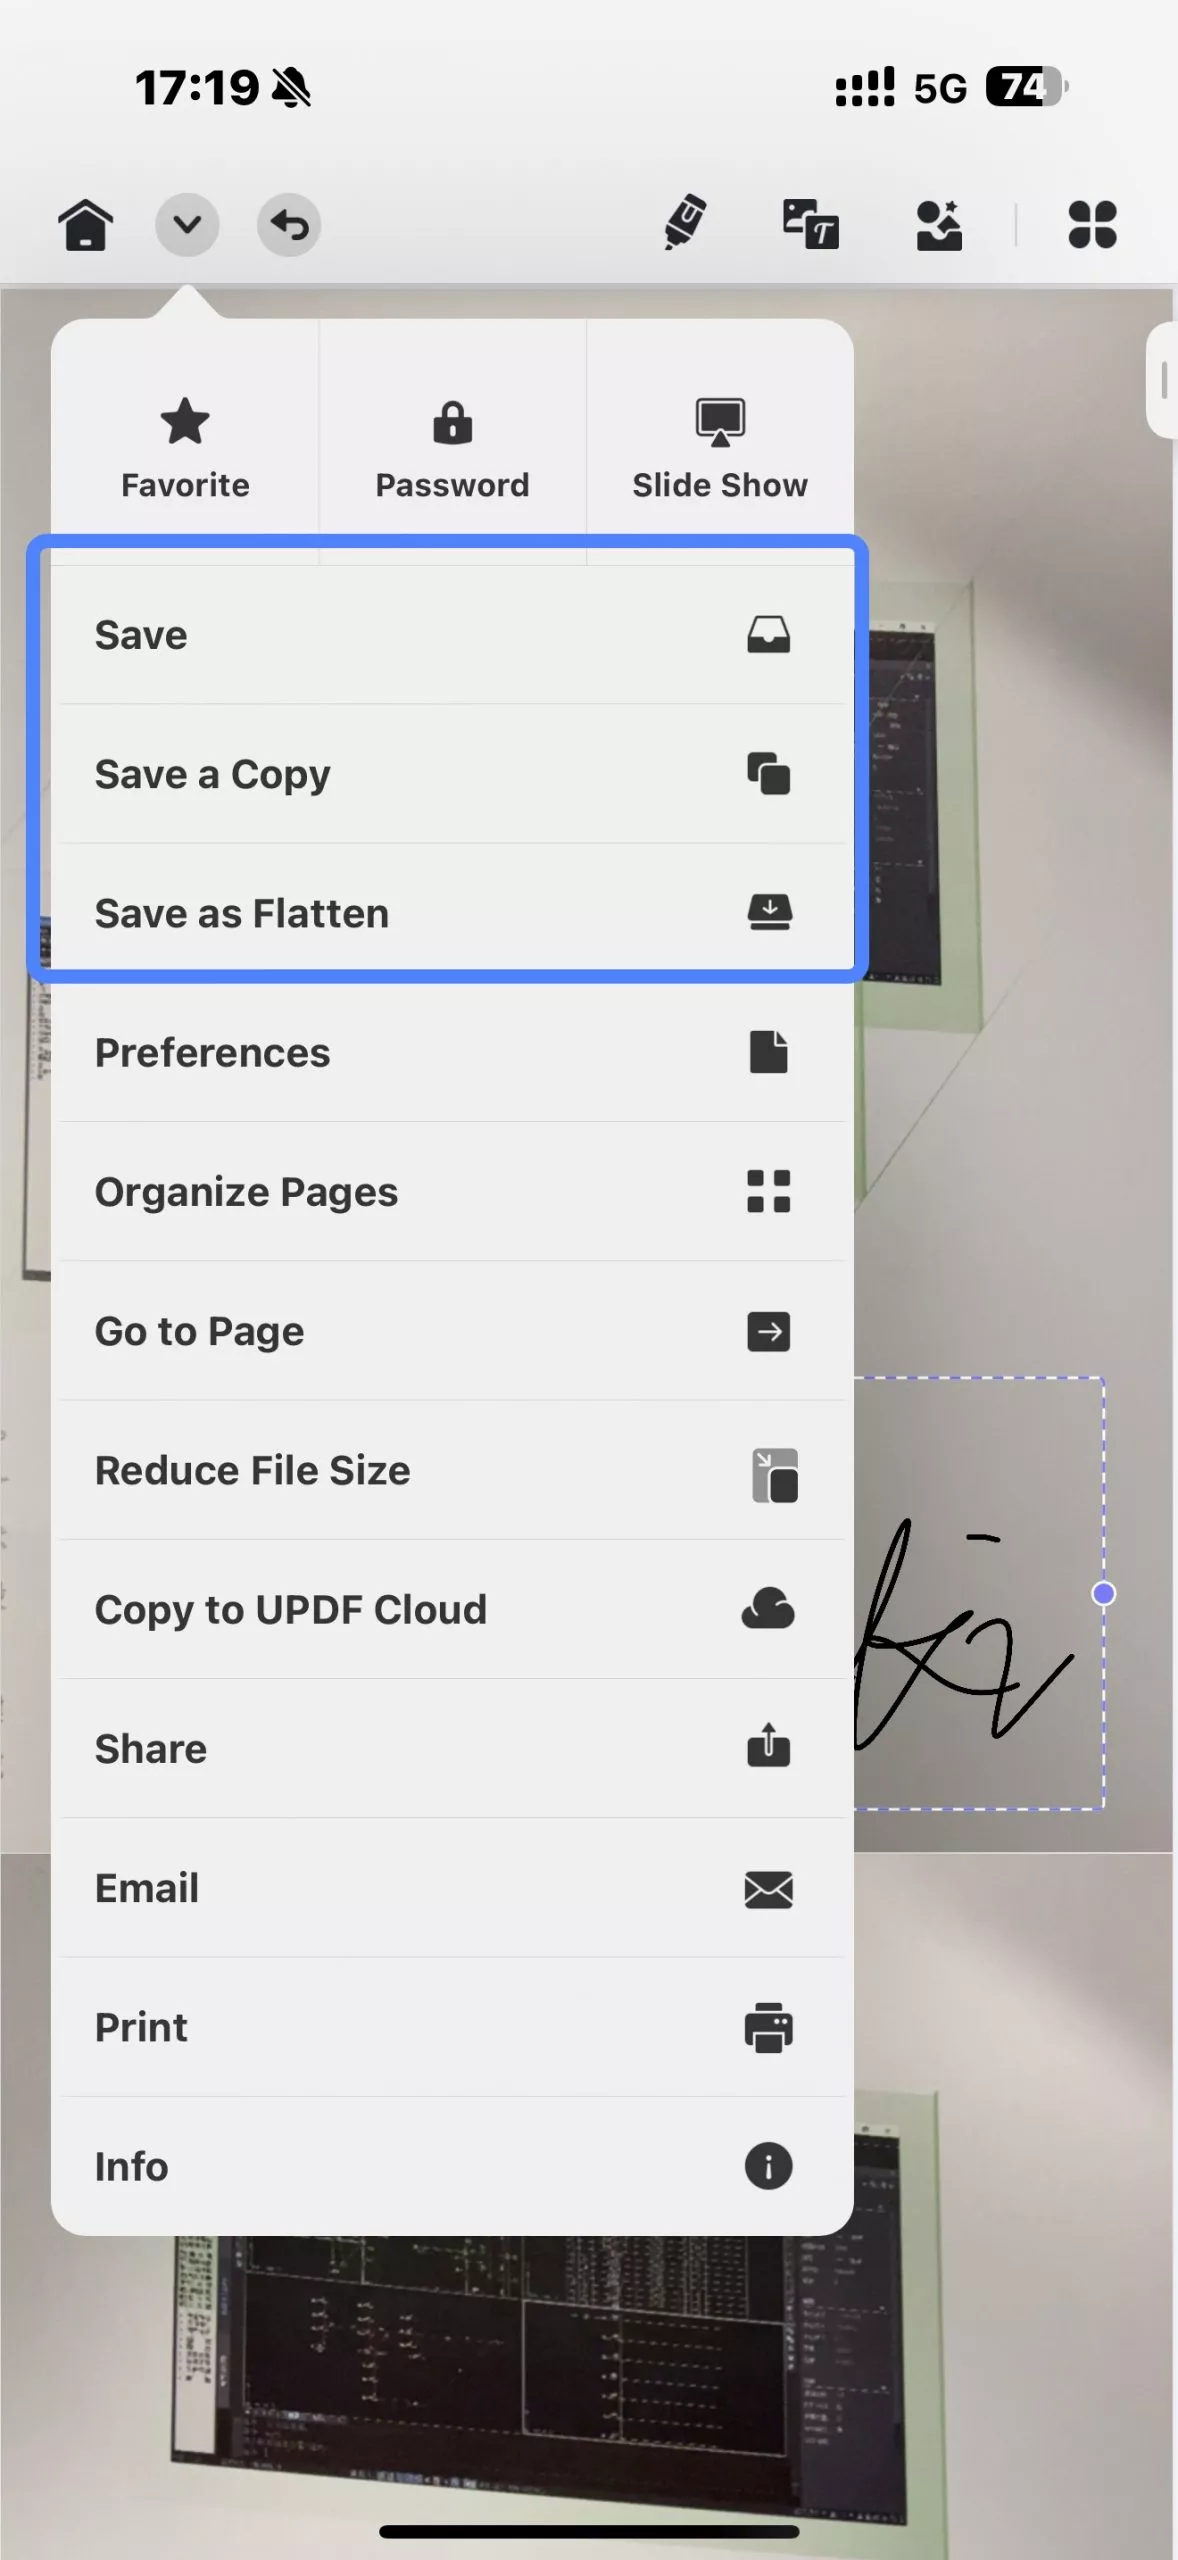
This signing feature streamlines the process, making it quick and efficient to sign important documents!
Wrapping Up
As you can see, scanning both sides of a document into a PDF has never been easier. Whether you're using a duplex scanner for traditional efficiency or opting for the modern convenience of the UPDF app, you now have the tools to handle all your document scanning needs with ease.
So why not take the next step toward a paperless future? With just a few taps and clicks, you can transform how you manage your documents, ensuring that everything is neatly organized and accessible right at your fingertips. Whether you're archiving important files, needing to send an ID, or just decluttering your workspace, these methods offer a seamless, hassle-free solution.
Don't let those stacks of paper pile up any longer—embrace the power of digital documentation today! Your desk (and your peace of mind) will thank you. And remember, with UPDF, you're not just scanning; you're elevating your entire workflow. Ready to get started? Your journey to a more organized life begins now!
Windows • macOS • iOS • Android 100% secure
 UPDF
UPDF
 UPDF for Windows
 UPDF for Mac
 UPDF for iPhone/iPad
 UPDF for Android
 UPDF AI Online
 UPDF Sign
 Edit PDF
 Annotate PDF
 Create PDF
 PDF Form
 Edit links
 Convert PDF
 OCR
OCR PDF to Word
 PDF to Image
 PDF to Excel
 Organize PDF
 Merge PDF
 Split PDF
 Crop PDF
 Rotate PDF
 Protect PDF
 Sign PDF
 Redact PDF
 Sanitize PDF
 Remove Security
 Read PDF
 UPDF Cloud
 Compress PDF
 Print PDF
 Batch Process
 About UPDF AI
 UPDF AI Solutions
 AI User Guide
 FAQ about UPDF AI
 Summarize PDF
 Translate PDF
 Chat with PDF
 Chat with AI
 Chat with image
 PDF to Mind Map
 Explain PDF
 Scholar Research
 Paper Search
 AI Proofreader
 AI Writer
 AI Homework Helper
 AI Quiz Generator
 AI Math Solver
 PDF to Word
 PDF to Excel
 PDF to PowerPoint
 User Guide
 UPDF Tricks
 FAQs
FAQs UPDF Reviews
 Download Center
 Blog
Blog Newsroom
 Tech Spec
 Updates
 UPDF vs. Adobe Acrobat
 UPDF vs. Foxit
 UPDF vs. PDF Expert




 Enid Brown
 Enya Moore
 Enrica Taylor
 Enola Miller
 Enola Davis