Sometimes the file size of a Word document becomes too large and makes it challenging to store or share the document. Owing to that, many users intend to look for ways to reduce or compress Word document size without compromising the quality of the document. So, whether you are looking to save space or want to avoid time-consuming uploads and downloads, then this article is for you. Here we will discuss in detail 8 effective ways to compress Word file size, including the best way to reduce document size significantly with UPDF. So, let's begin the discussion.
Part 1. Why Compress Word Document Size?
Many reasons can increase the urge to compress the Word document size. Some of the key ones are as follows:
- Save storage space on your device.
- Quickly upload or download for convenient file sharing.
- Make the document accessible to the ones with limited data or slow internet.
- Streamline document management processes.
In short, different users can have different reasons behind the need to compress DOCX file size. Now let's shift our focus to 8 ways to compress Word file size.
Part 2. A Time-saving Way to Compress the Word Document Size Significantly
Before diving into the common methods to compress the Word document size, we’ll first list the best and the easiest way to do it. If you are looking for a significant reduction in size without compromising the document quality, then UPDF comes into action.
UPDF is a powerful PDF editor that serves as a one-stop tool to edit, annotate, convert, and organize PDF files. Other than being a top-notch PDF editor tool, it can also serve as an ideal tool to compress Word documents or reduce PPT file size. Basically, you can first convert the Word document into a PDF file optimized for minimum size and then further reduce the file size with UPDF intelligent approach.
Windows • macOS • iOS • Android 100% secure
Follow the below steps to learn how to compress Word document size with UPDF:
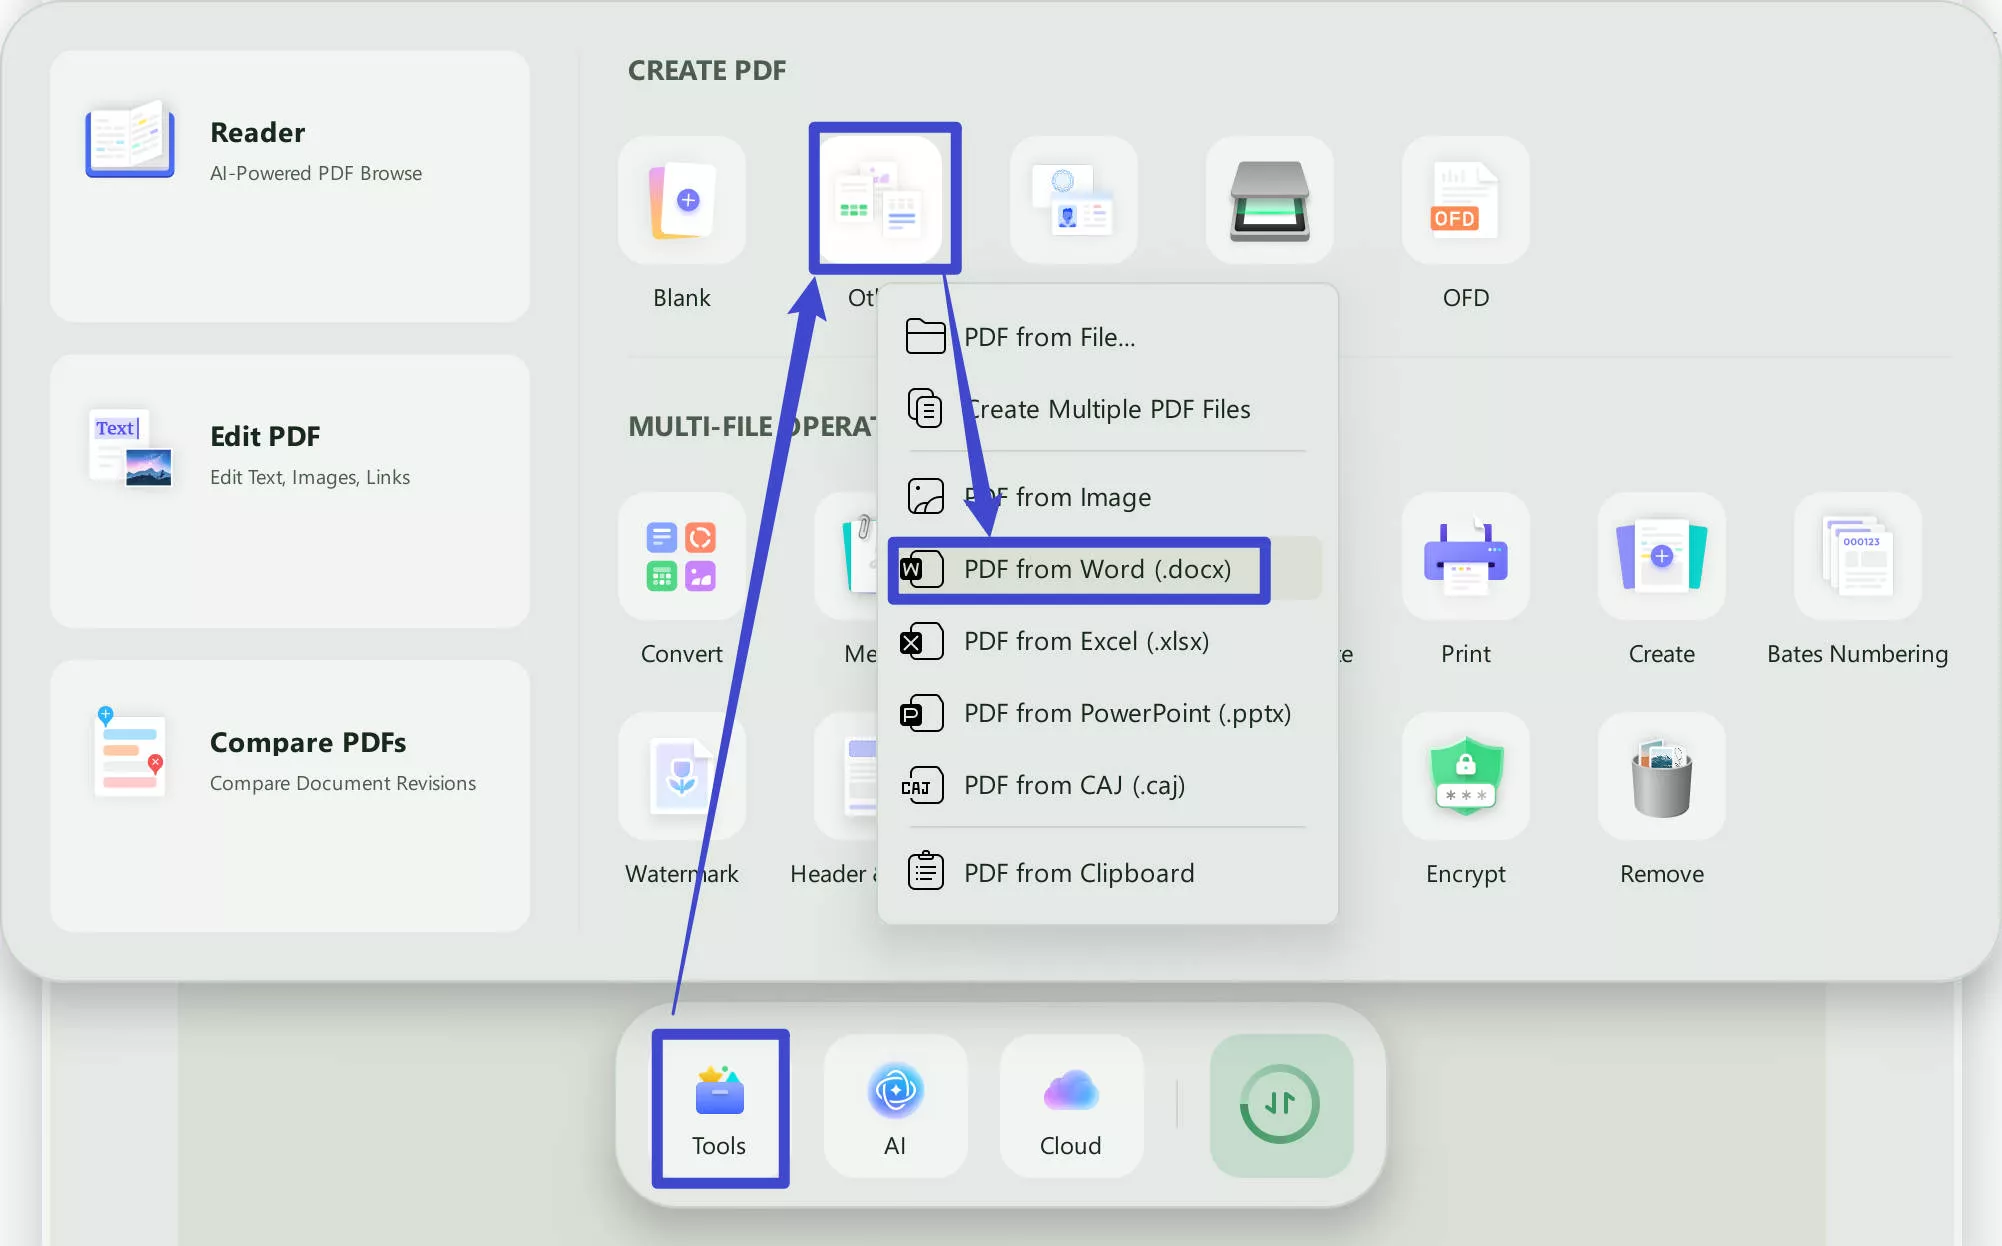
Step 1. Download, install, and launch UPDF on your PC. Create a PDF from a Word file by clicking "Tools > Other > PDF from Word".
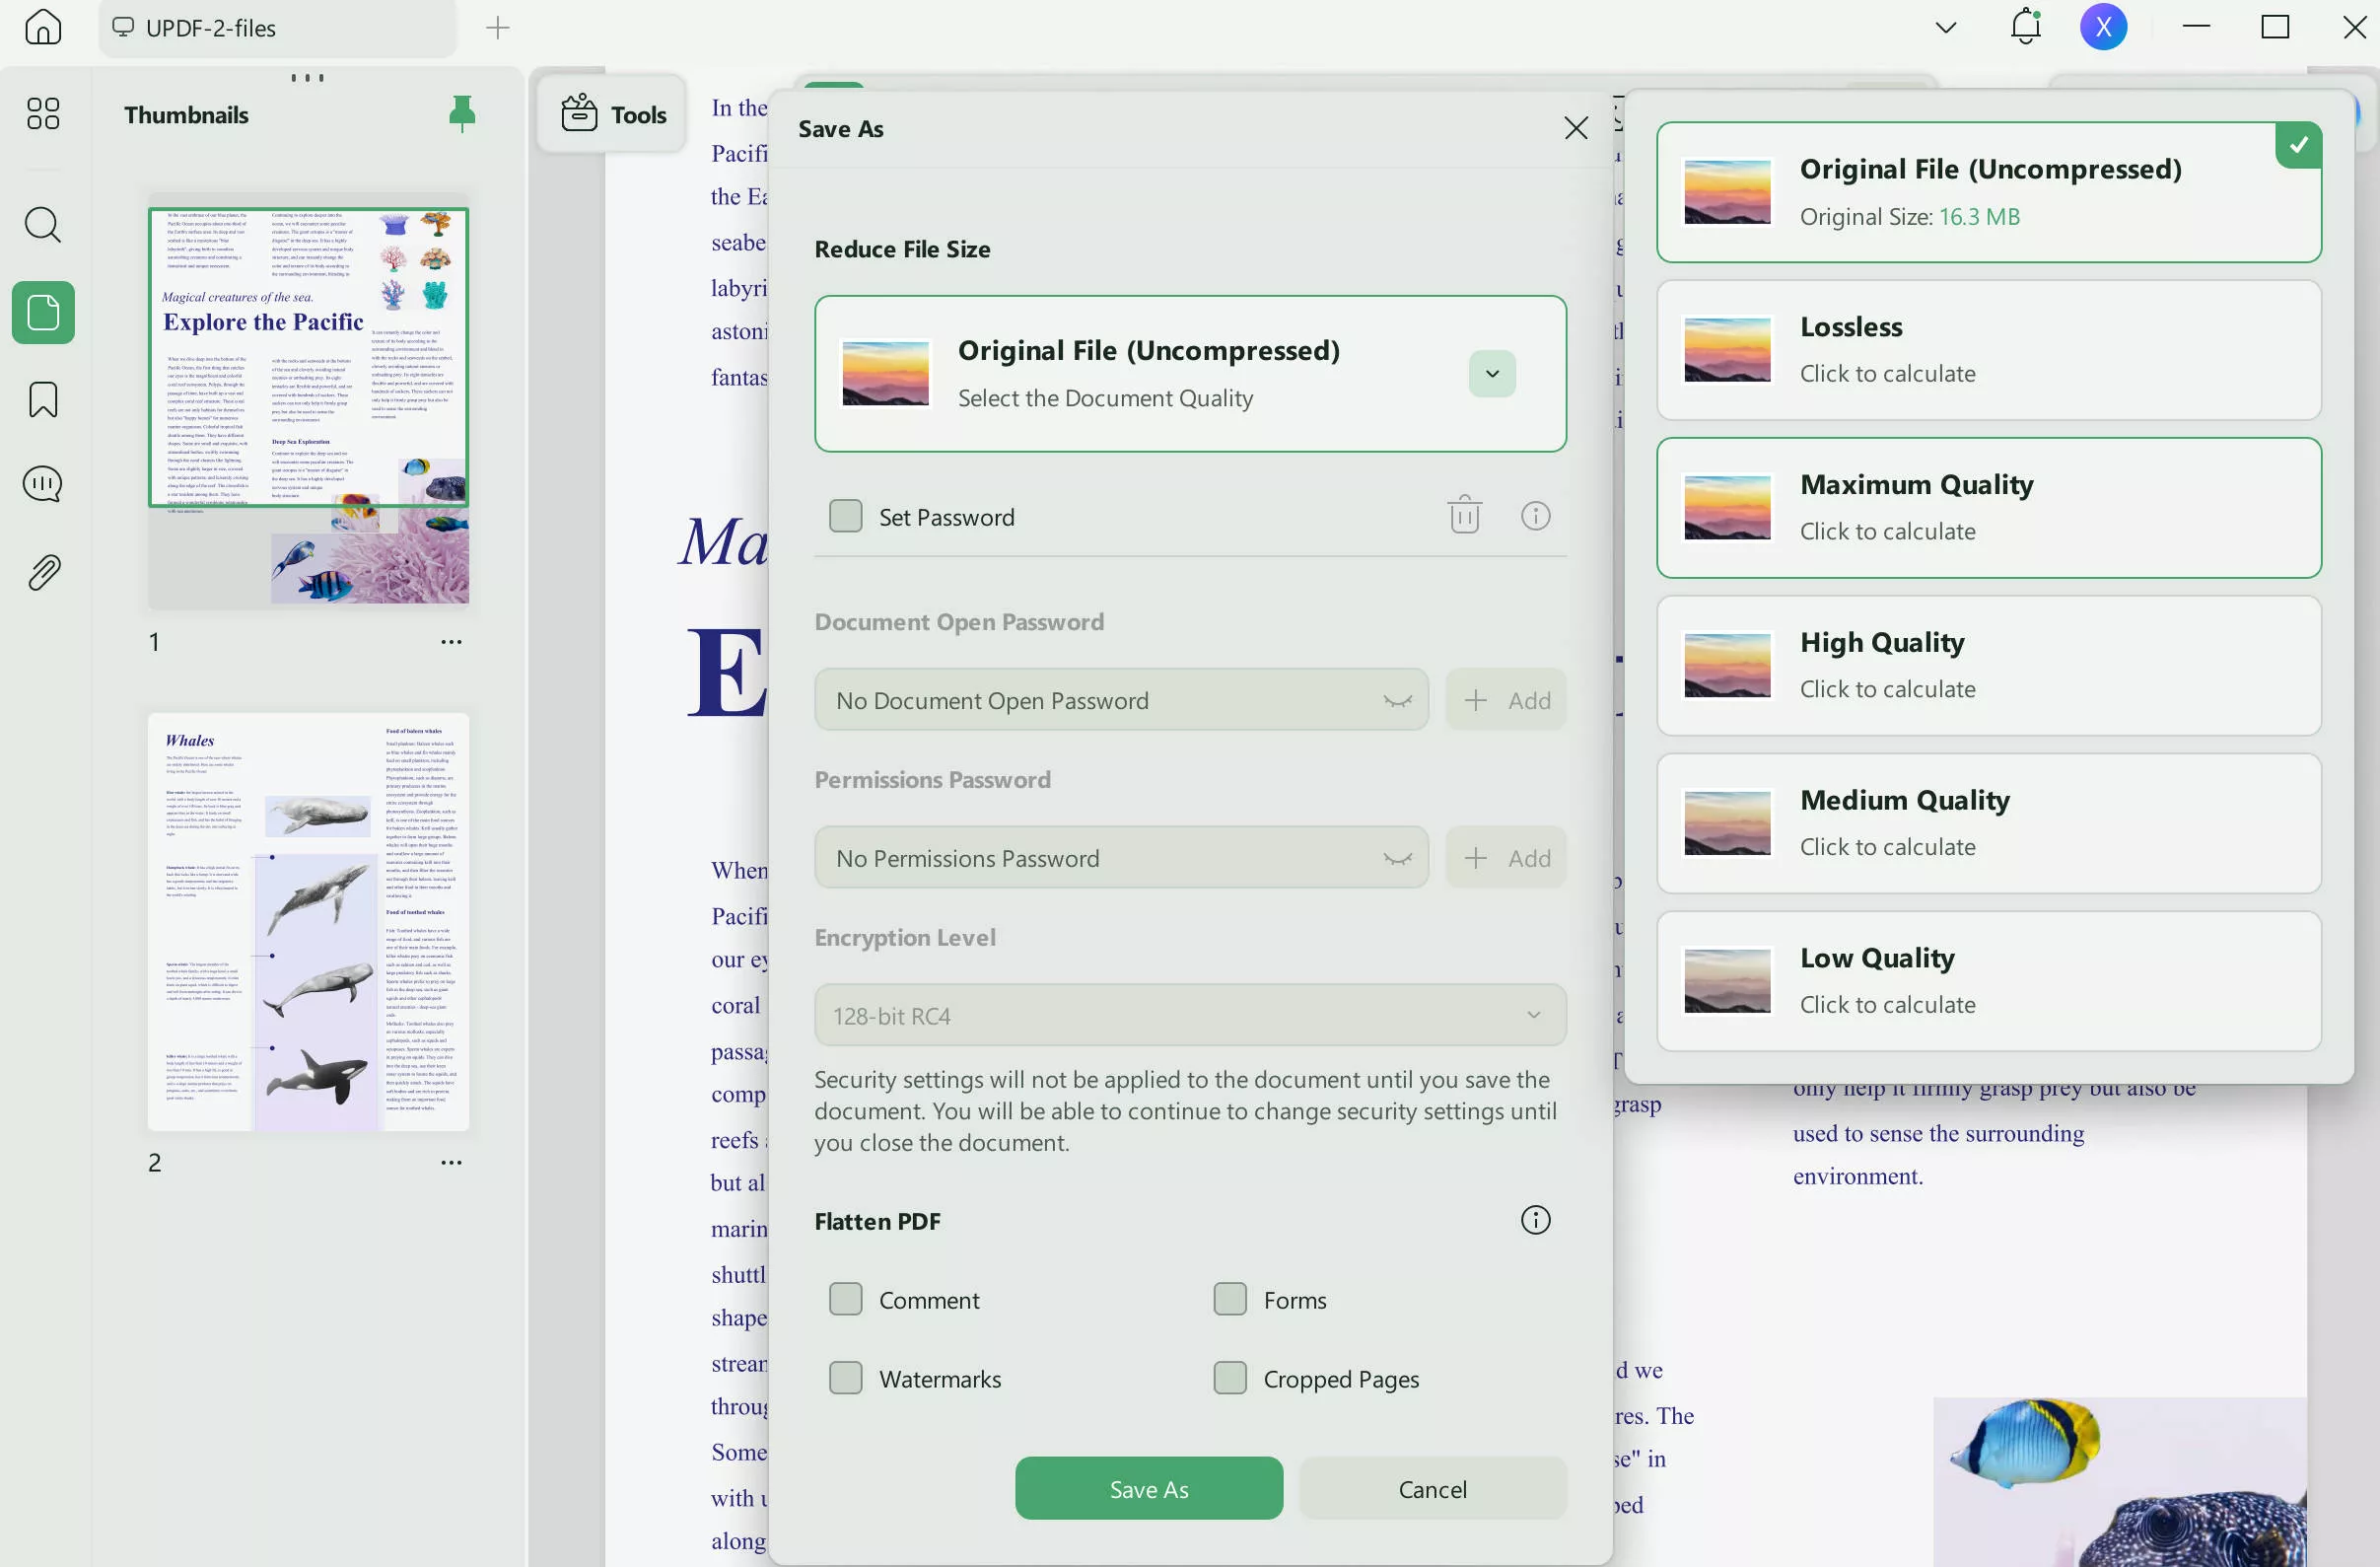
Step 2. The PDF file will open in UPDF. Afterward, click the narrow next to "Save" icon from the right-side toolbar and choose "Reduce File Size".
Step 3. Choose one of the four options in the pop-up window depending on your desired document quality. Once done, click "Save As".
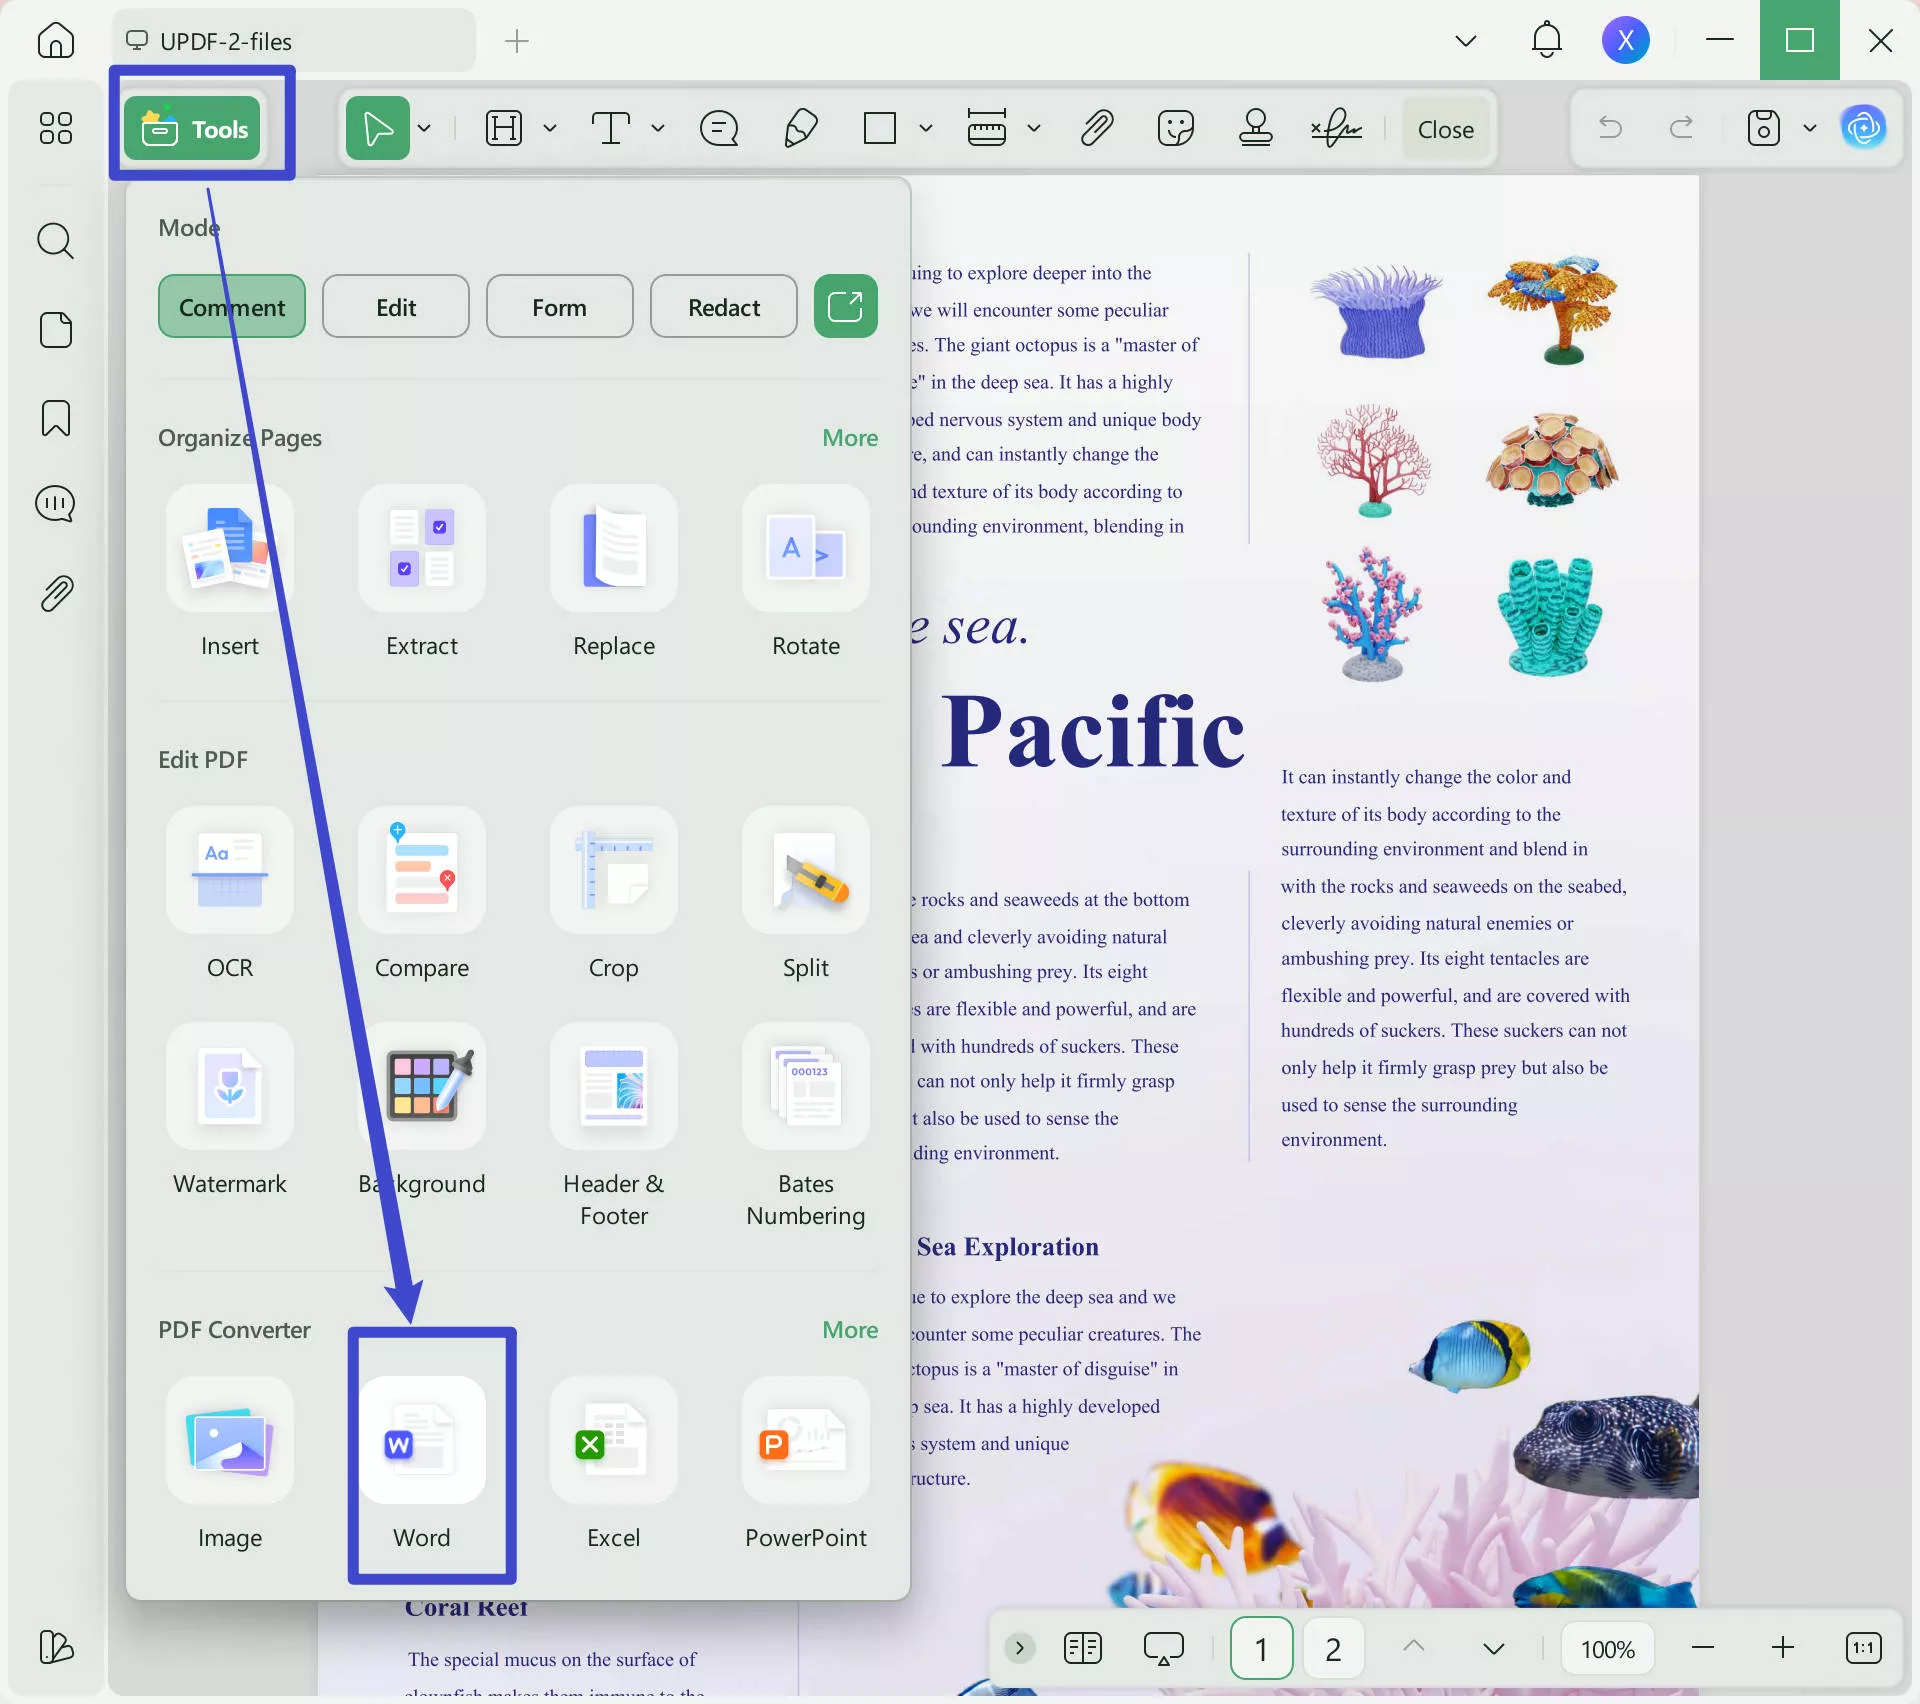
Step 4. Once the reduced-size PDF is stored, use UPDF convert feature to convert the PDF back to Word file format.
That's it! This way, you can easily and instantly reduce the Word document size significantly with UPDF intuitive approach. Moreover, you can further customize the PDF with built-in editing features of UPDF, such as editing/adding text and images, annotating, organizing, etc.
Windows • macOS • iOS • Android 100% secure
Part 3. 8 Ways to Compress Word File Size
Below we are presenting other 7 common ways to compress Word. So, go through each method and use the ones that best align with your needs:
2. Save in DOCX Format
Microsoft introduced the DOCX format with MS Word 2007. It's an updated version of the .doc format. The DOCX format is more like a ZIP file that compresses the document, thereby making it consume less space compared to a .doc document.
So, check whether the Word document you want to compress is in .doc or .docx format. If its .doc format, then follow the below steps to save the Word document in .docx format:
- Open the .doc Word document.
- Click File > Save as. Under "Save as type", choose "Word Document (.docx)". Once done, click "Save".

This way, you can easily reduce the size of the Word document by saving it in DOCX format. However, if your Word document is already in DOCX format, then proceed to the below methods to compress DOCX files.
3. Compress Pictures
Pictures are often the main reason behind the large file size in Word. For documents that have many pictures, Word allows you to compress the pictures to reduce the overall file size. Therefore, if your document contains pictures, then follow the below steps to compress them:
- Open the Word file you want to compress.
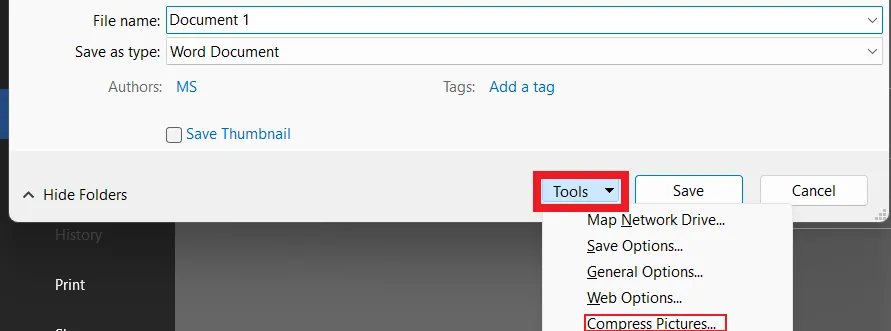
- Click File > Save as. Click the "Tools" button located next to the "Save" button and then choose "Compress Pictures". It will open the Compress Pictures" dashboard.
- Make sure the "Delete cropped areas of pictures" is checked. Afterward, pick the picture resolution of your choice. Once done, click "OK" and save the new version of the file.
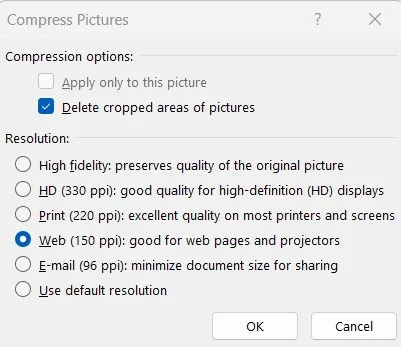
This way, the pictures will get compressed, and your Word file size will reduce accordingly.
4. Save Pictures at Lower Resolutions
Other than compressing pictures using the above method, you can also further customize the settings of pictures in the document to reduce the size, such as lowering the resolutions, discarding editing data, etc. Follow the below steps to save pictures at lower resolutions:
- Open the Word file you want to compress.
- Click File > Options > Advanced.
- Under the "Image Size and Quality" section, check "Discard editing data", uncheck "Do not compress images in file", and choose 150 PPI or lower resolution under the "Default resolution" option. Once done, click "OK".
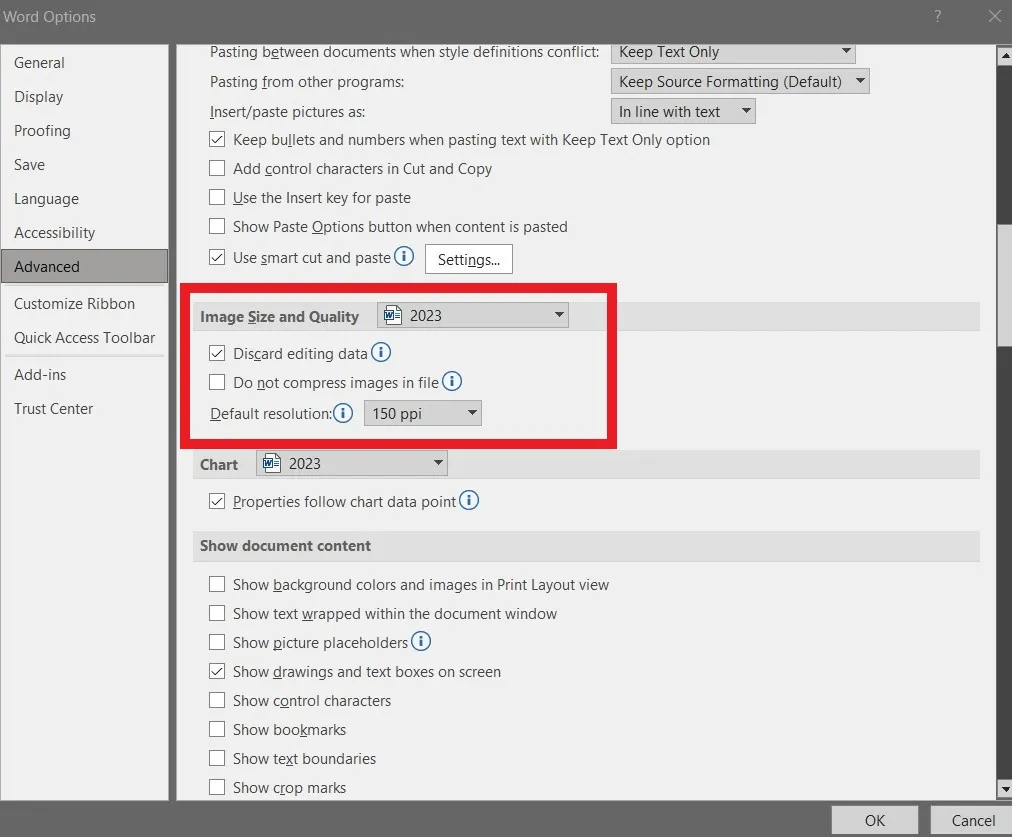
This way, you can lower picture resolutions and compress Word document size.
5. Remove Font Embed
When you use a custom font in your Word document and share the file with others, they will find it challenging to view the document properly if they haven't installed that customized font. To address this, Word allows embedding fonts in the document to make it work for everyone. However, doing so will consume a lot more space. Therefore, it is recommended to remove font embedding to reduce the file size. Follow the below steps to remove font embed:
- Open the Word file you want to compress.
- Click File > Options. Click the "Save" tab.
- Uncheck "Embed fonts in the file" and click the "OK" button.
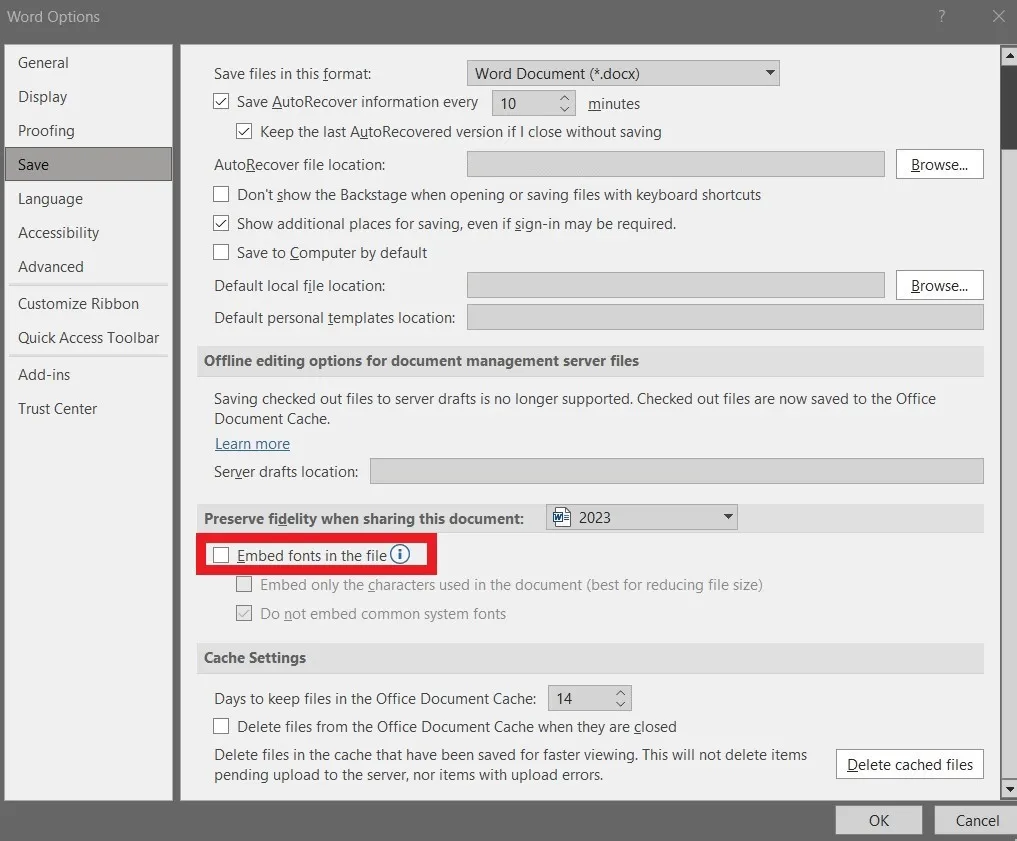
After executing the above steps, the document will have a reduced footprint than the original file.
6. Stop Tracking Changes
If you collaborate with others, tracking changes in the Word is an excellent way to keep track of what changes everyone is doing. However, doing so also increases the file size. So, once you are done with all the changes, it is recommended to stop the tracker by following the below steps:
- Go to the "Review" tab in the Word document.
- Under the "Tracking Section", click "Track Changes" to turn it off.

- If you want to accept all the changes made, click the drop-down button next to "Accept" and then choose "Accept All Changes and Stop Tracking".
This way, you will reduce the file size consumed by the change tracker in Word.
7. Insert Images not Copy/Paste
It is recommended to insert images instead of doing copy/paste. It is because when you paste an image, Word adds the file as a BMP or PNG format, which takes up more space. Moreover, it can also lose compression or bring in other data, which can increase the overall file size. However, when you insert the image, it keeps the file type and also does not lose compression. Follow the below steps to learn how to insert images in Word:
- Open the Word document and go to the place where you want to insert an image.
- Click the "Insert" tab from the top and then click Pictures > This Device.
- Choose the image you want to insert and click the "Insert" button.

This way, you can easily insert images instead of copying/pasting, thereby reducing the Word file size.
8. Use Online Word Compressor
Other than using built-in ways to compress Word documents, there are also online Word compressors that can compress the file and let you download the reduced-size version. Follow the below steps to use an online Word compressor:
- Choose the online Word compressor of your choice.
- Upload your Word document.
- Choose the level of compression you want and click the "Compress" button.
- Once the file is compressed, click the "Download" button to download it.

This way, online Word compressors can quickly compress Word files with just a few clicks. However, online services often come with privacy and security concerns. Therefore, it is preferred that you use a trustworthy service or opt for other methods discussed in this article.
Conclusion
With the growing reliance on digital documents, it is not uncommon to see Word documents consuming significant sizes due to the involvement of images, embedded fonts, charts, etc. Therefore, if you are struggling with large-sized Word files, the techniques discussed above can help you compress Word documents. However, if you want to reduce Word file size significantly without compromising the quality, then UPDF serves as the ideal solution. Its intuitive interface, instant document compression, and powerful editing features make it the ideal tool to compress Word documents and even do further customizations.
Windows • macOS • iOS • Android 100% secure
 UPDF
UPDF
 UPDF for Windows
 UPDF for Mac
 UPDF for iPhone/iPad
 UPDF for Android
 UPDF AI Online
 UPDF Sign
 Edit PDF
 Annotate PDF
 Create PDF
 PDF Form
 Edit links
 Convert PDF
 OCR
OCR PDF to Word
 PDF to Image
 PDF to Excel
 Organize PDF
 Merge PDF
 Split PDF
 Crop PDF
 Rotate PDF
 Protect PDF
 Sign PDF
 Redact PDF
 Sanitize PDF
 Remove Security
 Read PDF
 UPDF Cloud
 Compress PDF
 Print PDF
 Batch Process
 About UPDF AI
 UPDF AI Solutions
 AI User Guide
 FAQ about UPDF AI
 Summarize PDF
 Translate PDF
 Chat with PDF
 Chat with AI
 Chat with image
 PDF to Mind Map
 Explain PDF
 Scholar Research
 Paper Search
 AI Proofreader
 AI Writer
 AI Homework Helper
 AI Quiz Generator
 AI Math Solver
 PDF to Word
 PDF to Excel
 PDF to PowerPoint
 User Guide
 UPDF Tricks
 FAQs
FAQs UPDF Reviews
 Download Center
 Blog
Blog Newsroom
 Tech Spec
 Updates
 UPDF vs. Adobe Acrobat
 UPDF vs. Foxit
 UPDF vs. PDF Expert






 Enya Moore

 Enola Davis

 Enola Miller