Get to Know UPDF Sign
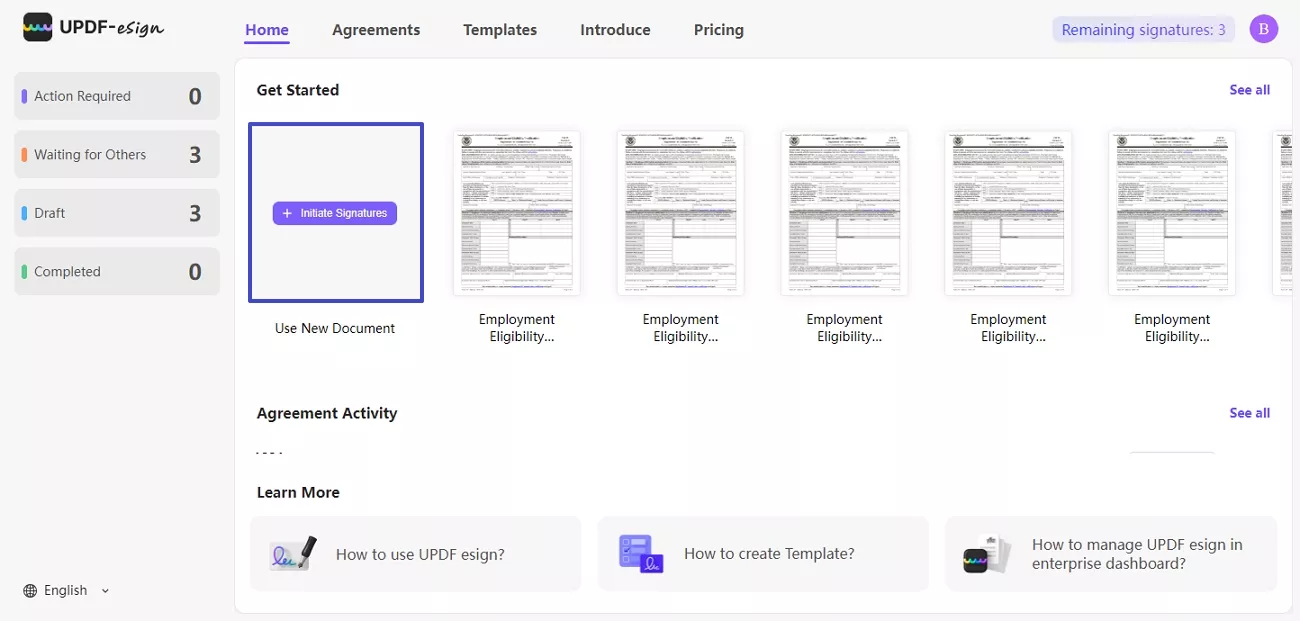
After signing into UPDF Sign, you will see several sections to utilize and proceed. Thus, get know-how about them through the following description:
1. Home
On the UPDF Sign home page, you can import new documents by pressing the + icon or Initiate Signature. Besides that, there are lists of pre-design templates that you can consider generating documents to save time and effort. On the same page, users can access agreement activity to navigate and track the document history.

2. Home Left Panel
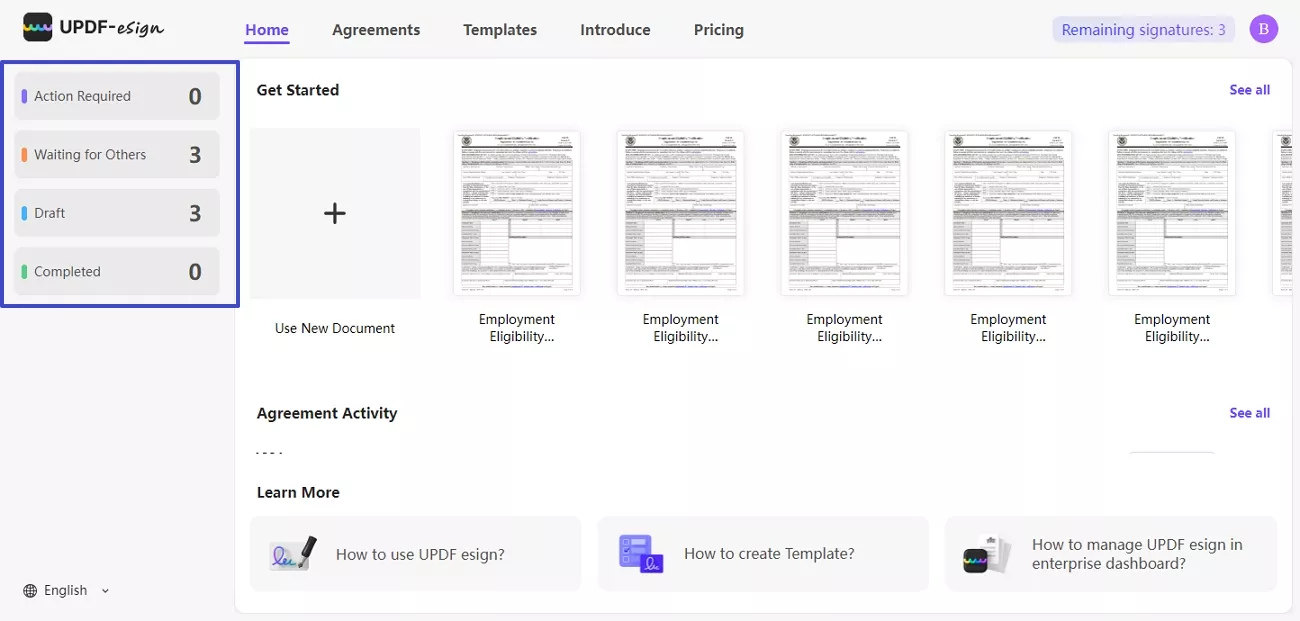
The UPDF Sign homepage left panel supports the Action Required tab, which shows the number of documents awaiting your signature. Beneath that, the Waiting for Others tab displays documents still pending signatures from recipients.
Furthermore, there is a Draft tab that shows a list of saved documents that you can easily complete from the agreement page. Lastly, the Completed tab notifies you about the signed and finished documents.

3. Agreements
Next, there is an "Agreements" page where you can see the following tabs on the left panel. This will help you navigate through your agreements record and understand the status of each agreement properly:
Inbox
This tab contains all the documents you've sent for signatures, as well as those you've received. You can navigate to the following top bars and track the progress of document.
- Name: This top bar displays the names of documents.
- Send Time: With this tap, you can see the date on which you sent the certain document.
- Last Change: In case you update the document, this tab will notify the date on which changes were made.
- Status: This tab lets you see whether the documents are signed or waiting for others.
- Operation: This tab shows the sign and re-notify options. The sign determines that the documents are waiting for your signature; however, the re-notify allows you to remind the signee to complete the process. Using the dots icon on documents that come under the Operations top bar, you can do more tasks, including: Save as template, Re-notify, Copy, Void, and Delete.
Sent
From the Sent tab, you can navigate how many documents have been sent to the receiver. Despite that, you can also track the name of the document, its send time, and the last time you made changes in it. Additionally, see the status of the sent documents, such as the need to sign or wait for others.
You can see if the documents are signed from the operation top bar. In case, there are some pending documents, you can re-notify them to complete the signing process.
Action Required
In the Action Required tab, you can locate the documents that are waiting for your signature. There are multiple options provided against a document that can be selected, based on its current status.
- Re-Notify: Furthermore, if you notice that the signee hasn't noticed your request, you can re-notify them from the same menu.
- Copy: This option features the ability to duplicate the document for easy creation.
- Delete: To remove your document from the records, use the Delete option to move it to the trash.
Completed
Once the entire signing process has been done by all parties, the agreement is shifted into the "Completed" section. On visiting this section, you will find the details of the agreement listed across the interface, with the status showing a Completed notification. You can perform several operations following the completion of the agreement signing.
Firstly, you can Download the agreement into your device to keep an offline record of your signed documents. You can also copy the agreement for using it across another agreement using the Copy option. If the agreement is of no use, you can have it deleted with the Delete option.
Drafts
When you return to the Home page without sending the document for signature, it will be saved in the Draft section. The Draft section holds all the documents that require attention before final submission to signees. If you want to continue working on the documents, click the Continue button besides the Operation tab. There, you can also move your document to templates or create duplicate documents by clicking the Copy option. For some reason, if you don't want to send a document, press the Delete option to move it to the trash panel.
Trash
Finally, the Trash tab functions like a recycle bin, allowing you to store deleted documents. You can restore documents from this tab as needed.
If you trash an incomplete document and then restore it, signers will no longer be able to sign it. However, if you restore a previously completed document, it will return as a completed document.
4. Pricing
Within this tab, you will get a detailed pricing plan of UPDF Sign's Individuals and Enterprise plans. Based on your preferences you can choose which one suits your needs and preferences. Each plan will have the Buy Now option button the pricing details that will navigate you to payment details.
 UPDF
UPDF
 UPDF for Windows
 UPDF for Mac
 UPDF for iPhone/iPad
 UPDF for Android
 UPDF AI Online
 UPDF Sign
 Edit PDF
 Annotate PDF
 Create PDF
 PDF Form
 Edit links
 Convert PDF
 OCR
OCR PDF to Word
 PDF to Image
 PDF to Excel
 Organize PDF
 Merge PDF
 Split PDF
 Crop PDF
 Rotate PDF
 Protect PDF
 Sign PDF
 Redact PDF
 Sanitize PDF
 Remove Security
 Read PDF
 UPDF Cloud
 Compress PDF
 Print PDF
 Batch Process
 About UPDF AI
 UPDF AI Solutions
 AI User Guide
 FAQ about UPDF AI
 Summarize PDF
 Translate PDF
 Chat with PDF
 Chat with AI
 Chat with image
 PDF to Mind Map
 Explain PDF
 Scholar Research
 Paper Search
 AI Proofreader
 AI Writer
 AI Homework Helper
 AI Quiz Generator
 AI Math Solver
 PDF to Word
 PDF to Excel
 PDF to PowerPoint
 User Guide
 UPDF Tricks
 FAQs
FAQs UPDF Reviews
 Download Center
 Blog
Blog Newsroom
 Tech Spec
 Updates
 UPDF vs. Adobe Acrobat
 UPDF vs. Foxit
 UPDF vs. PDF Expert