Wenn Ihre PDF-Dateien sehr groß sind und viel Speicherplatz auf Ihrem Mac beanspruchen, sollten Sie Ihre PDFs verkleinern, bevor Sie sie speichern, per E-Mail versenden oder in die Cloud hochladen. In diesem Artikel zeigen wir Ihnen deshalb, wie Sie ein PDF auf Mac verkleinern können.
Teil 1. PDF-Datei auf Mac ohne Qualitätsverlust verkleinern
UPDF für Mac ist eine PDF-Lösung, mit der Sie mühelos PDF-Dateien bearbeiten, beschriften, konvertieren, reduzieren, schützen und organisieren können. Wenn Sie ein schnelles, produktives und einfach zu bedienendes PDF-Tool benötigen, ist UPDF das richtige Tool für Sie. Lassen Sie es sich über die folgende Schaltfläche herunter, um alle Funktionen von UPDF zu erfahren.
Windows • macOS • iOS • Android 100% sicher
Schritt 1. Auf das Menü Dateigröße reduzieren zugreifen
Öffnen Sie Ihre PDF-Dateien mit UPDF und tippen Sie dann auf der rechten Seite auf „Unter anderem speichern“ und wählen Sie die Option „Dateigröße reduzieren...“.
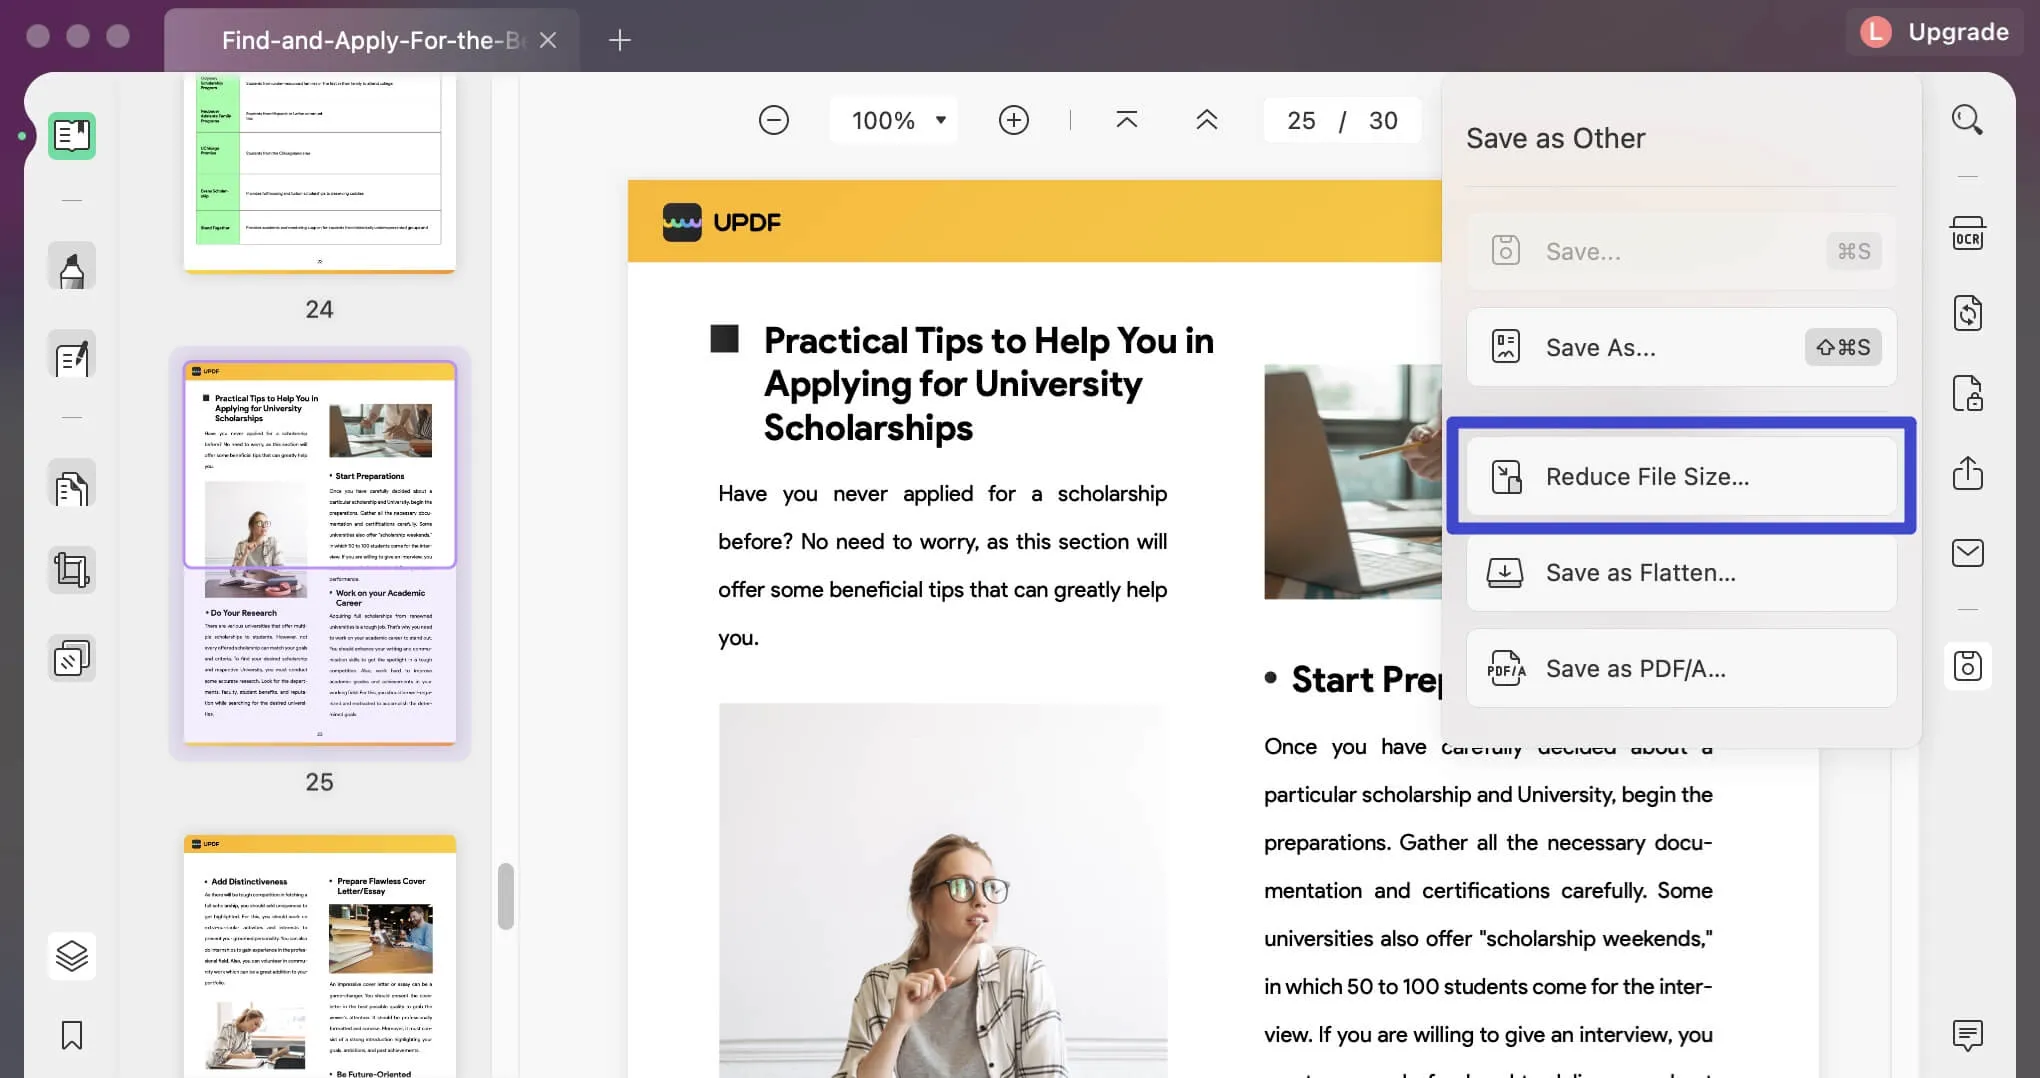
Schritt 2. Wie kann ich eine PDF-Datei auf Mac verkleinern?
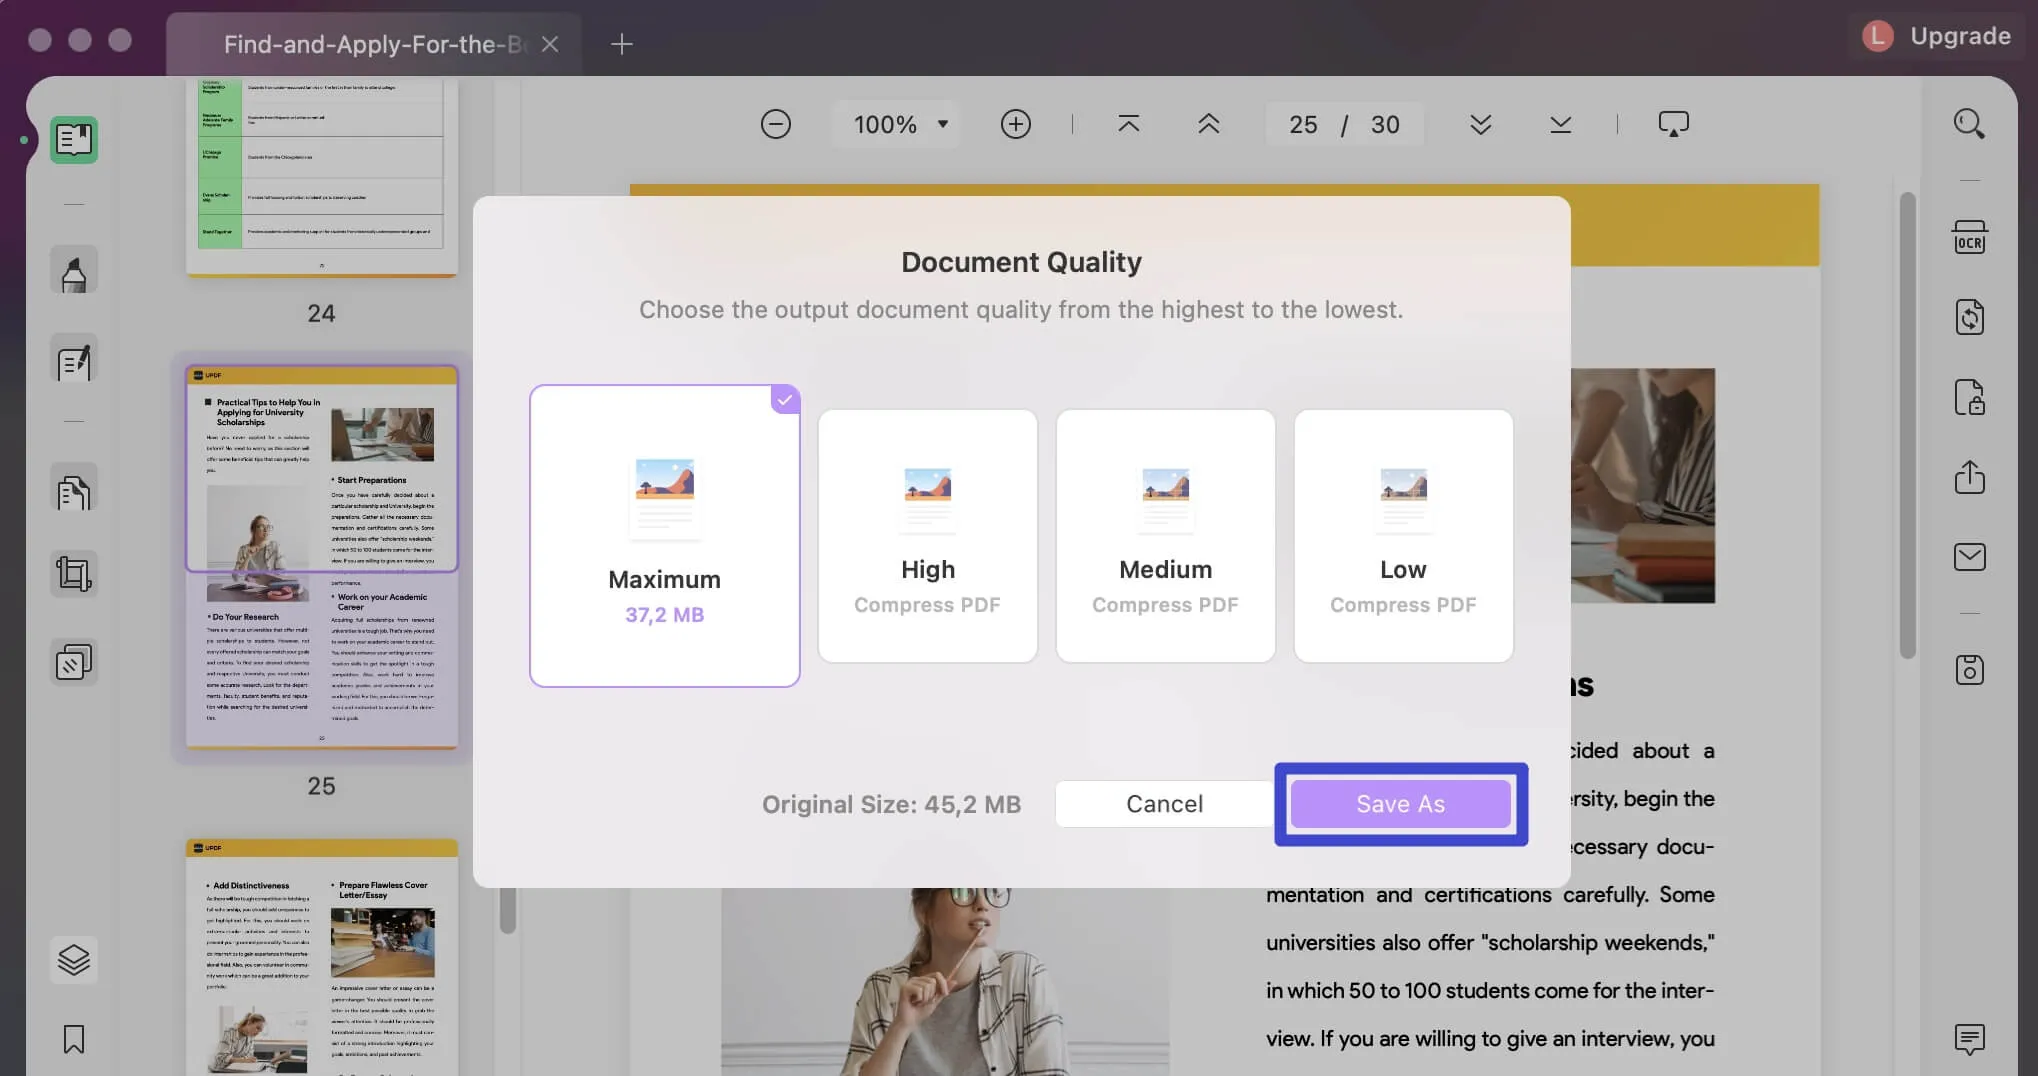
In dem Popup-Fenster haben Sie nun vier Optionen, um eine PDF-Datei zu verkleinern, nämlich „Maximal“, „Hoch“, „Mittel“ und „Niedrig“. Jede Option bezieht sich auf eine andere Dokumentqualität. Sie können eine davon nach Bedarf auswählen. Tippen Sie schließlich auf die Schaltfläche „Speichern unter“.
Video-Tutorial
Teil 2. PDF-Datei mit Mac in der Vorschau verkleinern
Sehen wir uns nun an, wie Sie Ihre PDF-Dateigröße mit Mac Preview verkleinern können. Mac Preview ist ein einfaches und unkompliziertes Tool zum Anzeigen, Kommentieren und Drucken von PDFs auf Ihrem Mac. Es bietet zudem eine einfache Möglichkeit, ein PDF kleiner zu machen. Wenn Sie schon einmal eine große PDF-Datei in Preview geöffnet haben, wissen Sie, dass das Laden sehr lange dauert und die Dateien viel Speicherplatz auf Ihrer Festplatte beanspruchen kann.
Schritt 1: Die PDF-Datei in der Vorschau öffnen
Zunächst müssen Sie die PDF-Datei öffnen, an der Sie arbeiten möchten. Sie können die PDF-Datei in die Preview-Oberfläche ziehen oder mit der rechten Maustaste auf das PDF-Dokument klicken und dann „Öffnen mit > Preview“ wählen.
Schritt 2: Die PDF-Datei exportieren
Sobald Sie das PDF-Dokument in Preview geöffnet haben, klicken Sie im oberen Menü auf „Datei“. Klicken Sie dann auf „Exportieren...“.
Hier können Sie einen geeigneten Dateinamen in das Dialogfeld eingeben oder mit dem vorhandenen Namensplatzhalter fortfahren. Sie können in diesem Moment auch Tags hinzufügen.
Schritt 3: PDF auf dem Mac verkleinern
Wählen Sie nun einen geeigneten Speicherort auf Ihrem Mac, an dem Sie die Datei speichern möchten.
Als nächstes müssen Sie die Option „Dateigröße reduzieren“ unter dem nächsten Pfeil von „Quarzfilter“ auswählen.
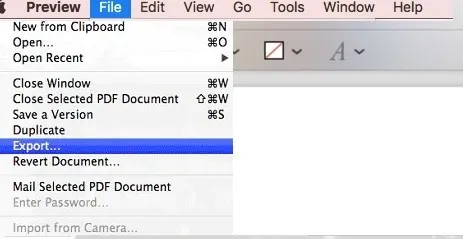
Durch diese Schritte wird die PDF-Datei jetzt kleiner und Sie brauchen nur noch auf „Speichern“ zu klicken.
Schließlich wird die Datei an den von Ihnen gewählten Speicherort exportiert. An dieser Stelle können Sie auch den Größenunterschied zwischen der Original-PDF-Datei und der komprimierten Version überprüfen, indem Sie mit der rechten Maustaste auf die Datei klicken und dann in den Optionen auf „Info abrufen“ und die Dateigröße neben dem PDF-Namen anzeigen.
Wenn Sie die komprimierte Datei öffnen, werden Sie feststellen, dass die visuellen und textlichen Details jedoch nicht so deutlich sind wie in der Originalversion.
Teil 3. PDF auf Mac mit Cisdem verkleinern
Der PDF-Kompressor von Cisdem ist eine der einfachsten Möglichkeiten, eine PDF-Datei auf Ihrem Mac zu verkleinern.
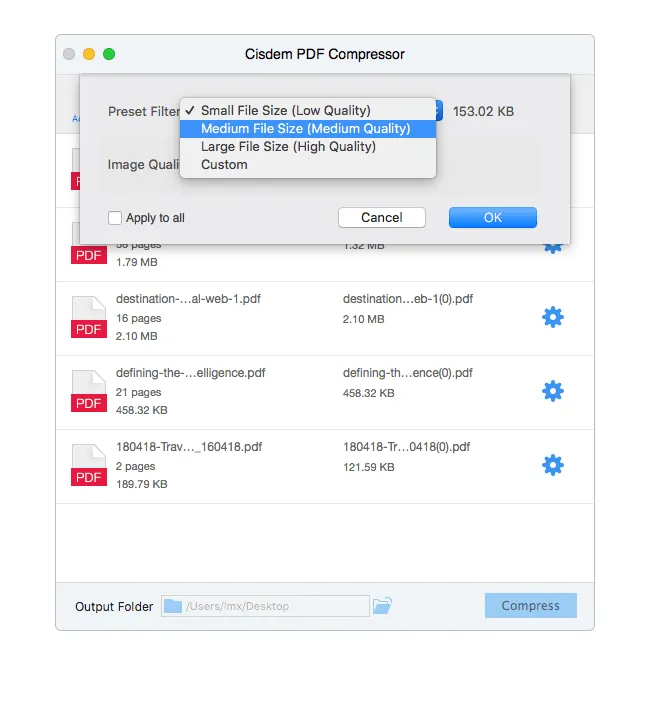
- Laden Sie zunächst die Cistem-Software auf Ihren Computer herunter. Dann öffnen Sie eine PDF-Datei, die Sie mit der Cisdem-Software verkleinern möchten. Alternativ können Sie die Dateien auch auf die Benutzeroberfläche der Software ziehen.
- Passen Sie dann die Einstellungen an. Es wird ein Dropdown-Menü angezeigt, in dem Sie zwischen verschiedenen Komprimierungseinstellungen wählen können. Diese sind „Klein, Mittel, Groß und Benutzerdefiniert“.
- Um die gleichen Einstellungen auf alle importierten PDF-Dokumente anzuwenden, klicken Sie auf das Kontrollkästchen „Auf alle anwenden“, bevor Sie auf „OK“ klicken.
- Sobald Sie den gewünschten Komprimierungsgrad ausgewählt haben, klicken Sie auf der Hauptschnittstelle auf „Komprimieren“ und warten Sie, bis der Vorgang abgeschlossen ist.
- Ihre PDF-Datei sollte nun deutlich kleiner sein als zu Beginn - und sie wird schneller geladen, wenn Sie sie in UPDF oder Preview unter Mac OS X öffnen!
Teil 4. Bonustipps zum Verkleinern von PDF-Dateien auf Mac
Zum Glück gibt es mehrere Möglichkeiten, PDFs auf Mac zu verkleinern, sodass sie schneller geöffnet werden und weniger Speicherplatz benötigen. Hier sind einige schnelle Tipps:
- Verwenden Sie einen PDF-Kompressor. Dies ist eine Art App, die Sie kostenlos herunterladen können und die es Ihnen ermöglicht, PDF-Dateien zu optimieren und zu verkleinern.
- Stellen Sie sicher, dass die Bilder in Ihrer PDF-Datei so klein wie möglich sind, indem Sie beim Speichern eine hohe Qualität wählen oder beim Hochladen auf unsere Plattform die Größe reduzieren. Gehen Sie dazu auf „Datei > Speichern unter“ und wählen Sie als Dateityp „JPEG“ anstelle des Formats JPEG 2000 oder PNG.
- Sie können die PDF-Datei in JPG oder andere Formate umwandeln, um sie zu verkleinern. Andere Formate sind in der Regel kleiner als das PDF-Format.
Fazit:
Wenn Sie Ihre PDF auf Mac verkleinern möchten, gibt es viele Möglichkeiten. Die gute Nachricht ist, dass es einige verschiedene praktische und schnelle Möglichkeiten für diese Aufgabe gibt. Das beste Tool ist UPDF. UPDF komprimiert Ihre Dateien, ohne deren Funktionalität einzuschränken, und verfügt über zahlreiche Funktionen. Über 1 Million Benutzer weltweit nutzen die Vorteile dieses Tools bereits - schließen Sie sich ihnen also an und testen Sie UPDF noch heute!
Windows • macOS • iOS • Android 100% sicher
 UPDF
UPDF
 UPDF für Windows
 UPDF für Mac
 UPDF für iPhone/iPad
 UPDF für Android
 UPDF AI Online
 UPDF Sign
 PDF bearbeiten
 PDF kommentieren
 PDF erstellen
 PDF-Formular
 Links bearbeiten
 PDF konvertieren
 OCR
OCR PDF in Word
 PDF in Bild
 PDF in Excel
 PDF organisieren
 PDFs zusammenführen
 PDF teilen
 PDF zuschneiden
 PDF drehen
 PDF schützen
 PDF signieren
 PDF schwärzen
 PDF bereinigen
 Sicherheit entfernen
 PDF lesen
 UPDF Cloud
 PDF komprimieren
 PDF drucken
 Stapelverarbeitung
 Über UPDF AI
 UPDF AI Lösungen
 KI-Benutzerhandbuch
 FAQ zu UPDF AI
 PDF zusammenfassen
 PDF übersetzen
 Chatten mit PDF
 Chatten mit AI
 Chatten mit Bild
 PDF zu Mindmap
 PDF erklären
 Wissenschaftliche Forschung
 Papersuche
 KI-Korrektor
 KI-Schreiber
 KI-Hausaufgabenhelfer
 KI-Quiz-Generator
 KI-Mathelöser
 PDF in Word
 PDF in Excel
 PDF in PowerPoint
 Tutorials
 UPDF Tipps
 FAQs
FAQs UPDF Bewertungen
 Downloadcenter
 Blog
Blog Newsroom
 Technische Daten
 Updates
 UPDF vs. Adobe Acrobat
 UPDF vs. Foxit
 UPDF vs. PDF Expert





 Delia Meyer
