UPDF ile PDF'deki Sayfaları Düzenleyin
Bazen PDF düzeni sayfalardaki şekillerin biçimlendirmesiyle zorlaşır. PDF belgelerini profesyonelce sunmak için, düzenli görünmeleri için sayfaları döndürmeniz gerekir.
Windows • macOS • iOS • Android %100 güvenli
- 1. Çoklu Seçim Modu
- 2. Sayfaları Seç
- 3. Sayfaları Ekle
- 4. Değiştir
- 5. Sayfaları Çıkar
- 6. Böl
- 7. Sayfa Etiketi, Sırası ve Boyutu
- 8. Sayfaları Döndür
- 9. Sayfaları Sil
- 10. Yakınlaştır ve uzaklaştır
Öncelikle sol araç çubuğunda bulunan Sayfaları Düzenle simgesine tıklayarak sayfa yönetim araçlarına ulaşabilirsiniz.
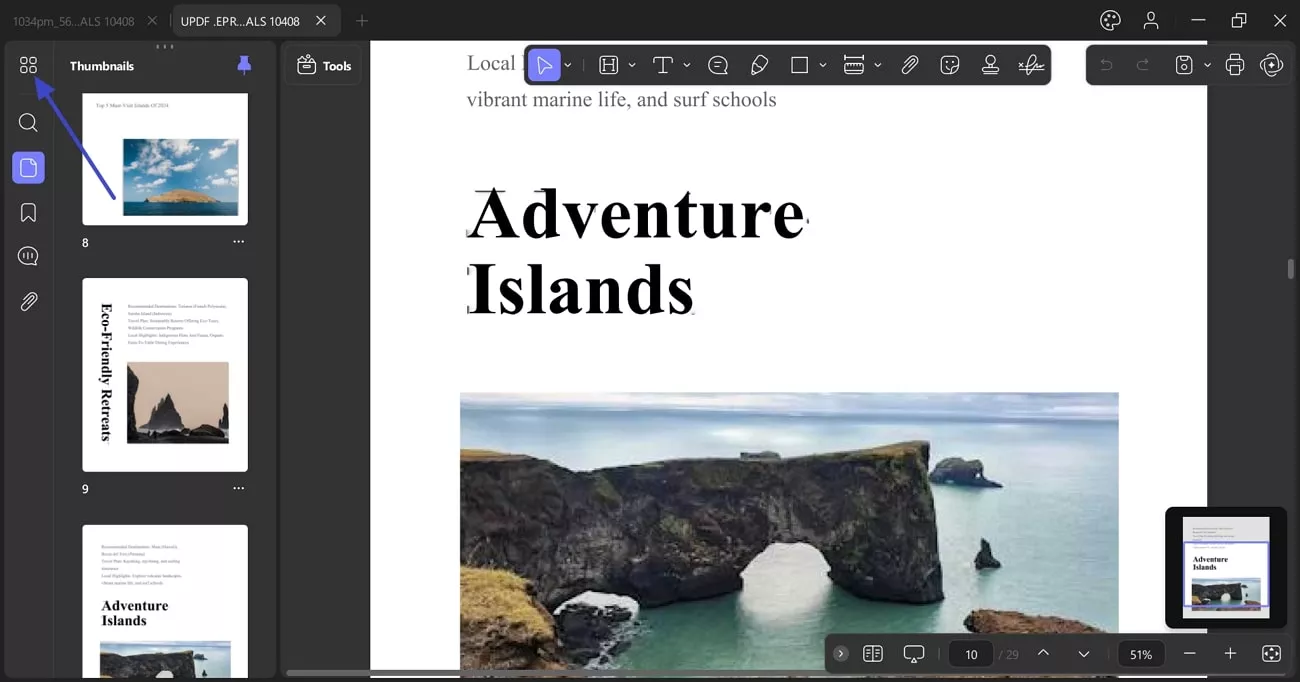
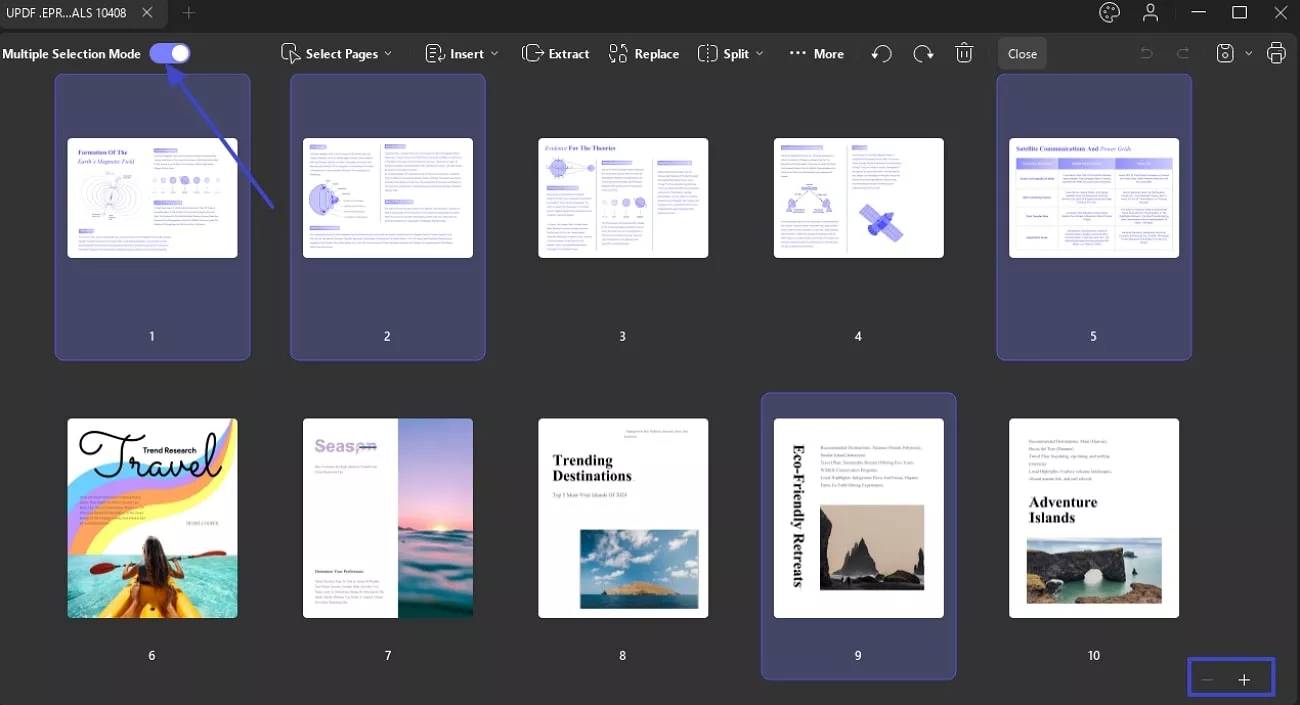
1. Çoklu Seçim Modu
İstediğiniz kadar sayfayı düzenlemek için bu özelliği açıp kapatabilirsiniz.
- Aynı sayfadan UPDF, ana ekranı yakınlaştırmak ve uzaklaştırmak için Artı ve Eksi simgeleri sunuyor.
2. Sayfaları Seçin
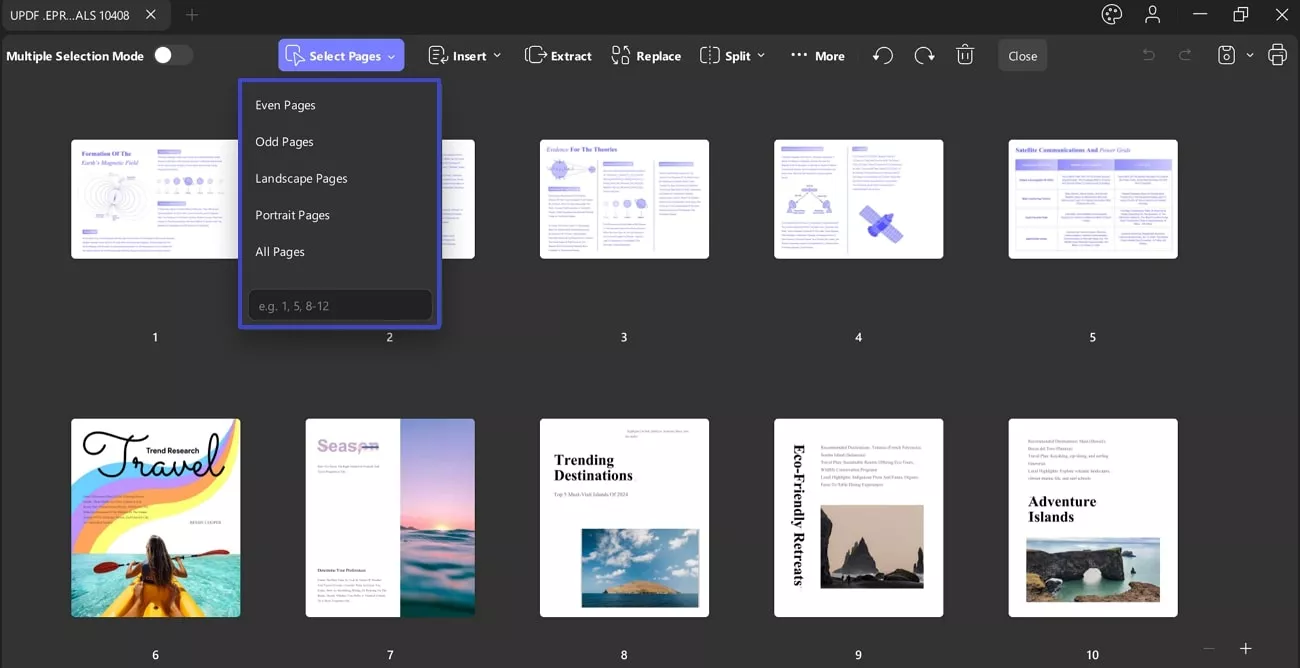
UPDF, bir PDF belgesinin sayfalarını seçmenize olanak tanır. Ekranın üst kısmından Sayfaları Seç'e gidin ve beş seçenek vardır:
- Çift Sayfalar: Çift Seçeneğini seçerek , tüm belgeleriniz için aynı anda çift sayfaları seçebilirsiniz. Buradan, Döndür, Kopyala ve Çıkar düğmelerini seçerek bu çift sayfaların her birini ayrı ayrı düzenleyebilirsiniz. Ayrıca, Sil simgesini kullanarak seçili sayfaları silmenizi sağlar .

2. Tek Sayfalar: Tek Sayfalar seçeneğinden , belgenin tüm tek sayfalarını tek tıklamayla seçebilirsiniz. Ayrıca, bu sayfaları tıpkı çift sayfalar gibi düzenleyebilirsiniz.
3. Yatay Sayfalar: Yatay Sayfalar seçeneği , belgenizdeki yalnızca yatay sayfaları vurgular.
4. Dikey Sayfalar: Dikey Sayfalar seçeneğini seçerek belgenin sadece dikey sayfalarını seçebilir, yatay sayfaları bırakabilirsiniz.
5. Tüm Sayfalar: Aynı şekilde, tüm belge sayfalarını seçmek istiyorsanız, Tüm Sayfalar seçeneğini kullanabilirsiniz.
6. Eğer bu seçenek dışında başka sayfalar seçmek isterseniz, manuel olarak herhangi bir sayfa numarasını yazabileceğiniz bir Metin Çubuğu sunar.
3. Sayfaları Ekle
UPDF, PDF belgesine sayfa eklemenize olanak tanır. Sayfa yönetimi araç çubuğundaki Ekle seçeneğine gidin ve beş seçenek vardır:
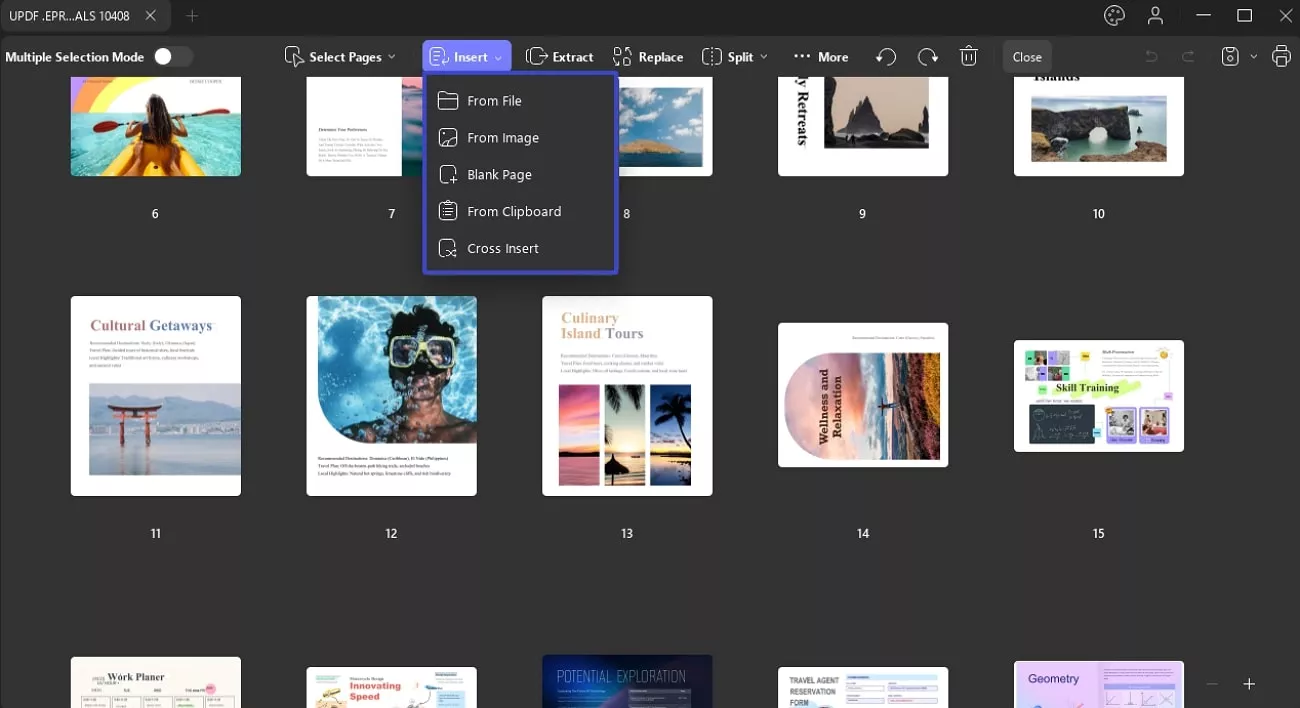
- Dosyadan : ' Dosyadan Ekle ' seçeneğini seçerek başka bir PDF seçebilir ve tüm sayfalarını veya belirli bir sayfa aralığını geçerli belgenize ekleyebilirsiniz. Ayrıca bu sayfaların nereye ekleneceğini de belirtebilirsiniz: başlangıçta, sonda veya belirli bir sayfanın öncesine veya sonrasına.
- Resimlerden: Resimlerden seçeneğini kullanarak Dosya Seç düğmesine tıklayarak bir resim ekleyebilirsiniz . Sayfa Boyutu ve Dosya Boyutunu resim ekleme açılır ekranından özelleştirebilirsiniz . İlk, Son Sayfa ve Özel seçeneklerini etkinleştirmenizi veya devre dışı bırakmanızı sağlar . UPDF, görüntüyü eklemek için Konum seçeneğinden Önce ve Sonra seçeneklerini etkinleştirmenizi veya devre dışı bırakmanızı sağlar .
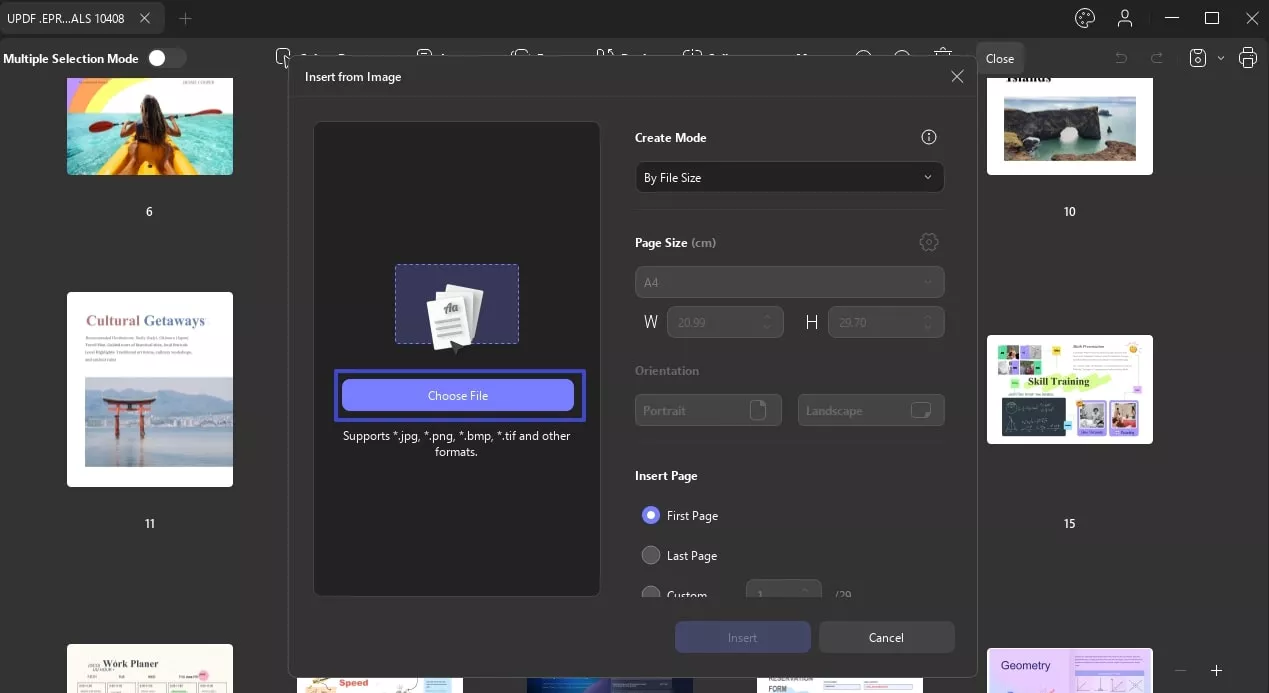
- Boş Sayfa Ekle: ' Boş Sayfa ' seçeneğini seçerek sayfa boyutunu seçebilirsiniz: varsayılan, A1, A2, A3, A4, A5, özel, vb. UPDF ayrıca sayfaları Dikey veya Yatay yönde eklemenize olanak tanır. Ayrıca, boş sayfanın nereye ekleneceğini belirtebilirsiniz: ilk veya son sayfa olarak veya belirli bir sayfadan önce veya sonra.
- Panodan Ekle: Panonuza kopyalanmış içerikle bir sayfa ekleyebilirsiniz. ' Boş Sayfadan Ekle ' seçeneğine benzer şekilde, sayfa boyutunu özelleştirebilir ve nereye ekleneceğini belirtebilirsiniz. Eklenen sayfadaki metin çok küçük görünüyorsa, Düzenle'ye erişmek ve eklenen sayfanın yazı tipi boyutunu ayarlamak için " Kapat " ve Araçlar seçeneğine tıklayabilirsiniz.
- Çapraz Ekleme : Bu seçenek, tek sayfalı ve çift sayfalı PDF'leri doğru sırayla eklemenize olanak tanır. Kaynak seçeneğiyle, tüm dosyayı seçebilir ve orijinal dosyaya ekleyebilirsiniz. Sayfalar Arası Ekleme ekranındaekran görüntüsünde gösterildiği gibi iki yöntem kullanabilirsiniz:
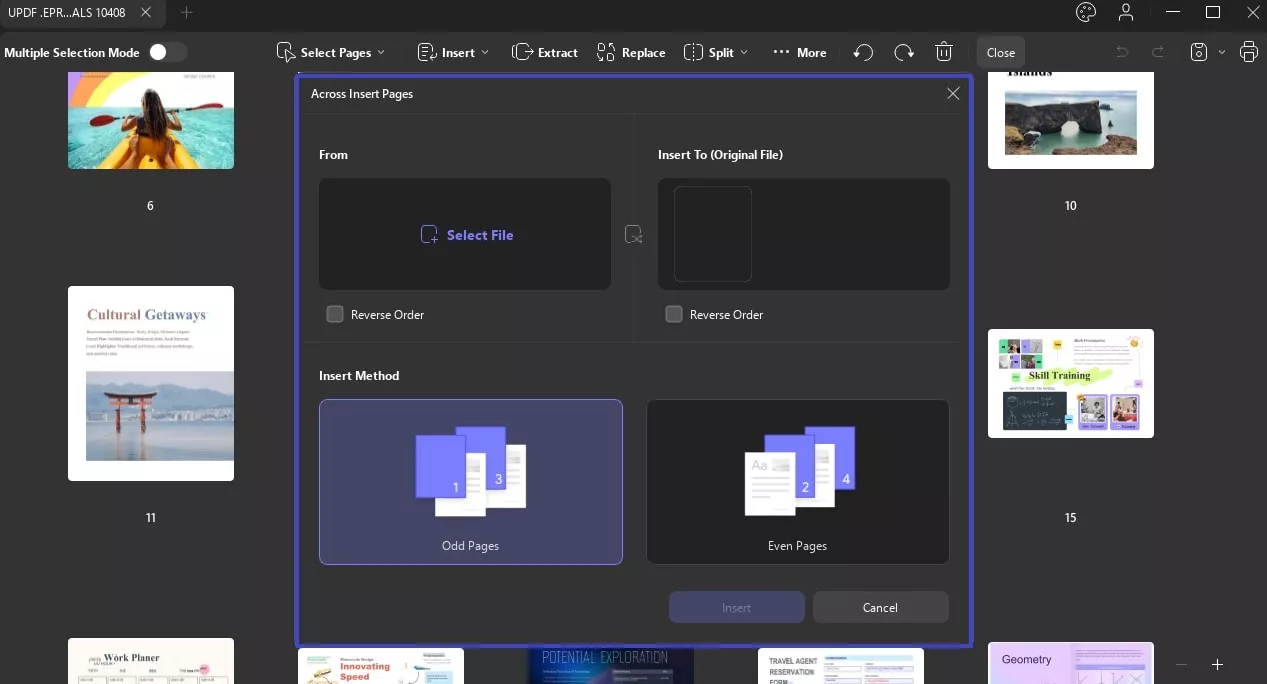
- Tek Sayfalar: Tek Sayfalar seçeneğini seçerek bunları orijinal dosyanıza tek sayfa olarak ekleyebilirsiniz.
- Çift Sayfalar: Seçili PDF sayfalarını orijinal dosyanıza çift sayfalar olarak eklemek istiyorsanız, Çift Sayfa seçeneğini belirleyin.
Yukarıdaki butona tıklamanın yanı sıra, sayfalar arasındaki Artı simgesine de tıklayabilir ve gerektiğinde eklemek için Dosyadan, Görüntüden, Boş Sayfa veya Panodan seçeneğini seçebilirsiniz.

Yukarıda belirtilen yöntemlerin dışında, UPDF ayrıca küçük resim yoluyla sayfa eklemenize de olanak tanır. İşte nasıl:
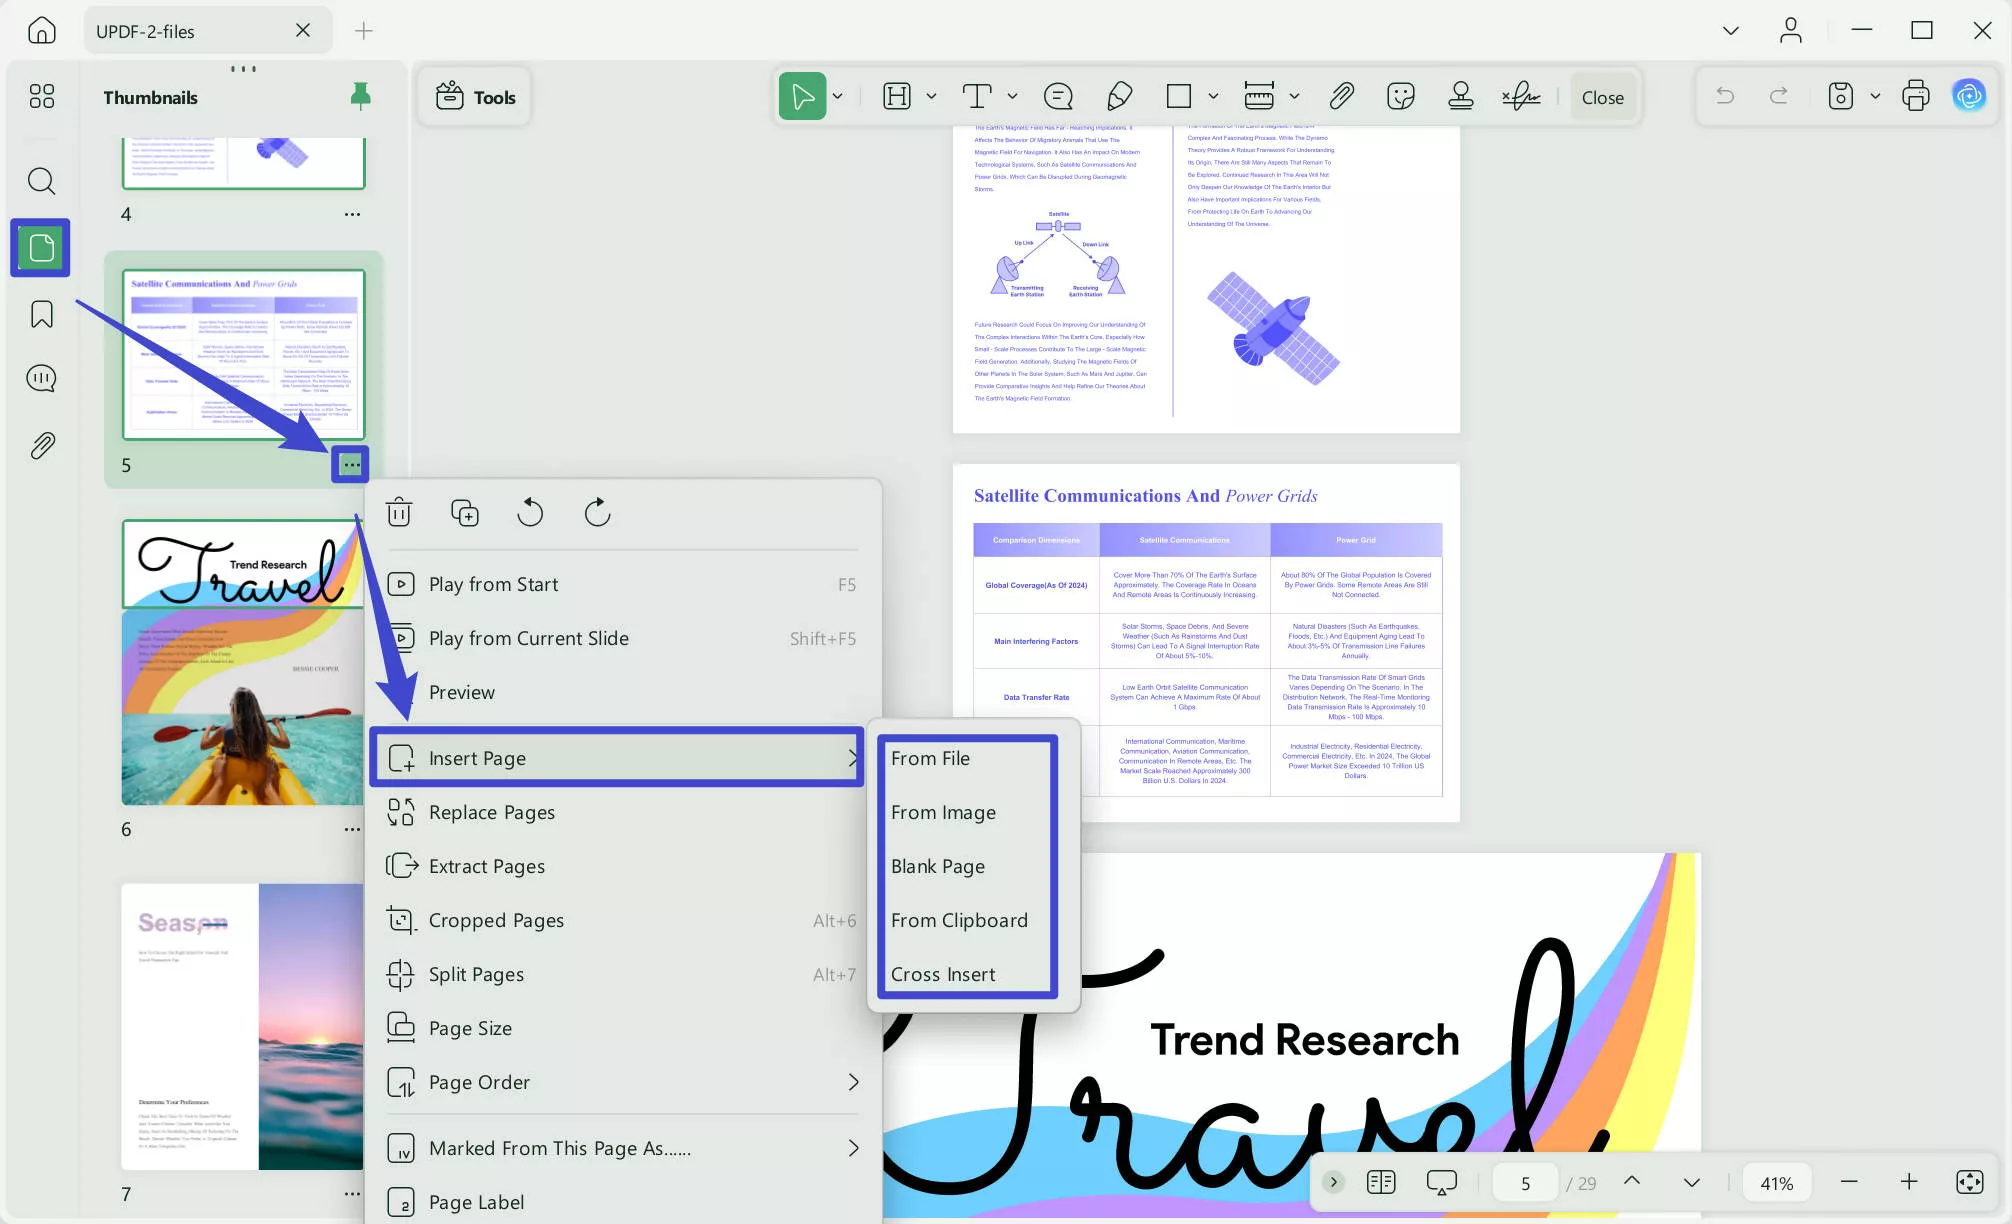
Adım 1: Küçük resim görünümünün etkinleştirildiğinden emin olun. Değilse, sol alt köşedeki küçük resim simgesine tıklayın.
Adım 2: “Üç Nokta”ya tıklayın veya sağ tıklayarak “Sayfa Ekle”yi seçin, ardından ihtiyacınız olan seçenekleri belirleyin.
4. Sayfaları Değiştir
UPDF ayrıca sayfaları başka bir PDF dosyasıyla değiştirmenize de olanak tanır. Belirli bir sayfayı tek sayfalık bir PDF ile değiştirmenin yolu şöyledir:
- Sayfaları Düzenle modunda değiştirmek istediğiniz sayfayı seçin.
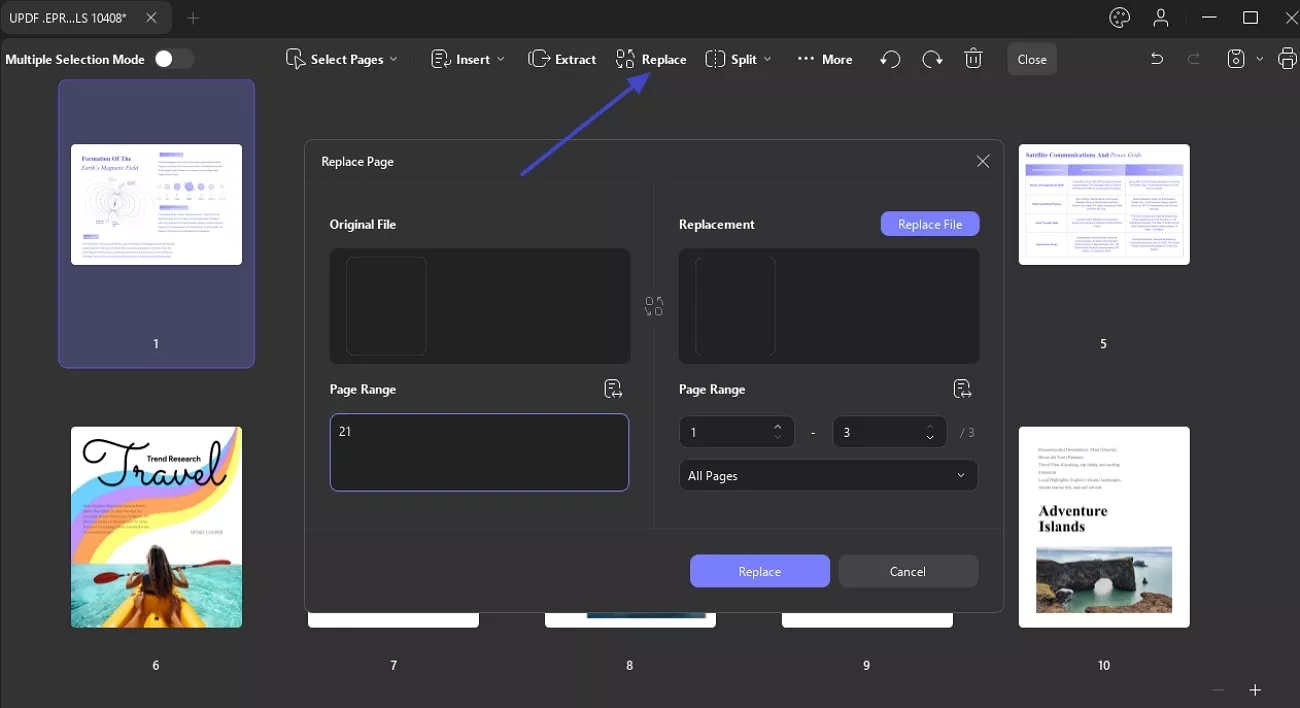
- Üst araç çubuğundaki ' Değiştir ' seçeneğine tıklayın .
- Değiştirmek istediğiniz tek sayfalık PDF'yi seçin ve ' Aç'a tıklayın . Seçilen sayfa değiştirilecektir.
Birden fazla belirli sayfayı çok sayfalı bir PDF ile değiştirmek için:
- Değiştirmek istediğiniz sayfaları seçin ve üst araç çubuğundaki ' Değiştir ' seçeneğine tıklayın. Örneğin, üç belirli sayfa seçtiyseniz.
- Yerel depolama alanınızdan çok sayfalı PDF'yi seçin. UPDF, ekleme için sayfa aralığını özelleştirmenizi isteyecektir. Devam etmek için ' Değiştir ' düğmesine tıklayın. (Seçilen sayfaları değiştirmek için dört sayfalık bir PDF kullanıyorsanız, ayarları dikkatlice özelleştirdiğinizden emin olun.)
- Seçilen sayfalar seçilen PDF'deki sayfalarla değiştirilecektir.
5. Sayfaları Çıkarın
Ayrıca yeni bir dosya oluşturmak için UPDF'deki sayfaları da çıkarabilirsiniz. İşte nasıl:
- ' Sayfaları Düzenle ' menüsüne tıklayarak sayfa yönetim moduna geçin .
- PDF'inizden çıkarmak istediğiniz sayfaları seçin. Ardından, üst araç çubuğundaki ' Çıkart'a tıklayın.
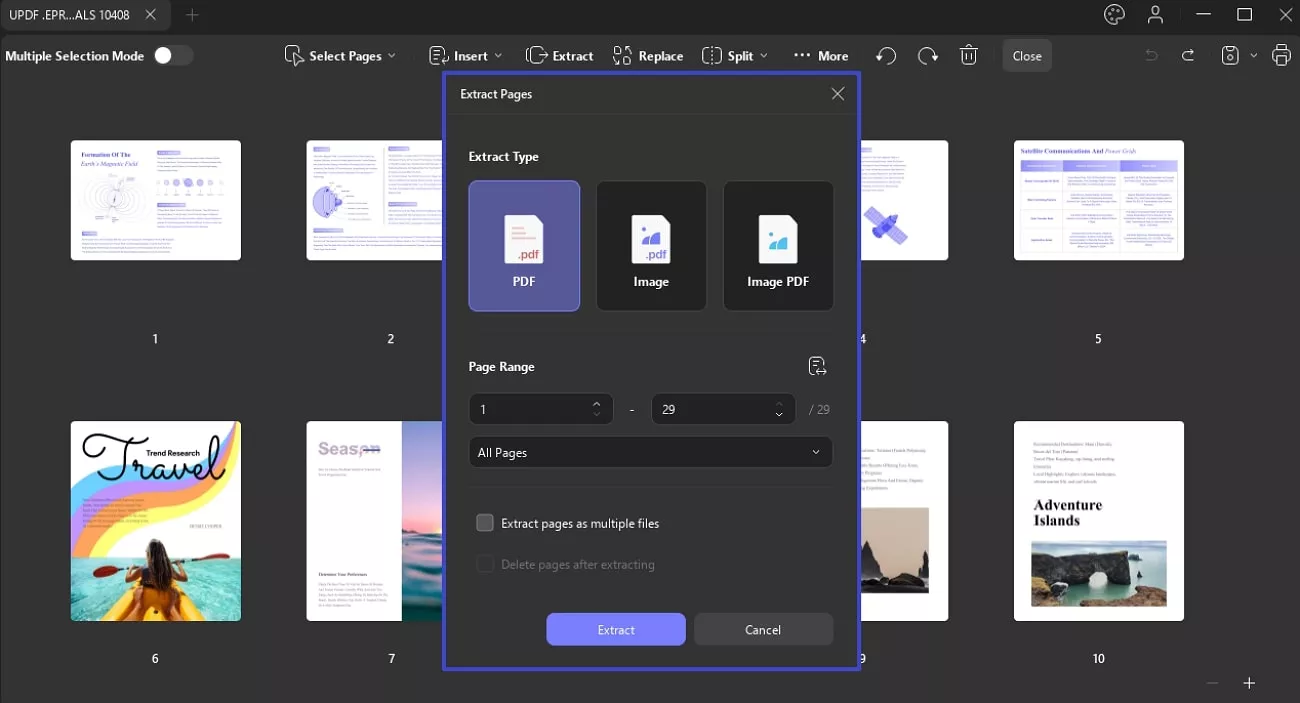
- UPDF bir onay penceresi gösterecektir. Burada PDF, Görüntü ve Görüntü PDF seçeneklerinden Çıkarma Türünü görebilirsiniz . Çıkarılacak sayfa aralığını seçebilirsiniz. Ayrıca sayfaları birden fazla dosya olarak çıkarmayı ve çıkarma işleminden sonra seçili sayfaları silmeyi seçebilirsiniz.
- Onayladıktan sonra ' Çıkart'a tıklayın , çıkarılan sayfaları kaydetmek için bir klasör seçin ve ' Kaydet'e tıklayın . Seçilen sayfalar yeni bir dosyaya çıkarılacak ve seçtiğiniz konuma kaydedilecektir.
6. Sayfaları Böl
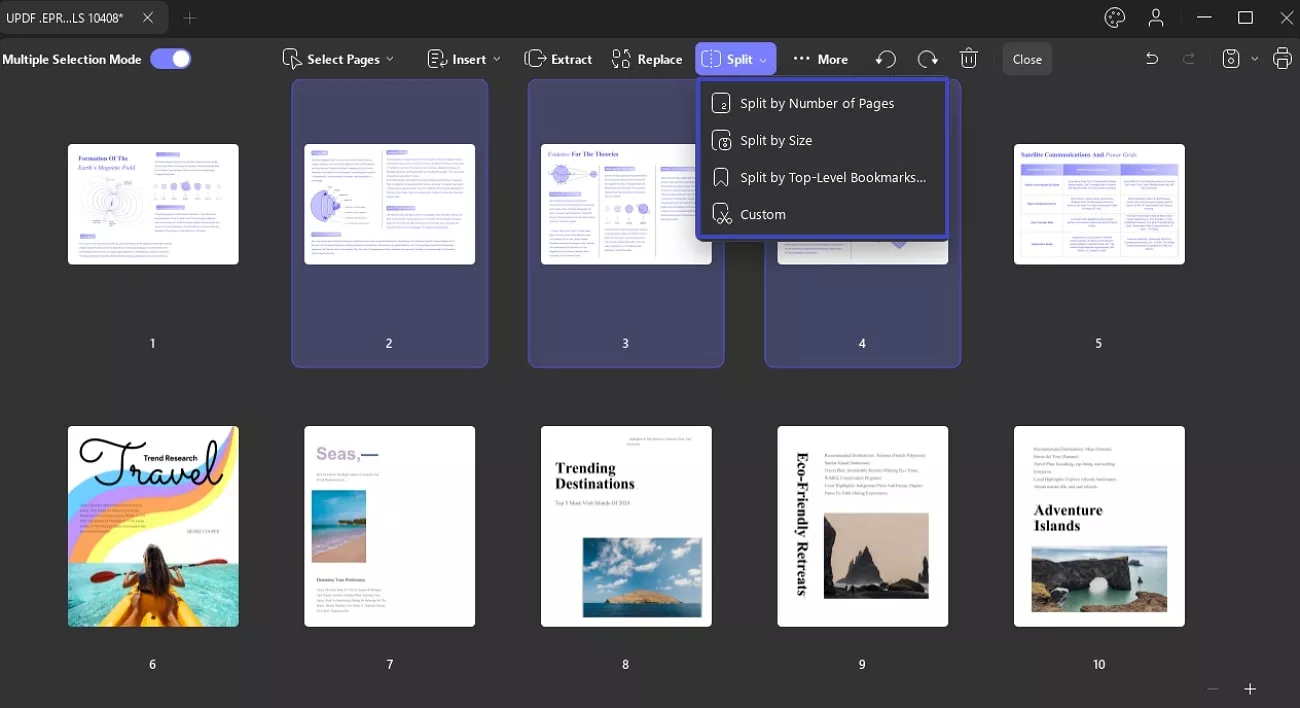
UPDF, sayfaların sayfa sayısına, boyuta, en üst düzey yer imlerine ve özel bölme aralığına göre bölünmesini destekler.
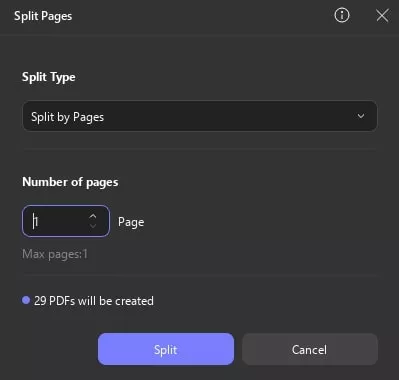
Yöntem 1. Sayfa Sayısına Göre Bölme
Bu seçenek, çok sayfalı bir PDF'yi birkaç küçük PDF'ye bölmenize olanak tanır. Örneğin, PDF'niz 23 sayfadan oluşuyorsa, istediğiniz sayıyı elle girerek 23'e kadar istediğiniz sayıda PDF'ye bölmeyi seçebilirsiniz.
Yöntem 2. Boyuta Göre Bölme
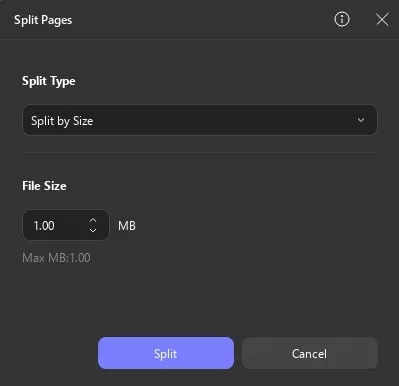
' Boyuta Göre Böl'ü seçerseniz , UPDF her bölünmüş PDF için belirli boyutu girmenizi ister. İstenilen boyutu girdikten sonra, onaylamak için ' Böl ' düğmesine tıklayın. UPDF daha sonra belirtilen boyuta göre birden fazla PDF oluşturur ve bu PDF'lerin tümü seçili dizindeki bir klasöre kaydedilir.
Aşağıdaki görsel 17.12MB'lık bir PDF'i bölerken onay arayüzünü göstermektedir.
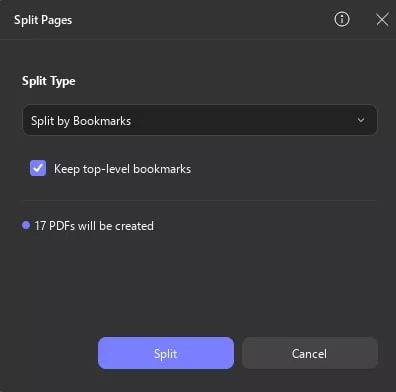
Yöntem 3. Üst Düzey Yer İşaretlerine Göre Bölme
Adından da anlaşılacağı gibi, bu yöntem çok sayfalı bir PDF'yi en üst düzey yer imlerine göre bölmenize olanak tanır. Bu yöntemi kullanmadan önce, doğru bölme için PDF'ye en üst düzey yer imleri eklediğinizden emin olun.
Yöntem 4. Özel Bölme Aralığı
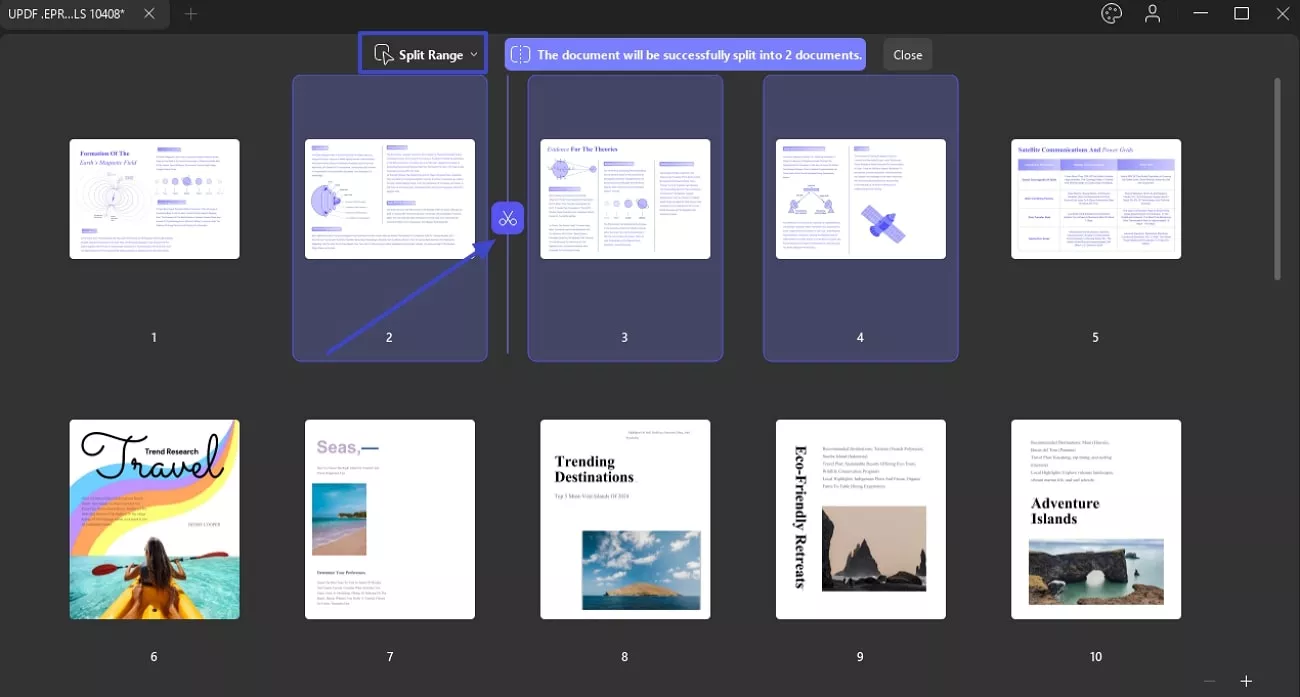
UPDF ayrıca özel bir sayfa aralığı kullanarak çok sayfalı bir PDF'yi bölmenize de olanak tanır.
Bu yöntemi seçtikten sonra, sol panel PDF sayfalarının küçük resimlerini görüntüler. Bölmeyi başlatmak istediğiniz sayfanın üzerine gelin ve makas simgesine tıklayın. Daha sonra, belge başarıyla 2 belgeye bölünecek düğmesine basın ve bölünmüş PDFs.irm'yi kaydetmek için bir konum seçin ve ' Böl ' düğmesine tıklayarak bölünmüş PDF'leri kaydetmek için bir konum seçin.
7. Sayfa Etiketi, Sırası ve Boyutu
UPDF, aşağıdaki özellikleri seçebileceğiniz Daha Fazla seçeneği sunar :
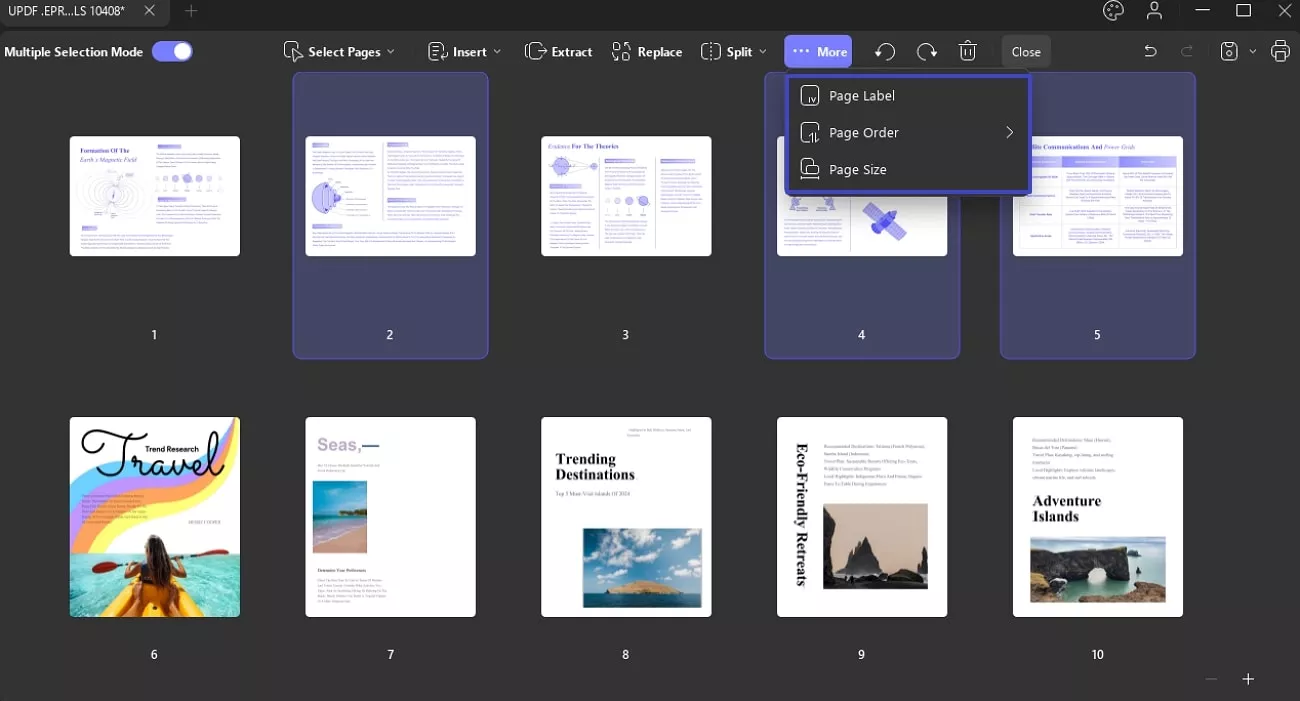
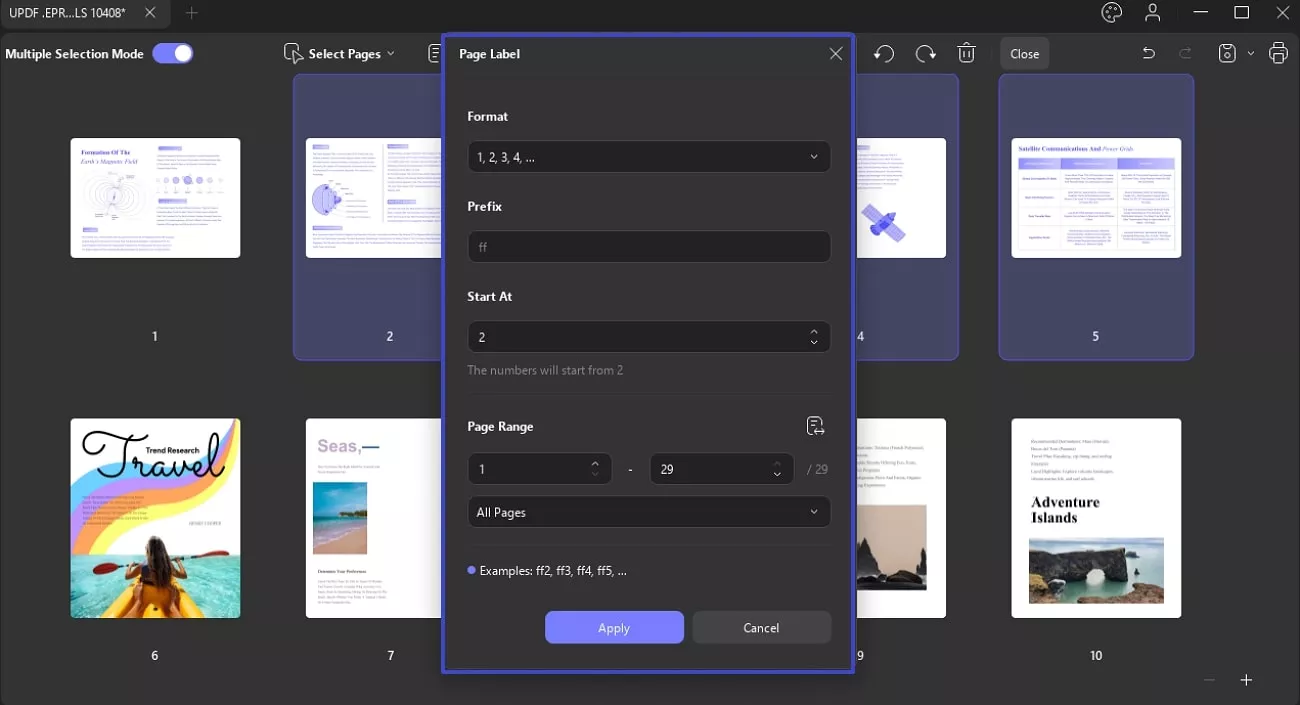
- Sayfa Etiketi: PDF sayfalarınıza Roma rakamları veya alfabetik sıra gibi farklı formatlarda etiketler ekleyebilirsiniz.
- Prefix kısmından sayfanın ilk harfini ff1, ff2, ff3 gibi değiştirmenize olanak sağlar.
- Start AT kısmından sayfalara ff2, ff3 gibi önekler kullanarak isim verebilirsiniz.
- UPDF, sayfaları Tüm, Çift ve Tek sayfalar gibi Sayfa Aralığına göre istediğiniz gibi düzenlemenize olanak tanır .
2. Sayfa Sırası: Sayfa Sırası seçeneğinden üç ek seçeneğe ulaşabilirsiniz:
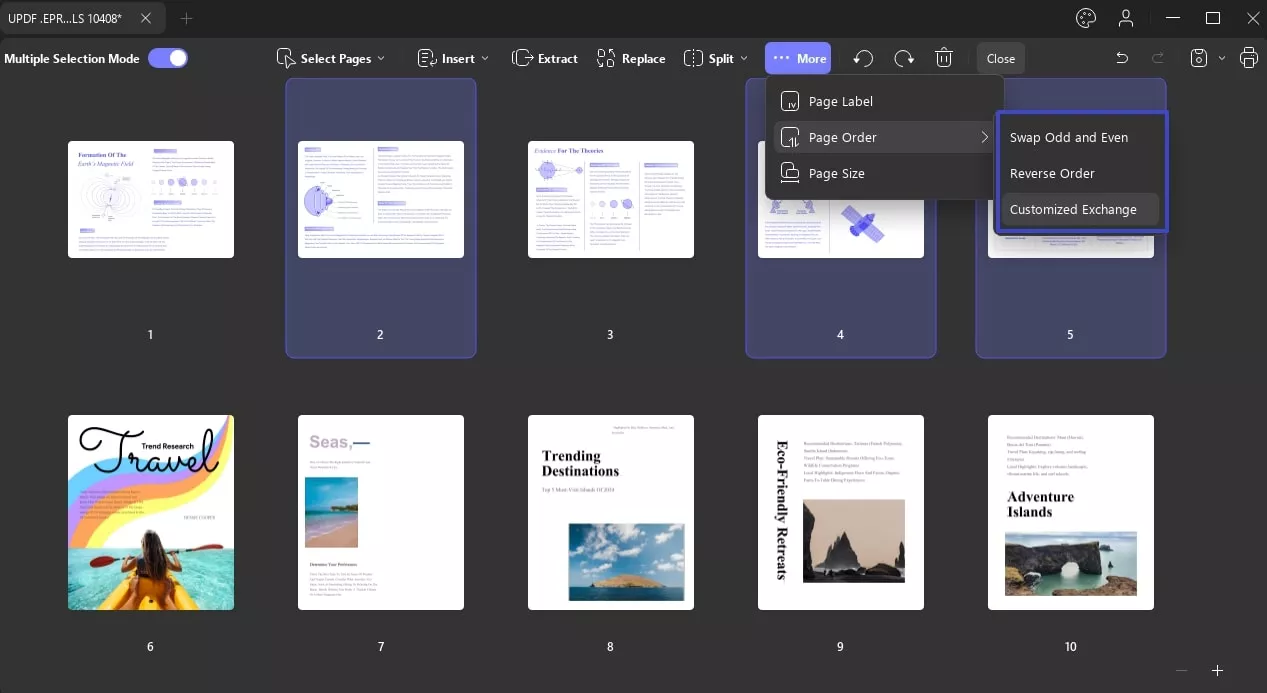
- Tek Sayıyı Çift Sayıya Değiştir: Bu seçenekle, ihtiyacınıza göre sayfa sırasını çift sayıdan tek sayıya ve tek sayıdan çift sayıya değiştirebilirsiniz.
- Ters Sıralama: Ters Sıralama seçeneğini kullanarak belge sayfalarınızın sırasını da tersine çevirebilirsiniz .
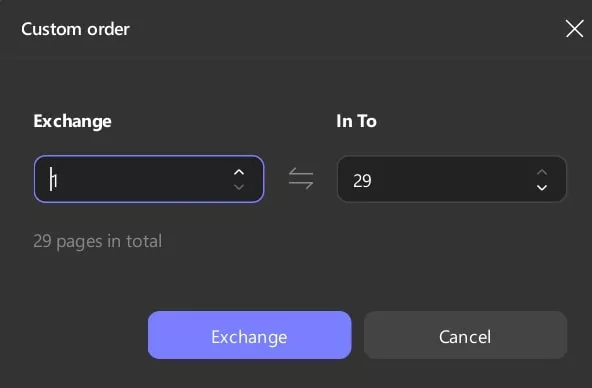
- Exchange'i Özelleştir: Sayfaları değiştirmek istiyorsanız Exchange ve Kime kısmına rakamı yazarak Exchange'i Özelleştir seçeneğini seçebilirsiniz .
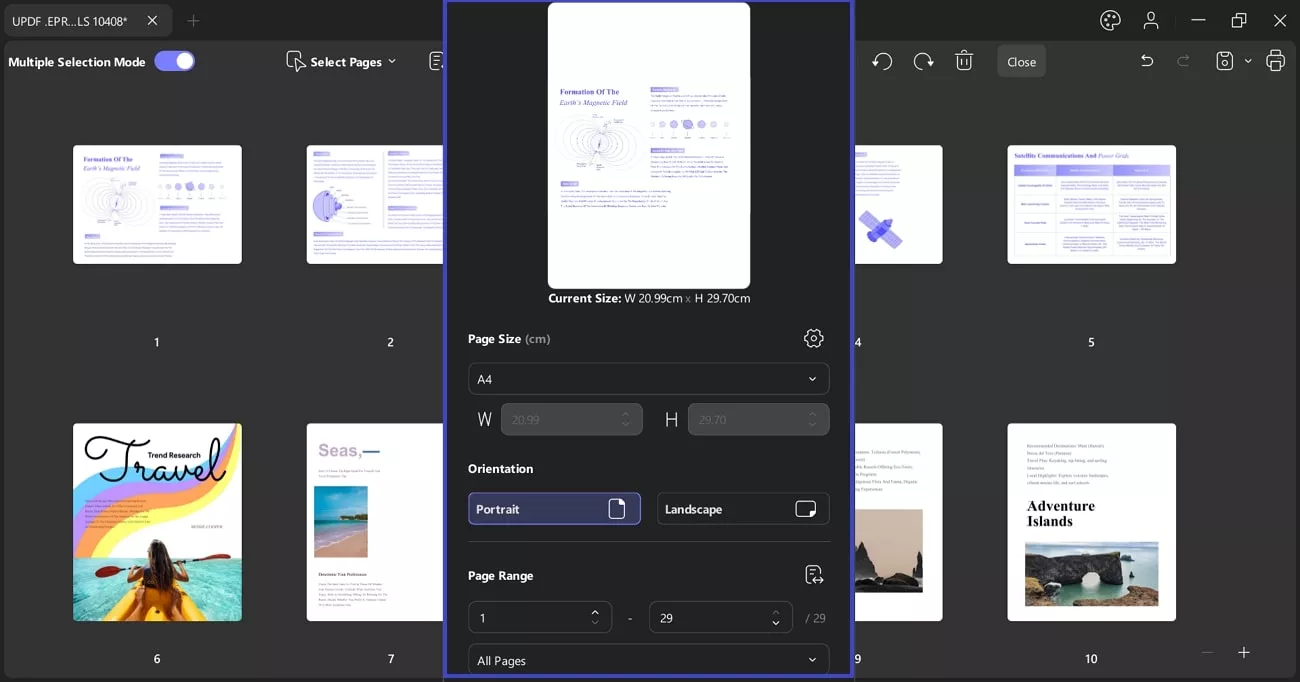
3. Sayfa Boyutu: UPDF, sayfa boyutunu A4 gibi cm cinsinden değiştirmenize, ayrıca sayfanın Genişliğini ve Yüksekliğini özelleştirerek değiştirmenize olanak tanır.
- Sayfaları Dikey veya Yatay yönde değiştirebilirsiniz.
- Numaraları yazarak, başlangıçtan bitişe kadar boyutunu değiştirmek istediğiniz sayfaların sayfa aralığını belirleyebilirsiniz.
8. Sayfaları Döndür
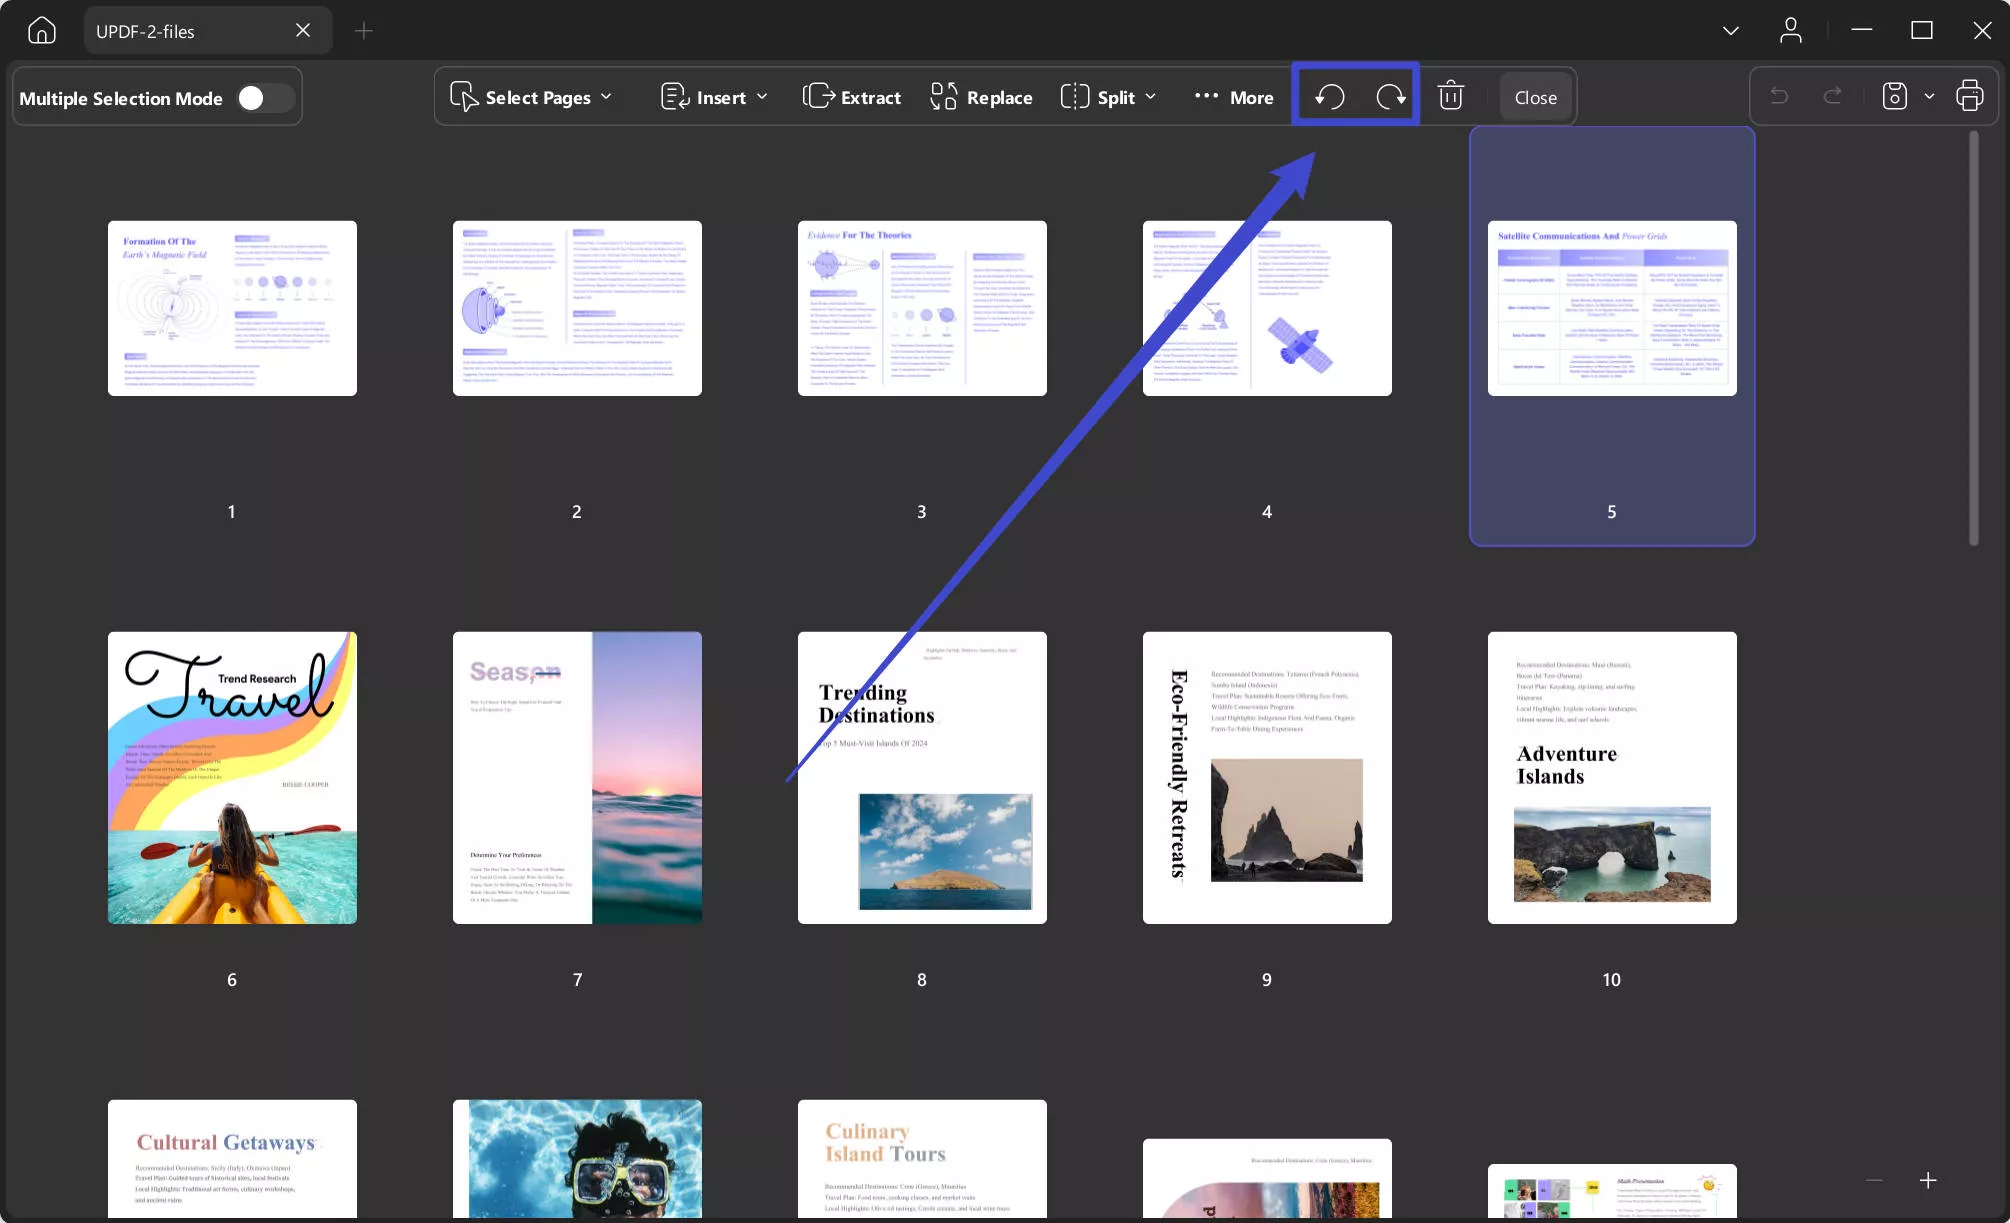
Belirli bir sayfayı döndürmek için sayfaya tıklayın ve ardından Saat Yönünün Tersine Döndür veya Saat Yönünde Döndür seçeneğini belirleyin.
9. Sayfaları Sil
Ayrıca PDF belgelerinizden istenmeyen sayfaları da silebilirsiniz. İşte nasıl:
- Birincil Sayfaları Düzenle işlevine gidin.
- Silmek istediğiniz sayfaları seçin. Üst araç çubuğundaki ' Sil ' seçeneğine tıklayın veya klavyenizdeki ' Sil ' tuşuna basın.
Not: Tek seferde silmek için tek bir sayfayı veya birden fazla sayfayı seçebilirsiniz.
Sayfaları sildikten sonra dosyayı kaydetmeyi unutmayın.
10. Yakınlaştırma ve uzaklaştırma
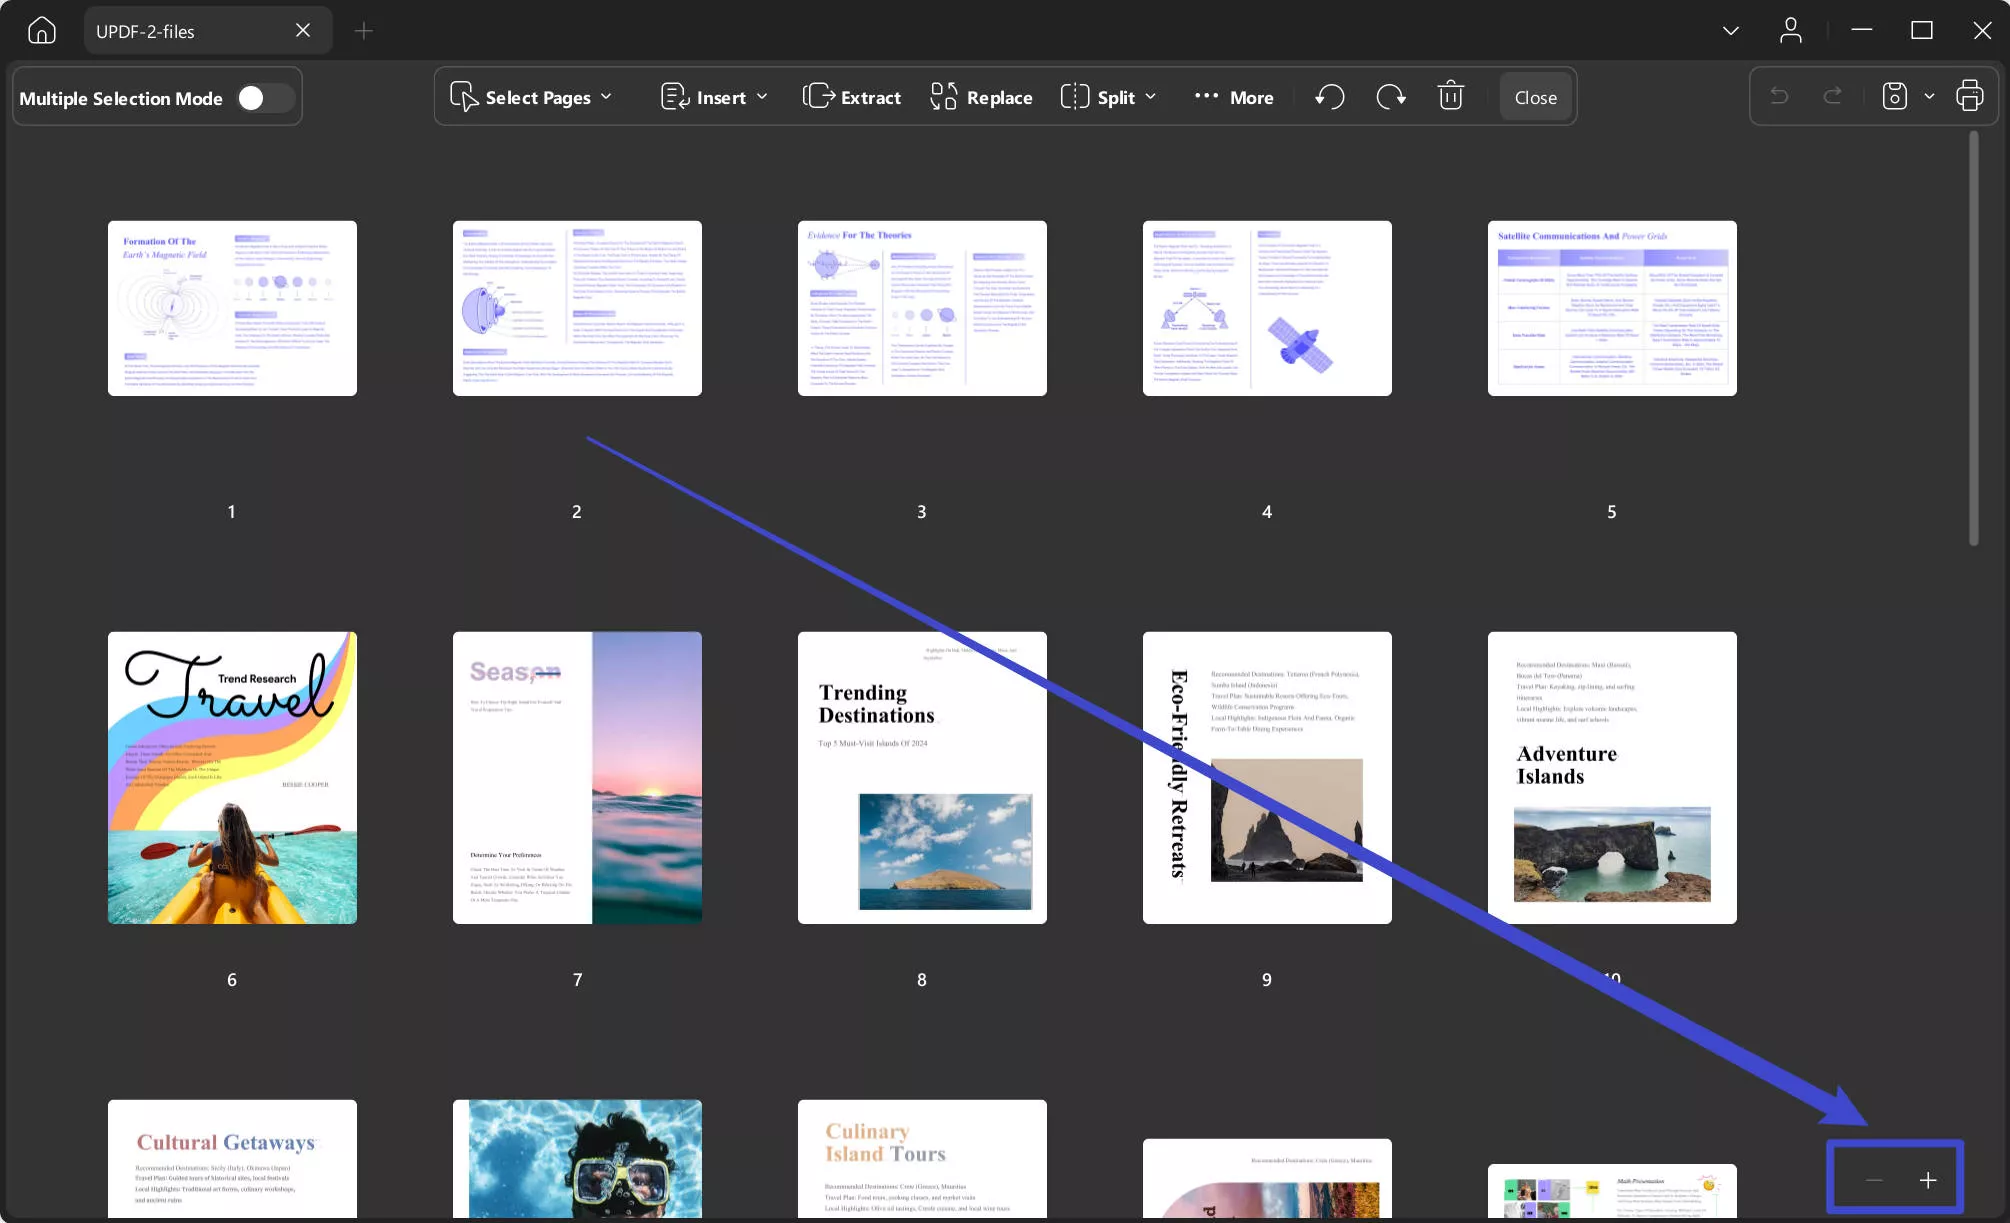
Sayfaları Düzenle modunda, küçük resim önizlemesini yakınlaştırabilir veya uzaklaştırabilirsiniz. Bu, özellikle küçük metinli bir PDF'yi düzenlerken faydalıdır.
 UPDF
UPDF
 UPDF için Windows
 UPDF Mac için
 iPhone/iPad için UPDF
 UPDF için Android
 UPDF AI Online
 UPDF Sign
 PDF Düzenle
 PDF Not Ekle
 PDF Oluştur
 PDF Formu
 Linkleri Düzenle
 PDF Dönüştür
 OCR
OCR PDF → Word
 PDF → Görsel
 PDF → Excel
 PDF Düzenle
 PDF Birleştir
 PDF Böl
 PDF Kırp
 PDF Döndür
 PDF Koru
 PDF İmzala
 PDF Düzenle
 PDF Temizle
 Güvenliği Kaldır
 PDF Oku
 UPDF Bulut
 PDF Sıkıştır
 PDF Yazdır
 Toplu İşlem
 UPDF AI Hakkında
 UPDF AI Çözümleri
 Yapay Zeka Kullanım Kılavuzu
 UPDF AI Hakkında Sıkça Sorulan Sorular
 PDF'yi Özetle
 PDF'yi Çevir
 PDF'yi açıkla
 PDF ile sohbet edin
 Yapay Zeka ile Sohbet
 Görüntü ile sohbet
 PDF'den Zihin Haritasına
 Akademik Araştırma
 Makale Arama
 Yapay Zeka Düzeltici
 Yapay Zeka Yazarı
 Yapay Zeka Ödev Yardımcısı
 Yapay Zeka Test Oluşturucu
 Yapay Zeka Matematik Çözücü
 PDF to Word
 PDF to Excel
 PDF to PowerPoint
 Kullanıcı Kılavuzu
 UPDF Püf Noktaları
 Sıkça Sorulan Sorular
 UPDF Yorumları
 İndirme Merkezi
 Blog
Blog Haber Merkezi
 Teknik Özellikler
 Güncellemeler
 UPDF vs. Adobe Acrobat
 UPDF vs. Foxit
 UPDF vs. PDF Expert

