Maak PDF op Windows met UPDF
UPDF voor Windows maakt PDF-bestanden van diverse bronnen, zoals Word, Excel, PowerPoint en afbeeldingen die op uw apparaat zijn opgeslagen. Bovendien biedt deze versie verbeterde functionaliteit, zodat u PDF's rechtstreeks vanaf het klembord en gescand papier kunt genereren. Zelfs als het om papierwerk gaat, kunt u nu probleemloos meerdere PDF's tegelijk maken.
Probeer het nu door op onderstaande downloadknop te klikken.
Windows • macOS • iOS • Android 100% veilig
Bovendien ondersteunt UPDF batch-creatie , waardoor u één of meerdere PDF's kunt maken van verschillende bestanden in ondersteunde formaten.
- Een PDF maken van een bestand
- Een PDF maken van een lege pagina
- Meerdere PDF's tegelijk maken
- Een PDF maken vanuit een scanner
Methode 1. Een PDF maken van een bestand
Optie 1. Maak een PDF van een Word/Excel/PowerPoint/CAJ-bestand
Het kan voorkomen dat u een document in een ander formaat hebt en dit naar een PDF moet converteren. In dat geval opent u gewoon UPDF en importeert u uw bestand via Open File om uw document automatisch als PDF te openen. U kunt ook de onderstaande stapsgewijze handleiding volgen om een PDF te maken vanuit CAJ/Word/PowerPoint of Excel:
- Open UPDF en klik op de knop ' Extra ' hieronder. Selecteer vervolgens 'Anders' in het pop-upvenster.
- Kies de optie uit de volgende lijst: PDF van afbeelding , PDF van Word , PDF van Excel , PDF van PowerPoint , PDF van CAJ .
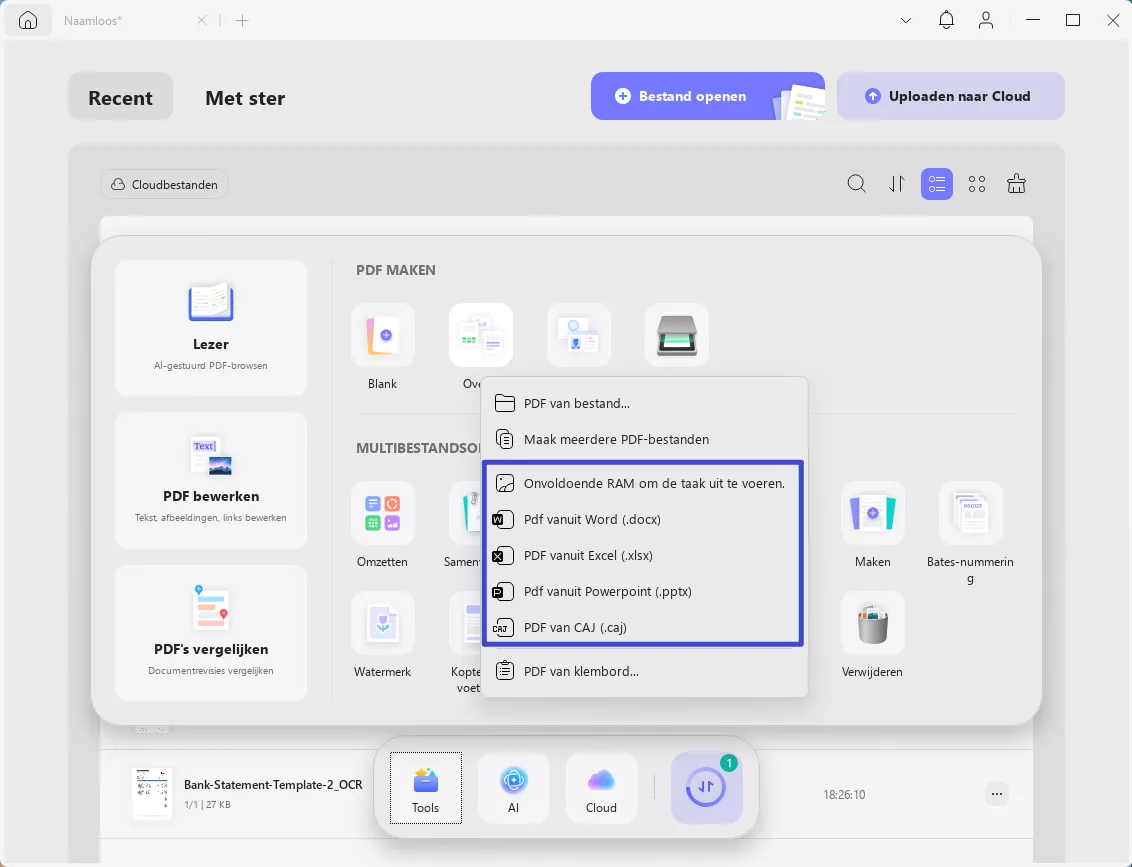
- U wordt gevraagd een document op uw apparaat te selecteren. Kies en klik op de knop 'Openen'. UPDF converteert het geselecteerde bestand vervolgens automatisch naar een PDF. Selecteer eenvoudig een locatie om het op te slaan.
- U kunt er ook voor kiezen om het bestand dat u wilt converteren naar een PDF, rechtstreeks te slepen en neer te zetten met de UPDF-versie.
Optie 2. Creëren vanuit afbeeldingen
UPDF ondersteunt verschillende afbeeldingsformaten, waaronder PNG , JPG , JPEG , BMP en TIF , die eenvoudig naar PDF-bestanden kunnen worden geconverteerd. Volg de onderstaande stappen om een PDF van uw afbeeldingen te maken:
- Open UPDF en klik op de knop ' Extra ' hieronder. Selecteer vervolgens ' Overig ' in het pop-upvenster.
- Kies uit de lijst de optie PDF van afbeelding .
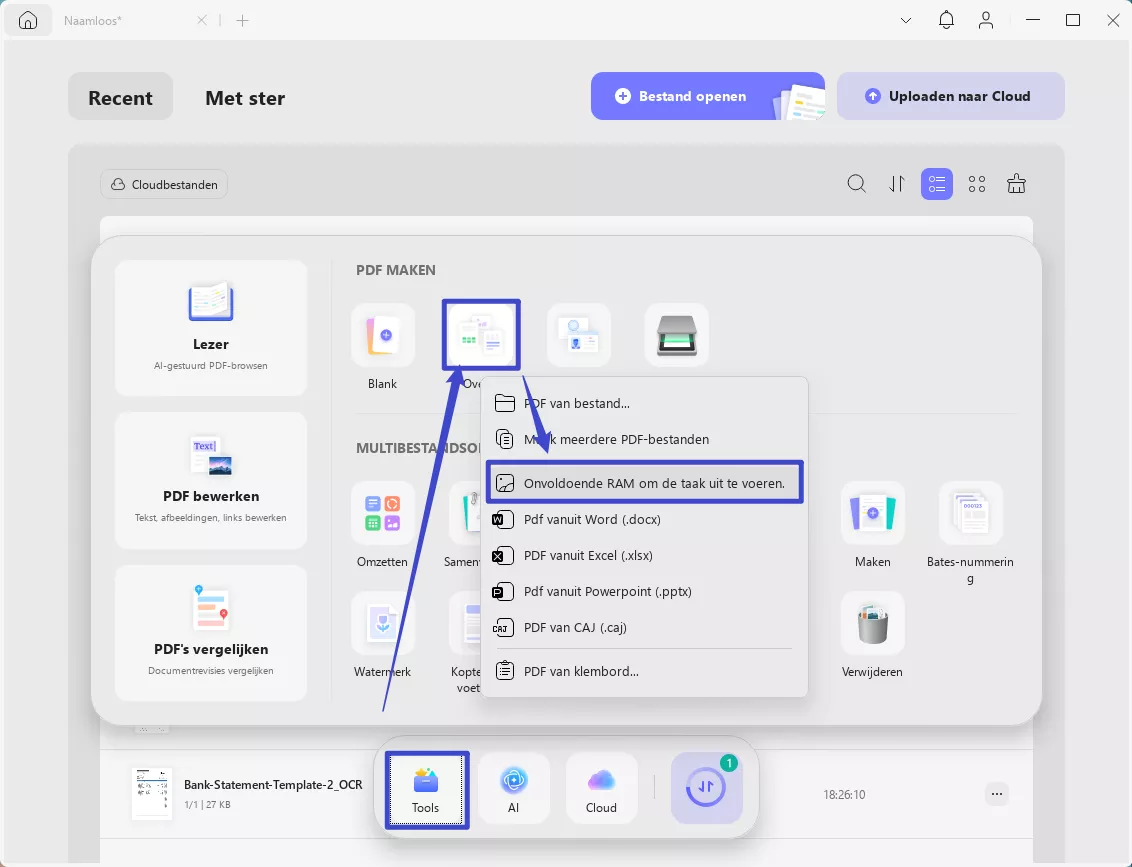
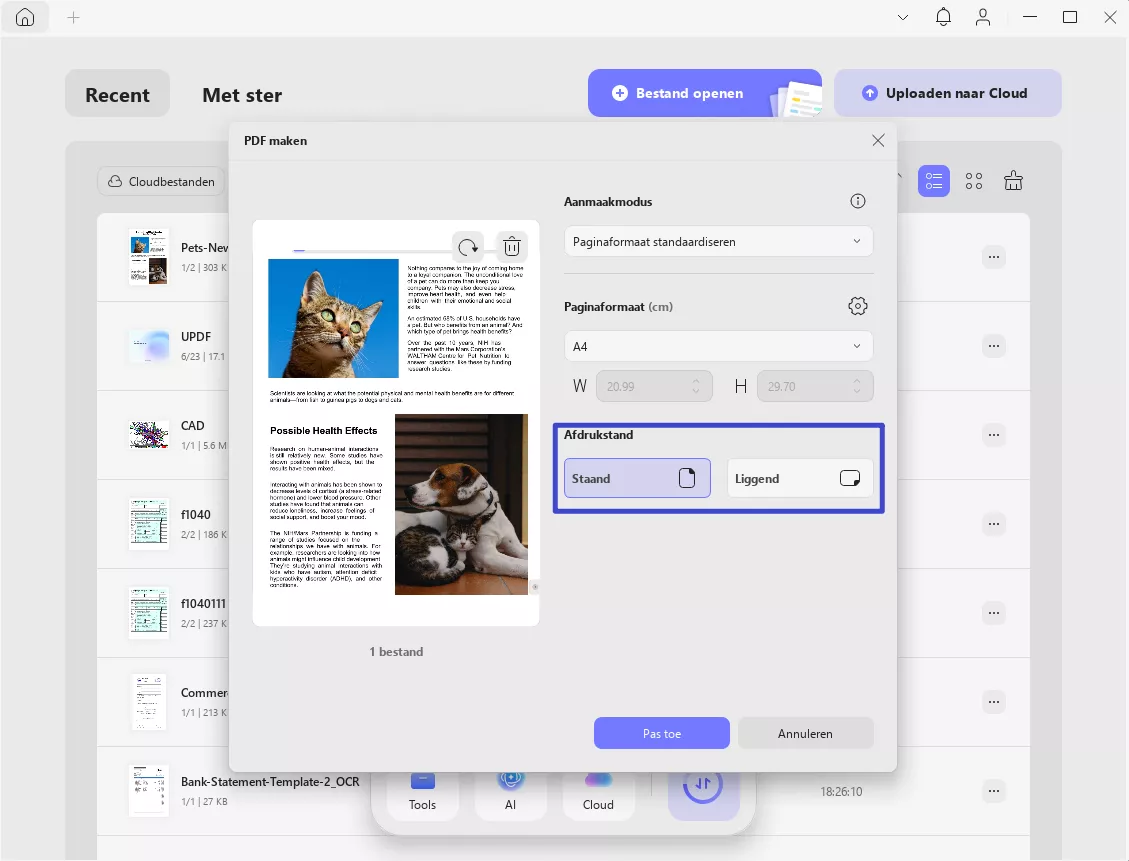
- U wordt gevraagd de documentbron te kiezen die u naar PDF wilt converteren. Kies het afbeeldingsbestand op uw apparaat. Als u meerdere afbeeldingen selecteert, vinkt u de optie 'Combineren tot één document' aan , stelt u de paginaformaten in en klikt u op de knop ' Toepassen ' om het bestand te maken.
- Als u er daarentegen voor kiest om een PDF per bestand te genereren , worden deze afbeeldingen omgezet in meerdere afzonderlijke PDF's. U kunt een locatie opslaan om ze één voor één op te slaan, waarna UPDF ze automatisch opent.
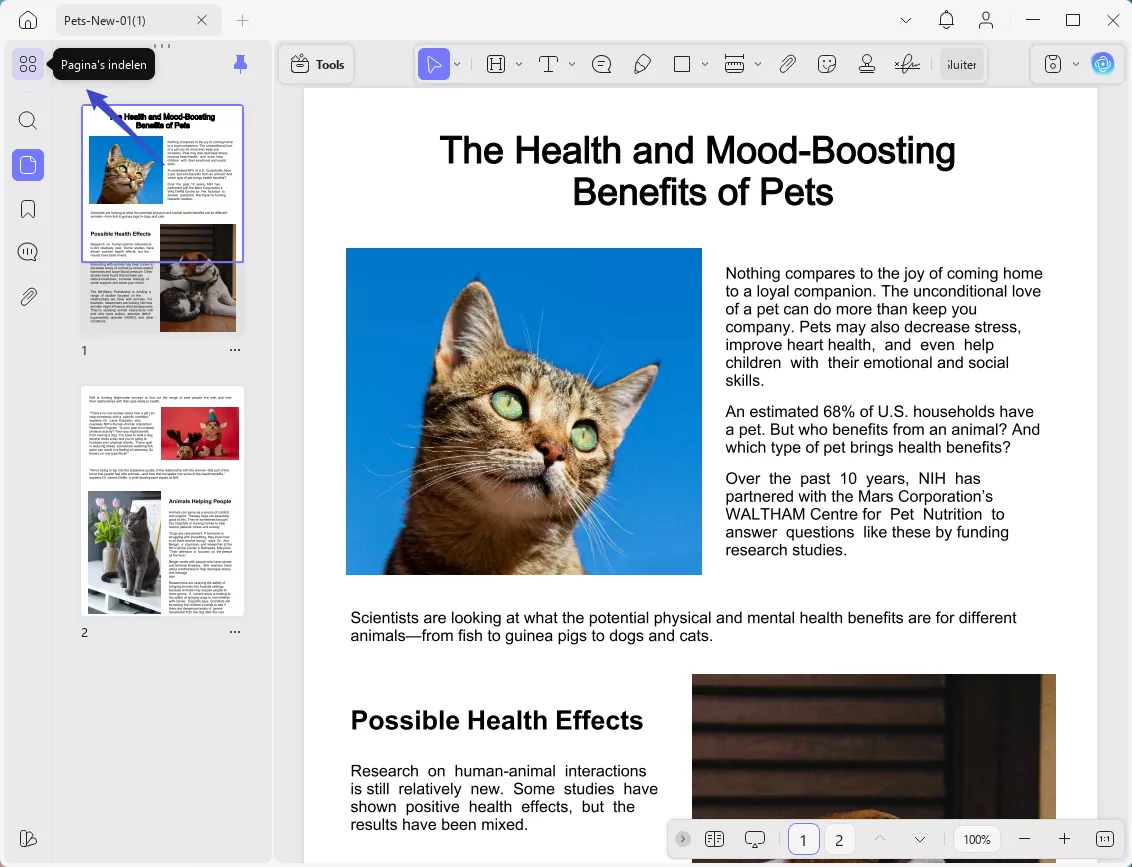
- Wanneer alle geïmporteerde afbeeldingen zijn geconverteerd naar een PDF, kunnen ze verder worden geëxtraheerd, gesplitst en verwijderd met de tool Pagina ordenen . U kunt een locatie kiezen om dit document op te slaan als een PDF/A- of een PDF met afbeeldingen .
Methode 2. Een PDF maken van een lege pagina
U kunt ook een PDF-bestand maken van een lege pagina. Een PDF maken van een lege pagina is een eenvoudige procedure die kan worden uitgevoerd met UPDF. Deze methode is uitstekend geschikt voor het maken van een nieuw PDF-document vanaf nul zonder een bestaand document als uitgangspunt te gebruiken. Stappen voor het maken van een lege pagina:
- Open de UPDF-software en vouw het menu Extra uit in de hoofdinterface.
- Selecteer uit de gegeven opties de optie Leeg om er een te maken.
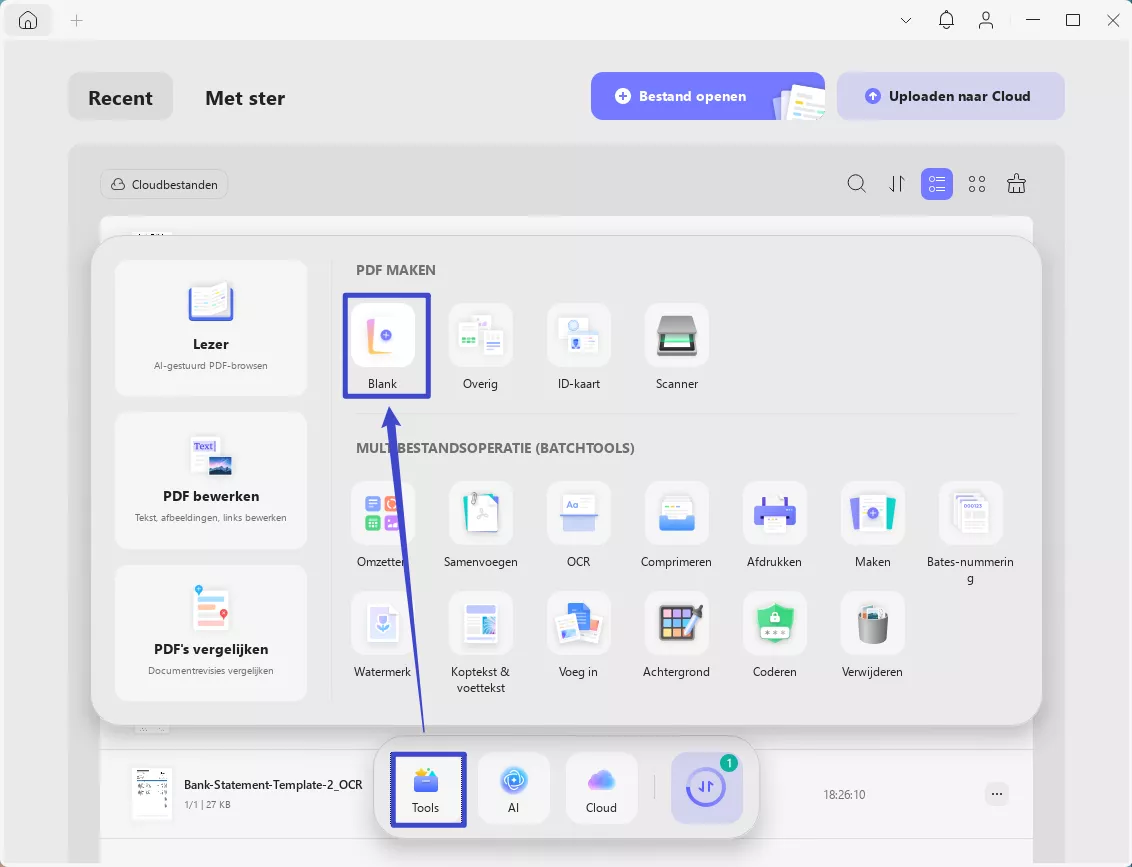
- Er verschijnt een klein venster waarin u de paginaopmaak kunt aanpassen, zoals de bestandsnaam, het aantal pagina's, het paginaformaat, de afdrukstand, de breedte, de hoogte en de papierstijl.
Bestandsnaam: Voer de gewenste naam in voor het aan te maken bestand.
Aantal pagina's: Voer een specifiek aantal in om het aantal pagina's aan te passen.
Paginaformaat: Kies uit Aangepast (voer de gewenste breedte en hoogte in) of uit de opties A0-A8, B0-B8, C5E, Comm10E, DLE en meer.
Stand: Staand of liggend.
Papierstijl: Papierstijl: U kunt uit verschillende opties kiezen, waaronder Leeg, Gestippeld, Gelijnd, Raster, Grafiek en meer.
Methode 3. Meerdere PDF's tegelijk maken
Als je de moeite van het één voor één aanmaken van meerdere PDF's wilt vermijden, biedt UPDF je de oplossing met de batch-PDF-creatiefunctie. Hiermee kun je meerdere PDF's tegelijk aanmaken zonder ingewikkelde procedures. Laten we de stappen eens bekijken.
Let op: Met deze functie kunnen gebruikers meerdere PDF's maken van afbeeldingen, Word, Excel, TXT en andere ondersteunde bestandsformaten. Gebruikers kunnen meerdere formaten tegelijk selecteren. Bovendien kan UPDF meer dan 100 PDF's genereren van de geselecteerde bestanden.
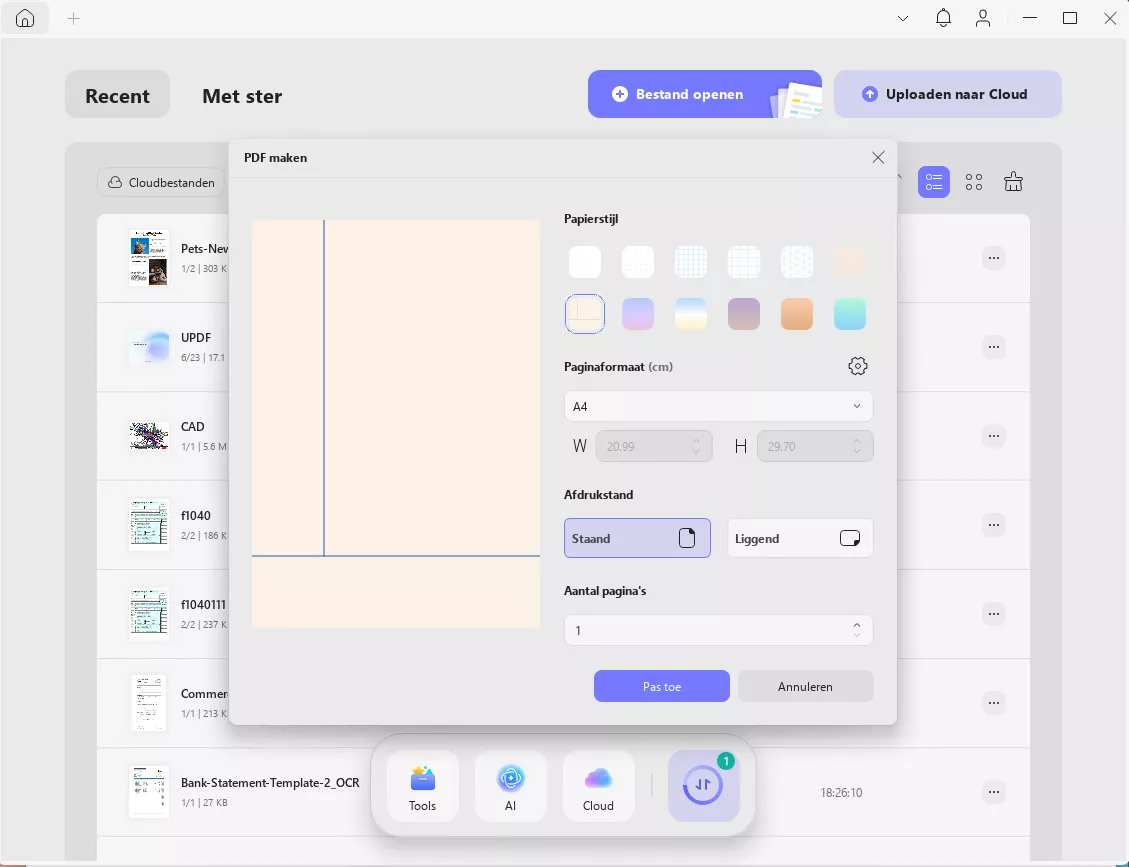
- Zodra u de UPDF-versie hebt geopend, navigeert u op de hoofdpagina naar de optie Extra .
- Ga nu naar het menu ' Overig' en kies de optie 'Meerdere PDF-bestanden maken' uit de lijst.
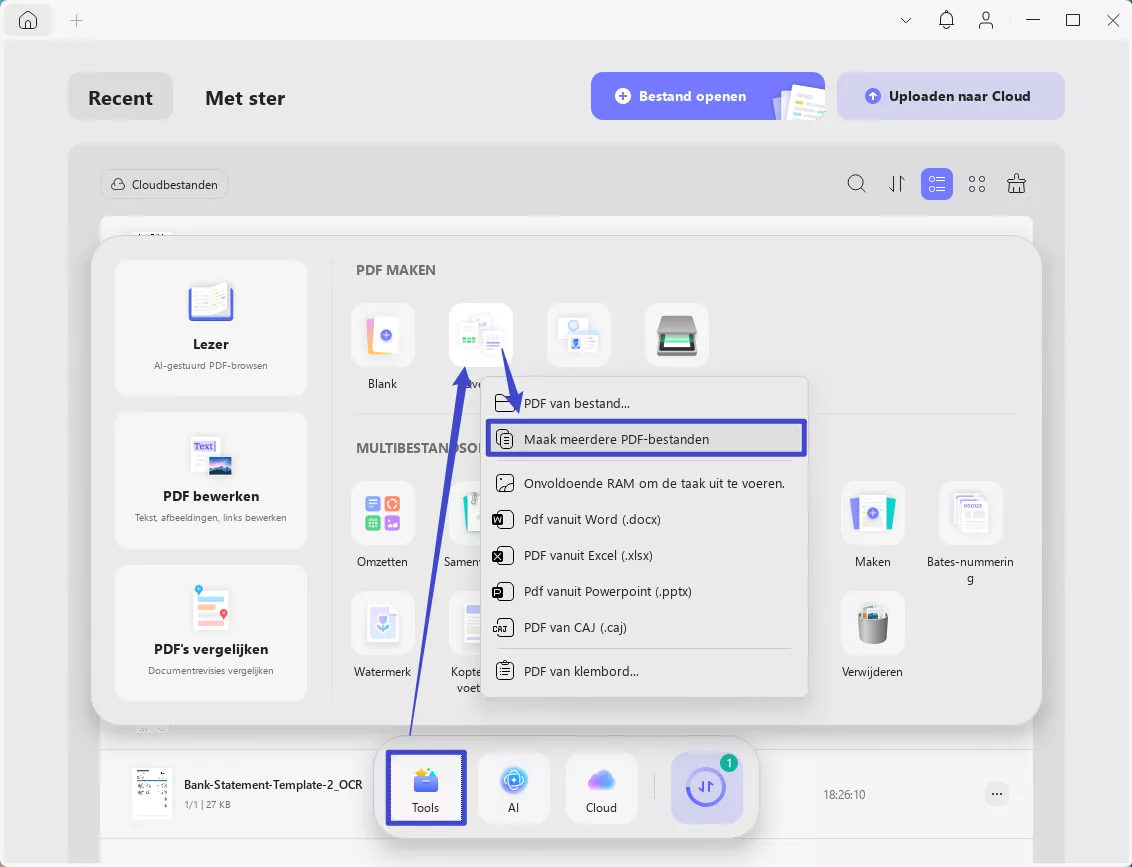
- Voeg nu je bestanden toe door op de knop + Bestanden toevoegen in de rechterbovenhoek van het scherm te klikken. Je kunt ook bestanden slepen en neerzetten om ze toe te voegen. Om een map toe te voegen, open je de vervolgkeuzelijst en selecteer je de optie Mappen toevoegen .
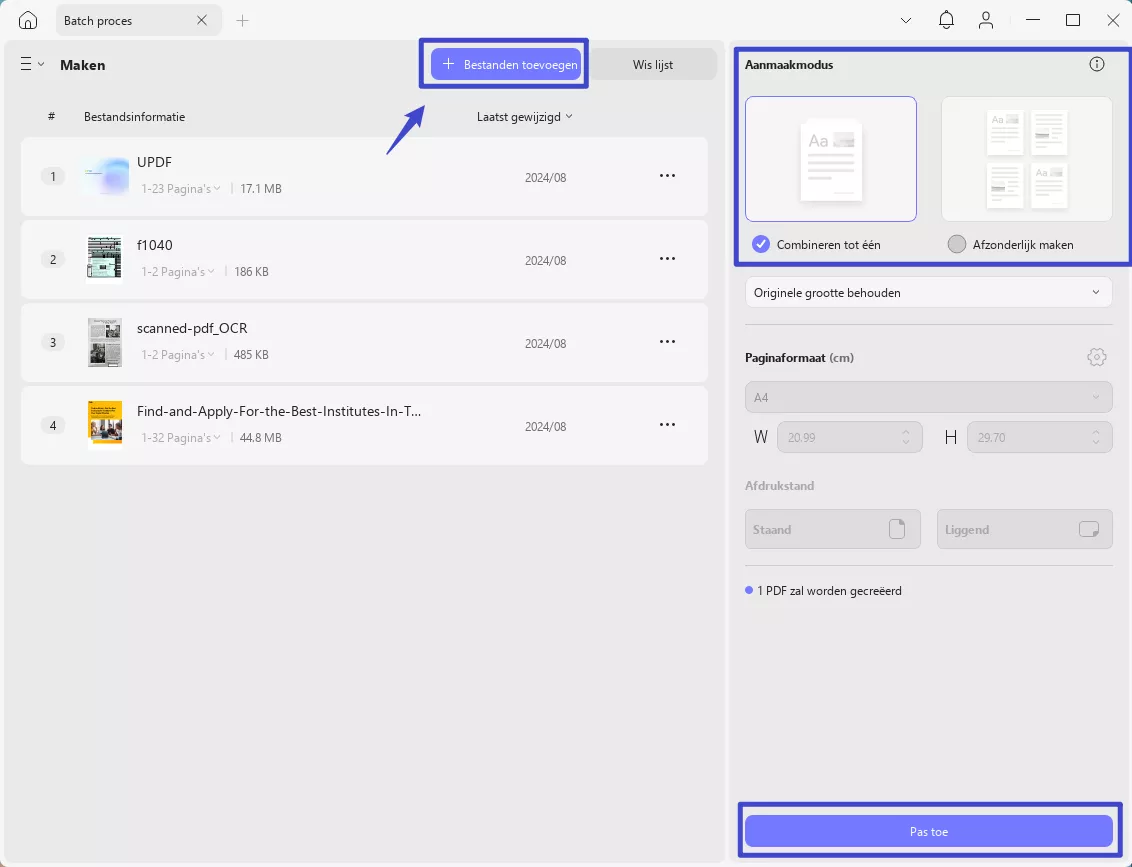
- Kies vervolgens of u één PDF-bestand of meerdere PDF- bestanden wilt maken.
- Pas hierna het Paginaformaat aan via de opties of pas het handmatig aan door de Breedte en Hoogte in te voeren .
- Pas vervolgens de pagina -oriëntatie aan met opties zoals Staand of Liggend . Zodra alle aanpassingen zijn gemaakt, klikt u op de knop Toepassen om het creatieproces te starten.
- Kies ten slotte een locatie om de gemaakte PDF's op te slaan. Alle PDF's die je hebt gemaakt, worden in verschillende tabbladen geopend; je kunt er naar eigen wens aan werken.
Methode 4. PDF maken van scanner
Naast de bovenstaande methoden ondersteunt UPDF voor Windows ook het maken van PDF's vanaf scanners. Vraagt u zich af hoe u er een kunt maken? We hebben een stapsgewijze handleiding voor u. Voordat u verdergaat met de handleiding, moet u ervoor zorgen dat uw computer is aangesloten op uw scanner .
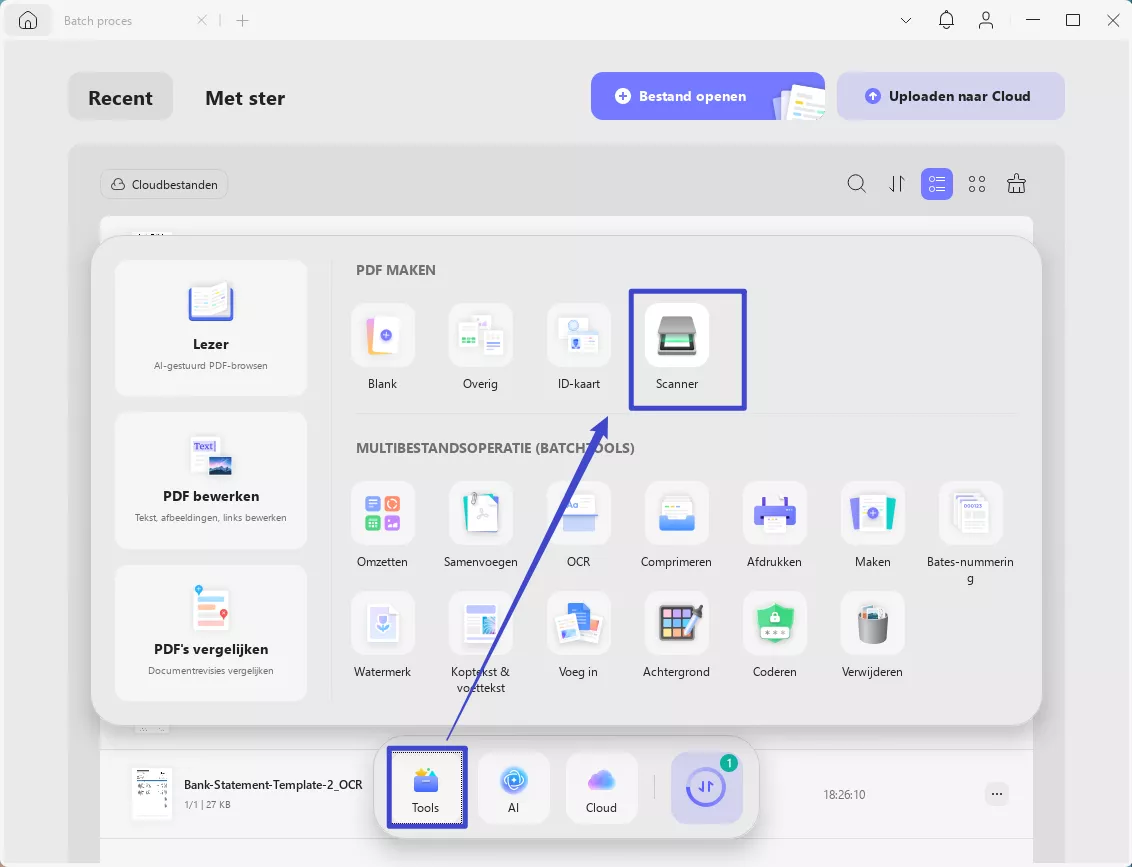
Stap 1. Start UPDF en ga naar het tabblad Extra . Selecteer Scanner in het menu Maken . Zoals eerder vermeld, zorg ervoor dat uw computer al is aangesloten op een scanner.
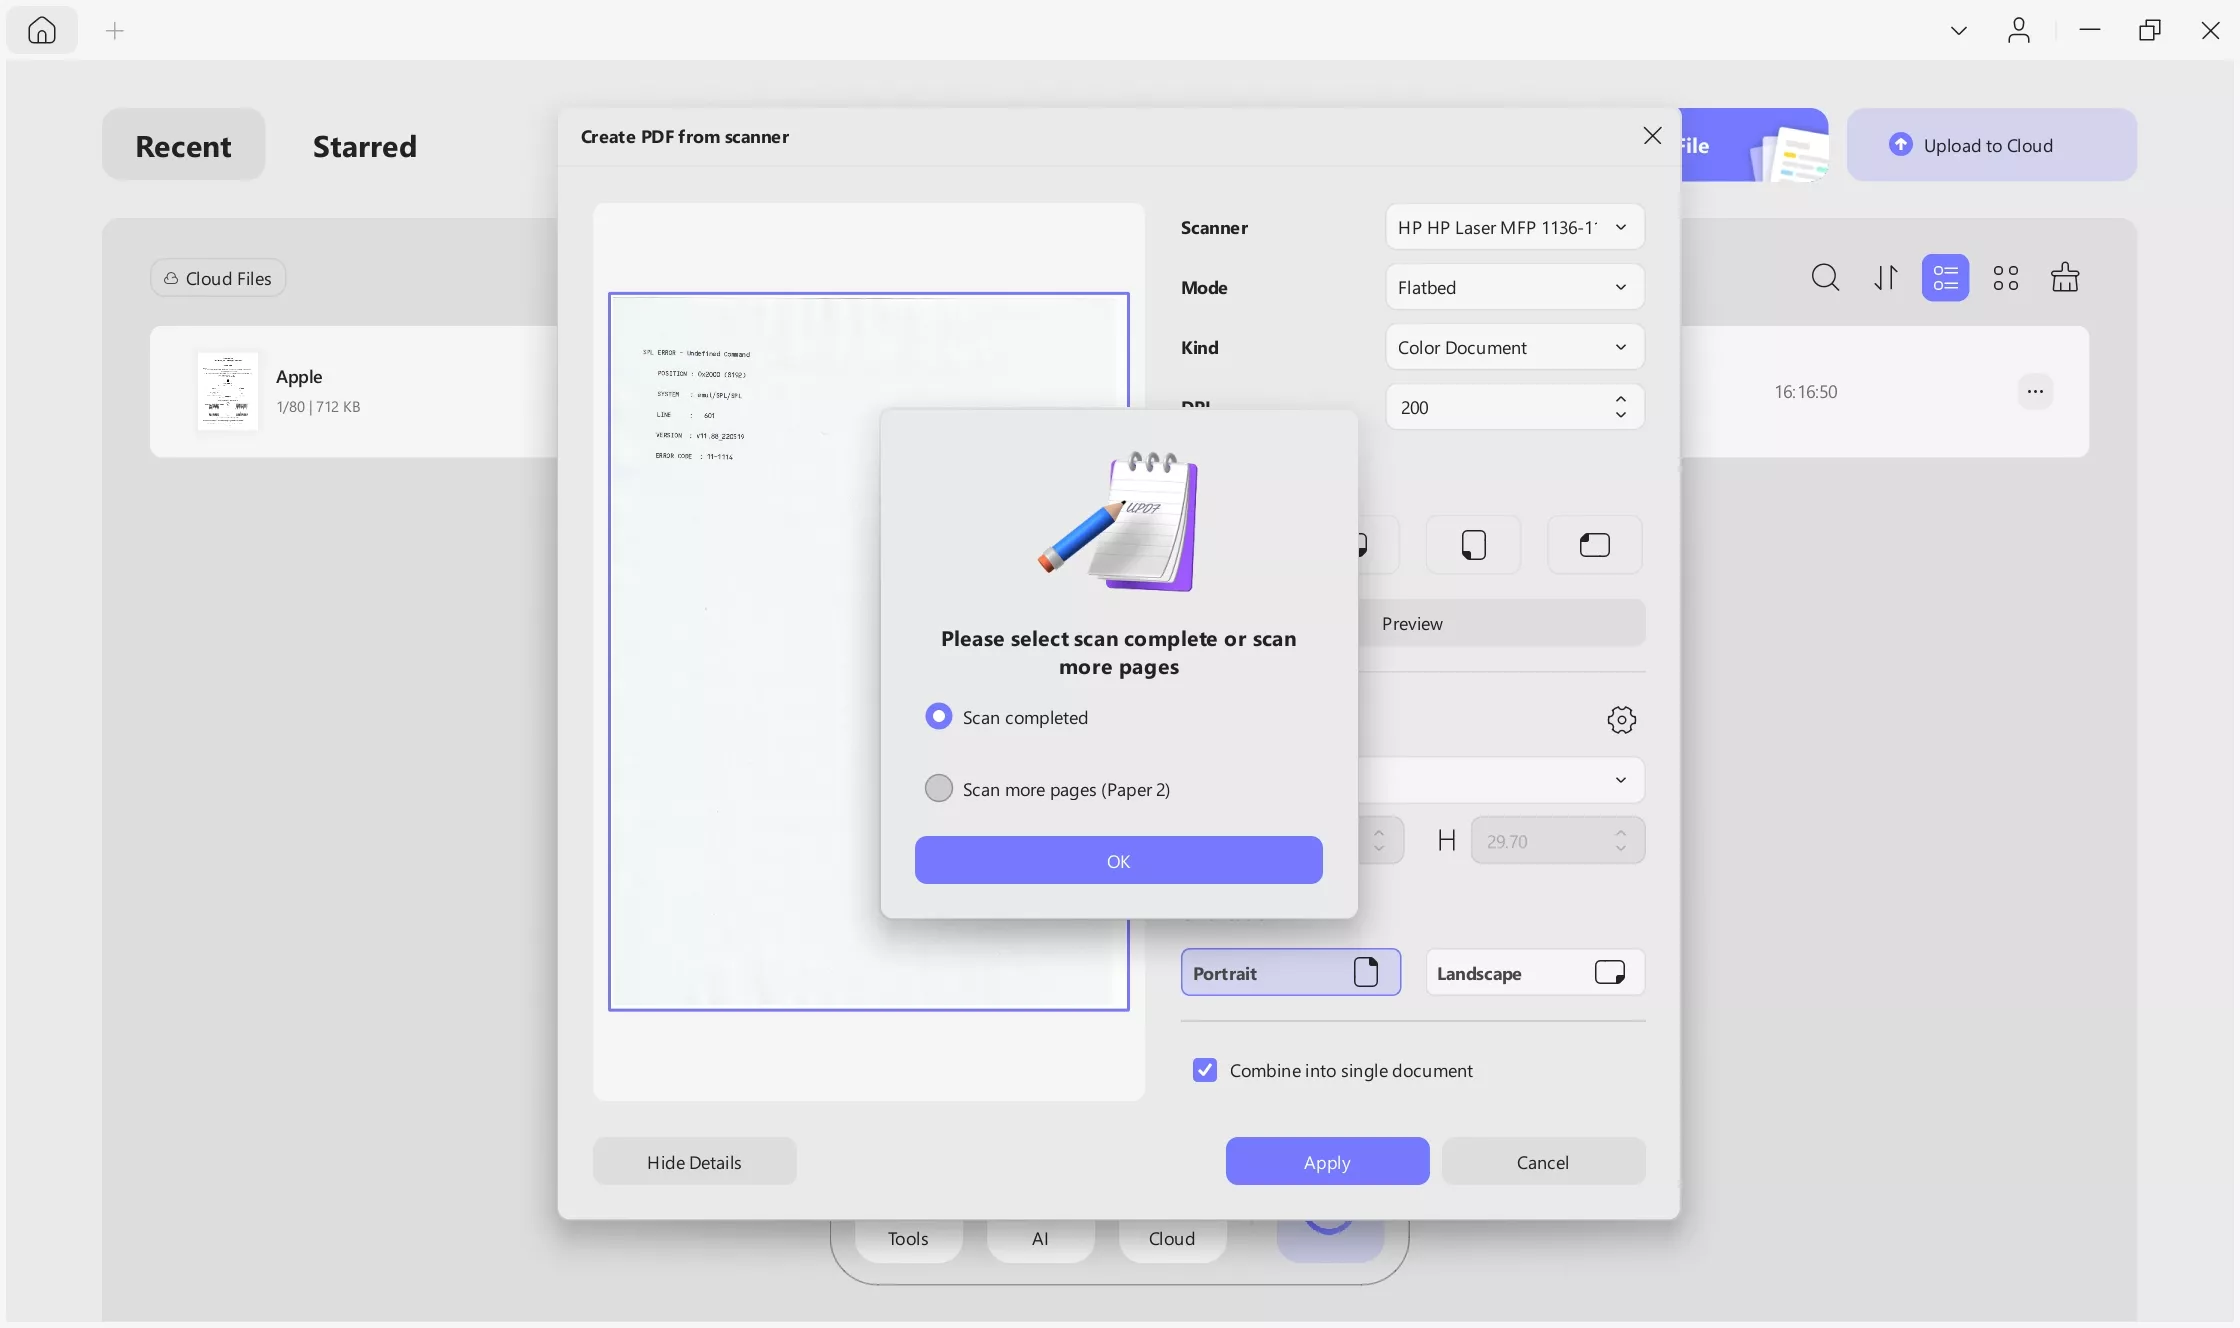
Stap 2. Bepaal of u meer pagina's wilt scannen en klik op OK.
Stap 3. Pas de scaninstellingen naar wens aan. Er zijn twee modi om uit te kiezen: Flatbed en Document Feeder. De scaninstellingen veranderen afhankelijk van de geselecteerde modus.
Flatbedscanner: Dit type scanner heeft een plat glazen oppervlak waarop u uw document met de bedrukte zijde naar beneden legt. Het scanmechanisme beweegt onder het glas om de afbeelding van het document vast te leggen.
Waar u het document moet plaatsen: Til het deksel van de scanner op, leg uw document met de bedrukte zijde naar beneden op het glasoppervlak en zorg dat het op één lijn ligt met de geleiders (meestal gemarkeerd met pijlen of een hoekgeleider) en sluit vervolgens het deksel voordat u begint met scannen.
Documentinvoer: Dit verwijst naar een automatische documentinvoer (ADF) die op sommige scanners te vinden is. Hiermee kunt u meerdere pagina's in een lade plaatsen, waarna de scanner elke pagina automatisch door het scanmechanisme voert.
Waar u het document moet plaatsen: Plaats de stapel documenten in de invoerlade en lijn ze uit met de geleiders. Zorg ervoor dat de pagina's in de juiste richting liggen en niet aan elkaar zijn geniet of vastgeklemd. De invoerlade voert elke pagina door om ze op volgorde te scannen.
U kunt de volgende parameters aanpassen:
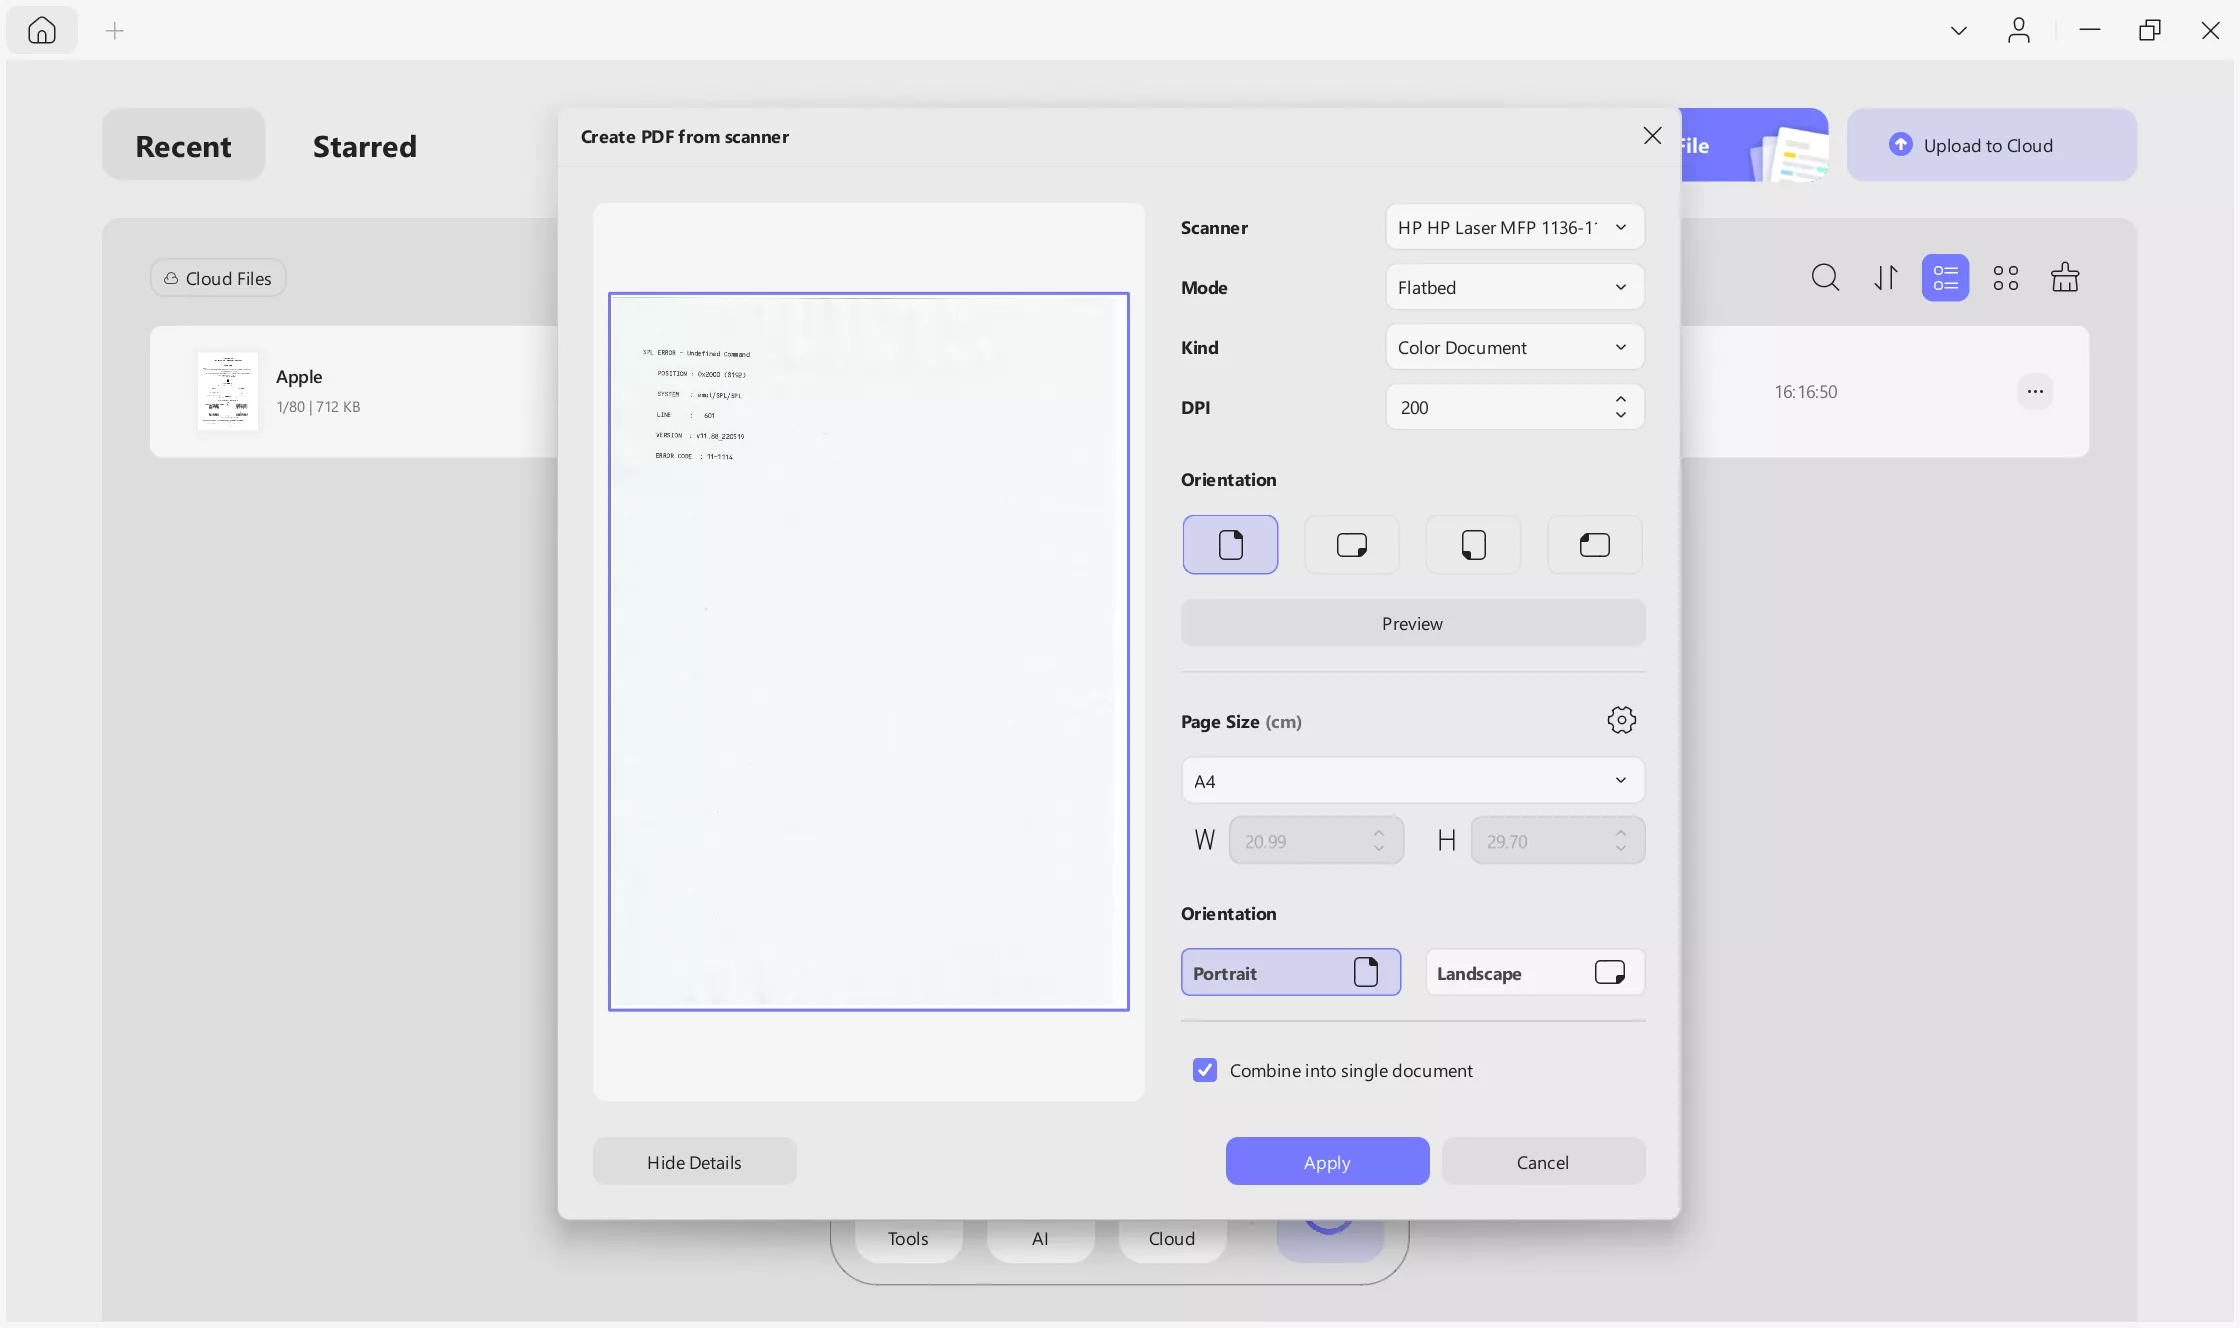
- Soort: Of u uw document in kleur of grijstinten wilt weergeven. Gekleurde documenten zijn meestal professionele presentaties, terwijl overeenkomsten, onderzoeksrapporten, enz. meestal in grijstinten worden weergegeven.
- Papierformaat : Hier kunt u een papierformaat selecteren, ofwel door een vooraf ingestelde optie te kiezen ofwel door het handmatig aan te passen. U kunt de breedte en hoogte invoeren of het papier bijsnijden met behulp van het voorbeeldvenster aan de linkerkant.
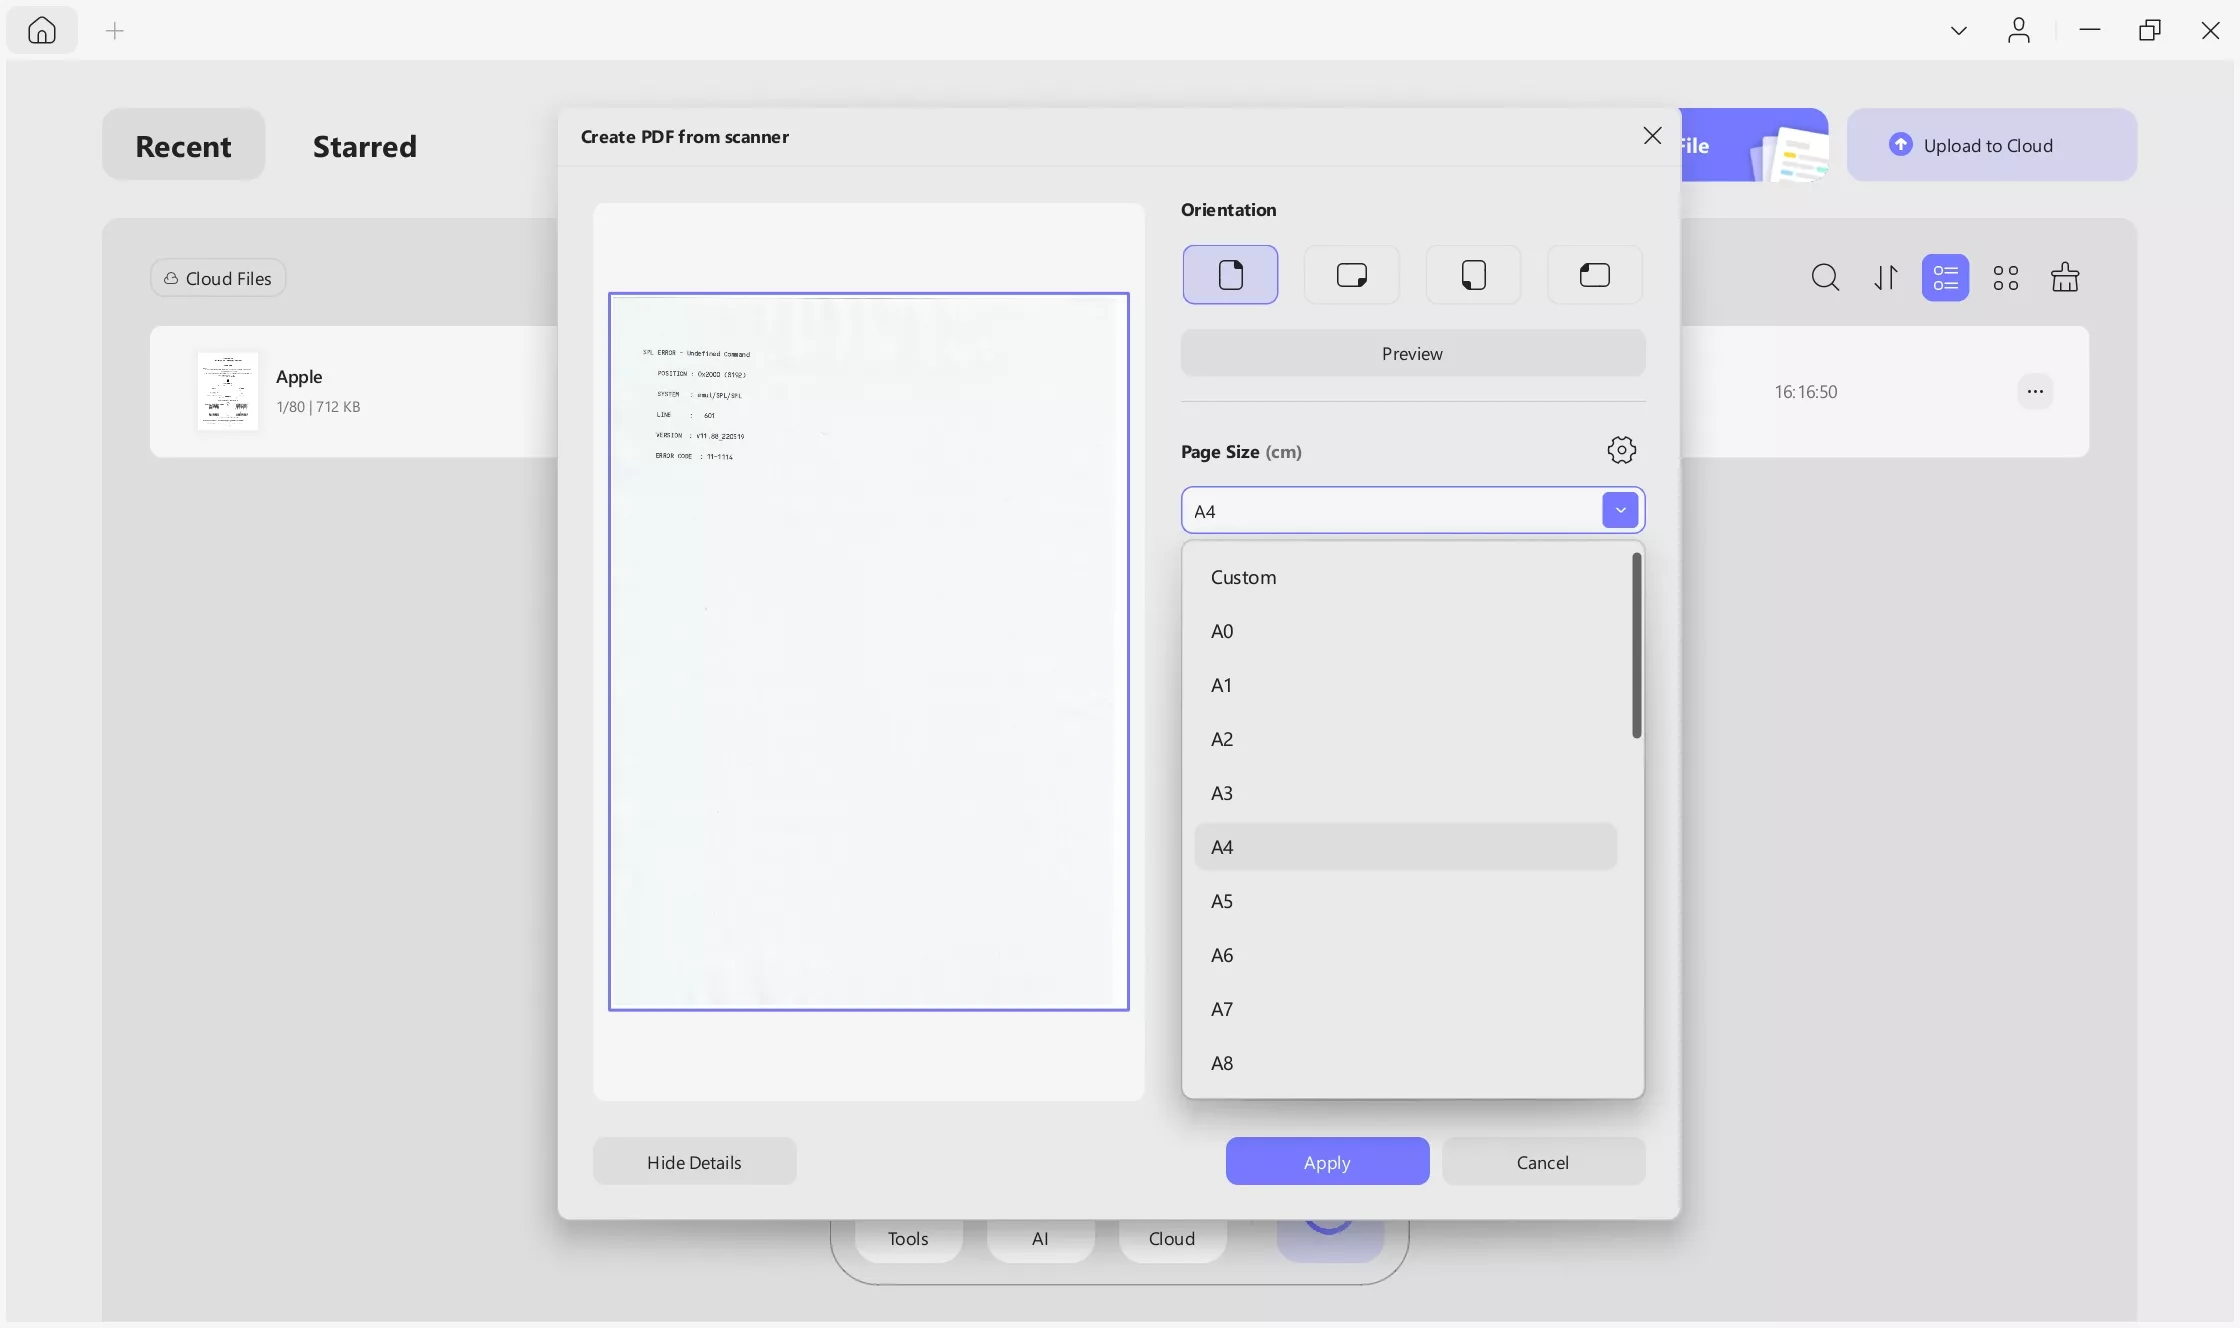
- Oriëntatie: Er zijn vier oriëntaties beschikbaar. U kunt kiezen uit pdf's met rechtopstaande pagina's, naar links, naar rechts of naar beneden. U kunt ook Dubbelzijdig aanvinken, afhankelijk van uw wensen.
Stap 4. U kunt ook beslissen of u de documenten wilt combineren tot één document of OCR wilt uitvoeren nadat u ze hebt gemaakt .
- Selecteer de optie OCR uitvoeren na aanmaken om de PDF die u maakt om te zetten in een bewerkbaar formaat. Anders wordt het een PDF op basis van afbeeldingen.
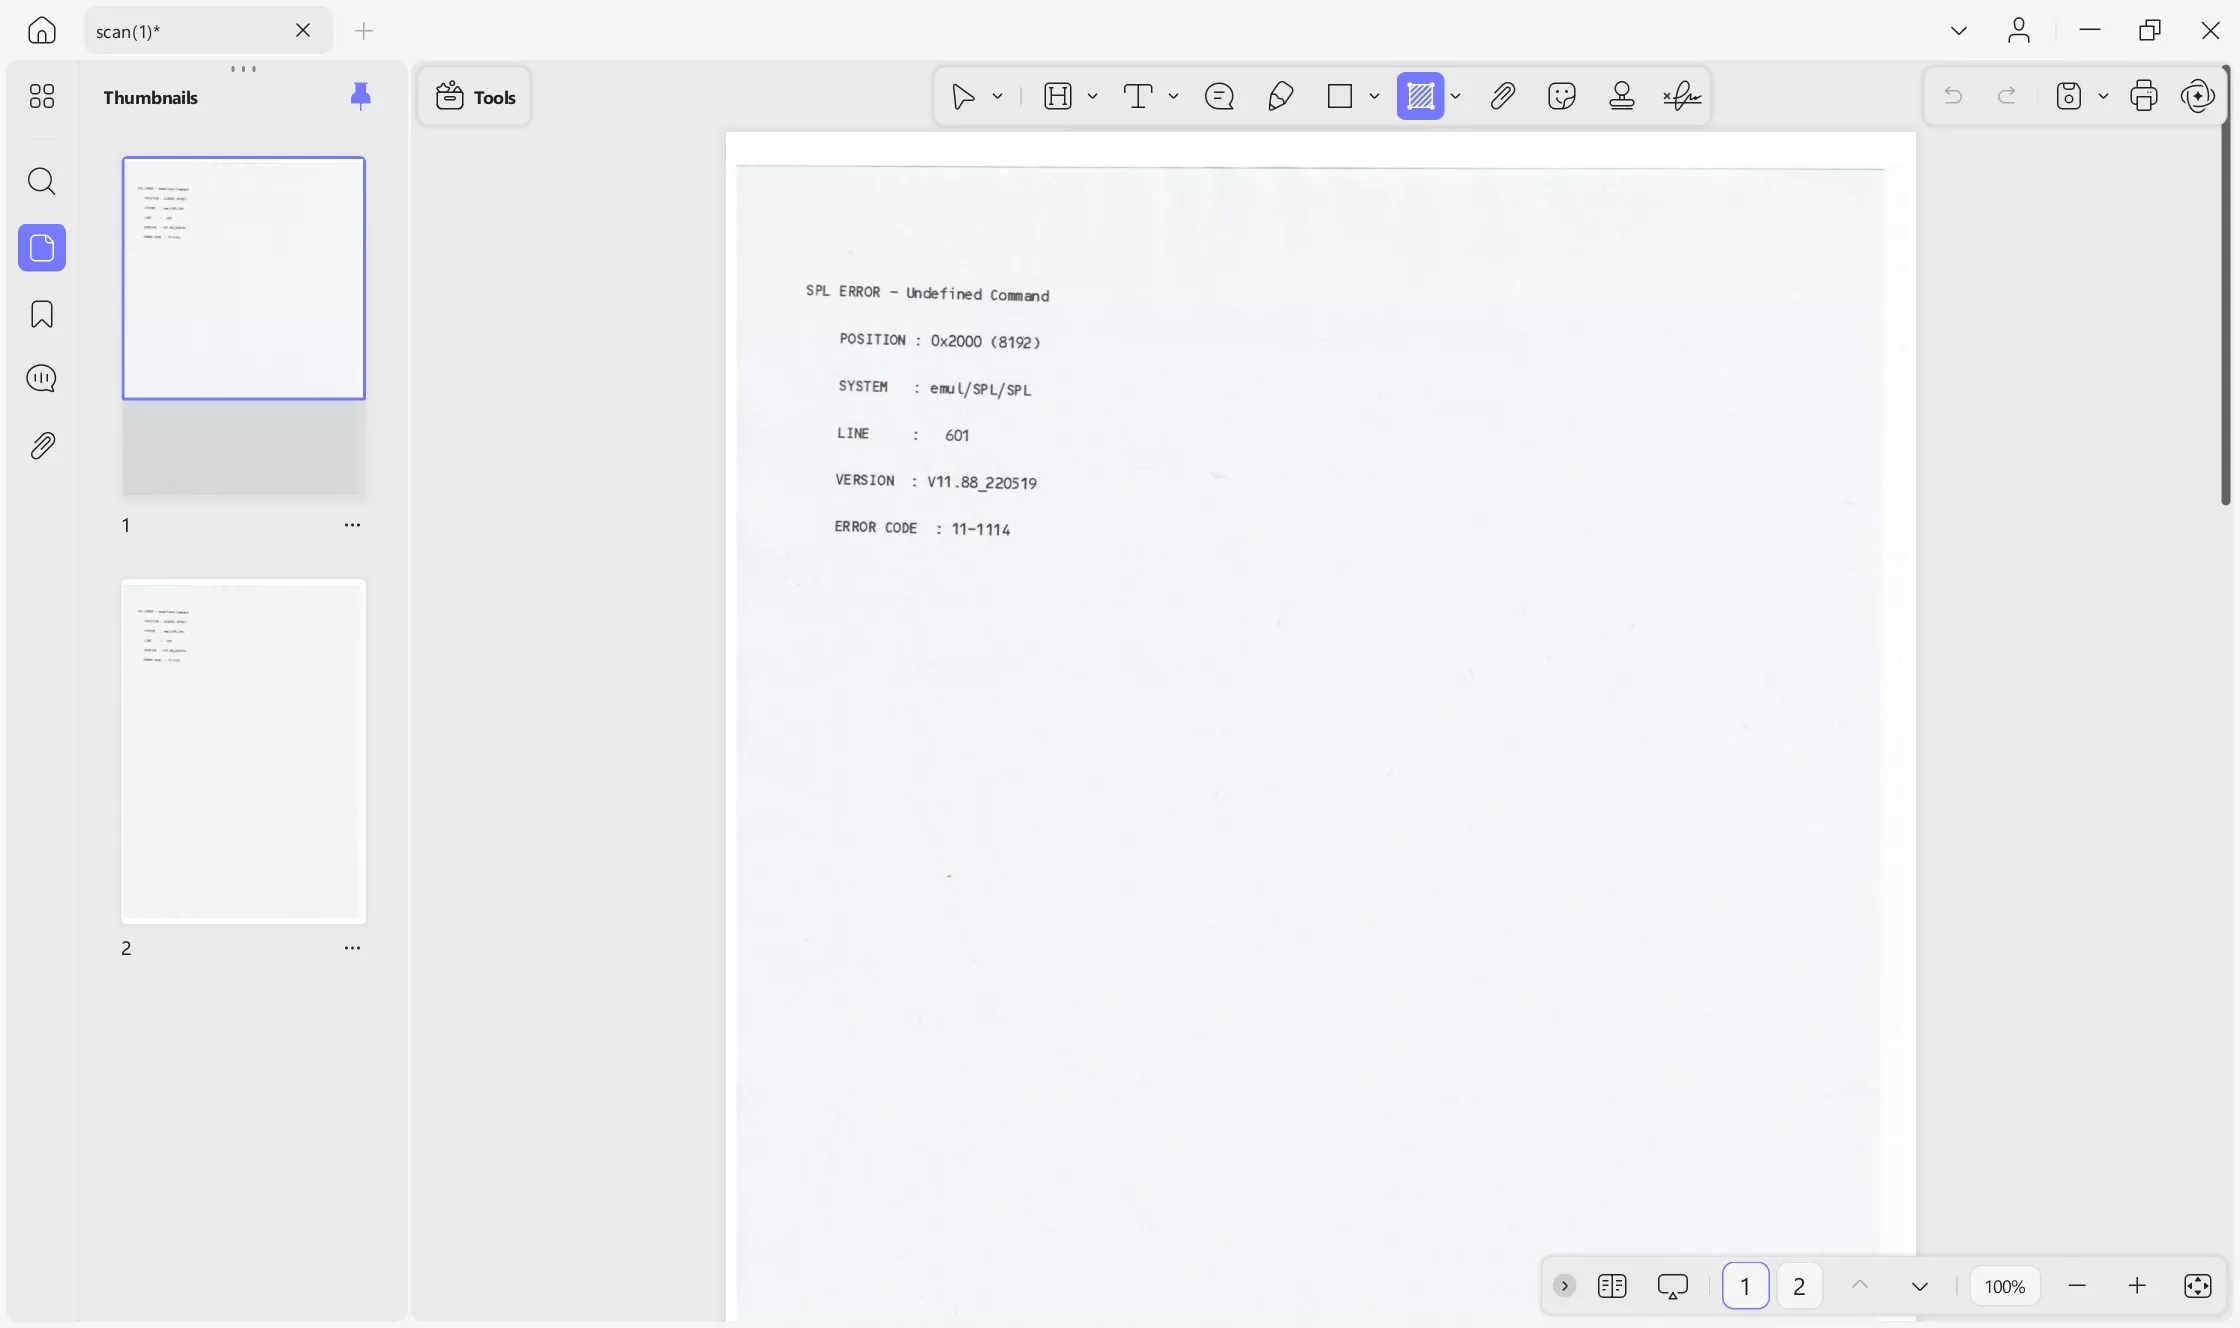
Stap 5. Nadat u de instellingen hebt geselecteerd, klikt u op Toepassen om het scanresultaat te bekijken. UPDF opent automatisch de PDF die u zojuist hebt gemaakt.
 UPDF
UPDF
 UPDF voor Windows
 UPDF voor Mac
 UPDF voor iPhone/iPad
 UPDF voor Android
 UPDF AI Online
 UPDF Sign
 PDF bewerken
 PDF annoteren
 PDF maken
 PDF-formulier
 Links bewerken
 PDF converteren
 OCR
OCR PDF naar Word
 PDF naar afbeelding
 PDF naar Excel
 PDF organiseren
 PDF samenvoegen
 PDF splitsen
 PDF bijsnijden
 PDF roteren
 PDF beveiligen
 PDF ondertekenen
 PDF bewerken
 PDF opschonen
 Beveiliging verwijderen
 Lees PDF
 UPDF Cloud
 PDF comprimeren
 PDF afdrukken
 Batch Process
 Over UPDF AI
 UPDF AI-oplossingen
 AI Gebruikersgids
 FAQ over UPDF AI
 PDF samenvatten
 PDF vertalen
 Chatten met PDF
 Chatten met afbeelding
 PDF naar Mindmap
 Chatten met AI
 PDF uitleggen
 Wetenschappelijk onderzoek
 Papier zoeken
 AI-proeflezer
 AI-schrijver
 AI-huiswerkhulp
 AI-quizgenerator
 AI-wiskundige oplosser
 PDF naar Word
 PDF naar Excel
 PDF naar PowerPoint
 Gebruikershandleiding
 UPDF-trucs
 Veelgestelde Vragen
 UPDF Beoordelingen
 Downloadcentrum
 Blog
Blog Nieuwsruimte
 Technische Specificaties
 Updates
 UPDF versus Adobe Acrobat
 UPDF versus Foxit
 UPDF versus PDF Expert

