 UPDF pro Windows
 UPDF pro Mac
 UPDF pro iOS
 UPDF pro Android
 UPDF AI Online
 UPDF Sign
 Upravit PDF
 Anotovat PDF
 Vytvořit PDF
 PDF formuláře
 Upravit odkazy
 Konvertovat PDF
 OCR
OCR PDF do Wordu
 PDF do obrázku
 PDF do Excelu
 Organizovat PDF
 Sloučit PDF
 Rozdělit PDF
 Oříznout PDF
 Otočit PDF
 Chránit PDF
 Podepsat PDF
 Redigovat PDF
 Sanitizovat PDF
 Odstranit zabezpečení
 Číst PDF
 UPDF Cloud
 Komprimovat PDF
 Tisknout PDF
 Dávkové zpracování
 O UPDF AI
 Řešení UPDF AI
 AI příručka
 FAQ o UPDF AI
 Shrnutí PDF
 Překlad PDF
 Chat s PDF
 Chat s AI
 Chat s obrázkem
 PDF na
 Vysvětlení PDF
 AI nástroje pro PDF
 AI nástroje pro obrázky
 AI chatovací nástroje
 AI nástroje pro psaní
 AI studijní nástroje
 AI pracovní nástroje
 Ostatní AI nástroje
 PDF na Word
 PDF na Excel
 PDF na PowerPoint
 Uživatelská příručka
 UPDF Triky
 FAQs
FAQs Recenze UPDF
 Středisko stahování
 Blog
Blog Tiskové centrum
 Technické specifikace
 Aktualizace
 UPDF vs. Adobe Acrobat
 UPDF vs. Foxit
 UPDF vs. PDF Expert
Znalost přidání digitálního podpisu do PDF se stala zásadní jak pro profesionály, tak pro firmy. Snižuje potřebu tisku, podepisování a skenování souborů, což proces urychluje a zefektivnuje. Ať už jednáte o smlouvách, dohodách nebo právních dokumentech, přidání digitálního podpisu zajišťuje bezpečnost i pohodlí. Tento článek vás provede kroky, jak bez problémů přidat digitální podpis pomocí UPDF, výkonného PDF nástroje navrženého tak, aby podepisování dokumentů bylo hračkou. Pojďme se podívat, jak můžete zjednodušit svůj pracovní postup pomocí charakteristických funkcí UPDF.eatures.
Část 1. Jak přidat digitální podpis do PDF
Představte si, že finalizujete důležitou smlouvu s klientem. Obě strany pracují na dálku a čas je klíčový. Místo neustálého tisku, podepisování a skenování dokumentů můžete bezpečně přidat svůj digitální podpis do PDF během několika minut, čímž ušetříte čas i úsilí.
UPDF umožňuje neuvěřitelně snadné přidávání digitálních podpisů do PDF. Díky uživatelsky přívětivému rozhraní můžete jakýkoli dokument podepsat během několika kliknutí. UPDF zajišťuje, že váš podpis je právně závazný a bezpečně šifrován, čímž chrání vaše osobní údaje. Při přidávání digitálního podpisu máte možnost vytvořit nový nebo importovat stávající podpis z místního úložiště.
Navíc umožňuje snadnou spolupráci, což umožňuje ostatním podepsat stejný dokument. Tento nástroj podporuje širokou škálu formátů podpisů, včetně ručně psaných, psaných a obrazových podpisů. Stáhněte si UPDF ještě dnes a zjednodušte si správu PDF – ať už jde o smlouvy, dohody nebo osobní dokumenty – zefektivníte svůj pracovní postup několika rychlými kroky!
Windows • macOS • iOS • Android 100% bezpečné
Metoda 1: Vytvořit a přidat digitální podpis
Krok 1: Otevřete svůj PDF soubor
Nejprve spusťte UPDF software na svém počítači. Pro otevření PDF souboru, který chcete podepsat, klikněte na tlačítko "Otevřít soubor", nebo si uživatelé jednoduše soubor přetáhnou do okna UPDF. Tím se váš dokument okamžitě načte do editoru.
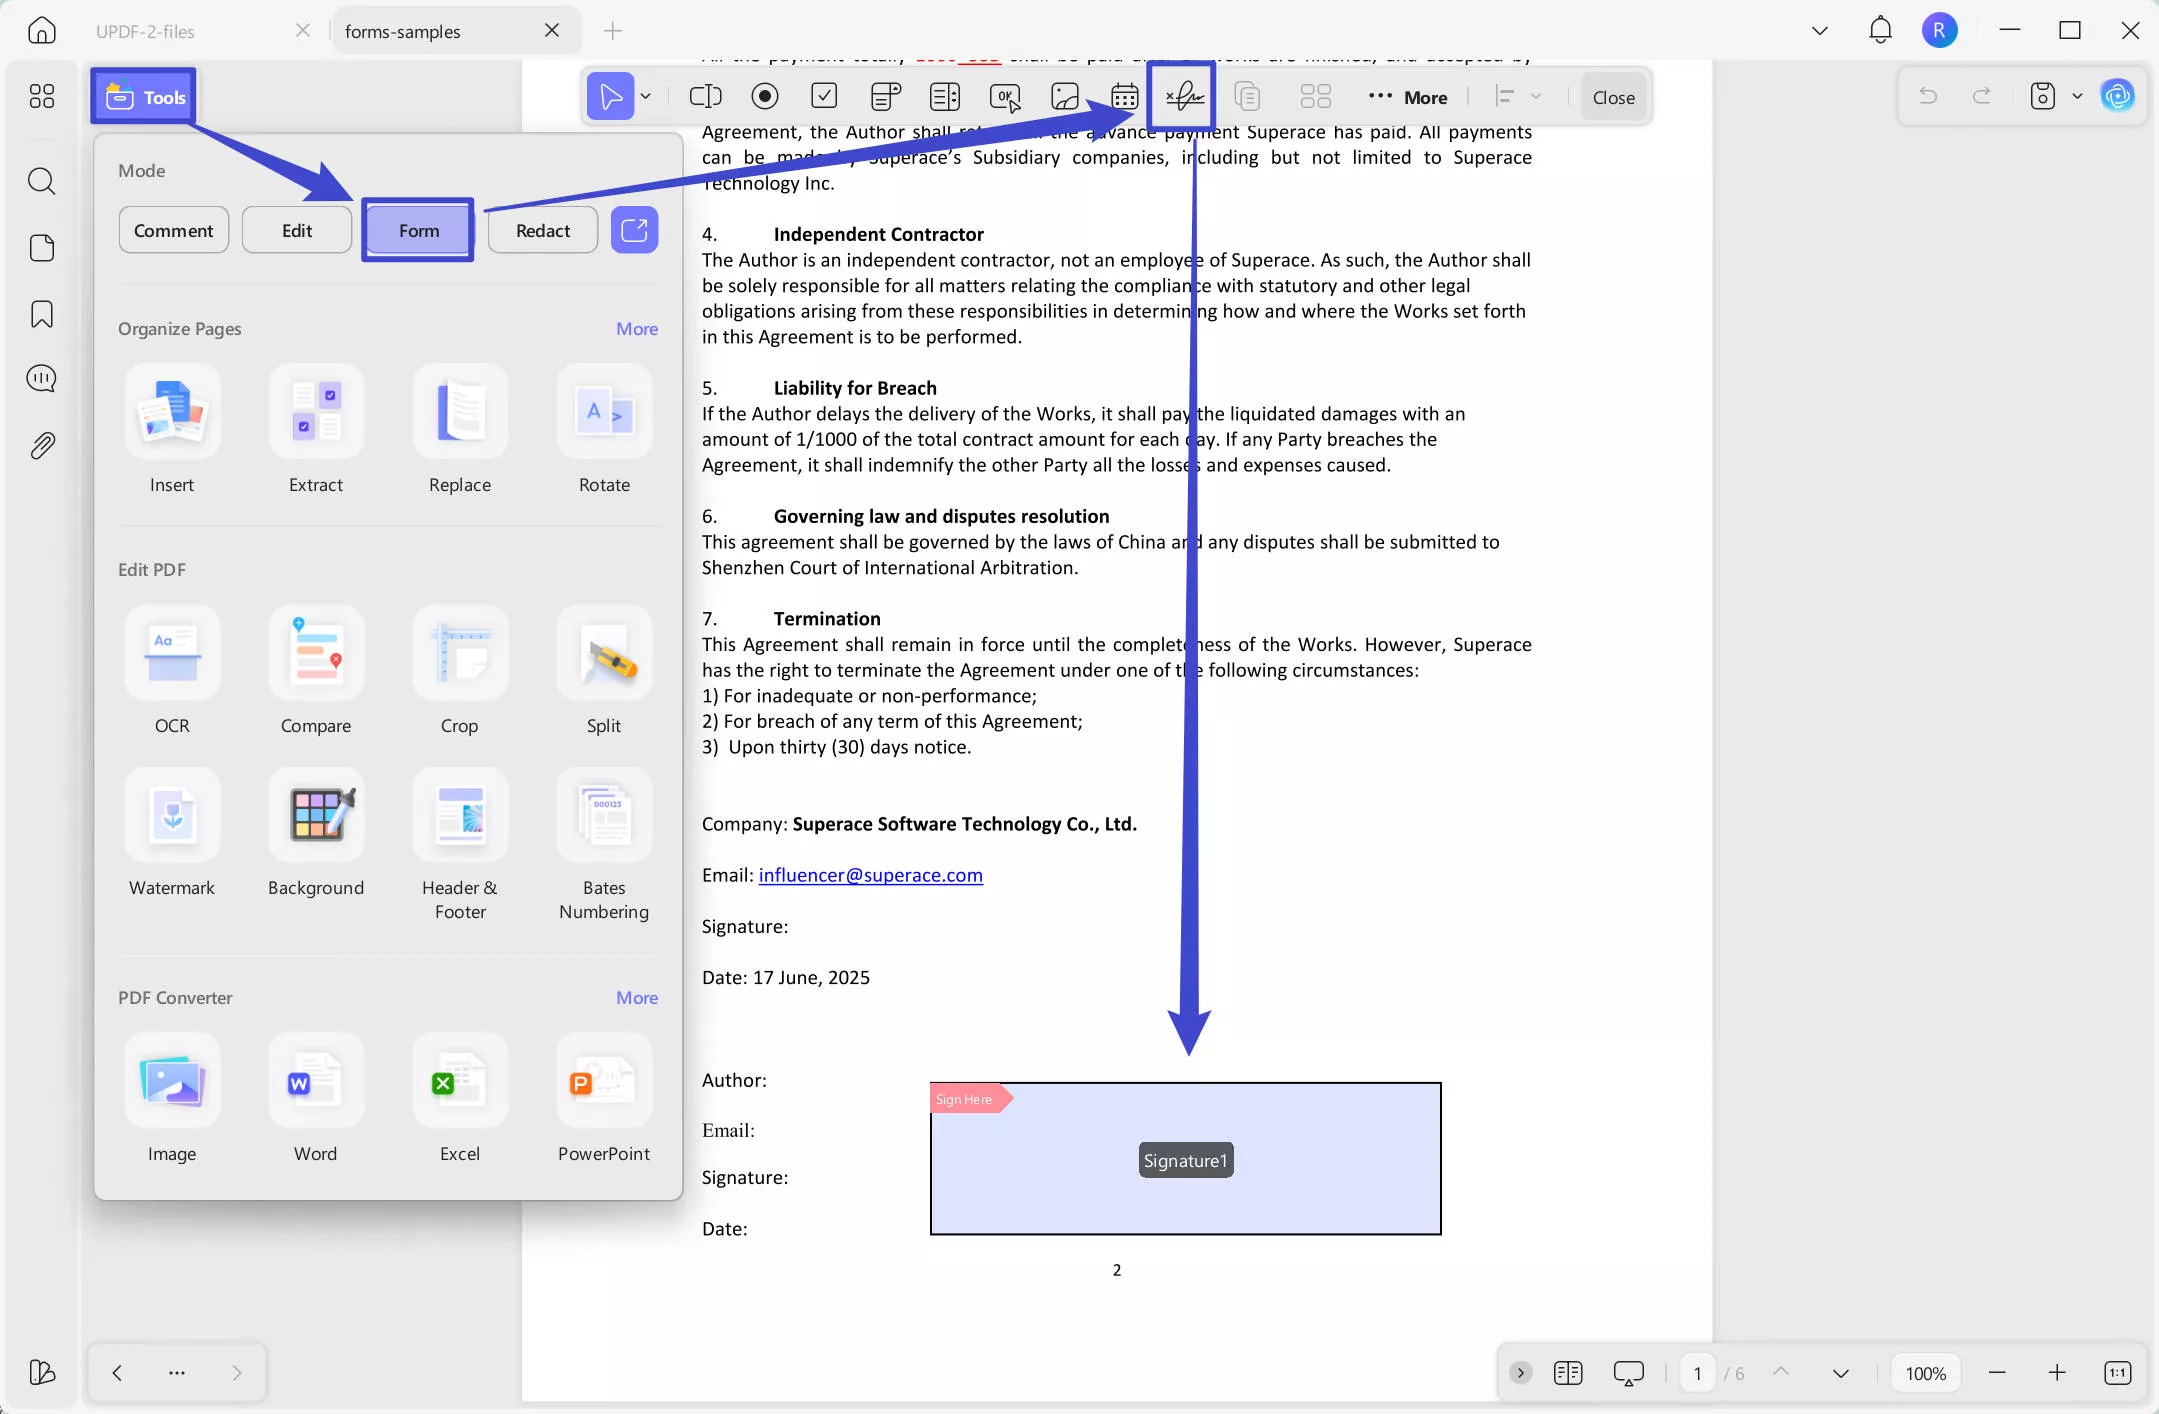
Krok 2: Přepnout na režim přípravy formy
Jakmile je váš soubor otevřený, přejděte na horní panel pažeb a vyberte režim "Nástroje" a poté "Formulář". To umožňuje funkce potřebné pro přidání formulářových polí do vašeho PDF. Odtud klikněte na možnost "Digitální podpis" v horním menu panelu.
Krok 3: Vytvořte pole podpisu
S vybranou volbou Digitální podpis nyní vytvoříte pole pro podpis. Vyberte jakékoli místo v PDF, kde chcete, aby se podpis objevil. Jakmile je umístěn, můžete velikost pole upravit tažením jeho rohů. Pro další přizpůsobení pole na něj dvakrát klikněte pro přístup k dalším nastavením podpisu.
Krok 4: Přidejte digitální podpis
Kliknutím na ikonu "Zavřít" v horním menu ukončíte režim "Formulář". Nyní můžete začít přidávat podpis kliknutím na pole podpisu.
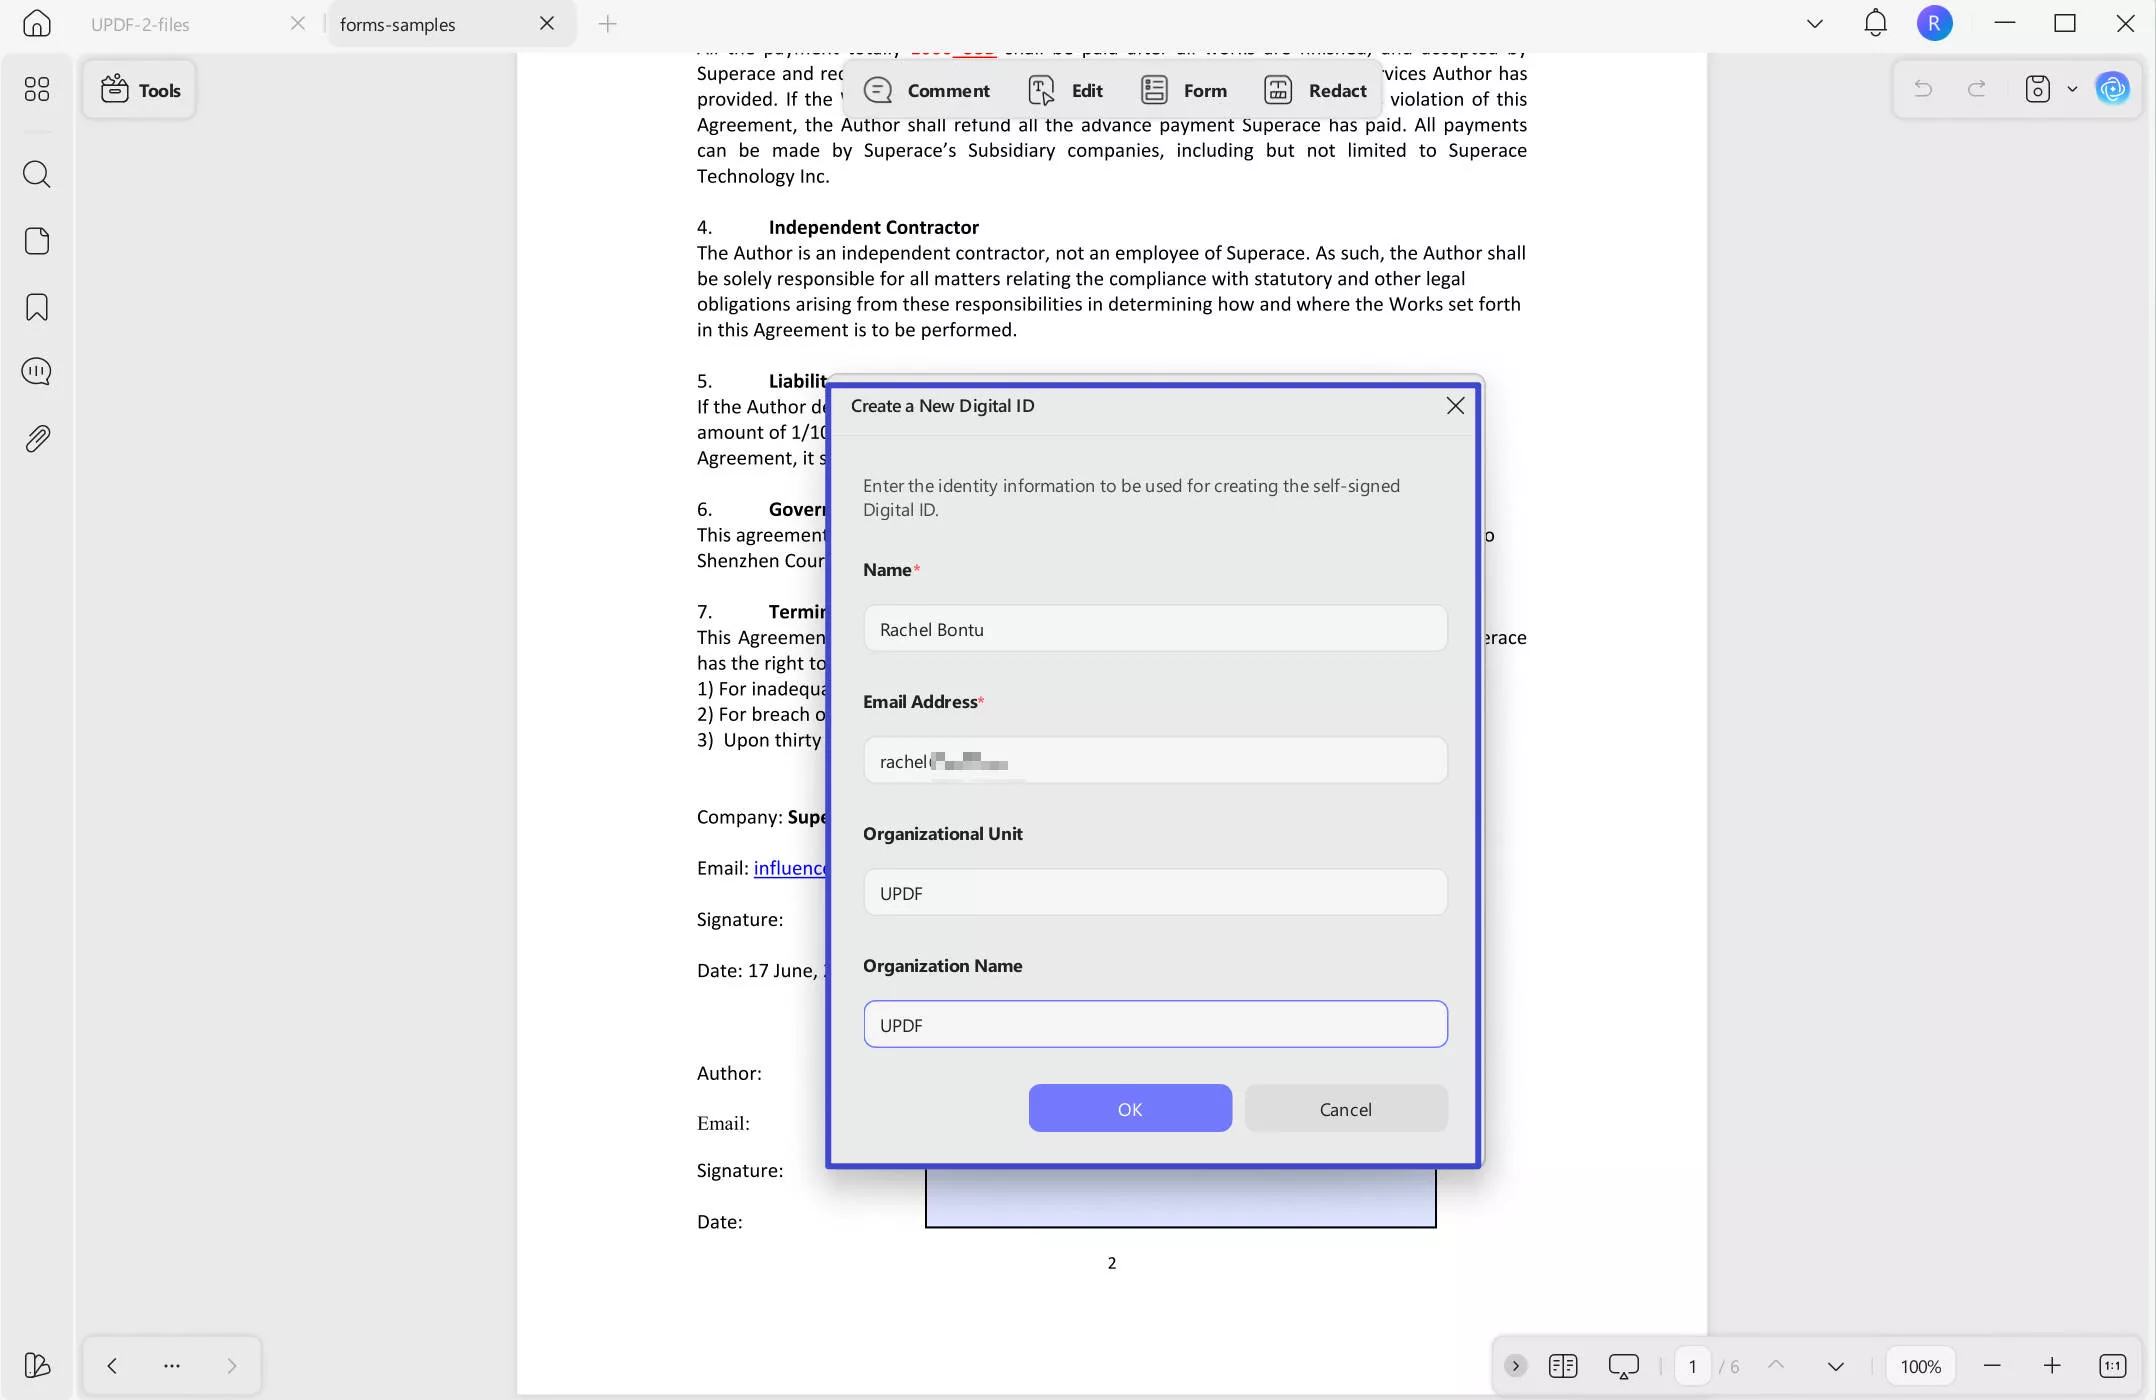
Podpis můžete vytvořit přímo v programu. Jednoduše klikněte na "Vytvořit" pro zadání svého jména nebo jiných údajů, poté klikněte na "OK" pro vytvoření digitálního podpisu. Vyberte místo, kde ho uložite, přidejte heslo, a pak klikněte na "OK".
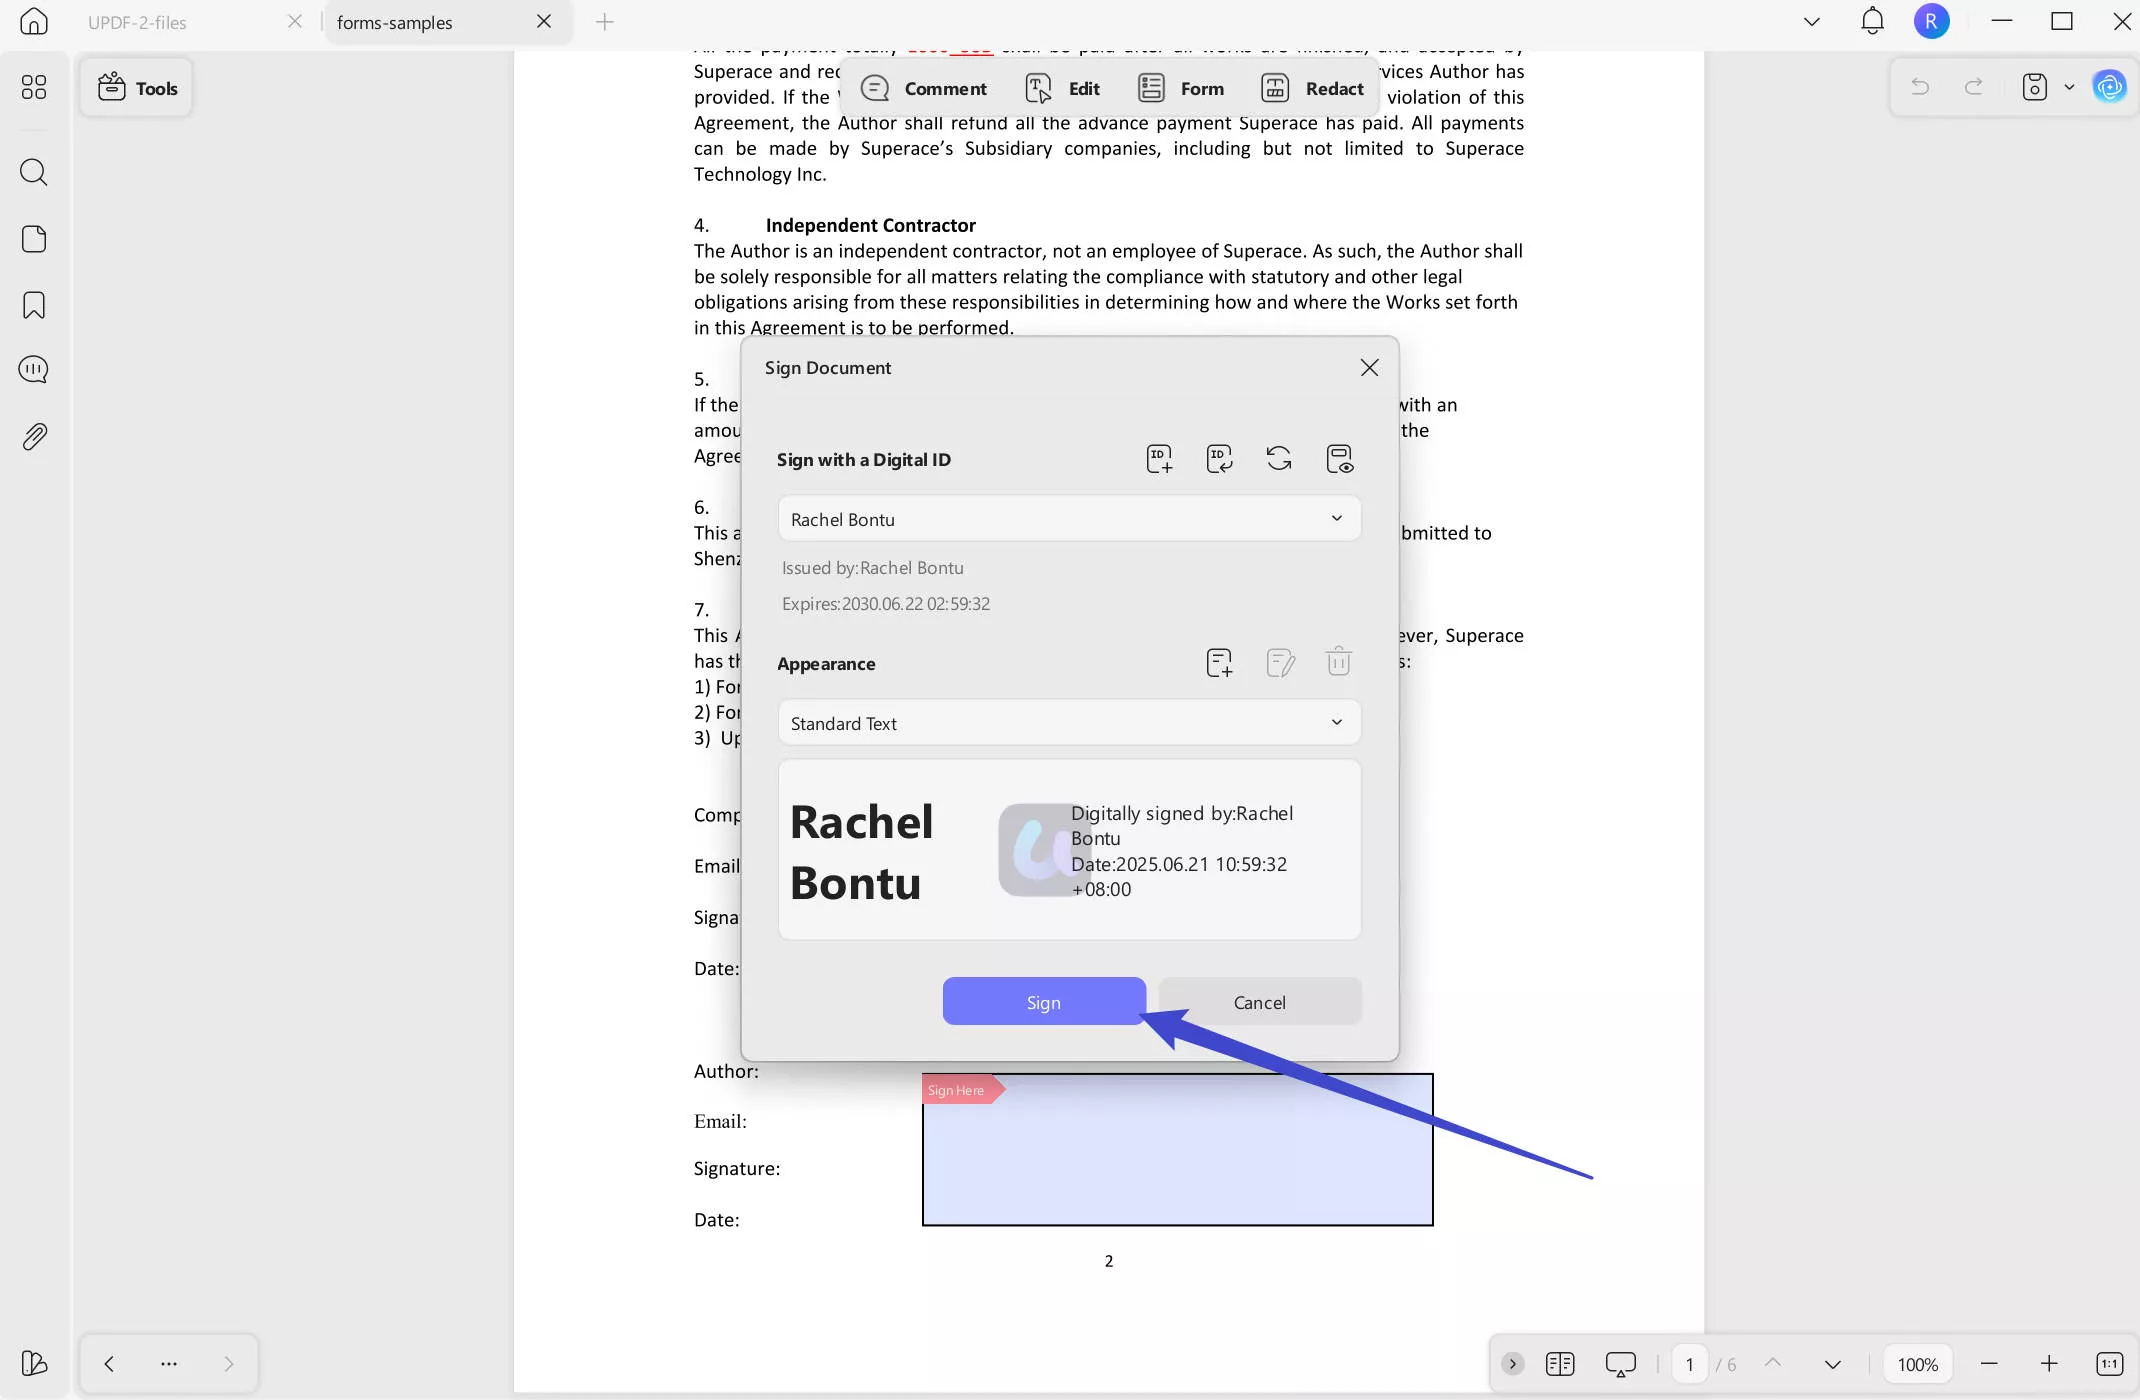
Krok 5: Podepište a uložte soubor
Po vytvoření podpisu klikněte na "Podpis" a vložte ho do určeného pole. Jakmile je podpis na místě, vyberte místo, kam chcete podepsané PDF uložit. Podpis je nyní bezpečně uložen v dokumentu.
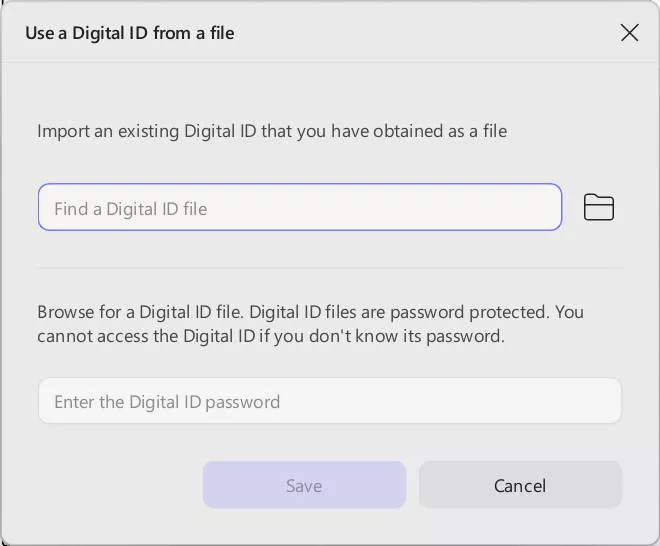
Metoda 2: Přidejte digitální podpis importem
Jakmile dokončíte kroky 1 až 3 z Metody 1, můžete pokračovat importem existujícího podpisu. Po kliknutí na pole podpisu místo vytvoření nového podpisu zvolte možnost "Importovat".
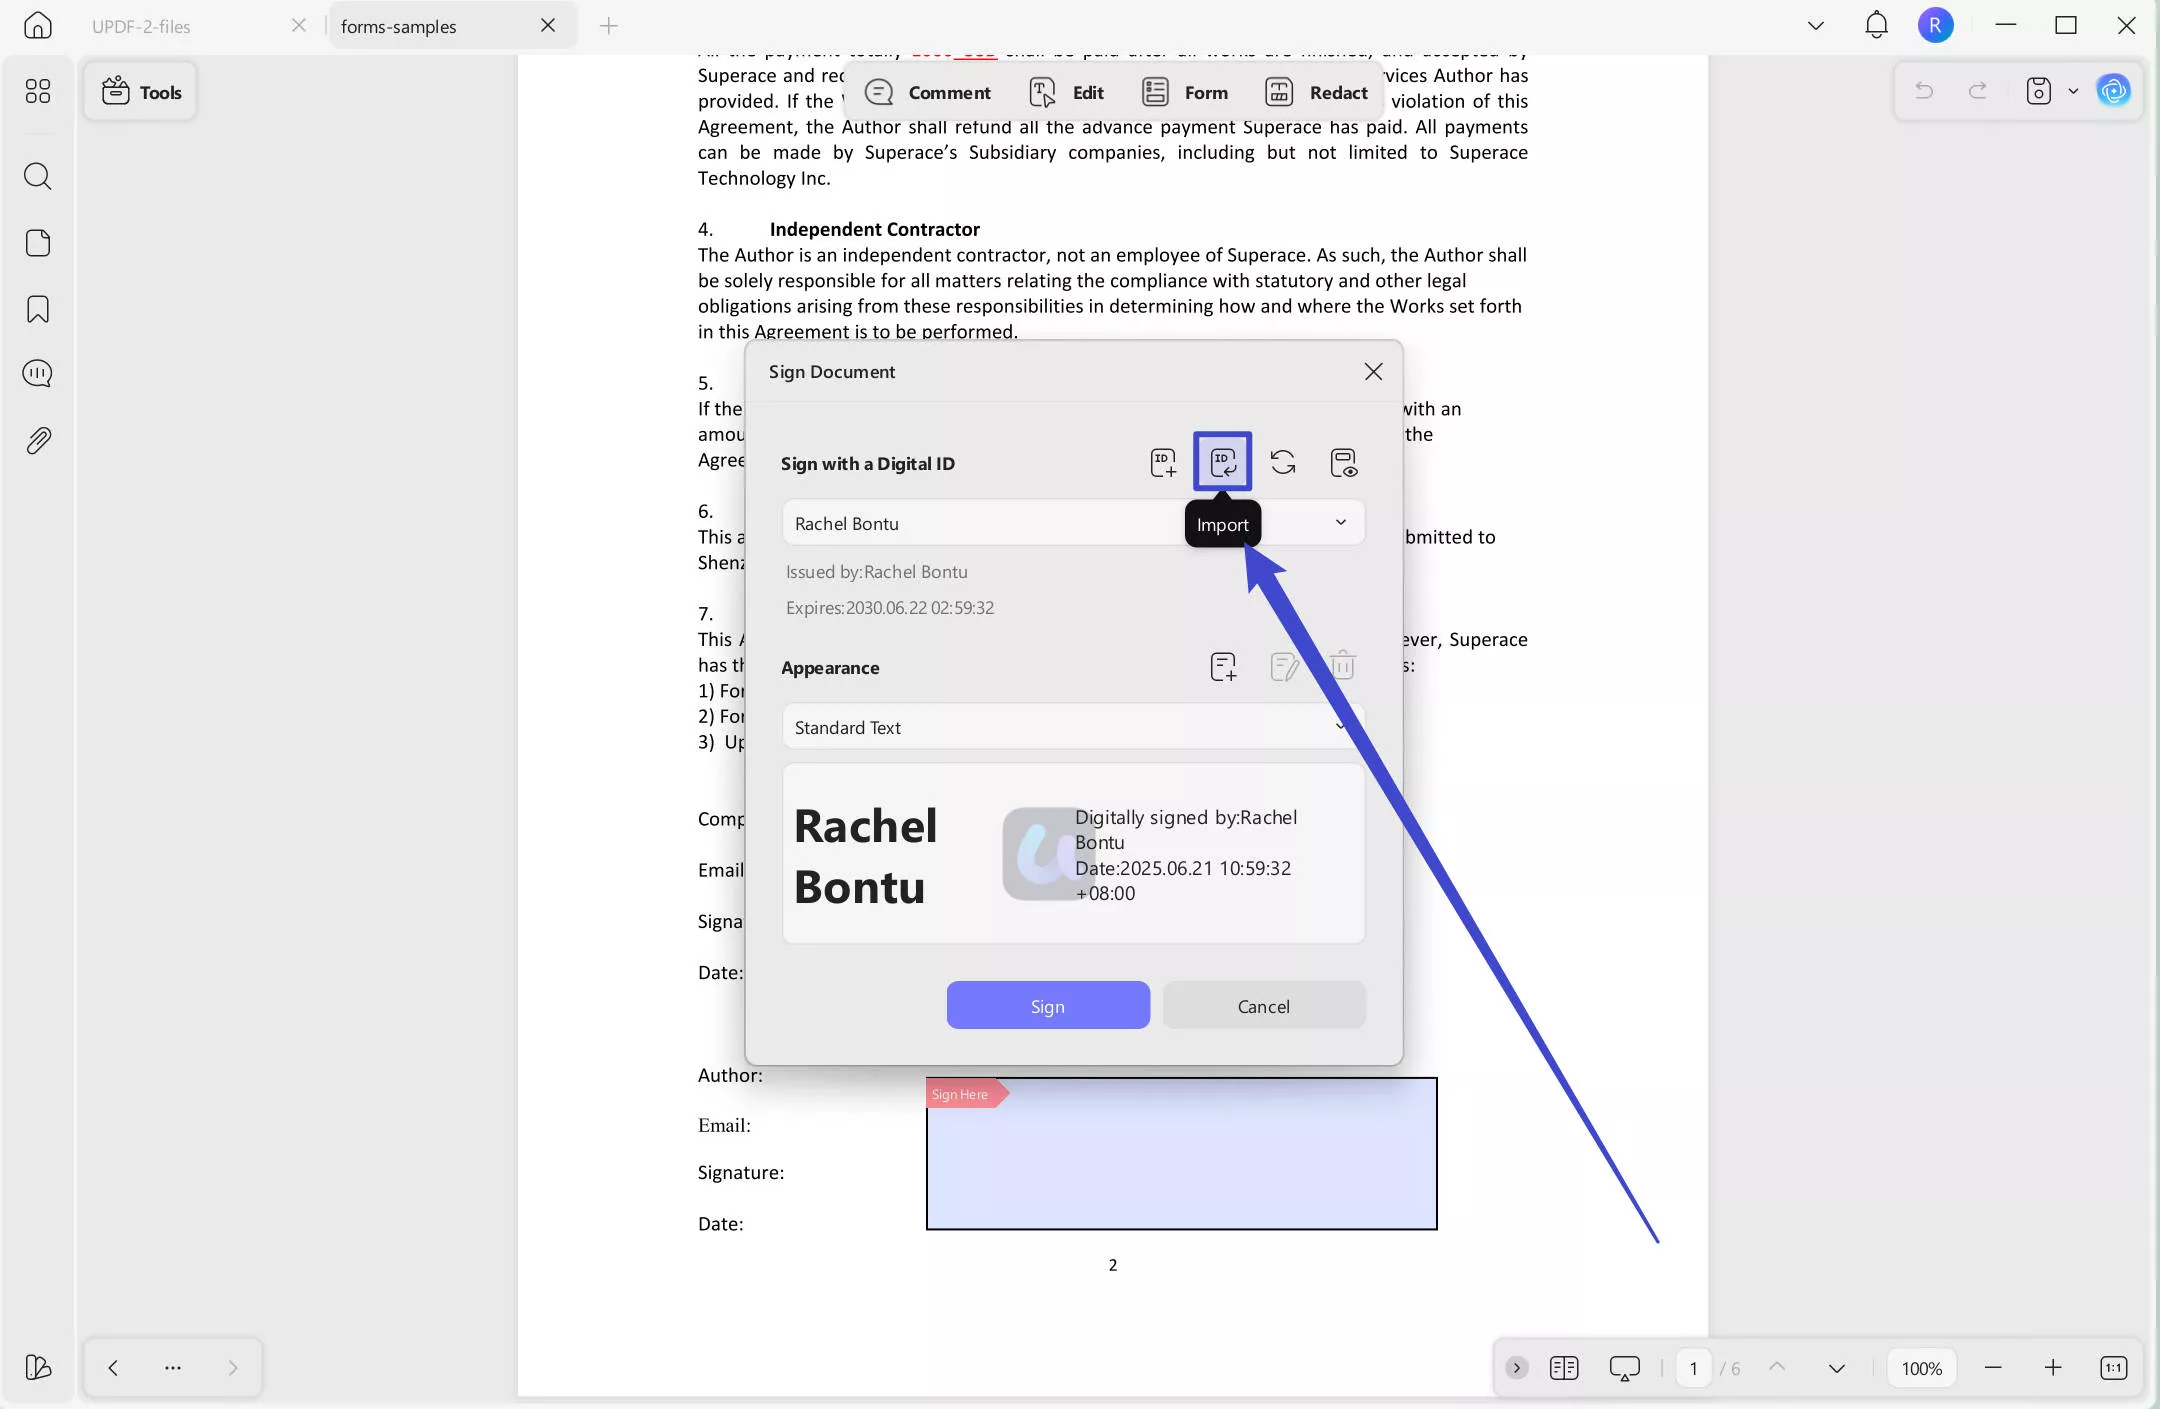
Nahrajte z vašeho zařízení již existující soubor s podpisem, klikněte na "Uložit" a poté na "Podepsat". Uložit soubor na finální zpracování.
Odemkněte plný potenciál UPDF upgradem na Pro verzi ještě dnes! Získejte přístup k prémiovým funkcím, jako je neomezené digitální podpisy, pokročilé nástroje pro úpravu PDF a vylepšené bezpečnostní možnosti. Zlepšte svůj pracovní postup s PDF a efektivněji zvládejte dokumenty. Upgradujte nyní a zažijte sílu UPDF Pro!
Část 2. Proč zvolit UPDF pro přidání digitálních podpisů?
UPDF vyniká jako uživatelsky přívětivé řešení pro přidávání digitálních podpisů, což činí proces bezpečným a efektivním. Ať už vytváříte podpis od začátku, nebo ho importujete, jednoduché rozhraní UPDF zajišťuje, že váš podpis bude aplikován bez problémů. Díky funkcím jako jsou přizpůsobitelné podpisové pole a snadné ukládání dokumentů je to skvělá volba pro správu digitálních podpisů.
Kromě podpisů nabízí UPDF komplexní bezpečnostní funkce pro PDF. Můžete cenzurovat citlivé informace, čímž zabráníte neoprávněnému přístupu k soukromým údajům, a přidávat vodoznaky do svých dokumentů pro budování značky nebo bezpečnost. Dále je k dispozici ochrana heslem, která chrání vaše PDF před neoprávněným prohlížením nebo úpravami. Tyto funkce spolupracují a zvyšují jak soukromí, tak profesionalitu vašich dokumentů.
UPDF nabízí širokou škálu dalších nástrojů pro zlepšení vašeho zážitku ze správy PDF. Podívejte se na následující video a zjistěte, co všechno pro vás UPDF může nabídnout!
Závěr
Přidání digitálního podpisu do vašich PDF je jednoduchý proces při používání UPDF. Dodržováním uvedených kroků můžete efektivně vytvářet bezpečné, profesionální dokumenty s přizpůsobitelnými podpisovými poli. Kromě možností podpisů nabízí UPDF řadu pokročilých funkcí, jako je redakce, ochrana heslem a vodoznaky, což z něj činí komplexní PDF řešení. Ať už spravujete smlouvy nebo sdílíte důležité dokumenty, UPDF zajišťuje jak soukromí, tak snadnost použití. Vyzkoušejte UPDF a vyzkoušejte jeho výkonné nástroje sami – je to ideální způsob, jak zefektivnit workflow s dokumenty.
Windows • macOS • iOS • Android 100% bezpečné


 Lizzy Lozano

 Enrica Taylor