UPDF na Windows
 UPDF na Mac
 UPDF na iPhone/iPad
 UPDF na Android
 UPDF AI Online
 UPDF Sign
 Edytuj PDF
 Zaznacz PDF
 Utwórz PDF
 Formularz PDF
 Edytuj linki
 Przekonwertuj PDF
 OCR
OCR PDF do Word
 PDF do obrazu
 PDF do Excel
 Zarządzaj PDF
 Scalać PDF
 Podziel PDF
 Przytnij PDF
 Obróć PDF
 Zabezpiecz PDF
 Podpisz PDF
 Redaguj PDF
 Oczyść PDF
 Usuń ochronę
 Otwórz PDF
 UPDF Chmura
 Skompresuj PDF
 Drukuj PDF
 Przetwarzanie wsadowe
 O UPDF AI
 Rozwiązania UPDF AI
 Podręcznik użytkownika AI
 FAQ dotyczące UPDF AI
 Podsumuj PDF
 Przetłumacz PDF
 Porozmawiaj z PDF-em
 Porozmawiaj z AI
 Porozmawiaj z obrazem
 PDF do mapy myśli
 Wyjaśnij PDF
 Narzędzia PDF AI
 Narzędzia obrazu AI
 Czat AI
 Pisanie AI
 Nauka z AI
 Praca z AI
 Inne narzędzia AI
 Generowanie Zakładek AI
 Podsumowanie Zakładek AI
 Generowanie Znaku Wodnego AI
 Generowanie Tła AI
 Generowanie Naklejek AI
 Generowanie Pieczęci AI
 Pakiet do Pisania AI
 UPDF Copilot
 Zarządzanie Stronami AI
 Semantyczne Wyszukiwanie AI
 PDF to Word
 PDF to Excel
 PDF do PowerPoint
 Przewodnik użytkownika
 Sztuczki UPDF
 FAQs
FAQs Recenzje UPDF
 Centrum pobierania
 Blog
Blog Sala prasowa
 Specyfikacja techniczna
 Aktualizacje
 UPDF a Adobe Acrobat
 UPDF a Foxit
 UPDF a PDF Expert
AI-Generuj znaki wodne, aby chronić pliki PDF
Dodawanie znaków wodnych do plików PDF pomaga chronić własność i zapobiegać niechcianym edycjom. Jednak stworzenie odpowiedniego znaku wodnego nie jest łatwe. Znalezienie gotowych projektów może zająć godziny poszukiwań. Nawet wtedy większość projektów znaków wodnych jest chroniona prawem autorskim i ograniczona do użycia.
Ponadto, aby projektować własne znaki wodne, będziesz musiał korzystać z zaawansowanych narzędzi, takich jak Photoshop. Jeśli nie jesteś grafikiem, stworzenie znaku wodnego zarówno profesjonalnego, jak i wizualnie zbalansowanego, może być bardzo wymagające.
Aby ułatwić sprawę, funkcja AI-Generate Watermark w UPDF pozwala natychmiast tworzyć projekty znaków wodnych za pomocą promptów tekstowych. Skorzystaj z poniższego przewodnika, aby dowiedzieć się, jak to działa.
Część 1. Jak generować znaki wodne AI dla PDF
UPDF oferuje dwa sposoby generowania obrazów znaków wodnych za pomocą AI. Możesz napisać spersonalizowany prompt lub użyć inteligentnych gotowych promptów. Obie metody generują trzy znaki wodne PNG o wysokiej rozdzielczości, które można bezpośrednio zastosować do PDF.
Przejdźmy przez szczegóły kroków.
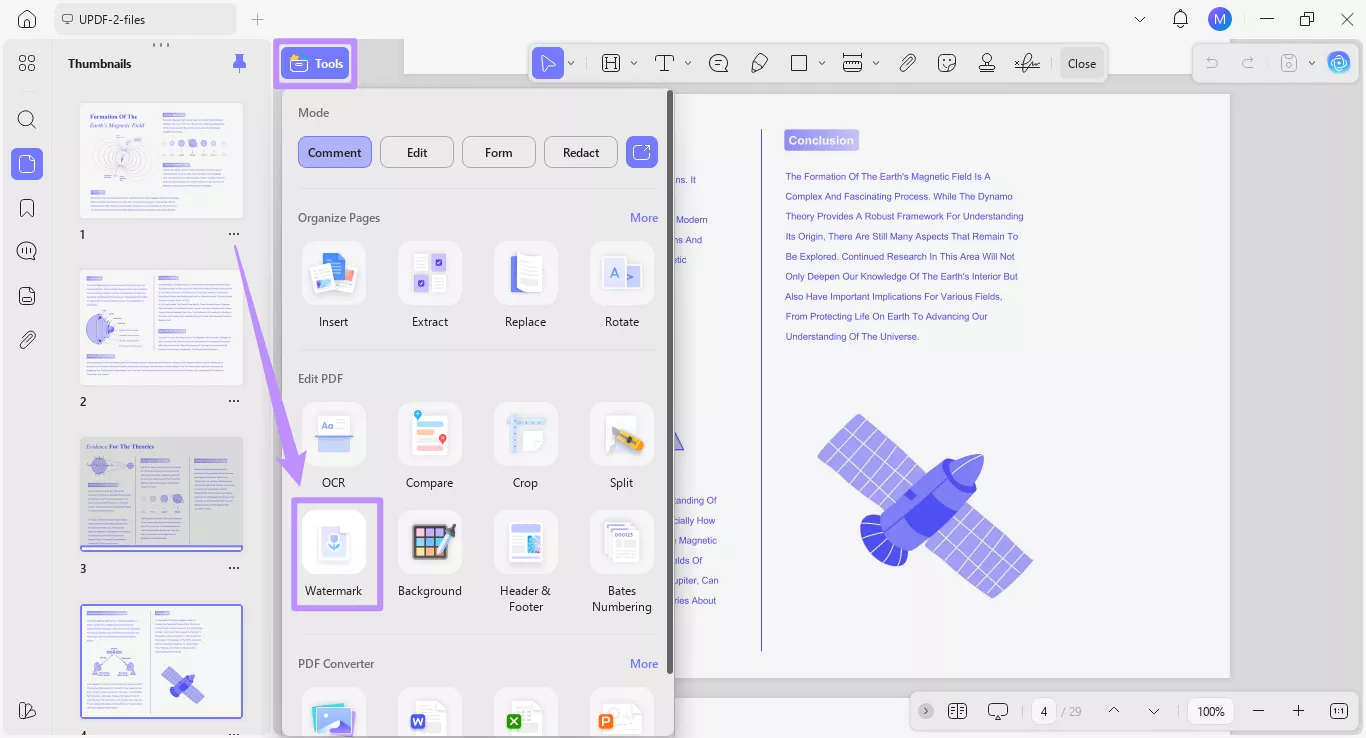
Krok 1. Otwórz PDF, który chcesz dodać znak wodny w UPDF. Następnie kliknij "Narzędzia" w lewym górnym rogu i wybierz "Znak wodny" w sekcji Edytuj PDF.
Step 2. From the menu at the top, select the “AI Watermark” option.
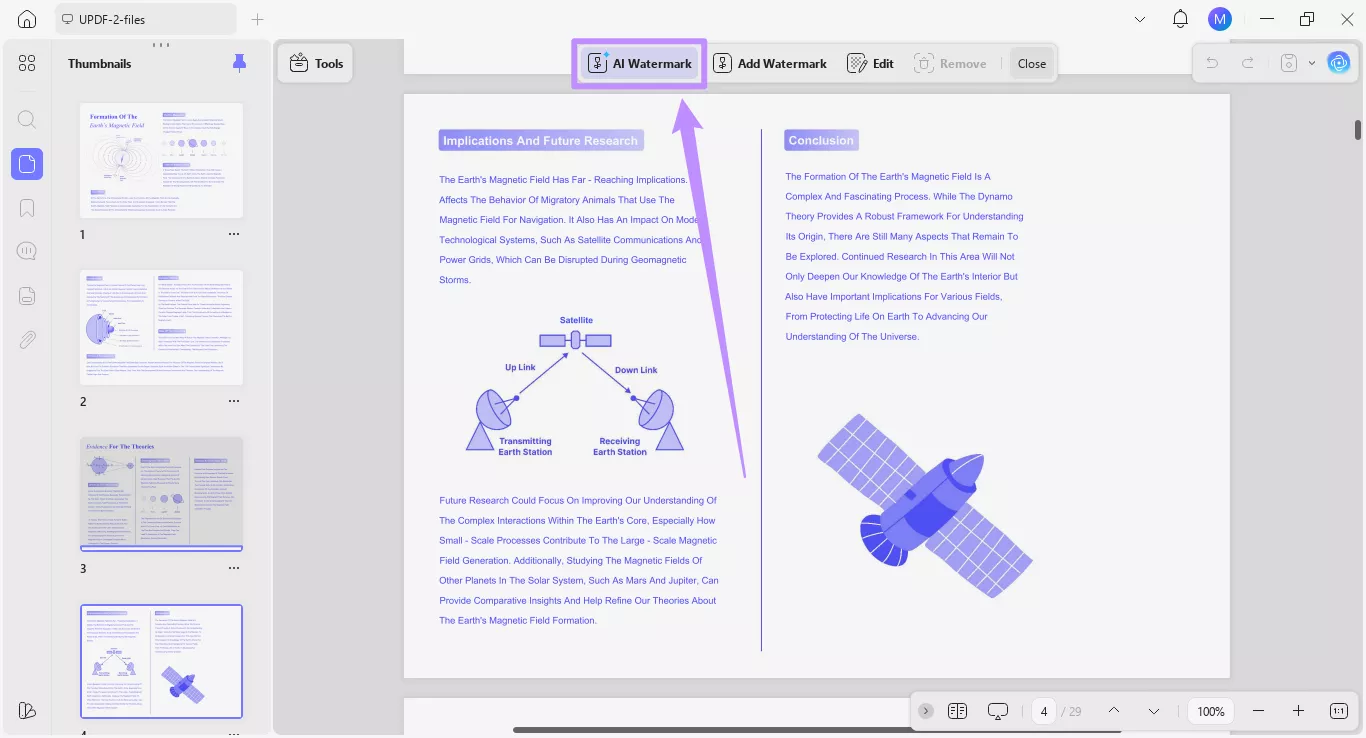
A new window for the AI Generate Watermark tool will open, where you can generate watermarks in two ways.
Method 1. Generate Watermarks with a Personalized Prompt
The Personalized Prompt option allows you to add a detailed description of the watermark design. You can freely add details about the watermark text, style, or color as needed.
Here’s what to do.
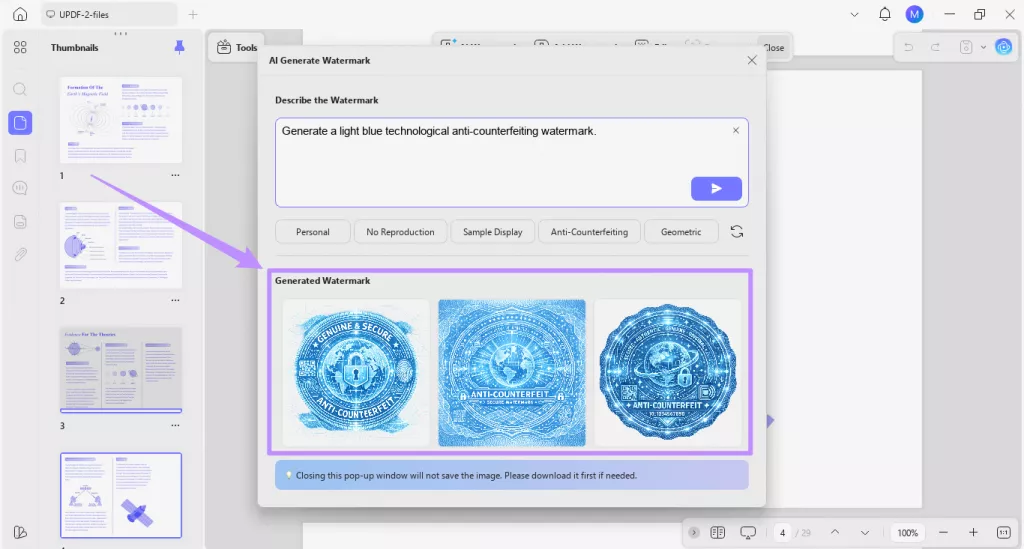
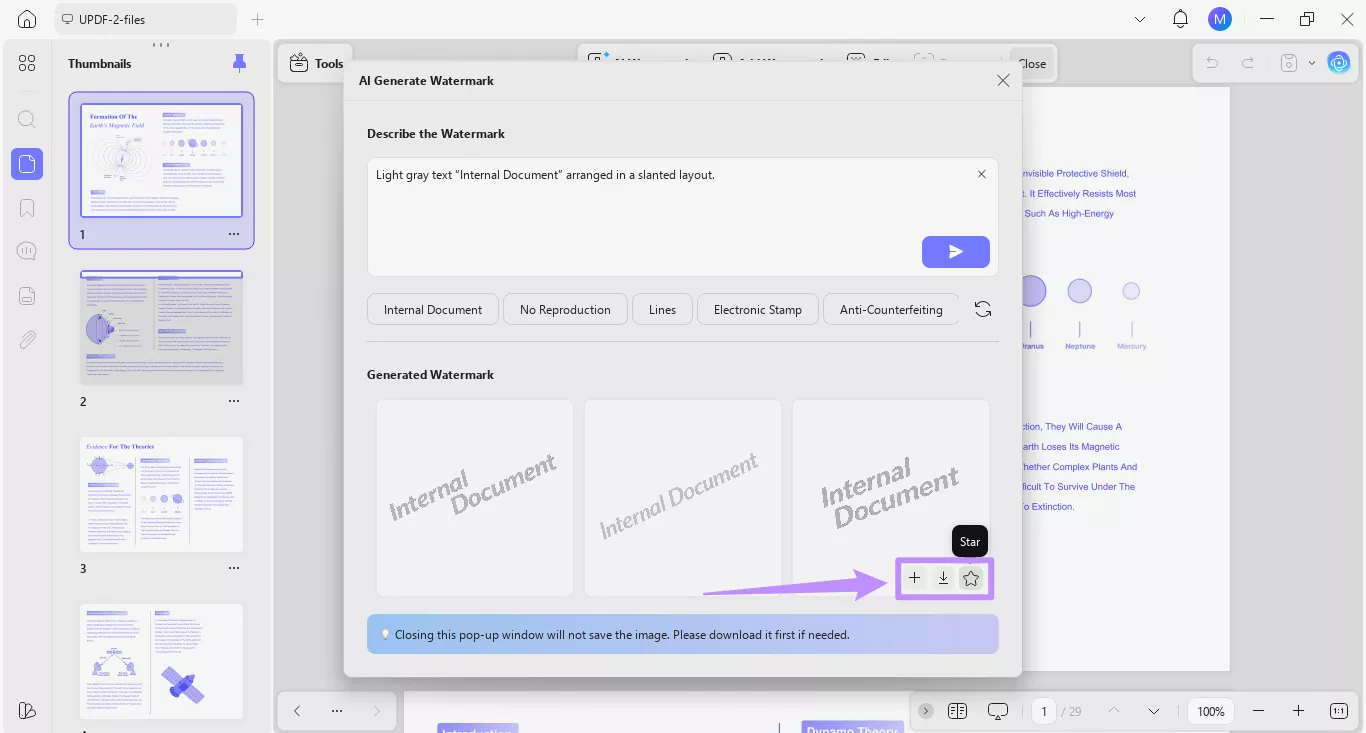
Step 1. Click the text box for Describe the Watermark and type in the details about the watermark you want to create.
For example, you can ask AI to “Generate a light blue technological anti-counterfeiting watermark.” Once you’re done, click the “Send” button.
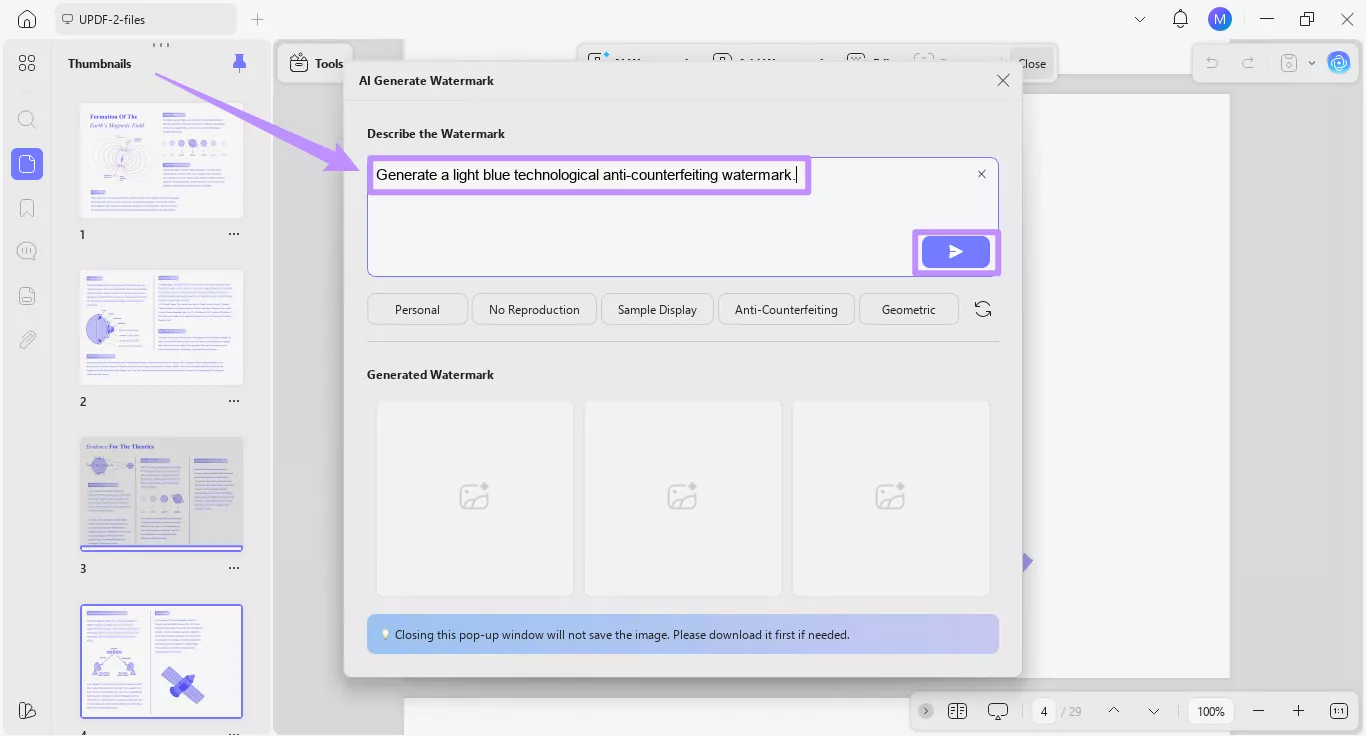
Step 2. Based on your description, UPDF AI will produce three high-resolution PNG watermark images with transparent backgrounds. You can view them under the “Generated Watermark” section.
Note:
Please be aware that each AI generation produces up to 3 watermarks, and 3 credits are used in total. If the AI produces fewer than 3 watermarks due to an issue, the credits are deducted only for the watermarks successfully generated.
Method 2. Create Watermarks Quickly with Smart Presets
If you don't want to customize your prompts manually, you can generate watermark descriptions faster with smart presets. The presets are named after the common watermark types. And clicking each automatically adds the relevant description in the prompt box.
Here's how it works.
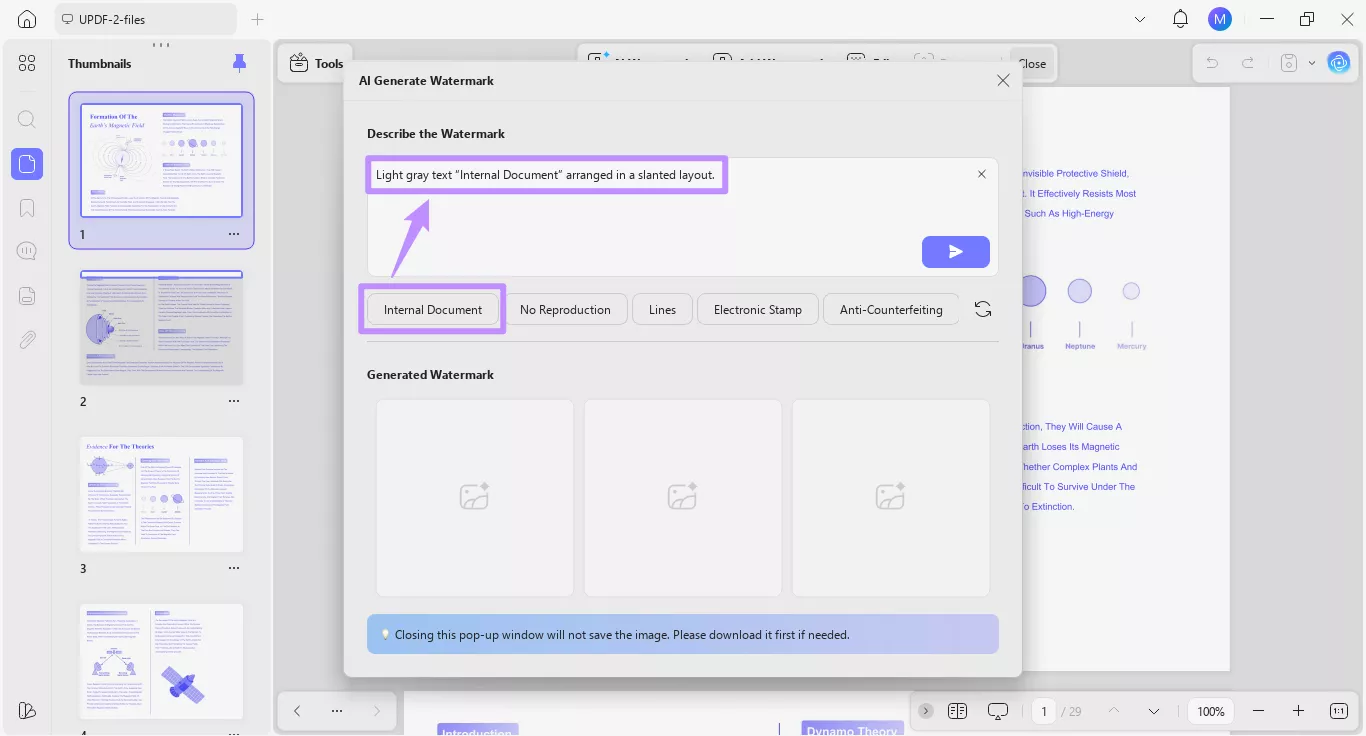
Step 1. Find the watermark presets under the prompt box and click the one you want to generate. The corresponding watermark description will appear in the prompt box.
- For example, if you click the “Internal Document” preset, it will add the prompt to generate an internal document text watermark in a specific layout.
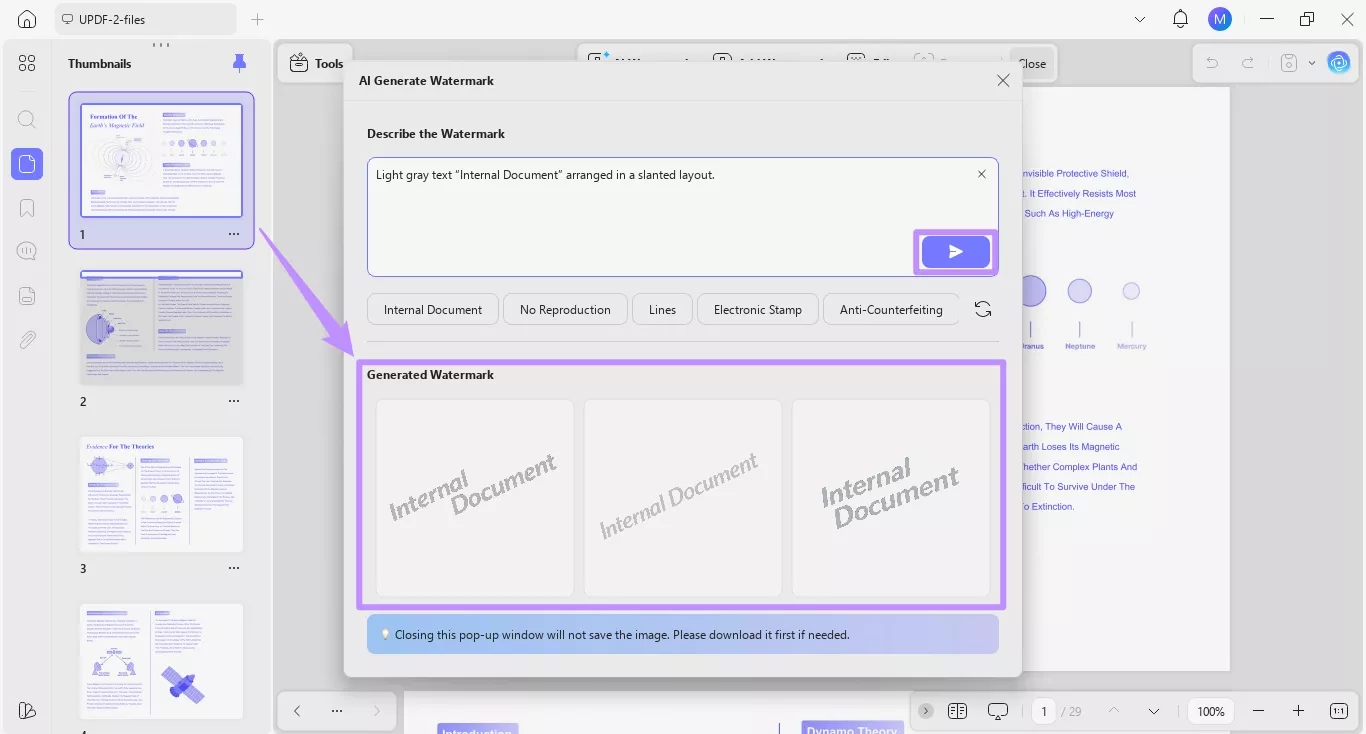
Step 2. You can manually edit the prompt if needed. Once done, click the “Send” button. The AI watermarks will appear under the “Generated Watermark” section.
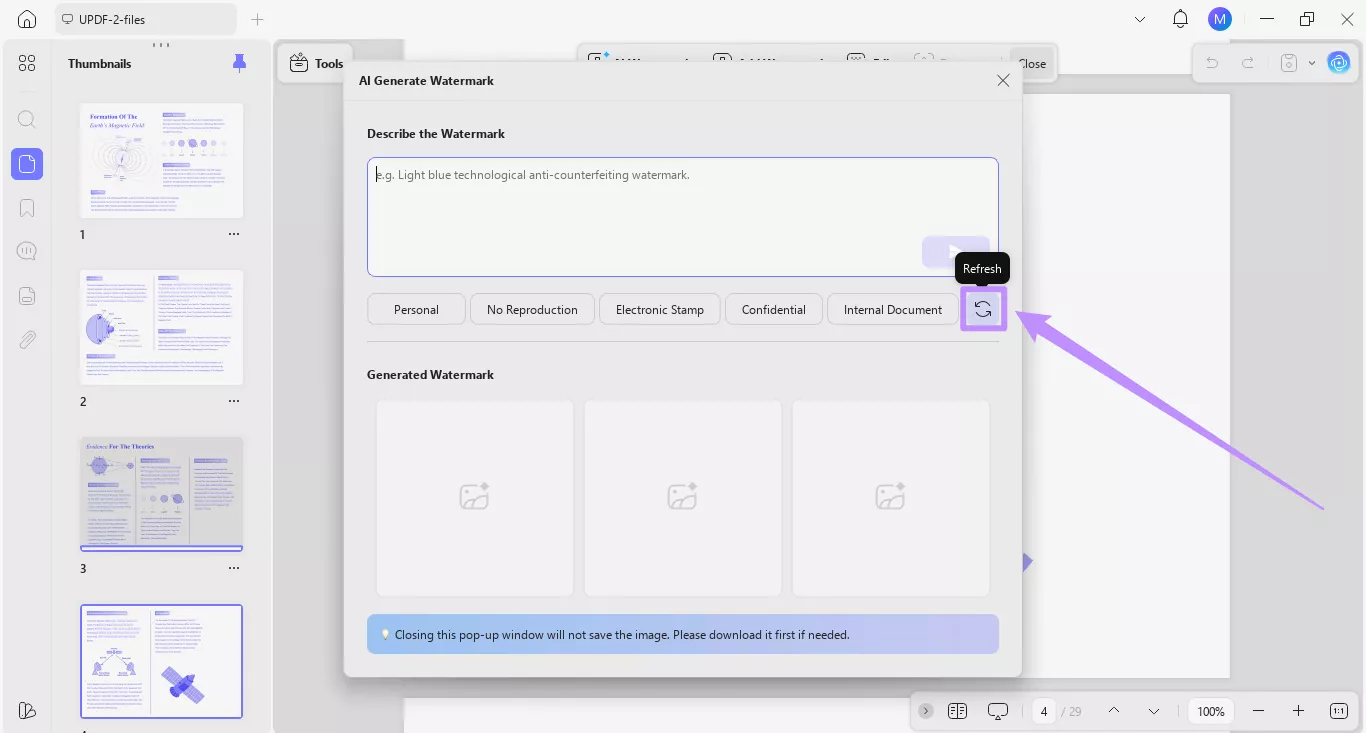
If you want to explore more presets, click the “Refresh” button to update the available options.
UPDF also helps you create watermarks manually without AI. To learn more, check out the complete guide on adding watermarks to PDF.
Part 2. Managing AI-Generated Watermarks
After generating watermarks, UPDF offers several options to manage and reuse them. You can immediately apply a watermark to the current PDF, download it as an image file, or save it inside UPDF for future documents. In addition, you can use the built-in editing options to adjust the watermark to your needs.
Here are the steps.
Step 1. Hover your cursor over the watermark you want to use, and you will see three options below the watermark. From here:
- Click the “Download” icon to save the watermark as a PNG file on your device.
- Click the “Star” icon to add the watermark to the “Starred” section for future use in UPDF. use.
- Click the “+”button to place the watermark directly on your PDF.
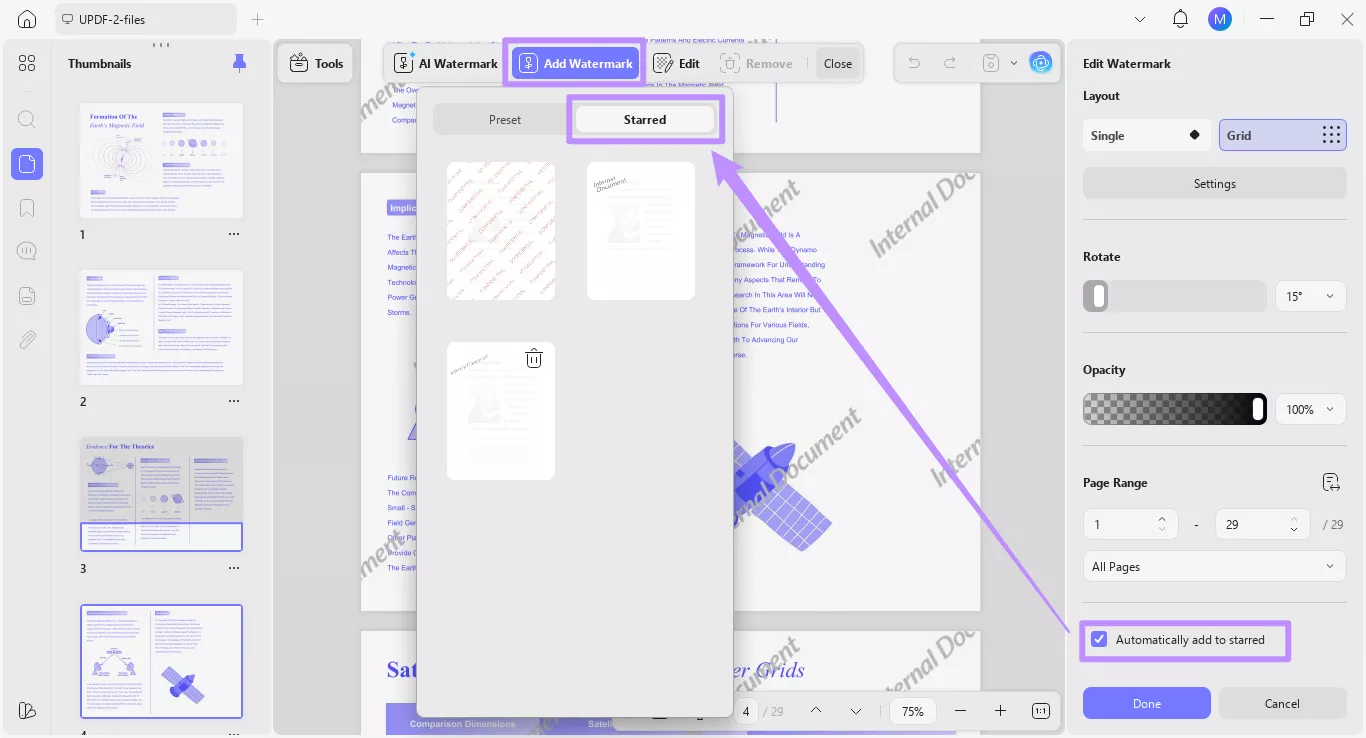
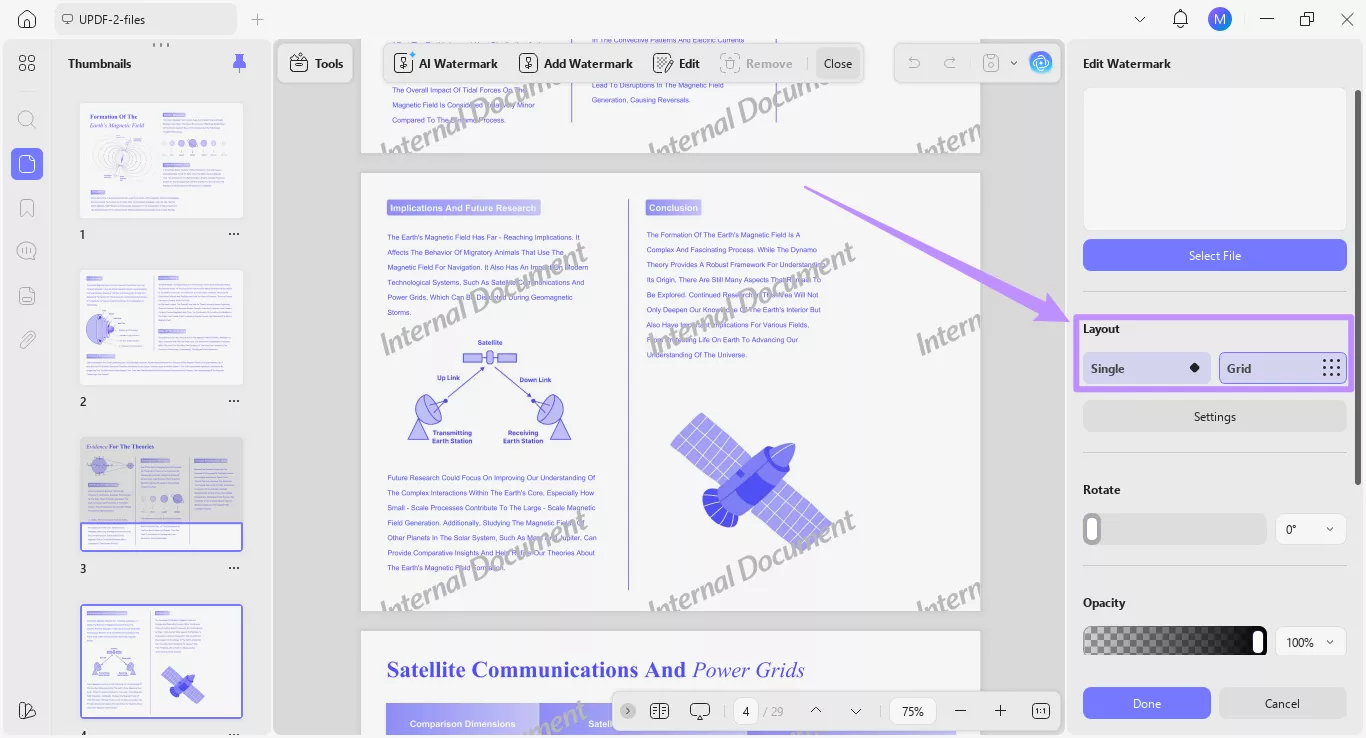
Krok 2. Po wybraniu dodania znaku wodnego, pojawi się on w dokumencie wraz z panelem Edytuj znak wodny po prawej stronie. Stąd możesz dostosować swoje znaki wodne za pomocą kilku opcji:
- W sekcji Układ możesz zmienić układ znaku wodnego z "Pojedynczy" na "Siatkowy".
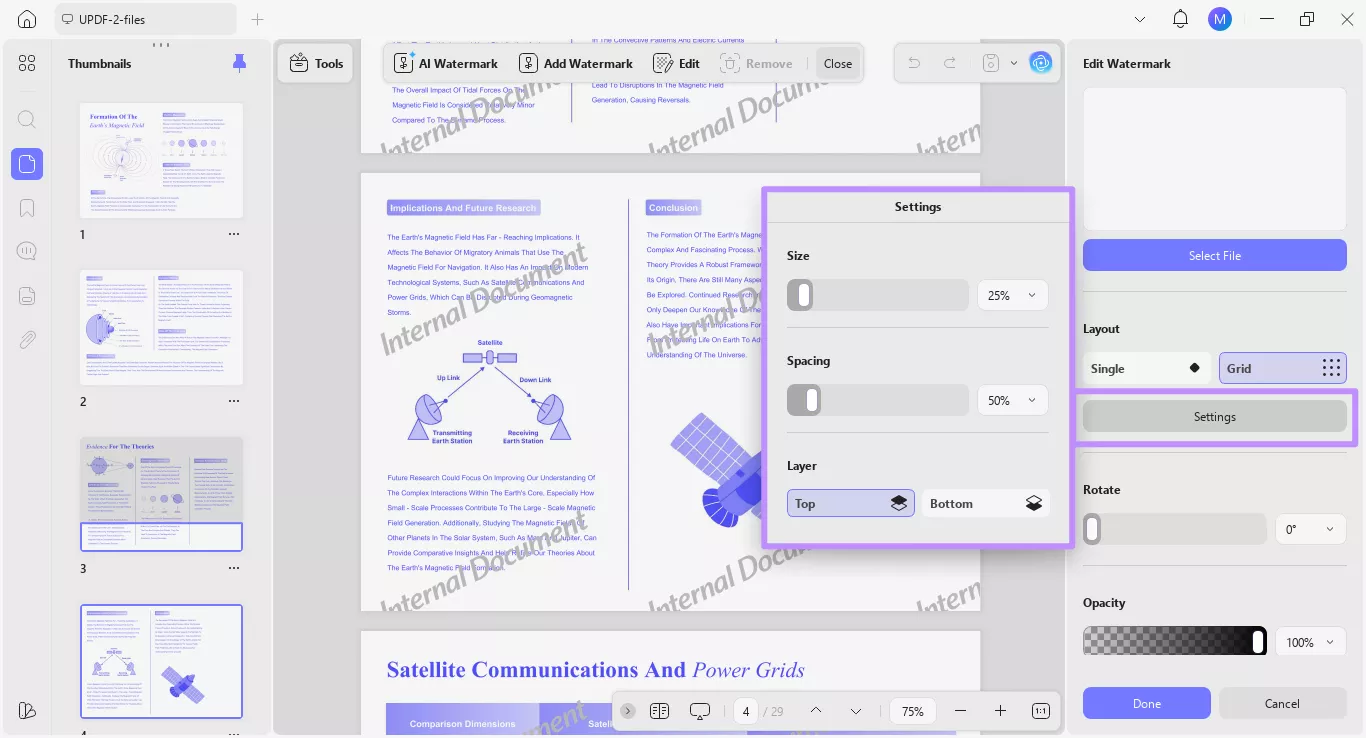
- Kliknij "Ustawienia", aby otworzyć rozszerzone menu. Stąd możesz dostosować rozmiar i odstępy znaku wodnego oraz zdecydować, czy dodać go do górnej czy dolnej warstwy.
- Możesz użyć suwaków lub menu rozwijanego, aby dostosować rotację i przezroczystość znaku wodnego.
- Idąc niżej, możesz zdefiniować zakres stron do zastosowania znaku wodnego.

- Na koniec możesz zaznaczyć opcję "Automatycznie dodaj do gwiazdek", aby dodać znak wodny do sekcji "Gwiazdkowe" w UPDF. Do tego menu możesz wejść w opcję "Dodaj znak wodny" od góry.